

When I think of Argentina’s culinary traditions, I envision the warmth of a gaucho gathering. The bold flavors and hearty ingredients create unforgettable meals. From sizzling chimichurri steak to classic empanadas, there’s so much to explore. Let’s delve into these robust gaucho recipes that promise to spice up your kitchen. Get ready for a taste of southern fire.
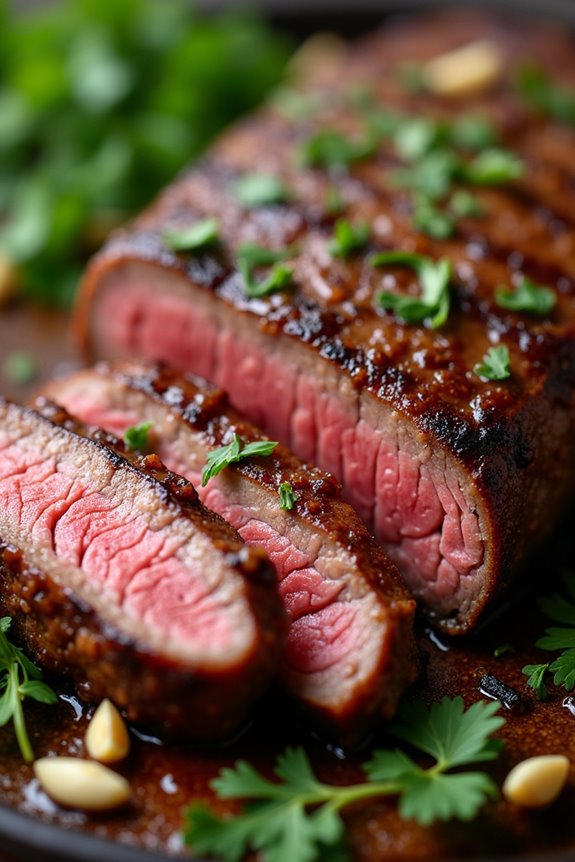
Grilled Chimichurri Steak
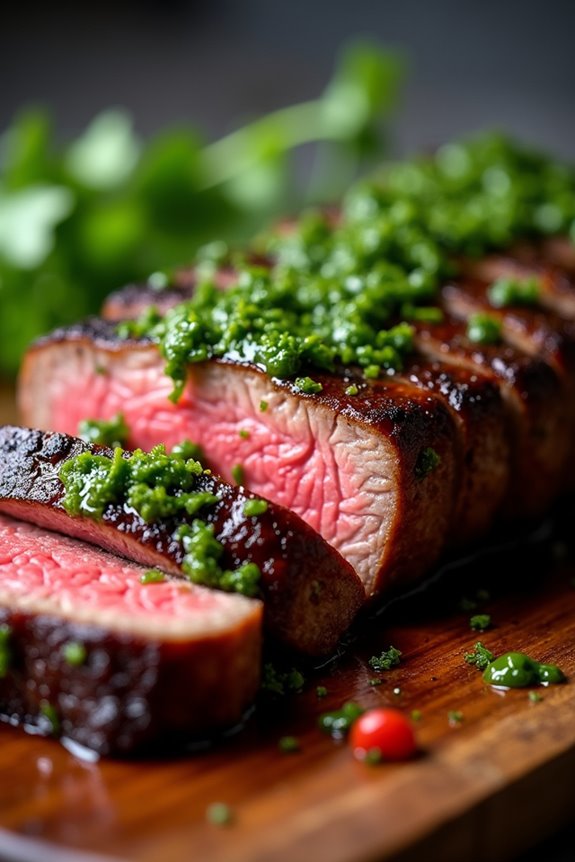
Grilled Chimichurri Steak is a quintessential dish that captures the essence of Argentinian barbecue, or asado. The star of this dish is the juicy, flavorful steak, which is beautifully complemented by a vibrant chimichurri sauce made with fresh herbs, garlic, and vinegar. This combination not only enhances the taste of the grilled meat but also brings a revitalizing brightness that balances the richness of the steak.
Perfect for summer grilling or a cozy family dinner, this dish is sure to impress your guests and leave them asking for seconds.
To achieve the perfect Grilled Chimichurri Steak, you’ll want to choose a high-quality cut of beef, such as flank steak or ribeye. The key is to allow the meat to marinate in the chimichurri sauce for at least an hour before grilling, which infuses it with flavor and tenderness. Once cooked, the steak is served with additional chimichurri drizzled on top, making it not just a meal but a celebration of flavors that embodies the spirit of traditional Argentinian cuisine.
Ingredients (Serves 4-6)
- 2 lbs flank steak (or ribeye)
- 1 cup fresh parsley, chopped
- 1/2 cup fresh cilantro, chopped
- 4 cloves garlic, minced
- 1/2 cup olive oil
- 1/4 cup red wine vinegar
- 1 teaspoon red pepper flakes
- 1 teaspoon salt
- 1/2 teaspoon black pepper
- Juice of 1 lemon
Cooking Instructions
- Prepare the Chimichurri Sauce: In a medium mixing bowl, combine the chopped parsley, cilantro, minced garlic, olive oil, red wine vinegar, red pepper flakes, salt, black pepper, and lemon juice. Mix well until all ingredients are thoroughly combined. This sauce will be used to marinate the steak as well as a topping.
- Marinate the Steak: Place the flank steak in a large resealable plastic bag or a shallow dish. Pour half of the chimichurri sauce over the steak, making certain it’s well coated. Seal the bag or cover the dish and marinate in the refrigerator for at least 1 hour, or up to overnight for maximum flavor.
- Preheat the Grill: When ready to cook, preheat your grill to medium-high heat. If using a charcoal grill, make sure the coals are evenly distributed for a consistent cooking temperature.
- Grill the Steak: Remove the steak from the marinade, allowing any excess sauce to drip off. Place the steak on the hot grill. Grill for about 5-7 minutes on each side for medium-rare, or until the internal temperature reaches 130-135°F. Adjust the grilling time according to your preferred doneness.
- Rest the Steak: Once cooked, remove the steak from the grill and let it rest on a cutting board for about 5-10 minutes. This allows the juices to redistribute, guaranteeing a tender and juicy result.
- Slice and Serve: After resting, slice the steak against the grain into thin strips. Serve on a platter, drizzled with the reserved chimichurri sauce for added flavor.
Extra Tips
When preparing Grilled Chimichurri Steak, the quality of your ingredients makes a significant difference. Opt for fresh herbs and high-quality olive oil for the chimichurri sauce, as these elements are essential for authentic flavor.
Additionally, if you prefer a spicier chimichurri, feel free to adjust the amount of red pepper flakes. Finally, consider serving the steak with traditional sides like grilled vegetables or crusty bread to soak up the delicious chimichurri sauce. Enjoy your culinary adventure with this vibrant and flavorful dish!
Argentine Asado: The Ultimate BBQ
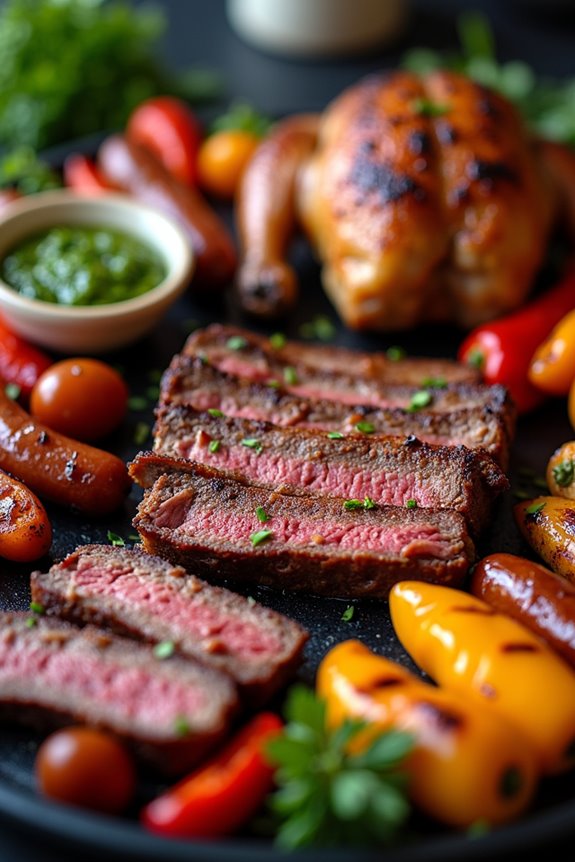
Argentine Asado is more than just a meal; it’s a cultural celebration that brings friends and family together over a delicious array of grilled meats. This traditional BBQ method is characterized by its slow-cooking technique, where various cuts of beef, pork, and sometimes lamb are grilled over an open flame or hot coals, often accompanied by tasty chimichurri sauce.
While the focus is primarily on the meat, the experience also includes an assortment of side dishes, fresh bread, and wine, making it a true feast for the senses.
To create the ultimate Argentine Asado, you’ll need to embrace the essence of patience and camaraderie that this cooking style requires. The key is to choose high-quality meats and allow them to cook slowly, developing a rich, smoky flavor that’s sure to impress your guests.
Whether you’re hosting a summer gathering or simply enjoying a weekend meal, this recipe will guide you through the steps to create an unforgettable Argentine Asado that celebrates the heritage of the gauchos.
Ingredients (Serving Size: 4-6 people)
- 2 lbs of beef short ribs
- 2 lbs of flank steak
- 2 lbs of pork sausages (chorizo)
- 1 whole chicken, halved
- 1 lb of beef short loin or sirloin
- 1 red bell pepper, cut into quarters
- 1 yellow bell pepper, cut into quarters
- 1 large onion, cut into wedges
- Salt, to taste
- Black pepper, to taste
- Olive oil, for brushing
- Fresh chimichurri sauce (for serving)
Cooking Instructions
1. Prepare the Grill: Start by preparing your grill or parrilla. If using charcoal, light the coals and let them burn until they’re covered with white ash. If using wood, let it burn down until you have a bed of hot coals ready for cooking. Aim for medium to high heat, as this will give you the perfect sear on the meats.
2. Season the Meats: While the grill is heating, season your meats generously with salt and black pepper. You can also brush them lightly with olive oil to keep them moist during cooking. The key isn’t to overpower the natural flavors of the meat, so keep it simple.
3. Grill the Meats: Start by placing the beef short ribs on the grill first, as they’ll take the longest to cook. Grill them for about 15-20 minutes on each side, or until they reach your desired doneness.
Next, add the flank steak, cooking for about 8-10 minutes on each side. Then, add the pork sausages and chicken halves, grilling until the sausages are cooked through and the chicken has a nice char, about 10-12 minutes per side.
Finally, grill the beef short loin or sirloin for about 5-7 minutes per side.
4. Grill the Vegetables: While the meats are cooking, place the bell peppers and onion wedges on the grill. Grill them for about 5-7 minutes, turning occasionally until they’re tender and have nice grill marks.
5. Serve: Once all the meats are cooked to your liking, remove them from the grill and let them rest for a few minutes. This allows the juices to redistribute.
Slice the meats against the grain and arrange them on a large platter. Serve with the grilled vegetables and fresh chimichurri sauce on the side.
Extra Tips
For the best flavor, consider marinating the meats in a mixture of olive oil, garlic, vinegar, and herbs for a few hours or overnight before grilling. This will enhance the taste and tenderness of the meat.
Additionally, make sure to keep an eye on the grill temperature to avoid overcooking. And remember, the social aspect of Asado is just as important as the cooking itself, so gather your friends and family, enjoy the process, and savor every bite of your Argentine Asado!
Spicy Chorizo and Bell Pepper Skewers
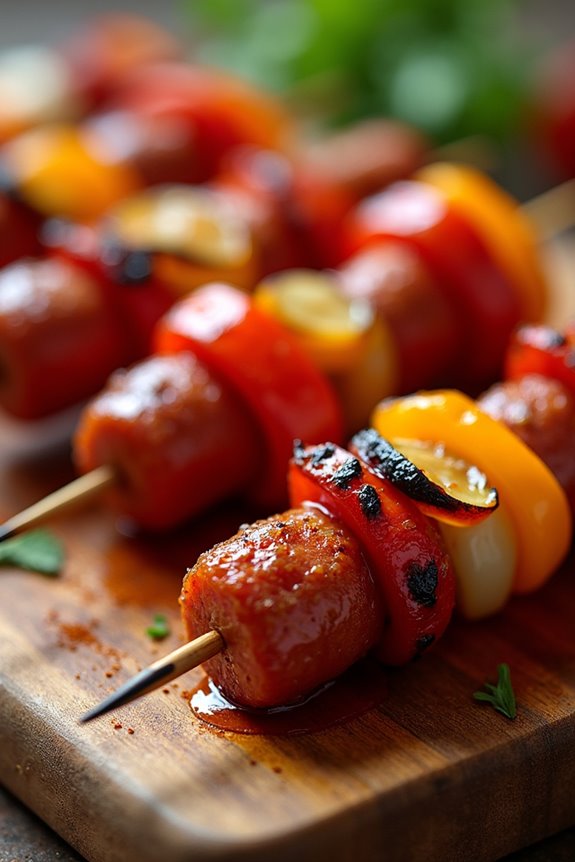
Spicy Chorizo and Bell Pepper Skewers are a delightful dish that perfectly encapsulates the vibrant flavors of Argentine cuisine.
These skewers aren’t only visually appealing but also pack a punch with their spicy chorizo sausage combined with the sweet, smoky taste of grilled bell peppers. Ideal for summer barbecues or casual gatherings, they’re sure to impress your guests and elevate your culinary repertoire.
The preparation is straightforward, making it a great option for both novice and experienced cooks. With just a few ingredients and some simple steps, you can create a flavorful appetizer or main dish that embodies the spirit of Argentine grilling, known as “asado.”
Whether you serve them with a fresh chimichurri sauce or on their own, these skewers are destined to be a hit!
Ingredients (serving size: 4-6 people):
- 1 pound spicy chorizo sausage
- 2 red bell peppers
- 2 yellow bell peppers
- 1 large onion
- 1 tablespoon olive oil
- 1 teaspoon smoked paprika
- 1 teaspoon garlic powder
- Salt and pepper to taste
- Skewers (wooden or metal)
Cooking Instructions:
- Prepare the Skewers: If using wooden skewers, soak them in water for at least 30 minutes to prevent them from burning on the grill. This step is important as it helps the skewers hold together without catching fire during cooking.
- Chop the Vegetables: While the skewers soak, wash and cut the bell peppers and onion into bite-sized pieces. Aim for about 1 to 1.5-inch squares to facilitate even cooking. This will create a colorful mix that adds both flavor and visual appeal to your skewers.
- Slice the Chorizo: Cut the spicy chorizo sausage into thick slices, about 1-inch wide. This size will allow them to cook evenly while still maintaining their juiciness.
- Assemble the Skewers: Thread the chorizo slices, bell pepper pieces, and onion pieces onto the skewers, alternating between the ingredients. This not only helps with cooking but also guarantees that every bite is packed with flavor.
- Season the Skewers: Once assembled, brush the skewers lightly with olive oil and season with smoked paprika, garlic powder, salt, and pepper. This step will enhance the flavors and provide a nice crust when grilled.
- Preheat the Grill: Heat your grill to medium-high heat. This temperature is ideal for achieving a good char on the skewers without overcooking the ingredients.
- Grill the Skewers: Place the skewers on the grill and cook for about 10-12 minutes, turning occasionally to promote even cooking. The chorizo should be browned and slightly crispy, and the vegetables should be tender and slightly charred.
- Serve: Once cooked, remove the skewers from the grill and let them rest for a couple of minutes. Serve hot, either alone or with your favorite dipping sauce, such as chimichurri.
Extra Tips:
For a twist on the traditional recipe, consider adding other vegetables such as zucchini or cherry tomatoes to the skewers for additional color and flavor.
If you prefer a milder taste, you can substitute the spicy chorizo with a milder sausage or even chicken.
Additionally, marinating the chorizo and vegetables in a mixture of olive oil, vinegar, and spices for a couple of hours before grilling can enhance the flavors even more.
Enjoy your cooking adventure with these delicious Spicy Chorizo and Bell Pepper Skewers!
Herb-Infused Grilled Lamb Chops

Gaucho cuisine celebrates the rich flavors and hearty cooking methods of Argentina, where grilling is an art form. Among the standout dishes, herb-infused grilled lamb chops offer a tantalizing combination of tender meat and aromatic herbs, making them a favorite for gatherings and special occasions. The unique blend of garlic, rosemary, and thyme creates a fragrant marinade that elevates the natural flavors of the lamb, while the grilling process imparts a smoky char that enhances the overall dish.
To prepare this dish, start with high-quality lamb chops, preferably from the rack. This cut is known for its tenderness and rich flavor, making it ideal for grilling. The marinade can be prepared in advance, allowing the flavors to meld beautifully before the lamb is grilled to perfection. Serve these delectable herb-infused grilled lamb chops with a side of chimichurri sauce and grilled vegetables for a complete Argentinian experience.
Ingredients (Serves 4-6):
- 8 lamb chops (about 1 inch thick)
- 4 cloves garlic, minced
- 2 tablespoons fresh rosemary, chopped
- 2 tablespoons fresh thyme, chopped
- 1/4 cup olive oil
- 1 tablespoon red wine vinegar
- 1 teaspoon salt
- 1/2 teaspoon black pepper
- Zest of 1 lemon
- Juice of 1 lemon
Cooking Instructions:
- Prepare the Marinade: In a mixing bowl, combine the minced garlic, chopped rosemary, chopped thyme, olive oil, red wine vinegar, salt, black pepper, lemon zest, and lemon juice. Whisk together until well blended. This herb-infused marinade will enhance the flavor of the lamb chops and help tenderize the meat.
- Marinate the Lamb Chops: Place the lamb chops in a large resealable plastic bag or a shallow dish. Pour the marinade over the lamb, making sure that each chop is well coated. Seal the bag or cover the dish, and refrigerate for at least 2 hours, or preferably overnight. Allowing the lamb to marinate for an extended period will deepen the flavors.
- Preheat the Grill: About 30 minutes before grilling, preheat your grill to medium-high heat. This guarantees that the grill is hot enough to sear the lamb chops, creating a delicious crust while keeping the inside juicy.
- Grill the Lamb Chops: Remove the lamb chops from the marinade and discard any leftover marinade. Place the chops on the hot grill, and cook for about 4-5 minutes on each side for medium-rare, or until they reach your desired doneness. Use tongs to flip the chops, and avoid pressing down on them to retain their juices.
- Rest the Lamb Chops: Once cooked, remove the lamb chops from the grill and let them rest on a plate for about 5 minutes. This allows the juices to redistribute throughout the meat, resulting in a more flavorful and tender bite.
- Serve: Serve the herb-infused grilled lamb chops with chimichurri sauce and your choice of grilled vegetables or a fresh salad. Garnish with additional herbs for a vibrant presentation.
Extra Tips:
For the best results, choose lamb that’s fresh and preferably grass-fed for richer flavors. If you can’t find fresh herbs, dried herbs can be used, but fresh herbs will provide a more vibrant taste.
Additionally, using a meat thermometer can help achieve the desired doneness; aim for an internal temperature of 135°F (57°C) for medium-rare. Finally, don’t hesitate to experiment with additional spices or herbs in the marinade to make the dish your own. Happy grilling!
Classic Gaucho Empanadas

Classic Gaucho Empanadas are a beloved staple of Argentine cuisine, known for their flaky pastry and savory fillings. These hand-held pies are perfect for any occasion, from casual gatherings to more formal dinners. They’re often filled with a variety of ingredients, including meats, cheeses, and vegetables, making them a versatile dish that can be customized to suit your taste preferences. The golden-brown crust and the rich flavors of the filling create a delightful culinary experience that transports you straight to the heart of Argentina.
Making Classic Gaucho Empanadas isn’t only about following a recipe; it’s about embracing the spirit of the gauchos and their love for hearty, comforting food. The process of preparing the dough and filling can be a rewarding experience, especially when shared with family and friends. Once you master this recipe, you’ll find yourself wanting to make them again and again, experimenting with different fillings and spices to create your perfect empanada.
Ingredients (Serves 4-6 people):
- 3 cups all-purpose flour
- 1 teaspoon salt
- 1/2 cup unsalted butter, cold and cubed
- 1 large egg
- 1/2 cup cold water
- 1 pound ground beef
- 1 onion, finely chopped
- 1 bell pepper, finely chopped
- 2 cloves garlic, minced
- 1 teaspoon cumin
- 1 teaspoon paprika
- Salt and pepper to taste
- 1/2 cup green olives, chopped (optional)
- 1 egg, beaten (for egg wash)
Cooking Instructions:
- Prepare the Dough: In a large mixing bowl, combine the flour and salt. Add the cold, cubed butter and use your fingers or a pastry cutter to mix until the mixture resembles coarse crumbs. In a separate bowl, whisk together the egg and cold water. Gradually add this mixture to the flour mixture, stirring until the dough comes together. Knead gently on a floured surface until smooth. Wrap in plastic wrap and refrigerate for at least 30 minutes.
- Cook the Filling: In a large skillet over medium heat, add a drizzle of oil and sauté the chopped onion, bell pepper, and garlic until soft and fragrant, about 5 minutes. Then, add the ground beef and cook until browned, breaking it apart with a spatula. Season with cumin, paprika, salt, and pepper. If using, stir in the chopped olives. Cook for an additional 2-3 minutes, then remove from heat and let cool.
- Roll Out the Dough: On a lightly floured surface, roll out the chilled dough to about 1/8 inch thick. Use a round cutter or a glass to cut out circles, about 4-5 inches in diameter. Gather the scraps, re-roll, and cut more circles until all the dough is used.
- Fill the Empanadas: Place about a tablespoon of the cooled filling in the center of each dough circle. Be careful not to overfill. Fold the dough over to create a half-moon shape. Press the edges together to seal, then crimp with a fork or pinch to create a decorative edge.
- Prepare for Baking: Preheat your oven to 400°F (200°C). Line a baking sheet with parchment paper. Place the filled empanadas on the baking sheet. Brush the tops with the beaten egg to give them a golden color when baked.
- Bake the Empanadas: Bake in the preheated oven for about 20-25 minutes, or until the empanadas are golden brown and flaky. Remove from the oven and let cool slightly before serving.
Extra Tips:
When making Classic Gaucho Empanadas, feel free to experiment with different fillings such as chicken, cheese, or even sweet options like fruit. Confirm the filling is cooled before placing it in the dough to prevent the dough from becoming soggy.
If you want to make the empanadas in advance, they freeze well; just bake them straight from the freezer, adding a few extra minutes to the cooking time. Enjoy your homemade empanadas with a side of chimichurri sauce for a delicious twist!
Smoky Grilled Vegetables
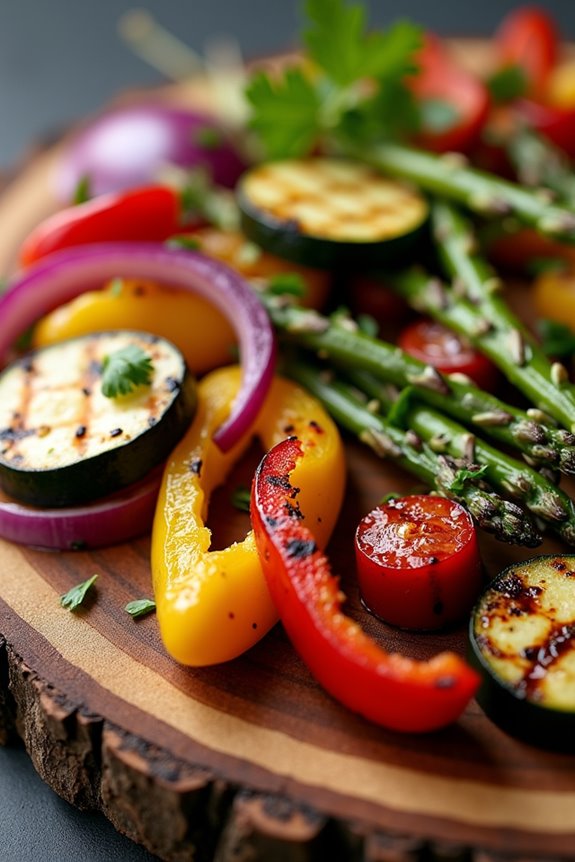
Smoky Grilled Vegetables are a vibrant and flavorful addition to any meal, perfect for those who enjoy the great outdoors and the taste of fresh, grilled produce. This dish embodies the spirit of the gaucho lifestyle, where cooking over open flames isn’t just a method but an art form. The combination of seasonal vegetables with a smoky char brings out their natural sweetness and adds depth to their flavor, making them an excellent side dish or a main vegetarian attraction.
This recipe is versatile, allowing you to use whatever vegetables you have on hand or prefer. Bell peppers, zucchini, eggplant, and asparagus are just a few examples that work beautifully when grilled. By marinating the vegetables beforehand, you infuse them with additional flavor while guaranteeing they remain juicy and tender after grilling. Gather your friends and family, fire up the grill, and enjoy the robust flavors of Smoky Grilled Vegetables.
Ingredients (Serves 4-6):
- 2 red bell peppers, sliced into strips
- 2 yellow bell peppers, sliced into strips
- 1 medium zucchini, sliced into rounds
- 1 medium eggplant, cut into cubes
- 1 bunch asparagus, trimmed
- 1 red onion, sliced into wedges
- 1/4 cup olive oil
- 2 tablespoons balsamic vinegar
- 2 teaspoons smoked paprika
- 1 teaspoon garlic powder
- Salt and pepper, to taste
- Fresh parsley, chopped (for garnish)
Cooking Instructions:
- Prepare the Marinade: In a large mixing bowl, combine the olive oil, balsamic vinegar, smoked paprika, garlic powder, salt, and pepper. Whisk until well blended. This marinade will infuse the vegetables with a smoky flavor and help them to caramelize beautifully on the grill.
- Marinate the Vegetables: Add all the sliced and chopped vegetables to the bowl with the marinade. Toss gently to confirm that all pieces are well coated. Cover the bowl with plastic wrap or transfer the vegetables to a resealable bag and let them marinate for at least 30 minutes at room temperature, or up to 2 hours in the refrigerator for deeper flavor.
- Preheat the Grill: While the vegetables are marinating, preheat your grill to medium-high heat. This is essential for achieving that perfect char on the vegetables. If using a charcoal grill, let the coals burn until they’re covered with white ash.
- Grill the Vegetables: Once the grill is hot, place the marinated vegetables directly on the grill grates or use a grill basket for smaller pieces. Grill for about 8-10 minutes, turning occasionally, until they’re tender and have nice grill marks. The exact time will vary depending on the vegetable type and size.
- Serve: Once the vegetables are grilled to perfection, remove them from the grill and transfer them to a serving platter. Garnish with freshly chopped parsley for added color and flavor. Serve warm alongside your favorite proteins or as part of a hearty salad.
Extra Tips:
For an added layer of flavor, consider experimenting with different herbs and spices in the marinade, such as thyme or oregano. If you prefer a spicier kick, a pinch of red pepper flakes can enhance the taste.
Additionally, feel free to use seasonal vegetables that you have on hand; grilling is a great way to make the most of fresh produce. Remember to keep an eye on the grill to avoid overcooking, as some vegetables may cook faster than others. Enjoy the smoky goodness!
Tender Flank Steak With Garlic Marinade
If you’re aiming to impress your family or guests with a mouthwatering dish that embodies the spirit of Argentine cuisine, search no more than Tender Flank Steak With Garlic Marinade. This recipe showcases the robust flavors of garlic and herbs, infusing the flank steak with a depth of taste that’s both satisfying and irresistible.
The marinade works to tenderize the meat while adding layers of flavor, making it perfect for grilling or pan-searing. Cooking flank steak may seem intimidating, but with the right approach, you can achieve a perfectly cooked steak that’s juicy and full of flavor.
The key is to let the steak marinate long enough for the flavors to penetrate the meat, and to cook it to the perfect doneness. With a few simple steps, you’ll be able to create a dish that not only tastes amazing but also brings a bit of Argentine flair to your dining table.
Ingredients (Serves 4-6)
- 2 pounds flank steak
- 1/4 cup olive oil
- 6 cloves garlic, minced
- 2 tablespoons fresh parsley, chopped
- 1 tablespoon red wine vinegar
- 1 tablespoon fresh oregano, chopped
- 1 teaspoon salt
- 1 teaspoon black pepper
- 1 teaspoon crushed red pepper flakes (optional)
- Juice of 1 lemon
Cooking Instructions
1. Prepare the Marinade: In a medium bowl, combine the olive oil, minced garlic, chopped parsley, red wine vinegar, chopped oregano, salt, black pepper, crushed red pepper flakes (if using), and lemon juice. Whisk the ingredients together until well blended.
The marinade should have a balanced mix of acidity and richness, which will enhance the flavor of the flank steak.
2. Marinate the Flank Steak: Place the flank steak in a large resealable plastic bag or a shallow dish. Pour the marinade over the steak, ensuring it’s evenly coated.
Seal the bag or cover the dish with plastic wrap, then refrigerate for at least 2 hours, or preferably overnight. The longer the steak marinates, the more tender and flavorful it will become.
3. Preheat the Grill or Pan: When ready to cook, preheat your grill or a large skillet over medium-high heat. If using a grill, make sure the grates are well-oiled to prevent sticking.
If using a skillet, add a tablespoon of olive oil to the pan to help with searing.
4. Cook the Steak: Remove the flank steak from the marinade, allowing any excess marinade to drip off. Place the steak on the hot grill or skillet.
Cook for about 5-7 minutes on each side for medium-rare, depending on the thickness of the steak. Use a meat thermometer to check for doneness; the internal temperature should read 130-135°F for medium-rare.
5. Rest and Slice the Steak: Once cooked to your desired doneness, remove the steak from the heat and let it rest for at least 5-10 minutes.
This resting period allows the juices to redistribute throughout the meat, ensuring every bite is juicy. After resting, slice the steak against the grain into thin strips to enhance tenderness.
6. Serve: Arrange the sliced flank steak on a platter and garnish with additional chopped parsley if desired.
This dish pairs beautifully with grilled vegetables or a fresh salad.
Extra Tips
For the best results, choose a high-quality flank steak and don’t skip the marinating step, as it’s important for flavor and tenderness.
If you’re short on time, even a 30-minute marinade can yield decent results, but an overnight soak will make a significant difference. Additionally, make sure to let the steak rest before slicing to maintain its juiciness, and always cut against the grain for best tenderness.
Enjoy your culinary adventure with this classic Gaucho recipe!
Grilled Corn With Aji Sauce

Grilled Corn with Aji Sauce is a delightful dish that captures the essence of traditional Argentine cuisine. This dish showcases sweet corn, grilled to perfection, and topped with a vibrant and spicy Aji sauce that brings a burst of flavor to each bite. The combination of smoky, charred corn and the zingy sauce creates a harmonious balance that’s perfect for summer barbecues or as a side dish for any meal.
The preparation of this dish is quite simple, making it accessible to both novice and experienced cooks. The key is to select the freshest corn available, which will enhance the overall taste of the dish. Coupled with the zesty Aji sauce, this dish isn’t just a treat for the taste buds, but also a feast for the eyes. Whether served at a gathering or as a family dinner, Grilled Corn with Aji Sauce is bound to impress.
Ingredients (serving size: 4-6 people):
- 4-6 ears of fresh corn, husked
- 2 tablespoons olive oil
- Salt, to taste
- 1 cup fresh cilantro, chopped
- 1-2 jalapeño peppers, seeds removed and minced
- 1/2 cup mayonnaise
- 2 tablespoons lime juice
- 1 teaspoon garlic, minced
- 1/2 teaspoon cumin
- 1/4 teaspoon salt (adjust to taste)
- 1/4 cup crumbled queso fresco (optional)
Cooking Instructions:
- Prepare the Corn: Start by husking the fresh corn and removing all the silk strands. Rinse the ears under cold water to clean them. Pat them dry with a clean towel before moving on to the grilling process.
- Preheat the Grill: Preheat your grill to medium-high heat. This guarantees that the corn cooks evenly and develops a nice char while grilling. If using a charcoal grill, wait until the coals are glowing and covered with white ash.
- Season the Corn: Brush the corn with olive oil and sprinkle salt over each ear. This step helps to enhance the natural sweetness of the corn and adds flavor.
- Grill the Corn: Place the corn on the grill, turning every 2-3 minutes until all sides are charred and golden brown, which should take about 10-12 minutes in total. Keep an eye on them to prevent burning.
- Prepare the Aji Sauce: While the corn is grilling, prepare the Aji sauce. In a bowl, combine the chopped cilantro, minced jalapeño peppers, mayonnaise, lime juice, minced garlic, cumin, and salt. Mix well until all ingredients are thoroughly combined. Adjust the seasoning, adding more jalapeño if you prefer a spicier sauce.
- Serve: Once the corn is perfectly grilled, remove it from the grill and let it cool for a minute. Serve the grilled corn on a platter with the Aji sauce drizzled generously on top or on the side for dipping. If desired, sprinkle crumbled queso fresco over the corn for an added touch.
Extra Tips: For an enhanced flavor, consider grilling the corn in the husk for a more smoky taste, or soak the corn in water for about 30 minutes before grilling to keep it moist. Additionally, feel free to experiment with other toppings such as chili powder or lime zest for an extra kick. Enjoy this dish fresh off the grill for the best taste!
Rustic Potato and Chorizo Hash

Rustic Potato and Chorizo Hash is a hearty and flavorful dish that embodies the spirit of gaucho cooking. With its combination of crispy potatoes, spicy chorizo, and vibrant vegetables, this dish is perfect for breakfast, brunch, or a satisfying dinner.
The rustic nature of the hash makes it easy to prepare, allowing the ingredients to shine through with their natural flavors. This dish isn’t only comforting but also versatile, as you can customize it with your favorite vegetables or spices.
The beauty of Rustic Potato and Chorizo Hash lies in its simplicity and the balance of flavors. The smoky, spicy chorizo complements the creamy potatoes, while bell peppers and onions add a touch of sweetness and crunch. Topped with a fried egg or served alongside a fresh salad, this hash is sure to be a crowd-pleaser. Gather your ingredients, and let’s get cooking!
Ingredients (Serves 4-6):
- 4 medium potatoes, peeled and diced
- 8 oz chorizo sausage, casing removed and crumbled
- 1 medium onion, diced
- 1 red bell pepper, diced
- 1 green bell pepper, diced
- 3 cloves garlic, minced
- 2 tablespoons olive oil
- Salt and pepper to taste
- Fresh parsley, chopped (for garnish)
- 4-6 eggs (optional, for serving)
Cooking Instructions:
- Prepare the Potatoes: Start by peeling and dicing the potatoes into small, even cubes. This will guarantee they cook uniformly. Place the diced potatoes in a pot of salted water and bring to a boil. Cook for about 5-7 minutes until they’re just tender but not fully cooked. Drain and set aside.
- Cook the Chorizo: In a large skillet over medium heat, add the crumbled chorizo. Cook for about 5-7 minutes, stirring occasionally, until the chorizo is browned and has released its oils. Use a slotted spoon to remove the chorizo from the pan and set aside, leaving the rendered fat in the skillet.
- Sauté the Vegetables: In the same skillet, add the olive oil if needed, then add the diced onions and bell peppers. Sauté for about 5 minutes, or until they’re soft and translucent. Add the minced garlic and cook for an additional minute until fragrant.
- Combine Ingredients: Add the drained potatoes to the skillet with the sautéed vegetables. Stir well to combine and season with salt and pepper. Let the mixture cook undisturbed for about 5-7 minutes, allowing the potatoes to crisp up on the bottom. Then, gently toss the mixture and let it cook for another 5 minutes.
- Add the Chorizo Back: Return the cooked chorizo to the skillet, mixing it in with the potatoes and vegetables. Cook for an additional 3-5 minutes, letting the flavors meld together and guaranteeing everything is heated through.
- Fry the Eggs: If serving with eggs, heat a small nonstick skillet over medium heat. Fry the eggs to your desired doneness (sunny-side up, over easy, etc.) and set aside.
- Serve: To serve, divide the Rustic Potato and Chorizo Hash onto plates, top with fried eggs if using, and garnish with freshly chopped parsley.
Extra Tips:
For a more vibrant hash, consider adding other vegetables such as zucchini, spinach, or even diced tomatoes. You can also experiment with different types of chorizo, such as Spanish or Mexican, for varying levels of spiciness.
If you prefer a vegetarian version, simply omit the chorizo and replace it with black beans or lentils for added protein. For a bit of heat, sprinkle some red pepper flakes or drizzle with hot sauce before serving. Enjoy your Rustic Potato and Chorizo Hash!
Fire-Roasted Tomato Salsa
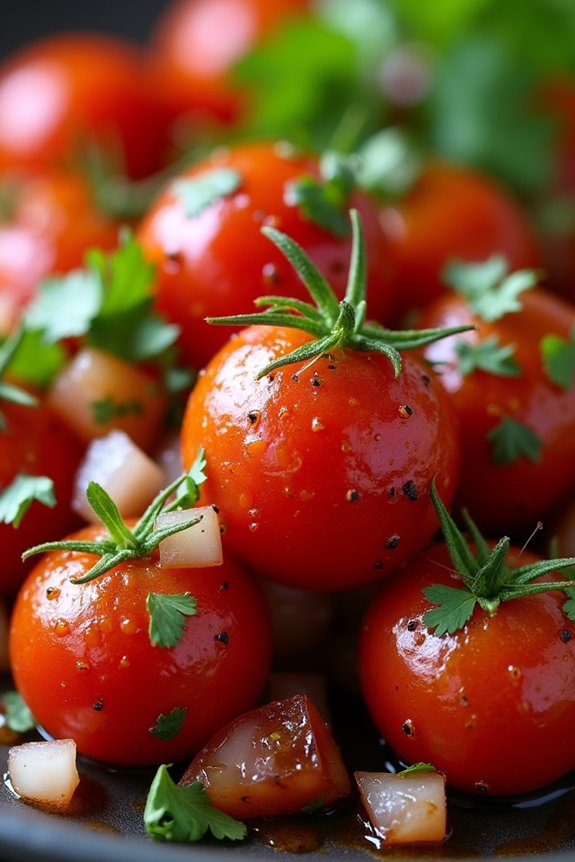
Fire-Roasted Tomato Salsa is a vibrant and flavorful addition to any gaucho-style meal. This salsa combines the rich, smoky flavors of fire-roasted tomatoes with the fresh and zesty notes of onions, cilantro, and lime. Perfect as a condiment for grilled meats, a dip for tortilla chips, or a topping for tacos, this salsa is sure to elevate your culinary experience.
The process of roasting the tomatoes over an open flame adds a depth of flavor that you simply can’t achieve with raw tomatoes, making it a staple in traditional gaucho cuisine.
Making Fire-Roasted Tomato Salsa at home is easy and requires just a handful of fresh ingredients. The key to this dish is to use ripe, high-quality tomatoes that will caramelize beautifully when roasted. The combination of smoky tomatoes, crunchy onions, and the brightness of lime juice creates a perfect balance that will tantalize your taste buds.
Gather your ingredients and get ready to create a salsa that brings the spirit of the Argentine pampas into your kitchen.
Ingredients (Serves 4-6):
- 6 ripe Roma tomatoes
- 1 medium onion, diced
- 2 cloves garlic, minced
- 1 jalapeño pepper, seeded and finely chopped
- 1/4 cup fresh cilantro, chopped
- Juice of 2 limes
- Salt, to taste
- Black pepper, to taste
- 1 tablespoon olive oil (optional)
Cooking Instructions:
1. Prepare the Tomatoes: Start by washing the Roma tomatoes thoroughly. Cut them in half lengthwise and remove the core. This will help them roast evenly and prevent any bitterness from the core.
2. Fire-Roast the Tomatoes: Preheat your grill or prepare a fire. Place the halved tomatoes cut-side down on the grill grates or directly over the flames. Roast them for about 5-10 minutes, or until the skins are charred and blistered. Keep an eye on them to prevent burning.
Once roasted, remove from heat and allow to cool slightly.
3. Chop the Ingredients: While the tomatoes are cooling, finely dice the onion, jalapeño, and garlic. Make sure to wear gloves when handling the jalapeño, as the oils can irritate your skin.
4. Combine Ingredients: Once the tomatoes are cool enough to handle, peel off the charred skins and chop the roasted flesh into bite-sized pieces. In a large mixing bowl, combine the chopped tomatoes, diced onion, minced garlic, jalapeño, and cilantro.
5. Add Lime and Season: Squeeze the juice of the two limes over the mixture. Season with salt and black pepper to taste, and mix everything until well combined. If desired, you can add a tablespoon of olive oil for extra richness.
6. Let it Rest: For the best flavor, let the salsa sit for at least 30 minutes before serving. This allows the flavors to meld together beautifully.
Extra Tips:
For an even smokier flavor, consider adding a pinch of smoked paprika or cumin to the salsa. You can also adjust the heat level by leaving some seeds in the jalapeño or adding more if you prefer a spicier salsa.
Serve it chilled or at room temperature with your favorite grilled meats or as a delicious dip with tortilla chips. Enjoy the authentic taste of gaucho cuisine with this easy-to-make Fire-Roasted Tomato Salsa!
Beef Short Ribs With Chimichurri Glaze
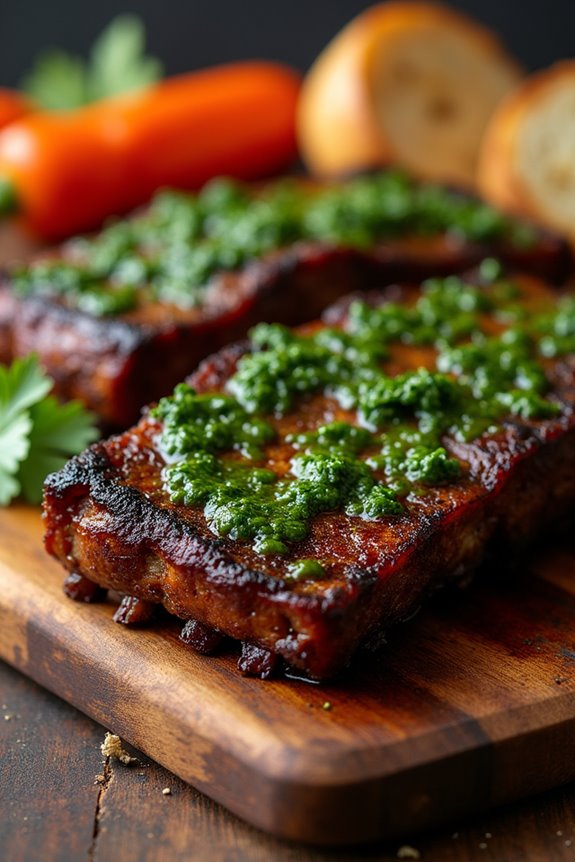
Beef Short Ribs with Chimichurri Glaze is a mouthwatering dish that brings the vibrant flavors of Argentine cuisine to your dining table. The short ribs are slow-cooked to tender perfection, allowing the rich beef flavor to develop fully, while the chimichurri glaze adds a fresh, zesty kick that complements the meat beautifully. This dish is perfect for gatherings, as it serves 4-6 people and is sure to impress your guests with its bold flavors and rustic appeal.
This recipe not only highlights the traditional Argentine method of cooking beef but also incorporates the vibrant herbs and spices that make chimichurri so beloved. The result is a hearty, flavorful dish that can be enjoyed with crusty bread or alongside grilled vegetables. With a little patience and the right techniques, you can create an unforgettable dish that celebrates the best of Gaucho cooking.
Ingredients (Serves 4-6)
- 4 lbs beef short ribs
- 2 tablespoons olive oil
- Salt and black pepper to taste
- 1 onion, chopped
- 4 cloves garlic, minced
- 2 cups beef broth
- 1 cup red wine
- 1 tablespoon tomato paste
- 1 teaspoon smoked paprika
- 1 teaspoon cumin
- 1 teaspoon dried oregano
- 1 tablespoon brown sugar
For the Chimichurri Glaze:
- 1 cup fresh parsley, chopped
- 1/2 cup fresh cilantro, chopped
- 3 cloves garlic, minced
- 1/2 teaspoon red pepper flakes
- 1/2 cup olive oil
- 2 tablespoons red wine vinegar
- Salt and black pepper to taste
Cooking Instructions
- Prepare the Short Ribs: Preheat your oven to 325°F (163°C). Season the beef short ribs generously with salt and black pepper on all sides. This will enhance the flavor of the meat as it cooks.
- Sear the Ribs: In a large, oven-safe pot or Dutch oven, heat 2 tablespoons of olive oil over medium-high heat. Once the oil is hot, add the short ribs in batches, searing them for about 3-4 minutes on each side until they’re beautifully browned. Remove the ribs and set them aside.
- Sauté Aromatics: In the same pot, add the chopped onion and minced garlic. Sauté for about 5 minutes or until the onion is translucent and fragrant. This step builds a flavor base for the dish.
- Deglaze the Pot: Pour in the red wine, scraping the bottom of the pot to release any browned bits. Let it simmer for about 2-3 minutes to reduce slightly, which helps concentrate the flavors.
- Add Remaining Ingredients: Stir in the beef broth, tomato paste, smoked paprika, cumin, dried oregano, and brown sugar. Mix well to combine all the flavors before returning the short ribs to the pot.
- Braise the Short Ribs: Cover the pot with a lid and place it in the preheated oven. Let the ribs braise for about 2.5 to 3 hours, or until the meat is fork-tender. This slow cooking process allows the flavors to meld beautifully.
- Prepare the Chimichurri Glaze: While the ribs are braising, prepare the chimichurri. In a bowl, combine the chopped parsley, cilantro, minced garlic, red pepper flakes, olive oil, and red wine vinegar. Season with salt and black pepper to taste. Mix well and set aside to let the flavors develop.
- Glaze the Ribs: Once the short ribs are done braising, remove them from the oven. Brush the chimichurri glaze generously over the ribs. You can also return them to the oven for an additional 10 minutes to caramelize the glaze slightly, if desired.
- Serve: Remove the ribs from the oven and let them rest for a few minutes before serving. Plate the ribs and drizzle with any remaining chimichurri sauce for added flavor.
Extra Tips
When cooking Beef Short Ribs with Chimichurri Glaze, choosing high-quality meat is essential for the best flavor and texture. Make sure to allow the ribs to rest after cooking, as this helps retain their juices.
If you have leftovers, they can be stored in an airtight container in the refrigerator and will taste even better the next day as the flavors continue to meld.
Feel free to adjust the chimichurri ingredients to suit your taste, adding more garlic or red pepper flakes for extra kick. Enjoy your culinary adventure into Gaucho cuisine!
Charred Poblano and Cheese Stuffed Peppers

Charred Poblano and Cheese Stuffed Peppers are a delightful dish that encapsulates the vibrant flavors of the gaucho tradition. This recipe features roasted poblano peppers filled with a savory mixture of cheeses and spices, making it a perfect appetizer or side dish for any gathering. The combination of the smoky char from the peppers and the creamy cheese filling creates a mouthwatering experience that enchants the palate.
These stuffed peppers aren’t only delicious but also visually appealing, making them a fantastic addition to any table setting. The preparation involves roasting the poblano peppers to enhance their flavor, then carefully stuffing them with a cheesy filling that can be customized with various herbs and spices. Whether served alongside grilled meats or as a standalone dish, Charred Poblano and Cheese Stuffed Peppers are sure to impress your guests.
Ingredients (serving size: 4-6 people)
- 4 large poblano peppers
- 1 cup shredded Monterey Jack cheese
- 1 cup shredded sharp cheddar cheese
- 1/2 cup cream cheese, softened
- 1/4 cup fresh cilantro, chopped
- 1/2 teaspoon garlic powder
- 1/2 teaspoon onion powder
- Salt and pepper to taste
- 1/2 teaspoon cumin (optional)
- Olive oil for drizzling
- 1/2 cup breadcrumbs (optional for topping)
Cooking Instructions
- Preheat the Oven: Begin by preheating your oven to 400°F (200°C). This will guarantee a hot cooking environment that will help char the peppers and melt the cheese perfectly.
- Char the Poblano Peppers: Place the poblano peppers on a baking sheet and drizzle them lightly with olive oil. Roast them in the preheated oven for about 20-25 minutes, turning them halfway through until the skins are blistered and charred. This step is vital as it enhances the flavor and makes peeling the skins easier.
- Prepare the Cheese Filling: While the peppers are roasting, prepare the cheese filling. In a mixing bowl, combine the shredded Monterey Jack cheese, shredded sharp cheddar cheese, softened cream cheese, chopped cilantro, garlic powder, onion powder, cumin (if using), and season with salt and pepper. Mix everything until well combined and creamy.
- Peel the Peppers: Once the peppers are done roasting, remove them from the oven and let them cool slightly. Carefully peel off the charred skins using your hands or a paper towel. This step can be messy, but it’s fundamental for a smooth texture and flavor.
- Stuff the Peppers: Once peeled, make a slit down the side of each poblano pepper and gently remove the seeds. Stuff each pepper generously with the cheese mixture, making sure they’re filled to the brim.
- Top with Breadcrumbs (Optional): If you like an extra crunchy topping, sprinkle breadcrumbs over the stuffed peppers. Drizzle a little olive oil over the breadcrumbs to help them brown nicely in the oven.
- Bake the Stuffed Peppers: Place the stuffed peppers back in the oven and bake for an additional 15-20 minutes, or until the cheese is bubbly and golden brown. Keep an eye on them to avoid overcooking.
- Serve and Enjoy: Once baked, remove the peppers from the oven and let them cool for a few minutes before serving. Garnish with additional cilantro if desired and enjoy your delicious Charred Poblano and Cheese Stuffed Peppers!
Extra Tips
When preparing Charred Poblano and Cheese Stuffed Peppers, feel free to customize the cheese filling to your taste. You can add ingredients like cooked chorizo, black beans, or corn for added texture and flavor.
Additionally, if you prefer a little heat, consider adding diced jalapeños or a sprinkle of crushed red pepper flakes to the cheese mixture. For a vegetarian option, simply omit any meat and load up on additional vegetables.
Finally, serve these stuffed peppers with a side of salsa or guacamole for an extra burst of flavor!
Gaucho-Style Roast Chicken
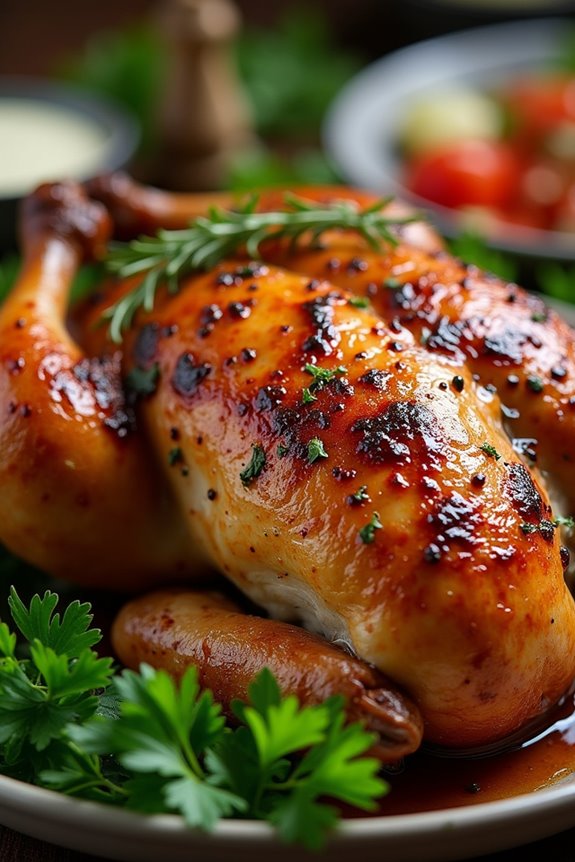
Gaucho-style roast chicken is a flavorful and aromatic dish that reflects the rich culinary traditions of the Argentine cowboys, or gauchos. This dish isn’t only hearty and satisfying but also brings together a delightful combination of spices and herbs that are characteristic of the region’s cooking.
The method of roasting the chicken allows the skin to crisp up beautifully while the meat remains juicy and tender. Whether you’re hosting a gathering or simply treating yourself and your family, this classic recipe is sure to impress.
To capture the essence of the gaucho’s cooking style, this recipe combines bold flavors with simple techniques. The use of garlic, herbs, and citrus not only enhances the taste of the chicken but also infuses it with a unique aroma that fills your kitchen as it roasts.
Served with a side of roasted vegetables or a fresh salad, gaucho-style roast chicken makes for a perfect meal any day of the week.
Ingredients (Serves 4-6)
- 1 whole chicken (about 4-5 pounds)
- 4 cloves of garlic, minced
- 1 lemon, juiced and zested
- 1 tablespoon fresh rosemary, chopped
- 1 tablespoon fresh thyme, chopped
- 1 tablespoon smoked paprika
- 1 teaspoon cumin
- 1 teaspoon salt
- 1/2 teaspoon black pepper
- 1/4 cup olive oil
- Fresh parsley, for garnish (optional)
Cooking Instructions
1. Preheat the Oven: Begin by preheating your oven to 425°F (220°C). This high temperature will help achieve a crispy skin on the chicken while keeping the meat moist.
2. Prepare the Marinade****: In a bowl, combine the minced garlic, lemon juice, lemon zest, chopped rosemary, chopped thyme, smoked paprika, cumin, salt, black pepper, and olive oil. Mix well until all ingredients are fully incorporated.
3. Marinate the Chicken: Pat the chicken dry with paper towels to remove excess moisture. This step is essential for achieving a crispy skin. Rub the marinade all over the chicken, making sure to get under the skin and into the cavity for maximum flavor.
Let the chicken marinate for at least 30 minutes at room temperature, or you can refrigerate it for several hours or overnight for deeper flavor.
4. Roast the Chicken: Place the marinated chicken breast-side up in a roasting pan. Insert it into the preheated oven and roast for about 1 hour and 15 minutes, or until the internal temperature reaches 165°F (75°C) and the juices run clear when the thigh is pierced.
Baste the chicken with its own juices halfway through the cooking time to enhance the flavor and moisture.
5. Rest the Chicken: Once cooked, remove the chicken from the oven and let it rest for 10-15 minutes. This resting period allows the juices to redistribute throughout the meat, ensuring a juicy and flavorful result.
6. Serve: Carve the chicken and serve it garnished with fresh parsley if desired. Pair it with roasted vegetables or a salad for a complete meal.
Extra Tips
For an added depth of flavor, consider using a combination of herbs such as oregano or cilantro in addition to rosemary and thyme.
If you’re looking to elevate the dish further, you can also stuff the cavity of the chicken with lemon wedges and whole garlic cloves before roasting. This not only enhances the flavor but also adds a beautiful presentation.
Don’t forget to save the leftover chicken for sandwiches or salads the next day! Enjoy your Gaucho-style roast chicken with family and friends for an authentic taste of Argentine cuisine.
Dulce De Leche Flan for Dessert

Dulce de leche flan is a classic dessert that brings a taste of Argentina right to your table. This creamy, rich flan is made with dulce de leche, a sweet and caramel-like sauce that adds depth and flavor to the traditional flan recipe.
With its smooth texture and delightful sweetness, this dessert is perfect for any occasion, whether it be a family gathering, a dinner party, or simply to satisfy your sweet tooth.
The beauty of dulce de leche flan lies in its simplicity and elegance. The flan is baked in a water bath, allowing it to cook evenly and develop a luxurious custard-like consistency. Topped with a drizzle of extra dulce de leche, this flan is sure to impress your guests and leave them asking for seconds.
Follow this recipe to create a delightful dessert that captures the essence of Argentine cuisine.
Ingredients (Serves 4-6):
- 1 cup dulce de leche
- 1 cup whole milk
- 4 large eggs
- 1 teaspoon vanilla extract
- 1/4 cup sugar
- 1/4 cup water (for the caramel)
Cooking Instructions:
1. Preheat the Oven: Start by preheating your oven to 350°F (175°C). This guarantees that your flan will bake evenly and set properly.
2. Prepare the Caramel: In a small saucepan over medium heat, combine 1/4 cup of sugar and 1/4 cup of water. Stir until the sugar dissolves, then stop stirring and let it cook until it turns a golden caramel color. This usually takes about 5-7 minutes.
Be careful not to burn it. Once ready, quickly pour the caramel into a round baking dish, tilting the dish to coat the bottom evenly. Set aside to cool.
3. Blend the Flan Mixture: In a blender, combine 1 cup of dulce de leche, 1 cup of whole milk, 4 large eggs, and 1 teaspoon of vanilla extract. Blend until smooth and well combined, about 30 seconds.
4. Pour the Flan Mixture: Carefully pour the flan mixture over the set caramel in your baking dish.
5. Bake in a Water Bath: Place the baking dish in a larger baking pan. Fill the larger pan with hot water until it reaches halfway up the sides of the flan dish. This water bath will help the flan cook evenly.
6. Bake the Flan: Place the entire setup in the preheated oven and bake for about 50-60 minutes, or until the flan is set but slightly wobbly in the center. You can check for doneness by inserting a knife into the center; it should come out clean.
7. Cool and Unmold: Once baked, remove the flan from the oven and the water bath. Allow it to cool to room temperature, then refrigerate for at least 4 hours or overnight.
To unmold, run a knife around the edges of the flan, place a serving plate on top, and quickly invert the dish. The caramel will flow over the top, creating a beautiful presentation.
Extra Tips:
For the best results, verify that all your ingredients are at room temperature before mixing, as this helps the flan achieve a smooth texture.
Additionally, you can adjust the sweetness of the flan by varying the amount of dulce de leche according to your taste. If you want a more complex flavor, consider adding a pinch of salt or a splash of coffee to the flan mixture.
Enjoy your delicious dulce de leche flan, and don’t forget to serve it chilled!