

As a fellow chocolate enthusiast, I’ve always been captivated by the irresistible charm of Brazilian sweets. These treats, with their rich flavors and delightful textures, bring a piece of Brazil right to our kitchens. From the classic Brigadeiros to the decadent Bolo De Brigadeiro, each recipe is a celebration in itself. I’ve gathered ten mouthwatering recipes that promise to satisfy every craving. Let’s explore these delicious options that just might become your new favorites.
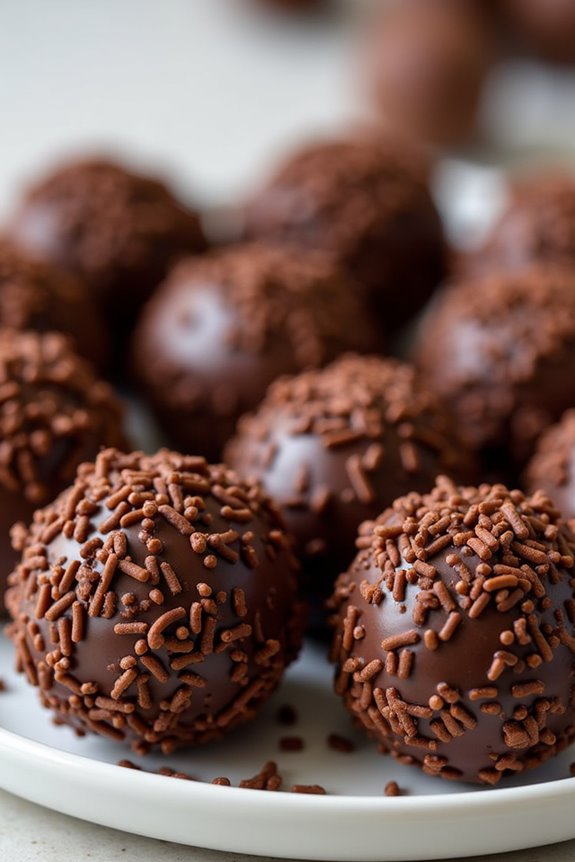
Brigadeiros: The Classic Brazilian Chocolate Truffle
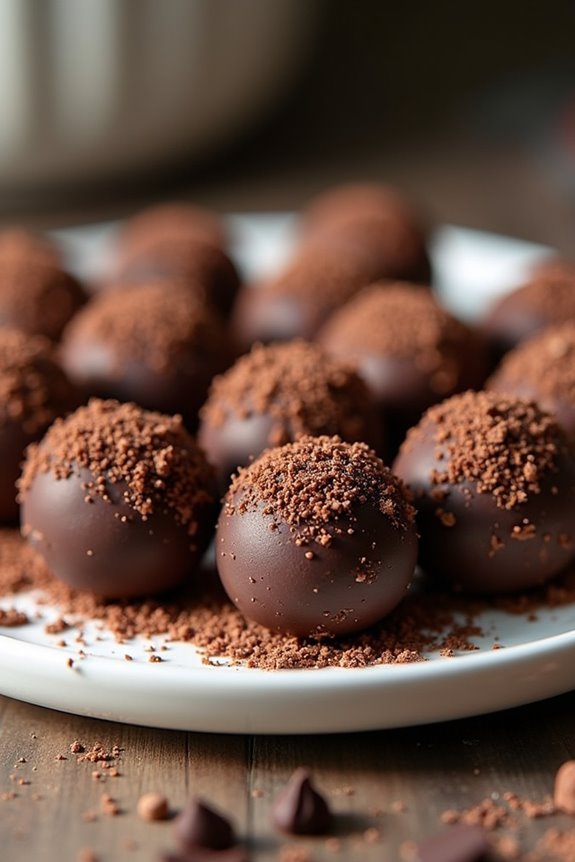
Brigadeiros are a beloved Brazilian treat that has become synonymous with celebration and sweetness. These delightful chocolate truffles are made from just a few simple ingredients and are incredibly easy to prepare. Traditionally served at birthday parties and festivities, brigadeiros are a must-try for anyone looking to indulge in a sweet, chocolatey experience. Their rich, fudgy texture and the irresistible chocolate flavor make them a favorite among both children and adults alike.
The charm of brigadeiros lies in their simplicity and versatility. You can roll them in a variety of toppings such as sprinkles, nuts, or cocoa powder to add a personal touch. This recipe will guide you through making the perfect brigadeiros, guaranteeing that you can recreate this classic Brazilian dessert right in your own kitchen. Gather your ingredients and let’s immerse ourselves in the world of brigadeiros!
Ingredients (Serves 4-6 people):
- 1 can (14 oz) sweetened condensed milk
- 2 tablespoons unsweetened cocoa powder
- 2 tablespoons unsalted butter
- A pinch of salt
- Chocolate sprinkles (for rolling)
- Additional toppings (optional, such as crushed nuts or coconut flakes)
Cooking Instructions:
- Prepare the Mixture: In a medium-sized non-stick saucepan, combine the sweetened condensed milk, cocoa powder, unsalted butter, and a pinch of salt. Stir everything together until the cocoa powder is fully incorporated into the milk.
- Cook the Mixture: Place the saucepan over medium heat. Continuously stir the mixture with a wooden spoon or spatula to prevent it from sticking to the bottom of the pan. Cook for about 10-15 minutes until the mixture thickens and pulls away from the sides of the pan, forming a fudgy consistency. You’ll know it’s ready when you can see the bottom of the pan for a few seconds when you stir.
- Cool the Mixture: Once the brigadeiro mixture has reached the desired consistency, remove it from the heat and transfer it to a greased plate or bowl. Allow it to cool at room temperature for about 30 minutes or until it’s easy to handle.
- Shape the Brigadeiros: Once the mixture has cooled, grease your hands with a little butter to prevent sticking. Take small amounts of the mixture (about a tablespoon) and roll them into small balls, roughly the size of a cherry.
- Coat the Brigadeiros: Pour the chocolate sprinkles into a shallow dish. Roll each brigadeiro ball in the sprinkles until they’re fully coated. Place them on a serving plate or in paper cups.
- Chill and Serve: For best flavor and texture, refrigerate the brigadeiros for about 30 minutes before serving. Enjoy your homemade brigadeiros fresh, or store them in an airtight container in the refrigerator for up to one week.
Extra Tips:
When making brigadeiros, the key is to constantly stir the mixture while cooking to prevent it from burning. If you prefer a richer chocolate flavor, you can substitute a portion of the cocoa powder with melted dark chocolate.
Additionally, consider experimenting with different toppings to give your brigadeiros a unique twist. Whether you choose classic chocolate sprinkles or get creative with nuts or coconut, brigadeiros are sure to impress at any gathering!
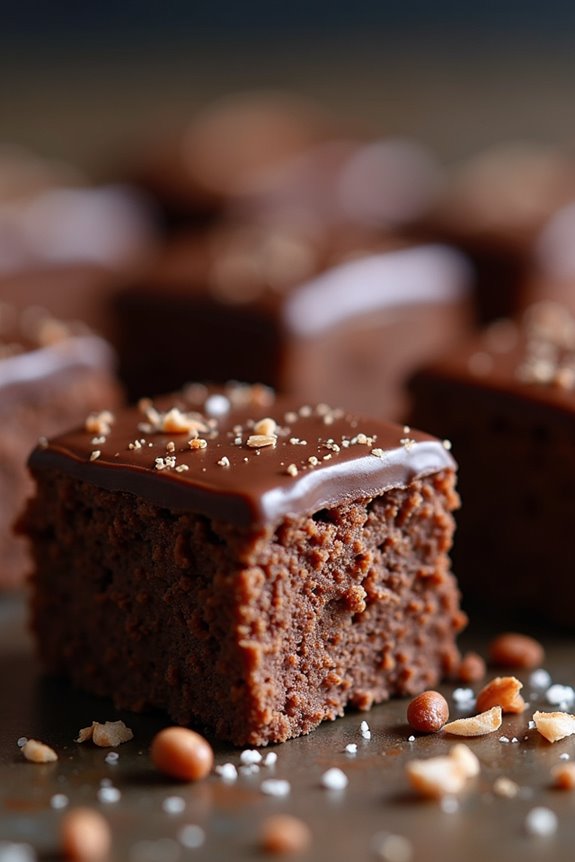
Bolo De Brigadeiro: a Decadent Chocolate Cake
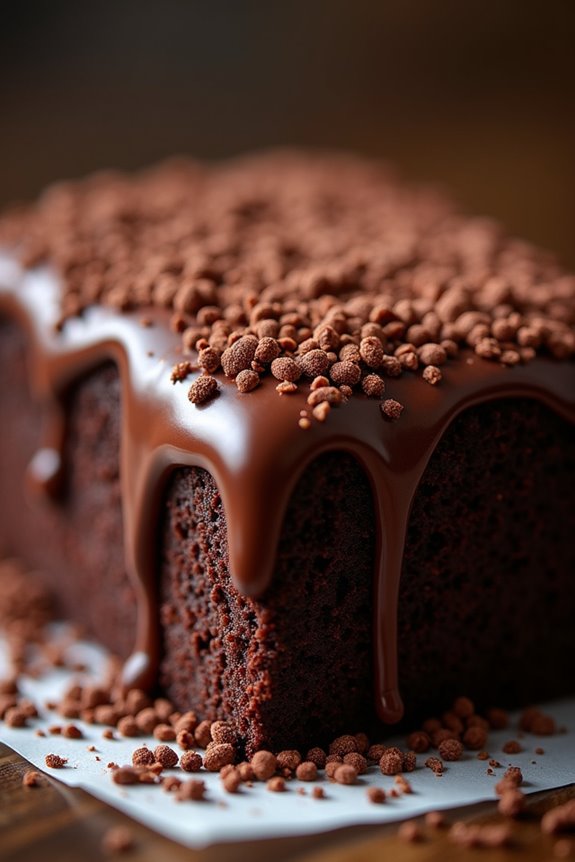
Bolo De Brigadeiro is a beloved Brazilian dessert that combines the rich flavors of chocolate and condensed milk, resulting in a moist and decadent cake that’s perfect for any celebration.
Originating from the traditional Brigadeiro sweet, this cake captures the essence of Brazil’s sweet tooth, making it a favorite among chocolate lovers. The cake isn’t only delicious but also visually appealing, often adorned with a glossy chocolate ganache and sprinkled with chocolate sprinkles or grated chocolate.
This indulgent treat is simple to make and is certain to impress friends and family alike. Whether you’re celebrating a birthday, an anniversary, or just a cozy evening at home, Bolo De Brigadeiro is the perfect dessert to bring joy to your table.
With its soft texture and rich flavor, it’s an experience that transports you straight to the heart of Brazil, where chocolate is truly celebrated.
Ingredients (Serves 4-6):
- 1 cup all-purpose flour
- 1 cup sugar
- 1/2 cup unsweetened cocoa powder
- 1/2 cup vegetable oil
- 2 large eggs
- 1 cup milk
- 1 tablespoon baking powder
- 1 teaspoon vanilla extract
- 1 can (14 ounces) sweetened condensed milk
- 1/4 cup unsweetened cocoa powder (for the brigadeiro filling)
- 1 tablespoon unsalted butter (for the brigadeiro filling)
- Chocolate sprinkles (for decoration)
Cooking Instructions:
- Preheat the Oven: Begin by preheating your oven to 350°F (175°C). This guarantees that your cake will bake evenly and rise properly.
- Prepare the Cake Batter: In a large mixing bowl, combine the all-purpose flour, sugar, cocoa powder, and baking powder. Mix well to combine. In a separate bowl, whisk together the vegetable oil, eggs, milk, and vanilla extract until fully combined. Gradually add the wet ingredients to the dry ingredients, mixing until smooth and homogeneous.
- Bake the Cake: Grease and flour a round 9-inch cake pan. Pour the batter into the prepared pan and smooth the top with a spatula. Bake in the preheated oven for about 30-35 minutes, or until a toothpick inserted in the center comes out clean. Once baked, remove from the oven and let cool in the pan for about 10 minutes before transferring to a wire rack to cool completely.
- Make the Brigadeiro Filling: In a saucepan over medium heat, combine the sweetened condensed milk, unsweetened cocoa powder, and unsalted butter. Stir constantly until the mixture thickens and starts to pull away from the sides of the pan, about 10-15 minutes. Remove from heat and allow to cool slightly.
- Assemble the Cake: Once the cake is completely cooled, slice it horizontally to create two layers. Spread a generous layer of the brigadeiro filling on the bottom layer. Place the top layer back on and press gently.
- Decorate the Cake: To finish, spread any remaining brigadeiro filling on top of the cake and let it drip down the sides. Finally, decorate the top and sides of the cake with chocolate sprinkles for a beautiful presentation.
Extra Tips:
When making Bolo De Brigadeiro, feel free to experiment with flavors by adding a pinch of sea salt to the brigadeiro filling for a salty-sweet contrast, or infusing the milk with a hint of coffee for a mocha flavor.
Always ascertain that the cake is completely cooled before assembling to prevent the filling from melting. This cake can also be stored in an airtight container for several days, making it a perfect make-ahead dessert for gatherings. Enjoy your delicious Brazilian chocolate cake!
Pudim De Chocolate: Silky Chocolate Pudding
Pudim De Chocolate, a beloved Brazilian dessert, is a rich and velvety chocolate pudding that delights the palate with its smooth texture and indulgent flavor. This dessert is often served chilled, allowing the flavors to meld beautifully, creating a perfect ending to any meal.
The simplicity of the ingredients combined with the elegance of presentation makes it a favorite for both everyday occasions and special celebrations.
Making Pudim De Chocolate is easier than you might think, and it requires only a few ingredients that you might already have in your pantry. The pudding can be prepared in advance, permitting you to impress your guests without the last-minute rush.
With its silky consistency and a decadent chocolate taste, this pudding is sure to become a cherished recipe in your dessert repertoire.
Ingredients (serving size: 4-6 people):
- 1 cup of granulated sugar
- 1/4 cup of water
- 2 cups of whole milk
- 1 cup of heavy cream
- 1/2 cup of unsweetened cocoa powder
- 3 large eggs
- 1 teaspoon of vanilla extract
- A pinch of salt
Cooking Instructions:
1. Prepare the Caramel: In a medium saucepan, combine the granulated sugar and water. Heat over medium-low heat, stirring gently until the sugar dissolves.
Increase the heat and let it boil without stirring until it turns a golden brown color, about 8-10 minutes. Carefully pour the caramel into a round cake pan, tilting the pan to coat the bottom evenly. Set aside to cool and harden.
2. Mix the Chocolate Pudding Ingredients: In a separate bowl, whisk together the cocoa powder, eggs, and a pinch of salt until smooth.
In a saucepan, heat the milk and heavy cream over medium heat until it’s warm but not boiling. Gradually add the warm milk mixture to the cocoa and egg mixture, whisking continuously to avoid cooking the eggs. Stir in the vanilla extract.
3. Combine and Blend: Once everything is well combined, pour the mixture through a fine-mesh sieve into the prepared caramel-coated cake pan.
This step helps facilitate your pudding is silky smooth by removing any lumps.
4. Bake the Pudding: Preheat your oven to 350°F (175°C). Place the cake pan with the pudding mixture into a larger baking dish.
Fill the outer dish with hot water until it reaches halfway up the sides of the cake pan, creating a water bath. Bake for about 50-60 minutes, or until the pudding is set but still slightly jiggly in the center.
5. Cool and Chill: Once baked, remove the pudding from the oven and let it cool at room temperature for about 30 minutes.
Then, refrigerate for at least 4 hours, or overnight for the best flavor and texture.
6. Serve: To serve, carefully run a knife around the edges of the pudding and invert it onto a serving plate.
The caramel sauce will flow over the top, making it look irresistible. Cut into slices and enjoy!
Extra Tips:
For the best results, use high-quality cocoa powder and chocolate to enhance the flavor of your Pudim De Chocolate.
If you prefer a richer chocolate taste, you can add melted dark chocolate to the mixture before baking. Additionally, allow the pudding to chill overnight for a firmer texture and more intense flavor.
Garnishing with whipped cream or chocolate shavings right before serving can elevate its presentation and add a touch of elegance.
Beijinho: Coconut Chocolate Treats
Beijinho, a delightful Brazilian treat, is a beloved dessert that combines the rich flavors of coconut and sweetened condensed milk. These little coconut balls, adorned with chocolate sprinkles, are a popular choice for parties, celebrations, and family gatherings.
With their creamy, sweet center and a touch of chocolate on the outside, beijinhos are bound to be a hit with both kids and adults alike. Making these treats is a simple process, and the results are incredibly satisfying.
This recipe makes 4-6 servings, perfect for sharing with friends and family. The key to achieving the perfect beijinho lies in balancing the sweetness with the natural flavor of coconut. You’ll find that the ingredients are straightforward, and the cooking process is manageable, even for those who may not be experienced in the kitchen.
So, gather your ingredients, and let’s get started on making these delicious coconut chocolate treats!
Ingredients:
- 1 can (14 oz) sweetened condensed milk
- 1 cup grated coconut (fresh or desiccated)
- 1 tablespoon unsalted butter
- 1 teaspoon vanilla extract
- Chocolate sprinkles (for coating)
- Extra grated coconut (for rolling, optional)
Cooking Instructions:
- Prepare the Mixture: In a medium-sized saucepan, combine the sweetened condensed milk, grated coconut, unsalted butter, and vanilla extract. Place the saucepan over medium heat. Stir the mixture constantly to make sure that it doesn’t stick to the bottom, and cook for about 10-15 minutes until it thickens and pulls away from the sides of the pan.
- Cool the Mixture: Once the mixture has thickened, remove it from the heat and transfer it to a greased plate or bowl. Allow it to cool at room temperature for approximately 30 minutes. This step is essential as it makes the mixture easier to handle when forming the balls.
- Shape the Beijinhos: Once the mixture is cool enough to handle, grease your hands with a little butter to prevent sticking. Take small portions of the mixture and roll them into small balls, about the size of a cherry. Aim for uniformity in size for a more appealing presentation.
- Coat the Beijinhos: Pour chocolate sprinkles (and extra grated coconut, if using) into a shallow dish. Roll each coconut ball in the chocolate sprinkles until fully coated. Make sure that each beijinho is generously coated to enhance its flavor and texture.
- Chill and Serve: Place the coated beijinhos in mini paper cups or on a serving platter. Refrigerate them for about 30 minutes to firm up before serving. This will help the flavors meld together and make the treats even more enjoyable.
Extra Tips:
When making beijinhos, you can experiment with different toppings such as crushed nuts or colored sprinkles to add a festive touch.
For a richer flavor, consider adding a pinch of salt to the mixture to balance the sweetness. If you prefer a lighter coconut flavor, you can reduce the amount of grated coconut used.
Be sure to keep the beijinhos stored in an airtight container in the refrigerator, where they’ll stay fresh for several days, allowing you to enjoy these delicious treats for longer.
Brownies Brasileiros: Fudgy Brazilian Brownies
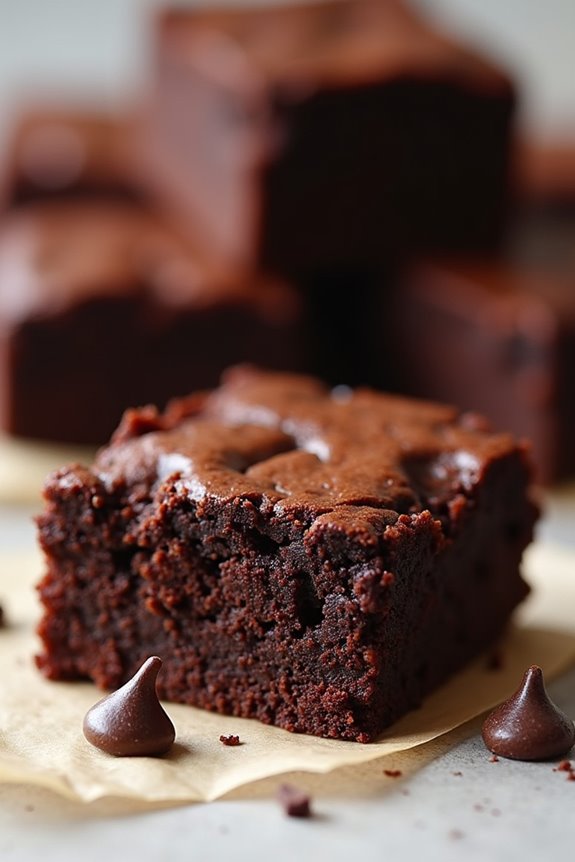
Brownies Brasileiros, or fudgy Brazilian brownies, are a delicious twist on the classic brownie recipe, infused with rich chocolate flavor and a hint of Brazilian flair.
These brownies are characterized by their dense, fudgy texture and a deep chocolate richness that makes them irresistible. The addition of ingredients like condensed milk and a touch of coconut can elevate the flavor profile, offering a unique taste that sets them apart from traditional brownies. Perfect for any occasion, these brownies are bound to impress family and friends alike.
Making Brownies Brasileiros is a straightforward process that requires minimal ingredients, allowing you to whip them up quickly. Whether you’re hosting a gathering, celebrating a special occasion, or simply indulging your sweet tooth, this recipe will provide you with a batch of decadent brownies that are both satisfying and delicious.
With a few simple steps, you’ll be well on your way to enjoying these delightful treats.
Ingredients (Serves 4-6):
- 1 cup (200g) granulated sugar
- 1/2 cup (100g) brown sugar
- 1/2 cup (115g) unsalted butter, melted
- 2 large eggs
- 1 teaspoon vanilla extract
- 1 cup (120g) all-purpose flour
- 1/3 cup (40g) unsweetened cocoa powder
- 1/2 teaspoon baking powder
- 1/4 teaspoon salt
- 1/2 cup (90g) chocolate chips (optional)
Cooking Instructions:
- Preheat the Oven: Begin by preheating your oven to 350°F (175°C). This step guarantees that your brownies will bake evenly and achieve the perfect fudgy texture.
- Prepare the Baking Pan: Grease an 8×8 inch (20×20 cm) square baking pan with butter or line it with parchment paper. This will prevent the brownies from sticking to the pan and make it easier to lift them out after baking.
- Mix Wet Ingredients: In a large mixing bowl, combine the granulated sugar, brown sugar, and melted butter. Mix well until the sugars are fully incorporated. Add the eggs one at a time, mixing after each addition, followed by the vanilla extract. This will create a smooth and creamy mixture.
- Combine Dry Ingredients: In a separate bowl, whisk together the flour, cocoa powder, baking powder, and salt. This step is important to evenly distribute the dry ingredients and prevent clumps in the brownie batter.
- Combine Wet and Dry Mixtures: Gradually add the dry ingredients to the wet mixture, stirring until just combined. Be careful not to overmix, as this can lead to a denser brownie. If you’re using chocolate chips, fold them into the batter at this stage.
- Pour and Bake: Pour the brownie batter into the prepared baking pan, spreading it evenly. Place it in the preheated oven and bake for about 20-25 minutes, or until a toothpick inserted into the center comes out with a few moist crumbs. This indicates that your brownies are fudgy and not overcooked.
- Cool and Serve: Once baked, remove the brownies from the oven and let them cool in the pan for about 10 minutes. Then, transfer them to a wire rack to cool completely before cutting them into squares. Serve them warm or at room temperature.
Extra Tips:
For an even more indulgent experience, consider adding chopped nuts or a swirl of dulce de leche on top of the brownie batter before baking.
Additionally, if you prefer a sweeter brownie, you can increase the brown sugar slightly. These brownies can also be stored in an airtight container for up to a week, making them a great treat for meal prep or to satisfy your chocolate cravings throughout the week.
Enjoy your delicious Brownies Brasileiros!
Quindim De Chocolate: Chocolate Coconut Custard
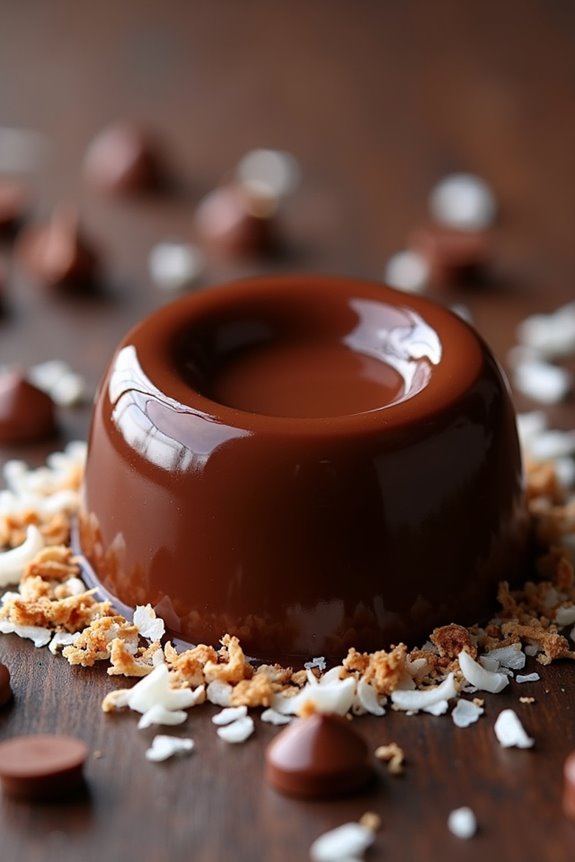
Quindim de Chocolate is a delightful Brazilian dessert that combines the rich flavors of chocolate and coconut into a creamy custard. This treat isn’t only visually appealing with its glossy surface but also boasts a texture that’s both smooth and satisfying.
Originating from the Afro-Brazilian community, this dessert has become a favorite across the country, often enjoyed during special occasions or simply as a sweet indulgence after a meal. With its sweet coconut flavor complemented by the deep richness of chocolate, quindim de chocolate is bound to impress your guests and tantalize your taste buds.
Making quindim de chocolate is simpler than it may seem, requiring only a handful of ingredients. The combination of egg yolks, sugar, coconut, and chocolate creates a unique custard that’s baked to perfection. The result is a luscious dessert that can be served chilled, allowing the flavors to meld beautifully.
Whether you’re a seasoned baker or a novice in the kitchen, following this recipe will lead you to a delicious outcome that captures the essence of Brazilian cuisine.
Ingredients for 4-6 servings:
- 1 cup sweetened shredded coconut
- 1 cup sugar
- 4 large egg yolks
- 1/2 cup unsweetened cocoa powder
- 1/2 cup coconut milk
- 1/4 cup heavy cream
- 1 teaspoon vanilla extract
- A pinch of salt
- Butter (for greasing the baking dishes)
Cooking Instructions:
- Preheat the Oven: Start by preheating your oven to 350°F (175°C). This guarantees that your quindim will bake evenly and achieve the right texture.
- Prepare the Baking Dish: Grease your ramekins or a muffin tin with butter to prevent the custard from sticking. This step is essential as it allows for easy removal of the quindim after baking.
- Mix the Ingredients: In a mixing bowl, combine the sweetened shredded coconut, sugar, cocoa powder, and a pinch of salt. Mix these dry ingredients well to confirm that the cocoa powder is evenly distributed throughout the coconut.
- Add Wet Ingredients: To the dry mixture, add the egg yolks, coconut milk, heavy cream, and vanilla extract. Stir everything together until you achieve a smooth batter. Make sure there are no lumps; this will help in achieving a silky custard.
- Pour into Baking Dish: Carefully pour the mixture into the prepared ramekins or muffin tin, filling each one about three-quarters full. This allows space for the custard to expand while baking.
- Bake: Place the filled baking dishes in the preheated oven and bake for about 25-30 minutes, or until the custards are set and a toothpick inserted in the center comes out clean.
- Cool and Chill: Once baked, remove the quindim from the oven and allow them to cool at room temperature. Then, refrigerate for at least 2 hours before serving. Chilling enhances the flavors and makes the custard even more invigorating.
- Serve: To serve, gently run a knife around the edges of the quindim to loosen them, then invert them onto serving plates. You can garnish with additional shredded coconut or chocolate shavings for an extra touch.
Extra Tips: When making quindim de chocolate, it’s important to use high-quality cocoa powder to enhance the chocolate flavor. Additionally, don’t skip the chilling step, as it allows the custard to firm up and develop its rich texture.
If you prefer a sweeter dessert, feel free to adjust the sugar content according to your taste. Enjoy this Brazilian delicacy as a perfect end to any meal, or simply as a treat for yourself!
Chocolate Casquinha: Chocolate-Dipped Ice Cream Cones

Chocolate Casquinha, a delightful Brazilian treat, combines the joy of ice cream with the rich decadence of chocolate. This popular street food isn’t only a feast for the senses but also a fun way to enjoy a classic dessert. The crispy, crunchy ice cream cone is generously dipped in a luscious layer of melted chocolate, creating a perfect balance between the creamy ice cream and the sweet chocolate coating. This dessert is perfect for hot summer days or any occasion where you want to impress your friends and family with a delicious homemade treat.
Making Chocolate Casquinha is simple and requires minimal ingredients, making it an ideal recipe for anyone, from novice cooks to seasoned chefs. The process involves preparing the chocolate dip, allowing it to cool slightly, and then immersing the ice cream cones into the melted chocolate. Once you’ve mastered the technique, you can even experiment with toppings such as crushed nuts, sprinkles, or coconut flakes to customize your cones further.
Let’s explore the ingredients and the step-by-step instructions to create these irresistible chocolate-dipped ice cream cones.
Ingredients (serving size: 4-6 people)
- 4-6 ice cream cones
- 200g dark chocolate (or milk chocolate, based on preference)
- 1 tablespoon coconut oil (optional, for a smoother consistency)
- Assorted toppings (crushed nuts, sprinkles, or shredded coconut, optional)
- Ice cream of choice (for filling the cones)
Cooking Instructions
- Melt the Chocolate: Start by breaking the chocolate into small pieces and placing them in a microwave-safe bowl. If you choose to use coconut oil, add it to the chocolate. Microwave the chocolate in 30-second intervals, stirring in between, until fully melted and smooth. Be cautious not to overheat the chocolate, as it can burn easily.
- Prepare the Ice Cream: While the chocolate is melting, scoop your desired ice cream flavor into each ice cream cone. Fill the cones generously, leaving a little space at the top for the chocolate dip. Place the filled cones upright in a cup or a cone holder to prevent them from tipping over.
- Dip the Cones: Once the chocolate is melted and smooth, take each ice cream cone and dip the top portion into the chocolate, allowing the excess to drip off. You can also roll the dipped edge in any toppings you desire for added flavor and texture.
- Set the Chocolate: Place the dipped cones upright on a baking sheet lined with parchment paper. Repeat this process until all cones are dipped. Allow them to sit at room temperature for a few minutes to let the chocolate set slightly, or place them in the refrigerator for about 10-15 minutes to harden more quickly.
- Serve and Enjoy: Once the chocolate has set, your Chocolate Casquinha is ready to serve! Enjoy them immediately for the best texture, or store them in the freezer for later enjoyment.
Extra Tips
When making Chocolate Casquinha, you can experiment with different types of chocolate for varying flavors and sweetness levels. Dark chocolate adds a rich, slightly bitter contrast to the sweetness of the ice cream, while milk chocolate provides a creamier taste.
If you want to make the dipping easier, let the melted chocolate cool slightly before immersing, as this will help it adhere better to the ice cream cone. Additionally, consider using a variety of ice cream flavors and toppings to create a fun and colorful dessert bar that everyone can enjoy.
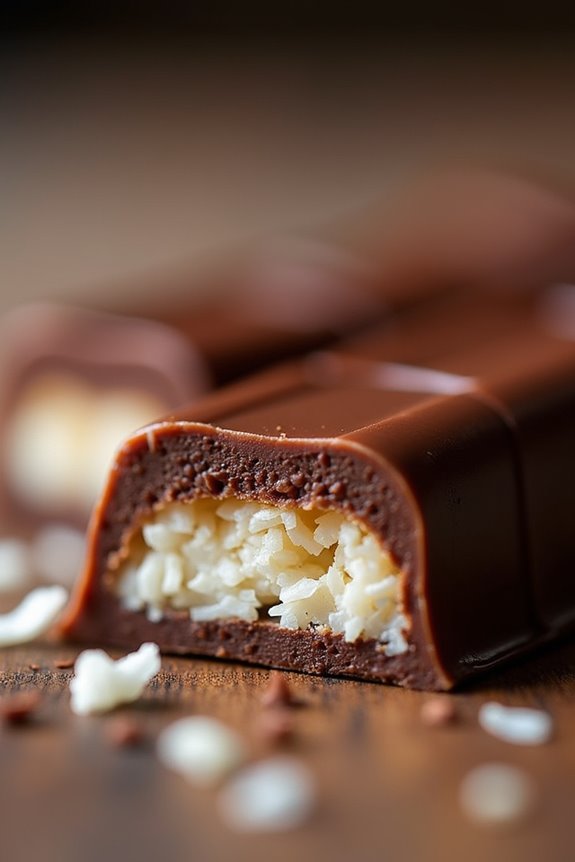
Cocada De Chocolate: Chocolate Coconut Candy
Cocada De Chocolate is a delightful Brazilian treat that combines the rich flavors of chocolate with the tropical essence of coconut. This dessert is perfect for those who love the combination of sweet and nutty flavors. The texture is chewy and satisfying, making it a popular choice during festivities or as a sweet indulgence any day of the week.
With just a few ingredients, you can whip up this delicious candy that will surely impress your friends and family. Making Cocada De Chocolate isn’t only easy but also a fun activity that can be enjoyed by all ages. The process involves cooking coconut with sugar and chocolate until it reaches a gooey, melt-in-your-mouth consistency.
Once set, these treats can be cut into squares or molded into delightful shapes, adding a touch of creativity to your dessert platter. Whether you serve them at a party or as a sweet snack, Cocada De Chocolate is sure to satisfy your chocolate cravings.
Ingredients (Serves 4-6):
- 2 cups grated fresh coconut (or dried coconut)
- 1 cup sweetened condensed milk
- 1 cup granulated sugar
- 1 cup dark chocolate chips
- 1 teaspoon vanilla extract
- A pinch of salt
- Butter for greasing the pan
Cooking Instructions:
- Prepare the Baking Pan: Start by greasing a square baking dish (around 8×8 inches) with butter. This will guarantee that the Cocada De Chocolate doesn’t stick to the pan once set.
- Combine Ingredients: In a medium saucepan over low heat, combine the grated coconut, sweetened condensed milk, and granulated sugar. Stir the mixture well to guarantee that the coconut is evenly coated with the milk and sugar.
- Cook the Mixture: Allow the mixture to cook over low to medium heat, stirring constantly to prevent it from sticking or burning. Continue cooking until the mixture thickens and starts to pull away from the sides of the pan, which should take about 10-15 minutes.
- Add Chocolate and Flavorings: Once the coconut mixture has thickened, remove it from the heat. Immediately stir in the dark chocolate chips, vanilla extract, and a pinch of salt. Mix until the chocolate chips have melted and are fully incorporated into the coconut mixture.
- Transfer to Baking Dish: Pour the chocolate coconut mixture into the prepared baking dish. Use a spatula to spread it evenly and press it down gently to guarantee it holds together well.
- Cool and Set: Allow the mixture to cool to room temperature, then cover it with plastic wrap and place it in the refrigerator for at least 2 hours to set completely.
- Cut and Serve: Once set, remove the Cocada De Chocolate from the refrigerator and cut it into squares or desired shapes. Serve chilled or at room temperature.
Extra Tips:
For an enhanced flavor experience, consider adding a sprinkle of sea salt on top of the Cocada De Chocolate just before it sets. This will balance the sweetness and add a gourmet touch.
Additionally, feel free to experiment with different types of chocolate, such as milk or white chocolate, depending on your taste preferences. If you want to make these treats even more special, you can add nuts or dried fruits to the mixture before it sets. Enjoy your delicious homemade Cocada De Chocolate!
Torta De Chocolate: Rich Chocolate Tart

Torta De Chocolate, a beloved dessert from Brazil, is a decadent chocolate tart that perfectly marries a buttery crust with a rich and velvety chocolate filling. This indulgent treat is often enjoyed during celebrations and gatherings, making it a staple in Brazilian cuisine. Its simplicity in preparation contrasts with the luxurious flavor it offers, making it a favorite for both novice and experienced bakers alike.
Crafting this chocolate tart is an inviting culinary adventure. The crust is made with a few basic ingredients that come together to create a flaky base, while the filling consists of high-quality chocolate that melts beautifully, guaranteeing a smooth texture. Whether served plain or adorned with whipped cream and fresh berries, Torta De Chocolate is sure to impress your guests and satisfy any chocolate lover’s cravings.
Ingredients (Serving Size: 4-6 people)
- 1 ½ cups all-purpose flour
- ½ cup unsweetened cocoa powder
- ¼ cup granulated sugar
- ½ teaspoon salt
- ½ cup cold unsalted butter, cubed
- 1 large egg yolk
- 3-4 tablespoons cold water
- 1 cup heavy cream
- 8 oz dark chocolate (70% cocoa), chopped
- 2 large eggs
- 1 teaspoon vanilla extract
- Optional: powdered sugar for dusting
Cooking Instructions
- Prepare the Crust: In a large mixing bowl, combine the flour, cocoa powder, granulated sugar, and salt. Mix well to guarantee the dry ingredients are evenly distributed. Add the cubed butter and use a pastry cutter or your fingers to work the butter into the flour until the mixture resembles coarse crumbs.
- Form the Dough: In a small bowl, whisk together the egg yolk and 3 tablespoons of cold water. Gradually add this mixture to the flour mixture, stirring until a dough begins to form. If the dough is too dry, add an additional tablespoon of cold water. Gather the dough into a ball, flatten it into a disk, wrap it in plastic wrap, and refrigerate for at least 30 minutes.
- Preheat the Oven: While the dough is chilling, preheat your oven to 350°F (175°C).
- Roll out the Dough: Once chilled, remove the dough from the refrigerator and roll it out on a floured surface into a circle about 1/8 inch thick. Carefully transfer the rolled dough to a tart pan, pressing it into the edges. Trim any excess dough and prick the bottom with a fork to prevent bubbling.
- Blind Bake the Crust: Line the tart crust with parchment paper and fill it with pie weights or dried beans. Bake in the preheated oven for 15 minutes. Remove the weights and parchment, and bake for an additional 5-10 minutes until the crust is set and slightly firm to the touch. Allow it to cool completely.
- Prepare the Filling: In a small saucepan, heat the heavy cream over medium heat until it just begins to simmer. Remove from heat and add the chopped dark chocolate, stirring until completely melted and smooth. Allow the mixture to cool slightly.
- Mix the Eggs and Vanilla: In a separate bowl, whisk together the eggs and vanilla extract. Gradually add the chocolate mixture to the eggs, whisking constantly to prevent the eggs from scrambling.
- Fill the Tart: Pour the chocolate filling into the cooled crust, smoothing the top with a spatula. Bake in the oven for about 20-25 minutes, or until the filling is set around the edges but slightly jiggly in the center.
- Cool and Serve: Remove the tart from the oven and let it cool at room temperature. Once cooled, refrigerate for at least 2 hours before serving. Dust with powdered sugar if desired.
Extra Tips
When making Torta De Chocolate, using high-quality dark chocolate will greatly enhance the flavor of the filling. Additionally, for an extra touch of elegance, consider garnishing the tart with fresh berries or a dollop of whipped cream just before serving.
If you prefer a sweeter tart, you can adjust the sugar content in the filling to suit your taste. Remember, patience is key, especially during the cooling process; this allows the flavors to meld and the filling to set properly for a delightful slice. Enjoy your rich chocolate creation!
Cocada De Chocolate: Chewy Chocolate-Covered Coconut Bars
Cocada De Chocolate is a delightful Brazilian treat that combines the rich flavors of chocolate with the chewy texture of coconut. These bars are perfect for satisfying your sweet tooth and can be enjoyed as a snack or dessert. The combination of sweetened shredded coconut and creamy chocolate creates a delectable contrast that will have you reaching for seconds.
Whether you’re hosting a gathering or simply indulging yourself, these chocolate-covered coconut bars are bound to impress.
Making Cocada De Chocolate is relatively easy and requires minimal ingredients, making it a perfect recipe for both novice and experienced bakers. The bars aren’t only delicious but also visually appealing, presenting a beautiful layer of chocolate over a chewy coconut base. Once you try this recipe, you’ll want to share it with friends and family!
Ingredients (Serves 4-6):
- 2 cups sweetened shredded coconut
- 1 cup sweetened condensed milk
- 1 teaspoon vanilla extract
- 1 cup semi-sweet chocolate chips
- 1 tablespoon coconut oil
- Pinch of salt
Cooking Instructions:
- Preheat Oven: Preheat your oven to 350°F (175°C). This guarantees that the coconut mixture will bake evenly and achieve the perfect chewy texture.
- Prepare Coconut Mixture: In a large mixing bowl, combine the shredded coconut, sweetened condensed milk, vanilla extract, and a pinch of salt. Stir the mixture until all the coconut is evenly coated with the condensed milk and other ingredients.
- Bake Coconut Base: Line an 8×8 inch baking dish with parchment paper, allowing some overhang for easy removal later. Pour the coconut mixture into the dish and press it down firmly with a spatula to create an even layer. Bake in the preheated oven for about 20-25 minutes, or until the top is lightly golden.
- Cool the Base: Once baked, remove the dish from the oven and allow it to cool completely at room temperature. This step is vital as the coconut layer will be easier to slice once it has cooled down.
- Melt Chocolate: In a microwave-safe bowl, combine the semi-sweet chocolate chips and coconut oil. Microwave in 30-second intervals, stirring in between, until the chocolate is fully melted and smooth.
- Coat the Coconut Bars: Once the coconut layer has cooled, lift it out of the baking dish using the parchment paper. Cut it into bars or squares as desired. Dip each piece into the melted chocolate, making sure it’s fully coated, and place them on a baking sheet lined with parchment paper.
- Chill to Set: Once all bars are coated in chocolate, place the baking sheet in the refrigerator for about 30 minutes or until the chocolate has hardened.
Extra Tips:
For an extra layer of flavor, consider adding a sprinkle of sea salt on top of the chocolate before it sets. This will enhance the sweetness of the chocolate while providing a delightful contrast.
Additionally, feel free to experiment with different types of chocolate, such as dark or white chocolate, to customize your Cocada De Chocolate to your taste. Enjoy your delicious homemade treats!