

Discovering the vibrant flavors of Argentinian cuisine has been such a delightful journey. The balance of taste and health in these dishes is truly inspiring. Think juicy grilled chicken with zesty chimichurri or a hearty lentil salad filled with fresh veggies. Each recipe carries a touch of tradition and a focus on well-being. Ready to explore how these meals can elevate your dining experience?
Argentine Grilled Chicken With Chimichurri
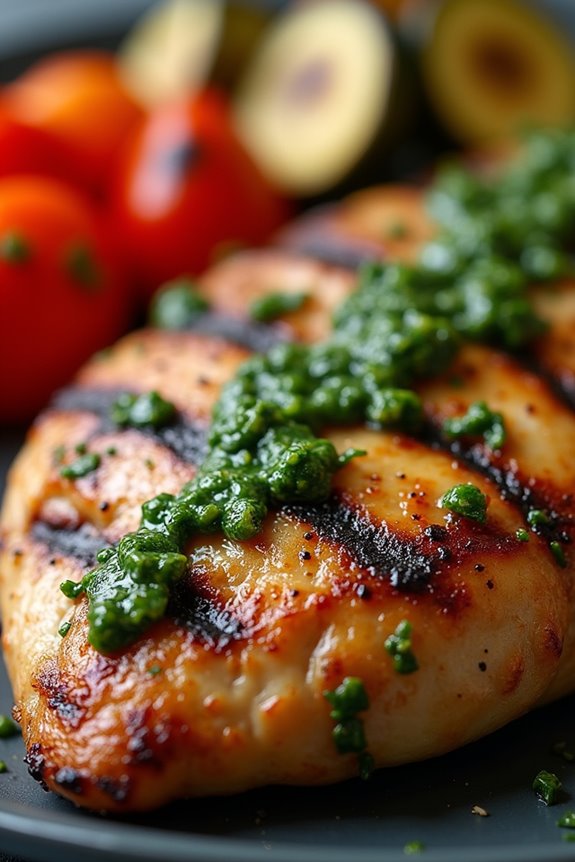
Argentine Grilled Chicken With Chimichurri is a quintessential dish that embodies the bold flavors and vibrant culinary traditions of Argentina. This dish features succulent chicken marinated and grilled to perfection, served alongside a zesty chimichurri sauce made from fresh herbs, garlic, vinegar, and olive oil.
The combination of the juicy chicken with the fresh, tangy chimichurri creates a delightful balance that’s sure to please anyone at the dinner table. This recipe isn’t only delicious but also healthy, as it utilizes lean chicken breast and fresh ingredients.
Whether you’re hosting a barbecue or simply looking for a wholesome family meal, Argentine Grilled Chicken With Chimichurri is a fantastic option. The dish is best served with a side of grilled vegetables or a light salad, making it a well-rounded and satisfying meal for 4-6 people.
Ingredients
- 4-6 boneless, skinless chicken breasts
- 4 cloves garlic, minced
- 1 teaspoon salt
- 1 teaspoon black pepper
- 1 tablespoon paprika
- 2 tablespoons olive oil
- 1 tablespoon red wine vinegar
- 1 cup fresh parsley, chopped
- 1/4 cup fresh oregano, chopped (or 2 tablespoons dried oregano)
- 1/2 teaspoon red pepper flakes (optional)
- Juice of 1 lemon
Cooking Instructions
- Marinate the Chicken: In a large bowl, combine the minced garlic, salt, black pepper, paprika, olive oil, and red wine vinegar. Mix well to create a marinade. Add the chicken breasts to the bowl, ensuring they’re fully coated in the marinade. Cover and refrigerate for at least 30 minutes, or up to 4 hours for more flavor.
- Prepare the Chimichurri Sauce: In a separate bowl, mix together the chopped parsley, oregano, red pepper flakes (if using), lemon juice, and a pinch of salt. Slowly drizzle in olive oil while stirring to combine. Adjust the seasoning to taste and set aside.
- Preheat the Grill: Preheat your grill to medium-high heat. If using a charcoal grill, wait until the coals are glowing and covered with ash. For a gas grill, allow it to heat for about 10-15 minutes.
- Grill the Chicken: Remove the marinated chicken from the refrigerator and let it sit at room temperature for 10-15 minutes before grilling. Place the chicken on the grill and cook for 6-8 minutes on one side. Flip the chicken and grill for another 6-8 minutes, or until the internal temperature reaches 165°F (75°C).
- Rest and Serve: Once cooked, remove the chicken from the grill and let it rest for 5 minutes. This will help retain the juices. Slice the chicken and serve it with a generous drizzle of chimichurri sauce over the top.
Extra Tips
For an even more flavorful chicken, consider adding a splash of lime juice or a teaspoon of cumin to the marinade. If you prefer a smokier flavor, try grilling the chicken over a wood fire or adding wood chips to your grill.
Additionally, make the chimichurri sauce a few hours ahead of time to allow the flavors to meld together beautifully. Enjoy your Argentine culinary adventure!
Quinoa Salad With Roasted Vegetables
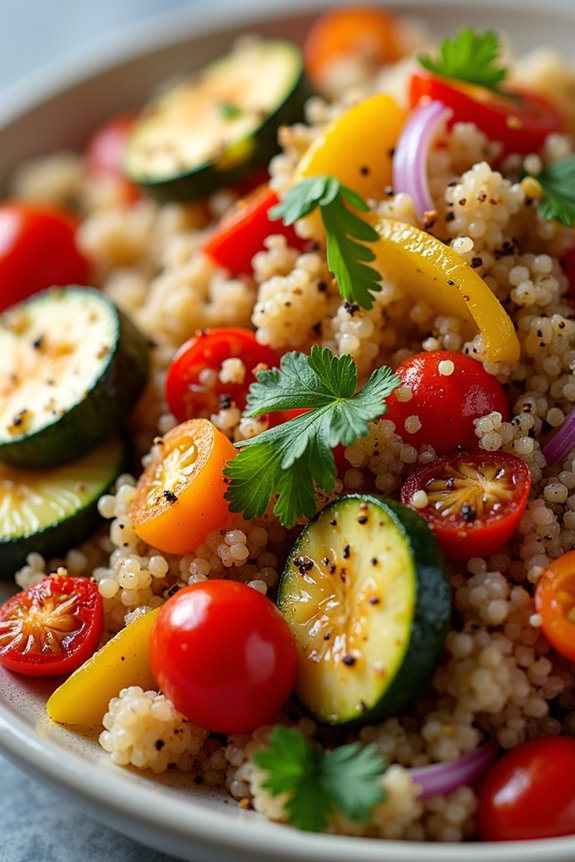
Quinoa Salad with Roasted Vegetables is a colorful and nutritious dish that brings together the earthy flavors of roasted vegetables and the protein-rich goodness of quinoa. This dish isn’t only hearty but also versatile, allowing you to include your favorite seasonal vegetables.
It’s perfect for a light lunch, a side dish at dinner, or even as a meal prep option for the week ahead. With its vibrant presentation and delicious taste, this salad will surely impress your family and friends.
To make this dish even more appealing, consider adding a zesty dressing that complements the roasted vegetables and enhances the quinoa’s nutty flavor. You can serve it warm or cold, making it a great option for any occasion.
The combination of textures from the crispy roasted vegetables and the fluffy quinoa creates a delightful culinary experience that’s also packed with nutrients. Now, let’s plunge into how to make this delicious quinoa salad!
Ingredients (Serves 4-6):
- 1 cup quinoa
- 2 cups vegetable broth or water
- 1 red bell pepper, diced
- 1 yellow bell pepper, diced
- 1 zucchini, diced
- 1 red onion, chopped
- 1 cup cherry tomatoes, halved
- 2 tablespoons olive oil
- 1 teaspoon garlic powder
- 1 teaspoon dried oregano
- Salt and pepper to taste
- 1/4 cup fresh parsley, chopped
- Juice of 1 lemon
Cooking Instructions:
1. Preheat the Oven: Begin by preheating your oven to 400°F (200°C). This temperature is perfect for roasting vegetables to achieve a tender interior and crispy edges.
2. Prepare the Quinoa: Rinse 1 cup of quinoa under cold water in a fine-mesh strainer to remove any bitterness. In a medium saucepan, combine the rinsed quinoa and 2 cups of vegetable broth or water. Bring to a boil, then reduce the heat to low, cover, and simmer for about 15 minutes or until the quinoa is fluffy and the liquid is absorbed.
Once done, remove from heat and let it sit covered for 5 minutes before fluffing it with a fork.
3. Roast the Vegetables: While the quinoa is cooking, prepare your vegetables. In a large mixing bowl, combine the diced red bell pepper, yellow bell pepper, zucchini, red onion, and halved cherry tomatoes. Drizzle with 2 tablespoons of olive oil and season with garlic powder, dried oregano, salt, and pepper.
Toss everything together until the vegetables are well coated.
4. Bake the Vegetables: Spread the seasoned vegetables evenly on a baking sheet lined with parchment paper. Roast in the preheated oven for 20-25 minutes, or until they’re tender and slightly caramelized.
Stir halfway through the roasting time for even cooking.
5. Combine and Serve: Once the quinoa and vegetables are cooked, combine them in a large bowl. Add the chopped fresh parsley and the juice of 1 lemon. Toss everything gently to combine, ensuring the flavors meld together.
Taste and adjust seasoning as needed.
6. Chill if Desired: If you prefer a chilled salad, let it cool to room temperature before refrigerating for at least 30 minutes. Otherwise, serve warm as a hearty and healthy meal.
Extra Tips:
To enhance the flavor of your quinoa salad even further, consider adding a handful of nuts or seeds, such as sunflower seeds or walnuts, for added crunch and healthy fats.
You can also experiment with different vegetables based on the season or your personal preference. For a touch of creaminess, adding feta cheese or avocado can elevate the dish.
Finally, this salad can be stored in the refrigerator for up to 3 days, making it an excellent option for meal prepping!
Beef Empanadas With Spinach and Feta

Beef Empanadas With Spinach and Feta are a delightful take on the classic Argentinian empanada, combining savory ground beef with the earthy flavors of spinach and the creamy texture of feta cheese. These hand-held pastries not only make for a delicious meal but also offer an excellent way to incorporate some greens into your diet.
Perfect for serving at dinner parties, picnics, or as a hearty snack, these empanadas are sure to impress your family and friends. The flaky pastry enveloping the flavorful filling is what makes these empanadas truly special. The combination of spices and ingredients brings a burst of flavor with every bite, while the spinach adds a healthy twist.
This recipe can be easily customized to cater to personal tastes, allowing you to experiment with different fillings, such as cheese, vegetables, or even chicken. Prepare to begin a culinary adventure that transports you straight to the streets of Argentina!
Ingredients (Serves 4-6):
- 1 lb ground beef
- 1 cup fresh spinach, chopped
- 1/2 cup feta cheese, crumbled
- 1 small onion, finely chopped
- 2 cloves garlic, minced
- 1 teaspoon paprika
- 1/2 teaspoon cumin
- 1/2 teaspoon black pepper
- Salt to taste
- 1 package of empanada dough discs (store-bought or homemade)
- 1 egg, beaten (for egg wash)
- Olive oil for cooking
Cooking Instructions:
1. Prepare the Filling: In a large skillet, heat a drizzle of olive oil over medium heat. Add the finely chopped onion and garlic, sautéing until the onion is translucent and fragrant, about 3-4 minutes.
Add the ground beef, breaking it apart with a spoon, and cook until browned, about 6-8 minutes. Stir in the chopped spinach, paprika, cumin, black pepper, and salt. Cook for an additional 2-3 minutes until the spinach is wilted. Remove from heat and let it cool slightly before adding the feta cheese. Mix well to combine.
2. Assemble the Empanadas: Preheat your oven to 400°F (200°C). On a clean surface, take an empanada dough disc and place a generous spoonful of the beef and spinach filling in the center.
Be careful not to overfill, as this can make sealing difficult. Fold the dough over to create a half-moon shape and press the edges together firmly. You can use a fork to crimp the edges for a decorative touch and to guarantee they’re sealed properly.
3. Prepare for Baking: Place the assembled empanadas on a baking sheet lined with parchment paper. Brush the tops with beaten egg to give them a golden color when baked.
This step is essential for achieving that beautiful finish.
4. Bake the Empanadas: Bake in the preheated oven for about 20-25 minutes or until the empanadas are golden brown and crispy. Keep an eye on them towards the end to prevent burning.
5. Serve: Once cooked, remove from the oven and let them cool for a few minutes on a wire rack. Serve warm with your favorite dipping sauce or a side salad for a complete meal.
Extra Tips:
For an added burst of flavor, consider incorporating additional spices such as chili flakes or fresh herbs like parsley or cilantro into the filling mix.
You can also experiment with different cheeses, such as mozzarella or goat cheese, to find your preferred taste combination. If you’re short on time, using store-bought empanada dough is a great shortcut, but if you have the time, making your dough from scratch will elevate the dish even further. Enjoy your delicious Beef Empanadas With Spinach and Feta!
Traditional Argentine Vegetable Stew (Pisto)
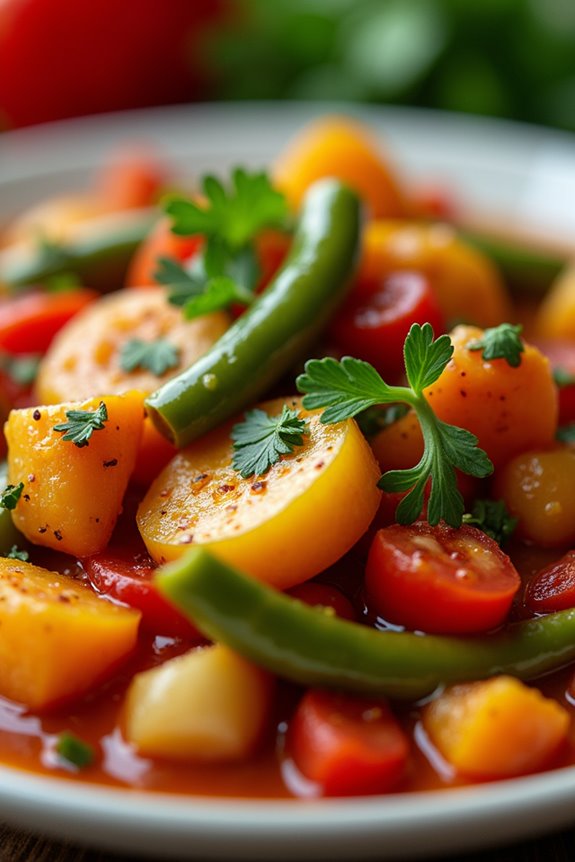
Pisto is a hearty and flavorful traditional Argentine vegetable stew that showcases the vibrant produce of the region. This dish isn’t only rich in nutrients but also embodies the essence of Argentine culinary traditions, often enjoyed as a comforting meal among families.
With a blend of fresh vegetables, herbs, and spices, Pisto is a perfect representation of the country’s love for fresh ingredients and wholesome cooking. It can be served as a main course or as a side dish, making it versatile for any dining occasion.
The beauty of Pisto lies in its adaptability; you can use seasonal vegetables available in your area, allowing for a personalized touch. While the dish is traditionally vegetarian, feel free to add in your favorite proteins such as chicken or beef for a heartier version. This recipe is designed to serve 4-6 people, making it ideal for family gatherings or meal prepping for the week ahead.
Ingredients:
- 2 tablespoons olive oil
- 1 large onion, diced
- 2 garlic cloves, minced
- 2 medium zucchinis, chopped
- 1 red bell pepper, diced
- 1 yellow bell pepper, diced
- 2 medium tomatoes, diced
- 1 cup green beans, trimmed and chopped
- 1 teaspoon smoked paprika
- 1 teaspoon ground cumin
- Salt and pepper to taste
- Fresh parsley, chopped (for garnish)
Cooking Instructions:
- Heat the Oil: In a large pot or Dutch oven, heat the olive oil over medium heat. This will create a base for the vegetables to sauté and develop flavor.
- Sauté the Aromatics: Add the diced onion to the pot and sauté for about 5 minutes until it becomes translucent. Then, stir in the minced garlic and cook for an additional minute, ensuring it doesn’t burn and releases its aromatic flavor.
- Add the Vegetables: Begin adding the chopped zucchinis, red and yellow bell peppers, and green beans to the pot. Stir well to combine and allow the vegetables to cook for about 7-10 minutes until they begin to soften.
- Incorporate the Tomatoes and Spices: Next, add the diced tomatoes, smoked paprika, ground cumin, salt, and pepper to the pot. These ingredients will enhance the stew with their rich flavors. Stir everything together, ensuring the spices are evenly distributed.
- Simmer the Stew: Reduce the heat to low, cover the pot, and let the stew simmer for about 20-25 minutes. This will allow all the flavors to meld together, and the vegetables will become tender.
- Adjust Seasoning and Serve: After simmering, taste the stew and adjust the seasoning if necessary. Once ready, remove from heat and serve hot, garnished with fresh chopped parsley.
Extra Tips: For a richer flavor, consider adding a splash of vegetable broth instead of water when simmering the stew. You can also experiment with other vegetables based on what’s in season or your personal preferences.
If you want to add protein, cooked chicken, or beans can be integrated seamlessly into the dish. Pisto can be stored in the refrigerator for up to three days, making it a great option for meal prep!
Lentil and Chorizo Salad
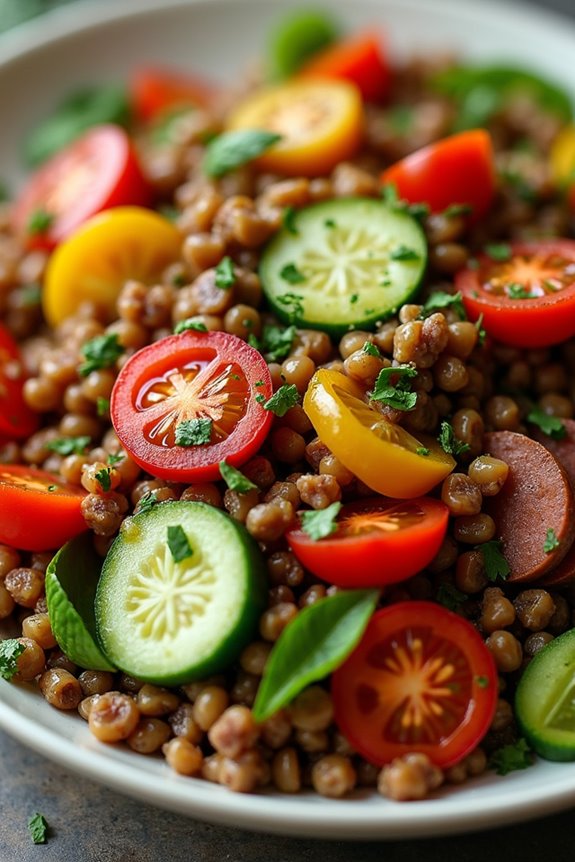
Lentil and Chorizo Salad is a vibrant and nutritious dish that embodies the heartiness of Argentinian cuisine. Packed with protein, fiber, and a host of vitamins, this salad isn’t only filling but also offers a delightful combination of textures and flavors. The earthy lentils pair beautifully with the spicy chorizo, creating a satisfying meal that’s perfect for lunch or as a light dinner.
This dish is simple to prepare and can be made in advance, making it a great option for meal prepping. With the zesty dressing and fresh vegetables, it’s an excellent way to incorporate legumes into your diet while enjoying a taste of Argentina. Serve it warm or chilled, and you’ll have a dish that’s sure to impress your family and friends.
Ingredients (Serving Size: 4-6 people)
- 1 cup green or brown lentils, rinsed and drained
- 200g chorizo sausage, sliced
- 1 bell pepper, diced (red or yellow)
- 1 small red onion, diced
- 2 cups cherry tomatoes, halved
- 1 cucumber, diced
- 1/4 cup fresh parsley, chopped
- 3 tablespoons olive oil
- 2 tablespoons red wine vinegar
- 1 teaspoon Dijon mustard
- Salt and pepper to taste
Cooking Instructions
- Cook the Lentils: In a medium saucepan, add the rinsed lentils and cover them with water. Bring to a boil, then reduce the heat and let simmer for about 20-25 minutes or until tender but not mushy. Drain any excess water and set aside to cool.
- Cook the Chorizo: In a large skillet over medium heat, add the sliced chorizo. Cook for about 5-7 minutes, stirring occasionally, until the chorizo is crispy and browned. Remove from heat and let cool slightly.
- Prepare the Vegetables: While the lentils and chorizo are cooking, prepare the vegetables. Dice the bell pepper, red onion, cucumber, and halve the cherry tomatoes. Place all the chopped vegetables in a large mixing bowl.
- Combine Ingredients: Once the lentils and chorizo have cooled slightly, add them to the mixing bowl with the vegetables. Sprinkle in the chopped parsley for added freshness.
- Make the Dressing: In a small bowl, whisk together the olive oil, red wine vinegar, Dijon mustard, salt, and pepper. Adjust the seasoning to your taste.
- Toss the Salad: Pour the dressing over the lentil and chorizo mixture, and gently toss everything together until well combined. Make sure all ingredients are coated with the dressing.
- Serve: You can serve the salad warm or chilled. If you prefer it chilled, refrigerate for about 30 minutes before serving.
Extra Tips
For an extra layer of flavor, consider adding a squeeze of lemon juice just before serving. This will enhance the freshness of the salad.
Additionally, you can customize the salad by incorporating other vegetables like spinach or arugula, or even add some avocado for creaminess.
If you’re looking for a vegetarian version, simply omit the chorizo and add roasted vegetables or feta cheese for added flavor. Enjoy your healthy Argentinian dish!
Grilled Salmon With Lemon and Herbs

Grilled Salmon with Lemon and Herbs is a delightful and healthy dish that captures the essence of Argentinian cuisine while highlighting the natural flavors of fresh fish. This recipe combines the rich, buttery taste of salmon with the brightness of lemon and the fragrant notes of herbs, creating a meal that’s both satisfying and nutritious.
Perfect for a summer barbecue or a cozy family dinner, this dish is easy to prepare and sure to impress your guests. Salmon isn’t only delicious, but it’s also packed with omega-3 fatty acids, which are essential for heart health. The grilling process adds a smoky flavor, while the lemon and herbs enhance the freshness of the fish.
Serve it alongside a light salad or grilled vegetables for a complete meal that embodies the spirit of healthy Argentinian dining.
Ingredients (Serves 4-6):
- 4-6 salmon fillets (about 6 ounces each)
- 2 tablespoons olive oil
- 2 lemons (1 for juice, 1 sliced)
- 4 cloves garlic, minced
- 2 tablespoons fresh parsley, chopped
- 1 tablespoon fresh dill, chopped
- 1 teaspoon salt
- 1/2 teaspoon black pepper
Cooking Instructions:
- Prepare the Marinade: In a small bowl, whisk together the olive oil, juice of one lemon, minced garlic, chopped parsley, chopped dill, salt, and black pepper. This marinade will infuse the salmon with flavor and keep it moist while grilling.
- Marinate the Salmon: Place the salmon fillets in a shallow dish or a resealable plastic bag. Pour the marinade over the salmon, ensuring that each piece is well coated. Allow the salmon to marinate in the refrigerator for at least 30 minutes, or up to 2 hours for more flavor.
- Preheat the Grill: While the salmon is marinating, preheat your grill to medium-high heat. If using a charcoal grill, make sure the coals are hot and glowing. For a gas grill, preheat for about 10-15 minutes.
- Prepare the Grill Grates: To prevent the salmon from sticking, brush the grill grates with a little olive oil using a paper towel or a grill brush. This step is essential for achieving beautiful grill marks and for easy cleanup.
- Grill the Salmon: Remove the salmon from the marinade and place it skin-side down on the grill. Cook for about 6-8 minutes, depending on the thickness of the fillets. Avoid flipping the salmon too soon; it will naturally release from the grill when it’s ready to be turned.
- Add Lemon Slices: After about 4 minutes, place lemon slices directly on the grill next to the salmon. These will caramelize and add a lovely flavor to the dish.
- Check for Doneness: The salmon is done when it flakes easily with a fork and has an internal temperature of 145°F (63°C). Remove the salmon from the grill and let it rest for a few minutes before serving.
- Serve and Enjoy: Serve the grilled salmon garnished with the grilled lemon slices and additional fresh herbs if desired. Pair it with a light salad or your favorite grilled vegetables for a complete meal.
Extra Tips:
For the best flavor, choose high-quality, fresh salmon fillets. If you prefer, you can also use a grill basket to make flipping the salmon easier, especially if your fillets are smaller or thinner.
Don’t be afraid to experiment with different herbs; thyme, basil, or even a touch of oregano can work beautifully in this recipe. Always keep an eye on the grill to prevent overcooking, as salmon can dry out quickly.
Enjoy your delicious and healthy Grilled Salmon with Lemon and Herbs!
Spinach and Cheese Stuffed Squash

Spinach and Cheese Stuffed Squash is a delightful and healthy Argentinian dish that showcases the rich flavors of fresh vegetables and creamy cheese. This recipe is perfect for a light dinner or as a side dish during a festive gathering. The combination of tender squash, nutrient-packed spinach, and savory cheese creates a satisfying meal that everyone will enjoy. Not only is it delicious, but it also provides a great way to incorporate more vegetables into your diet.
To prepare this dish, you’ll first need to select the right type of squash. Zucchini or yellow squash works best, as they’ve a mild flavor and soft texture that complement the filling beautifully. The stuffing is made with sautéed spinach, ricotta, and Parmesan cheese, which adds creaminess and depth to the dish. This recipe serves 4-6 people, making it ideal for sharing with family and friends.
Ingredients:
- 4 medium zucchinis or yellow squash
- 1 tablespoon olive oil
- 2 cloves garlic, minced
- 5 cups fresh spinach, chopped
- 1 cup ricotta cheese
- ½ cup grated Parmesan cheese
- 1 teaspoon salt
- ½ teaspoon black pepper
- ½ teaspoon nutmeg
- 1 cup shredded mozzarella cheese (for topping)
Cooking Instructions:
- Prepare the Squash: Preheat your oven to 375°F (190°C). Cut the zucchinis or yellow squash in half lengthwise and scoop out the seeds to create a hollow space for the filling. Place the squash halves cut-side up on a baking dish and drizzle with a little olive oil. Set aside.
- Sauté the Spinach: In a large skillet, heat the olive oil over medium heat. Add the minced garlic and sauté for about 1 minute until fragrant. Then, add the chopped spinach and cook for 3-4 minutes until wilted. Remove the skillet from heat and let it cool slightly.
- Make the Filling: In a mixing bowl, combine the cooked spinach and garlic, ricotta cheese, Parmesan cheese, salt, black pepper, and nutmeg. Mix well until all ingredients are thoroughly combined, creating a creamy filling.
- Stuff the Squash: Take the filling and generously spoon it into the hollowed-out squash halves. Make sure to pack it in well so that they’re filled to the top.
- Bake the Squash: Sprinkle the shredded mozzarella cheese evenly over the stuffed squash. Cover the baking dish with aluminum foil and bake in the preheated oven for 25-30 minutes. After that, remove the foil and bake for an additional 10-15 minutes, or until the cheese is golden and bubbly.
- Serve: Once cooked, remove the stuffed squash from the oven and let them cool slightly. Serve warm, garnished with fresh herbs if desired.
Extra Tips:
For added flavor, consider mixing in some chopped sun-dried tomatoes or olives into the filling. If you prefer a spicier kick, a pinch of red pepper flakes can be included.
Additionally, feel free to substitute different cheeses based on your preference, such as feta or goat cheese for a unique twist. Leftovers can be stored in the refrigerator for a few days and reheated in the oven or microwave for a quick meal.
Enjoy your healthy and delicious Spinach and Cheese Stuffed Squash!
Argentine-style Stuffed Bell Peppers

Argentine-style stuffed bell peppers, known as “Morrones Rellenos,” are a delightful dish that showcases the rich flavors of Argentina. This dish combines the sweetness of bell peppers with a savory filling made from ground meat, rice, and a medley of spices, all baked to perfection.
It’s a nutritious and satisfying meal that can be served as a main course or a hearty side. The preparation is simple yet rewarding, making it an excellent choice for family dinners or gatherings.
This recipe not only captures the essence of Argentine cuisine but also allows for various adaptations based on personal preferences. You can easily make it vegetarian by substituting the ground meat with lentils or quinoa, or you can add extra vegetables to the filling for more flavor and nutrition.
Regardless of your choice, these stuffed bell peppers are sure to become a favorite in your household.
Ingredients (Serves 4-6)
- 4 large bell peppers (any color)
- 1 pound ground beef or turkey
- 1 cup cooked rice
- 1 medium onion, finely chopped
- 2 cloves garlic, minced
- 1 can (14 oz) diced tomatoes, drained
- 1 teaspoon paprika
- 1 teaspoon cumin
- 1 teaspoon oregano
- Salt and pepper to taste
- 1 cup shredded cheese (mozzarella or cheddar)
- Olive oil for cooking
- Fresh parsley for garnish (optional)
Cooking Instructions
- Prepare the Bell Peppers: Preheat your oven to 375°F (190°C). Cut the tops off the bell peppers and remove the seeds and membranes. Lightly brush the outside of the peppers with olive oil and place them upright in a baking dish.
- Cook the Filling: In a large skillet over medium heat, add a drizzle of olive oil and sauté the chopped onion until translucent, about 5 minutes. Add the minced garlic and cook for another minute, being careful not to let it burn.
- Add the Meat: Increase the heat to medium-high and add the ground meat to the skillet. Cook until browned and fully cooked, breaking it up with a spatula as it cooks, approximately 7-10 minutes. Drain any excess fat if necessary.
- Combine Ingredients: Stir in the cooked rice, diced tomatoes, paprika, cumin, oregano, salt, and pepper into the meat mixture. Allow it to simmer for about 5 minutes to let the flavors meld together.
- Stuff the Peppers: Carefully spoon the filling into each bell pepper, packing it in lightly. Make sure to fill them generously, leaving a little space at the top for the cheese.
- Bake: Sprinkle the shredded cheese evenly on top of the stuffed peppers. Cover the baking dish with aluminum foil and bake in the preheated oven for 25 minutes. Remove the foil and bake for an additional 10-15 minutes, or until the peppers are tender and the cheese is bubbly and golden.
- Serve: Once cooked, remove from the oven and let them cool slightly. Garnish with fresh parsley if desired, then serve warm.
Extra Tips
When making Argentine-style stuffed bell peppers, feel free to experiment with the filling by adding your favorite spices or vegetables. For a spicier kick, consider incorporating diced jalapeños or a splash of hot sauce into the meat mixture.
Additionally, if you have leftover filling, it can be baked on its own or used in other dishes, such as tacos or burritos. These stuffed peppers can also be made ahead of time and stored in the refrigerator before baking, making them a convenient option for busy weeknights.
Enjoy your delicious and healthy Argentine-style stuffed bell peppers!
Whole Wheat Faina With Olive Tapenade

Whole Wheat Faina is a traditional Argentinian recipe that showcases the versatility of chickpea flour, known as “gram flour” or “besan.” This gluten-free flatbread isn’t only nutritious but also boasts a delightful nutty flavor that pairs wonderfully with a variety of toppings.
When served alongside a savory olive tapenade, it becomes a fantastic appetizer or a light meal that can easily impress guests at any gathering. Incorporating whole wheat flour adds a healthy twist to the classic faina, making it a fiber-rich option that’s perfect for those looking to maintain a balanced diet.
The olive tapenade, made from a blend of olives, capers, and herbs, brings a burst of flavor that complements the earthy notes of the faina. Whether you’re enjoying it as a snack, a side dish, or a main course, this recipe is sure to become a favorite in your household.
Ingredients (Serves 4-6):
- 1 cup whole wheat flour
- 1 cup chickpea flour
- 2 cups water
- 1/4 cup olive oil (plus extra for drizzling)
- 1 teaspoon salt
- 1 teaspoon baking powder
- 1/2 teaspoon black pepper
- 1/2 teaspoon garlic powder
- 1 cup mixed olives (green and black), pitted and chopped
- 2 tablespoons capers, rinsed and chopped
- 1 clove garlic, minced
- 1 tablespoon fresh parsley, chopped
- 1 tablespoon lemon juice
- Zest of 1 lemon
Cooking Instructions:
1. Prepare the Faina Batter****: In a large mixing bowl, whisk together the whole wheat flour, chickpea flour, salt, baking powder, black pepper, and garlic powder. Gradually add the water while continuously stirring to avoid lumps.
Once smooth, mix in the olive oil. Let the batter rest for about 30 minutes, which helps the flours to hydrate.
2. Preheat the Oven: While the batter is resting, preheat your oven to 425°F (220°C). Place a baking pan or cast-iron skillet inside the oven to heat up. This will help achieve a crispy crust.
3. Bake the Faina: After the resting period, carefully remove the hot skillet or pan from the oven, and pour a little olive oil into it to coat the bottom. Then, pour the prepared batter into the hot pan.
Return the pan to the oven and bake for 25-30 minutes, or until the edges are golden brown and the center is set.
4. Make the Olive Tapenade: While the faina is baking, prepare the olive tapenade. In a medium bowl, combine the chopped olives, capers, minced garlic, parsley, lemon juice, and lemon zest. Stir well to combine the ingredients.
Adjust seasoning to taste.
5. Serve: Once the faina is done baking, remove it from the oven and allow it to cool for a few minutes. Cut it into wedges or squares and serve warm with a generous dollop of olive tapenade on top.
Extra Tips:
For a more flavorful faina, consider adding herbs like rosemary or thyme directly into the batter. Additionally, feel free to experiment with different types of olives in the tapenade to create your desired flavor profile.
Serving the faina with a side of fresh salad or raw vegetables can enhance your meal’s healthiness and provide a revitalizing contrast to the rich tapenade. Enjoy your cooking adventure with this delightful Argentinian dish!
Roasted Beet and Goat Cheese Salad
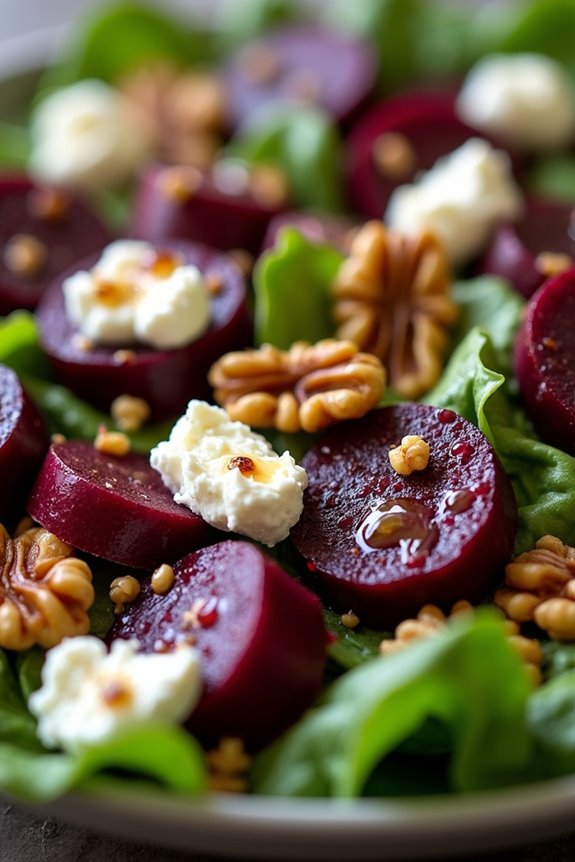
The Roasted Beet and Goat Cheese Salad is a vibrant and nutritious dish that perfectly exemplifies the flavors of Argentinian cuisine. This salad combines the earthiness of roasted beets with the creamy tang of goat cheese, creating a delightful balance that’s both satisfying and invigorating.
It’s a versatile dish that can be served as a starter or as a light main course, making it ideal for any occasion. Roasting the beets enhances their natural sweetness and gives them a tender texture, while the addition of fresh greens and a zesty vinaigrette adds a burst of flavor.
This dish not only looks stunning with its bright colors but also provides a wealth of nutrients, making it a healthy choice for those seeking to incorporate more vegetables into their diet.
Ingredients (Serving Size: 4-6 People)
- 4 medium-sized beets
- 5 cups mixed salad greens (arugula, spinach, or your choice)
- 4 oz goat cheese, crumbled
- 1/2 cup walnuts, toasted and roughly chopped
- 1/4 cup red onion, thinly sliced
- 1/4 cup balsamic vinegar
- 1/2 cup olive oil
- 1 tablespoon Dijon mustard
- Salt and pepper to taste
Cooking Instructions
1. Preheat the Oven: Preheat your oven to 400°F (200°C). This step is essential as a hot oven will help roast the beets evenly and bring out their natural sweetness.
2. Prepare the Beets: Wash and trim the beets, removing any leaves and tails. Wrap each beet individually in aluminum foil, ensuring they’re tightly sealed. This will create steam while they roast, keeping them moist and tender.
3. Roast the Beets: Place the wrapped beets on a baking sheet and roast in the oven for about 45-60 minutes or until they’re fork-tender. The exact time will depend on their size.
Once done, remove them from the oven, unwrap, and let them cool slightly.
4. Peel the Beets: Once cooled enough to handle, use paper towels or your hands to gently rub the skins off the beets. Cut them into wedges or slices, depending on your preference.
5. Prepare the Vinaigrette: In a small bowl, whisk together the balsamic vinegar, olive oil, Dijon mustard, salt, and pepper until well combined. This vinaigrette will add a tangy flavor that balances the sweetness of the beets.
6. Assemble the Salad: In a large salad bowl, combine the mixed greens, sliced beets, red onion, and walnuts. Drizzle the vinaigrette over the salad and toss gently to combine, ensuring all ingredients are coated.
7. Add Goat Cheese: Finally, sprinkle the crumbled goat cheese over the top of the salad. Serve immediately, and enjoy the delightful combination of flavors.
Extra Tips
When preparing the Roasted Beet and Goat Cheese Salad, consider roasting a larger batch of beets and storing them in the refrigerator for quick salads throughout the week.
Beets can be kept in the fridge for up to a week, making them a convenient and healthy addition to various dishes. Additionally, feel free to customize the salad by adding other ingredients like avocado, cranberries, or even grilled chicken for added protein.
Chicken and Vegetable Stir-Fry With Salsa Verde
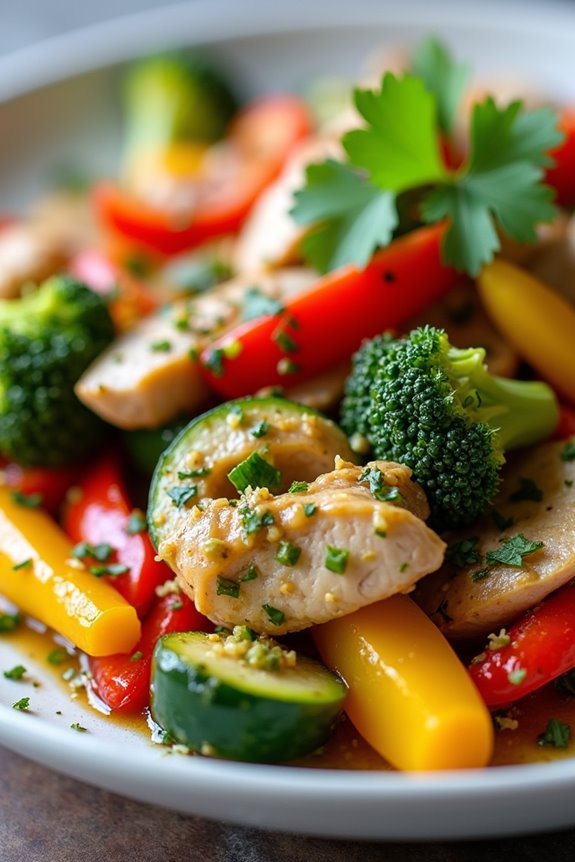
Chicken and Vegetable Stir-Fry With Salsa Verde is a vibrant and nutritious dish that embodies the spirit of Argentinian cuisine while keeping health at the forefront. This dish combines lean chicken breast with a colorful array of vegetables, all tossed together in a light and zesty salsa verde that adds a revitalizing kick. Perfect for a quick weeknight meal or a light dinner with friends, this stir-fry is packed with protein, vitamins, and flavor.
The beauty of this recipe lies in its versatility. You can easily substitute the vegetables according to what you have on hand or what’s in season. The salsa verde, made from fresh herbs, garlic, and olive oil, not only enhances the flavors of the chicken and veggies but also contributes a healthy dose of antioxidants and healthy fats. Whether served over rice, quinoa, or enjoyed on its own, this dish is sure to be a hit at your dining table.
Ingredients (Serves 4-6):
- 1 pound boneless, skinless chicken breasts, sliced into thin strips
- 2 tablespoons olive oil
- 1 red bell pepper, sliced
- 1 yellow bell pepper, sliced
- 1 medium zucchini, sliced
- 1 cup broccoli florets
- 3 cloves garlic, minced
- Salt and pepper, to taste
- ½ cup salsa verde (store-bought or homemade)
- Fresh cilantro, for garnish (optional)
Cooking Instructions:
- Prep the Ingredients: Start by washing and slicing all the vegetables as specified. This step guarantees everything cooks evenly and saves time during the stir-fry process. Also, slice the chicken into thin strips to promote quicker cooking and tender bites.
- Heat the Oil: In a large skillet or wok, heat the olive oil over medium-high heat. This step is essential as it creates a hot surface for the chicken to sear and develop flavor, preventing it from steaming.
- Cook the Chicken: Add the sliced chicken to the hot skillet in a single layer. Season with salt and pepper. Cook for about 5-7 minutes, stirring occasionally, until the chicken is browned and cooked through. Confirm the chicken reaches an internal temperature of 165°F for safety.
- Add the Vegetables: Once the chicken is cooked, add the minced garlic, red and yellow bell peppers, zucchini, and broccoli to the skillet. Stir-fry for another 5-7 minutes until the vegetables are tender but still crisp. This step adds color and essential nutrients to your dish while preserving the crunch of the vegetables.
- Incorporate Salsa Verde: Pour the salsa verde over the chicken and vegetables, stirring to combine. Cook for an additional 2-3 minutes to warm the salsa and allow the flavors to meld together. This not only enhances the dish’s flavor but also adds a beautiful glossy finish.
- Garnish and Serve: Remove the skillet from heat, and if desired, garnish with fresh cilantro. Serve the stir-fry hot over your choice of rice or quinoa, or enjoy it on its own for a low-carb option.
Extra Tips:
When preparing Chicken and Vegetable Stir-Fry With Salsa Verde, feel free to experiment with different vegetables based on your preferences or what you have in your pantry. Broccoli, snap peas, and carrots also work beautifully in this dish.
Additionally, for a spicier kick, consider adding some sliced jalapeños or a sprinkle of red pepper flakes to the stir-fry. Finally, if you’re making homemade salsa verde, using fresh herbs like parsley or cilantro will elevate the dish’s flavor profile greatly. Enjoy this healthy and delicious Argentinian-inspired meal!
Argentinian Gazpacho With Fresh Herbs

Argentinian Gazpacho is a revitalizing cold soup that celebrates the vibrant flavors of fresh vegetables and herbs, making it an ideal dish for hot summer days or as a light appetizer.
This dish showcases the essence of Argentinian cuisine, which often emphasizes the use of fresh, local ingredients. With tomatoes at its base, this gazpacho is enriched with crunchy cucumbers, bell peppers, and a variety of herbs that add depth and complexity to the flavor profile. Each spoonful is a burst of freshness, making it a perfect addition to any meal or an excellent standalone dish.
Making Argentinian Gazpacho isn’t only simple but also a fantastic way to incorporate more vegetables into your diet. The versatility of this recipe allows you to adjust the ingredients based on what you have available or your personal taste preferences. Serve it chilled, and garnish it with additional fresh herbs for a delightful presentation that’s sure to impress your family and friends.
Ingredients (Serves 4-6):
- 4 large ripe tomatoes, chopped
- 1 cucumber, peeled and diced
- 1 bell pepper (red or green), diced
- 1 small red onion, chopped
- 2-3 cloves of garlic, minced
- 4 cups vegetable broth (chilled)
- 1/4 cup extra virgin olive oil
- 2 tablespoons red wine vinegar
- Salt and pepper to taste
- 1/4 cup fresh basil, chopped
- 1/4 cup fresh parsley, chopped
- 1/4 cup fresh cilantro, chopped
- Optional: croutons for serving
Cooking Instructions:
- Prepare the Vegetables: Begin by washing and chopping all the vegetables: tomatoes, cucumber, bell pepper, and red onion. Confirm that they’re cut into uniform pieces to guarantee even blending and flavor distribution.
- Blend the Base: In a large blender or food processor, combine the chopped tomatoes, cucumber, bell pepper, red onion, and garlic. Blend on high speed until the mixture is smooth and creamy, but avoid over-blending if you prefer a chunkier texture.
- Add the Broth and Seasonings: Pour the chilled vegetable broth into the blended mixture. Add the extra virgin olive oil and red wine vinegar, then season with salt and pepper to taste. Blend again briefly to combine all the flavors.
- Incorporate Fresh Herbs: Add the chopped fresh herbs (basil, parsley, and cilantro) to the mixture. Pulse the blender a few times to incorporate the herbs while still leaving some texture.
- Chill the Gazpacho: Transfer the gazpacho into a large bowl or container, cover, and refrigerate for at least 1-2 hours. This allows the flavors to meld and the gazpacho to chill thoroughly.
- Serve: Once chilled, taste and adjust the seasoning if necessary. Serve the gazpacho in bowls, garnished with additional fresh herbs and croutons if desired. Enjoy the revitalizing flavors of this Argentinian classic!
Extra Tips:
For the best flavor, use ripe tomatoes in season, as they’ll impart the most sweetness and depth to the gazpacho.
Feel free to experiment with the herbs based on your preference or availability; dill or mint can also add a unique twist. Additionally, for a spicier version, consider adding a small diced jalapeño or a dash of hot sauce.
Always remember to chill the gazpacho thoroughly for the best taste experience, and serve it fresh for maximum flavor!
Dulce De Leche Chia Pudding

Dulce de leche is a beloved Argentinian treat that adds a rich caramel flavor to a range of desserts. This Dulce De Leche Chia Pudding is a healthier twist on the traditional pudding, combining the creamy sweetness of dulce de leche with the nutritional benefits of chia seeds. Chia seeds are packed with fiber, omega-3 fatty acids, and protein, making this pudding a nutritious option for breakfast or dessert.
This recipe is simple to prepare and allows for a delicious treat that satisfies your sweet tooth without compromising your health goals. The pudding can be made in advance, making it a convenient choice for busy days. With just a few ingredients, you can create a dessert that everyone will love, and it can be topped with your favorite fruits or nuts for added texture and flavor.
Ingredients (serving size: 4-6 people):
- 1 cup unsweetened almond milk (or any milk of your choice)
- 1/2 cup chia seeds
- 1/4 cup dulce de leche
- 1 teaspoon vanilla extract
- A pinch of salt
- Fresh fruits for topping (such as berries, bananas, or mango)
- Chopped nuts or granola (optional)
Cooking Instructions:
- Combine the Base Ingredients: In a mixing bowl, start by combining the almond milk, dulce de leche, vanilla extract, and a pinch of salt. Whisk the mixture until the dulce de leche is fully incorporated and the mixture is smooth. This step is essential for guaranteeing that the sweet flavor of the dulce de leche evenly distributes throughout the pudding.
- Add Chia Seeds: Once the base is well mixed, gradually add the chia seeds to the bowl. Stir well to guarantee that the chia seeds are evenly dispersed throughout the liquid. Chia seeds will swell and absorb the liquid, creating a pudding-like texture, so it’s important to mix them in thoroughly.
- Refrigerate: Cover the bowl with plastic wrap or transfer the mixture into individual serving jars or cups. Place the pudding in the refrigerator for at least 4 hours or overnight. This allows the chia seeds to expand and the mixture to thicken. If you’re short on time, a minimum of 30 minutes may suffice, but the longer chilling time yields a better texture.
- Serve and Garnish: Once the pudding has set and thickened, remove it from the refrigerator. Give it a good stir to break up any clumps formed by the chia seeds. Spoon the pudding into bowls or jars, and top with fresh fruits and optional nuts or granola for added crunch and flavor.
Extra Tips: To enhance the flavor of your Dulce De Leche Chia Pudding, consider using flavored almond milk or adding a touch of cocoa powder for a chocolatey twist. You can also experiment with different toppings, such as toasted coconut or a drizzle of additional dulce de leche on top for an extra indulgent treat. For a vegan version, make sure the dulce de leche is dairy-free or make your own using coconut milk.