

When I think about Argentinian cuisine, I instantly feel the warmth of gathering around a delicious meal. From the smoky aroma of sizzling Asado to the comforting flavors of a hearty locro, each dish brings people together. Whether you’re in the mood for crispy empanadas or a creamy dulce de leche flan, there’s a delicious journey waiting. These flavors can transform any evening into something truly special. Let’s explore these tasty Argentinian recipes that are perfect for making memories.
Asado: The Argentinian Barbecue
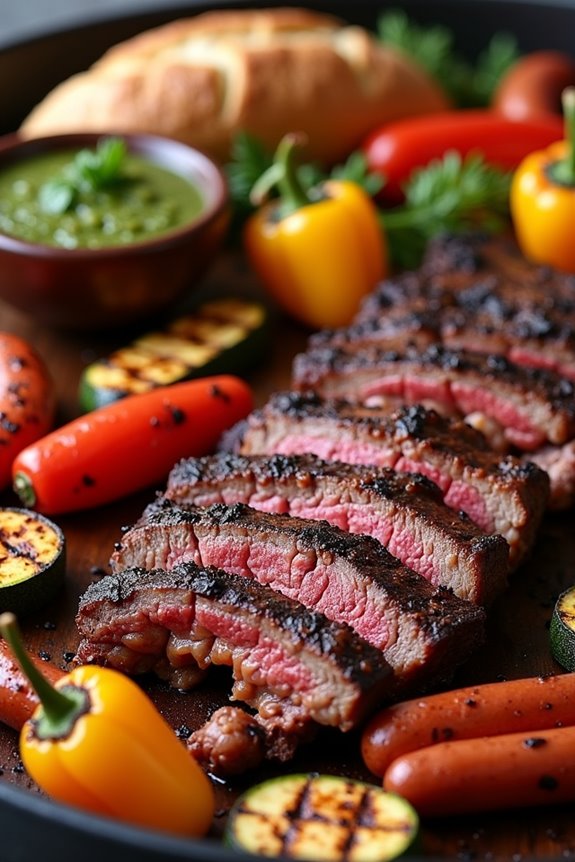
Asado is more than just a meal in Argentina; it’s a cultural tradition that brings family and friends together for an unforgettable outdoor experience. This iconic barbecue is known for its flavorful cuts of meat, slow-cooked over an open flame or charcoal, usually accompanied by a variety of side dishes and a rich chimichurri sauce. The preparation of Asado is as much about the cooking process as it’s about the company, making it a cherished social event that showcases the Argentine passion for good food and great company.
To make a perfect Asado, it’s essential to choose the right cuts of meat and cook them to perfection. Common choices include beef ribs, flank steak, and sausages like chorizo and morcilla. Whether you’re using a traditional parrilla (grill) or a simple charcoal grill, the key is to maintain a steady heat and allow the meat to sear beautifully while keeping it tender and juicy. Asado is often served with a variety of sides, including grilled vegetables, bread, and of course, the famous chimichurri sauce, which complements the rich flavors of the meat.
Ingredients (Serves 4-6)
- 2 pounds of beef short ribs
- 2 pounds of flank steak
- 1 pound of chorizo sausages
- 1 pound of morcilla (blood sausage)
- Salt (preferably coarse sea salt)
- 1 cup of chimichurri sauce (store-bought or homemade)
- 4-6 pieces of crusty bread (for serving)
- 1 pound of mixed bell peppers (for grilling)
- 1 pound of zucchini (for grilling)
Cooking Instructions
1. Prepare the Grill: Start by preparing your grill. If using charcoal, light it up and let the coals burn down until they’re covered with white ash, indicating they’re ready for grilling. If you have a gas grill, preheat it to a medium-high temperature. Make sure the grill grates are clean and well-oiled to prevent sticking.
2. Season the Meat: While the grill is heating up, generously season the beef short ribs and flank steak with coarse sea salt. The salt will enhance the natural flavors of the meat as it cooks. For the sausages, simply place them on the grill as they are, no need for additional seasoning.
3. Start Grilling the Meat: Place the beef short ribs directly over the heat first, as they take the longest to cook. Grill them for about 15-20 minutes, turning occasionally, until they develop a beautiful crust and are cooked to your desired doneness.
Next, add the flank steak and grill for about 5-7 minutes on each side for medium-rare. Finally, add the chorizo and morcilla, grilling them for about 10-12 minutes, turning occasionally, until browned and cooked through.
4. Grill the Vegetables: While the meat is cooking, slice the bell peppers and zucchini into thick strips. Toss them in a bit of olive oil and season with salt. Place them on the grill for about 5-10 minutes, turning occasionally, until they’re tender and have nice grill marks.
5. Rest the Meat: Once all the meat is grilled to perfection, remove it from the grill and let it rest for about 5-10 minutes. This step is vital as it allows the juices to redistribute throughout the meat, making it more tender and flavorful.
6. Serve: Slice the grilled meats and arrange them on a large platter. Serve with chimichurri sauce on the side, along with the grilled vegetables and crusty bread. Enjoy your Asado with family and friends, making sure everyone gets a taste of the delightful flavors.
Extra Tips
When preparing Asado, consider using a variety of cuts to please everyone’s tastes and textures. Don’t hesitate to experiment with different meats like lamb or chicken, as Asado can be quite versatile.
Additionally, make sure to use high-quality meat for the best flavors, and allow yourself plenty of time to enjoy the grilling process and the company around you. At last, remember that the key to a great Asado is patience, so resist the urge to rush the cooking; let the meat and grill do their magic!
Empanadas: Savory Pastry Pockets

Empanadas are a beloved staple of Argentinian cuisine, characterized by their flaky crust and savory fillings. These delectable pastry pockets can be filled with a variety of ingredients, ranging from seasoned meats to vegetables and cheeses. Traditionally, empanadas are enjoyed as a snack, appetizer, or even a main dish, and they’re perfect for gatherings or family dinners.
Each bite offers a delightful combination of textures and flavors, making them a favorite among both locals and visitors alike.
Making empanadas at home is a rewarding culinary adventure. The dough is simple to prepare, and the fillings can be customized to suit your taste. Whether you choose to fill them with ground beef, chicken, or a vegetarian option, the result is a deliciously satisfying meal that captures the essence of Argentinian cooking.
Serve them with chimichurri sauce or your favorite salsa for an added kick!
Ingredients (Serves 4-6)
- For the dough:
- 3 cups all-purpose flour
- 1 teaspoon salt
- 1/2 cup unsalted butter, chilled and cubed
- 1 large egg
- 1/4 to 1/2 cup cold water
- For the filling:
- 1 pound ground beef (or other protein of choice)
- 1 medium onion, finely chopped
- 1 bell pepper, finely chopped
- 2 cloves garlic, minced
- 1 teaspoon cumin
- 1 teaspoon paprika
- Salt and pepper to taste
- 1/2 cup olives, chopped (optional)
- 1/4 cup fresh parsley, chopped (optional)
- 1 egg, beaten (for egg wash)
Cooking Instructions
- Prepare the Dough: In a large mixing bowl, combine the flour and salt. Add the chilled butter and use your fingers or a pastry cutter to mix until the mixture resembles coarse crumbs. In a separate bowl, whisk together the egg and 1/4 cup of cold water. Gradually add this mixture to the flour mixture, mixing until a dough forms. If the dough is too dry, add more water a tablespoon at a time.
- Knead and Chill: Transfer the dough to a lightly floured surface and knead for about 5 minutes until smooth. Wrap the dough in plastic wrap and refrigerate for at least 30 minutes. This resting period allows the gluten to relax, making it easier to roll out.
- Cook the Filling: In a skillet over medium heat, add a drizzle of oil. Sauté the onions and bell peppers until soft, about 5 minutes. Add the garlic and cook for another minute. Then, add the ground beef (or other protein) and cook until browned. Stir in the cumin, paprika, salt, and pepper. If using olives and parsley, mix them in before removing the skillet from heat. Allow the filling to cool slightly.
- Roll Out the Dough: Once the dough has chilled, divide it into two portions. Roll one portion out on a floured surface to about 1/8 inch thickness. Use a round cutter (about 4 to 5 inches in diameter) to cut out circles.
- Fill the Empanadas: Place a tablespoon of the filling in the center of each dough circle. Be careful not to overfill them. Moisten the edges with water, fold the dough over the filling to create a half-moon shape, and press the edges to seal. For a decorative touch, you can crimp the edges with a fork.
- Bake the Empanadas: Preheat your oven to 375°F (190°C). Place the empanadas on a baking sheet lined with parchment paper. Brush the tops with the beaten egg for a golden finish. Bake for 25-30 minutes or until they’re golden brown.
- Serve and Enjoy: Allow the empanadas to cool slightly before serving. They’re best enjoyed warm and can be served with chimichurri sauce or your favorite dipping sauce.
Extra Tips
When making empanadas, feel free to get creative with the fillings! You can substitute the ground beef with chicken, pork, or even a combination of vegetables and cheeses for a vegetarian version.
Additionally, consider adding spices like oregano or chili flakes to give your filling a unique flavor profile. If you’re short on time, you can use store-bought empanada dough to simplify the process.
Finally, freezing uncooked empanadas is a great way to prep ahead; just bake them straight from the freezer, adding a few extra minutes to the cooking time. Enjoy your culinary journey into Argentinian flavors!
Milanesa: Breaded Meat Cutlets

Milanesa is a beloved dish in Argentina, often served at family gatherings and special occasions. This classic meal consists of thin slices of meat, typically beef or chicken, coated in breadcrumbs and fried until golden brown. The dish isn’t only flavorful but also versatile, as it can be accompanied by various sides such as mashed potatoes, salad, or even a fried egg on top. Its crispy exterior and tender interior make it a favorite among both adults and children.
Preparing Milanesa is relatively straightforward, but a few tips can help you achieve the perfect texture and flavor. The key is to guarantee that the meat is pounded thin enough to cook evenly while remaining juicy. The use of fresh ingredients, especially when it comes to herbs and spices, will elevate the dish, making each bite delightful. This recipe serves 4-6 people, making it an ideal choice for a family dinner or a gathering with friends.
Ingredients
- 4-6 thin beef or chicken cutlets (about 1 pound total)
- 1 cup all-purpose flour
- 2 large eggs
- 2 cups breadcrumbs (preferably homemade or panko)
- 1 teaspoon garlic powder
- 1 teaspoon onion powder
- 1 teaspoon paprika
- Salt and pepper to taste
- Vegetable oil for frying
- Fresh parsley, chopped (for garnish, optional)
- Lemon wedges (for serving, optional)
Cooking Instructions
- Prepare the Meat: If using beef, select a tender cut like sirloin or top round. Place the cutlets between two sheets of plastic wrap and pound them with a meat mallet or rolling pin until they’re about 1/4 inch thick. This step guarantees even cooking and tenderness.
- Set Up a Breading Station: In three separate shallow dishes, place the flour, beaten eggs, and breadcrumbs. In the breadcrumbs, mix in the garlic powder, onion powder, paprika, salt, and pepper for added flavor.
- Bread the Cutlets: Take each pounded cutlet and first dip it in the flour, guaranteeing both sides are coated. Shake off any excess flour before dipping it into the beaten eggs, allowing any excess egg to drip off. Finally, coat the cutlet in the breadcrumb mixture, pressing gently to guarantee the breadcrumbs adhere well. Repeat this process for all cutlets.
- Heat the Oil: In a large skillet, add enough vegetable oil to cover the bottom (about 1/4 inch deep) and heat over medium-high heat. To test if the oil is ready, drop a small piece of breadcrumb into the oil; if it sizzles and bubbles, the oil is hot enough.
- Fry the Cutlets: Carefully place the breaded cutlets into the hot oil, making sure not to overcrowd the pan. Fry for about 3-4 minutes on each side or until they’re golden brown and crispy. Use tongs to flip the cutlets gently.
- Drain and Serve: Once cooked, transfer the cutlets to a plate lined with paper towels to drain excess oil. Serve hot, garnished with fresh parsley and accompanied by lemon wedges for squeezing on top.
Extra Tips
When making Milanesa, consider marinating the meat in some lemon juice, garlic, and herbs for a few hours before cooking to enhance the flavor. You can also experiment with different types of meat or even use eggplant for a vegetarian version.
For a healthier option, try baking the breaded cutlets in the oven at 400°F for about 20 minutes, flipping halfway through, to achieve a crispy texture without the excess oil. Enjoy your delicious homemade Milanesa!
Locro: Hearty Argentinian Stew
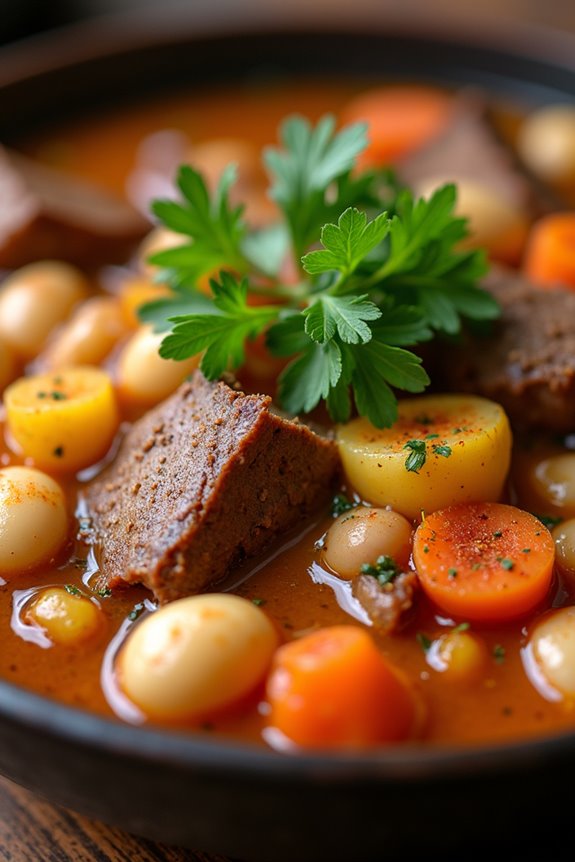
Locro is a traditional Argentinian stew that embodies the rich flavors and culinary heritage of the country. This hearty dish is a comforting combination of ingredients that typically includes corn, beans, potatoes, and various meats, making it a perfect meal for gatherings or chilly evenings. Its origins date back to the Inca civilization, and over the centuries, it has evolved into a beloved staple, particularly enjoyed during national holidays and celebrations.
The beauty of locro lies in its versatility; different regions and families have their unique takes on the recipe, adding local ingredients and spices. However, the core elements remain the same, creating a filling and nutritious dish that brings people together. Whether you’re celebrating Argentina’s May Revolution or simply craving something hearty, locro is sure to satisfy.
Ingredients (Serves 4-6):
- 1 cup of dried white beans
- 1 cup of hominy corn (or dry corn)
- 1 large onion, chopped
- 2 cloves of garlic, minced
- 1 large carrot, diced
- 2 medium potatoes, peeled and cubed
- 1 lb of beef brisket, cut into pieces
- 1 lb of pork shoulder, cut into pieces
- 1 chorizo sausage, sliced
- 4 cups of beef broth
- 2 bay leaves
- 1 teaspoon of paprika
- Salt and pepper to taste
- Fresh parsley for garnish
Cooking Instructions:
- Soak the Beans and Corn: Begin by soaking the dried white beans and hominy corn in separate bowls of water for at least 6-8 hours or overnight. This will help soften them and reduce cooking time later.
- Prepare the Meats: Cut the beef brisket and pork shoulder into bite-sized pieces. In a large pot or Dutch oven, heat a bit of oil over medium heat. Add the beef and pork, browning them on all sides. This step adds depth of flavor to your stew.
- Add Aromatics: Once the meats are browned, stir in the chopped onion and minced garlic. Sauté for about 5 minutes until the onion becomes translucent and fragrant, allowing the flavors to meld together.
- Incorporate Vegetables: Add the diced carrot and cubed potatoes to the pot. Stir well to combine all ingredients, letting the vegetables cook for another 5 minutes.
- Combine Beans and Corn: Drain the soaked beans and corn, then add them to the pot along with the sliced chorizo sausage. Stir to mix everything evenly.
- Pour in Broth and Season: Pour in the beef broth, ensuring that all ingredients are submerged. Add the bay leaves, paprika, salt, and pepper. Bring the mixture to a boil, then reduce the heat to low and cover the pot.
- Simmer: Allow the locro to simmer gently for about 2 to 3 hours. This slow cooking process allows the flavors to develop and the meats to become tender. Stir occasionally and add more broth or water if needed to keep it from drying out.
- Finish and Serve: Once the stew is thick and the meats are tender, remove the bay leaves. Taste and adjust seasoning if necessary. Serve hot, garnished with fresh parsley for a burst of color and freshness.
Extra Tips:
When making locro, feel free to customize the recipe to suit your taste. You can add other ingredients such as squash or different types of beans.
If you’re short on time, using canned beans can be a quick alternative; just adjust the cooking time accordingly. For an authentic touch, serve locro with a side of chimichurri sauce for an extra layer of flavor.
Enjoy the communal aspect of this dish by sharing it with friends and family, as it’s traditionally enjoyed in large gatherings.
Provoleta: Grilled Provolone Cheese

Provoleta is a beloved Argentine appetizer that showcases the rich, creamy texture of provolone cheese, making it a favorite among cheese lovers. This dish isn’t only simple to prepare but also creates a delightful experience as it’s served hot and bubbling, often accompanied by crusty bread and a drizzle of olive oil.
Grilling provolone brings out its natural flavors and gives it a smoky finish, perfect for sharing with family and friends during a festive gathering or as a delicious start to an Argentinian meal.
To prepare Provoleta, you’ll need a few essential ingredients that complement the cheese’s taste without overpowering it. The key is to choose high-quality provolone cheese, as this is the star of the dish. Additionally, a sprinkle of oregano and a touch of chili flakes elevate the flavor profile, making this simple dish truly memorable.
Let’s get started on making this delectable grilled cheese delight that serves 4-6 people.
Ingredients:
- 1 large wheel of provolone cheese (about 1 lb)
- 2 tablespoons olive oil
- 1 teaspoon dried oregano
- 1/2 teaspoon red chili flakes (optional)
- Freshly ground black pepper (to taste)
- Crusty bread (for serving)
Cooking Instructions:
- Prepare the Cheese: Start by selecting a high-quality wheel of provolone cheese. Make certain it’s at room temperature, which helps it melt evenly during grilling. If the cheese has a rind, you can leave it on; however, some prefer to trim it slightly for easier serving.
- Preheat the Grill or Skillet: Preheat your grill or a heavy skillet over medium-high heat. If you’re using a grill, ascertain that the grates are clean and lightly oiled to prevent sticking. For a skillet, add a small amount of olive oil to coat the bottom.
- Season the Cheese: Drizzle olive oil over the top of the provolone wheel. Sprinkle the dried oregano, red chili flakes (if using), and freshly ground black pepper evenly across the surface. These seasonings will enhance the cheese’s flavor and add a little kick.
- Grill the Cheese: Carefully place the provolone wheel on the grill or in the skillet. Allow it to cook for about 5-7 minutes on one side without moving it, until it becomes golden and starts to bubble. Keep an eye on it to prevent burning.
- Flip if Necessary: If you want a more even grilling, gently flip the cheese with a spatula after the first side has a nice color. Grill for an additional 3-5 minutes until the other side is also golden and the cheese is completely melted.
- Serve Hot: Once the cheese is fully melted and bubbly, carefully remove it from the grill or skillet. Transfer it to a serving dish and serve immediately with slices of crusty bread for dipping. Enjoy it warm to experience the gooey texture at its best!
Extra Tips:
For an even more flavorful experience, consider adding toppings such as chopped fresh herbs (like parsley or basil) or a light drizzle of balsamic glaze before serving.
If you don’t have access to a grill, an oven broiler can also work well; just be sure to watch it closely to prevent burning. Provoleta is best enjoyed fresh, so try to serve it as soon as it’s ready for the ultimate cheesy indulgence!
Choripán: Chorizo Sandwich

Choripán, a beloved street food in Argentina, is a simple yet flavorful dish that features grilled chorizo sausage nestled in a crusty bread roll.
Often enjoyed during asados (barbecues) or as a quick snack, this sandwich showcases the rich and savory flavors of Argentine cuisine. The combination of spicy sausage and fresh toppings creates a delightful culinary experience that’s both satisfying and comforting.
Typically served with chimichurri sauce, a vibrant mix of herbs, garlic, and vinegar, choripán isn’t just about the sausage; it’s about enhancing the flavor profile with the right condiments.
Whether you’re hosting a summer barbecue or simply craving a taste of Argentina, this dish is bound to impress your family and friends.
Ingredients (Serves 4-6 people):
- 4-6 Argentine chorizo sausages
- 4-6 crusty rolls (such as baguettes or ciabatta)
- Fresh chimichurri sauce (store-bought or homemade)
- Optional toppings: diced onions, sliced tomatoes, and jalapeños
Cooking Instructions:
- Preheat the Grill: Start by preheating your grill or barbecue to medium-high heat. A hot grill will guarantee that the chorizo sausages sear nicely, developing a delicious crust while keeping the insides juicy.
- Grill the Sausages: Once the grill is hot, place the chorizo sausages directly on the grates. Cook them for about 12-15 minutes, turning occasionally to guarantee even cooking. The sausages should be nicely browned and cooked through, with the internal temperature reaching 160°F (70°C).
- Prepare the Rolls: While the sausages are grilling, slice the crusty rolls in half lengthwise. If desired, you can lightly toast the insides on the grill for a minute or two to add some crunch.
- Assemble the Sandwiches: Once the sausages are cooked, remove them from the grill and let them rest for a minute. Place one sausage into each roll, then generously spoon chimichurri sauce over the top. Add any optional toppings like diced onions, sliced tomatoes, or jalapeños to personalize your choripán.
- Serve and Enjoy: Serve the choripán hot, with additional chimichurri on the side for dipping if desired. Enjoy your delicious and authentic Argentine chorizo sandwich!
Extra Tips:
For an authentic touch, consider making your own chimichurri sauce by blending fresh parsley, oregano, garlic, red pepper flakes, vinegar, and olive oil.
Let the sauce sit for a while to allow the flavors to meld before serving. Also, feel free to experiment with different types of sausage or toppings to suit your taste preferences.
The key to a great choripán is in the quality of the chorizo and the freshness of the bread, so choose wisely for the best results!
Humita En Chala: Corn Pudding
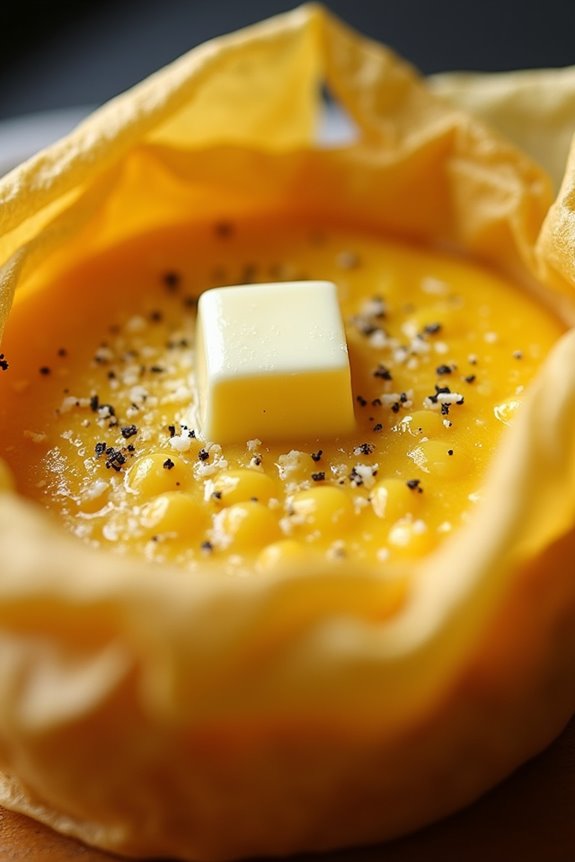
Humita En Chala is a traditional Argentinian dish that showcases the vibrant flavors of corn, which is a staple ingredient in many Latin American cuisines. Originating from the Andean regions, this delightful corn pudding is wrapped in corn husks and steamed to perfection. The dish offers a unique combination of sweet and savory flavors, making it a perfect addition to any Argentinian dinner table.
Whether you’re hosting a gathering or simply exploring the flavors of Argentina, Humita En Chala is guaranteed to impress your guests with its creamy texture and aromatic ingredients.
The preparation of Humita En Chala may seem intricate, but with a little patience and practice, you can master this culinary delight. The key to achieving the perfect pudding lies in the quality of the corn you use, so opt for fresh or frozen corn kernels if possible. The dish typically includes cheese, spices, and sometimes even a hint of sugar, creating a harmonious balance that’s both comforting and satisfying.
Serve it as a side dish or a main course, accompanied by a fresh salad or a glass of wine to enhance the experience.
Ingredients (Serves 4-6):
- 4 cups fresh corn kernels (or 2 cans of corn, drained)
- 1 cup milk
- 1 cup queso blanco or feta cheese, crumbled
- 1 tablespoon butter
- 1 teaspoon baking powder
- 1 teaspoon salt
- 1 teaspoon sugar (optional)
- ½ teaspoon ground black pepper
- 1 cup cornmeal
- 12-15 dried corn husks (soaked in warm water for 30 minutes)
Cooking Instructions:
- Prepare the Corn Husks: Start by soaking the dried corn husks in warm water for about 30 minutes. This will make them pliable and easier to work with when wrapping the pudding. After soaking, drain the husks and set them aside.
- Blend the Corn: In a blender or food processor, combine the fresh corn kernels (or canned corn) with the milk. Blend until you achieve a smooth and creamy consistency. This mixture will form the base of your pudding.
- Mix the Dry Ingredients: In a large mixing bowl, combine the cornmeal, baking powder, salt, sugar (if using), and black pepper. Mix the dry ingredients thoroughly to guarantee even distribution of flavors.
- Combine Mixtures: Pour the blended corn mixture into the bowl with the dry ingredients. Add in the crumbled cheese and melted butter. Stir everything together until well combined; the mixture should be thick but pourable.
- Assemble the Puddings: Take one soaked corn husk and place about 2-3 tablespoons of the corn mixture in the center. Fold the sides of the husk over the filling, then fold the bottom up to enclose the filling completely. Repeat this process for the remaining husks and filling.
- Steam the Humitas: Place the wrapped humitas upright in a large steamer basket. If you don’t have a steamer, you can use a deep pot with a steaming rack. Fill the pot with water to a level just below the bottom of the steamer and bring it to a boil. Cover the pot and steam the humitas for about 45 minutes to 1 hour, or until the pudding is set and firm to the touch.
- Serve: Carefully remove the humitas from the steamer and let them cool for a few minutes. Serve warm, and you can drizzle a bit of melted butter on top if desired.
Extra Tips:
When preparing Humita En Chala, using fresh corn will yield the best flavor and texture, but frozen corn works well in a pinch. Be sure to adjust the seasonings to your taste; some may prefer a sweeter version with added sugar, while others may enjoy a more savory profile.
Experiment with different cheeses for a unique twist, and consider serving them with a side of salsa or a fresh herb salad to complement the rich flavors of the corn pudding.
Puchero: Argentinian Meat and Vegetable Stew
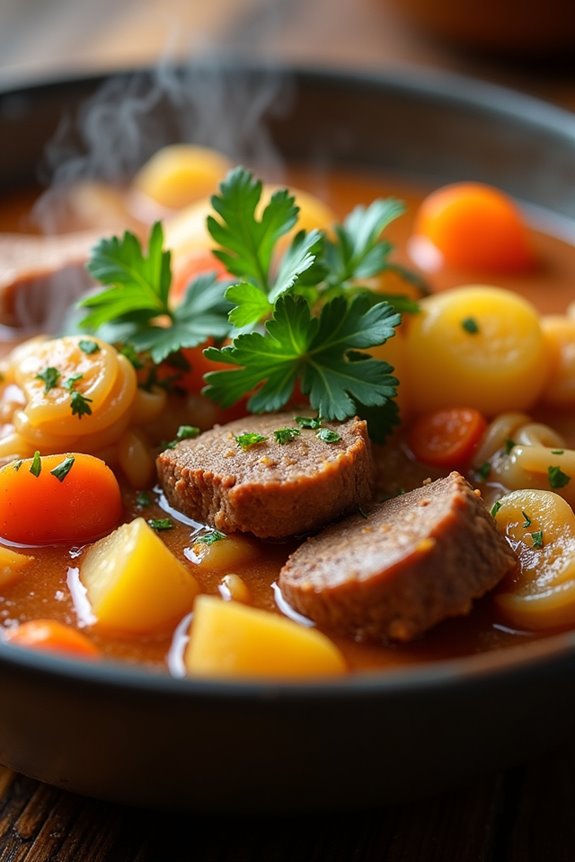
Puchero is a traditional Argentinian stew that brings together the rich flavors of various meats and the wholesome goodness of vegetables, making it a comforting dish perfect for family gatherings or chilly evenings. This hearty stew isn’t only a staple in Argentine cuisine but also reflects the country’s diverse cultural influences, from Spanish to Italian. The combination of ingredients creates a beautifully balanced meal that’s both filling and nutritious.
The beauty of Puchero lies in its versatility; you can use a variety of meats and vegetables based on what you have available or prefer. This dish is often served with a side of chimichurri sauce, which adds a fresh and zesty kick. As it’s typically cooked slowly, the flavors meld beautifully, and the meat becomes tender and juicy. Once you try this delicious Argentinian Puchero, you’ll find it hard to resist making it again.
Ingredients (Serves 4-6)
- 1 lb beef chuck, cut into large chunks
- 1 lb pork shoulder, cut into large chunks
- 1 lb chicken thighs, bone-in, skinless
- 4 medium potatoes, peeled and cut into quarters
- 3 carrots, peeled and sliced
- 1 large onion, quartered
- 2 stalks celery, chopped
- 1 small cabbage, cut into wedges
- 4 cloves garlic, minced
- 2 bay leaves
- Salt and pepper, to taste
- 10 cups beef broth or water
- Fresh parsley, for garnish
Cooking Instructions
- Prepare the Ingredients: Start by gathering all your ingredients. Cut the beef, pork, and chicken into large chunks. Prepare the vegetables by peeling and cutting them into the specified sizes. Make sure to have the garlic minced and the onion quartered, as these will enhance the flavor of the stew.
- Brown the Meats: In a large pot or Dutch oven, heat a drizzle of oil over medium-high heat. Once hot, add the beef chuck and pork shoulder. Sear the meat on all sides until browned, which should take about 5-7 minutes. This step adds a depth of flavor to the stew.
- Add Chicken and Aromatics: Once the beef and pork are browned, add the chicken thighs to the pot. Then, toss in the garlic, onion, and bay leaves. Stir everything together for about 2 minutes until the onions become translucent and aromatic.
- Add Broth and Simmer: Pour in the beef broth or water, ensuring the meat is fully submerged. Bring the mixture to a gentle boil, then reduce the heat to low. Cover the pot and let it simmer for about 1 hour, allowing the flavors to meld.
- Incorporate Vegetables: After an hour, add the potatoes, carrots, celery, and cabbage to the pot. Season with salt and pepper to taste. Stir gently to combine, cover, and continue to simmer for another 30-45 minutes, or until the vegetables are tender and the meats are falling off the bone.
- Serve: Once cooked, remove from heat and discard the bay leaves. Ladle the Puchero into bowls, making sure to include a generous portion of both meat and vegetables. Garnish with fresh parsley for a pop of color and freshness.
Extra Tips
To elevate the flavor of your Puchero, consider adding spices such as paprika or cumin, which can enhance the overall taste. Additionally, you can use different types of meats, like lamb or sausages, to create variations of the dish.
If you want a thicker stew, you can mash some of the potatoes before serving to give it a creamy texture. Finally, make sure to let the stew sit for a few minutes before serving, as this allows the flavors to settle and intensify. Enjoy your Puchero with crusty bread or over a bed of rice for a complete meal!
Ensalada Criolla: Fresh Argentinian Salad
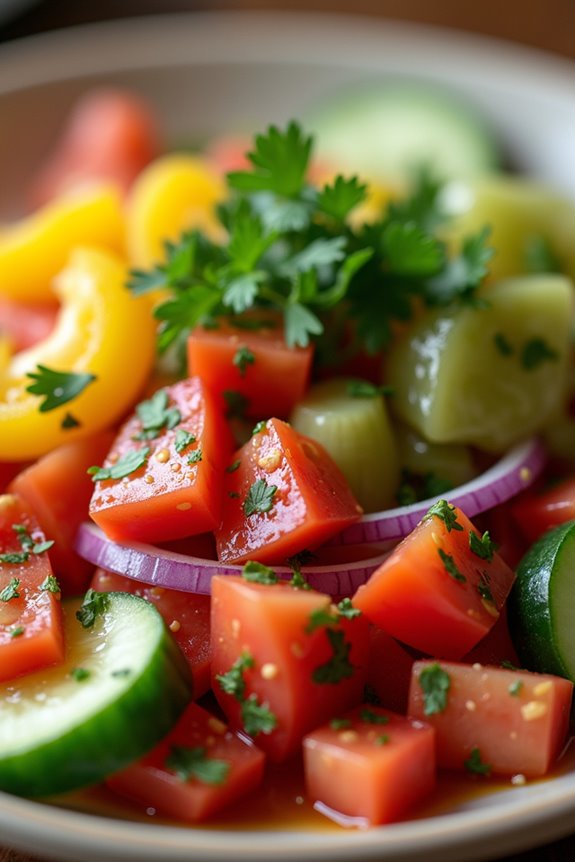
Ensalada Criolla is a vibrant and invigorating salad that showcases the natural flavors of fresh vegetables, making it a staple in Argentinian cuisine. This dish isn’t only easy to prepare but also serves as a perfect accompaniment to grilled meats, making it an excellent choice for any barbecue or family gathering.
The combination of onions, tomatoes, and bell peppers, dressed lightly with oil and vinegar, creates a delightful balance of flavors that will brighten any meal. This salad is highly versatile, allowing for variations based on seasonal vegetables and personal preferences.
The crispness of the fresh produce, combined with the tangy dressing, makes Ensalada Criolla both nutritious and satisfying. Whether served as a side dish or as a light meal, this salad is sure to appeal to everyone at the table.
Ingredients (Serves 4-6):
- 2 large ripe tomatoes, diced
- 1 medium red onion, thinly sliced
- 1 green bell pepper, diced
- 1 yellow bell pepper, diced
- 1 cucumber, diced
- 1 cup of fresh parsley, chopped
- 1/4 cup olive oil
- 2 tablespoons red wine vinegar
- Salt and pepper, to taste
Cooking Instructions:
1. Prepare the Vegetables: Start by washing all the vegetables thoroughly. Dice the tomatoes and cucumber, and thinly slice the red onion. Remove the seeds from the bell peppers and dice them into small pieces.
This guarantees that all the vegetables are ready for mixing and will contribute to the overall freshness of the salad.
2. Combine Ingredients: In a large mixing bowl, add the diced tomatoes, cucumber, green and yellow bell peppers, and sliced red onion. Make sure to add the chopped fresh parsley as well.
This combination of vegetables will provide a colorful and crunchy texture to your salad.
3. Make the Dressing: In a small bowl, whisk together the olive oil, red wine vinegar, salt, and pepper. This dressing enhances the flavors of the vegetables through a simple yet effective combination of acidity and richness.
Adjust the seasoning to your taste.
4. Dress the Salad: Pour the dressing over the mixed vegetables in the large bowl. Gently toss the salad to make certain that all the ingredients are well coated with the dressing.
Be careful not to overmix, as you want to maintain the integrity of the diced vegetables.
5. Chill and Serve: Let the salad sit for at least 15 minutes before serving. This resting time allows the flavors to meld together beautifully.
Serve the Ensalada Criolla chilled or at room temperature, as an invigorating side dish to complement your Argentinian dinner.
Extra Tips:
For an added twist, consider incorporating other vegetables such as radishes or avocados, or even a sprinkle of feta cheese for a richer flavor profile.
The salad can also be made ahead of time; just keep it in the refrigerator and dress it right before serving to maintain the crispness of the veggies.
Don’t hesitate to experiment with different herbs, such as cilantro or basil, to give the salad your unique touch!
Carbonada: Sweet Argentine Beef Stew

Carbonada is a traditional Argentinian dish that perfectly encapsulates the rich flavors of the country’s culinary heritage. This sweet beef stew combines tender chunks of meat with a medley of vegetables and fruits, creating a delightful balance of savory and sweet. The infusion of spices, along with the addition of seasonal ingredients, makes Carbonada a wholesome and hearty meal, ideal for family gatherings or cozy dinners.
This dish is often enjoyed during the colder months but can be savored year-round. Its unique combination of flavors reflects the diverse cultural influences in Argentina, making it a beloved staple in many households. Whether you’re looking to impress your guests or simply enjoy a comforting meal, Carbonada is sure to provide with its rich aroma and satisfying taste.
Ingredients (Serves 4-6):
- 2 lbs beef chuck, cut into 1-inch cubes
- 2 tablespoons vegetable oil
- 1 large onion, diced
- 2 cloves garlic, minced
- 2 large carrots, sliced
- 2 stalks celery, diced
- 1 red bell pepper, diced
- 1 cup butternut squash, cubed
- 1 cup potatoes, cubed
- 1 cup corn kernels (fresh or frozen)
- 1 can (14 oz) diced tomatoes
- 1 tablespoon tomato paste
- 2 cups beef broth
- 1 cup red wine (optional)
- 1 teaspoon paprika
- 1 teaspoon cumin
- 1 teaspoon oregano
- 2 bay leaves
- 1 cup dried apricots or peaches, chopped
- Salt and pepper, to taste
- Fresh parsley, for garnish
Cooking Instructions:
- Brown the Beef: In a large pot or Dutch oven, heat the vegetable oil over medium-high heat. Add the beef cubes in batches, making sure not to overcrowd the pot. Brown the beef on all sides for about 5-7 minutes. Remove the beef and set it aside.
- Sauté the Aromatics: In the same pot, add the diced onion and garlic. Sauté for about 3-4 minutes until the onion becomes translucent and fragrant. This step builds a flavorful base for the stew.
- Add Vegetables: Stir in the carrots, celery, and red bell pepper. Cook for another 5 minutes, allowing the vegetables to soften slightly and absorb the flavors of the onion and garlic.
- Combine Ingredients: Return the browned beef to the pot. Add the butternut squash, potatoes, corn, diced tomatoes, tomato paste, beef broth, and red wine (if using). Stir well to combine all ingredients.
- Season the Stew: Sprinkle in the paprika, cumin, oregano, and add the bay leaves. Season with salt and pepper to taste. Ascertain everything is well mixed.
- Simmer: Bring the stew to a boil, then reduce the heat to low. Cover and let it simmer for about 1.5 to 2 hours, stirring occasionally. This slow cooking will tenderize the beef and meld the flavors together.
- Add Dried Fruit: About 15 minutes before serving, stir in the chopped dried apricots or peaches. This adds a delightful sweetness that complements the savory elements of the dish.
- Serve: Once the beef is tender and the stew has thickened to your liking, remove the bay leaves. Ladle the Carbonada into bowls, garnish with fresh parsley, and enjoy!
Extra Tips:
When preparing Carbonada, feel free to customize the vegetables and fruits based on seasonal availability or personal preference. For a richer flavor, consider searing the beef in batches and deglazing the pot with a bit of red wine after browning. This will add depth to your stew.
Additionally, Carbonada can be made a day in advance; in fact, the flavors often improve after sitting overnight in the refrigerator, making it an ideal dish for meal prep!
Alfajores: Sweet Cookie Treats

Alfajores are a beloved Argentinian dessert that captures the essence of sweet indulgence. These delightful sandwich cookies are made with two soft, crumbly cookies filled with a luscious layer of dulce de leche and often rolled in shredded coconut or coated in chocolate. The combination of textures and flavors makes alfajores a perfect treat for any occasion, whether enjoyed with coffee in the afternoon or served at festive gatherings.
The origins of alfajores can be traced back to Arabic influences, but they’ve evolved into a distinctly Argentinian delicacy. The cookies are typically made with cornstarch, giving them a tender and melt-in-your-mouth quality. This recipe will help you create a batch of alfajores that serves 4-6 people, perfect for sharing with friends and family or indulging in a sweet moment by yourself.
Ingredients (Serves 4-6 people):
- 1 cup unsalted butter, softened
- 1 cup granulated sugar
- 2 large egg yolks
- 1 teaspoon vanilla extract
- 2 cups all-purpose flour
- 1 cup cornstarch
- 1 teaspoon baking powder
- 1 cup dulce de leche
- 1 cup unsweetened shredded coconut (optional, for rolling)
- Powdered sugar (for dusting)
Cooking Instructions:
- Prepare the Dough: In a large mixing bowl, cream together the softened butter and granulated sugar until light and fluffy. This should take about 3-5 minutes with an electric mixer. Next, add the egg yolks and vanilla extract, mixing until well incorporated.
- Combine Dry Ingredients: In a separate bowl, sift together the all-purpose flour, cornstarch, and baking powder. Gradually add the dry mixture to the butter mixture, stirring until a soft dough forms. The dough should be slightly sticky but manageable.
- Chill the Dough: Divide the dough into two equal portions and shape each into a disc. Wrap the discs in plastic wrap and refrigerate for at least 1 hour. Chilling the dough helps it firm up, making it easier to roll out.
- Roll and Cut Cookies: Preheat your oven to 350°F (175°C). On a lightly floured surface, roll out one disc of dough to about 1/8 inch thick. Use a round cookie cutter (about 2 inches in diameter) to cut out cookies. Place the cookies on a baking sheet lined with parchment paper, leaving some space between each.
- Bake the Cookies: Bake the cookies in the preheated oven for 10-12 minutes or until the edges are lightly golden. Remove them from the oven and allow them to cool on the baking sheet for a few minutes before transferring them to a wire rack to cool completely.
- Assemble the Alfajores: Once the cookies are completely cool, spread a generous amount of dulce de leche on the flat side of one cookie and sandwich it with another cookie. Repeat this process with the remaining cookies.
- Finish and Serve: If desired, roll the edges of the filled cookies in shredded coconut for added flavor and texture. Dust the tops lightly with powdered sugar before serving.
Extra Tips:
When making alfajores, be sure to use high-quality dulce de leche for the best flavor. If you prefer a richer taste, consider dipping the assembled cookies in melted chocolate instead of rolling them in coconut.
Additionally, feel free to experiment with flavored variations by adding a touch of cocoa powder to the cookie dough or infusing the dulce de leche with a hint of coffee or orange zest. Enjoy these cookies fresh, but they also store well in an airtight container for several days, allowing the flavors to meld beautifully!
Dulce De Leche Flan: Creamy Dessert Bliss

Dulce De Leche Flan is an iconic Argentinian dessert that embodies the rich culinary traditions of the region. This luscious custard, with its velvety texture and sweet caramel flavor, is a favorite among locals and visitors alike. The flan is made with simple ingredients, but the result is nothing short of heavenly. Served chilled and often drizzled with more dulce de leche, this dessert is perfect for any occasion, from casual family dinners to festive celebrations.
Making Dulce De Leche Flan is a delightful experience that combines the art of caramel making with the smoothness of custard preparation. The process may seem intricate, but with a little patience and love, you can create a dessert that will impress your guests and leave them asking for seconds.
So, gather your ingredients and get ready to indulge in this creamy dessert bliss that’s sure to become a staple in your recipe collection.
Ingredients (Serves 4-6)
- 1 cup sugar (for caramel)
- 4 large eggs
- 1 can (14 oz) sweetened condensed milk
- 1 can (12 oz) evaporated milk
- 1 teaspoon vanilla extract
- 1/2 cup dulce de leche (plus extra for drizzling, optional)
- Pinch of salt
Cooking Instructions
- Make the Caramel: In a medium saucepan over medium heat, add the sugar and allow it to melt without stirring. Swirl the pan gently to help the sugar melt evenly. When it turns a golden amber color, carefully pour it into a round flan mold or individual ramekins, tilting to coat the bottom evenly. Set aside to cool and harden.
- Prepare the Custard Mixture: In a large mixing bowl, whisk together the eggs until they’re frothy. Add the sweetened condensed milk, evaporated milk, vanilla extract, and a pinch of salt. Mix until all ingredients are well combined and the mixture is smooth.
- Combine Custard with Caramel: Pour the custard mixture over the cooled caramel in the flan mold. If using individual ramekins, divide the custard equally among them.
- Bake the Flan: Preheat your oven to 350°F (175°C). Place the flan mold or ramekins into a larger baking dish. Fill the larger dish with hot water until it reaches halfway up the sides of the flan mold or ramekins. Bake for about 50-60 minutes, or until the flan is set and a knife inserted in the center comes out clean.
- Cool and Chill: Once baked, remove the flan from the oven and let it cool to room temperature. After cooling, cover it with plastic wrap and refrigerate for at least 4 hours or overnight for the best flavor and texture.
- Serve: To serve, run a knife around the edges of the flan to loosen it. Invert the flan onto a serving plate, allowing the caramel to drizzle over the top. Optionally, drizzle additional dulce de leche over the flan before slicing and serving.
Extra Tips
When preparing Dulce De Leche Flan, it’s crucial to keep a close eye on the caramel as it can quickly go from perfectly golden to burnt. If you’re new to making caramel, consider using a candy thermometer, which can help you achieve the right temperature without the guesswork.
Additionally, feel free to experiment with flavors by adding a hint of orange or lemon zest to the custard mixture for an invigorating twist. This flan can be made a day ahead, allowing the flavors to meld beautifully as it chills in the refrigerator. Enjoy your delightful creation!