

When I think of Argentinian culture, the vibrant spirit of asado immediately comes to mind. The smoky aroma of grilled meats and the sizzle of sausages create an irresistible scene. I can almost hear the laughter of friends and family gathered around the grill, sharing stories over a feast. Each recipe in this list captures this tradition and invites you to experience the heart of Argentinian BBQ. Get ready to savor some unforgettable flavors.
Classic Argentine Asado: The Ultimate Grilled Beef
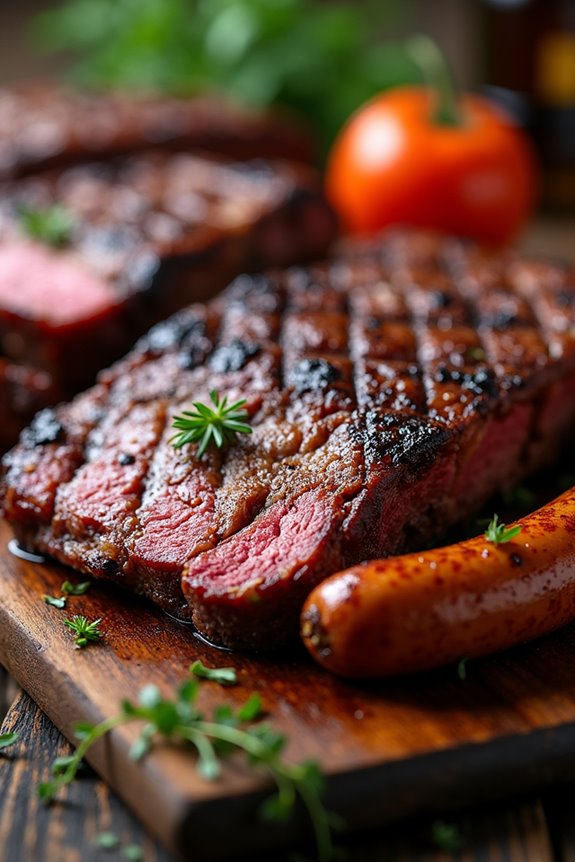
Argentine Asado isn’t just a dish; it’s a cultural experience that brings friends and family together around the grill. This traditional Argentine barbecue is celebrated for its unique flavors, simplicity, and the joy of cooking outdoors. The centerpiece of an Asado is certainly the beef, typically featuring cuts like short ribs, flank steak, and chorizo.
The beauty of this dish lies in its ability to transform high-quality meats into succulent, smoky creations that tantalize the senses. To make the perfect Asado, you’ll want to prepare your grill, known as a “parrilla,” and gather your ingredients. The key to a great Asado lies in the quality of the meat and the simplicity of the seasoning—often just salt.
Cooking over an open flame or charcoal brings out the natural flavors of the beef, while the slow cooking process guarantees tenderness and juiciness. Let’s immerse ourselves in this quintessential Argentine experience!
Ingredients (Serves 4-6)
- 2 lbs beef short ribs
- 2 lbs flank steak
- 1 lb chorizo sausage
- Coarse sea salt
- Freshly ground black pepper
- Olive oil (optional, for brushing)
- Fresh herbs (optional, for garnish)
Cooking Instructions
- Prepare the Grill: Start by setting up your parrilla or grill. If using charcoal, light the coals and let them burn until they’re covered with white ash. If using wood, let it burn down until you have a bed of hot coals. The heat should be medium-high to high for grilling.
- Season the Meat: Generously season the beef short ribs and flank steak with coarse sea salt, making sure to coat all sides. If desired, add a sprinkle of freshly ground black pepper. This simple seasoning will enhance the natural flavors of the beef.
- Grill the Chorizo: Place the chorizo sausages directly on the grill first, as they take a bit longer to cook. Grill them for about 10-12 minutes, turning occasionally until they’re browned and cooked through. Once done, remove them from the grill and set aside.
- Cook the Beef: Next, place the beef short ribs and flank steak on the grill. Cook the short ribs for about 15-20 minutes on each side, depending on thickness, aiming for a nice crust while keeping the inside tender. For the flank steak, grill for about 6-8 minutes on each side for medium-rare, adjusting the time according to your preferred doneness.
- Let it Rest: Once the beef is cooked to your liking, remove it from the grill and let it rest for about 5-10 minutes. This resting period allows the juices to redistribute throughout the meat, guaranteeing a moist and flavorful bite.
- Serve: Slice the flank steak against the grain into thin strips and serve alongside the short ribs and chorizo. Optionally, garnish with fresh herbs for a touch of color and flavor.
Extra Tips
When preparing an Argentine Asado, remember that the quality of the meat is paramount. Look for well-marbled cuts from a trusted butcher, as this will contribute to the tenderness and flavor of the final dish.
Additionally, while salt is the traditional seasoning, feel free to experiment with chimichurri sauce as a condiment for added flavor. Finally, don’t rush the cooking process; enjoy the art of grilling and the company of those around you!
Chorizo and Morcilla: A Sausage Lover’s Delight
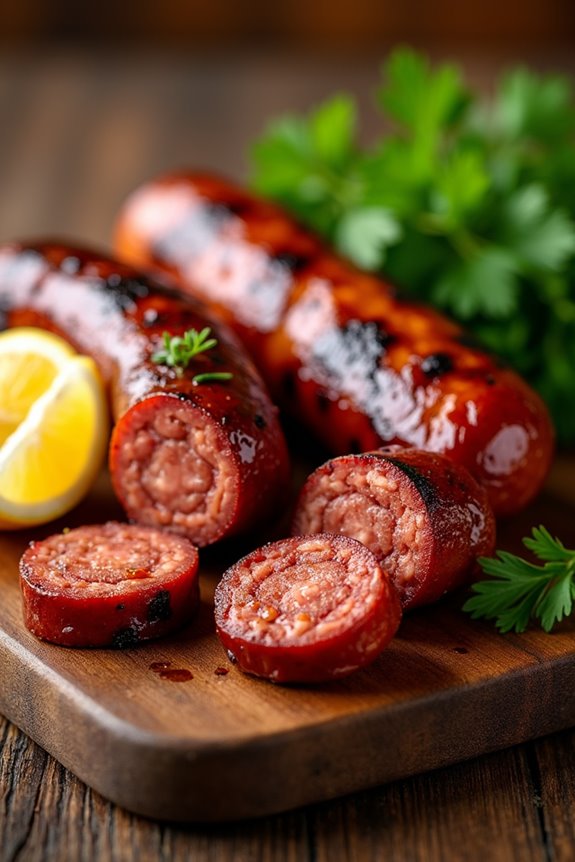
Chorizo and morcilla are two staples of Argentinian BBQ that showcase the rich flavors and culinary traditions of the region. Chorizo, a spicy sausage made from pork and seasoned with paprika and garlic, is often enjoyed grilled to perfection. Morcilla, or blood sausage, offers a unique taste experience, made from pork blood, rice, and spices, creating a rich and savory flavor profile. Together, these sausages not only satisfy meat lovers but also provide a delicious glimpse into the heart of Argentinian asado culture.
Cooking chorizo and morcilla on the grill isn’t only a treat for the palate but also an excellent way to gather friends and family to enjoy a traditional Argentine meal. The grilling process enhances the flavors of the sausages, allowing the smoky aroma to intermingle with the spices. Whether served as an appetizer or as part of a larger BBQ feast, chorizo and morcilla are sure to impress your guests and leave them craving more.
Ingredients (Serves 4-6)
- 6 links of fresh chorizo sausage
- 6 links of morcilla sausage
- Olive oil (for brushing)
- Sea salt (to taste)
- Fresh parsley (for garnish, optional)
- Lemon wedges (for serving, optional)
Cooking Instructions
- Prepare the Grill: Start by preheating your grill to medium heat. If you’re using charcoal, verify the coals are hot and covered with gray ash. For gas grills, turn on the burners to achieve a consistent heat level. A properly heated grill will help to achieve a nice char on the sausages without overcooking them.
- Prep the Sausages: While the grill is heating, take your chorizo and morcilla sausages out of the refrigerator. Allow them to come to room temperature for about 15-20 minutes. This helps them cook evenly and reduces the risk of bursting on the grill. You can lightly brush the sausages with olive oil to prevent sticking.
- Grill the Chorizo: Place the chorizo sausages on the grill, preferably over direct heat. Grill them for about 10-12 minutes, turning occasionally to confirm even cooking. The goal is to achieve a deep golden color and to cook them through to an internal temperature of 160°F (70°C).
- Grill the Morcilla: Once the chorizo is halfway done, add the morcilla sausages to the grill. Because morcilla is more delicate, grill it for about 6-8 minutes, turning gently to avoid breaking the sausage. Monitor closely to verify they don’t overcook, as they can become dry.
- Check for Doneness: Use a meat thermometer to check the internal temperature of the sausages. Confirm the chorizo reaches 160°F, while morcilla is best enjoyed when heated through but not overly cooked.
- Rest the Sausages: Once cooked, remove the sausages from the grill and let them rest on a cutting board for about 5 minutes. This allows the juices to redistribute within the sausage, making them more flavorful and juicy.
- Serve: Slice the sausages into bite-sized pieces or serve them whole on a platter. Garnish with fresh parsley and serve with lemon wedges on the side. The acidity of the lemon enhances the flavors of the sausages and adds a revitalizing touch to the dish.
Extra Tips
When grilling chorizo and morcilla, it’s crucial to manage the heat carefully. If you notice the sausages are browning too quickly, move them to a cooler part of the grill to avoid burning.
Additionally, serving these sausages with crusty bread or alongside chimichurri sauce can elevate the experience, providing complementary textures and flavors. Finally, don’t hesitate to experiment with different types of sausages or spices to find your perfect combination!
Grilled Provoleta: Cheesy Goodness Over Flames

Grilled Provoleta is a beloved appetizer in Argentinian BBQ culture, celebrated for its melty, gooey texture and rich flavors. This delicious dish features Provolone cheese, which is grilled until it reaches a delightful consistency, creating a heavenly experience for cheese lovers.
The combination of the smoky grill and the cheese’s natural saltiness makes it an irresistible starter that pairs perfectly with crusty bread and chimichurri sauce. To obtain the best results, it’s important to choose high-quality Provolone cheese. The grilling process enhances its flavors and creates a deliciously crispy edge while keeping the center wonderfully gooey.
Serve this grilled delicacy with fresh herbs or a sprinkle of chili flakes for an extra kick. Whether you’re hosting a barbecue or just looking to enjoy a delicious snack, Grilled Provoleta is an easy and impressive dish to prepare.
Ingredients (Serves 4-6):
- 1 large wheel of Provolone cheese (about 1 lb)
- 2 tablespoons olive oil
- 1 teaspoon dried oregano
- 1 teaspoon crushed red pepper flakes (optional)
- Fresh parsley for garnish
- Crusty bread for serving
Cooking Instructions:
- Prepare the Cheese: Start by taking the wheel of Provolone cheese out of its packaging and pat it dry with a paper towel. This will help the cheese achieve a nice crust when grilled.
- Preheat the Grill: Heat your grill to medium-high. If using a charcoal grill, let the coals burn down until they’re covered with white ash. For a gas grill, set it to medium-high heat and allow it to preheat for about 10-15 minutes.
- Season the Cheese: Drizzle the olive oil over the top of the cheese and sprinkle evenly with dried oregano and crushed red pepper flakes if using. This seasoning will enhance the flavor as it melts.
- Grill the Cheese: Place the cheese directly on the grill grates or use a grill-safe cast iron skillet for easier handling. Close the lid and grill for about 5-7 minutes, or until the cheese is bubbling and has a golden-brown crust. Keep an eye on it to avoid burning.
- Serve: Once grilled to perfection, carefully remove the cheese from the grill. Garnish with freshly chopped parsley for a pop of color and flavor. Serve immediately with slices of crusty bread for dipping.
Extra Tips:
For the best flavor, consider adding a drizzle of balsamic reduction or a few slices of fresh jalapeño on top of the cheese just before grilling.
If you don’t have a grill, you can also achieve great results using a broiler in your oven; just be certain you keep a close watch to prevent burning. Enjoy your Grilled Provoleta with a side of chimichurri for an authentic Argentinian experience!
Patagonian Lamb: A Tender, Flavorful Feast

Patagonian lamb is a culinary treasure that showcases the rich flavors of Argentinian cuisine. Renowned for its tenderness and unique taste, this dish is often prepared using traditional methods that allow the natural flavors of the meat to shine. Cooking lamb in the Argentine style often involves slow-roasting over an open flame or in a pit, infusing it with smoky notes that beautifully complement its inherent richness. This method not only enhances the flavor but also results in an incredibly succulent texture that will have your guests savoring every bite.
To prepare Patagonian lamb, you can use various cuts, with shoulder and leg being popular choices. Marinating the meat beforehand can elevate the dish, allowing the spices and herbs to penetrate the meat, resulting in a flavorful feast. Serve the lamb with chimichurri sauce and traditional side dishes such as roasted potatoes or a fresh salad to create a memorable meal that captures the essence of Argentinian BBQ.
Ingredients (Serves 4-6):
- 4-6 lbs of Patagonian lamb leg or shoulder
- 4 cloves garlic, minced
- 2 tablespoons fresh rosemary, chopped
- 2 tablespoons fresh thyme, chopped
- 1 tablespoon smoked paprika
- 1 tablespoon sea salt
- 1 teaspoon black pepper
- 1/4 cup olive oil
- 1/4 cup red wine vinegar
- 1 lemon, juiced
- Optional: Chimichurri sauce for serving
Cooking Instructions:
- Prepare the Marinade: In a mixing bowl, combine minced garlic, chopped rosemary, chopped thyme, smoked paprika, sea salt, black pepper, olive oil, red wine vinegar, and lemon juice. Whisk together until well blended. This marinade will infuse the lamb with aromatic flavors.
- Marinate the Lamb: Place the lamb in a large resealable plastic bag or a shallow dish. Pour the marinade over the lamb, making sure to coat it evenly. Seal the bag or cover the dish and refrigerate for at least 4 hours, preferably overnight. This allows the flavors to penetrate the meat deeply.
- Prepare the Grill: Preheat your grill for indirect cooking. If using a charcoal grill, arrange the coals to one side, leaving the other side free of direct heat. For a gas grill, turn on one side and leave the other side off. Aim for a temperature of around 325°F (160°C).
- Cook the Lamb: Remove the lamb from the marinade and let it come to room temperature for about 30 minutes. Place the lamb on the cooler side of the grill (indirect heat). Close the lid and cook for about 2 to 3 hours, depending on the size of the cut. Use a meat thermometer to check for doneness; the internal temperature should reach 145°F (63°C) for medium-rare.
- Rest the Meat: Once the lamb is cooked to your desired doneness, remove it from the grill and let it rest for at least 15-20 minutes. This resting period allows the juices to redistribute, guaranteeing a juicy and tender final product.
- Serve: Slice the lamb against the grain and serve it with chimichurri sauce and your choice of sides. Enjoy the tender, flavorful feast that’s Patagonian lamb!
Extra Tips:
When cooking Patagonian lamb, keep in mind that patience is key. Slow and steady cooking over indirect heat guarantees that the lamb becomes tender without drying out.
Additionally, using a meat thermometer is essential for achieving the perfect level of doneness. If you prefer a bit of char, you can finish the lamb over direct heat for a few minutes before serving.
Finally, don’t skip the chimichurri; this zesty sauce complements the richness of the lamb beautifully!
Chimichurri Sauce: The Perfect Companion
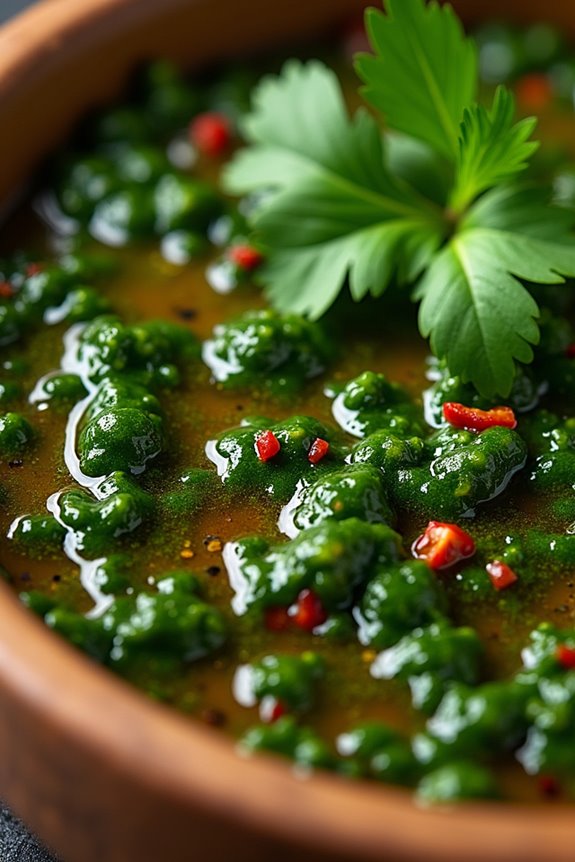
Chimichurri sauce is an iconic Argentinian condiment that elevates any BBQ dish with its vibrant flavors. This herbaceous sauce is traditionally made with parsley, garlic, vinegar, and oil, creating a zesty accompaniment that pairs beautifully with grilled meats, especially steak. The balance of freshness and acidity in chimichurri not only enhances the flavor of the meat but also complements the smokiness of the grill, making it a staple at any Argentinian asado (BBQ).
Whether you’re preparing a casual backyard gathering or a more elaborate feast, chimichurri is incredibly easy to whip up and can be made in advance. Its versatility allows it to be drizzled over grilled vegetables or used as a marinade, making it a must-have in your culinary repertoire. In this recipe, we’ll guide you through making a classic chimichurri sauce that will impress your guests and leave them craving more.
Ingredients (serving size: 4-6 people)
- 1 cup fresh parsley, finely chopped
- 1/2 cup fresh oregano, finely chopped (or 2 tablespoons dried oregano)
- 4 cloves garlic, minced
- 1/2 cup extra virgin olive oil
- 1/4 cup red wine vinegar
- 1 teaspoon red pepper flakes (adjust to taste)
- Salt and black pepper to taste
- Juice of 1 lemon (optional)
Cooking Instructions
- Prepare the Fresh Ingredients: Start by washing and drying the fresh parsley and oregano thoroughly. Remove any tough stems from the parsley and oregano, then finely chop them. You want the herbs to be finely chopped to release their flavors and to guarantee that the sauce has a nice texture.
- Mince the Garlic: Take the garlic cloves and mince them as finely as possible. If you prefer, you can use a garlic press for a smoother consistency. The garlic adds a robust flavor to the chimichurri, so make sure it’s well incorporated.
- Combine the Ingredients: In a medium bowl, combine the chopped parsley, oregano, and minced garlic. Add the red pepper flakes, a pinch of salt, and black pepper to taste. Mix well to guarantee the herbs and spices are evenly distributed.
- Add the Liquids: Slowly pour in the extra virgin olive oil and red wine vinegar to the herb mixture. If you’re using lemon juice, add that as well. Stir gently to combine all ingredients. The olive oil provides richness, while the vinegar adds acidity that balances the flavors.
- Adjust Seasonings: Taste the chimichurri sauce and adjust the seasoning as needed. You can add more salt, pepper, or red pepper flakes based on your preference for spiciness and flavor.
- Let it Rest: For the best flavor, cover the chimichurri and let it sit at room temperature for at least 30 minutes before serving. This resting period allows the flavors to meld together beautifully.
Extra Tips
When making chimichurri, feel free to customize it according to your taste preferences. Some variations include adding chopped cilantro or switching up the vinegar type for a different flavor profile.
If you want a smoother sauce, blend the ingredients in a food processor, but be careful not to over-blend. For an added kick, you can also incorporate a bit of finely chopped jalapeño.
Store any leftover chimichurri in the refrigerator for up to one week, and make sure to bring it back to room temperature before serving to guarantee the best flavor. Enjoy your chimichurri with grilled steaks, chicken, or even as a dipping sauce for crusty bread!
Asado De Tira: Short Ribs With a Twist

Asado de tira is a classic Argentinian dish that embodies the spirit of traditional barbecue, or asado. This particular recipe focuses on short ribs, which are a favorite cut in Argentina, known for their rich flavor and tenderness when cooked properly. The key to achieving the perfect asado de tira lies in the cooking method and the seasoning. The ribs are typically cooked slowly over an open flame, allowing the fat to render out and the meat to become succulent and juicy.
The twist in this recipe comes from the addition of a zesty chimichurri sauce, which adds a fresh and vibrant flavor to the finished dish. To prepare asado de tira, you’ll want to start by selecting high-quality short ribs. Seasoning is important, but simplicity is key; the goal is to enhance the natural flavors of the meat rather than overpower them. The chimichurri, made with fresh herbs, garlic, and vinegar, serves as a perfect accompaniment, adding a bright contrast to the rich meat.
This dish makes for a fantastic centerpiece at any barbecue gathering, showcasing the art of Argentinian grilling while also impressing your guests with its delightful flavors.
Ingredients (serving size: 4-6 people):
- 3 lbs short ribs (asado de tira)
- Salt (to taste)
- Black pepper (to taste)
- 1 tablespoon olive oil
- 1 cup fresh parsley, finely chopped
- 1/2 cup fresh cilantro, finely chopped
- 4 cloves garlic, minced
- 1 teaspoon red pepper flakes (optional)
- 1/2 cup red wine vinegar
- 1/2 cup olive oil (for chimichurri)
- Juice of 1 lemon
Cooking Instructions:
1. Prepare the Short Ribs:
Begin by trimming any excess fat from the short ribs, leaving a thin layer for flavor. Pat the ribs dry with paper towels. Season liberally with salt and black pepper on all sides. Allow them to rest at room temperature for about 30 minutes to absorb the seasoning.
2. Make the Chimichurri Sauce:
In a mixing bowl, combine the chopped parsley, cilantro, minced garlic, red pepper flakes (if using), red wine vinegar, olive oil, and lemon juice. Whisk together until well combined. Taste and adjust seasoning with salt and pepper. Set aside to let the flavors meld while the ribs cook.
3. Preheat the Grill:
Prepare your grill for indirect cooking by heating one side to medium-high heat. If using charcoal, arrange the coals on one side of the grill. If using gas, only light one side of the burners. This creates a hotter side for searing and a cooler side for slow cooking.
4. Sear the Ribs:
Place the ribs on the hot side of the grill. Sear for about 3-4 minutes on each side until a nice crust forms. This helps lock in the juices and adds flavor.
5. Cook the Ribs Indirectly:
Once seared, move the ribs to the cooler side of the grill. Close the lid and cook for about 2 to 2.5 hours, turning occasionally. The ribs are done when they’re tender and the meat pulls away easily from the bone.
6. Rest and Serve:
Once cooked, remove the ribs from the grill and let them rest for about 10 minutes. This allows the juices to redistribute throughout the meat. Serve with the chimichurri sauce drizzled over the top or on the side for dipping.
Extra Tips:
For the best results, consider using a charcoal grill for that authentic smoky flavor, but a gas grill can work just as well. If possible, marinate the ribs in a simple mixture of olive oil, garlic, and herbs for a few hours before cooking to enhance the flavor even more.
Always let the meat rest before serving to guarantee maximum juiciness. Enjoy your asado de tira with traditional sides such as grilled vegetables or crusty bread to complete the Argentinian barbecue experience!
Grilled Vegetables: A Colorful Side Dish
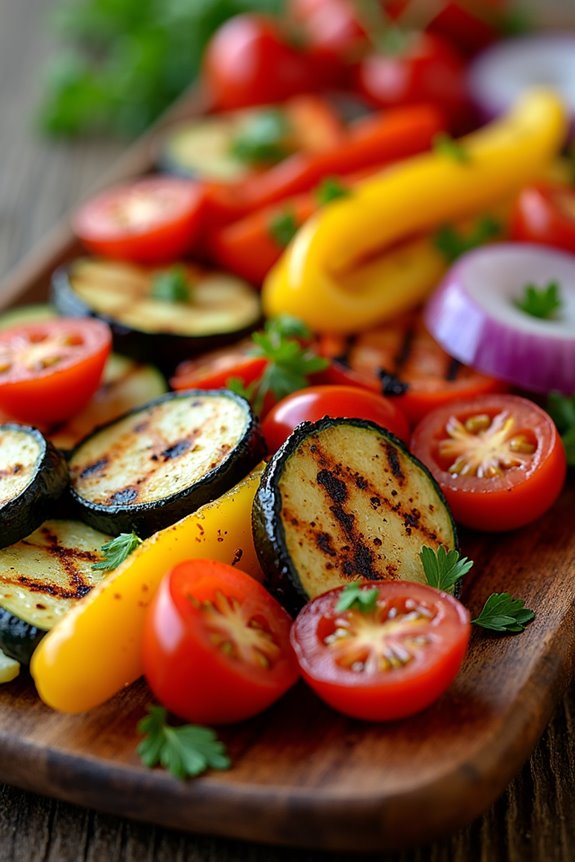
Grilled vegetables are a staple side dish in any Argentinian barbecue, adding not only vibrant colors to the plate but also a delightful blend of flavors and textures. This dish showcases seasonal vegetables that are marinated and grilled to perfection, enhancing their natural sweetness while adding a smoky char. Perfect for complementing meats like asado, these grilled vegetables are easy to prepare and can be customized based on your preferences or what you have on hand.
To achieve the best results, choose a variety of vegetables that not only taste great together but also look appealing on the plate. Bell peppers, zucchini, eggplant, and red onions are classic choices, but feel free to experiment with other favorites like asparagus or mushrooms. The key to a successful grilled vegetable dish is to guarantee that the vegetables are sliced evenly for even cooking, and marinated sufficiently to infuse them with flavor.
Ingredients (serving size: 4-6 people)
- 2 bell peppers (red, yellow, or green), cut into strips
- 1 medium zucchini, sliced into rounds
- 1 medium eggplant, sliced into rounds
- 1 red onion, cut into wedges
- 1 cup cherry tomatoes, halved
- 4 tablespoons olive oil
- 2 tablespoons balsamic vinegar
- 2 cloves garlic, minced
- 1 teaspoon dried oregano
- 1 teaspoon salt
- 1/2 teaspoon black pepper
- Fresh parsley, chopped (for garnish)
Cooking Instructions
- Prepare the Vegetables: Begin by washing and slicing all the vegetables. Cut the bell peppers into strips, the zucchini and eggplant into rounds, and the red onion into wedges. Halve the cherry tomatoes. Ensure that all pieces are roughly the same size to promote even grilling.
- Make the Marinade: In a large bowl, whisk together the olive oil, balsamic vinegar, minced garlic, dried oregano, salt, and black pepper. This marinade won’t only add flavor but also help to tenderize the vegetables.
- Marinate the Vegetables: Add all the prepared vegetables to the bowl with the marinade. Toss gently but thoroughly to guarantee that all the pieces are well coated. Cover the bowl and let the vegetables marinate for at least 30 minutes at room temperature. This allows the flavors to meld and enhances the overall taste.
- Preheat the Grill: While the vegetables are marinating, preheat your grill to medium-high heat. If using a charcoal grill, ensure that the coals are glowing red and covered with white ash.
- Grill the Vegetables: Once the grill is hot, place the marinated vegetables directly on the grill grates or use a vegetable grilling basket for easier handling. Grill the vegetables for about 4-5 minutes on each side, or until they’re tender and have visible grill marks. Keep an eye on them to prevent burning.
- Serve: Once grilled to your liking, remove the vegetables from the grill and transfer them to a serving platter. Garnish with freshly chopped parsley for an extra burst of color and flavor.
Extra Tips
For the best flavor, consider experimenting with different herbs in the marinade, such as thyme or rosemary, which pair well with grilled vegetables. Additionally, if you’re grilling a variety of meats, you can use the same grill for the vegetables to soak up some of the smoky flavors.
If you’re short on time, you can also marinate the vegetables overnight for an even deeper flavor profile. Enjoy your vibrant and delicious grilled vegetables alongside your favorite Argentinian BBQ dishes!
Empanadas: Savory Handheld Pastries

Empanadas are a beloved staple of Argentinian cuisine, known for their flaky crust and savory fillings. These delightful handheld pastries can be stuffed with a variety of ingredients, from seasoned meats to vegetables and cheeses. Traditionally, empanadas are baked or fried, making them a versatile option for a snack, appetizer, or main dish. Their rich flavors and satisfying textures make them a favorite at gatherings and family meals alike.
Making empanadas at home may seem intimidating, but the process is quite simple and rewarding. Once you master the dough and filling, you can experiment with different flavors to suit your palate. This recipe yields a batch of empanadas perfect for serving 4-6 people, guaranteeing there’s plenty to share or enjoy as leftovers. Whether you choose to bake or fry, these empanadas are sure to impress.
Ingredients (for 4-6 people):
- 2 cups all-purpose flour
- 1/2 cup unsalted butter, chilled and cubed
- 1/2 teaspoon salt
- 1/4 cup cold water
- 1 pound ground beef or chicken
- 1 medium onion, finely chopped
- 1 bell pepper, finely chopped
- 2 cloves garlic, minced
- 1 teaspoon cumin
- 1 teaspoon paprika
- 1/2 cup black olives, chopped (optional)
- 1 hard-boiled egg, chopped
- Salt and pepper to taste
- 1 egg, beaten (for egg wash)
Cooking Instructions:
- Prepare the Dough: In a large mixing bowl, combine the flour and salt. Add the chilled butter and mix until the mixture resembles coarse crumbs. Gradually add cold water, stirring until the dough comes together. Knead lightly on a floured surface until smooth. Wrap in plastic wrap and refrigerate for at least 30 minutes.
- Make the Filling: In a large skillet over medium heat, add a drizzle of oil and sauté the chopped onion and bell pepper until softened, about 5 minutes. Add the minced garlic and cook for an additional minute. Stir in the ground beef or chicken, cooking until browned. Season with cumin, paprika, salt, and pepper. Remove from heat and let cool slightly. Stir in chopped olives and hard-boiled egg, if using.
- Roll Out the Dough: Once the dough has chilled, remove it from the refrigerator and divide it into small balls (about the size of a golf ball). On a floured surface, roll out each ball into a circle about 1/8 inch thick.
- Fill the Empanadas: Place a spoonful of the filling in the center of each dough circle. Fold the dough over to create a half-moon shape, pressing the edges together to seal. Use a fork to crimp the edges for a decorative finish.
- Prepare for Baking or Frying: Preheat the oven to 375°F (190°C) if baking. Place the empanadas on a lined baking sheet. Brush the tops with beaten egg for a golden finish. If frying, heat oil in a deep pan over medium heat.
- Cook the Empanadas: For baking, bake for 20-25 minutes or until golden brown. For frying, carefully add the empanadas in batches and fry until golden and crispy, about 3-4 minutes per side. Drain on paper towels.
Extra Tips:
When making empanadas, feel free to get creative with the fillings! You can substitute the meat with vegetables, cheese, or any leftovers you have on hand.
To guarantee a crispier crust, consider chilling the filled empanadas in the fridge for about 15 minutes before baking or frying. Additionally, experimenting with spices and herbs can elevate the flavor profile of the filling. Serve your empanadas with chimichurri sauce or salsa for an extra kick!
Chicken a La Parrilla: Juicy and Flavorful

Chicken a La Parrilla is a quintessential dish in Argentinian cuisine that captures the essence of grilling. This dish showcases the beautiful, smoky flavors of the chicken while allowing the natural juices to create a tender and succulent bite. Typically cooked over an open flame, this method enhances the chicken’s flavor profile, making it a favorite among barbecue enthusiasts.
The beauty of Chicken a La Parrilla lies not only in its simplicity but also in the way it brings people together around the grill, embodying the spirit of shared meals and good company.
The marinade, or “adobo,” is what sets this dish apart, infusing the chicken with a blend of spices and herbs that complement its natural taste. A combination of garlic, fresh herbs, and citrus creates a vibrant and zesty flavor that marries beautifully with the charred exterior from grilling.
Whether you’re hosting a summer barbecue or enjoying a cozy family dinner, Chicken a La Parrilla is sure to impress your guests and satisfy your taste buds.
Ingredients (serving size: 4-6 people)
- 4-6 chicken thighs (bone-in, skin-on)
- 4 cloves of garlic, minced
- 1 tablespoon of fresh oregano, chopped
- 1 tablespoon of fresh parsley, chopped
- 1 teaspoon of paprika
- 1 teaspoon of salt
- ½ teaspoon of black pepper
- Juice of 1 lemon
- ¼ cup of olive oil
Cooking Instructions
- Prepare the Marinade: In a bowl, combine minced garlic, chopped oregano, chopped parsley, paprika, salt, black pepper, lemon juice, and olive oil. Mix well until all ingredients are thoroughly blended. This marinade will infuse the chicken with flavor and moisture.
- Marinate the Chicken: Place the chicken thighs in a large resealable plastic bag or a shallow dish. Pour the marinade over the chicken, making sure each piece is well-coated. Seal the bag or cover the dish with plastic wrap, and refrigerate for at least 1 hour, or up to overnight for maximum flavor.
- Preheat the Grill: About 15-20 minutes before grilling, preheat your grill to medium-high heat. If using charcoal, allow the coals to burn down until they’re covered in white ash. This guarantees an even cooking temperature.
- Grill the Chicken: Remove the chicken from the marinade, allowing any excess marinade to drip off. Place the chicken skin-side down on the grill. Cook for about 5-7 minutes until the skin is crispy and golden brown. Flip the chicken and reduce the heat to medium. Continue grilling for another 15-20 minutes, or until the internal temperature reaches 165°F (75°C).
- Rest and Serve: Once cooked, remove the chicken from the grill and let it rest for 5-10 minutes. This allows the juices to redistribute, guaranteeing juicy chicken. Serve with your favorite sides, such as grilled vegetables or a fresh salad.
Extra Tips
For an even richer flavor, consider adding a splash of white wine or vinegar to the marinade. You can also experiment with different herbs like thyme or rosemary for a unique twist.
If you prefer a smokier flavor, use wood chips on your grill or opt for a charcoal grill. Always make sure to monitor the chicken closely while grilling to prevent burning and guarantee it cooks evenly. Enjoy your Chicken a La Parrilla with a side of chimichurri sauce for an authentic Argentinian experience!
Blood Sausage Skewers: An Unforgettable Treat
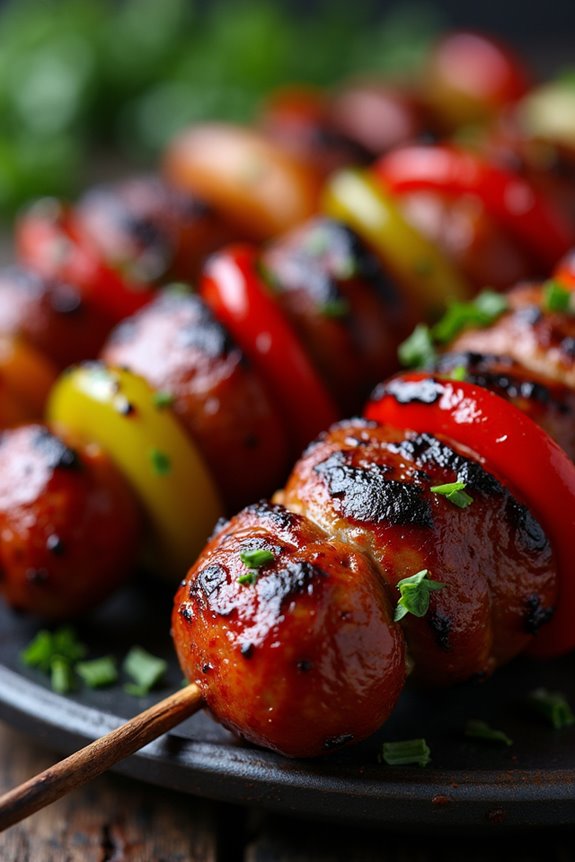
Blood sausage, known as “morcilla” in Argentina, is a beloved delicacy that adds a unique flavor and richness to any barbecue spread. This dish typically features a combination of blood, fat, and rice or other grains, resulting in a savory and slightly sweet sausage that pairs wonderfully with grilled vegetables and chimichurri sauce.
Skewering the blood sausage makes it easy to cook on the grill and serves as a fun and interactive way to enjoy this traditional Argentine dish while bringing a taste of the Argentine asado to your table.
When preparing blood sausage skewers, it’s vital to select high-quality morcilla for the best flavor. The grilling process enhances its natural flavors, giving it a smoky and crisp exterior while keeping the inside tender and juicy.
These skewers are perfect as an appetizer or as a main dish alongside other grilled favorites, and they’re sure to impress your guests with their rich taste and unique presentation.
Ingredients (Serves 4-6)
- 4-6 blood sausages (morcilla)
- 1 red bell pepper, cut into 1-inch pieces
- 1 green bell pepper, cut into 1-inch pieces
- 1 onion, cut into 1-inch pieces
- 2 tablespoons olive oil
- Salt and pepper to taste
- Fresh parsley, chopped (for garnish)
- Wooden or metal skewers
Cooking Instructions
- Prepare the Skewers: If you’re using wooden skewers, soak them in water for at least 30 minutes to prevent burning on the grill. Metal skewers can be used directly without soaking.
- Cut the Ingredients: Slice the blood sausages into 1-inch thick pieces. This size allows for even cooking and makes it easier to thread them onto the skewers. Also, cut the bell peppers and onion into similar-sized pieces to vitalize they cook at the same rate.
- Assemble the Skewers: Alternate threading the blood sausage pieces with the bell pepper and onion pieces onto the skewers. You can create a pattern that you find visually appealing, or simply mix them together. Leave a little space between each piece to allow for even cooking.
- Season the Skewers: Drizzle the assembled skewers with olive oil and season with salt and pepper. The olive oil will help prevent sticking and enhance the flavor, while the salt and pepper will bring out the natural taste of the ingredients.
- Preheat the Grill: Preheat your grill to medium-high heat. If you’re using a charcoal grill, vitalize the coals are glowing red and covered with a light layer of ash.
- Grill the Skewers: Place the skewers on the grill and cook for about 10-12 minutes, turning occasionally. The blood sausage should be heated through and develop a nice char, while the vegetables should become tender and slightly caramelized.
- Garnish and Serve: Once cooked, remove the skewers from the grill. Garnish with freshly chopped parsley for a burst of color and flavor. Serve the skewers while hot, paired with chimichurri sauce for dipping.
Extra Tips
When grilling blood sausage skewers, consider adjusting the cooking time based on the thickness of your sausage. If using thicker sausages, they may require a few extra minutes on the grill.
Additionally, experimenting with different vegetables, such as zucchini or mushrooms, can add more variety to your skewers. For those who enjoy a bit of spice, you can also marinate the vegetables in a bit of hot sauce or add chili flakes before grilling.
Enjoy the process and embrace the rich flavors of this traditional Argentine dish!
Argentinian Style Corn on the Cob: Choclo
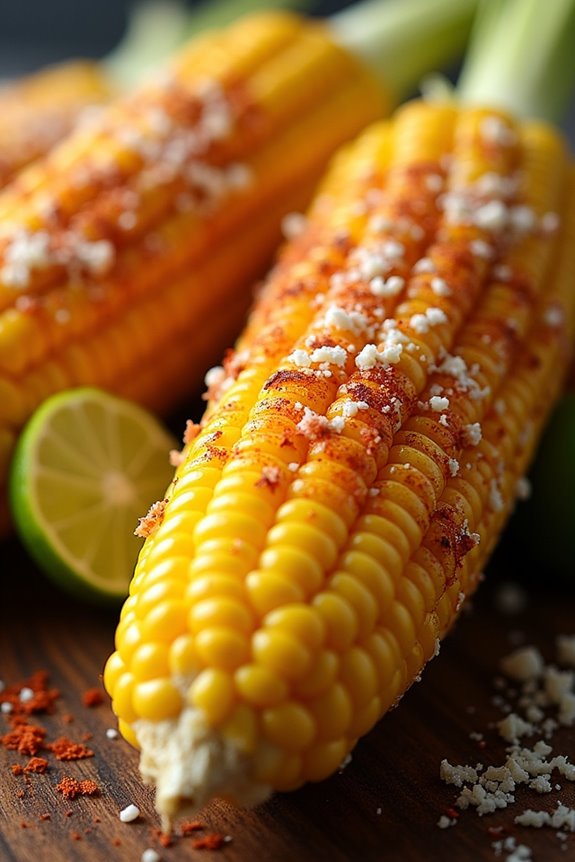
Choclo, the beloved Argentinian corn on the cob, is a delectable treat often enjoyed at asados (barbecues) and gatherings. This dish showcases the sweetness and texture of fresh corn, highlighted by a simple yet flavorful preparation. The unique twist lies in the addition of cheese and spices, which elevate the taste and provide a delightful contrast to the natural sweetness of the corn.
Whether served as a side dish or a snack, choclo is a staple that captures the essence of Argentinian culinary culture.
To prepare choclo, it’s crucial to use fresh, tender corn on the cob, as this will guarantee the best flavor and texture. Cooking the corn over an open flame adds a smoky char that enhances the overall experience. Traditionally, choclo is served with a sprinkle of cheese and a dash of salt, making for a mouthwatering combination that’s sure to impress your guests. Enjoying this dish is a celebration in itself, bringing people together around the grill for a shared love of good food.
Ingredients (Serves 4-6):
- 4-6 ears of fresh corn on the cob, husked
- 1 cup of grated queso fresco or Parmesan cheese
- 1 teaspoon of salt
- 1 teaspoon of smoked paprika (optional)
- 1 tablespoon of olive oil (for brushing)
- Lime wedges (for serving)
Cooking Instructions:
- Prepare the Corn: Start by husking the corn and removing all the silk threads. Rinse the corn under cold water to remove any remaining debris. This will guarantee a clean and fresh flavor when grilling.
- Preheat the Grill: If you’re using a charcoal grill, light the coals and let them burn until covered with white ash. For a gas grill, preheat it to medium-high heat. A hot grill will help achieve that sought-after char on the corn.
- Brush with Olive Oil: Lightly brush each ear of corn with olive oil. This helps to prevent sticking and adds a layer of flavor as the corn cooks. Guarantee that every side is coated to achieve even cooking.
- Grill the Corn: Place the corn directly on the grill grates. Cook for about 10-15 minutes, turning the corn every few minutes to guarantee even cooking and charring. You want the corn to be tender and slightly charred on all sides.
- Add Cheese and Seasoning: Once the corn is cooked, remove it from the grill and immediately sprinkle with grated queso fresco or Parmesan cheese, followed by a pinch of salt and smoked paprika, if using. The heat from the corn will melt the cheese slightly, creating a delicious topping.
- Serve with Lime Wedges: Arrange the corn on a serving platter and serve with lime wedges on the side. Squeezing fresh lime juice over the corn adds a bright, zesty flavor that complements the sweetness of the corn and the richness of the cheese.
Extra Tips:
For an enhanced flavor experience, consider soaking the corn in water for about 30 minutes before grilling. This helps to keep the corn moist during cooking and can create a more tender result.
Additionally, feel free to experiment with different cheeses or spices to customize the dish to your preference. Enjoying choclo straight off the grill, while it’s still hot, is the best way to savor the delicious flavors of this traditional Argentinian dish.
Alfajores: Sweet Finish to Your Asado

After indulging in a hearty Argentinian asado, there’s no better way to conclude the meal than with a sweet treat of alfajores. These delightful cookies, typically filled with dulce de leche and rolled in coconut or powdered sugar, offer a perfect balance of flavors and textures.
Originating from Spanish cuisine, alfajores have become a beloved dessert in Argentina, capturing the hearts of locals and visitors alike. Their rich, crumbly texture combined with a luscious filling makes them an irresistible accompaniment to a cup of coffee or mate.
Making alfajores isn’t only a delightful culinary experience but also a great way to bring family and friends together. The process involves preparing a buttery cookie dough, allowing it to chill, and then assembling the cookies with a generous dollop of dulce de leche.
Whether you plan to serve them at a special occasion or as an everyday treat, these cookies are sure to impress.
Ingredients (Serves 4-6 people):
- 2 cups all-purpose flour
- 1 cup cornstarch
- 1/2 cup unsweetened cocoa powder
- 1 cup unsalted butter, softened
- 3/4 cup sugar
- 2 large egg yolks
- 1 teaspoon vanilla extract
- 1 cup dulce de leche
- 1/2 cup shredded coconut (optional)
- Powdered sugar for dusting
Cooking Instructions:
1. Prepare the Dough: In a large mixing bowl, cream together the softened butter and sugar until light and fluffy. This process incorporates air into the mixture, which will help create a tender cookie.
Add the egg yolks one at a time, mixing well after each addition, then stir in the vanilla extract.
2. Combine Dry Ingredients: In a separate bowl, sift together the all-purpose flour, cornstarch, and cocoa powder. Sifting helps to aerate the flour and remove any lumps, ensuring a smooth cookie dough.
Gradually add the dry ingredients to the butter mixture, mixing until just combined. Be careful not to overmix, as this can result in tough cookies.
3. Chill the Dough: Form the dough into a disc, wrap it in plastic wrap, and refrigerate for at least 1 hour. Chilling the dough helps it firm up, making it easier to roll out and cut into shapes.
4. Roll and Cut: Preheat your oven to 350°F (175°C). On a lightly floured surface, roll out the chilled dough to about 1/4 inch thickness. Use a cookie cutter to cut out desired shapes (traditionally round), placing them on a baking sheet lined with parchment paper.
5. Bake the Cookies: Bake the Cookies in the preheated oven for about 10-12 minutes or until they’re lightly golden around the edges. Allow the cookies to cool on the baking sheet for a few minutes before transferring them to a wire rack to cool completely.
6. Assemble the Alfajores: Once the cookies are completely cool, spread a generous layer of dulce de leche on the flat side of one cookie and top it with another cookie. Gently press down to form a sandwich.
Repeat this process until all the cookies are assembled.
7. Finish with Coconut or Sugar: If desired, roll the edges of the alfajores in shredded coconut or dust with powdered sugar for an elegant touch. This adds a nice flavor and texture contrast to the rich dulce de leche filling.
Extra Tips:
When making alfajores, patience is key—allowing the dough to chill is essential for achieving the perfect texture.
Feel free to customize the filling; while dulce de leche is traditional, you can also try variations like chocolate ganache or fruit jams. For added flavor, consider incorporating a hint of lemon or orange zest into the dough.
Finally, store the assembled alfajores in an airtight container; they can be made a day in advance, allowing the flavors to meld beautifully. Enjoy your sweet finale to a delicious asado!