

When I think of snacking, the vibrant flavors of Argentinian cuisine come to mind. Each bite feels like a lively gathering with laughter and good company. From flaky empanadas to sweet alfajores, these snacks suit any occasion. I’ve gathered 14 delightful recipes that are easy to make and welcome your own creative twists. Let’s explore the tempting world of Argentinian snacks together.
Empanadas
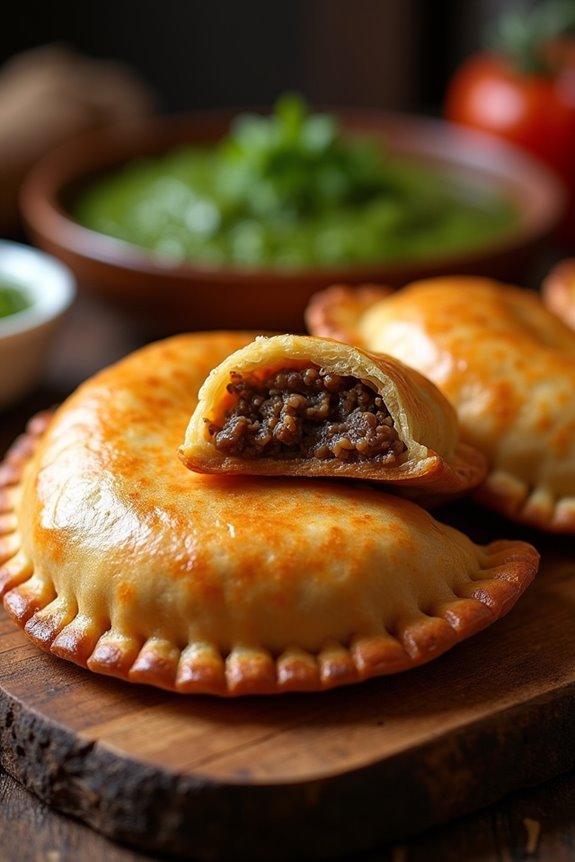
Empanadas are a beloved snack in Argentina, known for their flaky pastry and savory fillings. These delightful hand pies are perfect for any occasion, whether it’s a family gathering, a party, or just a cozy night in.
Originating from Spain, empanadas have been embraced by Argentine culture, with countless variations and fillings that showcase the country’s rich culinary heritage. The dough can be made from scratch or purchased pre-made, making this dish versatile and accessible for all levels of cooks.
The beauty of empanadas lies in their adaptability. You can fill them with a wide array of ingredients, from traditional beef and onion to more creative options like cheese, spinach, or even sweet fillings like dulce de leche.
This recipe will guide you through creating classic beef empanadas, which are sure to impress your family and friends. Serve them warm with chimichurri or your favorite dipping sauce for an authentic Argentine experience.
Ingredients (Serves 4-6 people)
- 2 cups all-purpose flour
- 1/2 cup unsalted butter, softened
- 1/2 teaspoon salt
- 1/4 cup cold water
- 1 pound ground beef
- 1 medium onion, finely chopped
- 2 hard-boiled eggs, chopped
- 1/2 cup green olives, chopped
- 1 teaspoon paprika
- 1 teaspoon cumin
- Salt and pepper to taste
- 1 egg (for egg wash)
Cooking Instructions
1. Make the Dough: In a large bowl, combine the flour and salt. Add the softened butter and mix until the mixture resembles coarse crumbs. Gradually add cold water, mixing until a dough forms. Knead the dough lightly for a minute, cover with plastic wrap, and let it rest in the refrigerator for at least 30 minutes.
2. Prepare the Filling: In a skillet over medium heat, cook the chopped onion until translucent. Add the ground beef and cook until browned, breaking it apart with a spatula. Stir in the paprika, cumin, salt, and pepper.
Once cooked, remove the skillet from heat and let the mixture cool slightly before adding the chopped hard-boiled eggs and green olives. Mix well to combine.
3. Roll Out the Dough: After the dough has rested, preheat your oven to 375°F (190°C). On a floured surface, Roll Out the Dough to about 1/8-inch thickness. Using a round cutter or a glass, cut out circles of dough approximately 4-6 inches in diameter.
4. Fill the Empanadas: Place a tablespoon of the beef filling in the center of each dough circle. Fold the circle in half to create a half-moon shape, pressing the edges together to seal. You can crimp the edges with a fork for a decorative touch.
5. Egg Wash: Beat the egg in a small bowl and brush the mixture over the sealed empanadas to give them a beautiful golden color when baked.
6. Bake the Empanadas: Place the empanadas on a baking sheet lined with parchment paper. Bake in the preheated oven for 25-30 minutes or until golden brown.
Extra Tips
When making empanadas, feel free to experiment with different fillings to suit your taste preferences. If you’re short on time, store-bought dough can be a great shortcut.
Additionally, for an added touch of flavor, consider adding spices like oregano or chili flakes to the filling. Remember to keep an eye on the empanadas while baking to prevent over-browning, and enjoy them fresh out of the oven for the best taste!
Provoleta
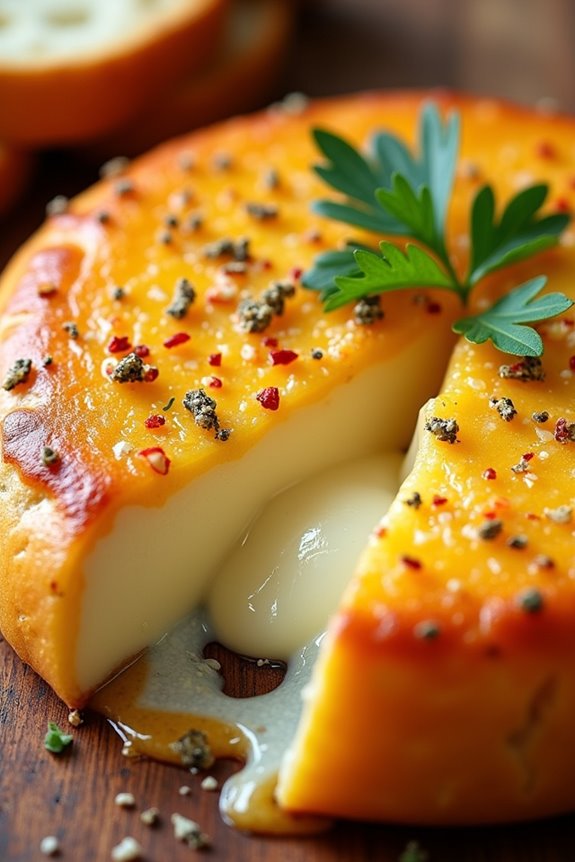
Provoleta is a delicious Argentine cheese dish that’s often enjoyed as an appetizer or snack. It features provolone cheese, which is melted to create a gooey, savory treat that’s perfect for sharing. Typically grilled or baked, it’s seasoned with herbs and spices that enhance its rich flavor. Served with crusty bread, this dish is a staple in Argentine cuisine and a delightful addition to any gathering.
To prepare Provoleta, you’ll need just a few key ingredients, and the cooking process is straightforward. The cheese is the star of the show, but the right seasonings and cooking method will elevate it to perfection. Whether you’re enjoying a casual barbecue or a festive dinner party, Provoleta will impress your guests and leave them wanting more.
Ingredients (Serves 4-6)
- 1 large wheel of provolone cheese (about 500g)
- 2 tablespoons olive oil
- 1 teaspoon dried oregano
- 1 teaspoon crushed red pepper flakes (optional)
- Freshly ground black pepper, to taste
- Fresh parsley, chopped (for garnish)
- Crusty bread, for serving
Cooking Instructions
- Prepare the Cheese: Start by selecting a high-quality wheel of provolone cheese. If it’s wrapped, remove it from the packaging. If desired, cut the cheese into half or keep it whole depending on the size of your grill or oven dish.
- Season the Cheese: Place the wheel of provolone on a heat-proof dish or a cast-iron skillet. Drizzle the olive oil over the cheese, making sure it’s well coated. Sprinkle the dried oregano and crushed red pepper flakes (if using) evenly over the surface. Finish it off with freshly ground black pepper to taste.
- Preheat the Grill or Oven: If using a grill, preheat it to medium heat. If using an oven, preheat it to 200°C (about 400°F). This guarantees that the cheese melts evenly and achieves a perfect golden crust.
- Cook the Provoleta: Place the dish with the cheese on the grill or in the oven. Cook for about 10-15 minutes, or until the cheese is melted and bubbling. Keep an eye on it to avoid burning; you want a nice golden color.
- Garnish and Serve: Once the cheese is perfectly melted, carefully remove it from the grill or oven. Sprinkle chopped fresh parsley on top for a burst of color and flavor. Serve immediately with slices of crusty bread for dipping.
Extra Tips
When making Provoleta, choose a high-quality provolone for the best flavor and texture. If you prefer a smoky taste, consider grilling the cheese instead of baking it, as this adds an extra layer of complexity.
Make sure to keep an eye on the cheese while it cooks, as it can quickly go from perfectly melted to overcooked. Enjoy this dish hot and fresh for the best experience!
Alfajores

Alfajores are a beloved Argentinian treat that consists of two delicate cookies sandwiched together with a rich layer of dulce de leche, often dusted with powdered sugar or coated in chocolate.
These sweet confections have their roots in Spanish and Moorish cuisine, evolving over centuries to become a quintessential part of Argentine culture. The soft, crumbly texture of the cookies combined with the caramel-like sweetness of dulce de leche creates a flavor experience that’s both comforting and indulgent.
Making alfajores at home is a rewarding process that allows you to enjoy this traditional snack fresh out of the oven. While there are many variations, the classic version typically features a cornstarch cookie that melts in your mouth.
Whether you’re enjoying them with a cup of coffee or sharing them with friends, alfajores are sure to delight anyone who tries them.
Ingredients (Serves 4-6)
- 1 cup all-purpose flour
- 1 cup cornstarch
- 1/2 cup powdered sugar
- 1/2 cup unsalted butter, softened
- 1/2 cup granulated sugar
- 1 large egg
- 1 teaspoon vanilla extract
- 1 teaspoon baking powder
- 1 cup dulce de leche
- Powdered sugar for dusting (optional)
- Chocolate coating (optional)
Cooking Instructions
1. Prepare the Dough: In a large mixing bowl, combine the all-purpose flour, cornstarch, powdered sugar, and baking powder. In a separate bowl, cream together the softened butter and granulated sugar until light and fluffy.
Add the egg and vanilla extract to the butter mixture, mixing until well combined. Gradually add the dry ingredients to the wet mixture, stirring until a soft dough forms.
2. Chill the Dough: Once the dough is mixed, wrap it in plastic wrap and refrigerate for at least 30 minutes. This chilling step helps the dough firm up, making it easier to roll out and cut into cookie shapes.
3. Roll and Cut the Cookies: Preheat your oven to 350°F (175°C). Remove the chilled dough from the refrigerator and roll it out on a floured surface to about 1/4 inch thick.
Use a round cookie cutter (about 2 inches in diameter) to cut out cookies and place them on a parchment-lined baking sheet, leaving space between each cookie.
4. Bake the Cookies: Bake the Cookies in the preheated oven for 10-12 minutes or until the edges are lightly golden. Be careful not to overbake, as you want them to remain soft.
Once baked, remove them from the oven and let them cool completely on a wire rack.
5. Assemble the Alfajores: Once the cookies are cool, spread a generous layer of dulce de leche on the flat side of one cookie and top it with another cookie, pressing gently to create a sandwich.
If desired, roll the edges in shredded coconut or dip the entire alfajor in melted chocolate for an extra special treat.
6. Dust and Serve: If you prefer, you can dust the assembled alfajores with powdered sugar before serving. Arrange them on a plate and enjoy these delightful cookies with your favorite beverage.
Extra Tips
When making alfajores, it’s important to use quality dulce de leche, as it greatly influences the flavor of the final product. You can find it in stores or make your own by slowly simmering sweetened condensed milk.
Additionally, feel free to experiment with different flavors by adding citrus zest or spices to the cookie dough for a unique twist on this classic treat. Remember that alfajores can be stored in an airtight container for several days, but they’re best enjoyed fresh!
Choripán

Choripán is a beloved Argentinian street food that consists of a delicious chorizo sausage served in a crusty bread roll. It’s a simple yet flavorful dish that perfectly captures the essence of Argentine cuisine. Typically enjoyed as a quick snack or a casual meal, choripán can be found at barbecues, street fairs, and food stalls across Argentina. The combination of the juicy, spiced chorizo with fresh toppings makes it a favorite among locals and visitors alike.
To prepare the perfect choripán, you’ll want to focus on high-quality ingredients, particularly the chorizo sausage, which should be well-seasoned and flavorful. While the traditional accompaniment is chimichurri sauce, which adds a zesty kick, you can personalize your choripán with various toppings such as onions, peppers, or even avocado. With its straightforward preparation, choripán isn’t only easy to make but also a fantastic way to enjoy the flavors of Argentina at home.
Ingredients (serving size: 4-6 people)
- 4-6 Argentine-style chorizo sausages
- 4-6 crusty bread rolls (such as baguette or ciabatta)
- 1 cup chimichurri sauce (store-bought or homemade)
- 1 medium onion, sliced (optional)
- 1 medium red bell pepper, sliced (optional)
- Olive oil (for grilling)
- Salt and pepper (to taste)
Cooking Instructions
- Preheat the Grill: Begin by preheating your grill to medium-high heat. This guarantees that the chorizos will cook evenly and get a nice char on the outside.
- Prepare the Chorizo: While the grill is heating up, lightly brush the chorizo sausages with olive oil to prevent sticking and enhance their flavor. Season them with a pinch of salt and pepper if desired.
- Grill the Chorizo: Place the chorizo sausages on the grill, turning them occasionally to guarantee they cook evenly. Grill them for about 10-15 minutes, or until they’re browned and cooked through (internal temperature should reach 160°F or 70°C).
- Toast the Bread Rolls: In the final few minutes of grilling the chorizo, place the bread rolls on the grill, cut side down. Toast them for about 2-3 minutes or until they’re golden brown and slightly crispy.
- Prepare Optional Toppings: If you’re using onions and peppers, you can grill them alongside the chorizos for added flavor. Simply toss them in a little olive oil, season with salt and pepper, and grill until they’re tender and slightly charred, about 5-7 minutes.
- Assemble the Choripán: Once the chorizo is cooked and the bread is toasted, remove them from the grill. Slice the bread rolls open and place a grilled chorizo inside each roll. Top with chimichurri sauce and any additional grilled vegetables if desired.
- Serve Immediately: Serve the choripán hot, with extra chimichurri on the side for dipping. Enjoy the burst of flavors and the satisfying texture of this authentic Argentinian snack!
Extra Tips
When making choripán, don’t hesitate to experiment with different types of chorizo or homemade variations to suit your taste. For a spicier kick, consider using a chorizo with added chili or paprika.
Additionally, if you’re grilling for a crowd, you can keep the cooked sausages warm in a low oven while you finish grilling the rest. Finally, serving choripán with a side of pickled vegetables or a fresh salad can complement the dish beautifully and add some balance to the rich flavors. Enjoy your culinary journey to Argentina!
Humita
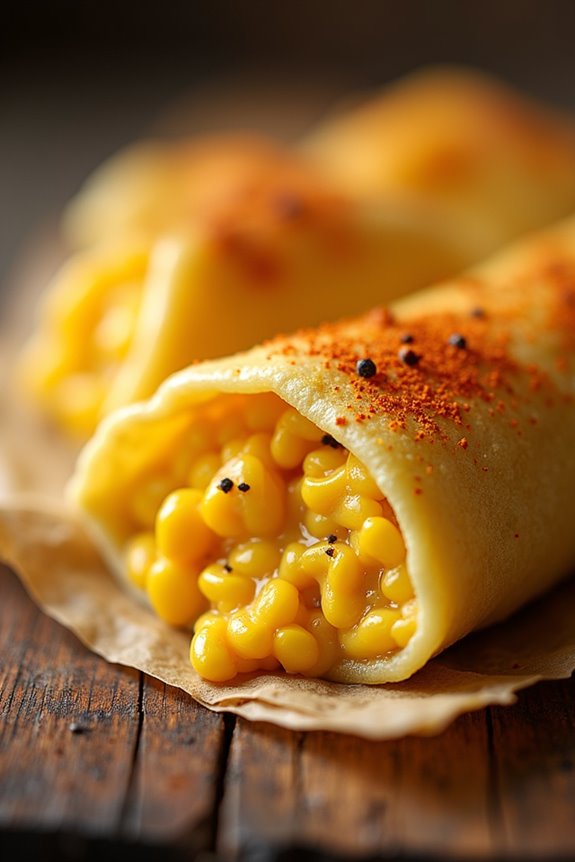
Humita is a traditional Argentine dish that showcases the delightful flavors of corn, a staple ingredient in many South American cuisines. This dish can be considered a savory corn pudding or a tamale-like preparation, where fresh corn is blended and mixed with cheese, herbs, and spices, then wrapped in corn husks and steamed to perfection.
Humita is often enjoyed as a snack or side dish and can be found at food markets and street stalls throughout Argentina, offering a taste of the country’s culinary heritage.
Making Humita is a simple yet rewarding process, perfect for those looking to explore authentic Argentinian flavors in their own kitchen. The use of fresh corn adds a sweet and creamy texture, while the addition of cheese and spices elevates the flavor profile.
With the right techniques and ingredients, you can create this delicious dish that will impress your family and friends, transporting them straight to the vibrant streets of Buenos Aires.
Ingredients (serves 4-6 people):
- 4 cups fresh corn kernels (about 6-8 ears of corn)
- 1 cup milk
- 1 cup cheese (such as queso fresco or mozzarella), grated
- 1/2 cup onion, finely chopped
- 1/4 cup butter, melted
- 2 teaspoons baking powder
- 1 teaspoon salt
- 1/2 teaspoon black pepper
- 1/2 teaspoon paprika
- Corn husks (soaked in warm water for 30 minutes)
Cooking Instructions:
- Prepare the Corn: Start by shucking the fresh corn and removing the kernels from the cob. You can use a knife to carefully cut the kernels off. Place the corn kernels in a large bowl.
- Blend the Mixture: Transfer about half of the corn kernels to a blender or food processor. Add the milk and blend until smooth. This will create a creamy base for your Humita. Once blended, pour the mixture back into the bowl with the remaining whole corn kernels.
- Sauté the Onions: In a skillet, melt the butter over medium heat. Add the finely chopped onions and sauté until they’re soft and translucent, about 5 minutes. This step enhances the flavor of the onions, adding depth to the dish.
- Combine Ingredients: Add the sautéed onions, grated cheese, baking powder, salt, black pepper, and paprika to the bowl with the corn mixture. Stir everything together until well combined, ensuring that all ingredients are evenly distributed.
- Prepare the Corn Husks: Take your soaked corn husks and pat them dry. Lay one husk flat on your workspace, and place a generous spoonful (about 1/4 cup) of the corn mixture in the center of the husk.
- Wrap the Humita: Fold the sides of the husk over the filling, then fold up the bottom to secure the mixture inside. Repeat this process with the remaining husks and corn mixture.
- Steam the Humitas: Arrange the wrapped Humitas upright in a steamer basket. If you don’t have a steamer, you can use a large pot with a steaming rack. Steam the Humitas for about 30-40 minutes, or until they’re firm and set.
- Serve: Once cooked, carefully unwrap the Humitas and serve them warm. They can be enjoyed as-is or with a drizzle of olive oil or sauce of your choice.
Extra Tips:
For the best flavor, using fresh corn is key, as it provides natural sweetness that frozen corn can’t replicate. If fresh corn is unavailable, you can use high-quality frozen corn.
Additionally, feel free to experiment with spices or add extras like chopped herbs (such as basil or cilantro) for a unique twist. Humitas can also be made ahead of time and reheated, making them a convenient option for gatherings or meal prep.
Facturas
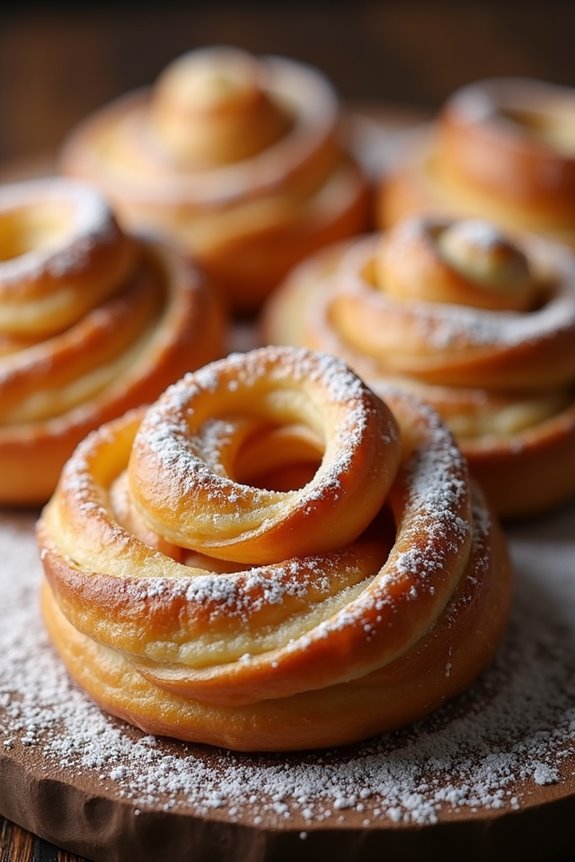
Facturas are a delightful assortment of Argentinian pastries that often grace the breakfast table or serve as a sweet afternoon snack. These flaky, buttery treats come in various shapes and sizes, filled with sweet jams, custards, or simply dusted with sugar.
They’re a perfect accompaniment to a cup of mate or coffee, embodying the warmth and social spirit of Argentinian culture. The name “factura” translates to “invoice” in Spanish, hinting at the tradition of bakeries selling these pastries by the dozen, just like a bill!
Making facturas at home may sound intimidating, but the process is quite rewarding. With a little patience and practice, you can create these tender pastries that will impress your family and friends.
The versatility of facturas allows for many variations, including fillings like dulce de leche, cream cheese, or chocolate. So, roll up your sleeves and get ready to enjoy the comforting aroma of freshly baked pastries wafting through your home.
Ingredients (Serves 4-6 people):
- 4 cups all-purpose flour
- 1 cup unsalted butter, softened
- 1/2 cup sugar
- 1 cup warm milk
- 1 packet (2 1/4 tsp) active dry yeast
- 1/4 tsp salt
- 2 large eggs
- 1 tsp vanilla extract
- 1/2 cup dulce de leche or fruit jam (for filling)
- Powdered sugar (for dusting)
Cooking Instructions:
- Prepare the Yeast Mixture: In a small bowl, combine the warm milk and active dry yeast. Let it sit for about 5-10 minutes until it becomes frothy. This step is essential as it activates the yeast, which will help your dough rise.
- Make the Dough: In a large mixing bowl, combine the flour, sugar, and salt. Create a well in the center and add the frothy yeast mixture, softened butter, eggs, and vanilla extract. Mix the ingredients together until a dough forms. You may need to use your hands to incorporate everything fully.
- Knead the Dough: Transfer the dough to a floured surface and knead for about 8-10 minutes until it’s smooth and elastic. This step develops the gluten in the flour, giving your facturas their desirable texture.
- First Rise: Place the kneaded dough in a greased bowl, cover it with a clean cloth, and let it rise in a warm place for about 1 to 2 hours, or until it doubles in size. This is where the dough becomes light and fluffy.
- Shape the Facturas: Once the dough has risen, punch it down to release air. Divide it into equal portions and shape them into your desired forms (such as coils, spirals, or rectangles). Make sure to leave a little space in the center for the filling.
- Add the Filling: Place a spoonful of dulce de leche or fruit jam in the center of each shaped pastry. Be careful not to overfill them, as they may burst during baking.
- Second Rise: Arrange the shaped facturas on a greased baking sheet, cover them with a cloth, and let them rise for another 30-45 minutes. This step will guarantee they’re fluffy and airy when baked.
- Bake the Pastries: Preheat your oven to 350°F (175°C). Bake the facturas for 15-20 minutes or until they’re golden brown. Keep an eye on them to avoid over-baking.
- Cool and Dust: Once baked, allow the facturas to cool on a wire rack. After they’ve cooled slightly, dust them with powdered sugar for an added sweet touch.
Extra Tips:
When making facturas, feel free to experiment with different fillings and shapes to personalize your pastries. You can also brush the tops with an egg wash before baking for a shiny finish.
If you want to enhance the flavor, consider adding spices like cinnamon to the dough or the filling. Store any leftovers in an airtight container, and they can be reheated in the oven for a few minutes to regain their flaky texture.
Enjoy your homemade facturas with a hot beverage for a taste of Argentina!
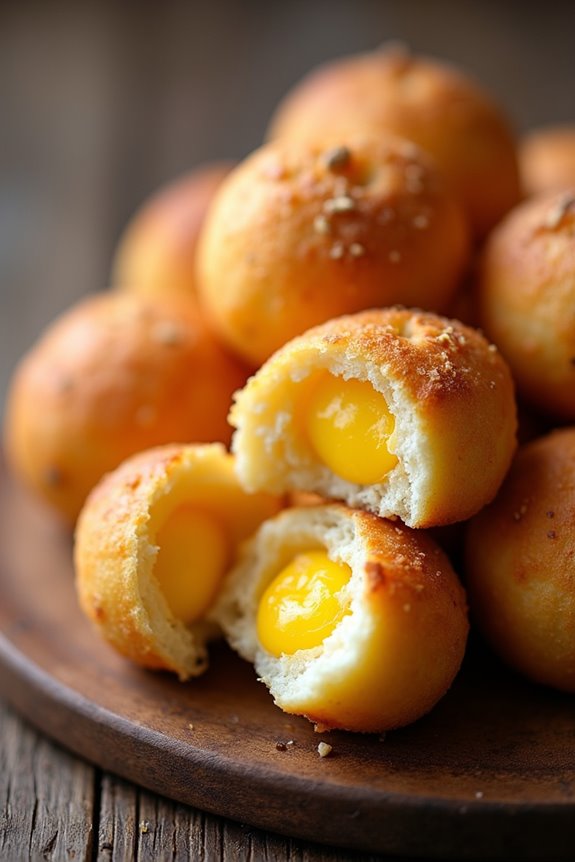
Chipá
Chipá is a delightful and traditional snack from Argentina, particularly popular in the northeastern regions of the country. These cheesy bread rolls are made primarily with manioc flour (also known as cassava flour), which gives them a unique texture that’s both chewy and soft.
Chipá is often enjoyed fresh from the oven, making them the perfect accompaniment to a cup of mate or as a delicious snack any time of the day. The combination of cheese and the slightly sweet taste of the manioc flour makes for a truly irresistible treat.
The preparation of Chipá involves a few simple ingredients, and while the recipe is quite easy, the result is simply delicious. Traditionally, it’s made with a specific type of cheese known as “queso Paraguay,” but if you can’t find that, a mix of mozzarella and Parmesan works beautifully too.
Once you master the basic recipe, feel free to experiment with different cheese blends or even add herbs for a twist on this classic favorite. Let’s plunge into making this delightful Argentinian snack!
Ingredients (Serves 4-6)
- 2 cups manioc flour (cassava flour)
- 1 cup grated cheese (preferably mozzarella and Parmesan)
- 1/2 cup milk
- 1/4 cup vegetable oil
- 2 large eggs
- 1 teaspoon baking powder
- 1 teaspoon salt
Cooking Instructions
- Preheat the Oven: Begin by preheating your oven to 375°F (190°C). This guarantees that the Chipá will bake evenly and develop a nice golden color.
- Mix Dry Ingredients: In a large mixing bowl, combine the manioc flour, baking powder, and salt. Whisk them together until they’re well blended. This step guarantees that the leavening agent is evenly distributed throughout the flour.
- Add Wet Ingredients: In a separate bowl, mix together the milk, vegetable oil, and eggs. Whisk until the mixture is smooth and well combined. This mixture will help bind the dry ingredients and create a dough-like consistency.
- Combine Mixtures: Gradually pour the wet mixture into the bowl with the dry ingredients while stirring continuously. Use a spatula or your hands to combine until the dough starts to form. The mixture should be moist but not too sticky.
- Incorporate Cheese: Add the grated cheese to the dough and fold it in gently until it’s evenly distributed. This step is essential as the cheese will melt during baking, creating a deliciously cheesy interior.
- Shape the Chipá: Take small portions of the dough and roll them into balls or shape them into small disks (about the size of a golf ball). Place them on a baking sheet lined with parchment paper, leaving some space between each piece.
- Bake: Place the baking sheet in the preheated oven and bake for about 15-20 minutes or until the Chipá are puffed up and golden brown on top. Keep an eye on them to prevent burning.
- Serve Warm: Once baked, remove the Chipá from the oven and let them cool slightly. They’re best served warm, allowing you to enjoy their fluffy texture and cheesy flavor to the fullest.
Extra Tips
For the best results, use freshly grated cheese as it melts better than pre-packaged shredded cheese. You can also experiment by adding herbs like oregano or thyme for an extra layer of flavor.
If you find the dough too dry, add a splash more milk, and if it’s too wet, a little more manioc flour can help. Enjoy your Chipá fresh out of the oven for the ultimate taste experience!
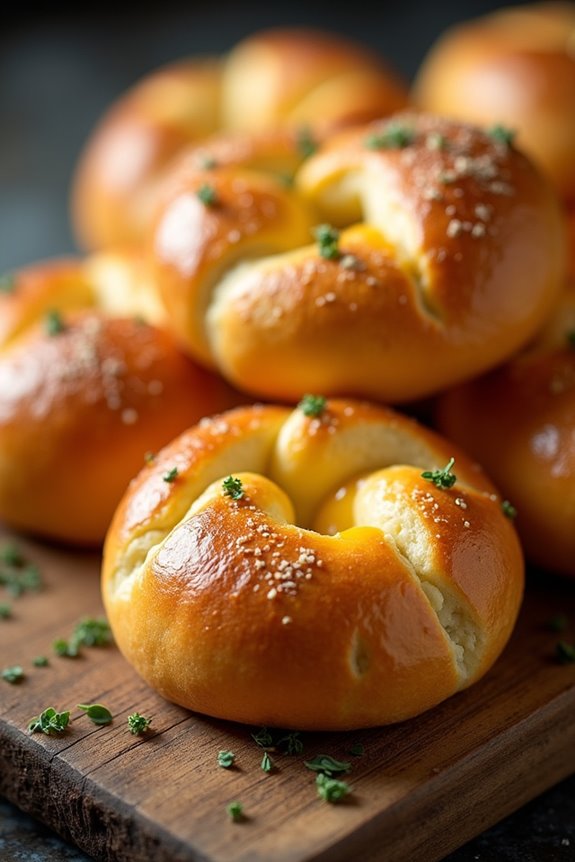
Pão De Queijo
Pão De Queijo, or Brazilian cheese bread, is a delightful snack that has gained popularity across Latin America and beyond. This gluten-free treat is made with tapioca flour, which gives it a unique chewy texture, while cheese adds a savory flavor that makes it irresistible.
Originating from the state of Minas Gerais in Brazil, this snack is perfect for any occasion, whether as a breakfast item, a party appetizer, or a cozy snack to enjoy with friends and family.
The beauty of Pão De Queijo lies in its simplicity and the fact that it can be customized with various types of cheese to suit individual tastes. The basic recipe calls for just a handful of ingredients, making it easy to whip up a batch whenever the craving strikes.
With its golden, crusty exterior and soft, cheesy interior, Pão De Queijo is sure to become a favorite in your household.
Ingredients (Serves 4-6):
- 2 cups tapioca flour
- 1 cup milk
- 1/2 cup vegetable oil
- 1 teaspoon salt
- 1 cup grated Parmesan cheese (or a mix of cheeses)
- 2 large eggs
Cooking Instructions:
- Preheat the Oven: Begin by preheating your oven to 375°F (190°C). This guarantees that your Pão De Queijo will bake evenly and achieve that perfect golden color.
- Heat the Liquid Ingredients: In a medium saucepan, combine the milk, vegetable oil, and salt. Heat the mixture over medium heat until it comes to a gentle boil. Stir occasionally to prevent it from scorching.
- Combine with Tapioca Flour: Once the milk mixture has reached a boil, remove it from the heat. In a large mixing bowl, add the tapioca flour. Pour the hot milk mixture over the flour and stir with a wooden spoon until a dough forms. Be cautious as the dough will be hot.
- Incorporate the Eggs and Cheese: Allow the dough to cool for a few minutes, then add the eggs one at a time, mixing well after each addition. Once the eggs are fully incorporated, fold in the grated cheese until evenly distributed.
- Shape the Dough: Using your hands, scoop out small portions of dough, about the size of a golf ball. Roll each portion into a ball and place them onto a baking sheet lined with parchment paper. Make sure to leave some space between each ball as they’ll expand while baking.
- Bake: Place the baking sheet in the preheated oven and bake for about 15-20 minutes, or until the Pão De Queijo are puffed and golden brown on the outside.
- Cool and Serve: Once baked, remove them from the oven and let them cool for a few minutes on the baking sheet. Serve warm and enjoy the cheesy goodness!
Extra Tips:
For an added twist, feel free to experiment with different types of cheese, such as mozzarella or cheddar, to create your own unique flavor profile.
Additionally, for a more pronounced cheese flavor, you can sprinkle some extra grated cheese on top of the balls before baking. Pão De Queijo is best enjoyed fresh out of the oven, but they can also be stored in an airtight container for a couple of days or frozen for later use.
Just reheat them in the oven for a few minutes to restore their delightful texture!
Dulce De Leche Flan
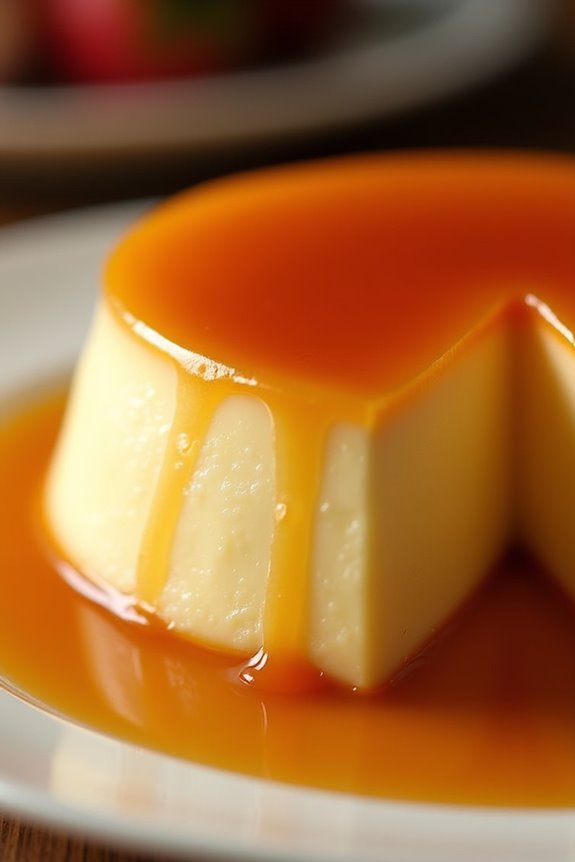
Dulce De Leche Flan is a classic Argentinian dessert that marries the rich, caramel-like flavor of dulce de leche with the smooth, creamy texture of flan. This decadent treat is perfect for any occasion, whether you’re hosting a dinner party or simply looking to indulge your sweet tooth.
The combination of sweetened condensed milk, eggs, and vanilla creates a luscious custard that’s infused with the unmistakable taste of dulce de leche, making it a beloved favorite among dessert lovers.
Making Dulce De Leche Flan may seem intimidating, but it’s quite straightforward with the right steps. The flan is baked in a water bath, which guarantees even cooking and results in a silky texture.
Once chilled, the flan is inverted onto a platter to reveal a stunning caramel topping that will impress your guests. This dessert can be prepared in advance, making it a convenient option for gatherings or special occasions.
Ingredients (Serves 4-6)
- 1 cup dulce de leche
- 1 can (14 ounces) sweetened condensed milk
- 1 can (12 ounces) evaporated milk
- 4 large eggs
- 1 teaspoon vanilla extract
- 1 cup granulated sugar (for caramel)
- 1/4 cup water (for caramel)
Cooking Instructions
1. Prepare the Caramel: In a medium saucepan, combine the granulated sugar and water over medium heat. Stir gently until all the sugar is dissolved. Stop stirring and allow the mixture to boil until it turns a golden amber color. This will take about 8-10 minutes.
Quickly pour the caramel into a round baking dish or individual ramekins, tilting the dish to coat the bottom and sides. Be careful, as the caramel will be very hot.
2. Blend the Flan Mixture: In a blender, combine the dulce de leche, sweetened condensed milk, evaporated milk, eggs, and vanilla extract. Blend on high speed until the mixture is completely smooth and well combined. This should take about 1-2 minutes.
3. Pour the Mixture: Carefully pour the blended flan mixture over the hardened caramel in the baking dish. If you’re using ramekins, distribute the mixture evenly among them.
4. Bake in a Water Bath: Preheat your oven to 350°F (175°C). Place the baking dish or ramekins inside a larger baking pan. Fill the larger pan with hot water until it reaches halfway up the sides of the flan dish.
This water bath will help the flan cook evenly and prevent it from cracking.
5. Bake: Bake in the preheated oven for about 50-60 minutes, or until the flan is set but still slightly jiggly in the center. You can check for doneness by inserting a knife into the center; it should come out clean.
6. Cool and Chill: Once done, remove the flan from the water bath and allow it to cool to room temperature. Cover with plastic wrap and refrigerate for at least 4 hours or overnight to allow the flavors to meld and to set completely.
7. Serve: To Serve, run a knife around the edges of the flan to loosen it. Invert the flan onto a serving plate, allowing the caramel to drizzle over the top. Slice into wedges and enjoy!
Extra Tips
When preparing Dulce De Leche Flan, it’s important to verify that the caramel is the right color before removing it from the heat, as it can quickly go from perfect to burnt.
Additionally, using room temperature ingredients will help achieve a smoother texture in the flan. If you want to enhance the flavor, consider adding a pinch of salt to the flan mixture or garnishing with fresh fruits like berries before serving.
Enjoy your delightful Argentinian dessert!
Salteñas

Salteñas are a beloved Argentinian snack, often enjoyed as a hearty appetizer or a light meal. These savory pastries are similar to empanadas but are distinct in their dough and filling. Traditionally, salteñas are filled with a rich mixture of meat, potatoes, olives, and spices, all enveloped in a slightly sweet and slightly flaky dough.
They’re typically enjoyed hot and are known for their unique juicy filling, which gives them a delightful texture and flavor that’s hard to resist.
Making salteñas can be a fun culinary adventure, especially when you gather your friends or family in the kitchen. The preparation involves making the dough from scratch, preparing the filling, and finally assembling and baking the pastries. While the process may seem intricate, the end result is well worth the effort.
With a little patience and practice, you’ll be able to create these delicious snacks that will impress anyone lucky enough to try them.
Ingredients (Serves 4-6)
- 3 cups all-purpose flour
- 1/2 cup unsalted butter, melted
- 1/2 cup warm water
- 1 large egg
- 1 teaspoon salt
- 1/4 cup sugar
- 1 tablespoon baking powder
- 1 pound ground beef or chicken
- 1 medium onion, finely chopped
- 2 medium potatoes, peeled and diced
- 1/2 cup green olives, pitted and chopped
- 1 tablespoon paprika
- 1 teaspoon cumin
- Salt and pepper to taste
- 1/4 cup beef or chicken broth
- 1 egg (for egg wash)
Cooking Instructions
1. Make the Dough: In a large mixing bowl, combine the flour, baking powder, sugar, and salt. In a separate bowl, mix the melted butter, warm water, and 1 egg. Gradually add the wet ingredients to the dry ingredients, mixing until a soft dough forms. Knead the dough for about 5 minutes until it’s smooth.
Cover with plastic wrap and set aside to rest for 30 minutes.
2. Prepare the Filling: In a large skillet over medium heat, sauté the chopped onion until translucent. Add the ground beef or chicken and cook until browned. Stir in the diced potatoes, olives, paprika, cumin, salt, and pepper.
Pour in the broth and simmer for about 10-15 minutes until the potatoes are tender and the mixture is slightly thickened. Remove from heat and let it cool.
3. Roll Out the Dough: After the dough has rested, divide it into small balls, roughly the size of a golf ball. On a floured surface, roll out each ball into a thin circle, approximately 6 inches in diameter.
4. Assemble the Salteñas: Place a generous spoonful of the meat filling in the center of each dough circle. Fold the dough over to create a half-moon shape, and crimp the edges to seal securely.
Make sure there are no gaps, as this will help contain the filling during baking.
5. Prepare for Baking: Preheat your oven to 375°F (190°C). Line a baking sheet with parchment paper. Place the assembled salteñas on the sheet, making sure to leave space between them.
Beat the remaining egg and brush it over the tops of the pastries for a golden finish.
6. Bake: Bake in the preheated oven for about 25-30 minutes, or until the salteñas are golden brown. Remove from the oven and let cool slightly before serving.
Extra Tips
To achieve the best results, consider letting your dough rest longer for a flakier texture. You can also experiment with different fillings, such as shredded chicken or a vegetarian option with cheese and vegetables.
If you want to make the salteñas ahead of time, you can freeze them after assembling and before baking. Just add a few extra minutes to the baking time when cooking from frozen. Enjoy your homemade salteñas with a side of chimichurri sauce for an extra kick!
Sopaipillas

Sopaipillas are a beloved Argentinian snack, often enjoyed for their crispy texture and delightful flavor. These golden fried pastries are typically made from a simple dough that can be seasoned or sweetened, depending on personal preferences. Traditionally, they’re served with a drizzle of honey or a sprinkle of sugar, making them a perfect treat at any time of day – be it breakfast, a snack, or dessert.
Their versatility allows for creative variations, including savory fillings or toppings, which can cater to different palates.
Making sopaipillas at home is a fun and rewarding experience. The dough comes together quickly and has only a few ingredients, making it accessible for novice cooks. Once fried, these delightful pastries puff up beautifully, creating a light and airy interior that contrasts perfectly with the crispy exterior.
Whether you’re sharing them with friends at a gathering or enjoying them solo, sopaipillas are sure to satisfy your cravings for something delicious and comforting.
Ingredients (Serves 4-6)
- 2 cups all-purpose flour
- 1 teaspoon baking powder
- 1/2 teaspoon salt
- 1 tablespoon sugar
- 2 tablespoons unsalted butter, softened
- 3/4 cup warm water (approximately)
- Oil for frying (vegetable or canola)
- Honey or powdered sugar for serving (optional)
Cooking Instructions
- Prepare the Dough: In a large mixing bowl, combine the all-purpose flour, baking powder, salt, and sugar. Mix these dry ingredients well. Then, add the softened butter and use your fingers or a pastry cutter to integrate it into the flour mixture until it resembles coarse crumbs. Gradually add the warm water, mixing until a soft dough forms.
- Knead the Dough: Transfer the dough onto a lightly floured surface. Knead the dough gently for about 2-3 minutes, until it’s smooth and elastic. Be careful not to over-knead, as this can result in tough sopaipillas. Once kneaded, cover the dough with a clean kitchen towel and let it rest for about 15-20 minutes.
- Roll Out the Dough: After resting, divide the dough into two or three portions for easier handling. Roll out each portion on a floured surface to about 1/4 inch thick. Use a knife or a pizza cutter to cut the dough into squares or circles, approximately 3-4 inches in size.
- Heat the Oil: In a deep skillet or frying pan, pour enough oil to cover the bottom by about an inch. Heat the oil over medium-high heat until it reaches around 350°F (175°C). You can test the oil by dropping a small piece of dough into it; if it bubbles and rises to the surface, it’s ready.
- Fry the Sopaipillas: Carefully place a few pieces of the cut dough into the hot oil, being cautious not to overcrowd the pan. Fry for about 2-3 minutes on each side or until they turn golden brown and puff up. Use a slotted spoon to remove the sopaipillas from the oil and place them on a paper towel-lined plate to drain excess oil.
- Serve: Once all the sopaipillas are fried, serve them warm. You can drizzle them with honey, sprinkle powdered sugar, or enjoy them plain.
Extra Tips
For the best results, guarantee the oil is hot enough before frying the sopaipillas, as this helps them puff up properly. You can also experiment with adding spices or herbs to the dough for a unique flavor twist.
If you want a sweeter version, consider mixing cinnamon into the sugar for dusting or adding vanilla extract to the dough. Enjoy your homemade sopaipillas fresh, as they’re best when served warm!
Peperonata

Peperonata is a vibrant and flavorful dish that hails from the rich culinary traditions of Argentina. This sweet and tangy Italian-inspired pepper stew is a delightful combination of bell peppers, tomatoes, onions, and spices, making it an excellent accompaniment for various Argentine snacks or as a standalone dish.
The versatility of peperonata allows it to be served warm or at room temperature, making it perfect for gatherings or casual family dinners. The dish isn’t only delicious but also packed with nutrients, thanks to the colorful array of vegetables.
Whether you spread it on crusty bread, serve it over grilled meats, or enjoy it simply as a side dish, peperonata is sure to be a crowd-pleaser. Its aromatic profile comes from a gentle simmering process that melds the flavors beautifully, guaranteeing each bite is rich and satisfying.
Ingredients (Serves 4-6)
- 4 medium bell peppers (red, yellow, or green)
- 1 large onion
- 2 cloves of garlic
- 2 medium ripe tomatoes
- 1/4 cup olive oil
- 1 tablespoon red wine vinegar
- 1 teaspoon sugar
- Salt, to taste
- Freshly ground black pepper, to taste
- Fresh basil or parsley, for garnish
Cooking Instructions
- Prepare the Vegetables: Start by washing the bell peppers, removing the stems and seeds, and cutting them into thin strips. Peel and thinly slice the onion, and mince the garlic. Dice the tomatoes into small pieces. This preparation will make certain that your vegetables cook evenly and blend nicely in the dish.
- Sauté the Onions and Garlic: In a large skillet, heat the olive oil over medium heat. Add the sliced onions and cook for about 5 minutes until they start to become translucent. Stir in the minced garlic and continue to sauté for an additional minute, being careful not to burn the garlic. This step enhances the flavor base for your peperonata.
- Add the Peppers: Incorporate the sliced bell peppers into the skillet with the onions and garlic. Stir well to combine, and cook for approximately 10-15 minutes, stirring occasionally, until the peppers are soft and slightly caramelized. This cooking process allows the natural sweetness of the peppers to develop.
- Incorporate Tomatoes and Seasonings: Add the diced tomatoes to the skillet along with red wine vinegar, sugar, salt, and pepper. Stir well to combine all the ingredients. Allow the mixture to simmer on low heat for about 10 more minutes, uncovered, so that the flavors meld together and the sauce thickens slightly.
- Finish and Garnish: Once the peperonata has reached your desired consistency, taste and adjust the seasoning if necessary. Remove from heat and garnish with freshly chopped basil or parsley for a pop of color and additional flavor.
Extra Tips
For a deeper flavor profile, consider adding a pinch of red pepper flakes for a touch of heat or a splash of balsamic vinegar for added depth. You can also experiment with different types of bell peppers or even add other vegetables like zucchini or eggplant to enhance the dish.
Peperonata can be made ahead of time and stored in the refrigerator for up to three days, allowing the flavors to develop even further. Enjoy this delightful dish in various ways – it’s a fantastic addition to any meal!
Medialunas

Medialunas, or “half moons,” are a beloved Argentinian pastry that’s often enjoyed for breakfast or as a snack. These sweet, flaky croissants are typically served with coffee or mate and are a staple in Argentinian bakeries. The dough is rich and buttery, creating a delicate texture that melts in your mouth.
Medialunas can be found in two variations: the sweet version, which is coated in syrup for an extra touch of sweetness, and the savory version, which is less common but still delicious.
Making medialunas at home may seem challenging, but with a little patience and practice, you’ll be able to recreate this delightful treat in your own kitchen. The dough requires some resting time, allowing it to rise and develop the perfect flavor and texture. Once baked, you can enjoy them fresh out of the oven or store them for later consumption. This recipe yields about 4-6 servings, depending on how many you want to indulge in!
Ingredients (Serves 4-6)
- 4 cups all-purpose flour
- 1 cup milk, warmed
- 1/2 cup granulated sugar
- 1/2 cup unsalted butter, softened
- 2 1/4 teaspoons active dry yeast (1 packet)
- 2 large eggs
- 1 teaspoon salt
- 1 tablespoon vanilla extract
- 1/4 cup honey or simple syrup (for glaze)
Cooking Instructions
- Activate the Yeast: In a small bowl, combine the warm milk, sugar, and yeast. Stir gently and let it sit for about 5-10 minutes until it becomes frothy. This step proves that the yeast is active and ready to help the dough rise.
- Prepare the Dough: In a large mixing bowl, combine the flour and salt. Create a well in the center and add the frothy yeast mixture, softened butter, eggs, and vanilla extract. Mix with a spoon until the dough begins to come together.
- Knead the Dough: Transfer the dough onto a lightly floured surface. Knead the dough for about 8-10 minutes until it’s smooth and elastic. If necessary, add small amounts of flour to prevent sticking.
- First Rise: Place the kneaded dough in a greased bowl, cover it with a clean kitchen towel, and let it rise in a warm place for about 1-2 hours or until it has doubled in size.
- Shape the Medialunas: After the dough has risen, roll it out into a large rectangle (about 1/4 inch thick). Cut the dough into triangles. Starting from the wide end, roll each triangle towards the point to form a crescent shape. Place them on a baking sheet lined with parchment paper, spacing them apart.
- Second Rise: Cover the shaped medialunas with a towel again and let them rise for another 30-45 minutes until they puff up a bit.
- Preheat the Oven: While the medialunas are rising, preheat your oven to 375°F (190°C).
- Bake the Medialunas: Once the second rise is complete, place the baking sheet in the preheated oven and bake for 15-20 minutes or until they’re golden brown.
- Glaze: While the medialunas are baking, prepare the glaze by warming the honey or simple syrup in a small saucepan. Once the medialunas are out of the oven, brush them with the warm glaze to give them a sweet shine.
- Serve: Let the medialunas cool slightly on a wire rack before serving. Enjoy them warm or at room temperature with your favorite beverage!
Extra Tips
When making medialunas, be sure to keep an eye on the dough during the rising phases; too much heat can cause it to overproof, leading to a dense texture.
Additionally, for an even flakier pastry, you can incorporate cold butter into the dough using the “lamination” technique, which involves folding the dough with layers of butter.
Experimenting with the amount of sugar in the glaze will allow you to customize the sweetness to your liking, ensuring the perfect balance to complement your medialunas.
Picada

Picada is a traditional Argentinian appetizer that embodies the spirit of sharing and socializing over good food. This delightful dish typically consists of an array of cured meats, cheeses, olives, and bread, making it a perfect choice for gatherings with family and friends.
The beauty of a picada lies in its versatility; you can customize it with your favorite ingredients, allowing for a unique presentation that reflects your personal taste. This platter isn’t just about the flavors; it’s about the experience of enjoying the food together.
Whether you’re hosting a casual get-together or a festive celebration, a well-prepared picada will surely impress your guests and set the tone for a memorable evening. Pair it with some Argentinian wine or a revitalizing drink, and you’ll have the perfect starter to kick off any meal.
Ingredients (Serves 4-6 people)
- 200g of chorizo sausage, sliced
- 200g of salami, sliced
- 200g of prosciutto, sliced
- 150g of aged cheese, cubed
- 150g of soft cheese (like queso crema or goat cheese)
- 100g of green olives
- 100g of black olives
- 1 baguette or crusty bread, sliced
- 2 tablespoons of extra virgin olive oil
- 1 tablespoon of balsamic vinegar
- Fresh herbs for garnish (such as parsley or oregano)
Cooking Instructions
- Prepare the Ingredients: Start by slicing the chorizo, salami, and prosciutto into thin pieces. Cut the aged cheese into cubes and set aside the soft cheese. Rinse the olives under cold water to remove excess brine and drain them well.
- Arrange the Board: Choose a large serving platter or wooden board. Begin by adding the sliced cured meats, arranging them in a decorative manner. You can create sections or alternate the types for visual appeal.
- Add the Cheeses: Next, place the cubed aged cheese and the soft cheese on the platter. You can use a small bowl for the soft cheese to keep it contained, and sprinkle some herbs on top for added flavor.
- Incorporate the Olives: Scatter the green and black olives around the meats and cheeses. This adds color and variety to the presentation.
- Include the Bread: Arrange the sliced baguette or crusty bread around the platter. If desired, you can lightly toast the bread slices for extra texture.
- Drizzle with Olive Oil and Vinegar: In a small bowl, mix the olive oil and balsamic vinegar. Drizzle this mixture over the entire platter to enhance the flavors of the meats, cheeses, and olives.
- Garnish and Serve: Finally, finish off your picada with a sprinkle of fresh herbs. Serve immediately with toothpicks or small forks for easy snacking.
Extra Tips
When preparing a picada, feel free to experiment with different types of meats, cheeses, and accompaniments like nuts, fruits, or pickles to suit your taste and the preferences of your guests.
Additionally, consider the presentation; a colorful and well-arranged platter can elevate the overall experience. Don’t forget to pair your picada with a nice Argentinian wine, such as Malbec, for a truly authentic experience. Enjoy your gathering and the delightful flavors of Argentina!