

When I think of cozy Colombian breakfasts, warmth and nostalgia fill the air. Each dish tells a story, whether it’s the comforting arepas or the delightful buñuelos that bring a sweet aroma to your kitchen. There’s something truly special about starting your day with these traditional flavors. Every bite offers a little cultural journey. Let’s explore these ten recipes together and see what makes them perfect morning treats.
Arepas: The Versatile Colombian Staple

Arepas are a beloved staple in Colombian cuisine, known for their versatility and deliciousness. These cornmeal cakes can be grilled, baked, or fried, making them an excellent base for various toppings and fillings. Traditionally, arepas are made from pre-cooked corn flour, which gives them a unique texture and flavor. They can be enjoyed at any time of the day, whether for breakfast, lunch, or dinner, and can be customized to suit personal preferences, from savory to sweet.
Making arepas is a simple yet rewarding process. Once you’ve mastered the basic dough, you can experiment with fillings like cheese, avocado, chorizo, or even sweet ingredients like chocolate or fruit. The beauty of arepas lies in their adaptability; they can be made to complement a plethora of dishes or stand alone as a satisfying meal. Whether you’re serving them with eggs in the morning or using them to scoop up a hearty stew, arepas are sure to delight your taste buds.
Ingredients (Serves 4-6):
- 2 cups of pre-cooked white or yellow corn flour (masarepa)
- 2 ½ cups of warm water
- 1 teaspoon of salt
- 1 tablespoon of vegetable oil or melted butter (optional, for richer flavor)
- Cheese, avocado, or other fillings (optional)
Cooking Instructions:
- Prepare the Dough: In a large mixing bowl, combine the pre-cooked corn flour and salt. Gradually add the warm water and mix with your hands or a spoon until the dough comes together. If you’re using vegetable oil or melted butter, add it to the mixture for a richer flavor. The dough should be moist but not sticky; if it’s too dry, add more water, one tablespoon at a time.
- Knead the Dough: Once the dough is formed, knead it gently for about 2-3 minutes until it becomes smooth and pliable. If the dough cracks when you shape it, add a little more water. If it’s too wet, sprinkle in a bit more flour.
- Shape the Arepas: Divide the dough into equal portions, about the size of a golf ball. With your hands, flatten each ball into a disc about ½ inch thick. Make sure the edges are smooth to prevent cracking during cooking.
- Cook the Arepas: Preheat a skillet or griddle over medium heat. Lightly grease the cooking surface with oil. Place the arepas on the skillet and cook for about 5-7 minutes on each side, or until they develop a golden brown crust. If you prefer them softer, you can also bake them in a preheated oven at 375°F (190°C) for about 15-20 minutes after pan-frying.
- Serve and Enjoy: Once cooked, remove the arepas from the skillet and let them cool slightly. Slice them open like a pita and fill with your choice of toppings, such as cheese, avocado, or any other preferred fillings. Serve warm.
Extra Tips:
When making arepas, it’s important to use pre-cooked corn flour, as regular cornmeal won’t yield the same results. If you’re looking for added flavor, consider incorporating spices or herbs into the dough. Additionally, if you want to achieve a crispy texture, you can double-cook the arepas by frying them first and then baking them.
Experiment with different fillings and toppings to find your favorite combinations!
Buñuelos: Sweet and Cheesy Fried Delights

Buñuelos are a beloved Colombian breakfast treat, often enjoyed during festive occasions but delightful enough for any day of the week. These sweet and cheesy fried dough balls are crispy on the outside and soft on the inside, making them a favorite among both adults and children. The combination of cheese and a hint of sweetness creates a unique flavor that’s hard to resist.
Traditionally, buñuelos are served warm, often accompanied by a hot cup of chocolate or coffee, making them a perfect morning indulgence.
Making buñuelos at home is easier than it may seem, and with the right ingredients, you can achieve that authentic taste. This recipe yields about 4-6 servings, making it ideal for sharing with family or friends. Whether you’re looking to impress guests or simply treat yourself, these buñuelos will undoubtedly bring a taste of Colombia to your breakfast table.
Ingredients (Serves 4-6)
- 1 cup of queso fresco (crumbled) or other soft cheese
- 1 cup of corn starch
- 1/2 cup of all-purpose flour
- 1/4 cup of sugar
- 1 teaspoon of baking powder
- 1/2 teaspoon of salt
- 1/4 teaspoon of ground cinnamon (optional)
- 1/2 cup of milk
- 1 large egg
- Vegetable oil (for frying)
Cooking Instructions
- Prepare the Dough: In a large mixing bowl, combine the crumbled queso fresco, corn starch, all-purpose flour, sugar, baking powder, salt, and ground cinnamon (if using). Mix the dry ingredients together until well combined. This will guarantee that the flavors are evenly distributed throughout the dough.
- Add Wet Ingredients: In a separate bowl, whisk together the milk and the egg until well blended. Gradually pour this mixture into the bowl with the dry ingredients, stirring continuously until a soft dough forms. The dough should be slightly sticky but manageable; if it’s too dry, add a little more milk.
- Shape the Buñuelos: Once the dough is well mixed, take small portions of it and roll them into balls about the size of a golf ball. Make sure to keep your hands slightly oiled to prevent sticking. Place the rolled balls on a plate lined with parchment paper as you prepare to fry them.
- Heat the Oil: In a deep frying pan or pot, pour enough vegetable oil to submerge the buñuelos (about 2-3 inches deep). Heat the oil over medium-high heat until it reaches about 350°F (175°C). You can test the oil by dropping a small piece of dough in; if it sizzles and rises to the surface, the oil is ready.
- Fry the Buñuelos: Carefully place a few buñuelos in the hot oil, making sure not to overcrowd the pan. Fry them for about 4-5 minutes, turning occasionally until they’re golden brown all over. Use a slotted spoon to remove them from the oil and transfer them to a plate lined with paper towels to drain excess oil.
- Serve Warm: Serve the buñuelos warm, dusted with powdered sugar if desired. They can be enjoyed on their own or with a side of hot chocolate or coffee for dipping.
Extra Tips
For the best results, verify that your oil is hot enough before frying, as this will help achieve that perfect crispy texture. If you want a more pronounced cheese flavor, consider using a mix of cheeses, or experiment with different types of soft cheese available in your area.
Additionally, buñuelos are best enjoyed fresh, so try to fry them in small batches and serve them immediately for the ultimate experience!
Changua: A Creamy Egg and Milk Soup
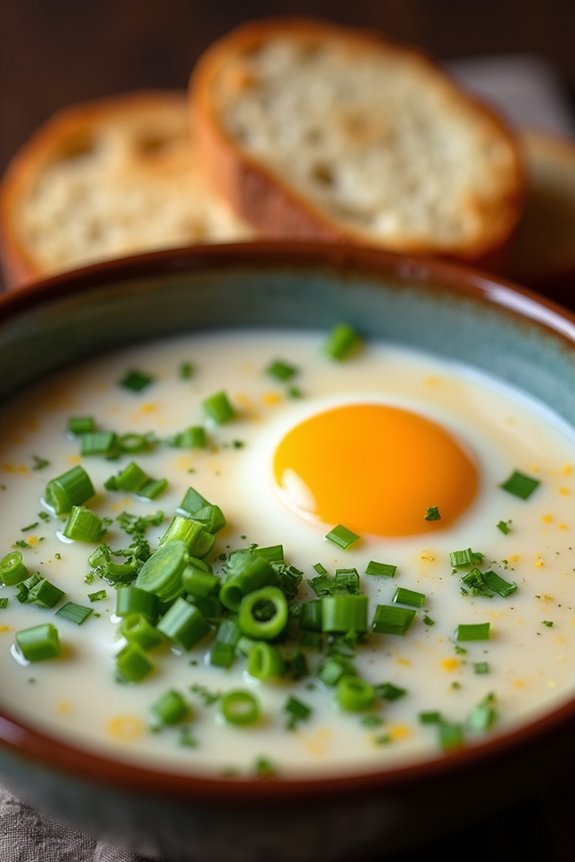
Changua is a traditional Colombian breakfast dish that warms both the body and soul. Originating from the Andean region, this creamy egg and milk soup is typically enjoyed with bread and is perfect for a hearty morning meal.
With its comforting flavors and simple preparation, Changua is a delightful way to start the day, especially on those chilly mornings when you crave something rich and satisfying.
The beauty of Changua lies in its simplicity. It showcases the natural flavors of fresh ingredients, with eggs poached in a soothing broth of milk, water, and fresh herbs.
Often served with a sprinkle of scallions and a dash of salt, this dish isn’t only nourishing but also a great way to introduce a taste of Colombian culture into your breakfast routine.
Ingredients (Serves 4-6):
- 4 cups of water
- 2 cups of milk
- 4 large eggs
- 4 green onions (scallions), chopped
- 1 tablespoon of fresh cilantro, chopped
- 1 teaspoon of salt (or to taste)
- ½ teaspoon of black pepper (or to taste)
- 4 slices of bread (preferably stale or toasted, for serving)
- Optional: avocado, for serving
Cooking Instructions:
1. Prepare the Broth: In a large pot, combine the water and milk. Place the pot over medium heat and bring the mixture to a gentle simmer.
Stir occasionally to prevent the milk from scorching on the bottom. This creamy base is essential for the soup’s flavor and texture.
2. Add Aromatics: Once the broth is simmering, add the chopped green onions and cilantro to the pot.
These ingredients will infuse the soup with their fresh flavors. Allow the mixture to simmer for about 5 minutes until the green onions soften and the flavors meld together.
3. Poach the Eggs: Carefully crack the eggs into the simmering broth, making sure to space them evenly.
You can use a spoon to gently create a small whirlpool in the broth to help the eggs cook evenly. Cover the pot with a lid and let the eggs poach for about 3-5 minutes, or until the whites are set but the yolks remain runny.
Adjust the cooking time based on your preference for egg doneness.
4. Season the Soup: Once the eggs are poached to your liking, season the Changua with salt and black pepper.
Taste the broth and adjust the seasoning as needed to enhance the flavors.
5. Serve: Ladle the Changua into bowls, ensuring each serving has an egg.
Serve hot with slices of bread on the side for dipping. If desired, add slices of avocado for a creamy complement to the dish.
Extra Tips:
When making Changua, freshness is key, so try to use high-quality eggs and fresh herbs for the best flavor.
If you prefer a thicker soup, you can reduce the amount of water slightly or let it simmer longer before adding the eggs.
Additionally, feel free to experiment with toppings such as crumbled cheese or a sprinkle of chili flakes for an extra kick. This dish is versatile and can be customized to suit your taste preferences!
Tamales: Hearty Packages of Flavor
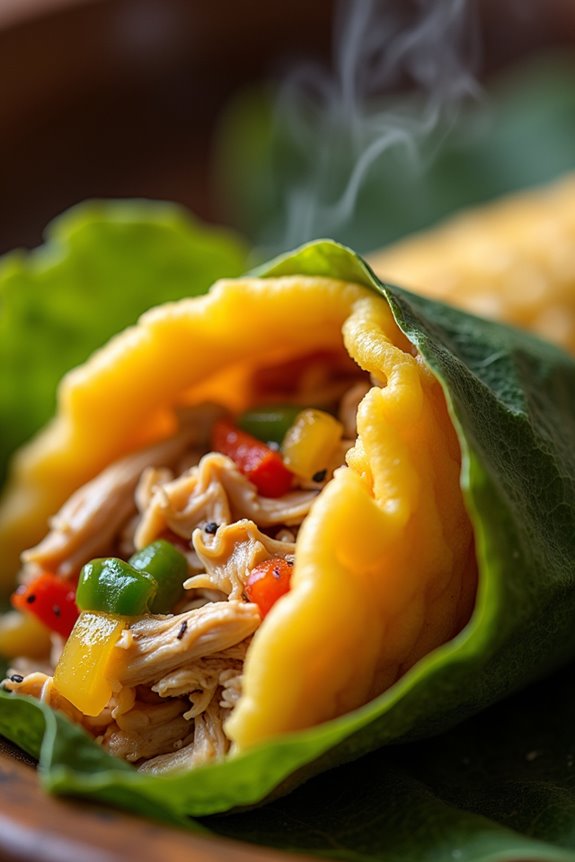
Tamales are a traditional Colombian dish that embodies the rich culinary heritage of the country. These delightful bundles are made from masa (corn dough) filled with a variety of ingredients, including meats, vegetables, and spices, all wrapped in banana leaves or corn husks. The result is a beautifully presented meal that not only pleases the palate but also nourishes the body.
Making tamales can be a labor of love, but the end result is well worth the effort, offering a taste of Colombia in every bite. The process of preparing tamales may seem intimidating at first, but with some patience and practice, you’ll master this delicious dish. The ingredients are versatile, allowing you to customize your tamales to suit your taste.
Whether you prefer a savory pork filling or a vegetarian option with cheese and vegetables, tamales can be adapted to fit your preferences. Gather your friends and family for a tamale-making party, and soon you’ll find yourself enjoying these hearty packages of flavor together.
Ingredients (serving size: 4-6 people)
- 2 cups masa harina
- 1/2 cup vegetable shortening
- 1 cup chicken or vegetable broth
- 1 teaspoon baking powder
- 1 teaspoon salt
- 2 cups cooked, shredded chicken or your choice of filling (pork, cheese, vegetables)
- 1/2 cup salsa or mole sauce (optional)
- 6-8 banana leaves or corn husks, soaked in warm water
- Additional seasonings (cumin, garlic powder, or chili powder to taste)
Cooking Instructions
- Prepare the Masa: In a large mixing bowl, combine the masa harina, baking powder, and salt. In a separate bowl, cream the vegetable shortening until fluffy. Gradually add the masa mixture to the shortening, alternating with the broth, until you achieve a soft, spreadable dough.
- Prepare the Filling: If using chicken, confirm that it’s cooked and shredded. Mix the chicken with salsa or mole sauce if desired, along with any additional seasonings. For vegetarian options, incorporate cooked vegetables and cheese.
- Prepare the Wrappers: Take the soaked banana leaves or corn husks and cut them into rectangles (about 6×8 inches). Pat them dry with a paper towel. This will prevent the tamales from becoming soggy during cooking.
- Assemble the Tamales: Place a spoonful of masa on the center of each leaf or husk. Flatten it slightly with the back of the spoon. Add a spoonful of your filling on top of the masa. Fold the sides of the leaf or husk over the filling, then fold the bottom up to enclose the tamale completely.
- Steam the Tamales: Arrange the tamales upright in a large steamer pot. Add water to the pot, making sure it doesn’t touch the tamales. Cover the pot with a lid and steam over medium heat for about 1 to 1.5 hours, or until the masa easily pulls away from the wrapper.
- Serve: Once cooked, remove the tamales from the steamer and let them cool for a few minutes before serving. You can serve them with extra salsa or mole sauce on the side.
Extra Tips
When making tamales, it’s crucial to confirm that the masa dough is moist enough to spread easily but not too wet, as this could lead to a soggy tamale. Don’t hesitate to experiment with different fillings and spices to find your favorite combination!
Additionally, consider preparing a larger batch and freezing the tamales for a convenient meal option later on. Just steam the frozen tamales directly from the freezer, adding a few extra minutes to the cooking time. Happy cooking!
Calentado: The Ultimate Leftover Dish
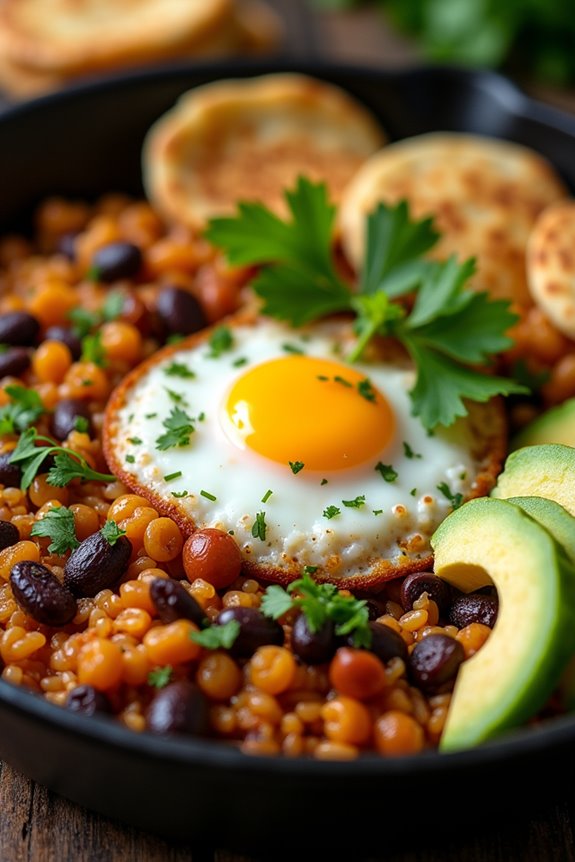
Calentado is a popular Colombian breakfast dish that ingeniously utilizes leftover rice and beans, making it not only a delicious meal but also a practical one. This hearty dish is often served with a variety of accompaniments, such as eggs, avocado, and arepas, creating a filling and satisfying start to the day. The name “calentado” translates to “heated,” which perfectly describes the process of warming up previously cooked ingredients and transforming them into a delightful breakfast experience.
Traditionally, calentado is made by combining leftover rice and beans with an array of seasonings and sometimes adding additional ingredients like meat or vegetables to enhance the flavors. It’s a dish that reflects the Colombian culture of making the most out of what you have, showcasing the creativity and resourcefulness in the kitchen. While it may have humble origins, calentado has become a beloved staple, celebrated for its comforting flavors and versatility.
Ingredients (Serves 4-6)
- 2 cups of cooked rice (preferably leftover)
- 1 cup of cooked black or pinto beans (preferably leftover)
- 1 medium onion, finely chopped
- 2 cloves of garlic, minced
- 1 tablespoon of vegetable oil
- 1 teaspoon of ground cumin
- Salt and pepper, to taste
- 1-2 eggs (optional, for frying)
- Chopped fresh cilantro (for garnish)
- Avocado slices (for serving)
- Arepas (for serving)
Cooking Instructions
- Prepare the Ingredients: Start by gathering all your ingredients. If using leftover rice and beans from the refrigerator, verify they’re at room temperature for easier mixing. Chop the onion and mince the garlic to have them ready for cooking.
- Sauté the Aromatics: In a large skillet, heat the vegetable oil over medium heat. Once hot, add the chopped onions and sauté for about 3-4 minutes, or until they become translucent. This step is essential as it builds the base flavor for your calentado.
- Add Garlic and Spices: Stir in the minced garlic and cook for an additional minute until fragrant. Then, sprinkle in the ground cumin, salt, and pepper. Allow the spices to toast slightly, which will enhance their flavors.
- Mix in Rice and Beans: Add the cooked rice and beans to the skillet, stirring well to combine all the ingredients. Cook for about 5-7 minutes, allowing the mixture to heat through and for the flavors to meld together. Stir occasionally to prevent sticking.
- Optional: Cook the Eggs: If you’d like to include eggs, push the rice and bean mixture to one side of the skillet and crack the eggs into the empty space. Fry the eggs to your desired doneness, sunny-side up or scrambled, and then mix them into the calentado.
- Serve: Once everything is heated and cooked through, remove the skillet from the heat. Serve the calentado hot, garnished with chopped fresh cilantro, alongside slices of avocado and warm arepas on the side.
Extra Tips
For an even more flavorful calentado, consider adding some diced leftover meat, such as chorizo or pork, during the sautéing step. This will enhance the protein content and add depth to the dish.
Feel free to adjust the seasonings to your preference, and don’t hesitate to experiment with additional toppings like hot sauce or cheese for an extra kick!
Huevos Pericos: Scrambled Eggs With a Twist

Huevos Pericos, a delightful Colombian breakfast staple, is a vibrant and flavorful dish that elevates the humble scrambled egg to new heights. This dish is characterized by the addition of fresh herbs, onions, and tomatoes, giving it a unique twist that tantalizes the tastebuds. Traditionally served with arepas or toasted bread, Huevos Pericos isn’t only quick to prepare but also provides a hearty start to the day, making it perfect for families or breakfast gatherings.
To prepare Huevos Pericos, the key is to use fresh, high-quality ingredients that will bring out the flavors of the dish. The combination of sautéed vegetables mixed with fluffy scrambled eggs creates a delightful texture and taste. Whether you’re a seasoned cook or a beginner in the kitchen, this recipe is easy to follow and guarantees a satisfying meal that will impress your family and friends.
Ingredients (Serves 4-6):
- 6 large eggs
- 1 medium onion, finely chopped
- 1 medium tomato, diced
- 1/4 cup fresh cilantro, chopped
- 1 tablespoon butter or vegetable oil
- Salt and pepper to taste
- Optional: 1 jalapeño, finely chopped (for heat)
Cooking Instructions:
1. Prepare the Ingredients: Gather all your ingredients and chop the onion, tomato, and cilantro. If you’re using jalapeño, make sure to remove the seeds for less heat. This prep work will streamline the cooking process and guarantee that everything is ready when you need it.
2. Sauté the Vegetables: In a large skillet, heat the butter or vegetable oil over medium heat. Add the chopped onion and sauté for about 2-3 minutes until it becomes translucent.
Then, add the diced tomato (and jalapeño, if using) to the skillet. Cook for an additional 2-3 minutes until the tomatoes soften. This step enhances the flavors and creates a fragrant base for your eggs.
3. Beat the Eggs: In a separate bowl, crack the eggs and whisk them together until well combined. Add a pinch of salt and pepper to taste. Beating the eggs thoroughly ensures that they’ll be fluffy when cooked.
4. Combine and Cook: Pour the beaten eggs into the skillet with the sautéed vegetables. Stir gently with a spatula, allowing the eggs to cook evenly. Keep stirring occasionally, and cook until the eggs are just set but still soft, about 3-5 minutes.
This technique prevents overcooking and results in creamy scrambled eggs.
5. Add Cilantro: Once the eggs are cooked to your liking, remove the skillet from heat and fold in the chopped cilantro. This adds a fresh, aromatic flavor that complements the dish beautifully.
6. Serve: Serve the Huevos Pericos hot, either on their own or alongside arepas, sliced avocado, or toast. Garnish with extra cilantro if desired for a colorful presentation.
Extra Tips:
When preparing Huevos Pericos, feel free to adjust the ingredients according to your taste preferences. Adding different vegetables like bell peppers or spinach can enhance the nutritional value and flavor profile of the dish.
Additionally, for a creamier texture, consider adding a splash of milk or cream to the eggs before cooking. Remember to cook the eggs over medium heat to avoid overcooking them, which can lead to a rubbery texture. Enjoy experimenting with this versatile recipe!
Avena: A Creamy Colombian Oatmeal
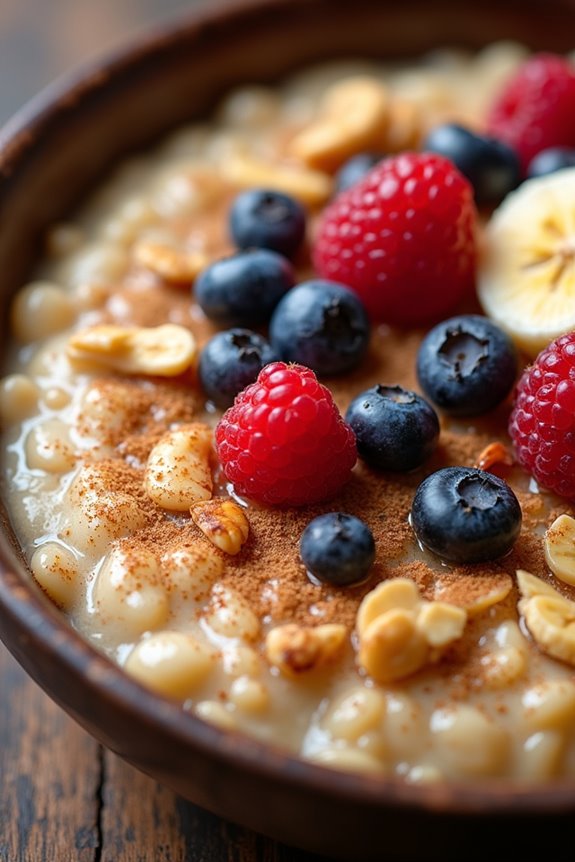
Avena, or Colombian oatmeal, is a delicious and nutritious breakfast option that’s beloved across Colombia. This creamy dish is made from rolled oats, milk, and a variety of spices, creating a warm and comforting meal that’s perfect for starting your day. Often sweetened with panela (unrefined cane sugar) and flavored with cinnamon, this oatmeal isn’t only filling but also provides a taste of traditional Colombian flavors.
The beauty of Avena lies in its versatility; it can be served warm or chilled, and can be customized with toppings such as fruit, nuts, or additional sweeteners. Making Avena at home is simple, and once you master the basic recipe, you can experiment with different flavors to suit your palate. Here’s how to make this delightful Colombian breakfast treat for 4-6 people.
Ingredients:
- 2 cups rolled oats
- 4 cups water
- 2 cups milk (whole or any preferred alternative)
- 1 cup panela (or brown sugar)
- 1 teaspoon cinnamon
- 1 teaspoon vanilla extract
- A pinch of salt
- Optional toppings: sliced bananas, berries, shredded coconut, or nuts
Cooking Instructions:
- Rinse the Oats: Begin by rinsing the rolled oats under cold water in a fine-mesh sieve. This step helps to remove any impurities and excess starch, leading to a creamier texture in the final dish.
- Cook the Oats: In a large saucepan, combine the rinsed oats and 4 cups of water. Bring the mixture to a boil over medium-high heat, stirring occasionally to prevent the oats from sticking to the bottom of the pan. Once boiling, reduce the heat to low and let it simmer for about 5-7 minutes, or until the oats are tender.
- Add Milk and Flavoring: After the oats have softened, stir in the milk, panela (or brown sugar), cinnamon, vanilla extract, and a pinch of salt. Mix well to combine all the ingredients, and let the mixture simmer for an additional 5-10 minutes. This will allow the flavors to meld together and the oatmeal to thicken.
- Check Consistency: After simmering, check the consistency of the Avena. If you prefer a thicker oatmeal, you can let it cook a bit longer. If it’s too thick for your liking, add a little more milk or water to reach your desired consistency.
- Serve: Once the Avena is ready, remove it from the heat and serve it warm in bowls. Feel free to add your preferred toppings such as sliced bananas, berries, or a sprinkle of nuts for added texture and flavor.
Extra Tips:
When making Avena, you can adjust the sweetness according to your taste; if you prefer a less sweet oatmeal, reduce the amount of panela or sugar used.
Additionally, for a creamier texture, try substituting part of the water with additional milk or using whole milk. Avena can also be made in advance and stored in the refrigerator for up to three days; simply reheat and add a splash of milk when serving to revive its creamy consistency.
Enjoy your Colombian breakfast!
Pandebono: Cheesy Bread Rolls

Pandebono is a beloved Colombian breakfast treat that brings a delightful combination of flavors and textures to the table. These cheesy bread rolls are made with a blend of cassava flour and cheese, resulting in a slightly chewy yet soft exterior, while the inside remains warm and cheesy.
Traditionally enjoyed with hot chocolate or coffee, pandebono is a staple in Colombian households and is often served during special occasions or family gatherings.
Making pandebono at home is easier than you might think. With a few simple ingredients and straightforward steps, you can whip up a batch that will transport you straight to the heart of Colombia. The aromatic scent of freshly baked pandebono will fill your kitchen, making it the perfect way to start your day or to impress guests with a unique dish.
Ingredients (serving size: 4-6 people)
- 2 cups of cassava flour (yuca flour)
- 1 cup of grated cheese (such as queso blanco or mozzarella)
- 1/2 cup of milk
- 2 eggs
- 1/2 teaspoon of baking powder
- 1/2 teaspoon of salt
- 1 tablespoon of sugar (optional)
- 1 tablespoon of butter (melted)
Cooking Instructions
- Preheat the Oven: Begin by preheating your oven to 375°F (190°C). This guarantees that your pandebono will be baked evenly and achieve a beautiful golden color.
- Mix Dry Ingredients: In a large mixing bowl, combine the cassava flour, baking powder, and salt. If you prefer a slightly sweet flavor, add the sugar as well. Mix well to guarantee that the dry ingredients are evenly distributed.
- Combine Wet Ingredients: In a separate bowl, whisk together the eggs, milk, and melted butter. Mixing these ingredients separately helps to break up the eggs and guarantees a smoother mixture when combined with the dry ingredients.
- Combine Mixtures: Gradually add the wet mixture to the dry ingredients, stirring until a dough begins to form. You may need to use your hands to knead the dough lightly until it comes together. It should be slightly sticky but manageable.
- Add Cheese: Fold in the grated cheese into the dough. Make sure the cheese is well incorporated throughout the mixture, as this will give the pandebono its signature cheesy flavor.
- Shape the Rolls: Take small portions of the dough and roll them into balls, about the size of a golf ball. Place them on a baking sheet lined with parchment paper, leaving space between each roll as they’ll expand while baking.
- Bake: Place the baking sheet in the preheated oven and bake for 20-25 minutes or until the pandebono are puffed up and golden brown on top.
- Cool and Serve: Once baked, remove the pandebono from the oven and allow them to cool slightly on a wire rack. Serve warm, ideally with a hot beverage.
Extra Tips
For an extra twist on your pandebono, feel free to experiment with different types of cheese or add herbs such as oregano or chives for additional flavor.
If you find the dough too sticky to handle, lightly flour your hands before shaping the rolls. Additionally, pandebono is best enjoyed fresh out of the oven, but you can store any leftovers in an airtight container and reheat them in the oven to restore their delightful texture.
Enjoy your culinary journey into Colombian cuisine!
Almojábanas: Savory Cheese Muffins

Almojábanas are a delightful Colombian treat that can brighten up any breakfast table. These savory cheese muffins are made with a combination of cornmeal and cheese, creating a moist and flavorful bite that pairs wonderfully with coffee or fresh juice.
They’re a popular street food and are cherished for their simplicity and rich taste. The texture is slightly chewy on the outside while remaining soft and tender on the inside, making them a perfect start to the day or a satisfying snack.
Making almojábanas at home is easier than you might think. With just a few basic ingredients, you can whip up a batch that will transport you to the vibrant streets of Colombia.
They’re best enjoyed warm, straight from the oven, with a bit of butter or jam if desired. Whether you’re hosting a breakfast gathering or just treating yourself, these cheesy muffins are sure to impress.
Ingredients (serving size: 4-6 people)
- 2 cups cornmeal (masarepa)
- 1 cup grated cheese (preferably queso blanco or mozzarella)
- 1 cup milk
- 1/2 cup vegetable oil
- 2 large eggs
- 1 tablespoon baking powder
- 1/2 teaspoon salt
Cooking Instructions
- Preheat the Oven: Begin by preheating your oven to 400°F (200°C). This guarantees that your almojábanas will bake evenly and develop a nice golden color.
- Mix Dry Ingredients: In a large mixing bowl, combine the cornmeal, baking powder, and salt. Stir the dry ingredients together until they’re well mixed, which helps to guarantee that the baking powder is evenly distributed throughout the mixture.
- Combine Wet Ingredients: In another bowl, whisk together the eggs, milk, and vegetable oil until smooth. This mixture will provide moisture and richness to the almojábanas.
- Combine Mixtures: Gradually add the wet ingredients to the dry ingredients, stirring until just combined. Avoid over-mixing; a few lumps are okay. The goal is to create a thick batter.
- Add Cheese: Fold in the grated cheese gently into the batter. This step is essential as it adds the savory flavor and gooey texture that makes almojábanas so desirable.
- Prepare the Muffin Tin: Lightly grease a muffin tin or line it with muffin liners. This will prevent the almojábanas from sticking and make for easy removal once they’re baked.
- Fill Muffin Tin: Spoon the batter into the prepared muffin tin, filling each cup about 3/4 full. This allows room for the muffins to rise without overflowing.
- Bake: Place the muffin tin in the preheated oven and bake for 20-25 minutes, or until the tops are golden brown and a toothpick inserted in the center comes out clean.
- Cool and Serve: Once baked, remove the almojábanas from the oven and let them cool for a few minutes in the muffin tin before transferring them to a wire rack. Serve warm with butter or your favorite jam.
Extra Tips
For an extra flavor boost, feel free to experiment with different cheeses or add herbs like cilantro or green onions to the batter.
Make sure to adjust the salt content accordingly depending on the type and saltiness of the cheese used. Additionally, these almojábanas can be made ahead of time and reheated; they also freeze well, allowing you to enjoy this delicious Colombian breakfast treat whenever the craving strikes!
Chocoramo: A Sweet Chocolate-Covered Treat

Chocoramo is a beloved Colombian treat that perfectly combines the richness of chocolate with the soft, cake-like texture of a biscuit. This delightful snack is often enjoyed during breakfast or as an afternoon pick-me-up. With its sweet chocolate coating and fluffy filling, Chocoramo has become a popular choice among both children and adults alike.
Making your own version of Chocoramo at home can be a fun and rewarding experience, letting you customize the flavors and ingredients to your liking. While the traditional Chocoramo is typically found in stores, creating this sweet snack from scratch allows you to enjoy a fresher and possibly healthier version.
With just a few simple ingredients and steps, you can whip up a batch of these chocolate-covered treats that are sure to impress your family and friends. Follow this easy recipe to bring a taste of Colombia to your kitchen!
Ingredients (Serves 4-6):
- 1 cup all-purpose flour
- 1/2 cup granulated sugar
- 1/2 cup unsweetened cocoa powder
- 1/2 teaspoon baking powder
- 1/4 teaspoon salt
- 1/2 cup unsalted butter, softened
- 2 large eggs
- 1 teaspoon vanilla extract
- 1 cup chocolate chips (semisweet or milk chocolate)
- 1 tablespoon vegetable oil (for melting chocolate)
Instructions:
- Preheat the Oven: Begin by preheating your oven to 350°F (175°C). This guarantees an even baking temperature for your Chocoramo, helping them to rise properly and develop a nice texture.
- Mix Dry Ingredients: In a medium bowl, combine the all-purpose flour, granulated sugar, cocoa powder, baking powder, and salt. Whisk together until the mixture is well blended and there are no lumps. This step is essential for achieving a uniform batter.
- Cream Butter and Sugar: In a separate large bowl, beat the softened butter with an electric mixer until it becomes creamy. Gradually add the dry ingredients to the creamed butter, mixing until combined.
- Add Eggs and Vanilla: Add the eggs, one at a time, mixing well after each addition. Then, stir in the vanilla extract. This will enhance the flavor of your Chocoramo and give it that classic taste.
- Bake the Biscuits: Scoop the batter into small mounds on a baking sheet lined with parchment paper, spacing them about 2 inches apart. Bake for 12-15 minutes or until a toothpick inserted into the center comes out clean. Allow them to cool on a wire rack.
- Melt the Chocolate: In a microwave-safe bowl, combine the chocolate chips and vegetable oil. Microwave in short bursts (30 seconds at a time), stirring in between until the chocolate is fully melted and smooth. This will create a glossy coating for your Chocoramo.
- Coat the Biscuits: Once the biscuits are completely cool, dip each one into the melted chocolate, making sure they’re fully coated. Place them back on the parchment paper to set. You can use a fork to lift them out and let excess chocolate drip off.
- Let Chocolate Set: Allow the chocolate to set completely at room temperature or in the refrigerator for faster results. Once set, your Chocoramo treats are ready to be enjoyed!
Extra Tips:
For an added twist, consider adding flavors to the batter such as orange zest or coffee for a unique taste. You can also experiment with different types of chocolate for the coating, such as dark chocolate for a richer flavor or white chocolate for a sweeter profile.
Additionally, be sure to store any leftovers in an airtight container to keep them fresh for longer. Enjoy your homemade Chocoramo as a delightful breakfast treat or a sweet snack throughout the day!