

Colombian desserts hold a special place in my heart, offering a sweet escape into vibrant flavors and cherished traditions. Each recipe tells its own story, from the creamy delight of Tres Leches Cake to the irresistible crunch of Buñuelos. These treats are perfect for sharing with loved ones or simply indulging in a moment of sweetness. If you’re looking for some delicious inspiration, I’ve rounded up a collection of dreamy postres that will surely brighten your day. Let’s explore these enchanting recipes together and discover the magic of Colombian sweets.
Arequipe: The Sweet Caramel Spread
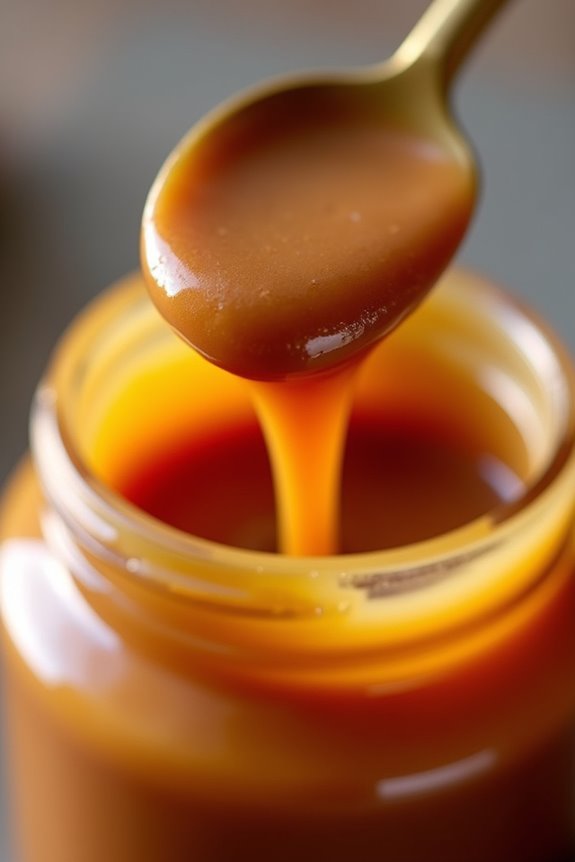
Arequipe, a beloved Colombian dessert, is a sweet caramel spread that delights the palate with its rich, creamy texture and deep caramel flavor. Often enjoyed on toast, drizzled over desserts, or even eaten straight from the jar, this treat is a staple in many Colombian households. The charm of arequipe lies in its simplicity, requiring just a few ingredients and a bit of patience to achieve the perfect consistency.
Whether you’re looking to elevate your breakfast or satisfy a sweet craving, arequipe is a versatile addition to your culinary repertoire.
Making arequipe is a rewarding experience that brings the comforting aroma of caramel into your kitchen. It’s traditionally made with just sweetened condensed milk, but there are variations that incorporate vanilla or a pinch of salt for added depth. As you simmer the mixture, you’ll be mesmerized by the transformation from a pale liquid to a luscious, golden spread.
The process does necessitate careful attention to avoid burning, but the result is undeniably worth it.
Ingredients (Serves 4-6):
- 1 can (14 oz) sweetened condensed milk
- 2 tablespoons unsalted butter
- 1 teaspoon vanilla extract (optional)
- A pinch of salt (optional)
Cooking Instructions:
- Prepare Your Ingredients: Gather all the ingredients you need for making arequipe. Make sure you have a heavy-bottomed saucepan, as this will help distribute heat evenly and prevent burning during the cooking process.
- Combine Ingredients in the Saucepan: Pour the sweetened condensed milk into the saucepan. Add the unsalted butter, and if using, the vanilla extract and a pinch of salt. Stir the mixture gently to combine all the ingredients.
- Heat the Mixture: Place the saucepan over low to medium heat. It’s crucial to keep the heat low to avoid scorching the milk. Stir continuously to prevent the mixture from sticking to the bottom of the pan.
- Simmer and Stir: As the mixture heats up, continue to stir it frequently. You’ll notice it begin to thicken and change color after about 10-15 minutes. Maintain a gentle simmer, and keep stirring to guarantee even cooking.
- Watch for Color Change: After about 30-40 minutes of simmering, the mixture should start to turn a golden brown color. This is a sign that the arequipe is nearing completion. Continue stirring while watching for the desired consistency, which should be thick enough to coat the back of a spoon.
- Cool and Store: Once you achieve the desired consistency and color, remove the saucepan from the heat. Allow the arequipe to cool slightly before transferring it to a clean glass jar or container. It will thicken further as it cools.
- Enjoy: Your homemade arequipe is now ready to be enjoyed! Use it as a spread, a filling for desserts, or simply enjoy it by the spoonful.
Extra Tips:
When making arequipe, patience is key. Avoid increasing the heat to speed up the process, as this could lead to burning. If you’re new to making caramel, keep a close watch on the mixture during the final stages to achieve that perfect golden hue.
You can experiment with flavors by adding a touch of cinnamon or even a splash of coffee for a unique twist. Store your arequipe in an airtight container in the refrigerator, where it can last for up to two weeks. Enjoy your delicious creation!
Tres Leches Cake: A Moist Milk Cake Delight

Tres Leches Cake, or “Pastel de Tres Leches,” is a classic Colombian dessert that has captured the hearts of many around the world. This delightful cake is known for its incredible moisture and rich flavor, which comes from soaking the sponge cake in a mixture of three types of milk: evaporated milk, condensed milk, and heavy cream. The result is a luscious dessert that’s both sweet and satisfying, making it a perfect treat for any occasion.
The origins of Tres Leches Cake can be traced back to Latin America, where it has become a staple in many households. Its light and airy texture paired with the creamy milk mixture creates a dessert that’s a feast for the senses. Whether you’re celebrating a birthday, a family gathering, or simply indulging your sweet tooth, Tres Leches Cake is sure to impress your guests and leave them craving more.
Ingredients (Serves 4-6)
- 1 cup all-purpose flour
- 1 ½ teaspoons baking powder
- ¼ teaspoon salt
- ½ cup unsalted butter, softened
- 1 cup granulated sugar
- 5 large eggs
- 1 teaspoon vanilla extract
- 1 cup evaporated milk
- 1 cup sweetened condensed milk
- 1 cup heavy cream
- 1 teaspoon vanilla extract (for the milk mixture)
- Whipped cream (for topping)
- Fresh fruit or cherries (for garnish, optional)
Cooking Instructions
1. Preheat the Oven: Start by preheating your oven to 350°F (175°C). This guarantees that your cake will bake evenly and rise properly.
2. Prepare the Cake Batter: In a medium bowl, whisk together the all-purpose flour, baking powder, and salt. In a separate large mixing bowl, beat the softened butter and granulated sugar together until light and fluffy. This should take about 3-5 minutes.
Add the eggs one at a time, mixing well after each addition. Stir in the vanilla extract. Gradually add the flour mixture to the wet ingredients, mixing until just combined.
3. Bake the Cake: Pour the batter into a greased 9×13 inch baking dish, smoothing the surface with a spatula. Bake in the preheated oven for 25-30 minutes or until a toothpick inserted into the center comes out clean.
Remove the cake from the oven and allow it to cool in the pan for about 10 minutes before transferring it to a wire rack to cool completely.
4. Prepare the Milk Mixture: In a bowl, whisk together the evaporated milk, sweetened condensed milk, heavy cream, and the additional teaspoon of vanilla extract. Set aside.
5. Soak the Cake: Once the cake has cooled, poke holes all over the surface using a fork or a skewer. This will help the milk mixture soak in. Pour the milk mixture evenly over the cake, allowing it to absorb the liquid.
Cover the cake and refrigerate for at least 4 hours, or preferably overnight, to let the flavors meld.
6. Serve: Before serving, top the cake with whipped cream and garnish with fresh fruit or cherries if desired. Slice and serve chilled for a revitalizing dessert experience.
Extra Tips
When making Tres Leches Cake, it’s important to let the cake soak in the milk mixture for a sufficient amount of time, preferably overnight, as this will enhance its moisture and flavor.
Additionally, feel free to get creative with your toppings; you can use toasted coconut, nuts, or even a sprinkle of cinnamon for added flavor. If you want a more decadent treat, consider drizzling some chocolate sauce on top before serving.
Buñuelos: Crispy Cheese Balls
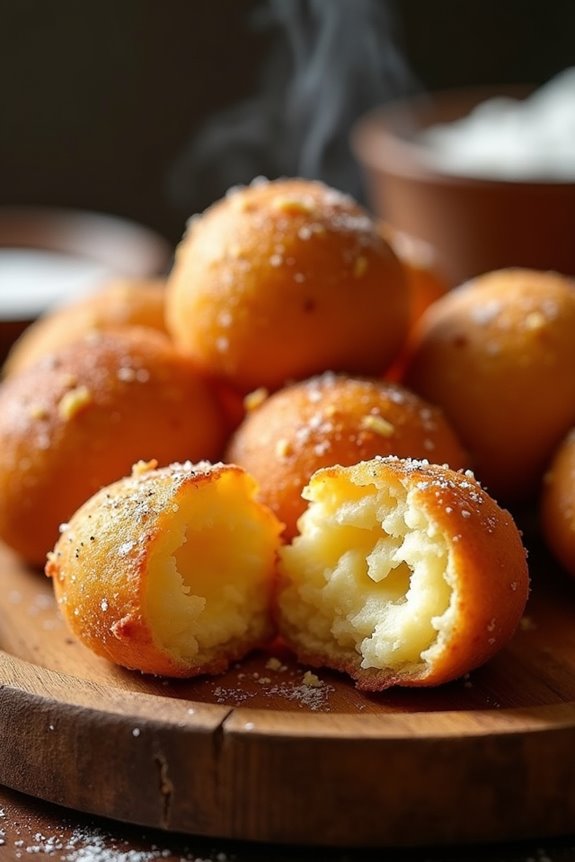
Buñuelos are a beloved Colombian dessert that perfectly combines the flavors of cheese and dough into a delightful, crispy treat. Traditionally enjoyed during the Christmas season, these cheese balls are a staple in Colombian households and are often served alongside a warm cup of hot chocolate or coffee. The combination of a slightly salty cheese with sweet dough creates a harmonious balance that’s both satisfying and indulgent.
Making buñuelos at home is easier than you might think, and the end result is an irresistible snack that will have everyone coming back for more. The key to achieving the perfect texture is to fry them at the right temperature, so they puff up beautifully and develop a golden, crispy exterior. Whether you’re preparing for a holiday gathering or simply craving a taste of Colombia, these buñuelos are sure to impress.
Ingredients (Serves 4-6 people):
- 1 cup of queso fresco or farmer’s cheese, crumbled
- 1 cup of tapioca flour
- 1/4 cup of all-purpose flour
- 1/4 cup of sugar
- 1/2 teaspoon of baking powder
- 1/4 teaspoon of salt
- 2 large eggs
- 1/4 cup of milk
- Vegetable oil (for frying)
Cooking Instructions:
- Prepare the Cheese Mixture: In a mixing bowl, combine the crumbled queso fresco, tapioca flour, all-purpose flour, sugar, baking powder, and salt. Mix well to confirm that all the dry ingredients are evenly distributed.
- Combine Wet Ingredients: In a separate bowl, beat the eggs and then add the milk. Whisk until well combined.
- Form the Dough: Pour the wet mixture into the dry ingredients. Stir with a spoon or your hands until a soft dough forms. If the dough is too sticky, add a little more tapioca flour until it reaches a manageable consistency.
- Shape the Buñuelos: Take about a tablespoon of dough and roll it into a ball between your palms. Repeat this process with the remaining dough, placing the shaped balls on a plate.
- Heat the Oil: In a deep frying pan or pot, pour enough vegetable oil to cover the buñuelos when frying (about 2-3 inches deep). Heat the oil over medium heat until it reaches 350°F (175°C). You can test if the oil is ready by dropping a small piece of dough into it; if it sizzles and rises to the surface, the oil is hot enough.
- Fry the Buñuelos: Carefully add the buñuelos to the hot oil, making sure not to overcrowd the pan. Fry them in batches for about 4-6 minutes or until they’re golden brown, turning them occasionally to confirm even cooking.
- Drain and Serve: Once cooked, use a slotted spoon to transfer the buñuelos to a plate lined with paper towels to drain excess oil. Serve warm, optionally dusted with powdered sugar or accompanied by a sweet sauce.
Extra Tips:
For the best results, make sure the cheese you use isn’t too watery, as this can affect the texture of the buñuelos. If using queso fresco, confirm it’s well-drained.
Additionally, keeping the oil at the right temperature is essential; too hot, and they’ll cook too quickly on the outside without cooking through, too cool, and they’ll become greasy. If you’re unsure, use a thermometer to monitor the oil temperature.
Enjoy your buñuelos fresh for the best taste and texture!
Natilla: Traditional Colombian Custard

Natilla is a beloved Colombian dessert that’s often enjoyed during the festive season, particularly around Christmas. This creamy, custard-like treat is made with milk, sugar, and a touch of cinnamon, creating a warm and comforting flavor that’s guaranteed to delight your palate.
Traditionally, natilla is thickened with cornstarch, which gives it a unique texture that’s smooth and velvety. It’s typically served chilled and can be garnished with a sprinkle of cinnamon or grated coconut for an extra touch.
Making natilla is a wonderful way to bring a taste of Colombia into your home. The preparation is relatively simple and requires only a few basic ingredients. Whether you’re hosting a holiday gathering or simply indulging in a sweet treat, natilla is certain to impress your friends and family with its delightful flavor and creamy consistency.
Ingredients (Serves 4-6)
- 4 cups whole milk
- 1 cup sugar
- 1 cup cornstarch
- 1 teaspoon vanilla extract
- 1 cinnamon stick
- 1/4 teaspoon salt
- Ground cinnamon (for garnish)
- Grated coconut (optional, for garnish)
Cooking Instructions
- Combine Milk and Cinnamon: In a medium saucepan, pour in the 4 cups of whole milk and add the cinnamon stick. Heat the mixture over medium heat until it begins to warm, but don’t bring it to a boil. Stir occasionally to prevent the milk from scorching.
- Mix Dry Ingredients: In a separate bowl, combine the 1 cup of cornstarch, 1 cup of sugar, and 1/4 teaspoon of salt. Mix well to confirm there are no lumps in the cornstarch. This will help in achieving a smooth custard texture.
- Create a Slurry: Once the milk is warm, remove the cinnamon stick and take a small amount of the warm milk (about 1 cup) and slowly pour it into the dry mixture. Whisk continuously to create a slurry. This step is vital as it prevents lumps from forming once you combine it back with the larger milk mixture.
- Thicken the Mixture: Pour the slurry back into the saucepan with the remaining warm milk. Continue to cook over medium heat, stirring constantly. The mixture will begin to thicken after a few minutes. Keep stirring until it reaches a custard-like consistency.
- Add Flavorings: Once thickened, remove the saucepan from the heat and stir in the 1 teaspoon of vanilla extract. Mix well to distribute the flavor evenly throughout the natilla.
- Cool and Set: Pour the natilla into a serving dish or individual cups. Allow it to cool at room temperature for a while before transferring it to the refrigerator. Chill for at least 2 hours or until set.
- Serve: Once chilled and set, sprinkle ground cinnamon on top for garnish. If desired, add grated coconut for an extra layer of flavor and texture. Serve cold and enjoy!
Extra Tips
When making natilla, it’s important to stir continuously while cooking to prevent lumps from forming.
If you prefer a richer flavor, you can substitute half of the whole milk with coconut milk. Additionally, experimenting with different garnishes, such as crushed nuts or dried fruit, can add an interesting twist to this traditional dessert.
Enjoy the process and the delightful results of this Colombian classic!
Postre De Nata: Creamy, Sweet Treat

Postre De Nata is a traditional Colombian dessert that captures the essence of creamy sweetness and rich flavor. Often enjoyed as a delightful treat after a meal, this dessert is a perfect representation of Colombian culinary heritage. The main ingredient, fresh cream, is simmered with sugar and flavored with cinnamon, creating a luscious texture that melts in your mouth.
It’s a simple yet indulgent dessert that can be served on special occasions or as a comforting everyday sweet. Making Postre De Nata isn’t only easy but also rewarding, as it fills your kitchen with the warm, inviting aroma of caramelized sugar and spices.
This dessert is often accompanied by a sprinkle of cinnamon on top, making it visually appealing and delicious. Whether you’re familiar with Colombian cuisine or trying it for the first time, this dessert is sure to impress friends and family alike.
Ingredients (serving size: 4-6 people):
- 4 cups of fresh cream
- 1 cup of sugar
- 1 cinnamon stick
- 1 teaspoon of vanilla extract
- A pinch of salt
- Ground cinnamon (for serving, optional)
Cooking Instructions:
- Prepare the Ingredients: Start by gathering all your ingredients. Make certain to measure the cream, sugar, and spices accurately. This will help guarantee that your Postre De Nata has the perfect balance of sweetness and flavor.
- Heat the Cream: In a large saucepan, pour in the 4 cups of fresh cream. Place it over medium heat and allow it to warm up gently. Make sure to stir occasionally to prevent it from sticking to the bottom of the pan.
- Add Sugar and Cinnamon: Once the cream is warmed, add 1 cup of sugar and the cinnamon stick to the saucepan. Continue to stir until the sugar is fully dissolved. This process will take about 5-7 minutes.
- Simmer the Mixture: Lower the heat and let the mixture simmer gently. Keep stirring occasionally to avoid boiling. Allow it to cook for about 30-40 minutes until the mixture thickens and reduces in volume. You want a creamy consistency that coats the back of a spoon.
- Incorporate Vanilla and Salt: After the mixture has thickened, remove the saucepan from the heat. Discard the cinnamon stick and stir in 1 teaspoon of vanilla extract and a pinch of salt. This will enhance the flavor of the dessert.
- Cool and Serve: Pour the mixture into individual serving cups or a large dish. Allow it to cool at room temperature for a bit, then refrigerate for at least 2 hours or until fully set. Before serving, sprinkle some ground cinnamon on top for added flavor and presentation.
Extra Tips: When preparing Postre De Nata, make sure to use fresh cream for the best flavor and texture. If you want to experiment with flavors, consider adding a splash of orange or lemon zest to the mixture for a citrusy twist.
Be patient while simmering the cream; the longer it cooks, the richer the flavor will be. Enjoy your creamy delight!
Obleas: Thin Wafers With Arequipe
Obleas are a traditional Colombian dessert that consists of thin, crunchy wafers filled with arequipe, a delicious caramel-like spread made from sweetened condensed milk. This delightful treat isn’t only popular in Colombia but also enjoyed in various forms across Latin America.
The combination of the crispy wafers and the smooth, sweet filling results in a mouthwatering experience that’s certain to please anyone with a sweet tooth.
Making obleas at home is an enjoyable process and allows you to customize the filling to your liking. While arequipe is the classic choice, you can also experiment with other fillings such as fruit preserves or chocolate spread. This recipe provides a simple and straightforward way to create these delightful wafers, perfect for serving 4-6 people at your next gathering or as a special treat for yourself.
Ingredients (Serving Size: 4-6 people)
- 1 cup all-purpose flour
- 1/4 cup sugar
- 1/2 teaspoon salt
- 1/2 teaspoon baking powder
- 1/4 cup water
- 1/2 cup arequipe (or dulce de leche)
- Optional: powdered sugar for dusting
Cooking Instructions
1. Prepare the Batter: In a large mixing bowl, combine the all-purpose flour, sugar, salt, and baking powder. Whisk these dry ingredients together until well mixed. Gradually add the water while stirring until you have a smooth and thick batter. The consistency should be similar to pancake batter.
2. Heat the Cooking Surface**: Preheat a non-stick skillet or a flat griddle over medium heat. It’s important to make certain the surface is hot enough to create a crispy texture** but not too hot that it burns the wafers.
3. Cook the Obleas: Once the skillet is hot, pour a small amount of the batter (about 2 tablespoons) onto the skillet, spreading it into a thin, round shape using the back of a spoon. Cook for about 1-2 minutes on one side, or until the edges start to lift and the bottom is golden brown.
Flip the oblea and cook for an additional 1-2 minutes on the other side until it’s fully cooked and crispy. Repeat this process with the remaining batter, stacking the cooked wafers on a plate as you go.
4. Assemble the Obleas: Take one oblea and spread a generous layer of arequipe on one side. Place another oblea on top to create a sandwich. Press down gently to verify it sticks together.
Repeat with the remaining wafers and filling.
5. Serve and Enjoy: If desired, dust the assembled obleas with powdered sugar for an added touch of sweetness. Serve immediately and enjoy the delightful combination of textures and flavors!
Extra Tips
When making obleas, it’s essential to keep the batter thin for a crispier texture. If the batter is too thick, the wafers may turn out chewy rather than crispy.
Additionally, you can customize your fillings to suit your taste—try adding chopped nuts or a sprinkle of cinnamon to the arequipe for a unique twist. If you’re not serving them immediately, keep the assembled obleas in an airtight container to maintain their crispness.
Merengón: Meringue and Fruit Layered Dessert

Merengón is a delightful Colombian dessert that features layers of crispy meringue and fresh fruit, often complemented by whipped cream. This dessert isn’t only a feast for the eyes but also a treat for the taste buds, combining the sweetness of meringue with the tartness of fresh fruits like strawberries, peaches, or passion fruit.
It’s a popular choice for celebrations and gatherings, making it a perfect addition to any festive table.
Creating the perfect Merengón requires a little patience, especially when it comes to making the meringue. The key to achieving a light and airy texture is to whip the egg whites until they form stiff peaks, guaranteeing that the meringue holds its shape during baking.
Once baked and cooled, you can layer the meringue with your choice of fruit and whipped cream for a stunning dessert that will impress your guests.
Ingredients (Serves 4-6)
- 4 large egg whites
- 1 cup granulated sugar
- 1 teaspoon vanilla extract
- 1/2 teaspoon cream of tartar
- 1 cup heavy whipping cream
- 2 tablespoons powdered sugar
- 2 cups mixed fresh fruits (such as strawberries, peaches, or passion fruit)
Cooking Instructions
1. Prepare the Baking Sheet: Preheat your oven to 225°F (110°C). Line a baking sheet with parchment paper and draw two circles (about 8 inches in diameter) on the paper. This will help you shape the meringue later.
2. Make the Meringue: In a clean mixing bowl, combine the egg whites and cream of tartar. Using an electric mixer, beat the egg whites on medium speed until they start to become frothy. Gradually add the granulated sugar, one tablespoon at a time, while continuing to beat.
Increase the mixer speed to high and beat until the mixture forms stiff peaks and is glossy. Add the vanilla extract and mix briefly to combine.
3. Shape the Meringue: Spoon the meringue mixture evenly onto the prepared circles on the parchment paper. Use a spatula to smooth the tops and create a slight indent in the center, which will hold the cream and fruit later.
4. Bake the Meringue: Place the baking sheet in the preheated oven and bake for about 1.5 hours, or until the meringue is dry and can easily be lifted off the parchment paper.
Once done, turn off the oven and let the meringue cool completely inside the oven with the door slightly ajar.
5. Prepare the Whipped Cream: In a chilled mixing bowl, add the heavy whipping cream and powdered sugar. Using an electric mixer, beat on medium-high speed until soft peaks form.
Be careful not to over-whip; you want a light and fluffy texture.
6. Assemble the Merengón: Once the meringue layers are cool, carefully remove them from the parchment paper. Place one meringue layer on a serving platter. Spread half of the whipped cream on top, then layer half of the mixed fresh fruits.
Place the second meringue layer on top and repeat the process with the remaining whipped cream and fruits.
7. Serve: Slice the Merengón into servings and enjoy immediately for the best texture, as the meringue can absorb moisture over time.
Extra Tips
When making Merengón, it’s important to confirm that your mixing bowl and beaters are completely clean and free from grease, as any fat can prevent the egg whites from whipping properly.
Additionally, feel free to experiment with different fruits or even add a splash of fruit puree between the layers for added flavor. If you’re preparing this dessert in advance, assemble it just before serving to maintain the crispiness of the meringue.
Arroz Con Leche: Creamy Rice Pudding

Arroz con leche, or creamy rice pudding, is a cherished dessert in Colombian culture that brings comfort and warmth with every bite. This delightful dish is made from simple ingredients, transforming regular rice into a sweet, creamy delicacy that’s often enjoyed after meals or during special occasions. The combination of rice, milk, sugar, and spices creates a rich and satisfying dessert that can be served warm or chilled, making it a versatile treat for any time of the year.
This creamy rice pudding isn’t only popular in Colombia but also throughout Latin America, where each country has its own variations and additions. Commonly flavored with cinnamon and sometimes adorned with raisins or coconut, arroz con leche is reminiscent of childhood memories and family gatherings. Whether you’re looking for a comforting dessert to enjoy on a cozy evening or a dish to impress your guests, this recipe for arroz con leche is sure to please.
Ingredients (Serves 4-6):
- 1 cup of long-grain white rice
- 4 cups of whole milk
- 1 cup of water
- 1 cup of sugar
- 1 cinnamon stick
- 1 teaspoon of vanilla extract
- 1/4 teaspoon of salt
- Ground cinnamon (for serving)
- Raisins (optional, for garnish)
Cooking Instructions:
- Rinse the Rice: Begin by rinsing the rice under cold water in a fine-mesh sieve. This step helps to remove excess starch, which can make the pudding too gummy. Rinse until the water runs clear, then drain the rice well.
- Cook the Rice: In a medium-sized pot, combine the rinsed rice and 1 cup of water. Bring to a boil over medium heat. Once boiling, reduce the heat to low, cover the pot, and let it simmer for about 15 minutes, or until the water is absorbed and the rice is tender.
- Add Milk and Sugar: After the rice has cooked, add the 4 cups of whole milk, 1 cup of sugar, the cinnamon stick, vanilla extract, and salt to the pot with the rice. Stir gently to combine all the ingredients.
- Simmer the Mixture: Increase the heat slightly to bring the mixture to a gentle boil. Once boiling, reduce the heat to low and let it simmer uncovered. Stir frequently to prevent the rice from sticking to the bottom of the pot. Continue to simmer for about 30-40 minutes, or until the pudding has thickened to your desired consistency. The rice should be creamy and tender.
- Remove from Heat: Once the arroz con leche has thickened, remove the pot from the heat. Discard the cinnamon stick. If desired, you can stir in some raisins at this point for added flavor and texture.
- Serve: Allow the pudding to cool slightly before serving. You can serve arroz con leche warm or chilled, depending on your preference. When serving, sprinkle with ground cinnamon and garnish with additional raisins if desired.
Extra Tips: When making arroz con leche, it’s important to stir frequently to avoid sticking and burning. You can adjust the sweetness by adding more or less sugar based on your taste. For a richer flavor, consider using a combination of whole milk and coconut milk. Additionally, experimenting with different spices such as nutmeg or cardamom can give the pudding a unique twist. Enjoy your delicious arroz con leche!
Cocadas: Chewy Coconut Bites

Cocadas are a beloved traditional Colombian dessert that perfectly captures the essence of tropical flavors with their rich coconut texture and sweet notes. These delightful, chewy coconut bites are often enjoyed as a treat for special occasions, but they’re simple enough to whip up any day of the week.
With just a handful of ingredients, you can create a deliciously satisfying dessert that will transport your taste buds straight to the sunny beaches of Colombia.
The secret to perfect cocadas lies in the balance of sweetened condensed milk and shredded coconut, which combine to create a wonderfully chewy and slightly sticky texture. Traditionally, cocadas are baked until they achieve a golden-brown color, providing a delightful contrast to their soft interior.
Whether you enjoy them as an afternoon snack or as a sweet ending to your meal, these coconut bites are bound to please everyone at the table.
Ingredients (Serves 4-6 people)
- 2 cups shredded coconut (unsweetened)
- 1 cup sweetened condensed milk
- 1/2 cup granulated sugar
- 1/4 cup unsalted butter, melted
- 1 tsp vanilla extract
- 1/2 tsp salt
- 2 large egg whites
Cooking Instructions
- Preheat the Oven: Begin by preheating your oven to 350°F (175°C). This guarantees that the cocadas will bake evenly and achieve a nice golden color when finished.
- Prepare the Baking Sheet: Line a baking sheet with parchment paper. This will prevent the cocadas from sticking and make it easier to remove them once they’re baked.
- Mix the Ingredients: In a large mixing bowl, combine the shredded coconut, sweetened condensed milk, granulated sugar, melted butter, vanilla extract, and salt. Use a spatula or a wooden spoon to mix the ingredients thoroughly until well combined.
- Incorporate the Egg Whites: In a separate bowl, whisk the egg whites until they form soft peaks. Gently fold the whipped egg whites into the coconut mixture. This step is essential as it adds airiness to the cocadas, helping them achieve a light and chewy texture.
- Form the Cocadas: Using your hands or a cookie scoop, form the mixture into small mounds and place them on the prepared baking sheet, leaving a little space between each mound as they’ll expand slightly while baking.
- Bake: Place the baking sheet in the preheated oven and bake for 15-20 minutes, or until the cocadas turn a lovely golden brown. Keep an eye on them, as baking times may vary depending on your oven.
- Cool and Serve: Once baked, remove the cocadas from the oven and allow them to cool on the baking sheet for about 5 minutes. Then, transfer them to a wire rack to cool completely. Serve them at room temperature and enjoy!
Extra Tips
For an added twist, consider incorporating flavors like lime zest or chopped nuts into the mixture before baking.
If you want to enhance the coconut flavor even further, use freshly grated coconut instead of shredded. Be sure to store any leftovers in an airtight container at room temperature to maintain their chewy texture.
Enjoy your homemade cocadas with a cup of Colombian coffee or share them with friends and family for a delightful treat!
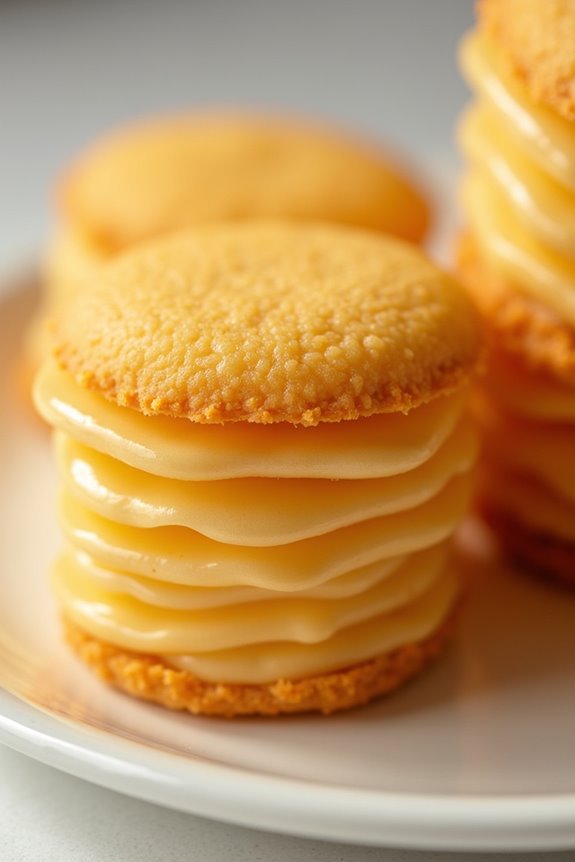
Galletas De Arequipe: Caramel Sandwich Cookies

Galletas De Arequipe are a delightful Colombian dessert that brings together the rich flavors of caramel and buttery cookies. These sandwich cookies are filled with arequipe, a delicious caramel spread that’s similar to dulce de leche. The combination of the crunchy cookies and the smooth, sweet filling creates a perfect balance of textures and flavors, making this treat irresistible.
Whether served at a festive gathering or enjoyed as an everyday snack, Galletas De Arequipe are certain to please anyone with a sweet tooth.
Making Galletas De Arequipe is a straightforward process that requires just a few ingredients and some love. The dough is simple to work with and can be rolled out and cut into shapes for added fun. Once baked, the cookies are complemented with a generous layer of arequipe, creating a satisfying treat that’s both comforting and nostalgic.
This recipe yields enough cookies for 4-6 people, making it perfect for sharing with family and friends or indulging in a sweet moment alone.
Ingredients (Serves 4-6)
- 2 cups all-purpose flour
- 1/2 cup unsalted butter, softened
- 1/2 cup granulated sugar
- 1 large egg
- 1 teaspoon vanilla extract
- 1/2 teaspoon baking powder
- 1/4 teaspoon salt
- Arequipe (to fill the cookies, about 1 cup)
Cooking Instructions
- Prepare the Dough: In a mixing bowl, cream together the softened butter and granulated sugar until light and fluffy. This should take about 3-4 minutes. Once well combined, add the egg and vanilla extract, mixing until fully incorporated.
- Combine Dry Ingredients: In another bowl, whisk together the all-purpose flour, baking powder, and salt. Gradually add the dry mixture to the wet ingredients, mixing until a dough forms. The dough should be smooth and slightly sticky.
- Chill the Dough: Wrap the dough in plastic wrap and refrigerate for at least 30 minutes. Chilling helps the dough firm up, making it easier to roll out and cut into shapes.
- Preheat the Oven: Preheat your oven to 350°F (175°C) while the dough chills. Line a baking sheet with parchment paper to prevent sticking.
- Roll and Cut the Cookies: On a lightly floured surface, roll out the chilled dough to about 1/4 inch thickness. Use cookie cutters or a sharp knife to cut out desired shapes. Place the cut-out cookies on the prepared baking sheet, leaving some space between each cookie.
- Bake the Cookies: Bake in the preheated oven for 10-12 minutes, or until the edges are lightly golden. Be careful not to over-bake, as you want the cookies to remain soft.
- Cool the Cookies: Once baked, remove the cookies from the oven and allow them to cool on the baking sheet for a few minutes before transferring them to a wire rack to cool completely.
- Assemble the Sandwiches: Once the cookies are completely cool, spread a generous layer of arequipe on the bottom of one cookie and sandwich it with another cookie. Press gently to spread the filling to the edges.
Extra Tips
When making Galletas De Arequipe, feel free to experiment with the thickness of the cookies according to your preference. Thinner cookies will be crunchier, while thicker ones will be softer.
If you’re feeling adventurous, you can also add a pinch of cinnamon or cocoa powder to the dough for a unique flavor twist. Make certain that the arequipe is at room temperature for easier spreading, and don’t hesitate to adjust the amount of filling to suit your taste.
Enjoy these cookies with a cup of coffee or hot chocolate for a truly indulgent experience!
Sopa De Frutas: Refreshing Fruit Soup

Sopa de Frutas, or Fruit Soup, is a vibrant and rejuvenating Colombian dessert that beautifully showcases a variety of seasonal fruits. This delightful dish is perfect for warm weather, serving as a light and flavorful treat that tantalizes the taste buds. The combination of fresh fruits immersed in a sweetened, aromatic base creates a delightful balance of textures and flavors, making it a popular choice for family gatherings and festive occasions.
The beauty of Sopa de Frutas lies in its versatility; you can use any combination of fruits depending on availability and personal preference. Commonly used fruits include papaya, mango, pineapple, and strawberries, each contributing unique flavors and colors to the dish. Additionally, the fruit soup can be served chilled or at room temperature, making it an excellent dessert option that can be prepared ahead of time.
Ingredients (Serves 4-6):
- 1 cup diced papaya
- 1 cup diced mango
- 1 cup diced pineapple
- 1 cup diced strawberries
- 2 cups fresh orange juice
- 1 tablespoon lime juice
- 2 tablespoons sugar (adjust to taste)
- 1 teaspoon vanilla extract
- Fresh mint leaves for garnish
Cooking Instructions:
- Prepare the Fruits: Start by washing and peeling the fruits as required. Dice the papaya, mango, pineapple, and strawberries into bite-sized pieces. Confirm that the pieces are uniform to create an appealing presentation and even flavor distribution.
- Mix the Base: In a large mixing bowl, combine the fresh orange juice, lime juice, sugar, and vanilla extract. Stir well until the sugar is completely dissolved. This mixture will serve as the flavorful base for your fruit soup.
- Combine Fruits and Base: Add the diced fruits to the bowl with the juice mixture. Gently stir to confirm that all the fruit pieces are well-coated with the sweetened juice. Be careful not to mash the fruits; you want to maintain their shape and texture.
- Chill the Soup: Cover the bowl with plastic wrap or a lid and place it in the refrigerator. Allow the soup to chill for at least 30 minutes, which will help meld the flavors and enhance the overall taste of the dish.
- Serve the Sopa de Frutas: Once chilled, give the fruit soup a gentle stir before transferring it to serving bowls. Garnish each bowl with fresh mint leaves for an added touch of freshness and flavor.
Extra Tips:
When preparing Sopa de Frutas, feel free to experiment with different fruits based on what’s in season or your personal favorites. Additionally, for an extra layer of flavor, consider adding a splash of coconut milk or a sprinkle of cinnamon to the base mixture.
This dessert not only looks stunning, but it also offers a nutritious way to enjoy fresh fruits, making it a guilt-free indulgence after any meal.
Chocoramo: Chocolate-Covered Cake Snack

Chocoramo is a beloved Colombian treat that combines the soft, spongy texture of a cake with a rich chocolate coating. This delightful snack is often enjoyed with a cup of coffee or as an after-school treat for children. The cake is typically flavored with vanilla and has a moist consistency that pairs perfectly with the sweet chocolate covering.
Making Chocoramo at home allows you to experience the authentic flavors of Colombia right in your kitchen, and it’s a fun project for both baking enthusiasts and beginners alike. The recipe for Chocoramo isn’t only simple but also allows for customization according to your taste. You can experiment with different fillings or toppings, but the classic version remains a favorite.
This recipe will yield enough Chocoramos to satisfy 4-6 people, making it ideal for sharing with friends or family. Gather your ingredients and let’s plunge into creating this delicious Colombian dessert!
Ingredients (serving size: 4-6 people):
- 1 cup all-purpose flour
- 1 cup granulated sugar
- ½ cup unsweetened cocoa powder
- ½ cup unsalted butter, softened
- 2 large eggs
- ½ cup milk
- 1 teaspoon vanilla extract
- 1 teaspoon baking powder
- ½ teaspoon baking soda
- ½ teaspoon salt
- 12 oz semi-sweet chocolate, chopped (for coating)
Cooking Instructions:
- Preheat the Oven: Begin by preheating your oven to 350°F (175°C). This guarantees that the cake bakes evenly and rises properly.
- Prepare the Baking Pan: Grease and flour a rectangular baking pan (approximately 9×13 inches) to prevent the cake from sticking. You can also line it with parchment paper for easier removal.
- Mix Dry Ingredients: In a large mixing bowl, whisk together the all-purpose flour, cocoa powder, baking powder, baking soda, and salt. This step guarantees that all the dry ingredients are well combined and helps to aerate the flour for a lighter cake.
- Cream Butter and Sugar: In another bowl, beat the softened butter and granulated sugar together until light and fluffy. This process typically takes about 3-4 minutes and is essential for incorporating air into the mixture, which helps the cake rise.
- Add Eggs and Vanilla: Add the eggs one at a time, mixing well after each addition. Then, stir in the vanilla extract. This adds flavor and richness to the cake.
- Combine Mixtures: Gradually add the flour mixture to the butter mixture, alternating with the milk. Start and end with the flour mixture, mixing until just combined. Be careful not to overmix, as this can lead to a dense cake.
- Bake the Cake: Pour the batter into the prepared baking pan and smooth the top. Bake in the preheated oven for about 25-30 minutes or until a toothpick inserted in the center comes out clean. Allow the cake to cool in the pan for 10 minutes before transferring it to a wire rack to cool completely.
- Prepare Chocolate Coating: While the cake cools, melt the chopped semi-sweet chocolate in a heatproof bowl over a pot of simmering water (double boiler method) or in the microwave in short bursts, stirring until smooth.
- Cut and Coat the Cake: Once the cake has cooled, cut it into rectangular pieces resembling the classic Chocoramo shape. Dip each piece into the melted chocolate, ensuring it’s fully coated. Place the coated cakes on a wire rack to set.
- Let the Chocolate Set: Allow the chocolate coating to cool and harden at room temperature or in the refrigerator for faster results. Once set, your Chocoramos are ready to be enjoyed!
Extra Tips: For an added twist, consider filling the cake with a layer of dulce de leche or whipped cream before coating it with chocolate. This will give your Chocoramos an extra layer of flavor and creaminess.
Additionally, ascertain that the chocolate is tempered properly for a glossy finish and better texture. Enjoy your homemade Chocoramos with a cup of Colombian coffee for a truly authentic experience!