

When I think about starting my day on a positive note, wholesome Chilean breakfasts come to mind. Picture crispy marraqueta smothered in creamy avocado or a hearty chorrillana breakfast bowl packed with flavors. Each dish tells a story and offers a unique twist on morning meals. If you’re curious about how to bring these vibrant flavors into your own kitchen, you won’t want to miss what comes next.
Marraqueta With Avocado

Marraqueta, a traditional Chilean bread, is a staple often enjoyed during breakfast or as a snack throughout the day. This crusty bread, known for its unique shape and light, airy texture, serves as the perfect base for a variety of toppings. One of the most popular and delicious ways to enjoy marraqueta is by pairing it with creamy avocado, which not only enhances the flavor but also offers a nutritious boost.
This simple yet satisfying dish is ideal for sharing, making it a great choice for breakfast with family or friends. Preparing marraqueta with avocado is quick and easy, allowing you to enjoy a taste of Chilean cuisine in your own home. The combination of the crunchy bread and the smooth avocado creates a delightful contrast that will please any palate.
Whether you’re looking for a quick breakfast option or a light lunch, marraqueta with avocado is sure to become a favorite.
Ingredients (Serves 4-6):
- 4-6 marraqueta rolls
- 2 ripe avocados
- 1 small lime (for juice)
- Salt, to taste
- Black pepper, to taste
- Red pepper flakes (optional, for garnish)
- Fresh cilantro or parsley (optional, for garnish)
Cooking Instructions:
- Prepare the Avocados: Start by cutting the avocados in half, removing the pit, and scooping the flesh into a mixing bowl. Use a fork to mash the avocado to your desired consistency—smooth or chunky, depending on your preference.
- Season the Avocado: Squeeze the juice of the lime into the bowl with the mashed avocado. This won’t only add flavor but also help prevent the avocado from browning. Season with salt and black pepper to taste, mixing well to combine all the ingredients.
- Heat the Marraqueta: If you prefer warm bread, place the marraqueta rolls in a preheated oven at 350°F (175°C) for about 5-7 minutes, or until they’re crisp on the outside. Alternatively, you can toast the rolls on a skillet until they’re golden brown.
- Assemble the Dish: Once the marraqueta rolls are ready, slice them in half lengthwise. Generously spread the seasoned avocado mixture onto each half of the marraqueta, ensuring an even distribution.
- Garnish and Serve: If desired, sprinkle red pepper flakes on top for added heat and garnish with fresh cilantro or parsley for a pop of color and flavor. Serve immediately while the bread is still warm.
Extra Tips:
To enhance the flavor of your marraqueta with avocado, consider adding toppings such as sliced tomatoes, radishes, or a sprinkle of feta cheese for an extra layer of taste.
Additionally, you can experiment with different seasonings like garlic powder or chili powder to tailor the dish to your liking. For a more filling breakfast, serve it alongside scrambled eggs or a side of fresh fruit. Enjoy your delicious Chilean breakfast!
Pebre on Toast

Pebre is a traditional Chilean condiment that combines fresh herbs, tomatoes, onion, and chili peppers, delivering a burst of flavor and freshness. This vibrant mixture is often served alongside bread, making it a perfect addition to your breakfast table. Toasting the bread adds a delightful crunch, creating a harmonious balance with the zesty pebre.
This dish isn’t only simple to prepare but also a fantastic way to introduce the flavors of Chile to your morning routine. Incorporating fresh ingredients is key to achieving the best taste in this dish. The combination of cilantro, tomatoes, and the kick from the chili peppers makes pebre a versatile topping that can elevate any meal.
Whether you’re using it as a spread on bread or as a dip, this dish is sure to impress your family and friends. Plus, it’s a great way to start your day with a healthy and flavorful breakfast!
Ingredients (Serves 4-6):
- 1 cup fresh cilantro, finely chopped
- 1 medium onion, finely chopped
- 2 medium tomatoes, diced
- 1-2 green chili peppers, finely chopped (adjust to taste)
- 2 tablespoons olive oil
- 1 tablespoon red wine vinegar
- Salt and pepper to taste
- 4-6 slices of rustic bread or French baguette
Cooking Instructions:
- Prepare the Ingredients: Begin by washing and chopping the fresh cilantro, onion, tomatoes, and chili peppers. Make sure to finely chop the onions and chili peppers to enhance the flavors and texture of the pebre.
- Mix the Pebre: In a medium-sized bowl, combine the chopped cilantro, onion, diced tomatoes, and chili peppers. Gently mix the ingredients together to guarantee they’re evenly distributed.
- Add Flavor: Drizzle in the olive oil and red wine vinegar. Season the mixture with salt and pepper to taste. Stir well to combine, ensuring all the ingredients are coated with the oil and vinegar, which will help to meld the flavors together.
- Toast the Bread: While the pebre is resting and allowing the flavors to develop, preheat your oven to 400°F (200°C). Place the slices of bread on a baking sheet and toast them in the oven for about 5-7 minutes or until they’re golden brown and crispy. You can also toast the bread in a toaster if you prefer.
- Serve: Once the bread is toasted, remove it from the oven and let it cool slightly. Spoon a generous amount of the pebre mixture onto each slice of toast. Serve immediately while the bread is still warm.
Extra Tips:
For a more personalized touch, feel free to experiment with the ratio of ingredients in your pebre. Some people enjoy adding a squeeze of lemon juice for extra acidity, while others may prefer to include diced avocado or olives for additional texture.
Always taste your pebre before serving to ascertain it’s seasoned to your liking. Enjoy your pebre on toast as a hearty breakfast or as a light snack throughout the day!
Chilean Breakfast Omelette

The Chilean Breakfast Omelette, also known as “Tortilla Española,” is a delicious and hearty dish that showcases the vibrant flavors of Chilean cuisine. This omelette is typically made with fresh ingredients, including eggs, potatoes, and onions, which come together to create a satisfying meal perfect for breakfast, brunch, or even a light dinner.
The simplicity of the ingredients allows each flavor to shine, and it can be easily customized with additional vegetables or meats based on your preferences. In Chile, breakfast is often a leisurely affair, and this omelette is a popular choice to start the day off right.
It’s a versatile dish that can be enjoyed hot or cold, making it ideal for meal prep or for serving guests. Pair it with a side of fresh bread and a cup of coffee or tea for a truly authentic Chilean experience.
Ingredients (serves 4-6 people):
- 6 large eggs
- 2 medium potatoes, peeled and diced
- 1 medium onion, finely chopped
- 1/2 cup bell peppers, diced (optional)
- 1/2 cup grated cheese (optional, such as queso fresco or cheddar)
- 1/4 cup milk
- Salt and pepper, to taste
- Olive oil, for frying
- Fresh herbs (such as parsley or cilantro), for garnish (optional)
Cooking Instructions:
- Prepare the Ingredients: Start by washing and peeling the potatoes. Dice them into small cubes for even cooking. Chop the onion and bell peppers if using, and set all the vegetables aside.
- Cook the Potatoes: In a large skillet, heat a generous amount of olive oil over medium heat. Add the diced potatoes and cook for about 10-12 minutes, stirring occasionally, until they’re golden brown and tender. Remove them from the skillet and drain on a paper towel to remove excess oil.
- Sauté the Onions and Peppers: In the same skillet, add a little more olive oil if needed, and sauté the chopped onion until it becomes translucent, about 3-4 minutes. If using bell peppers, add them to the skillet and cook for an additional 2-3 minutes until softened.
- Combine Ingredients: In a large bowl, whisk together the eggs, milk, salt, and pepper. Then, gently fold in the cooked potatoes, sautéed onions, and bell peppers. If you’re using cheese, add it at this stage as well.
- Cook the Omelette: Wipe the skillet clean and add a bit more olive oil. Pour the egg mixture back into the skillet and spread it evenly. Cook on low to medium heat for about 5-7 minutes, until the edges begin to set.
- Flip the Omelette: To cook the top side, you can either carefully flip the omelette with a large spatula or, if you’re comfortable, slide it onto a large plate and invert it back into the skillet. Cook for another 5-7 minutes until the omelette is fully set and golden brown.
- Serve: Once cooked, remove the omelette from the skillet and let it sit for a minute. Slice it into wedges, garnish with fresh herbs if desired, and serve warm.
Extra Tips:
For a more flavorful omelette, consider adding spices like paprika or cumin to the egg mixture. You can also experiment with different vegetables, such as spinach or tomatoes, to enhance the dish further.
If you’re making it for a crowd, this omelette can be made ahead of time and reheated in the oven. Just be sure to cover it with foil to keep it from drying out. Enjoy your Chilean Breakfast Omelette!
Humita Steamed Corn Pudding

Humita is a traditional Chilean dish that showcases the delightful taste of fresh corn. This steamed corn pudding is both savory and slightly sweet, making it a perfect breakfast option to start your day. Humitas can be enjoyed on their own or accompanied by a dollop of sour cream or a sprinkle of cheese. The dish isn’t only rich in flavor but also packed with nutrients, as corn is a staple in many Latin American diets.
Preparing humita is a wonderful opportunity to explore the flavors of Chilean cuisine. The main ingredient, corn, is blended with ingredients like cheese, basil, and spices to create a creamy mixture that’s then wrapped in corn husks and steamed to perfection. This unique cooking method retains the moisture and enhances the flavors, resulting in a dish that’s both comforting and satisfying.
Ingredients (Serves 4-6):
- 4 cups fresh corn kernels (about 6-8 ears of corn)
- 1 cup milk
- 1 cup crumbled queso fresco or ricotta cheese
- 1/4 cup butter, melted
- 1/2 cup cornmeal
- 1/4 cup fresh basil, chopped
- 1 teaspoon baking powder
- 1 teaspoon salt
- Corn husks, soaked in water for 30 minutes
Instructions:
- Prepare the Corn: Start by shucking the corn and removing the kernels from the cobs. You should have approximately 4 cups of fresh corn kernels. Set aside a few tablespoons of the kernels for garnish if desired.
- Blend the Mixture: In a blender or food processor, combine the fresh corn kernels with the milk and blend until you get a smooth mixture. This will create the base for your humita pudding.
- Mix in Remaining Ingredients: In a large mixing bowl, combine the blended corn mixture with the melted butter, crumbled cheese, cornmeal, chopped basil, baking powder, and salt. Stir well until all the ingredients are fully incorporated. The mixture should have a thick, pudding-like consistency.
- Prepare the Corn Husks: Take the soaked corn husks and pat them dry. Place two husks together, overlapping slightly, to form a sturdy wrapper for your humitas.
- Fill the Husks: Spoon about 1/4 to 1/3 cup of the corn mixture onto the center of each husk. Fold the sides of the husks inward and then roll them up from the bottom, securing the filling tightly inside. You can tie them with a thin strip of corn husk or kitchen twine if desired.
- Steam the Humitas: Place the wrapped humitas in a steamer basket over boiling water. Cover the pot and steam for about 30-40 minutes, or until the humitas are firm and cooked through. You can check their doneness by inserting a toothpick; it should come out clean.
- Serve: Once cooked, carefully unwrap the humitas and serve them hot. You can garnish with fresh corn kernels or serve with sour cream or cheese on the side.
Extra Tips:
When making humitas, using fresh corn is essential for achieving the best flavor and texture. If fresh corn isn’t available, frozen corn can be used, but try to avoid canned corn as it may alter the dish’s consistency.
Additionally, feel free to experiment with the herbs and spices you add—some people enjoy adding a pinch of nutmeg or a sprinkle of chili powder for a unique twist.
Finally, confirm that your corn husks are well-soaked to make them pliable for wrapping, preventing any tearing during the steaming process. Enjoy your delicious and authentic Chilean breakfast!
Confitured Bread With Peaches
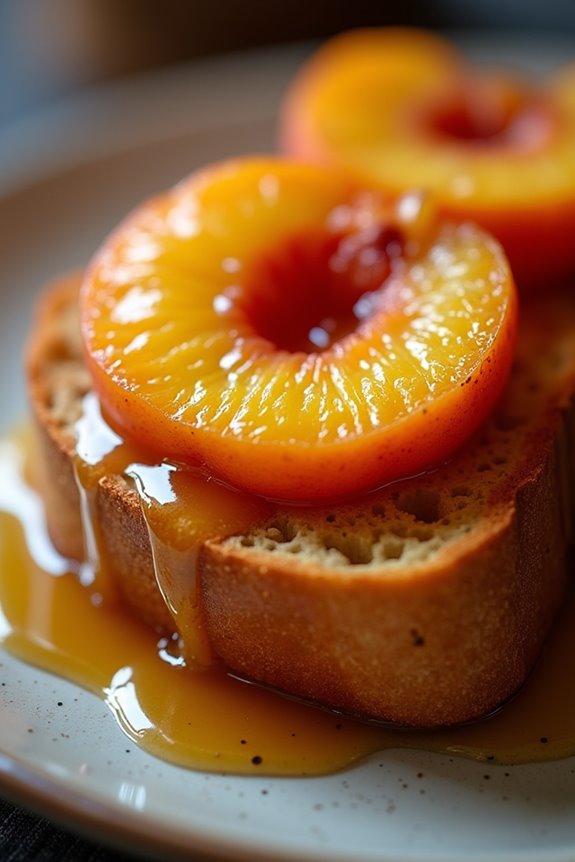
Confitured bread with peaches is a delightful Chilean breakfast dish that combines the sweetness of confitured peaches with the warmth of toasted bread. This dish is a great way to start your day with a burst of flavor and a touch of elegance.
The confitured peaches add a syrupy richness to the bread, making it a perfect pairing with a cup of coffee or tea.
Making confitured bread with peaches is surprisingly simple, requiring only a few basic ingredients. The beauty of this dish lies in its versatility; you can use different types of bread and adjust the sweetness based on your personal preference.
Whether you enjoy it as a leisurely weekend breakfast or a quick weekday option, this dish is sure to captivate your family and friends.
Ingredients (Serves 4-6)
- 4-6 slices of thick bread (like sourdough or brioche)
- 4 ripe peaches, pitted and sliced
- 1 cup granulated sugar
- 1/2 cup water
- 1/2 teaspoon vanilla extract
- 1 tablespoon lemon juice
- Pinch of salt
- Butter (for toasting bread)
Cooking Instructions
1. Prepare the Peaches: Start by washing the peaches thoroughly. Once clean, cut them in half, remove the pits, and slice them into wedges. Place the peach slices aside in a bowl.
2. Make the Syrup: In a medium saucepan, combine the granulated sugar and water over medium heat. Stir until the sugar dissolves completely.
Once dissolved, add the sliced peaches, vanilla extract, lemon juice, and a pinch of salt. Bring the mixture to a gentle boil.
3. Confit the Peaches: Reduce the heat to low and let the peaches simmer in the syrup for about 15-20 minutes. This will allow the peaches to soften and absorb the sweetness of the syrup.
Stir occasionally to guarantee even cooking.
4. Toast the Bread: While the peaches are confituring, heat a skillet over medium heat and add a small amount of butter. Once the butter is melted and bubbling, add the slices of bread.
Toast each side until golden brown and crispy, which should take about 3-4 minutes per side.
5. Assemble the Dish: Once the bread is toasted and the peaches are ready, place the slices of toasted bread on serving plates.
Generously spoon the confitured peaches and syrup over each slice.
6. Serve and Enjoy: Serve the confitured bread warm, allowing everyone to enjoy the delightful combination of flavors.
You can also add a dollop of whipped cream or a scoop of vanilla ice cream for an extra treat.
Extra Tips
When making confitured bread with peaches, feel free to experiment with different types of bread to find your favorite combination.
For a gourmet touch, consider adding a sprinkle of cinnamon or nutmeg while the peaches are cooking. Additionally, if you have leftover confitured peaches, they can be stored in the refrigerator for up to a week and used as a topping for yogurt or pancakes.
Pan De Pascua (Chilean Fruit Cake)
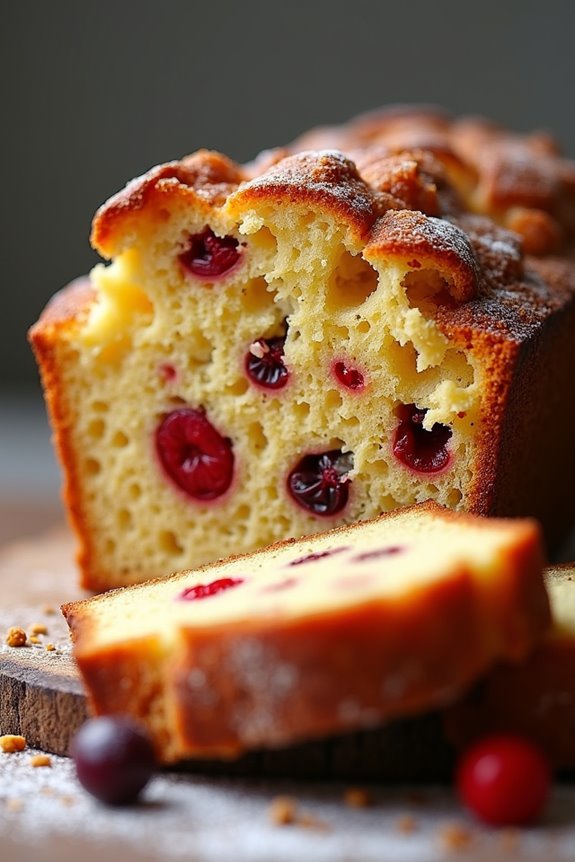
Pan De Pascua, often enjoyed during the festive season in Chile, is a rich and flavorful fruit cake that embodies the spirit of celebration. This traditional dessert is made with a delightful mix of dried fruits, nuts, and spices, creating a moist and aromatic treat that pairs perfectly with a cup of coffee or tea.
While it’s commonly served during Christmas time, Pan De Pascua can be relished year-round, making it a beloved staple in Chilean households.
The texture of Pan De Pascua is unique, with a delightful crumb that’s both dense and moist. The combination of flavors from the fruits and spices, such as cinnamon and nutmeg, creates a warm, inviting taste that transports you straight into the heart of Chilean culture.
Baking this cake isn’t just about the ingredients; it’s also about the love and care put into preparing it. Gather your ingredients, and let’s get started on this delicious journey!
Ingredients (serving size: 4-6 people):
- 2 cups all-purpose flour
- 1 cup sugar
- 1 cup unsalted butter, softened
- 4 large eggs
- 1 cup milk
- 1 teaspoon baking powder
- 1 teaspoon baking soda
- 1 teaspoon cinnamon
- 1/2 teaspoon nutmeg
- 1/4 teaspoon salt
- 1 cup mixed dried fruits (raisins, prunes, apricots, etc.)
- 1/2 cup chopped nuts (walnuts or almonds)
- 1/2 cup candied fruits (cherries, orange peel, etc.)
- 1/2 cup honey
- 1 teaspoon vanilla extract
Instructions:
- Preheat the Oven: Begin by preheating your oven to 350°F (175°C). This guarantees that your cake will bake evenly and rise properly.
- Prepare the Baking Pan: Grease and flour a loaf pan or cake mold to prevent the cake from sticking. You can also line it with parchment paper for easier removal after baking.
- Mix Dry Ingredients: In a large bowl, sift together the flour, baking powder, baking soda, cinnamon, nutmeg, and salt. This step helps to aerate the flour and evenly distribute the leavening agents and spices.
- Cream Butter and Sugar: In another bowl, cream the softened butter and sugar together until light and fluffy. This process incorporates air into the mixture, which helps the cake rise.
- Add Eggs and Honey: Beat in the eggs one at a time, mixing well after each addition. Then, add the honey and vanilla extract, continuing to mix until fully combined.
- Combine Wet and Dry Mixtures: Gradually add the dry ingredients to the wet mixture, alternating with the milk. Start and end with the dry ingredients, mixing until just combined. Be careful not to overmix, as this can result in a dense cake.
- Incorporate Fruits and Nuts: Gently fold in the mixed dried fruits, chopped nuts, and candied fruits into the batter. This adds texture and flavor to your cake.
- Pour into Pan: Pour the batter into the prepared baking pan, smoothing the top with a spatula to guarantee even baking.
- Bake: Place the pan in the preheated oven and bake for approximately 50-60 minutes, or until a toothpick inserted into the center comes out clean. Keep an eye on it as baking times may vary.
- Cool and Serve: Once baked, remove the cake from the oven and let it cool in the pan for about 10 minutes before transferring it to a wire rack to cool completely. Slice and serve as desired.
Extra Tips: To enhance the flavor of your Pan De Pascua, consider soaking the dried fruits in a bit of rum or brandy for a few hours before adding them to the batter. This not only adds depth to the flavor but also keeps the fruits moist.
Additionally, you can experiment with different spices or add a pinch of ground cloves for a unique twist. Enjoy your baking and the delightful aroma that will fill your kitchen!
Yogurt With Fresh Fruits and Nuts
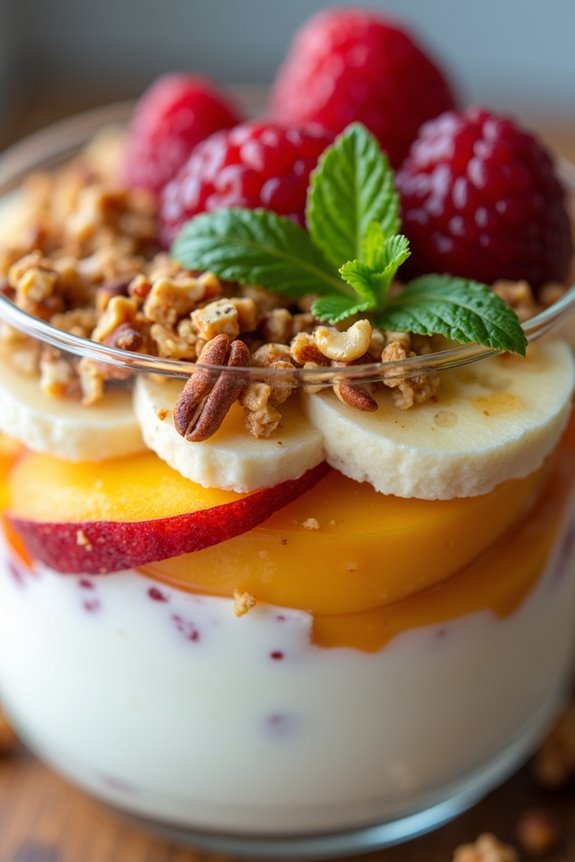
Yogurt with fresh fruits and nuts is a delightful and healthy way to start your day, especially in Chile where breakfast can be a light yet nourishing affair. This dish combines the tartness of yogurt with the sweetness of fresh fruits and the crunch of nuts, creating a satisfying and nutritious meal that’s perfect for any time of the day.
In addition to being delicious, it’s also incredibly versatile, allowing you to customize the ingredients based on what’s in season or your personal preferences.
To make this dish truly authentic and representative of Chilean flavors, consider using local fruits such as berries, peaches, or even tropical fruits like mango. This yogurt dish can be served as a simple breakfast, a revitalizing snack, or even a light dessert. The combination of creamy yogurt, vibrant fruits, and crunchy nuts provides a balance of protein, vitamins, and healthy fats, making it a wholesome choice for everyone.
Ingredients (Serves 4-6):
- 4 cups plain Greek yogurt
- 2 cups mixed fresh fruits (such as berries, banana slices, and diced peaches)
- 1 cup granola or mixed nuts (such as almonds, walnuts, or hazelnuts)
- 2 tablespoons honey or maple syrup (optional)
- 1 teaspoon vanilla extract (optional)
- Fresh mint leaves for garnish (optional)
Cooking Instructions:
- Prepare the Yogurt Base: In a large mixing bowl, add the plain Greek yogurt. If desired, stir in the honey or maple syrup and vanilla extract to sweeten and enhance the flavor of the yogurt. Mix well until the ingredients are fully combined and the yogurt is creamy.
- Wash and Cut the Fruits: Rinse the mixed fresh fruits thoroughly under cold water. If using larger fruits like bananas or peaches, slice them into bite-sized pieces. Make sure to remove any pits from the peaches and cut berries in half if they’re large.
- Assemble the Dish: In serving bowls or glasses, start by spooning a layer of the sweetened yogurt at the bottom. Next, add a layer of the mixed fresh fruits on top of the yogurt.
- Add Nuts or Granola: Sprinkle a generous amount of granola or mixed nuts over the fruits. This will add a nice crunch and texture to the dish.
- Repeat Layers: If you have enough ingredients, you can repeat the layers of yogurt, fruits, and nuts to create a beautiful, visually appealing dish. Aim for at least two layers for a delightful presentation.
- Garnish and Serve: Finish off the dish with a few fresh mint leaves on top for a pop of color and added flavor. Serve immediately while the yogurt is fresh and the fruits are vibrant.
Extra Tips:
When preparing Yogurt with Fresh Fruits and Nuts, feel free to get creative! You can customize the fruits to your liking or use what’s available in your local area.
For a bit of extra flavor, consider toasting the nuts lightly in a dry skillet to enhance their taste. If you’re preparing the dish ahead of time, keep the yogurt and fruits separate until just before serving to maintain the freshness and texture.
Enjoy this nutritious breakfast as a fantastic way to fuel your day!
Completo Breakfast Sandwich

The Completo Breakfast Sandwich is a delightful and hearty Chilean dish that combines the best of a traditional breakfast with the classic Completo hot dog. This sandwich isn’t only filling but also packed with flavors that will awaken your taste buds and prepare you for the day ahead.
Typically served with a variety of toppings, the Completo can be customized to suit your preferences, making it a versatile option for breakfast or brunch gatherings.
To create this delicious meal, you’ll be layering fluffy scrambled eggs, savory sausages, fresh avocado, and a drizzle of tangy sauces all within a soft roll. The combination of these ingredients not only brings a satisfying texture but also a burst of flavors that represent the essence of Chilean cuisine.
Whether you’re hosting a family breakfast or just treating yourself, this Completo Breakfast Sandwich is sure to impress and fill you up.
Ingredients (Serves 4-6):
- 4-6 soft bread rolls (such as French bread or hot dog buns)
- 6 large eggs
- 1 cup milk
- Salt and pepper to taste
- 4-6 sausages (hot dogs or chorizo)
- 2 ripe avocados
- 1 cup mayonnaise
- 1 cup ketchup
- 1/2 cup mustard
- Optional toppings: diced tomatoes, chopped onions, pickles, or cilantro
Cooking Instructions:
- Prepare the Sausages: In a skillet over medium heat, add the sausages and cook them for about 5-7 minutes, turning occasionally until they’re browned and heated through. Depending on the type of sausage you use, make sure they’re cooked to the appropriate internal temperature. Once done, remove from heat and set aside.
- Scramble the Eggs: In a mixing bowl, whisk together the eggs, milk, salt, and pepper until well combined. Heat a non-stick skillet over medium-low heat and pour in the egg mixture. Stir gently with a spatula as the eggs cook, ensuring they don’t stick to the pan. Continue cooking until the eggs are softly scrambled and slightly runny, about 5-6 minutes. Remove from heat.
- Prepare the Avocado: While the eggs are cooking, slice the avocados in half, remove the pit, and scoop the flesh into a bowl. Mash the avocado with a fork and season with a pinch of salt and pepper. You can also add lime juice for extra flavor if desired.
- Assemble the Sandwiches: Slice the bread rolls in half and lightly toast them if desired. On the bottom half of each roll, layer the scrambled eggs, followed by the cooked sausage. Spoon a generous amount of the mashed avocado on top, and then drizzle with mayonnaise, ketchup, and mustard to taste.
- Add Optional Toppings: If you’re using any optional toppings like diced tomatoes, onions, or pickles, add them on top of the sauces for added flavor and texture. Top with the other half of the roll to complete your sandwich.
Extra Tips:
For an extra kick, you can add sliced jalapeños or hot sauce to the Completo Breakfast Sandwich.
If you’re preparing this dish for a larger group, consider setting up a DIY sandwich bar where guests can assemble their own sandwiches with their preferred toppings. This not only makes serving easier but also allows everyone to customize their meal to their liking.
Additionally, using fresh, quality ingredients will enhance the overall taste of the sandwich. Enjoy your delicious Completo Breakfast Sandwich!
Oatmeal With Cinnamon and Apple
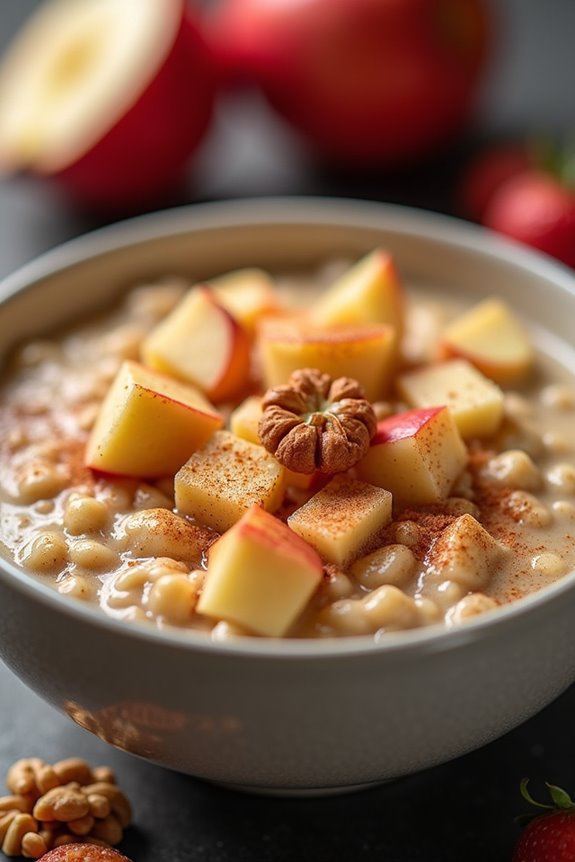
Oatmeal with Cinnamon and Apple is a delightful and nutritious dish that embodies the warmth and comfort of a traditional Chilean breakfast. This hearty meal combines the wholesome goodness of oats with the natural sweetness of apples and a hint of cinnamon, creating a perfect start to your day. Not only is it easy to prepare, but it also offers a wonderful balance of flavors and textures, making it a favorite among families.
This dish isn’t only filling but also packed with fiber and essential nutrients, making it a great choice for breakfast or even a cozy brunch. The aroma of cinnamon wafting through your kitchen will entice everyone to the table, ready to enjoy this warm, comforting bowl of oatmeal. With just a few simple ingredients, you can whip up this delicious recipe and share it with your loved ones.
Ingredients (Serves 4-6):
- 2 cups rolled oats
- 4 cups water or milk (or a combination of both)
- 2 medium apples, peeled, cored, and diced
- 1 teaspoon ground cinnamon
- 1/4 teaspoon salt
- 1-2 tablespoons honey or maple syrup (optional for sweetness)
- 1/2 cup chopped nuts (e.g., walnuts or almonds, optional)
- Fresh fruit or additional toppings (e.g., berries or banana slices, optional)
Cooking Instructions:
- Prepare the Ingredients: Begin by gathering all your ingredients. Peel, core, and dice the apples, and measure out the oats, water or milk, cinnamon, and salt. Having everything ready will streamline the cooking process.
- Cook the Oats: In a medium-sized pot, bring the water or milk to a boil over medium heat. Once boiling, add the rolled oats and a pinch of salt. Stir to combine, and reduce the heat to low. Let the mixture simmer for about 5-10 minutes, stirring occasionally, until the oats have absorbed most of the liquid and reached your desired consistency.
- Add Apples and Cinnamon: Once the oats are cooked, add the diced apples and ground cinnamon to the pot. Stir well to combine, and cook for an additional 2-3 minutes, allowing the apples to soften slightly and infuse their flavor into the oatmeal.
- Sweeten (if desired): If you prefer a sweeter oatmeal, drizzle in honey or maple syrup at this stage, adjusting the sweetness according to your taste. Stir to incorporate, and remove the pot from the heat.
- Serve: Spoon the oatmeal into bowls and top with chopped nuts, fresh fruit, or any additional toppings you like. Serve warm and enjoy your hearty breakfast!
Extra Tips:
Feel free to experiment with different types of apples for varying flavors and textures—some apples are sweeter, while others are tart. You can also add a splash of vanilla extract for an extra layer of flavor.
If you’re preparing this dish for a larger group, consider making a double batch and serving it buffet-style, allowing everyone to customize their toppings. Leftovers can be stored in the refrigerator and reheated for a quick breakfast on busy mornings!
Chorrillana Breakfast Bowl

The Chorrillana Breakfast Bowl is a beloved Chilean dish that perfectly combines hearty ingredients to create a filling and satisfying meal. Originating from the vibrant streets of southern Chile, this dish is traditionally served as a late-night snack, but it has become a popular choice for breakfast, especially on weekends.
With its layers of crispy fries, sautéed beef, onions, and eggs, this bowl is sure to awaken your taste buds and provide the energy you need to start your day.
Creating a Chorrillana Breakfast Bowl at home is easier than you might think. The key is to prepare each component with care, allowing the flavors to meld beautifully. Whether you’re serving it to friends or enjoying a cozy breakfast at home, this dish is a fantastic way to experience the rich culinary heritage of Chile.
Let’s explore the ingredients and cooking instructions to bring this delicious meal to your table.
Ingredients (serves 4-6):
- 4 large potatoes (for fries)
- 1 lb (450g) beef sirloin, thinly sliced
- 1 large onion, thinly sliced
- 4 large eggs
- 1 tablespoon olive oil
- 1 teaspoon paprika
- Salt and pepper, to taste
- Fresh parsley, chopped (for garnish)
Cooking Instructions:
1. Prepare the Fries: Begin by peeling the potatoes and cutting them into thick fries. Rinse the cut fries in cold water to remove excess starch, which will help them become crispier when fried. Pat them dry with a kitchen towel.
2. Fry the Potatoes: Heat oil in a deep fryer or a large pot over medium-high heat. Fry the potatoes in batches until they’re golden brown and crispy, about 5-7 minutes per batch. Remove them from the oil and drain on paper towels, seasoning with salt while they’re still hot. Set aside.
3. Cook the Beef and Onions: In a large skillet, heat the olive oil over medium heat. Add the sliced onions and sauté until they become translucent, about 5 minutes.
Then, add the sliced beef to the skillet, along with paprika, salt, and pepper. Cook until the beef is browned and cooked through, around 5-7 minutes. Stir frequently to guarantee even cooking.
4. Fry the Eggs: In a separate frying pan, cook the eggs sunny-side up or to your desired level of doneness. Season with salt and pepper.
5. Assemble the Bowl: To serve, layer a generous serving of fries at the bottom of each bowl. Top with the sautéed beef and onions, followed by a fried egg. Garnish with freshly chopped parsley for a touch of color and flavor.
6. Serve Immediately: Chorrillana is best enjoyed hot, so serve the bowls immediately while everything is fresh and warm.
Extra Tips:
When making your Chorrillana Breakfast Bowl, consider varying the toppings to suit your taste. You can add sliced avocados, fresh tomatoes, or even jalapeños for a spicy kick.
For a vegetarian version, substitute the beef with sautéed bell peppers and mushrooms. Additionally, make sure to use starchy potatoes like Russets for the fries, as they yield the best texture. Enjoy your culinary adventure into Chilean breakfast culture!
Chilean Fruit Salad
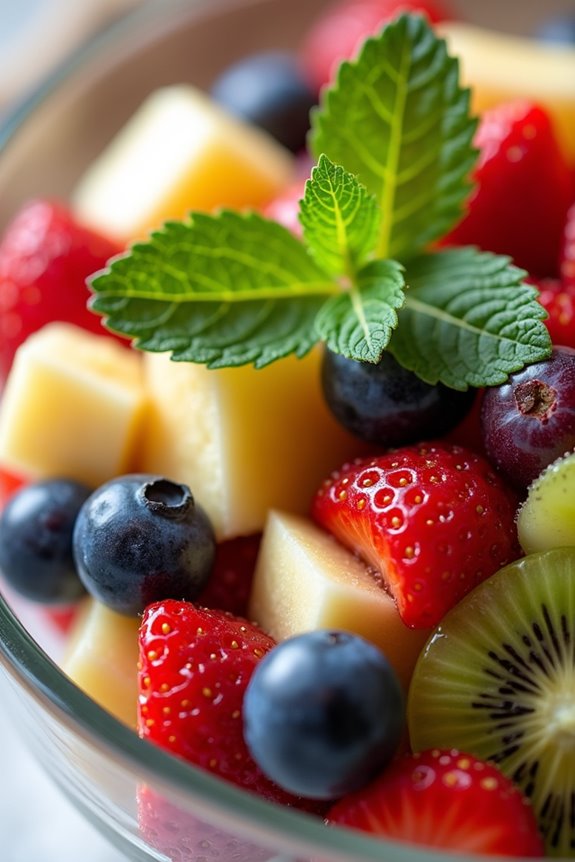
Chilean Fruit Salad, known as “Ensalada de Frutas,” is a invigorating and vibrant dish that beautifully showcases the country’s rich variety of fruits. This salad is typically served as a breakfast option or a light dessert, making it a versatile addition to any meal. The combination of fresh fruits not only adds color to your table but also provides a nutritious start to your day. With its natural sweetness and juicy textures, it’s a delightful way to incorporate more fruits into your diet.
In Chile, this fruit salad is often enhanced with a touch of lime juice, which adds a zesty contrast to the sweetness. The beauty of this recipe lies in its flexibility; you can use seasonal fruits or your personal favorites. Common ingredients include apples, bananas, kiwis, and berries, but feel free to experiment with whatever fruits you have on hand. This dish isn’t just a feast for the eyes; it’s a celebration of flavors that represents the essence of Chilean cuisine.
Ingredients (Serves 4-6):
- 2 apples, diced
- 2 bananas, sliced
- 2 kiwis, peeled and diced
- 1 cup strawberries, hulled and halved
- 1 cup blueberries
- 1 cup grapes, halved
- 2 tablespoons honey (optional)
- Juice of 1 lime
- Fresh mint leaves for garnish (optional)
Instructions:
- Prepare the Fruits: Start by washing all the fruits thoroughly. This includes rinsing the apples, strawberries, blueberries, and grapes to remove any dirt or pesticides. For the kiwis and bananas, peel them carefully using a knife or a peeler.
- Cut the Fruits: Once washed, proceed to cut the apples into bite-sized cubes, slice the bananas into rounds, and dice the kiwis into small pieces. Halve the strawberries and grapes. Confirm that all fruits are similar in size for a uniform texture in the salad.
- Combine the Fruits: In a large mixing bowl, gently toss together all the prepared fruits: apples, bananas, kiwis, strawberries, blueberries, and grapes. Be careful not to mash the softer fruits like bananas and strawberries as you mix.
- Add Sweetness and Flavor: If you prefer a sweeter salad, drizzle the honey over the mixed fruits. Squeeze the juice of one lime over the salad to enhance the flavors and prevent the apples and bananas from browning. Toss the salad gently to confirm all fruits are evenly coated.
- Chill and Serve: Cover the bowl with plastic wrap or a lid and let the salad chill in the refrigerator for about 30 minutes. This step allows the flavors to meld together and makes the salad invigorating when served.
- Garnish and Enjoy: Before serving, give the salad another gentle toss. Garnish with fresh mint leaves for an added touch of freshness and aroma. Serve chilled in individual bowls or a large serving dish.
Extra Tips:
To make your Chilean Fruit Salad even more delightful, consider adding a sprinkle of cinnamon or a handful of nuts for an added crunch. You can also mix in a dollop of yogurt for creaminess or substitute honey with agave syrup for a vegan option.
Experiment with seasonal fruits to keep the salad exciting and adjust the sweetness according to your taste. Enjoy the vibrant colors and flavors that this salad brings to your breakfast table!
Milk and Chocolate Bread Pudding
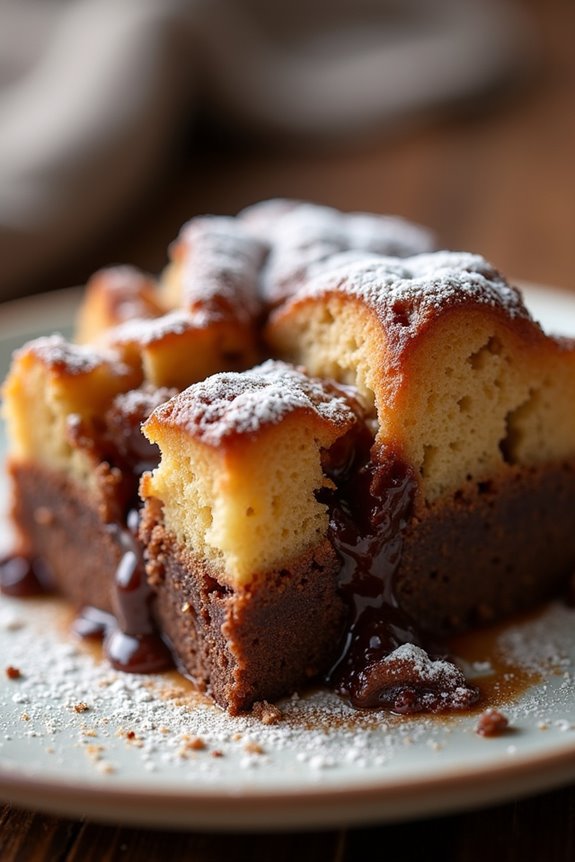
Milk and Chocolate Bread Pudding is a delightful twist on the traditional bread pudding that showcases the rich flavors of chocolate combined with the creamy texture of milk. This scrumptious dish is perfect for breakfast or a comforting dessert, making it a versatile addition to your culinary repertoire. The warm, indulgent pudding is ideal for chilly mornings or cozy evenings, and it’s a great way to use up leftover bread.
This recipe is simple and requires minimal ingredients, making it accessible for cooks of all skill levels. The combination of eggs, milk, chocolate, and bread creates a rich custard that envelops the cubes of bread, resulting in a deliciously gooey dessert. Topped with a dusting of powdered sugar or served with a scoop of vanilla ice cream, this Milk and Chocolate Bread Pudding will surely become a favorite in your household.
Ingredients (serving size: 4-6 people):
- 4 cups of day-old bread, cubed
- 2 cups of milk
- 1 cup of semi-sweet chocolate chips
- 4 large eggs
- 3/4 cup of granulated sugar
- 1 teaspoon of vanilla extract
- 1/2 teaspoon of cinnamon
- A pinch of salt
- Powdered sugar for dusting (optional)
Cooking Instructions:
- Preheat the Oven: Begin by preheating your oven to 350°F (175°C). This guarantees that your bread pudding cooks evenly and reaches the desired texture.
- Prepare the Bread: Take your day-old bread and cut it into cubes. Spread the bread cubes evenly in a greased 9×13-inch baking dish. This will create a base for the pudding that soaks up all the delicious custard mixture.
- Melt the Chocolate: In a small saucepan over low heat, melt the semi-sweet chocolate chips, stirring frequently until smooth. This step is essential for incorporating rich chocolate flavor throughout the pudding.
- Mix the Custard: In a mixing bowl, whisk together the milk, eggs, granulated sugar, vanilla extract, cinnamon, and a pinch of salt until well combined. Then, add the melted chocolate to the mixture and stir until fully incorporated. This custard mixture will bring moisture and richness to the bread pudding.
- Combine Bread and Custard: Pour the chocolate custard mixture over the cubed bread in the baking dish. Gently press the bread down with a spatula to guarantee all the pieces are soaked with the custard. Allow it to sit for about 10-15 minutes, so the bread can absorb the liquid.
- Bake the Pudding: Place the baking dish in the preheated oven and bake for 35-40 minutes, or until the top is golden brown and a toothpick inserted into the center comes out clean. This step is key for achieving a firm yet creamy texture.
- Cool and Serve: Once baked, remove the pudding from the oven and allow it to cool slightly before serving. Dust with powdered sugar if desired and serve warm, either on its own or with a scoop of vanilla ice cream.
Extra Tips: When making Milk and Chocolate Bread Pudding, feel free to experiment with different types of bread, such as brioche or challah, for added flavor and texture. Additionally, you can enhance the recipe by adding nuts or dried fruit for extra crunch and sweetness.
Make sure not to skip the soaking time, as this is vital for achieving a moist and decadent pudding. Enjoy your delicious creation!