

When I think of Chilean cuisine, vibrant colors and bold flavors come to mind. Each dish is a celebration of the region’s fresh ingredients, especially when it comes to vegetarian options. From creamy Choclo Con Queso to zesty Pebre, there’s so much creativity to explore. Are you curious about how these traditional favorites can be reimagined for a plant-based feast? Let’s uncover these delicious possibilities together.
Choclo Con Queso

Choclo Con Queso is a delightful vegetarian dish from Chile that beautifully showcases the country’s love for fresh corn. This comforting dish features sweet corn topped with creamy cheese, often enjoyed as a side dish or a light main course. The combination of flavors and textures makes it a favorite among both locals and visitors, reflecting the rich agricultural heritage of Chile, where corn is a staple ingredient.
The preparation of Choclo Con Queso is simple yet rewarding. It brings together the natural sweetness of fresh corn with the savory creaminess of cheese, creating a satisfying treat that can be served warm. Ideal for gatherings or casual family dinners, this dish is sure to impress with its vibrant flavors and rustic charm.
Ingredients (serving size: 4-6 people)
- 4 large ears of fresh corn (or 4 cups of frozen corn kernels)
- 1 cup of crumbled queso fresco or feta cheese
- 1/2 cup of grated Parmesan cheese
- 1 cup of milk
- 2 tablespoons of butter
- Salt and pepper to taste
- Fresh parsley or cilantro for garnish (optional)
Cooking Instructions
- Prepare the Corn: If using fresh corn, carefully husk the ears and remove all the silk. Boil a large pot of water, add a pinch of salt, and cook the corn for about 5-7 minutes until tender. If using frozen corn, simply thaw it in a bowl of warm water or microwave according to package instructions.
- Blend the Corn: Once the corn is cooked, cut the kernels off the cob (if using fresh) and place them in a large mixing bowl. If you prefer a creamier texture, you can blend half of the corn with the milk until smooth.
- Combine Ingredients: In the mixing bowl with the corn, add the crumbled queso fresco or feta, grated Parmesan cheese, butter, and a pinch of salt and pepper. Stir the mixture until well combined, ensuring the cheese melts slightly from the warmth of the corn.
- Bake the Dish: Preheat your oven to 375°F (190°C). Grease a baking dish with a little butter or oil. Pour the corn and cheese mixture into the dish and spread it evenly. Bake for about 20-25 minutes, or until the top is golden and bubbly.
- Garnish and Serve: Remove the baking dish from the oven and let it cool slightly. If desired, sprinkle chopped parsley or cilantro on top for a fresh burst of flavor. Serve warm and enjoy!
Extra Tips
For an added depth of flavor, consider mixing in some sautéed onions or garlic into the corn mixture before baking. You can also experiment with different types of cheese or add a sprinkle of chili powder or paprika for a bit of heat.
This dish can be made ahead of time and reheated, making it a great option for meal prep or potlucks. Enjoy your Choclo Con Queso with a side salad or crusty bread for a complete meal!
Pebre
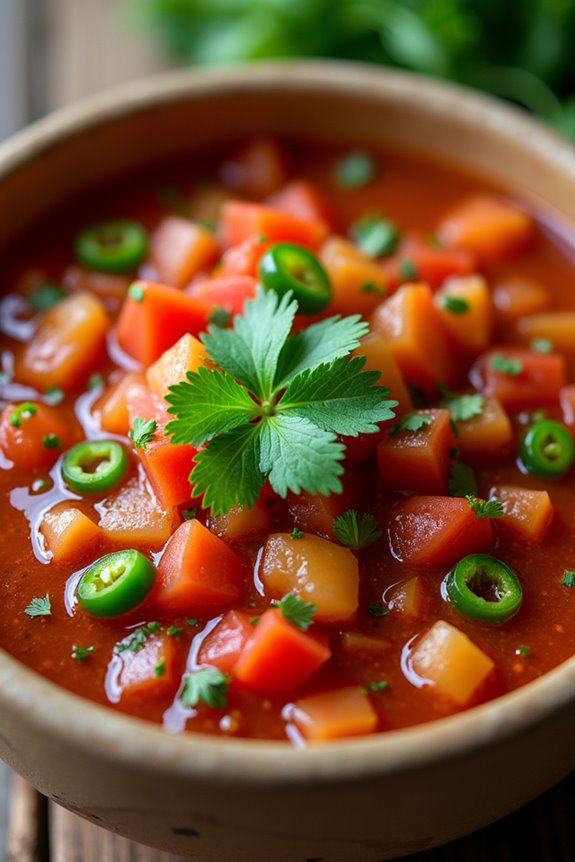
Pebre is a traditional Chilean condiment that adds a burst of flavor to various dishes, especially grilled meats, bread, and even vegetables. This vibrant mixture combines fresh herbs, spices, and vegetables, creating a delightful combination that’s both invigorating and aromatic. It’s a staple in Chilean cuisine and is often served at barbecues or as a topping for empanadas and sandwiches.
Making your own pebre at home is simple and allows you to customize the flavors according to your preferences.
This vegetarian version of pebre isn’t only easy to prepare but also brings a taste of Chile to your dining table. By using fresh ingredients, you can create a sauce that isn’t only delicious but also healthy. Enjoy it as a dip, a dressing, or a side condiment, and impress your friends and family with this authentic Chilean recipe.
Ingredients (Serves 4-6):
- 1 cup fresh cilantro, chopped
- 1 medium onion, finely chopped
- 2 medium tomatoes, diced
- 1-2 fresh green chilies, chopped (adjust for spice preference)
- 2 cloves garlic, minced
- 1 tablespoon olive oil
- 2 tablespoons red wine vinegar
- Salt to taste
- Black pepper to taste
Cooking Instructions:
- Prepare the Vegetables: Start by washing and chopping the fresh cilantro, onions, tomatoes, and green chilies. Confirm all the pieces are finely chopped to allow for an even distribution of flavors in the pebre. The freshness of each ingredient is key to a vibrant final product.
- Combine Ingredients in a Bowl: In a medium-sized mixing bowl, combine the chopped cilantro, onions, tomatoes, and green chilies. Use a spatula or wooden spoon to gently mix the ingredients together. This will help to evenly distribute the flavors and create a cohesive mixture.
- Add Garlic and Seasonings: Next, add the minced garlic to the bowl along with the olive oil and red wine vinegar. Stir the mixture gently to incorporate the liquids. These ingredients will give the pebre its characteristic tangy flavor, complementing the freshness of the vegetables.
- Season to Taste: Sprinkle salt and black pepper over the mixture according to your taste preference. Start with a pinch and adjust as necessary. Taste the pebre and confirm the balance of flavors is to your liking; you can add more vinegar or salt if needed.
- Let it Rest: For the best flavor, let the pebre sit at room temperature for about 20-30 minutes before serving. This resting period allows the flavors to meld together, enhancing the overall taste of the condiment.
- Serve: After resting, give the pebre a quick stir and serve it in a small bowl alongside your favorite dishes. It pairs beautifully with grilled vegetables, crusty bread, or as a topping for your main course.
Extra Tips:
When making pebre, feel free to experiment with additional ingredients such as diced bell peppers or even a squeeze of lime juice for a citrusy twist.
The key to a great pebre lies in using the freshest ingredients possible, so if you can, opt for organic herbs and vegetables. For a spicier kick, consider adding more chilies or a dash of cayenne pepper.
Finally, pebre can be stored in an airtight container in the refrigerator for up to a week, making it a great make-ahead condiment.
Porotos Granados
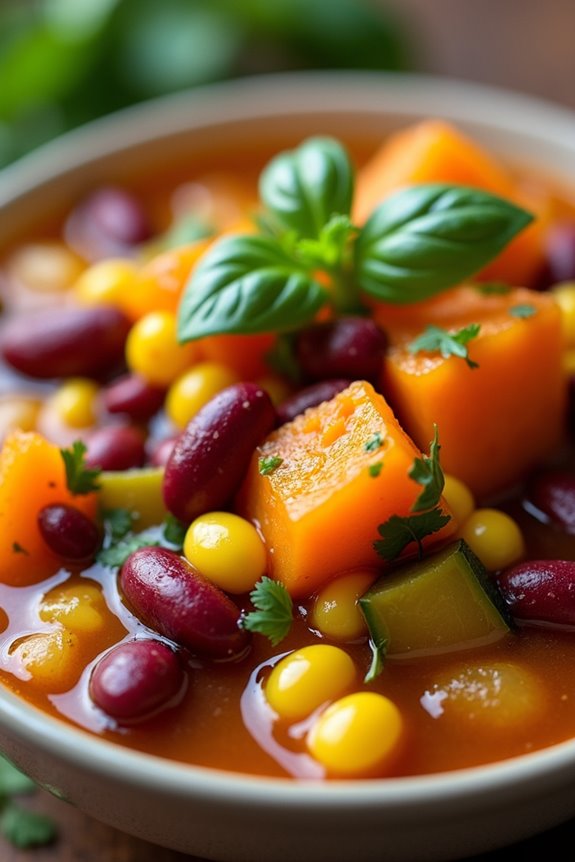
Porotos Granados is a traditional Chilean dish that embodies the heart of the country’s culinary heritage. This hearty stew is made with fresh ingredients, including beans, corn, and squash, which are abundant in Chilean agricultural practices. The dish showcases a vibrant medley of colors and flavors, making it a delightful meal for both vegetarians and non-vegetarians alike.
Often enjoyed during the summer months when the ingredients are at their peak, Porotos Granados provides a comforting and nutritious option that warms the soul. This delightful stew can be served as a main dish or as a side. It isn’t only rich in protein and fiber from the beans but also packed with vitamins and minerals from the fresh vegetables.
The combination of spices adds depth to the dish, making it a favorite among locals and visitors. Whether you’re hosting a dinner party or enjoying a cozy meal at home, Porotos Granados is sure to captivate.
Ingredients (Serves 4-6)
- 2 cups fresh cranberry beans (or 1 can of canned beans, drained and rinsed)
- 2 tablespoons olive oil
- 1 medium onion, chopped
- 2 cloves garlic, minced
- 1 medium carrot, diced
- 1 medium zucchini, diced
- 1 cup fresh corn kernels (or 1 cup frozen corn)
- 1 cup butternut squash, peeled and diced
- 2 cups vegetable broth
- 1 teaspoon ground cumin
- 1 teaspoon paprika
- Salt and pepper to taste
- Fresh basil or cilantro for garnish (optional)
Cooking Instructions
- Prepare the Beans: If using fresh cranberry beans, soak them in water overnight. Drain and rinse before cooking. If using canned beans, verify they’re well-drained and rinsed. Set aside.
- Sauté the Aromatics: In a large pot, heat the olive oil over medium heat. Add the chopped onion and cook for about 5 minutes until it becomes translucent. Add the minced garlic and sauté for an additional minute until fragrant, being careful not to burn the garlic.
- Add the Vegetables: Stir in the diced carrot, zucchini, and butternut squash. Cook the vegetables for about 5-7 minutes, stirring occasionally, until they begin to soften. This step enhances the flavors of the vegetables.
- Incorporate the Beans and Corn: Add the prepared beans and corn kernels to the pot. Stir well to combine all the ingredients, making certain that the vegetables and beans are evenly distributed.
- Pour in the Broth and Spices: Add the vegetable broth along with ground cumin, paprika, salt, and pepper. Stir everything together and bring the mixture to a gentle boil. Once boiling, reduce the heat to low and let it simmer for about 20-25 minutes, allowing the flavors to meld.
- Final Touches: Taste the stew and adjust the seasoning if necessary. If the stew is too thick, you can add a little more vegetable broth or water to reach your desired consistency.
- Serve and Garnish: Ladle the Porotos Granados into bowls and garnish with fresh basil or cilantro if desired. Serve warm with crusty bread or a side salad.
Extra Tips
For an added layer of flavor, consider incorporating additional spices such as chili powder or a dash of cayenne pepper for heat. You can also customize the recipe by adding other seasonal vegetables like bell peppers or tomatoes.
If you’re looking for a creamier texture, a splash of coconut milk can be added during the simmering stage. This dish also tastes even better the next day, making it a great option for meal prepping or leftovers!
Humitas

Humitas are a traditional Chilean dish that showcases the rich culinary heritage of the country. These delightful treats are made with fresh corn and are often described as a savory version of tamales. The corn is typically ground and mixed with cheese, onions, and spices, creating a creamy filling that’s then wrapped in corn husks and steamed to perfection.
Humitas can be served as a side dish or as a main course, and they’re perfect for any occasion, whether it be a family gathering or a festive celebration.
In addition to being delicious, humitas are also a versatile dish that can be adapted to suit various tastes. You can experiment with the filling by adding different cheeses or spices, or even incorporating vegetables for a more robust flavor. This recipe will guide you through the process of making authentic Chilean humitas from scratch, ensuring that you impress your family and friends with your culinary skills.
Ingredients (serving size: 4-6 people)
- 2 cups fresh corn kernels (approximately 4-5 ears of corn)
- 1 cup milk
- 1/2 cup grated cheese (preferably Chilean queso fresco or similar)
- 1 small onion, finely chopped
- 1/4 cup butter, melted
- 1 teaspoon baking powder
- 1 teaspoon salt
- 1/2 teaspoon black pepper
- 1/4 teaspoon cumin (optional)
- 12-15 dried corn husks, soaked in warm water for at least 30 minutes
Cooking Instructions
- Prepare the Corn: Start by shucking the corn and removing the kernels from the cobs. You can use a sharp knife to cut the kernels off or a corn stripper if you have one. Measure out 2 cups of corn kernels and set aside.
- Make the Corn Mixture: In a blender or food processor, combine the corn kernels and milk. Blend until smooth and creamy. This mixture will serve as the base of your humitas filling.
- Mix the Filling: In a large bowl, combine the blended corn mixture with the melted butter, grated cheese, finely chopped onion, baking powder, salt, black pepper, and cumin (if using). Stir until all ingredients are well combined and form a thick batter.
- Prepare the Corn Husks: Take the soaked corn husks and gently pat them dry with a towel. Lay them flat on a clean surface or cutting board. You’ll need 12-15 husks, depending on the size of your humitas.
- Assemble the Humitas: Place about 2-3 tablespoons of the corn mixture in the center of each corn husk. Fold the sides over the filling and then fold up the bottom to secure it. Repeat this process until all the filling is used.
- Steam the Humitas: In a large steamer pot, arrange the filled corn husks upright, securing them with twine or placing them upright in a deep pot with a lid. Fill the pot with water until it reaches just below the bottom of the husks. Cover and steam for approximately 45-60 minutes, or until the filling is set and firm to the touch.
- Serve: Once cooked, carefully remove the humitas from the steamer. Allow them to cool slightly before serving. You can enjoy them warm as is, or with a drizzle of olive oil or a sprinkle of additional cheese.
Extra Tips
When making humitas, always use the freshest corn possible for the best flavor and texture. If you can’t find fresh corn, frozen corn can be a suitable alternative, but be sure to thaw it before blending.
Additionally, don’t hesitate to customize your filling by adding diced peppers, herbs, or spices that suit your palate. For an added touch, serve humitas with a side of salsa or a fresh salad for a complete meal. Enjoy your culinary adventure with this traditional Chilean dish!
Ensalada Chilena

Ensalada Chilena is a revitalizing and vibrant salad that captures the essence of Chilean cuisine. Traditionally served as a side dish, it showcases the freshness of local ingredients, making it a perfect accompaniment to any meal. The combination of tomatoes, onions, and cilantro, all drizzled with a zesty dressing, creates a delightful medley of flavors that’s both simple and satisfying. This salad not only reflects the agricultural richness of Chile but also highlights the country’s cultural love for fresh, wholesome foods.
Preparing Ensalada Chilena is an excellent way to celebrate the bounty of fresh vegetables. The key to a great salad lies in the quality of the ingredients, so be certain to select ripe tomatoes and fresh herbs. This dish isn’t only healthy but also incredibly easy to make, making it a go-to recipe for gatherings or a light meal at home. Its vibrant colors and fresh flavors will brighten any table and delight your guests.
Ingredients (Serves 4-6)
- 4 ripe tomatoes
- 1 medium red onion
- 1 bunch of fresh cilantro
- 1 tablespoon olive oil
- 1 tablespoon red wine vinegar
- Salt to taste
- Pepper to taste
Cooking Instructions
- Prepare the Vegetables: Start by washing the tomatoes thoroughly under cold water. Remove the stems and cut them into wedges. Next, peel the red onion and slice it thinly into half-moons. If you find raw onion too pungent, you can soak the slices in cold water for about 10 minutes to mellow the flavor.
- Chop the Cilantro: Rinse the cilantro under cold water and shake off any excess moisture. Remove the thicker stems and finely chop the leaves. Set aside a small portion for garnish if desired.
- Combine Ingredients: In a large salad bowl, combine the tomato wedges, sliced onion, and chopped cilantro. Toss gently to mix the ingredients without crushing the tomatoes.
- Make the Dressing: In a small bowl, whisk together the olive oil, red wine vinegar, salt, and pepper. Adjust the seasoning according to your taste preference.
- Dress the Salad: Drizzle the dressing over the salad mixture. Toss everything together gently to make sure the vegetables are evenly coated with the dressing.
- Serve: Allow the salad to sit for a few minutes at room temperature to let the flavors meld. Serve the Ensalada Chilena in individual bowls or on a large platter, garnished with the reserved cilantro if you set some aside.
Extra Tips
When preparing Ensalada Chilena, using the freshest ingredients will enhance the overall flavor of the dish. Feel free to customize the salad by adding avocados or a squeeze of lime for an extra zing.
For added texture, consider tossing in some crumbled feta cheese or toasted nuts. This salad can also be made ahead of time; just keep the dressing separate until you’re ready to serve to maintain the freshness of the vegetables.
Pastel De Choclo

Pastel De Choclo, or corn pie, is a traditional Chilean dish that brings together the vibrant flavors of the Andes with a comforting blend of ingredients. This vegetarian version replaces the traditional meat with flavorful vegetables, providing a hearty and satisfying meal that still pays homage to its roots. The dish layers a savory mixture of vegetables with a rich corn topping, creating a beautiful and delicious presentation perfect for family gatherings or cozy dinners.
This dish not only showcases the sweetness of fresh corn but also incorporates a medley of vegetables, making it a nutritious option for those who prefer a plant-based diet. The Pastel De Choclo is typically baked until golden and bubbly, creating a delightful crust on top that’s hard to resist. It’s a wonderful way to experience Chilean cuisine while maintaining vegetarian principles.
Ingredients (serving size: 4-6 people):
- 4 cups of fresh corn kernels (or 2 cans of corn)
- 1 large onion, finely chopped
- 2 cloves of garlic, minced
- 1 red bell pepper, diced
- 1 zucchini, diced
- 1 cup of mushrooms, chopped
- 1 teaspoon of paprika
- 1 teaspoon of cumin
- 2 tablespoons of olive oil
- Salt and pepper to taste
- 1 cup of vegetable broth
- 1 cup of milk (or plant-based milk)
- 1 tablespoon of fresh basil, chopped (optional)
- 1 tablespoon of fresh parsley, chopped (optional)
- 2 tablespoons of grated cheese (optional, for topping)
Cooking Instructions:
- Prepare the Corn Mixture: If using fresh corn, remove the kernels from the cob using a sharp knife. In a blender or food processor, blend half of the corn with the milk until smooth. This will create a creamy base for your topping. Set aside the blended corn and the remaining whole corn kernels.
- Sauté the Vegetables: In a large skillet, heat the olive oil over medium heat. Add the chopped onion and garlic, sautéing until the onion is translucent, about 5 minutes. Then, add the diced bell pepper, zucchini, and mushrooms, cooking for another 5-7 minutes until the vegetables are tender.
- Season the Mixture: Stir in the paprika, cumin, salt, and pepper to the vegetable mixture. Pour in the vegetable broth and allow it to simmer for about 5 minutes, letting the flavors meld together. If using, add the chopped basil and parsley for added flavor.
- Combine Corn and Vegetables: In a large mixing bowl, combine the sautéed vegetable mixture with the whole corn kernels. Mix well to make certain the vegetables are evenly distributed.
- Prepare the Topping: In another bowl, combine the blended corn mixture with the remaining whole corn, stirring until well combined. If desired, you can add grated cheese to this mixture for an extra layer of flavor.
- Assemble the Pastel: Preheat your oven to 375°F (190°C). In a baking dish, spread the vegetable and corn mixture evenly on the bottom. Pour the corn topping over the vegetable layer, spreading it out evenly.
- Bake: Place the baking dish in the preheated oven and bake for about 30-35 minutes, or until the top is golden brown and firm to the touch.
- Serve: Once baked, remove from the oven and let it cool for a few minutes before serving. Cut into squares and serve warm.
Extra Tips:
For an added depth of flavor, you can incorporate additional spices such as a dash of chili powder or a sprinkle of nutritional yeast for a cheesy flavor without the dairy.
Feel free to experiment with seasonal vegetables or even add a layer of cooked lentils or beans for extra protein. Serve with a fresh salad or a side of avocado for a complete meal. Enjoy the delightful taste of Chilean cuisine with this comforting vegetarian Pastel De Choclo!
Cazuela De Verduras
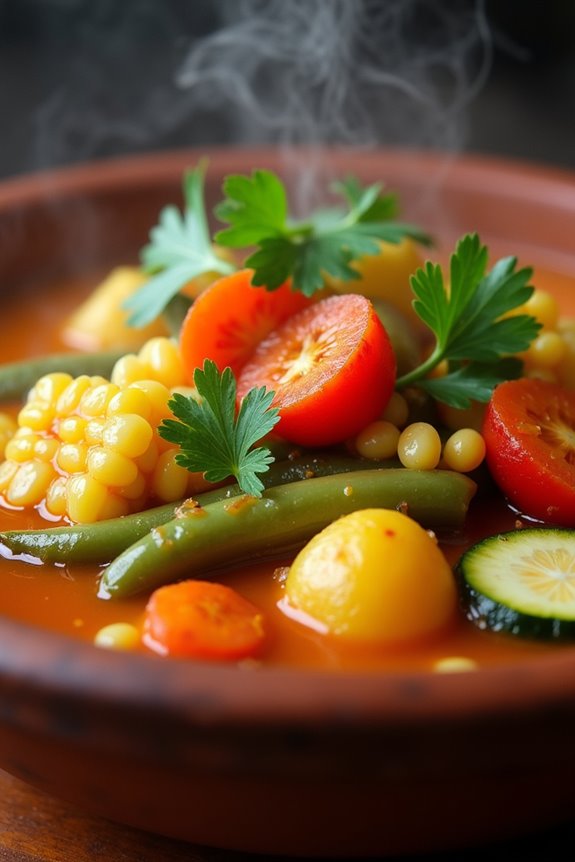
Cazuela de Verduras is a traditional Chilean vegetable stew that celebrates the rich flavors of fresh produce, making it a perfect choice for vegetarians and anyone looking to enjoy a hearty, nutritious meal. This comforting dish is a colorful mix of seasonal vegetables, herbs, and spices, simmered together to create a wholesome and satisfying meal.
The best part about cazuela is its versatility; you can customize it based on the vegetables you have on hand or what’s in season, making it a staple in many Chilean households.
The origins of cazuela can be traced back to indigenous cultures in Chile, where cooking with earth’s bounty was celebrated. In this vegetarian version, the focus is on highlighting the natural flavors of the vegetables while providing a warm and nourishing experience.
Serve it with a side of crusty bread or over a bed of rice for a complete meal that’s sure to please everyone at the table.
Ingredients (Serves 4-6 people):
- 2 tablespoons olive oil
- 1 large onion, diced
- 2 cloves garlic, minced
- 2 medium carrots, sliced
- 2 medium potatoes, diced
- 1 zucchini, diced
- 1 red bell pepper, diced
- 1 cup green beans, trimmed and cut into 1-inch pieces
- 1 cup corn kernels (fresh or frozen)
- 6 cups vegetable broth
- 1 teaspoon dried oregano
- 1 teaspoon paprika
- Salt and pepper to taste
- Fresh cilantro or parsley for garnish
Cooking Instructions:
1. Sauté the Aromatics: In a large pot, heat the olive oil over medium heat. Add the diced onion and sauté for about 5 minutes or until the onion becomes translucent.
Then, add the minced garlic and cook for an additional minute, stirring frequently to prevent burning.
2. Add the Hard Vegetables****: Stir in the sliced carrots and diced potatoes. Cook for about 5-7 minutes, allowing the vegetables to soften slightly while stirring occasionally.
This step helps to build flavor and guarantees that the carrots and potatoes cook evenly.
3. Incorporate Remaining Vegetables: Add the diced zucchini, red bell pepper, green beans, and corn to the pot. Stir everything together to combine and cook for another 3-4 minutes.
The vibrant colors of the vegetables will start to shine through as they heat up.
4. Pour in the Broth: Carefully add the vegetable broth to the pot. Stir in the dried oregano and paprika, then season with salt and pepper to taste.
Bring the mixture to a boil, then reduce the heat to a simmer and cover the pot.
5. Simmer the Cazuela: Allow the cazuela to simmer for about 25-30 minutes, or until all the vegetables are tender.
Stir occasionally to prevent sticking and guarantee even cooking. The flavors will meld beautifully during this time.
6. Serve and Garnish: Once the vegetables are tender, remove the pot from heat. Ladle the cazuela into bowls and garnish with freshly chopped cilantro or parsley.
Serve hot and enjoy!
Extra Tips:
For added depth of flavor, consider incorporating a splash of soy sauce or a dash of hot sauce just before serving.
If you want to make the dish even heartier, feel free to add cooked lentils or chickpeas along with the vegetables. Additionally, feel free to adjust the seasoning based on your preference, and don’t shy away from experimenting with different herbs like thyme or basil for a unique twist.
Enjoy the warmth and goodness of this traditional Chilean cazuela!
Paila Marina Veggie
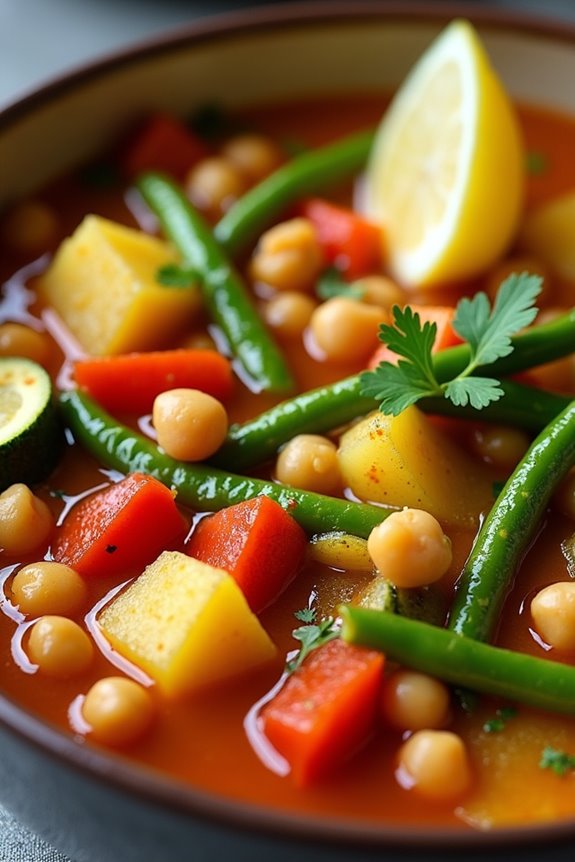
Paila Marina Veggie is a delightful vegetarian twist on the traditional Chilean seafood stew, known for its vibrant flavors and hearty ingredients. This dish is perfect for those who want to enjoy the essence of Chilean cuisine without the seafood. Instead, it features a medley of fresh vegetables and legumes, simmered in a rich, savory broth spiced with traditional Chilean seasonings. Not only is this dish packed with nutrients, but it’s also a wonderful way to experience the comforting and satisfying elements of a classic Chilean paila.
To prepare Paila Marina Veggie, you’ll want to gather fresh, seasonal vegetables to bring out the best flavors. The combination of bell peppers, zucchini, and potatoes creates a colorful and satisfying base, while the inclusion of beans adds protein and heartiness to the dish. Ideal for a family dinner or a gathering with friends, this vegetarian paila will surely impress your guests with its authentic taste and aromatic presentation.
Ingredients (Serves 4-6):
- 1 large onion, diced
- 2 cloves garlic, minced
- 1 red bell pepper, diced
- 1 green bell pepper, diced
- 1 medium zucchini, sliced
- 2 medium potatoes, diced
- 1 cup green beans, trimmed and cut into 1-inch pieces
- 1 cup diced ripe tomatoes (fresh or canned)
- 1 can (15 oz) chickpeas, drained and rinsed
- 4 cups vegetable broth
- 1 tablespoon olive oil
- 1 teaspoon smoked paprika
- 1 teaspoon dried oregano
- 1 teaspoon cumin
- Salt and pepper to taste
- Fresh cilantro or parsley for garnish (optional)
- Lemon wedges for serving (optional)
Cooking Instructions:
- Sauté the Aromatics: In a large pot, heat the olive oil over medium heat. Add the diced onion and garlic, sautéing until the onion becomes translucent and fragrant, about 5 minutes. This step is crucial to build the base flavors for the stew.
- Add the Vegetables: Stir in the diced bell peppers, zucchini, and potatoes. Cook for an additional 5-7 minutes, allowing the vegetables to soften slightly. This will help to enhance their flavors and prepare them for the simmering process.
- Incorporate the Tomatoes and Broth: Add the diced tomatoes to the pot, followed by the vegetable broth. Bring the mixture to a gentle boil, then reduce the heat to low. This will create a flavorful broth that forms the foundation of your paila.
- Season the Stew: Sprinkle in the smoked paprika, dried oregano, cumin, salt, and pepper. Stir well to guarantee all the spices are evenly distributed. Allow the stew to simmer gently for about 15 minutes, giving the vegetables time to cook through and the flavors to meld together beautifully.
- Add the Green Beans and Chickpeas: Finally, stir in the green beans and chickpeas, allowing them to heat through for an additional 5-10 minutes. This step will add texture and protein to your dish, making it hearty and filling.
- Serve and Garnish: Remove the paila from heat and ladle it into bowls. If desired, garnish with fresh cilantro or parsley and serve with lemon wedges on the side. The acidity from the lemon will brighten up the flavors of the stew.
Extra Tips:
When preparing Paila Marina Veggie, feel free to customize the vegetables based on what’s in season or what you have on hand. You can add ingredients like corn, spinach, or even squash for additional flavor and texture.
For a spicier kick, consider adding a pinch of red pepper flakes or a splash of hot sauce. Leftovers can be stored in the refrigerator for a couple of days and taste even better the next day as the flavors continue to develop. Enjoy your cooking!
Sopaipillas

Sopaipillas are delightful, light, and fluffy pastries that are a beloved treat in Chilean cuisine. Traditionally made from pumpkin or squash, these golden-brown delights are often enjoyed as a snack or dessert, perfect for dipping in a variety of sauces or simply sprinkled with sugar. The dough is easy to work with, making it a fun dish to prepare with family or friends.
When served warm, sopaipillas become irresistibly soft and slightly crispy on the outside, creating a wonderful contrast in texture. These versatile pastries can be filled with a range of ingredients, from sweet fillings like dulce de leche to savory options like cheese or beans.
However, the classic version is typically served plain or with a sprinkle of sugar and cinnamon. Whether you’re looking for a tasty accompaniment to a meal or a stand-alone snack, sopaipillas are sure to satisfy your cravings and impress your guests with their unique flavor and texture.
Ingredients (Serves 4-6):
- 2 cups all-purpose flour
- 1 cup cooked and mashed pumpkin or squash
- 1 teaspoon baking powder
- 1 teaspoon salt
- 2 tablespoons sugar
- 2 tablespoons vegetable oil (plus more for frying)
- 1/4 cup warm water (as needed)
Cooking Instructions:
- Prepare the Dough: In a large mixing bowl, combine the all-purpose flour, baking powder, salt, and sugar. Mix these dry ingredients thoroughly. Next, add the mashed pumpkin or squash and 2 tablespoons of vegetable oil to the bowl. Gradually mix in the warm water until the dough begins to come together. You may need to add a little more water if the dough feels too dry.
- Knead the Dough: Once the dough has formed, transfer it to a floured surface. Knead the dough for about 5-7 minutes until it becomes smooth and elastic. This step is essential for achieving the perfect texture in your sopaipillas.
- Roll Out the Dough: After kneading, let the dough rest for about 15-20 minutes, covered with a clean kitchen towel. Once rested, roll out the dough to about 1/4 inch thickness. Use a sharp knife or pastry cutter to cut the dough into squares or circles, depending on your preference.
- Heat the Oil: In a deep skillet or frying pan, heat vegetable oil over medium heat. You’ll want enough oil to submerge the sopaipillas partially. To test if the oil is hot enough, drop a small piece of dough into the oil; it should sizzle and rise to the surface.
- Fry the Sopaipillas: Carefully add the cut dough pieces into the hot oil in batches to avoid overcrowding. Fry each sopaipilla for about 2-3 minutes on each side, or until they’re golden brown. Use a slotted spoon to remove them from the oil and place them on paper towels to drain excess oil.
- Serve: While still warm, serve the sopaipillas with a sprinkle of sugar and cinnamon, or with your favorite dipping sauce or filling. Enjoy them fresh for the best taste and texture.
Extra Tips:
For a richer flavor, consider adding spices like nutmeg or cinnamon directly into the dough mixture. If you want to make the sopaipillas even fluffier, you can let the dough rest longer before rolling it out.
Additionally, if you have leftover sopaipillas, they can be stored in an airtight container for a couple of days and reheated in the oven to restore their crispiness. Enjoy experimenting with different toppings and fillings to customize your sopaipillas to your taste!
Quinoa Con Verduras
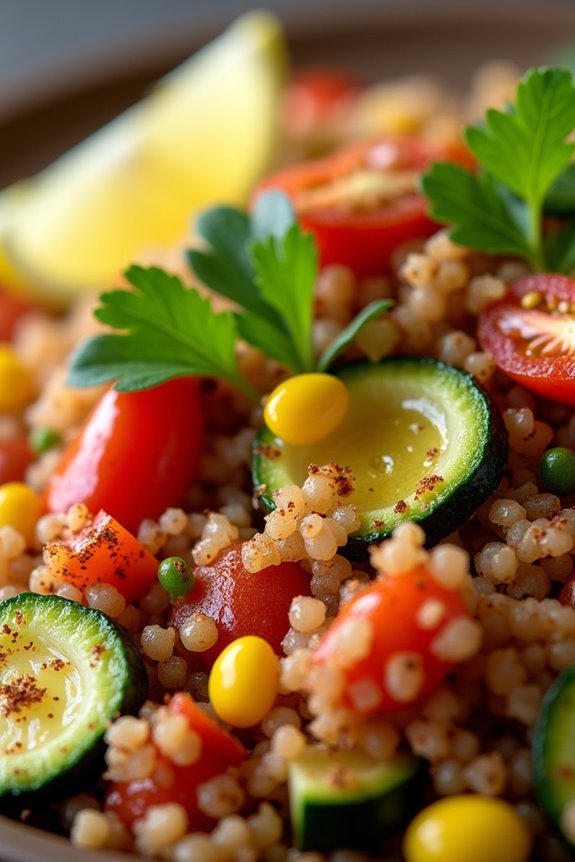
Quinoa con Verduras is a delightful vegetarian dish that embodies the vibrant flavors of Chile while providing a healthy and nutritious meal option. This dish features protein-packed quinoa paired with an array of colorful vegetables, making it not only visually appealing but also a wholesome addition to your dining table. Quinoa, a staple in many South American cuisines, is gluten-free and rich in essential amino acids, making it a perfect base for a vegetarian meal.
In this recipe, we’ll explore how to create a savory quinoa dish that highlights seasonal vegetables. You can customize the vegetables based on your preference or what you have on hand. This dish can be served warm or at room temperature, making it a versatile choice for lunch, dinner, or even as a side dish for a larger gathering.
Ingredients (Serves 4-6)
- 1 cup quinoa
- 2 cups vegetable broth or water
- 1 tablespoon olive oil
- 1 medium onion, diced
- 2 cloves garlic, minced
- 1 red bell pepper, diced
- 1 zucchini, diced
- 1 cup corn (fresh, frozen, or canned)
- 1 cup cherry tomatoes, halved
- 1 teaspoon cumin
- 1 teaspoon smoked paprika
- Salt and pepper to taste
- Fresh cilantro or parsley for garnish (optional)
- Lemon wedges for serving (optional)
Cooking Instructions
- Rinse the Quinoa: Begin by rinsing the quinoa under cold water in a fine-mesh strainer. This step is important to remove the natural coating called saponin, which can impart a bitter flavor to the quinoa. Once rinsed, let it drain for a moment.
- Cook the Quinoa: In a medium saucepan, bring the vegetable broth or water to a boil. Add the rinsed quinoa, reduce the heat to low, cover, and let it simmer for about 15 minutes or until all the liquid is absorbed. After cooking, remove from heat and let it sit, covered, for another 5 minutes. Fluff the quinoa with a fork before serving.
- Sauté the Vegetables: While the quinoa is cooking, heat olive oil in a large skillet over medium heat. Add the diced onion and sauté for 3-4 minutes until it becomes translucent. Then, add the minced garlic and sauté for an additional minute until fragrant.
- Add Remaining Vegetables: Stir in the diced red bell pepper and zucchini, cooking for about 5 minutes until they start to soften. Then add the corn and cherry tomatoes, and continue cooking for another 3-4 minutes, stirring occasionally.
- Season the Mixture: Sprinkle in the cumin and smoked paprika. Season with salt and pepper to taste, and mix everything well to guarantee the flavors are evenly distributed. Cook for an additional 2 minutes to allow the spices to meld with the vegetables.
- Combine Quinoa and Vegetables: Once both the quinoa and vegetable mixture are ready, gently fold the quinoa into the skillet with the vegetables. Stir until well combined and heated through.
- Serve: Transfer the quinoa con verduras to a serving dish. Garnish with fresh cilantro or parsley if desired, and serve with lemon wedges on the side for an extra zing.
Extra Tips
When preparing quinoa con verduras, feel free to experiment with different vegetables based on the season or your personal preferences. Vegetables like spinach, kale, or even roasted sweet potatoes can add unique flavors and textures to the dish.
Additionally, consider adding beans or chickpeas for an extra protein boost. Leftovers can be stored in the refrigerator for a few days and can be reheated easily, making it a fantastic meal prep option!
Alfajores De Dulce De Leche

Alfajores de dulce de leche are a beloved treat in Chile, known for their soft, crumbly texture and rich, sweet filling. These delightful sandwich cookies are typically made from a buttery dough that’s dusted with powdered sugar and filled with a generous layer of dulce de leche, a creamy caramel-like sauce. The combination of flavors and textures makes them a favorite dessert for many, and they’re often enjoyed with a cup of coffee or tea.
Making alfajores de dulce de leche at home is a rewarding experience, and the process is simpler than you might think. With just a few key ingredients and some careful preparation, you can create these sweet confections that are sure to impress friends and family alike. They also make for a wonderful gift or treat during special occasions and celebrations.
Ingredients (Serves 4-6)
- 2 cups all-purpose flour
- ½ cup cornstarch
- 1 teaspoon baking powder
- ½ teaspoon baking soda
- ½ cup unsalted butter, softened
- ½ cup granulated sugar
- 1 large egg
- 1 teaspoon vanilla extract
- 1 cup dulce de leche
- Powdered sugar for dusting
Instructions
- Preheat the Oven: Begin by preheating your oven to 350°F (175°C). This step is important for ensuring that your alfajores bake evenly and achieve the perfect texture.
- Combine Dry Ingredients: In a medium bowl, sift together the all-purpose flour, cornstarch, baking powder, and baking soda. Mixing these dry ingredients helps to incorporate the leavening agents evenly throughout the flour, which is vital for the rise and lightness of the cookies.
- Cream the Butter and Sugar: In a large mixing bowl, cream together the softened butter and granulated sugar using an electric mixer until the mixture becomes light and fluffy. This process typically takes about 3-5 minutes and is essential for creating a tender cookie texture.
- Add Egg and Vanilla: Next, beat in the egg and vanilla extract to the butter-sugar mixture until fully combined. The egg adds richness and moisture to the dough, while the vanilla enhances the overall flavor.
- Incorporate Dry Ingredients: Gradually add the dry ingredient mixture to the wet ingredients, mixing on low speed until just combined. Overmixing can lead to tough cookies, so be careful to stop as soon as there are no dry streaks.
- Roll and Cut the Dough: On a lightly floured surface, roll out the dough to about ¼-inch thickness. Use a round cookie cutter to cut out circles of dough. Place the circles on a baking sheet lined with parchment paper, leaving space between each cookie to allow for spreading.
- Bake the Cookies: Bake the cookies in the preheated oven for about 10-12 minutes, or until the edges are lightly golden. Keep an eye on them to prevent overbaking, as they should remain soft.
- Cool the Cookies: Once baked, remove the cookies from the oven and let them cool on the baking sheet for a few minutes before transferring them to a wire rack to cool completely.
- Assemble the Alfajores: Once the cookies are completely cooled, spread a generous layer of dulce de leche on the bottom side of one cookie and top it with another cookie to create a sandwich. Repeat this process with the remaining cookies.
- Dust with Powdered Sugar: Finally, dust the assembled alfajores with powdered sugar before serving. This adds a beautiful touch and a hint of extra sweetness.
Extra Tips
When making alfajores de dulce de leche, it’s important to choose a high-quality dulce de leche for the best flavor. You can make your own by simmering sweetened condensed milk, but store-bought options are just as delicious and convenient.
Additionally, feel free to experiment with flavors by adding a pinch of cinnamon or cocoa powder to the dough for a unique twist. Allowing the assembled alfajores to sit for a few hours or overnight can enhance the flavors, as the cookies will absorb some moisture from the dulce de leche, making them even more delectable.
Enjoy your homemade alfajores with friends and family!