

When it comes to Chilean cuisine, the delightful variety of bread is a real standout.
Each type of bread, from the crusty Marraqueta to the flaky Hallulla, offers its own unique texture and flavor.
These breads are perfect companions for everything from hearty stews to light salads.
Are you ready to explore how these beloved Chilean bread recipes can enhance your meals?
Let’s take a look at some favorites that are sure to inspire your next culinary adventure.
Marraqueta: The Classic Chilean Bread Roll
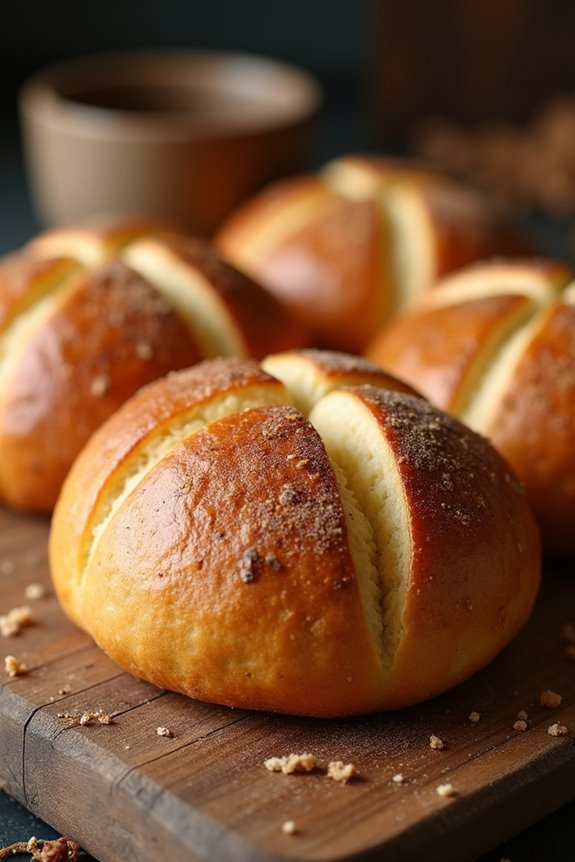
Marraqueta is a beloved Chilean bread roll that’s known for its unique shape and crispy crust. Often enjoyed with butter, avocado, or even as a sandwich base, marraqueta has a delightful texture that makes it a staple in Chilean households. Its origins can be traced back to the 19th century, and it has evolved into an essential part of the country’s culinary tradition.
The bread is characterized by its distinct cross-slit design, which allows for even baking and a crispy exterior. Making marraqueta at home is a rewarding experience that fills your kitchen with the aroma of freshly baked bread. The dough is relatively simple to prepare, requiring just a few basic ingredients.
Once baked, these rolls can be served warm, making them an ideal accompaniment to any meal or enjoyed on their own as a tasty snack. Here’s how to make this classic Chilean bread roll from scratch.
Ingredients (Serves 4-6 people):
- 500g all-purpose flour
- 10g salt
- 10g sugar
- 7g dry yeast
- 300ml warm water
- 30ml olive oil
Cooking Instructions:
- Prepare the Yeast Mixture: In a small bowl, combine the warm water, sugar, and dry yeast. Stir gently and let it sit for about 10 minutes until it becomes frothy. This step activates the yeast, guaranteeing that your dough rises properly.
- Mix Dry Ingredients: In a large mixing bowl, combine the all-purpose flour and salt. Mix well to guarantee that the salt is evenly distributed throughout the flour. This helps to create a uniform texture in the final bread.
- Combine Ingredients: Once the yeast mixture is frothy, pour it into the bowl with the flour mixture, along with the olive oil. Mix everything together until a rough dough starts to form.
- Knead the Dough: Transfer the dough onto a floured surface and knead it for about 10 minutes. You want to achieve a smooth and elastic texture. If the dough is sticky, add a little more flour as needed.
- First Rise: Place the kneaded dough into a lightly oiled bowl, cover it with a clean cloth, and let it rise in a warm place for about 1 hour or until it has doubled in size. This is an essential step for developing the bread’s texture and flavor.
- Shape the Rolls: Once risen, punch down the dough to release any air bubbles. Divide the dough into 8 equal pieces. Shape each piece into a small ball and then flatten it slightly. Using a sharp knife or a dough scraper, make a cross on the top of each roll to create the signature marraqueta look.
- Second Rise: Place the shaped rolls on a baking sheet lined with parchment paper, guaranteeing they’re spaced apart. Cover them again with a cloth and allow them to rise for another 30 minutes.
- Preheat and Bake: Preheat your oven to 220°C (428°F). Once the rolls have puffed up, bake them in the preheated oven for about 15-20 minutes, or until they’re golden brown and sound hollow when tapped on the bottom.
- Cool and Serve: Remove the rolls from the oven and let them cool on a wire rack. Serve warm or at room temperature with your favorite spreads or fillings.
Extra Tips:
When making marraqueta, it’s crucial to verify that your water is warm but not too hot, as this can kill the yeast.
Additionally, if you want an extra crispy crust, place a small dish of water in the oven while baking to create steam. This helps to achieve that perfect crust that’s characteristic of marraqueta.
Finally, enjoy experimenting with different fillings or toppings to enhance the flavors of this delicious bread!
Hallulla: Savory and Flaky Flatbread
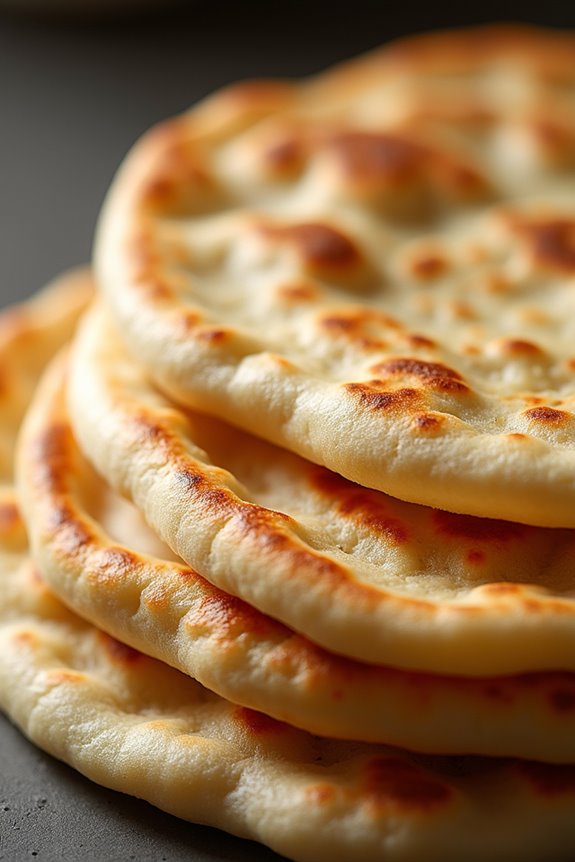
Hallulla is a traditional Chilean flatbread that embodies the delightful fusion of savory flavors and flaky textures. This versatile bread is often enjoyed alongside meals, making it an ideal accompaniment for a variety of dishes or as a standalone snack. Its simple preparation and use of wholesome ingredients make Hallulla a favorite in Chilean households, where it’s often served warm and fresh from the oven.
Making Hallulla requires just a few basic ingredients and can be easily mastered by both novice and experienced bakers. The dough is rolled out and baked until golden brown, resulting in a deliciously flaky flatbread that pairs beautifully with cheese, meats, or spreads. This recipe yields enough Hallulla for 4-6 people, guaranteeing that everyone can indulge in this delightful treat.
Ingredients
- 4 cups all-purpose flour
- 1 teaspoon baking powder
- 1 teaspoon salt
- 1 teaspoon sugar
- 1 cup warm water
- 1/4 cup vegetable oil
- Extra flour for dusting
Cooking Instructions
- Prepare the Dough: In a large mixing bowl, combine the all-purpose flour, baking powder, salt, and sugar. Mix these dry ingredients together until well incorporated.
- Add Wet Ingredients: Make a well in the center of the dry mixture and pour in the warm water and vegetable oil. Using a wooden spoon or your hands, mix the ingredients until a shaggy dough begins to form.
- Knead the Dough: Transfer the dough onto a lightly floured surface. Knead the dough for about 5-7 minutes until it becomes smooth and elastic. If the dough is sticky, sprinkle a little more flour as needed.
- Rest the Dough: Shape the kneaded dough into a ball and place it in a lightly greased bowl. Cover the bowl with a damp cloth or plastic wrap and let it rest for about 30 minutes. This resting period helps to relax the gluten in the dough, making it easier to roll out.
- Shape the Hallulla: After resting, divide the dough into 8 equal pieces. Take one piece and roll it out on a floured surface into a circle about 1/4 inch thick. Repeat with the remaining pieces of dough.
- Cook the Hallulla: Preheat a large skillet or griddle over medium heat. Place one rolled-out piece of dough onto the skillet and cook for about 3-4 minutes on each side or until golden brown with flecks of darker color. Repeat this process for the remaining pieces of dough.
- Serve Warm: Once cooked, remove the Hallulla from the skillet and let it cool slightly on a wire rack. Serve warm alongside your favorite dips, cheeses, or meats.
Extra Tips
For the best flavor, consider adding herbs or spices to the dough, such as dried oregano or garlic powder.
Additionally, confirm your skillet is adequately preheated before adding the dough to achieve that perfect golden crust.
If you want to store leftover Hallulla, wrap them in foil or place them in an airtight container to maintain their freshness, and reheat them in the oven or on a skillet before serving.
Enjoy your homemade Hallulla!
Paila Marina: A Unique Seafood Bread
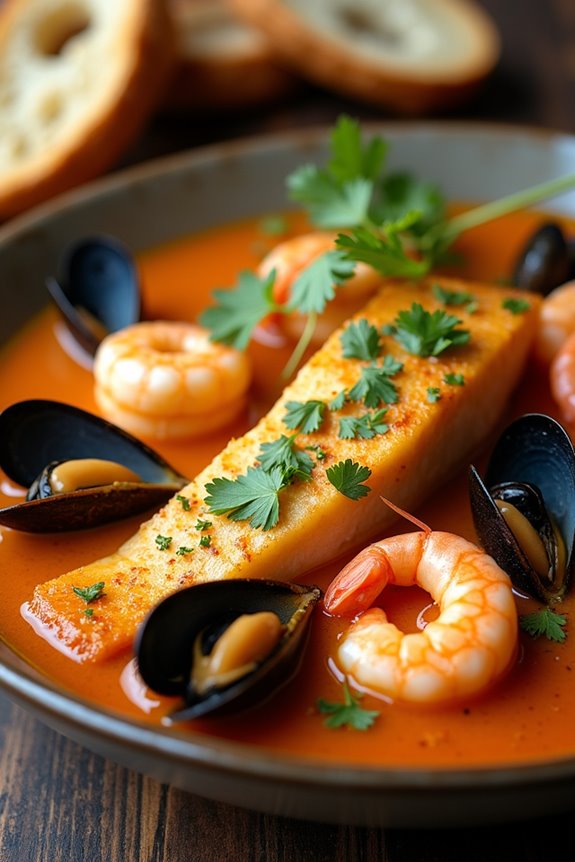
Paila Marina is a delightful Chilean seafood dish that combines rich flavors with a comforting bread base, making it a beloved choice for both locals and visitors alike. This dish isn’t only a feast for the palate but also a feast for the eyes, as the vibrant colors of the seafood create a stunning presentation. The blend of fresh seafood, aromatic herbs, and spices harmonizes beautifully, creating a dish that captures the essence of the ocean and the heart of Chilean cuisine.
To make Paila Marina, you’ll need a variety of seafood, which can include fish, clams, mussels, and shrimp, all simmered in a savory broth. The addition of bread serves as a delicious vessel for soaking up the flavorful juices, making every bite a satisfying experience. This dish is perfect for gatherings, offering a unique twist on traditional seafood fare and is sure to impress your guests with its deliciousness and visual appeal.
Ingredients (Serves 4-6):
- 1 lb (450g) fresh fish fillets (such as sea bass or hake)
- 0.5 lb (225g) shrimp, peeled and deveined
- 0.5 lb (225g) mussels, cleaned
- 0.5 lb (225g) clams, cleaned
- 4 cups fish stock or seafood broth
- 1 onion, finely chopped
- 2 cloves garlic, minced
- 1 red bell pepper, diced
- 1 cup diced tomatoes (fresh or canned)
- 1 teaspoon paprika
- 1 teaspoon cumin
- Salt and pepper to taste
- 1 tablespoon olive oil
- Fresh cilantro or parsley for garnish
- Crusty bread for serving
Cooking Instructions:
- Prepare the Seafood: Begin by cleaning and preparing the seafood. Rinse the fish, shrimp, mussels, and clams under cold water to remove any sand or debris. Cut the fish into bite-sized pieces and set aside.
- Sauté the Aromatics: In a large pot, heat the olive oil over medium heat. Add the chopped onion, garlic, and red bell pepper. Sauté for about 5 minutes or until the onion is translucent and fragrant.
- Add the Tomatoes and Spices: Stir in the diced tomatoes, paprika, cumin, salt, and pepper. Cook for an additional 3-4 minutes until the tomatoes soften and release their juices.
- Pour in the Broth: Add the fish stock or seafood broth to the pot. Bring the mixture to a gentle boil, then reduce the heat to a simmer. Allow it to cook for about 10 minutes to let the flavors meld together.
- Incorporate the Seafood: Carefully add the fish pieces, shrimp, mussels, and clams to the pot. Cover and cook for another 5-7 minutes or until the seafood is cooked through and the mussels and clams have opened up.
- Serve: Ladle the Paila Marina into bowls, making sure to include plenty of broth and seafood. Garnish with fresh cilantro or parsley. Serve with slices of crusty bread for dipping.
Extra Tips:
To enhance the flavors of your Paila Marina, consider adding a splash of white wine to the broth for an added depth of flavor. You can also customize the seafood based on what’s available or your personal preferences.
If you want to make the dish spicier, feel free to incorporate some chopped chili peppers or a dash of hot sauce. Finally, serving the dish immediately after cooking guarantees that the seafood remains tender and the bread stays crusty, making for the best dining experience.
Pan De Pascua: Chilean Christmas Cake Bread
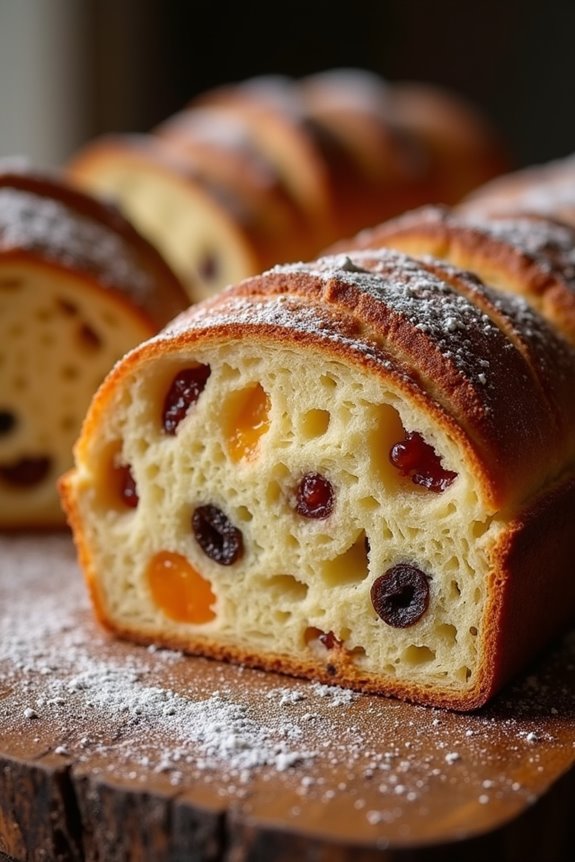
Pan de Pascua, a traditional Chilean Christmas cake, is a delightful sweet bread that embodies the festive spirit of the holiday season. This rich and flavorful bread is packed with dried fruits and nuts, making it a beloved treat at gatherings and family celebrations.
Often enjoyed alongside a warm cup of tea or coffee, Pan de Pascua isn’t only a delicious dessert but also a symbol of togetherness and warmth during the holidays.
The origins of Pan de Pascua can be traced back to European influences, particularly from Italy and Spain, which have inspired many Chilean baked goods. The name itself translates to “Easter Bread,” hinting at its historical significance during festive seasons.
However, it has become a staple of Christmas celebrations in Chile, where families gather to share this beloved cake. With its dense texture and aromatic spices, Pan de Pascua is sure to become a cherished part of your holiday traditions.
Ingredients (Serves 4-6):
- 2 cups all-purpose flour
- 1 cup sugar
- 1 cup milk
- 3 large eggs
- 1 cup mixed dried fruits (such as raisins, apricots, and prunes)
- ½ cup chopped nuts (such as walnuts or almonds)
- 1 teaspoon baking powder
- 1 teaspoon ground cinnamon
- ½ teaspoon ground nutmeg
- ½ teaspoon ground cloves
- ½ teaspoon vanilla extract
- Zest of 1 orange
- Zest of 1 lemon
- A pinch of salt
Cooking Instructions:
- Preheat the Oven: Begin by preheating your oven to 350°F (175°C). This step is crucial to guarantee that your Pan de Pascua bakes evenly and achieves the perfect texture.
- Prepare the Baking Pan: Grease a loaf pan or a round cake pan with butter or non-stick spray. This will prevent the bread from sticking and allow for easy removal once it’s baked.
- Mix Dry Ingredients: In a large mixing bowl, combine the all-purpose flour, baking powder, ground cinnamon, ground nutmeg, ground cloves, and salt. Whisk the ingredients together until they’re well blended and set aside.
- Combine Wet Ingredients: In another bowl, whisk together the eggs and sugar until the mixture is light and frothy. Gradually add the milk, vanilla extract, orange zest, and lemon zest, mixing until fully combined.
- Combine Mixtures: Slowly add the dry ingredients to the wet mixture, stirring gently until just combined. Be careful not to overmix, as this can result in a dense bread.
- Fold in Fruits and Nuts: Gently fold in the mixed dried fruits and chopped nuts into the batter. Confirm that they’re evenly distributed throughout the mixture for the best flavor in each slice.
- Pour into Pan: Transfer the batter into the prepared baking pan, smoothing the top with a spatula. This step guarantees that the surface of the Pan de Pascua is even, which helps it bake uniformly.
- Bake: Place the pan in the preheated oven and bake for approximately 45-55 minutes, or until a toothpick inserted into the center comes out clean. Keep an eye on the bread towards the end of the baking time to prevent over-baking.
- Cool and Serve: Once baked, remove the Pan de Pascua from the oven and let it cool in the pan for about 10 minutes. Then, transfer it to a wire rack to cool completely before slicing. Serve with a dusting of powdered sugar, if desired.
Extra Tips: To enhance the flavors of your Pan de Pascua, consider letting it rest for a day before serving, as this allows the flavors to meld beautifully.
Additionally, feel free to customize the dried fruits and nuts based on your preferences or what you have on hand. For a festive touch, you can even drizzle a simple glaze made of powdered sugar and water over the top once it’s cooled. Enjoy this wonderful Chilean treat with loved ones!
Pino Bread: Stuffed Chilean Dough
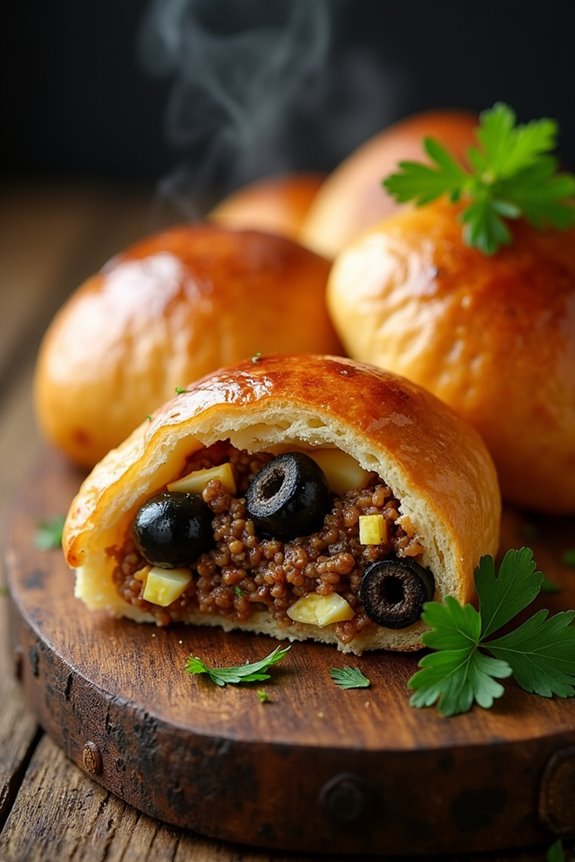
Pino bread is a delicious Chilean specialty that combines the comforting qualities of bread with a savory, flavorful filling. The dough is typically made from flour, yeast, and a touch of sugar, and it’s filled with pino, a traditional mixture of ground beef, onions, olives, hard-boiled eggs, and spices. This hearty dish is often enjoyed during celebrations and gatherings, embodying the warmth and hospitality of Chilean culture.
Making pino bread at home is a rewarding experience that allows you to explore the rich flavors of Chilean cuisine. With a little patience and preparation, you can create this delightful dish that will impress your family and friends. Whether served as a main course or a snack, pino bread is sure to be a hit at your next meal.
Ingredients (Serves 4-6)
- 4 cups all-purpose flour
- 1 packet (2 ¼ teaspoons) active dry yeast
- 1 teaspoon sugar
- 1 teaspoon salt
- 1 ½ cups warm water (about 110°F)
- 2 tablespoons olive oil
- 1 pound ground beef
- 1 large onion, finely chopped
- 1 teaspoon cumin
- 1 teaspoon paprika
- Salt and pepper to taste
- ½ cup black olives, pitted and sliced
- 2 hard-boiled eggs, chopped
- 1 egg (for egg wash)
Cooking Instructions
1. Prepare the Dough: In a large mixing bowl, combine the warm water, sugar, and yeast. Allow it to sit for about 10 minutes until it becomes frothy.
Add the olive oil, flour, and salt, then mix until a soft dough forms. Knead the dough on a floured surface for about 8-10 minutes until it becomes smooth and elastic.
Place it in a greased bowl, cover with a cloth, and let it rise in a warm place for about 1 hour, or until it has doubled in size.
2. Cook the Filling: In a large skillet, heat a tablespoon of olive oil over medium heat. Add the chopped onions and cook until they’re translucent, about 5 minutes.
Add the ground beef, breaking it apart with a spatula. Cook until browned, about 7-10 minutes.
Stir in the cumin, paprika, salt, and pepper. Remove from heat and let cool slightly. Once cooled, mix in the sliced olives and chopped hard-boiled eggs.
3. Assemble the Bread: Preheat your oven to 375°F (190°C). Once the dough has risen, punch it down to release the air.
Divide the dough into 8 equal pieces. Roll each piece into a circle about 6 inches in diameter.
Place a generous spoonful of the pino filling in the center of each circle. Fold the dough over the filling to create a half-moon shape and seal the edges by pinching them together or using a fork.
4. Bake the Pino Bread: Place the stuffed pino breads on a baking sheet lined with parchment paper. Beat the egg and brush it over the tops of the breads for a shiny finish.
Bake in the preheated oven for 20-25 minutes, or until golden brown. Remove from the oven and let cool slightly before serving.
5. Serve and Enjoy: Serve the pino bread warm, either as a main dish or a tasty snack.
They can be enjoyed on their own or accompanied by a fresh salad or dipping sauce.
Extra Tips
When making pino bread, feel free to customize the filling to suit your taste. You can add ingredients like diced bell peppers, herbs, or even cheese for an extra layer of flavor.
Additionally, make sure not to overfill the dough pockets, as this can lead to bursting during baking. If you want a softer bread, cover the baking sheet with a clean cloth after baking and let the breads steam for a few minutes.
Enjoy your culinary adventure with this delightful Chilean dish!
Pan Amasado: Traditional Homemade Bread
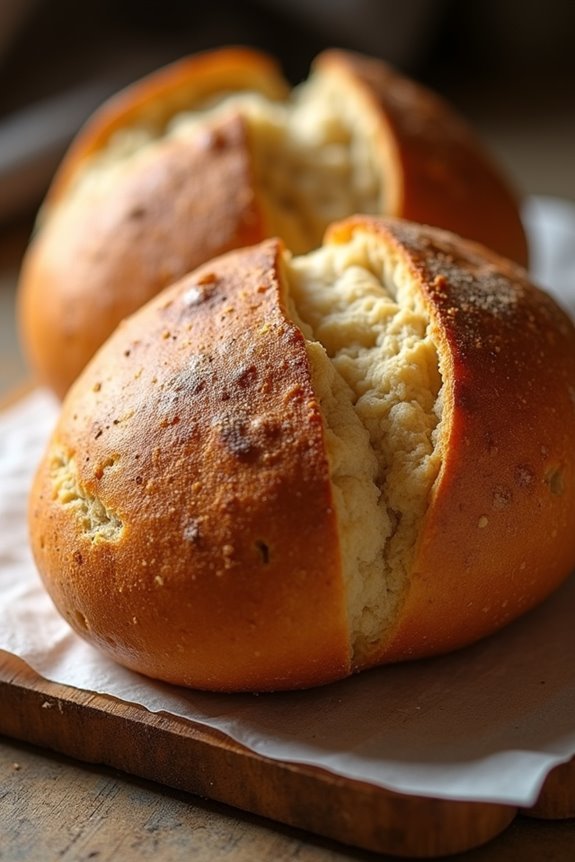
Pan Amasado is a beloved traditional bread from Chile that showcases the simplicity and warmth of homemade baking. This rustic bread is often enjoyed with meals or as a snack, and its soft, fluffy texture makes it perfect for slathering with butter, cheese, or even jam.
Originating from the heart of Chilean culture, Pan Amasado is an indispensable part of family gatherings and celebrations, allowing you to connect with both the flavors of the past and the comforts of home.
Making Pan Amasado is a straightforward process that requires minimal ingredients, making it an accessible option for both novice and experienced bakers. The dough is typically kneaded by hand, giving it a personal touch that reflects the love and care put into its preparation.
As you commence on this culinary journey, you’ll discover the joy of creating a delicious bread that not only fills the belly but also warms the heart.
Ingredients (Serves 4-6 people):
- 4 cups all-purpose flour
- 1 cup warm water
- 1 tablespoon salt
- 1 tablespoon sugar
- 2 tablespoons vegetable oil or melted butter
- 1 packet (2 ¼ teaspoons) dry yeast
Cooking Instructions:
- Activate the Yeast: In a small bowl, combine the warm water, sugar, and dry yeast. Let this mixture sit for about 5-10 minutes until it becomes frothy. This step guarantees that the yeast is active and will help the bread rise properly.
- Mix the Dry Ingredients: In a large mixing bowl, combine the all-purpose flour and salt. Stir these dry ingredients together to evenly distribute the salt throughout the flour.
- Combine Wet and Dry Ingredients: Once the yeast mixture is frothy, add it to the dry ingredients along with the vegetable oil or melted butter. Stir with a wooden spoon or spatula until the mixture begins to form a dough.
- Knead the Dough: Transfer the dough onto a lightly floured surface. Knead the dough for about 8-10 minutes until it’s smooth and elastic. If the dough is too sticky, you can sprinkle a bit more flour as needed.
- Let the Dough Rise: Place the kneaded dough into a greased bowl, cover it with a clean cloth or plastic wrap, and let it rise in a warm place for about 1 hour or until it has doubled in size. This is vital for achieving the light and fluffy texture characteristic of Pan Amasado.
- Shape the Bread: After the dough has risen, punch it down gently to release the air. Divide the dough into equal portions (about 6 pieces) and shape each piece into a round or oval loaf, about 1 inch thick.
- Second Rise: Place the shaped loaves on a baking sheet lined with parchment paper. Cover them again with a cloth and let them rise for an additional 30 minutes.
- Preheat the Oven: While the loaves are rising, preheat your oven to 375°F (190°C).
- Bake the Bread: Once the loaves have risen, place them in the preheated oven and bake for 20-25 minutes, or until they’re golden brown on top and sound hollow when tapped on the bottom.
- Cool and Serve: Remove the Pan Amasado from the oven and let it cool on a wire rack. Once cooled, slice and serve warm, or at room temperature, with your favorite spreads.
Extra Tips:
For an even richer flavor, consider adding herbs or spices to the dough, such as oregano or garlic powder, or sprinkle sesame seeds on top before baking.
Make sure to knead the dough thoroughly for the best texture, and don’t rush the rising times, as they’re fundamental for developing flavor and lightness in the bread.
Enjoy your freshly baked Pan Amasado with a variety of toppings and share it with family and friends to create cherished memories around the table!
Pan De Molde: Soft Sliced Bread
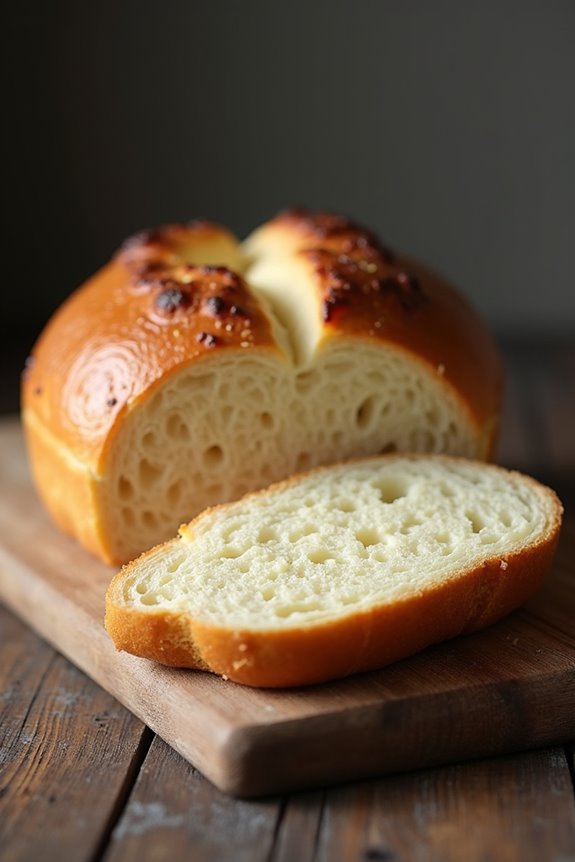
Pan de Molde, or soft sliced bread, is a staple in Chilean households, cherished for its fluffy texture and versatility. This bread is perfect for sandwiches, toast, or simply enjoyed with a spread of butter or jam. The recipe is simple and requires a few basic ingredients, making it an ideal choice for both novice and experienced bakers alike. The end result is a beautifully golden loaf with a soft crumb that will have everyone reaching for seconds.
Making Pan de Molde at home allows you to enjoy the aroma of freshly baked bread wafting through your kitchen. It’s a wonderful addition to any meal or can be savored as a snack. Whether you’re preparing a family breakfast or hosting friends for tea, this soft sliced bread is sure to impress. With a little time and patience, you can master this beloved Chilean recipe.
Ingredients (Serves 4-6)
- 4 cups all-purpose flour
- 2 teaspoons instant yeast
- 1 tablespoon sugar
- 1 teaspoon salt
- 1 ½ cups warm milk (about 110°F)
- 3 tablespoons unsalted butter, melted
- 1 large egg
Cooking Instructions
- Activate the Yeast: In a small bowl, combine the warm milk and sugar. Sprinkle the instant yeast over the milk and stir gently to combine. Allow the mixture to sit for about 5-10 minutes, or until it becomes frothy. This indicates that the yeast is active and ready to use.
- Mix the Dry Ingredients: In a large mixing bowl, whisk together the all-purpose flour and salt. Make a well in the center of the flour mixture.
- Combine Wet Ingredients: Once the yeast mixture is frothy, add it to the well in the flour along with the melted butter and the egg. Use a wooden spoon or dough scraper to mix the ingredients until a shaggy dough begins to form.
- Knead the Dough: Transfer the dough to a lightly floured surface and knead for about 8-10 minutes, or until the dough is smooth and elastic. You can also do this in a stand mixer with a dough hook attachment for about 5 minutes on medium speed.
- First Rise: Shape the kneaded dough into a ball and place it in a lightly greased bowl, covering it with a clean kitchen towel. Let it rise in a warm, draft-free area for about 1-1.5 hours, or until it has doubled in size.
- Shape the Loaf: Once the dough has risen, punch it down to release the air. Turn it out onto a floured surface and shape it into a loaf by flattening it into a rectangle and rolling it tightly from one end to the other.
- Second Rise: Place the shaped loaf seam-side down in a greased loaf pan. Cover it with the kitchen towel again and allow it to rise for another 30-45 minutes, or until it has risen above the edges of the pan.
- Preheat Oven and Bake: Preheat your oven to 350°F (175°C). Once the dough has risen, bake it in the preheated oven for 30-35 minutes, or until the top is golden brown and the bread sounds hollow when tapped on the bottom.
- Cool the Bread: Remove the loaf from the oven and let it cool in the pan for about 10 minutes. Then, turn it out onto a wire rack to cool completely before slicing.
Extra Tips
For the best results, confirm that your ingredients are at room temperature before mixing. If you’re in a cold environment, you can let the dough rise in a slightly warm oven (turned off) or cover it with a warm, damp cloth to encourage rising.
Additionally, for an extra soft crust, brush the top of the loaf with melted butter right after it comes out of the oven. Store the bread in an airtight container to keep it fresh for several days, or slice and freeze it for longer storage. Enjoy your homemade Pan de Molde!
Pan De Queso: Cheese-Stuffed Bread Rolls
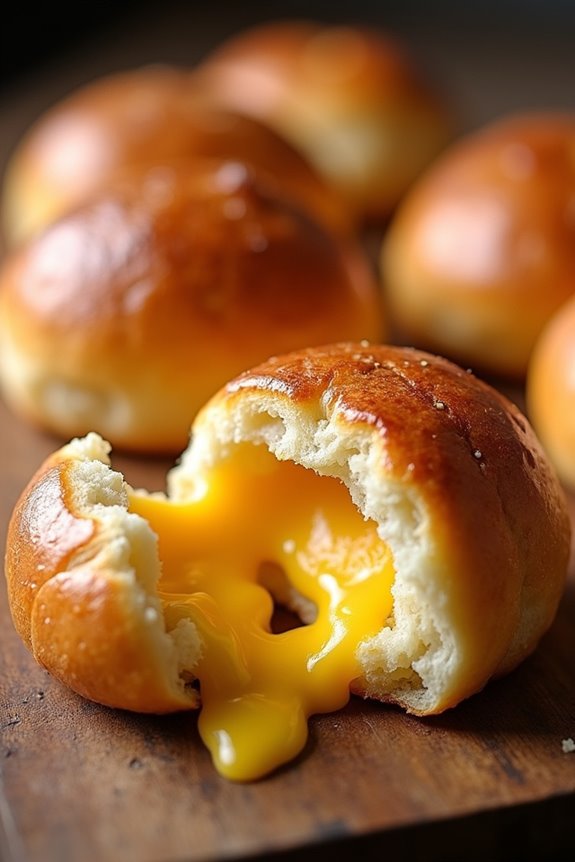
Pan De Queso, or cheese-stuffed bread rolls, is a delightful Chilean treat that perfectly balances the savory flavor of cheese with the warm, comforting texture of freshly baked bread.
These rolls are soft on the outside and gooey on the inside, making them a popular choice for breakfast, snacks, or even as a side dish during meals. The combination of cheese varieties used can be adjusted according to personal preference, guaranteeing that each batch of Pan De Queso can be unique and tailored to your taste.
Making Pan De Queso is a wonderful way to introduce a bit of Chilean culture into your kitchen. The dough is simple to prepare, and the addition of cheese is what makes these rolls truly special.
Whether you’re baking for a family gathering or simply indulging in a comforting snack at home, these cheese-stuffed rolls are sure to please everyone. Let’s explore the ingredients and steps to create this delightful dish!
Ingredients (serving size: 4-6 people):
- 2 cups all-purpose flour
- 1 cup warm milk (about 110°F or 43°C)
- 2 tablespoons unsalted butter, melted
- 1 tablespoon sugar
- 1 teaspoon salt
- 1 packet (2 ¼ teaspoons) active dry yeast
- 1 cup shredded cheese (such as mozzarella, queso blanco, or a blend)
- 1 egg (for egg wash)
- Additional flour for dusting
Cooking Instructions:
- Activate the Yeast: In a small bowl, combine the warm milk, sugar, and active dry yeast. Stir gently and let it sit for about 5-10 minutes until it becomes frothy. This step confirms that the yeast is active and ready to help the dough rise.
- Prepare the Dough: In a large mixing bowl, combine the all-purpose flour and salt. Make a well in the center and pour in the activated yeast mixture along with the melted butter. Mix with a wooden spoon or your hands until the dough begins to come together.
- Knead the Dough: Transfer the dough onto a floured surface and knead for about 8-10 minutes until it’s smooth and elastic. If the dough is too sticky, sprinkle a little more flour as needed. Kneading helps develop the gluten, assuring a good texture in the final product.
- Let It Rise: Place the dough in a lightly greased bowl and cover it with a clean kitchen towel or plastic wrap. Let it rise in a warm place for about 1 hour, or until it has doubled in size. This step is vital for achieving fluffy bread rolls.
- Shape the Rolls: Once the dough has risen, punch it down to release the air. Divide the dough into equal pieces (about 8-12 depending on desired size). Flatten each piece slightly, place a tablespoon of shredded cheese in the center, and fold the dough over the cheese, pinching to seal it. Shape each roll into a ball.
- Second Rise: Arrange the filled rolls on a baking sheet lined with parchment paper, leaving some space between each roll. Cover them again and let them rise for another 30 minutes.
- Preheat the Oven: While the rolls are rising, preheat your oven to 375°F (190°C). This guarantees that the rolls will bake evenly and achieve a golden brown color.
- Egg Wash: Beat the egg in a small bowl and brush a light layer over the tops of the rolls for a shiny, golden crust.
- Bake: Place the baking sheet in the preheated oven and bake for 20-25 minutes, or until the rolls are golden brown and cooked through. Check for doneness by tapping the bottom of a roll; it should sound hollow.
- Cool and Serve: Once baked, remove the rolls from the oven and let them cool slightly on a wire rack. Serve warm and enjoy the melty cheese inside!
Extra Tips: When making Pan De Queso, consider experimenting with different types of cheese to find your favorite combination. You can also add herbs or spices to the dough for an extra flavor boost.
For a fun twist, try adding a touch of garlic powder or dried oregano. Always verify that your yeast is fresh for the best rise, and if you live in a colder area, place the dough in a slightly warm oven (turned off) to help it rise effectively. Enjoy your baking adventure!
Pan Trenzado: Braided Chilean Bread
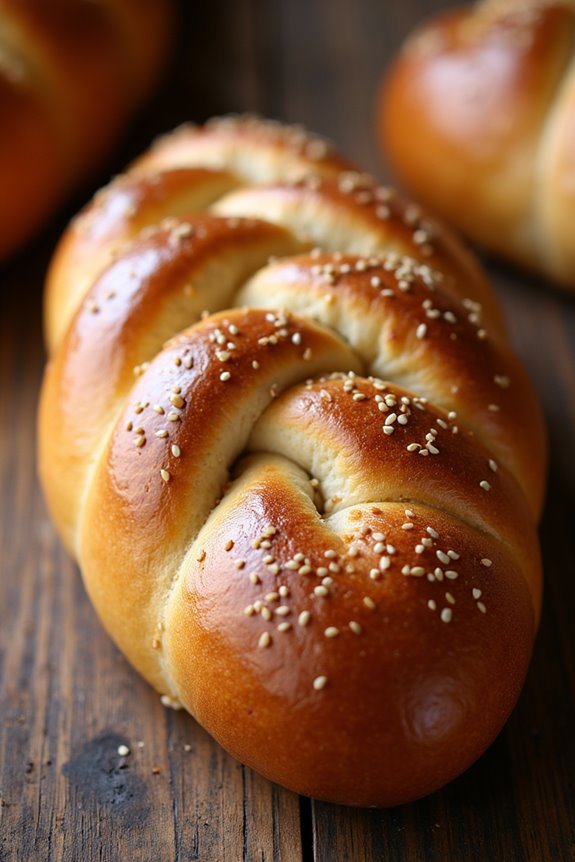
Pan Trenzado, or Braided Chilean Bread, is a delightful treat that combines a soft, fluffy texture with a beautiful braided appearance, making it perfect for any occasion. This traditional bread is often enjoyed during family gatherings or special celebrations in Chile.
The combination of simple ingredients results in a deliciously sweet bread, which can be served warm or toasted, and pairs wonderfully with butter, jam, or cheese.
The process of making Pan Trenzado isn’t only rewarding but also a great way to engage with family and friends. Kneading the dough and braiding it together creates a sense of connection and tradition, as many Chileans have been making this bread for generations.
Once baked, its golden crust and soft interior will surely impress anyone who tastes it, making it a cherished addition to any meal.
Ingredients (Serves 4-6):
- 4 cups all-purpose flour
- 1/2 cup sugar
- 2 teaspoons salt
- 2 teaspoons dry yeast
- 1 cup warm milk
- 1/2 cup unsalted butter, melted
- 2 large eggs
- 1 teaspoon vanilla extract
- 1 egg (for egg wash)
- Sesame seeds (optional, for topping)
Cooking Instructions:
- Activate the Yeast: In a small bowl, combine the warm milk and dry yeast. Let it sit for about 5-10 minutes until it becomes frothy. This step confirms that the yeast is alive and ready to help the bread rise.
- Prepare the Dough: In a large mixing bowl, whisk together the flour, sugar, and salt. Create a well in the center and add the frothy yeast mixture, melted butter, eggs, and vanilla extract. Mix until the dough starts to come together.
- Knead the Dough: Transfer the dough onto a floured surface and knead it for about 8-10 minutes until it’s smooth and elastic. If the dough is too sticky, sprinkle a little more flour as needed. This step develops the gluten, giving the bread its structure.
- Let the Dough Rise: Place the kneaded dough in a greased bowl, cover it with a damp cloth, and let it rise in a warm place for about 1-2 hours, or until it doubles in size. This process is essential for achieving a light and airy bread.
- Shape the Bread: Once the dough has risen, punch it down to release air. Divide the dough into three equal parts. Roll each piece into long strands (about 12-14 inches long) and braid them together. Pinch the ends to seal.
- Second Rise: Place the braided dough on a baking sheet lined with parchment paper. Cover it with a cloth and let it rise for another 30-45 minutes until it puffs up slightly.
- Prepare for Baking: Preheat your oven to 350°F (175°C). Beat the additional egg in a small bowl and brush it over the top of the braided bread for a beautiful golden finish. If desired, sprinkle sesame seeds on top.
- Bake the Bread: Bake in the preheated oven for 25-30 minutes, or until the bread is golden brown and sounds hollow when tapped on the bottom.
- Cool and Serve: Remove the bread from the oven and let it cool on a wire rack before slicing. Enjoy your freshly baked Pan Trenzado warm or at room temperature.
Extra Tips:
When making Pan Trenzado, verify that your ingredients are at room temperature for better incorporation and a smoother dough.
Additionally, if you want to add a twist to the flavor, consider incorporating spices like cinnamon or nutmeg into the dough or adding dried fruits and nuts.
For a sweeter bread, you can also brush the finished loaf with a light syrup made from sugar and water after baking, giving it a beautiful shine and added sweetness.
Pan De Choclo: Corn Bread Delight

Pan de Choclo, or Corn Bread, is a traditional Chilean dish that showcases the delightful flavors of corn in a moist, savory bread. This dish is often enjoyed as a side with meals or as a snack, and its unique texture and taste make it a beloved staple in Chilean cuisine. Made with fresh corn, onions, cheese, and spices, Pan de Choclo is a comforting and hearty bread that brings a taste of the Andes right to your table.
The preparation of Pan de Choclo is a beautiful blend of simplicity and tradition. The key ingredient is fresh corn, which provides a natural sweetness and rich flavor. Combined with sautéed onions and cheese, this dish creates a deliciously satisfying experience. Whether you’re sharing it at a family gathering or enjoying a quiet dinner at home, Pan de Choclo is sure to captivate and please everyone at the table.
Ingredients (Serves 4-6):
- 4 cups fresh corn kernels (or 2 cans of corn, drained)
- 1 medium onion, finely chopped
- 2 tablespoons butter
- 1 cup milk
- 2 large eggs
- 1 cup all-purpose flour
- 1 teaspoon baking powder
- 1 teaspoon salt
- 1 cup grated cheese (such as mozzarella or Chilean queso)
- 1 tablespoon sugar (optional)
- Fresh basil or cilantro for garnish (optional)
Cooking Instructions:
- Prepare the Corn: If using fresh corn, remove the kernels from the cobs and set aside. If using canned corn, drain and rinse the corn kernels. This step guarantees the corn is ready to provide its sweet flavor to the bread.
- Sauté the Onions: In a skillet, melt the butter over medium heat. Add the finely chopped onion and sauté until translucent and fragrant, about 5 minutes. This step enhances the flavor of the onions, which will complement the sweetness of the corn.
- Blend the Corn Mixture: In a blender or food processor, combine the corn kernels, milk, and eggs. Blend until smooth. This mixture will serve as the base of the bread and give it a creamy texture.
- Combine Ingredients: In a large bowl, mix the corn blend with the sautéed onions. Add flour, baking powder, salt, and sugar (if using). Stir until just combined. This step guarantees that all the flavors are well incorporated into the batter.
- Add Cheese: Gently fold in the grated cheese, reserving a bit for topping if desired. The cheese will add a delicious, gooey texture to the bread once baked.
- Prepare the Baking Dish: Preheat your oven to 375°F (190°C). Grease a baking dish or a cast-iron skillet with butter or cooking spray. This step helps prevent the bread from sticking to the dish.
- Bake the Bread: Pour the batter into the prepared dish and spread evenly. Sprinkle the reserved cheese on top. Bake for 30-40 minutes, or until the top is golden brown and a toothpick inserted in the center comes out clean. This step allows the bread to rise and develop a beautiful crust.
- Cool and Serve: Once baked, remove the Pan de Choclo from the oven and let it cool slightly before slicing. Serve warm, garnished with fresh basil or cilantro if desired. Enjoy the deliciousness of your homemade corn bread!
Extra Tips: When making Pan de Choclo, using fresh corn will yield the best flavor, but frozen corn can also be a good alternative. For a twist, you can add chopped bell peppers or jalapeños for extra flavor and heat.
Serve the bread alongside a fresh salad or as a complement to a hearty stew for a complete meal. Leftovers can be stored in an airtight container in the refrigerator and reheated in the oven for the best texture. Enjoy your culinary journey into Chilean cuisine!
Pan De Manteca: Rich and Buttery Bread
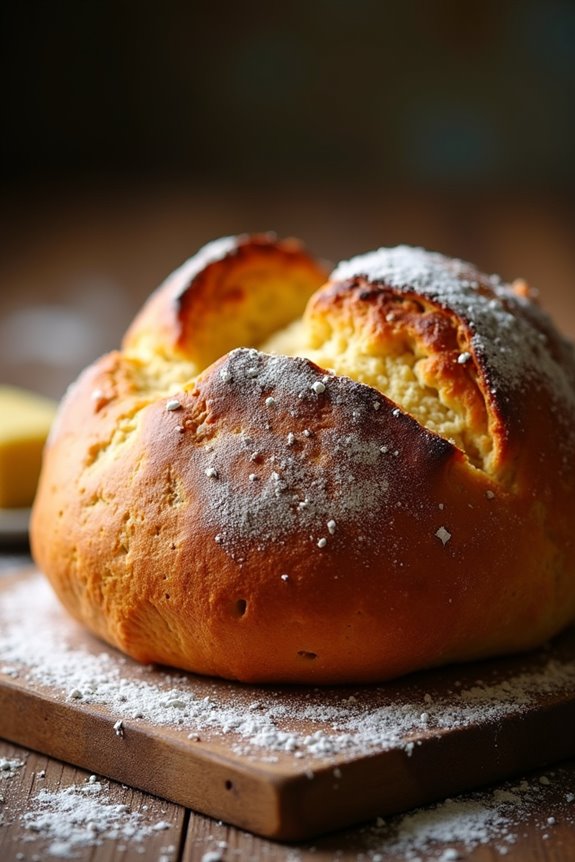
Pan De Manteca is a traditional Chilean bread that’s celebrated for its rich, buttery flavor and soft texture. This delightful bread is often enjoyed as a side dish for meals or as a snack on its own, sometimes accompanied by a spread of butter or jam.
The process of making Pan De Manteca involves simple ingredients that come together to create a comforting loaf that will fill your kitchen with an irresistible aroma. Whether you’re looking to impress guests or simply enjoy a taste of Chilean culture, this bread is a must-try.
The recipe is straightforward, allowing both novice and experienced bakers to create this delicious bread with ease. The key to achieving that signature rich taste lies in the generous use of butter, which not only enhances the flavor but also guarantees a tender crumb.
Once baked to golden perfection, you’ll find that this bread is perfect for any time of the day, be it breakfast, lunch, or dinner.
Ingredients (Serves 4-6 people):
- 4 cups all-purpose flour
- 1 cup unsalted butter, softened
- 1 cup warm milk (about 110°F or 43°C)
- 1/4 cup sugar
- 2 teaspoons salt
- 1 tablespoon active dry yeast
- 2 large eggs
- 1 teaspoon vanilla extract
Cooking Instructions:
- Prepare the Yeast Mixture: In a small bowl, combine the warm milk, sugar, and active dry yeast. Stir gently and let it sit for about 5-10 minutes until it becomes frothy. This indicates that the yeast is active and ready to use.
- Mix the Wet Ingredients: In a large mixing bowl, combine the softened butter, eggs, and vanilla extract. Use a whisk or an electric mixer to blend these ingredients until they’re well combined and creamy.
- Combine Dry Ingredients: In a separate bowl, mix the all-purpose flour and salt. Gradually add the flour mixture to the butter and egg mixture, alternating with the yeast mixture, until a dough begins to form.
- Knead the Dough: Transfer the dough onto a lightly floured surface. Knead the dough for about 8-10 minutes until it’s smooth and elastic. If the dough is too sticky, sprinkle a little more flour as needed.
- First Rise: Place the kneaded dough into a greased bowl, cover it with a clean kitchen towel or plastic wrap, and let it rise in a warm place for about 1-2 hours or until it has doubled in size.
- Shape the Bread: Once the dough has risen, punch it down to release air. Divide the dough into two equal portions and shape each portion into a loaf. Place the shaped loaves into greased loaf pans.
- Second Rise: Cover the loaves again and let them rise for another 30-45 minutes, until they’ve puffed up.
- Preheat the Oven: Preheat your oven to 350°F (175°C) while the loaves are rising.
- Bake the Bread: Once the loaves have risen, place them in the preheated oven and bake for about 25-30 minutes, or until the tops are golden brown and the bread sounds hollow when tapped on the bottom.
- Cool and Serve: Remove the loaves from the oven and let them cool in the pans for about 10 minutes. Then, transfer them to a wire rack to cool completely before slicing.
Extra Tips:
To enhance the flavor of your Pan De Manteca, consider adding herbs or spices such as rosemary or cinnamon to the dough. You can also brush the top of the loaves with melted butter before baking for an extra golden crust.
If you want to keep the bread fresh, store it in an airtight container at room temperature for up to three days, or freeze it for longer storage. Enjoy your homemade Pan De Manteca with your favorite toppings or as a delicious side to your meals!