

When I think of South American cuisine, vibrant flavors and fresh ingredients come to mind. I love how these 11 healthy recipes not only keep meals light but also pack a satisfying punch. From the zesty Grilled Shrimp Ceviche with Mango to the comforting Lentil and Vegetable Stew, each dish offers a unique taste experience. Curious about how to bring a taste of South America into your kitchen? Let’s explore these delicious options together.
Quinoa Tabbouleh With Avocado and Black Beans

Quinoa Tabbouleh with Avocado and Black Beans is a revitalizing and nutritious dish that beautifully combines the flavors of the Mediterranean with South American ingredients. This vibrant salad isn’t only packed with protein from the quinoa and black beans but also includes healthy fats from the avocado, making it a perfect option for a light lunch or a side dish for dinner.
The fresh herbs and vegetables add crunch and brightness, while the lemon juice provides a zesty finish that ties all the flavors together. This dish is incredibly versatile and can be customized to suit your taste preferences. You can add more vegetables, such as bell peppers or cucumbers, or even swap out the black beans for chickpeas.
It’s an ideal meal prep option as it can be made ahead and stored in the refrigerator for a few days, allowing the flavors to meld and develop further. Let’s plunge into the recipe to create this colorful and healthy dish for 4-6 people!
Ingredients:
- 1 cup quinoa
- 2 cups water
- 1 can (15 oz) black beans, rinsed and drained
- 1 large avocado, diced
- 1 cup cherry tomatoes, halved
- 1 cucumber, diced
- 1/2 cup fresh parsley, chopped
- 1/4 cup fresh mint, chopped
- 1/4 cup red onion, finely chopped
- Juice of 2 lemons
- 3 tablespoons olive oil
- Salt and pepper to taste
Cooking Instructions:
- Cook the Quinoa: Rinse the quinoa under cold water to remove any bitterness. In a medium saucepan, combine the rinsed quinoa and 2 cups of water. Bring to a boil over medium-high heat, then reduce the heat to low, cover, and let it simmer for about 15 minutes or until the quinoa is fluffy and the water is absorbed. Remove from heat and let it cool slightly.
- Prepare the Vegetables: While the quinoa is cooking, prepare the other ingredients. Dice the avocado, cucumber, and red onion, and halve the cherry tomatoes. Chop the fresh parsley and mint. This step guarantees all ingredients are ready to mix together seamlessly.
- Combine Ingredients: In a large bowl, combine the cooked quinoa, black beans, diced avocado, cherry tomatoes, cucumber, parsley, mint, and red onion. Gently fold the ingredients together to avoid mashing the avocado, guaranteeing everything is evenly distributed.
- Make the Dressing: In a small bowl, whisk together the lemon juice, olive oil, salt, and pepper. This dressing will enhance the flavors of the salad and add a bright, zesty touch.
- Dress the Salad: Pour the dressing over the quinoa mixture and toss gently to combine. Taste and adjust seasoning if necessary, adding more salt, pepper, or lemon juice according to your preference.
- Serve: Allow the salad to sit for about 10 minutes to let the flavors meld together. Serve chilled or at room temperature, and enjoy this wholesome dish.
Extra Tips: To elevate the flavor even further, consider adding a pinch of cumin or chili powder to the dressing for a hint of warmth. If you prefer a creamier texture, you can substitute the diced avocado with guacamole.
This dish isn’t only great on its own but also pairs wonderfully with grilled chicken or fish for a more substantial meal. Store any leftovers in an airtight container in the refrigerator for up to three days, but note that the avocado may brown slightly over time.
Grilled Shrimp Ceviche With Mango
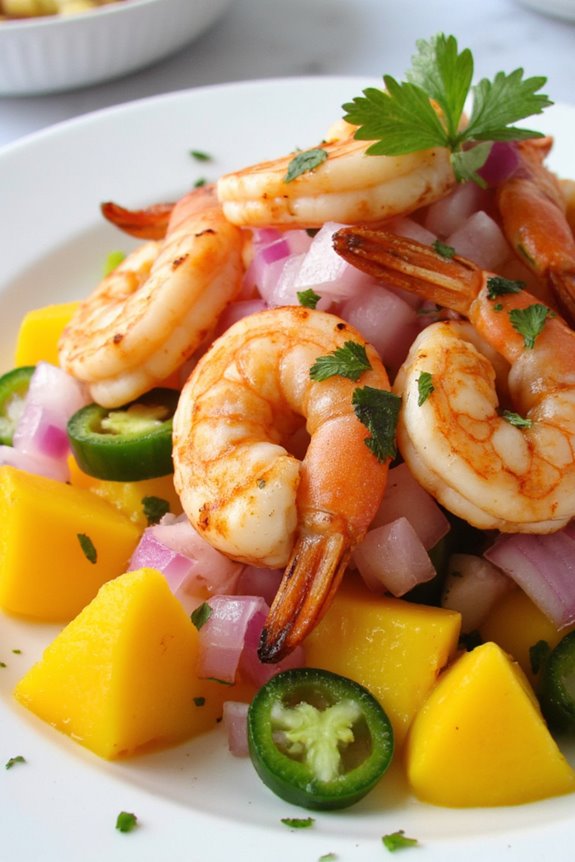
Grilled Shrimp Ceviche with Mango is a vibrant and revitalizing dish that captures the essence of South American cuisine. This dish combines the bright flavors of fresh shrimp and juicy mango with zesty lime juice and aromatic herbs, making it a perfect appetizer or light meal for warm weather gatherings. The grilling of the shrimp adds a smoky depth that complements the sweetness of the mango, creating a delightful balance of flavors.
This ceviche isn’t only delicious but also packed with nutrients. Shrimp are a great source of lean protein and essential omega-3 fatty acids, while mangoes provide a rich source of vitamins A and C. The addition of fresh vegetables and herbs not only enhances the taste but also contributes to the overall health benefits of the dish. Serve it chilled with tortilla chips or as a topping on a salad for a delicious and nutritious meal.
Ingredients (Serves 4-6):
- 1 pound large shrimp, peeled and deveined
- 1 ripe mango, diced
- 1 medium red onion, finely chopped
- 1 medium cucumber, diced
- 1-2 jalapeños, finely chopped (adjust based on spice preference)
- 1/2 cup fresh cilantro, chopped
- Juice of 4 limes
- 2 tablespoons olive oil
- Salt, to taste
- Freshly ground black pepper, to taste
- Tortilla chips or lettuce leaves, for serving
Cooking Instructions:
- Marinate the Shrimp: In a bowl, combine the peeled and deveined shrimp with lime juice, olive oil, salt, and pepper. Confirm the shrimp are fully coated in the marinade. Let the shrimp marinate for at least 15-20 minutes in the refrigerator. This step allows the shrimp to absorb the zesty flavors while slightly “cooking” them in the acidity of the lime juice.
- Prepare the Grill: Preheat your grill to medium-high heat. If using wooden skewers, soak them in water for about 30 minutes beforehand to prevent them from burning on the grill. This step is essential for achieving perfectly grilled shrimp.
- Skewer the Shrimp: After marinating, thread the shrimp onto the skewers. This will make it easier to grill them evenly. Make sure to leave a little space between each shrimp to allow for even cooking.
- Grill the Shrimp: Place the skewered shrimp on the preheated grill. Grill for about 2-3 minutes on each side, or until the shrimp are opaque and cooked through. Be careful not to overcook the shrimp, as they can become tough. Once cooked, remove them from the grill and let them cool slightly.
- Combine Ingredients: In a large mixing bowl, combine the grilled shrimp, diced mango, chopped red onion, diced cucumber, jalapeños, and fresh cilantro. Mix gently to avoid mashing the mango and shrimp.
- Final Seasoning: Taste the ceviche and adjust the seasoning with more lime juice, salt, or pepper as needed. Allow the ceviche to rest for about 10 minutes to let the flavors meld.
- Serve: Serve the Grilled Shrimp Ceviche with Mango chilled, alongside tortilla chips or on a bed of lettuce leaves for a light, revitalizing meal.
Extra Tips:
When preparing Grilled Shrimp Ceviche with Mango, make sure to use fresh, high-quality shrimp for the best flavor and texture. If you want to enhance the dish even further, consider adding diced avocado or a splash of coconut milk for a creamy twist.
Additionally, this dish can be made a few hours in advance; just keep it chilled in the refrigerator until serving. Always taste and adjust seasoning before serving, as fresh ingredients can vary in flavor intensity. Enjoy this healthy and delicious recipe as part of your next gathering or as a revitalizing meal any day of the week!
Sweet Potato and Black Bean Tacos
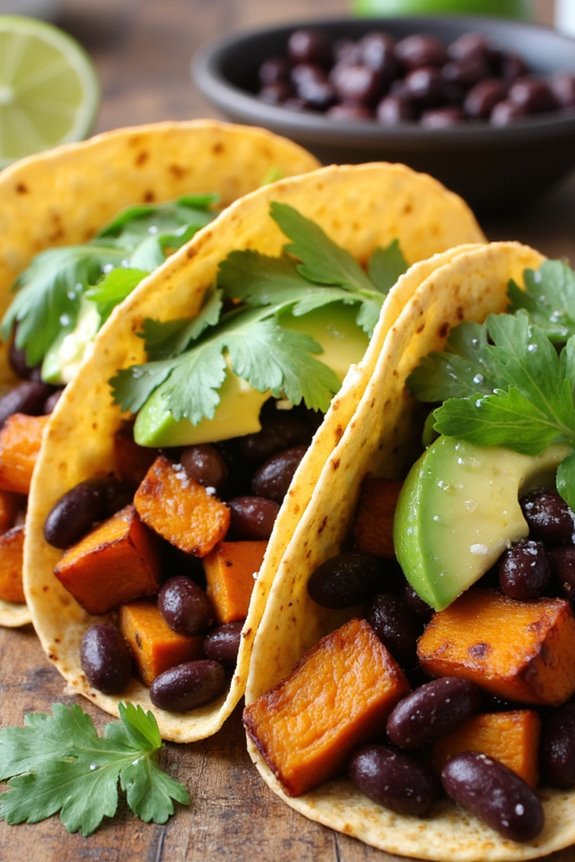
Sweet Potato and Black Bean Tacos are a delicious and nutritious meal that showcases the vibrant flavors of South American cuisine. This dish combines the natural sweetness of roasted sweet potatoes with the hearty texture of black beans, all wrapped in warm corn tortillas. It’s a perfect option for a meatless dinner or a satisfying lunch, packed with fiber, vitamins, and minerals.
The addition of fresh toppings like avocado, cilantro, and lime juice elevates this dish even further, making it a colorful and appealing option for both vegetarians and meat lovers alike. Not only are these tacos simple to prepare, but they also offer versatility regarding toppings and flavor profiles.
You can customize them to suit your taste by adding spicy salsa, crumbled feta cheese, or a drizzle of your favorite sauce. These tacos aren’t only healthy but also visually appealing, making them a great choice for gatherings or family meals. With a preparation time of about 30 minutes and a cooking time of 30 minutes, you’ll have a wholesome meal on the table in no time.
Ingredients (Serves 4-6):
- 4 medium sweet potatoes, peeled and diced
- 1 can (15 oz) black beans, drained and rinsed
- 1 tablespoon olive oil
- 1 teaspoon cumin
- 1 teaspoon smoked paprika
- 1/2 teaspoon salt
- 1/4 teaspoon black pepper
- 8-10 corn tortillas
- 1 avocado, sliced
- 1/4 cup fresh cilantro, chopped
- 1 lime, cut into wedges
- Optional: hot sauce or salsa for serving
Cooking Instructions:
- Preheat the Oven: Begin by preheating your oven to 400°F (200°C). This guarantees that your sweet potatoes will roast evenly and achieve a nice caramelization.
- Prepare the Sweet Potatoes: In a large mixing bowl, combine the diced sweet potatoes with olive oil, cumin, smoked paprika, salt, and black pepper. Toss them well to coat all the pieces evenly with the spices.
- Roast the Sweet Potatoes: Spread the seasoned sweet potatoes on a baking sheet in a single layer. Place them in the preheated oven and roast for about 25-30 minutes, or until they’re tender and slightly browned, stirring halfway through to guarantee even cooking.
- Heat the Black Beans: While the sweet potatoes are roasting, place the black beans in a small saucepan over medium heat. Stir them occasionally until they’re warmed through, about 5-7 minutes. You can add a splash of water or a pinch of cumin for extra flavor if desired.
- Warm the Tortillas: In a dry skillet over medium heat, warm the corn tortillas for about 30 seconds on each side, or until they’re pliable and slightly toasted. This step enhances their flavor and makes them easier to fold.
- Assemble the Tacos: Once the sweet potatoes are done roasting, remove them from the oven. To assemble the tacos, place a spoonful of roasted sweet potatoes and a spoonful of black beans onto each tortilla. Top with slices of avocado, fresh cilantro, and a squeeze of lime juice.
- Serve: Arrange the tacos on a serving platter and serve with lime wedges and optional hot sauce or salsa on the side. Enjoy your delicious Sweet Potato and Black Bean Tacos!
Extra Tips:
When preparing Sweet Potato and Black Bean Tacos, feel free to experiment with different toppings and spices to suit your palate. For added crunch, you can incorporate shredded cabbage or diced red onions.
If you prefer a little heat, consider adding jalapeños or a spicy salsa. Additionally, for an even heartier meal, try adding cooked quinoa or brown rice inside the tacos. Enjoy the process of making these delightful tacos and let your creativity shine!
Spinach and Feta Empanadas

Spinach and feta empanadas are a delightful South American dish that combines the earthy flavor of spinach with the creamy, tangy taste of feta cheese, all enveloped in a golden, flaky pastry. These empanadas aren’t only delicious but also packed with nutrients, making them a healthy option for lunch or a snack.
Whether baked or fried, these empanadas are sure to impress with their rich flavors and satisfying texture. Making empanadas from scratch may seem intimidating, but with a little preparation, you can create a delicious batch that can be shared with family and friends.
Perfect for gatherings, picnics, or even as a simple weeknight dinner, these spinach and feta empanadas are versatile and can be served with a side salad or a dipping sauce for an added flavor boost.
Ingredients (serves 4-6):
- 2 cups fresh spinach, chopped
- 1 cup feta cheese, crumbled
- 1 small onion, finely chopped
- 2 cloves garlic, minced
- 1 tablespoon olive oil
- 1 teaspoon dried oregano
- Salt and pepper to taste
- 1 package (14 oz) empanada dough discs (store-bought or homemade)
- 1 egg, beaten (for egg wash)
Cooking Instructions:
- Sauté the Vegetables: In a large skillet, heat the olive oil over medium heat. Add the chopped onion and minced garlic, sautéing until the onion is translucent, about 3-4 minutes. This step helps to build a flavor base for the filling.
- Cook the Spinach: Add the chopped spinach to the skillet and cook until wilted, about 2-3 minutes. Stir occasionally to guarantee the spinach cooks evenly. This step reduces the moisture content of the spinach, preventing the empanadas from becoming soggy.
- Combine the Filling: Remove the skillet from heat and let the mixture cool slightly. In a mixing bowl, combine the sautéed spinach and onion mixture with the crumbled feta cheese, dried oregano, salt, and pepper. Mix well to combine all the ingredients thoroughly.
- Prepare the Empanadas: Preheat your oven to 400°F (200°C) if you plan to bake the empanadas. Take the empanada dough discs and place a generous spoonful of the spinach and feta filling in the center of each disc. Be careful not to overfill, as this can make sealing difficult.
- Seal the Empanadas: Fold the dough over the filling to create a half-moon shape. Use a fork to crimp the edges together, ensuring a tight seal to keep the filling inside during cooking. If desired, you can brush the edges with a little water before sealing for extra adhesion.
- Egg Wash: Place the sealed empanadas on a baking sheet lined with parchment paper. Brush the tops with the beaten egg to give them a beautiful golden color when baked.
- Bake: Bake in the preheated oven for 20-25 minutes, or until the empanadas are golden brown and crispy. If you prefer frying, heat oil in a deep pan and fry the empanadas until golden brown, about 3-4 minutes per side.
- Serve: Allow the empanadas to cool slightly before serving. They can be enjoyed warm or at room temperature, and they pair well with a dipping sauce like chimichurri or yogurt sauce.
Extra Tips:
For an added twist, consider incorporating other ingredients into the filling such as chopped artichokes, sun-dried tomatoes, or even a dash of red pepper flakes for some heat.
You can also make these empanadas ahead of time; simply freeze them before baking or frying, and cook them straight from the freezer when you’re ready. This not only saves time but also allows you to enjoy fresh empanadas whenever the craving strikes!
Peruvian Roasted Chicken With Aji Verde
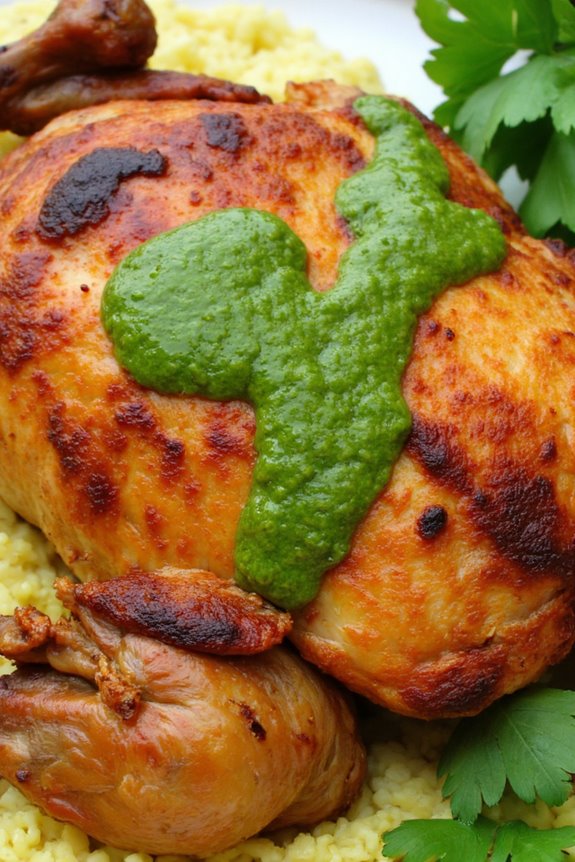
Peruvian Roasted Chicken, known as “Pollo a la Brasa,” is a beloved dish that showcases the rich flavors of South America. This dish features tender, juicy chicken marinated in a mix of spices and herbs, then roasted to perfection, resulting in a crispy skin and succulent meat. The accompanying Aji Verde sauce, made from fresh ingredients, provides a zesty and spicy kick that elevates the dish to a whole new level.
This recipe is perfect for gatherings or family dinners and serves 4-6 people. The combination of the roasted chicken and the vibrant Aji Verde creates a delightful culinary experience that’s both satisfying and healthy. Whether you’re exploring the flavors of Peru for the first time or revisiting a favorite dish, this recipe will bring a taste of South America right to your kitchen.
Ingredients (Serves 4-6):
- 1 whole chicken (3-4 pounds)
- 4 cloves of garlic, minced
- 2 tablespoons of paprika
- 1 tablespoon of cumin
- 1 tablespoon of dried oregano
- 1 tablespoon of salt
- 1 tablespoon of black pepper
- 1/4 cup of olive oil
- Juice of 2 limes
- Fresh cilantro leaves (for garnish)
For Aji Verde:
- 1 cup of fresh cilantro leaves
- 1 jalapeño pepper, seeded
- 2 cloves of garlic
- 1/2 cup of mayonnaise
- 1 tablespoon of lime juice
- Salt to taste
Cooking Instructions:
- Prepare the Marinade: In a bowl, combine the minced garlic, paprika, cumin, oregano, salt, black pepper, olive oil, and lime juice. Mix well to create a marinade.
- Marinate the Chicken: Rinse the chicken under cold water and pat it dry with paper towels. Rub the marinade all over the chicken, making sure to get it under the skin and inside the cavity for maximum flavor. Cover the chicken and refrigerate for at least 2 hours, preferably overnight for a deeper flavor.
- Preheat the Oven: When you’re ready to cook, preheat your oven to 425°F (220°C). This high temperature will help achieve a crispy skin.
- Roast the Chicken: Place the marinated chicken in a roasting pan, breast side up. Roast in the preheated oven for about 1 hour and 15 minutes, or until the internal temperature reaches 165°F (75°C) and the juices run clear. Baste the chicken with its juices halfway through cooking for added moisture.
- Prepare the Aji Verde: While the chicken is roasting, prepare the Aji Verde sauce. In a blender or food processor, combine the cilantro, jalapeño, garlic, mayonnaise, lime juice, and a pinch of salt. Blend until smooth. Adjust seasoning if necessary.
- Rest the Chicken: Once done, remove the chicken from the oven and let it rest for about 10-15 minutes. This helps the juices redistribute and keeps the meat moist.
- Serve: Carve the chicken and serve it hot, drizzled with Aji Verde sauce and garnished with fresh cilantro leaves.
Extra Tips:
For an even more authentic flavor, consider adding a touch of beer to your marinade.
Additionally, if you want to make your Aji Verde spicier, leave some seeds in the jalapeño or add a few dashes of hot sauce.
Pair the chicken with sides like roasted vegetables or a fresh salad to create a well-rounded meal. Enjoy your culinary journey through Peru!
Chilled Avocado Soup With Cilantro
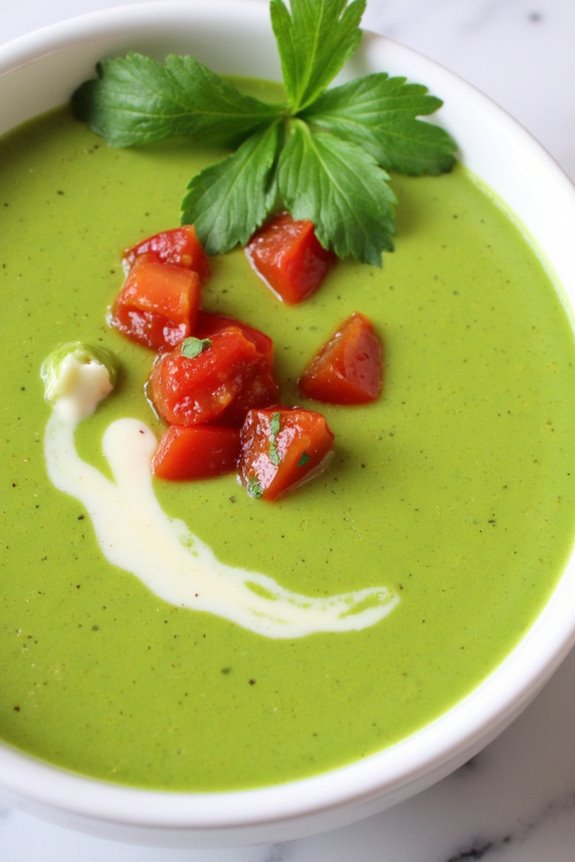
Chilled Avocado Soup with Cilantro is a revitalizing and nutritious dish that embodies the vibrant flavors of South America. This creamy soup is perfect for hot summer days, showcasing the rich texture of ripe avocados combined with the fresh zing of cilantro. Not only is it easy to prepare, but it also offers an impressive presentation that can elevate any meal. The natural creaminess of the avocados eliminates the need for heavy dairy, making this dish light yet satisfying.
This soup isn’t just about taste; it’s packed with healthy fats, vitamins, and minerals. Avocados are known for their heart-healthy monounsaturated fats and high fiber content. The addition of cilantro not only adds a burst of flavor but also contains antioxidants that can benefit your overall health. Serve this chilled delight as an appetizer or a light meal, and watch your guests rave about its deliciousness!
Ingredients (Serves 4-6):
- 3 ripe avocados
- 2 cups vegetable or chicken broth
- 1 cup plain Greek yogurt
- 1 cup fresh cilantro leaves, packed
- 1 small onion, diced
- 2 cloves garlic, minced
- 1 lime, juiced
- Salt and pepper to taste
- Optional garnishes: additional cilantro, lime wedges, diced tomatoes
Cooking Instructions:
- Prepare the Avocados: Cut the avocados in half, remove the pit, and scoop the flesh into a blender. This creamy base will form the heart of your soup.
- Blend the Ingredients: Add the vegetable or chicken broth, Greek yogurt, fresh cilantro leaves, diced onion, minced garlic, and lime juice to the blender with the avocado. This combination will create a rich and flavorful mixture.
- Season the Soup: Blend all the ingredients until smooth and creamy. Taste the mixture, then season with salt and pepper according to your preference. You may want to adjust the lime juice as well for added acidity.
- Chill the Soup: Once blended, transfer the soup to a bowl or airtight container and refrigerate for at least 1-2 hours. Chilling allows the flavors to meld and enhances the revitalizing quality of the dish.
- Serve: When ready to serve, give the soup a good stir. Pour it into bowls and garnish with additional cilantro, lime wedges, and diced tomatoes if desired. Enjoy your chilled avocado soup!
Extra Tips: To elevate the flavor of your chilled avocado soup, consider roasting the garlic before blending it in. This will give the soup a deeper, sweeter taste.
Also, if you prefer a thinner consistency, simply add more broth until you reach your desired texture. For a spicy kick, you can blend in a jalapeño or sprinkle some red pepper flakes on top before serving. Enjoy!
Brazilian Collard Greens With Garlic
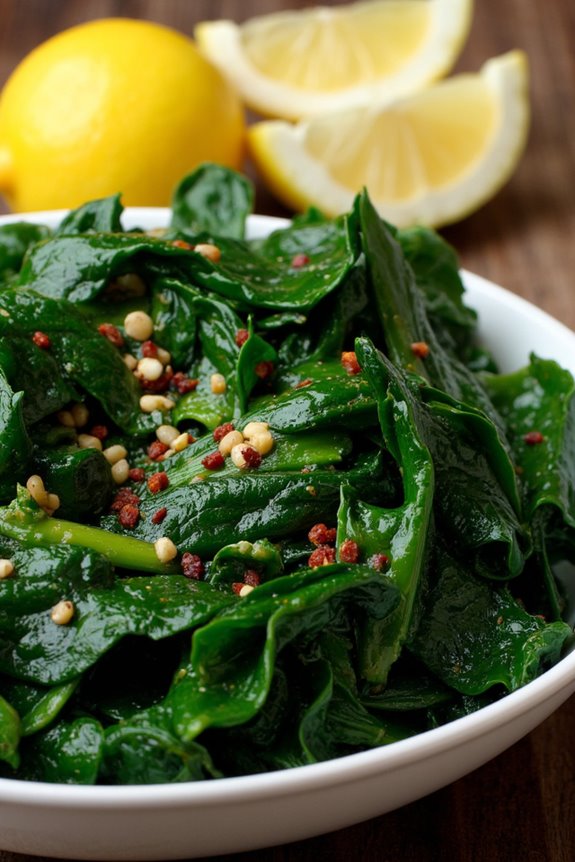
Brazilian Collard Greens With Garlic, known as “Couve à Mineira,” is a vibrant and healthy dish that features the rich, earthy flavor of collard greens sautéed with garlic. This dish isn’t only a staple in Brazilian cuisine but also a wonderful accompaniment to many meals, especially grilled meats or rice and beans. The preparation is quick and simple, making it a perfect side dish for busy weeknights or festive gatherings.
The key to achieving the best flavor in this dish lies in the freshness of the collard greens and the aromatic punch of the garlic. When cooked properly, the greens become tender yet retain a slight crunch, while the garlic infuses the dish with a savory essence. This recipe caters to 4-6 people, ensuring everyone can enjoy a taste of this nutritious and delicious South American delight.
Ingredients (Serves 4-6)
- 1 pound fresh collard greens
- 4 cloves garlic, minced
- 2 tablespoons olive oil
- 1 teaspoon salt (or to taste)
- 1/2 teaspoon black pepper (or to taste)
- 1/4 teaspoon red pepper flakes (optional)
- Lemon wedges (for serving)
Cooking Instructions
- Prepare the Collard Greens: Begin by washing the collard greens thoroughly under cold water to remove any dirt or grit. Remove the thick stems from the leaves by slicing along each side of the stem with a knife. Stack the leaves, roll them tightly, and slice them into thin strips (about 1/4 inch wide) to create a chiffonade.
- Sauté the Garlic: In a large skillet, heat the olive oil over medium heat. Once the oil is hot, add the minced garlic and sauté for about 1-2 minutes, stirring frequently. Be careful not to let the garlic burn, as it can turn bitter. You want the garlic to become fragrant and lightly golden.
- Cook the Collard Greens: Add the sliced collard greens to the skillet with the sautéed garlic. Season with salt, black pepper, and red pepper flakes (if using). Stir well to combine all the ingredients and coat the greens with the garlic and oil. Cook for approximately 5-7 minutes, stirring occasionally, until the greens are tender but still vibrant in color.
- Adjust Seasoning and Serve: Taste the collard greens and adjust the seasoning if necessary. Once cooked to your liking, remove the skillet from the heat. Serve the Brazilian Collard Greens With Garlic warm, garnished with lemon wedges for an extra burst of flavor.
Extra Tips
When cooking Brazilian Collard Greens With Garlic, consider using fresh greens for the best taste and nutrition. If collard greens are unavailable, you can substitute them with kale or Swiss chard.
For a richer flavor, you may also add a splash of vegetable or chicken broth while sautéing the greens. Finally, serving the dish with a squeeze of fresh lemon juice enhances the flavors and adds a delightful brightness to the meal.
Lentil and Vegetable Stew
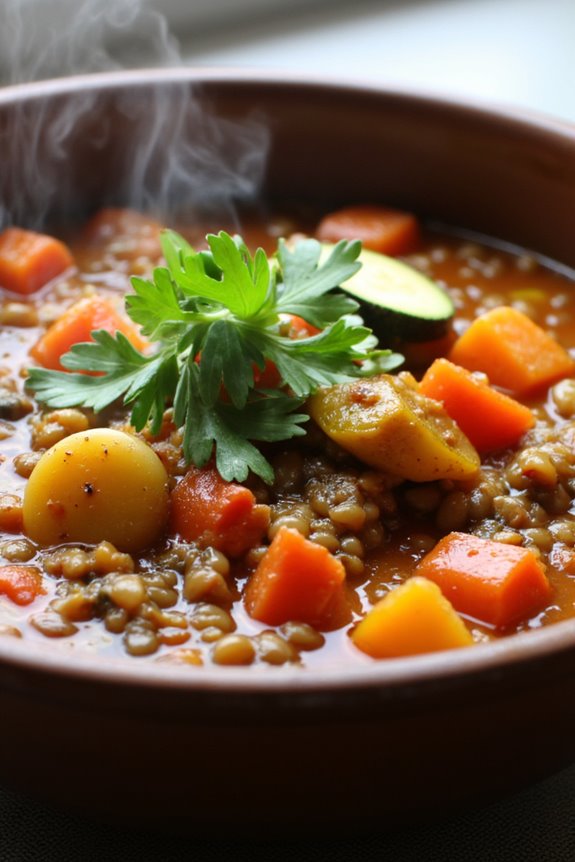
Lentil and Vegetable Stew is a hearty and nutritious dish that embodies the vibrant flavors of South American cuisine. This stew is packed with protein-rich lentils and a medley of colorful vegetables, making it not only filling but also a great source of vitamins and minerals. It’s perfect for a cozy family dinner or as a meal prep option for the week.
The combination of spices and fresh ingredients creates a warm and inviting aroma that will fill your kitchen, making it a dish everyone will love. This recipe isn’t only simple to prepare but also adaptable, allowing you to use whatever vegetables you have on hand.
Whether you enjoy the earthy taste of lentils or are looking for a comforting meal, this stew is sure to satisfy. Serve it with a side of crusty bread or over cooked rice for a complete meal. Let’s plunge into the recipe!
Ingredients (Serves 4-6):
- 1 cup dried lentils (green or brown)
- 1 medium onion, diced
- 2 cloves garlic, minced
- 2 medium carrots, diced
- 1 medium bell pepper, diced (any color)
- 2 medium tomatoes, chopped
- 1 zucchini, diced
- 1 teaspoon ground cumin
- 1 teaspoon smoked paprika
- 4 cups vegetable broth
- 2 tablespoons olive oil
- Salt and pepper to taste
- Fresh parsley, for garnish (optional)
Cooking Instructions:
- Prepare the Lentils: Rinse the lentils under cold water to remove any debris or dirt. Set them aside to drain. This step guarantees that your lentils are clean and ready to cook.
- Sauté the Aromatics: In a large pot, heat the olive oil over medium heat. Add the diced onion and minced garlic, cooking for about 3-4 minutes until the onion becomes translucent and fragrant. This will build a flavorful base for your stew.
- Add the Vegetables: Stir in the diced carrots and bell pepper, cooking for another 5 minutes. Then, add the chopped tomatoes and zucchini. Cook for an additional 3-4 minutes until the vegetables begin to soften. This step helps to enhance the flavors and guarantees that the vegetables are tender.
- Season: Sprinkle in the ground cumin and smoked paprika, stirring well to combine. Cook for another minute to allow the spices to release their flavors into the vegetable mixture.
- Combine with Broth and Lentils: Pour in the vegetable broth and add the rinsed lentils. Stir everything together, making sure the lentils are submerged in the liquid. Bring the mixture to a boil.
- Simmer: Reduce the heat to low and cover the pot. Let the stew simmer for about 25-30 minutes or until the lentils are tender. Stir occasionally to prevent sticking. This slow cooking allows the flavors to meld and develop.
- Season to Taste: Once the lentils are tender, taste the stew and add salt and pepper as needed. Adjust the seasoning according to your preference.
- Serve: Ladle the stew into bowls and garnish with fresh parsley if desired. Enjoy your hearty and nutritious meal!
Extra Tips:
When preparing Lentil and Vegetable Stew, feel free to customize it based on your taste preferences or what you have available. You can add leafy greens like spinach or kale for extra nutrients, or incorporate other vegetables such as sweet potatoes or green beans.
Additionally, if you’d like a thicker stew, you can mash some of the lentils with a fork to create a creamier texture. Leftovers can be stored in the refrigerator for up to three days and taste even better the next day as the flavors continue to develop. Enjoy your culinary journey through South America!
Tropical Fruit Salad With Lime Dressing
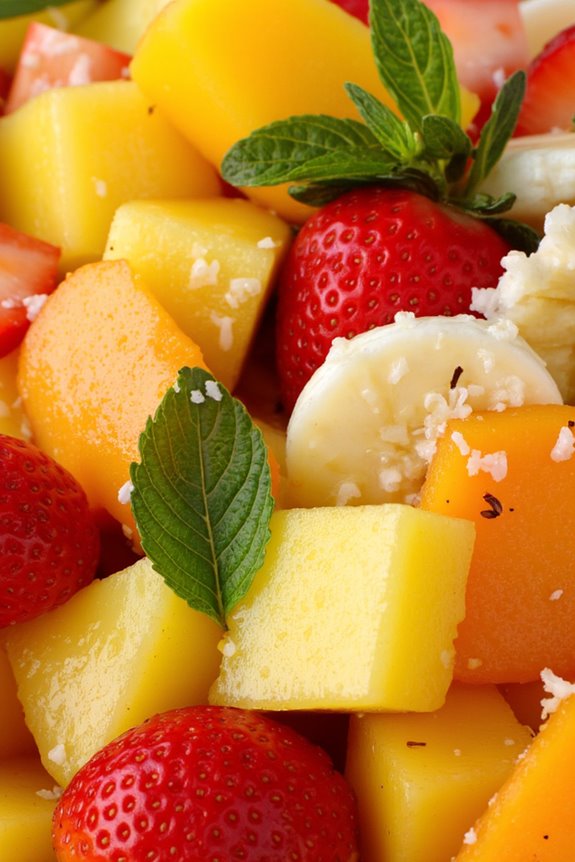
Tropical Fruit Salad with Lime Dressing is a revitalizing and vibrant dish that embodies the essence of South American flavors. This salad isn’t only pleasing to the eye but also bursting with nutrients, making it a perfect addition to any meal or a stand-alone snack.
Combining a variety of fresh tropical fruits like mango, pineapple, and papaya, this recipe is a celebration of the sweet and tangy flavors that tropical regions are known for. The lime dressing enhances the fruits’ natural sweetness while adding a zesty kick, making it an ideal choice for warm weather or as a festive side dish.
Making this salad is simple and quick, making it a great option for gatherings or a light meal. With just a few ingredients and minimal preparation time, you can create a nutritious dish that will impress your guests and satisfy your taste buds.
It’s also highly versatile; feel free to swap in your favorite fruits or whatever is in season. This Tropical Fruit Salad with Lime Dressing is sure to be a hit among both kids and adults alike!
Ingredients (Serves 4-6)
- 1 ripe mango, diced
- 1 cup fresh pineapple, diced
- 1 cup papaya, diced
- 1 cup strawberries, sliced
- 1 banana, sliced
- 1/4 cup fresh mint leaves, chopped
- 2 tablespoons honey (optional)
- Juice of 2 limes
- Zest of 1 lime
Cooking Instructions
- Prepare the Fruits: Start by washing all of your fruits thoroughly. Dice the mango, pineapple, and papaya into bite-sized pieces. Slice the strawberries and bananas. Confirming uniform sizes helps create a visually appealing salad and makes it easier to eat.
- Combine Fruits: In a large mixing bowl, gently combine the diced mango, pineapple, papaya, sliced strawberries, and bananas. Be careful not to mash the fruits; use a spatula or wooden spoon to mix them together lightly.
- Make the Lime Dressing: In a small bowl, whisk together the juice of 2 limes, lime zest, and honey (if using). The honey adds a touch of sweetness, but you can adjust the amount based on your taste preference. The lime dressing will bring everything together beautifully.
- Dress the Salad: Pour the lime dressing over the mixed fruits in the large bowl. Toss gently to coat all the fruits evenly with the dressing. This step enhances the flavors and confirms every bite is deliciously zesty.
- Add Mint: Finally, sprinkle the chopped mint leaves over the salad and give it one last gentle toss. The mint adds an invigorating aroma and flavor that complements the tropical fruits perfectly.
- Chill and Serve: If possible, let the salad chill in the refrigerator for about 30 minutes before serving. This allows the flavors to meld together. Serve in individual bowls or on a large platter.
Extra Tips
For an added crunch, consider including a handful of toasted coconut flakes or chopped nuts such as macadamias or almonds. You can also experiment with other tropical fruits like kiwi, passion fruit, or guava based on availability.
To keep the salad fresh, store any leftovers in an airtight container in the refrigerator and consume within a day or two to enjoy the best texture and flavor.
Argentinian Chimichurri Quinoa
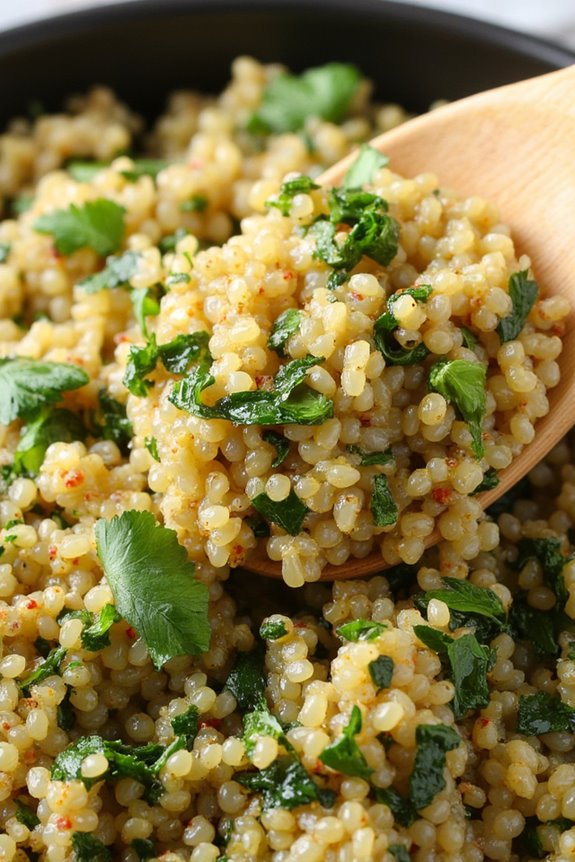
Argentinian Chimichurri Quinoa is a vibrant and nutritious dish that combines the delightful flavors of traditional chimichurri sauce with wholesome quinoa. This dish not only celebrates the bold and zesty flavors of South American cuisine but also offers a healthy alternative to heavier side dishes. Quinoa is a fantastic source of protein and fiber, making it a perfect base that complements the fresh herbs and spices found in chimichurri.
The chimichurri sauce, a staple in Argentinian cooking, is primarily made from parsley, garlic, vinegar, and olive oil, giving it an invigorating kick. When combined with nutty quinoa, this dish creates a harmonious blend of textures and flavors that can be enjoyed as a side or a main course. Whether you’re hosting a gathering or simply seeking a nutritious meal, this Argentinian Chimichurri Quinoa is sure to impress.
Ingredients (Serves 4-6):
- 1 cup quinoa
- 2 cups water or vegetable broth
- 1 cup fresh parsley, finely chopped
- 1/2 cup fresh cilantro, finely chopped
- 4 cloves garlic, minced
- 1/2 cup extra virgin olive oil
- 1/4 cup red wine vinegar
- 1 teaspoon crushed red pepper flakes (optional)
- Salt and pepper to taste
- Juice of 1 lemon
Cooking Instructions:
- Rinse the Quinoa: Start by rinsing the quinoa under cold water in a fine mesh strainer. This removes the natural coating called saponin that can give quinoa a bitter taste. Rinse until the water runs clear.
- Cook the Quinoa: In a medium saucepan, combine the rinsed quinoa and water (or vegetable broth) and bring to a boil. Once boiling, reduce the heat to low, cover, and let it simmer for about 15 minutes or until the liquid is absorbed and the quinoa is fluffy. Remove from heat and let it sit covered for an additional 5 minutes.
- Prepare the Chimichurri: In a separate bowl, mix together the chopped parsley, cilantro, minced garlic, olive oil, red wine vinegar, crushed red pepper flakes (if using), salt, and pepper. Stir until the ingredients are well combined. The chimichurri should be vibrant and aromatic.
- Combine Quinoa and Chimichurri: Fluff the cooked quinoa with a fork and transfer it to a large mixing bowl. Pour the chimichurri sauce over the quinoa and gently fold it in until the quinoa is evenly coated with the sauce.
- Add Lemon Juice: Squeeze the juice of one lemon over the quinoa mixture. This adds an invigorating acidity that enhances the flavors of the dish. Taste and adjust seasoning with more salt or pepper as needed.
- Serve: Serve the Argentinian Chimichurri Quinoa warm or at room temperature. It can be enjoyed as a side dish or as a light main course, garnished with additional fresh herbs if desired.
Extra Tips:
When making Argentinian Chimichurri Quinoa, feel free to customize the chimichurri by adding other herbs such as oregano or basil for a unique twist. Additionally, you can include diced vegetables like bell peppers or cherry tomatoes for added color and nutrition.
If you prefer a spicier kick, increase the amount of crushed red pepper flakes. This dish is versatile and can be stored in the refrigerator for up to three days, making it a perfect option for meal prep. Enjoy this healthy South American delight!
Coconut and Lime Rice With Grilled Vegetables
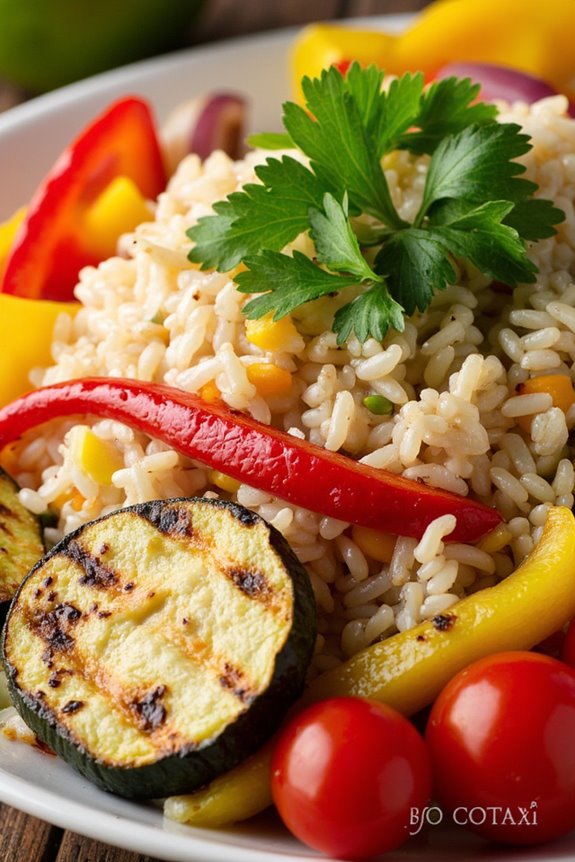
Coconut and Lime Rice With Grilled Vegetables is a vibrant, flavorful dish that celebrates the tropical ingredients characteristic of South American cuisine. The combination of creamy coconut milk and zesty lime creates a wonderfully fragrant rice that pairs perfectly with a medley of grilled vegetables. This dish not only satisfies your taste buds but also provides a healthy option for family dinners or gatherings with friends.
The colorful vegetables not only add an appealing presentation but also offer a variety of nutrients, making this a nutritious choice for any meal.
Preparing Coconut and Lime Rice With Grilled Vegetables is a straightforward process that infuses your kitchen with enticing aromas. The rice absorbs the rich coconut flavor while the vegetables develop a smoky char on the grill, enhancing their natural sweetness. This dish can be served alongside grilled chicken or fish for a complete meal, or enjoyed on its own as a hearty vegetarian option.
With a few simple ingredients, you can create a delightful dish that brings the essence of South America right to your table.
Ingredients (serving size: 4-6 people):
- 2 cups jasmine rice
- 1 can (13.5 oz) coconut milk
- 1 ½ cups vegetable broth
- 1 lime (zest and juice)
- 1 tablespoon olive oil
- 1 teaspoon salt
- 1 red bell pepper, sliced
- 1 yellow bell pepper, sliced
- 1 zucchini, sliced
- 1 red onion, sliced
- 1 cup cherry tomatoes
- Fresh cilantro for garnish (optional)
Cooking Instructions:
- Cook the Jasmine Rice: Rinse the jasmine rice under cold water until the water runs clear. In a medium saucepan, combine the rice, coconut milk, vegetable broth, salt, lime zest, and lime juice. Bring to a boil, then reduce the heat to low, cover, and simmer for about 18-20 minutes, or until the rice is tender and the liquid is absorbed. Remove from heat and let it sit covered for an additional 5 minutes.
- Prepare the Vegetables: While the rice is cooking, prepare the vegetables. In a large bowl, combine the sliced red and yellow bell peppers, zucchini, red onion, and cherry tomatoes. Drizzle with olive oil and season with salt and pepper. Toss until the vegetables are well-coated.
- Preheat the Grill: Preheat your grill to medium-high heat. If using a grill pan, heat it over medium-high heat on the stove.
- Grill the Vegetables: Once the grill is hot, add the prepared vegetables. Grill for about 5-7 minutes, turning occasionally, until the vegetables are tender and have nice grill marks. Remove them from the grill and set aside.
- Fluff the Rice: After the rice has rested, fluff it with a fork to separate the grains. Taste and adjust the seasoning with additional lime juice or salt as desired.
- Serve: To serve, spoon the coconut and lime rice onto plates and top with the grilled vegetables. Garnish with fresh cilantro if desired.
Extra Tips:
For added flavor, consider marinating the vegetables in lime juice, olive oil, and spices like cumin or paprika for 30 minutes before grilling. This will enhance their taste and add a bit more depth to the dish.
Additionally, you can customize the vegetables based on what’s in season or available, such as adding eggplant, asparagus, or corn. Serve the dish warm, and for a complete meal, pair it with grilled seafood or chicken. Enjoy your tropical culinary adventure!