

Exploring the vibrant flavors of South American cuisine is like embarking on a delicious journey. The diversity of ingredients and traditions in each dish is truly inspiring. From the comforting arepas of Venezuela to the zesty ceviche of Peru, every recipe has a unique story to tell. Each bite lets you experience the heart of the region. Let’s uncover the essence of these culinary gems together.
Arepas: The Versatile Venezuelan Corn Cake
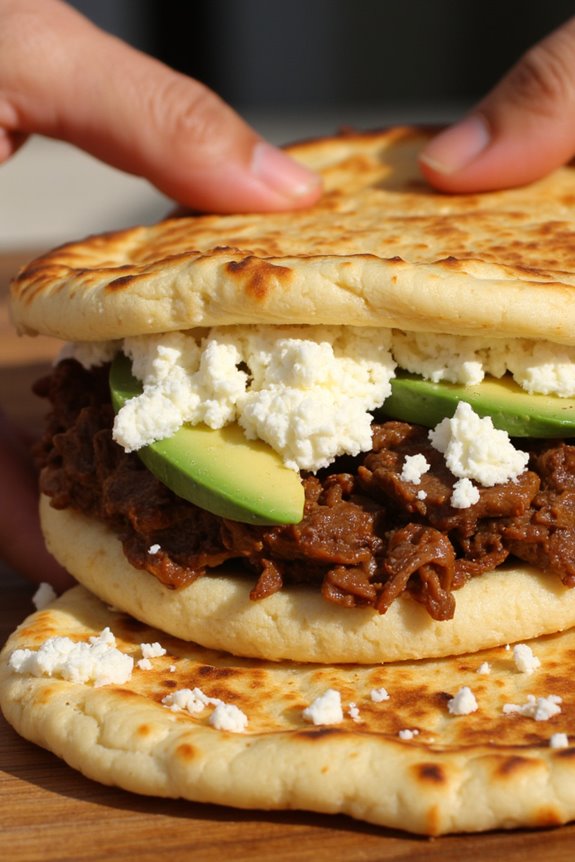
Arepas are a beloved staple in Venezuelan cuisine, celebrated for their versatility and delicious flavor. These round, flat corn cakes can be grilled, baked, or fried, making them a perfect accompaniment to a variety of dishes or a satisfying meal on their own. Traditionally made with masa harina, a type of corn flour, arepas can be stuffed or topped with an array of fillings, including cheese, meats, vegetables, and sauces, allowing for endless culinary creativity.
Making arepas isn’t only simple but also an enjoyable process that can bring a touch of Venezuelan culture into your kitchen. Whether you’re looking for a hearty breakfast, a quick lunch, or a delightful snack, arepas can be customized to suit your taste. Their crispy exterior and soft interior make them irresistible, and they can easily become a family favorite. Let’s plunge into this delightful recipe that serves 4-6 people.
Ingredients:
- 2 cups masa harina
- 2 ½ cups warm water
- 1 teaspoon salt
- 1 tablespoon vegetable oil (optional, for frying)
- Cheese, meats, or other fillings of your choice (e.g., shredded beef, black beans, avocado)
Cooking Instructions:
- Prepare the Dough: In a large mixing bowl, combine the masa harina and salt. Gradually add the warm water while mixing with your hands or a spoon until a soft dough forms. The dough should be moist but not sticky. If it’s too dry, add a little more water; if too sticky, add a sprinkle of masa harina.
- Shape the Arepas: Divide the dough into 8-10 equal portions, depending on your desired size. Roll each portion into a ball and then flatten it to form a disc about ½ inch thick. Make sure the edges are smooth for even cooking.
- Cook the Arepas: Heat a skillet or griddle over medium heat. If you prefer a crispy texture, you can add a bit of vegetable oil to the pan. Place the arepas on the heated surface and cook for about 5-7 minutes on each side, until they develop a golden-brown crust. Alternatively, you can bake them in a preheated oven at 375°F (190°C) for about 15-20 minutes, flipping halfway through.
- Test for Doneness: The arepas are ready when they’re firm to the touch and sound hollow when tapped. If you want a chewier texture, you can cook them a bit longer.
- Stuff or Top the Arepas: Once cooked, let the arepas cool slightly. To fill them, slice them open like a pocket and stuff with your choice of fillings such as cheese, shredded beef, or vegetables. Alternatively, you can serve them topped with fresh ingredients like avocado and salsa.
Extra Tips:
When making arepas, feel free to experiment with different types of masa harina, as some may yield different textures or flavors. If you have leftover arepas, they can be refrigerated and reheated the next day—simply warm them in a skillet or toaster oven for a quick snack.
Don’t hesitate to get creative with your fillings; traditional Venezuelan combinations often include reina pepiada (chicken and avocado) or pabellón (shredded beef, black beans, and plantains). Enjoy your culinary adventure with these delightful corn cakes!
Ceviche: A Fresh Peruvian Classic
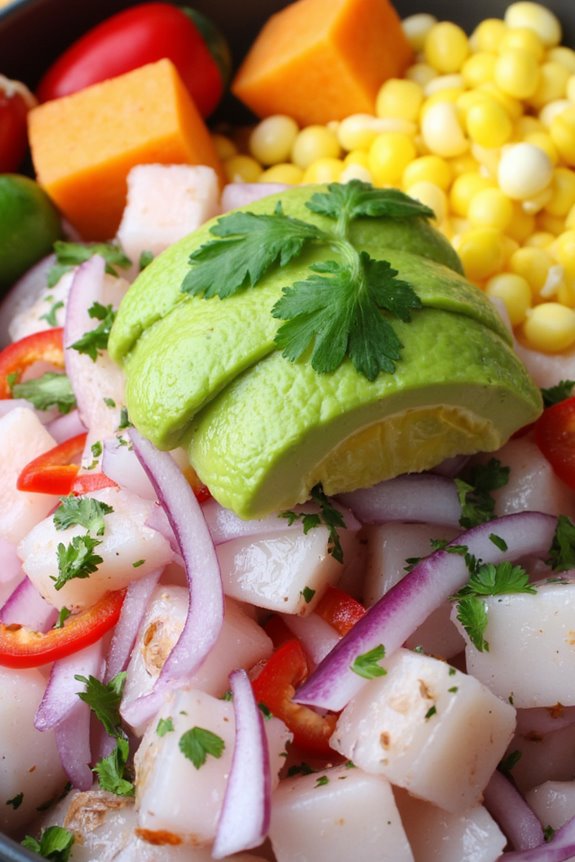
Ceviche is a vibrant and invigorating dish that hails from Peru, where it’s considered a national treasure. This dish showcases the natural flavors of fresh fish marinated in citrus juices, primarily lime, which “cooks” the fish without any heat. Alongside the fish, ceviche often features a medley of ingredients such as onions, cilantro, and chili peppers, creating a delightful balance of flavors and textures that’s both zesty and energizing.
Served chilled, ceviche not only tantalizes the taste buds but also embodies the essence of South American cuisine, making it a perfect starter for any meal or a light and satisfying main course.
Preparing ceviche is a straightforward process that allows the quality of the ingredients to shine. The key to an exceptional ceviche lies in using the freshest fish available. While traditional recipes often call for white fish like tilapia or sole, variations may include shrimp, scallops, or even mixed seafood.
The dish is typically served with accompaniments such as sliced avocado, corn, or sweet potatoes, enhancing its flavor profile while providing a pleasing contrast.
Ingredients (Serving Size: 4-6 people)
- 1 pound fresh white fish fillets (such as tilapia, snapper, or halibut)
- 1 cup fresh lime juice (about 8-10 limes)
- 1 small red onion, thinly sliced
- 1-2 serrano or jalapeño peppers, finely chopped (adjust to taste)
- 1 cup fresh cilantro, chopped
- 1 teaspoon salt (or to taste)
- 1 avocado, diced (for serving)
- 1 cup cooked corn (optional, for serving)
- 1 medium sweet potato, boiled and sliced (optional, for serving)
Cooking Instructions
- Prepare the Fish: Begin by selecting the freshest fish possible. Rinse the fish fillets under cold water and pat them dry with a paper towel. Cut the fish into small, bite-sized cubes and place them in a glass or ceramic bowl. Avoid using metal bowls as they can react with the lime juice.
- Marinate the Fish: Pour the fresh lime juice over the cubed fish, making sure that all pieces are fully submerged. This acid will “cook” the fish, turning it opaque. Cover the bowl with plastic wrap and refrigerate for about 30-60 minutes, depending on the thickness of the fish cubes. Stir occasionally to make certain of even marination.
- Add Vegetables and Seasoning: Once the fish has marinated and appears opaque, remove it from the refrigerator. Drain some of the excess lime juice if desired, then add the thinly sliced red onion, chopped peppers, cilantro, and salt to the fish. Gently toss the mixture to combine all the ingredients without breaking apart the fish.
- Serve the Ceviche: To serve, spoon the ceviche into bowls and garnish with diced avocado. If desired, add sides of cooked corn and sliced sweet potato for added texture and flavor. Serve immediately for the best taste and freshness.
Extra Tips
When making ceviche, the quality of the fish is paramount; always choose fish that’s sushi-grade and as fresh as possible. If you’re unsure about the fish’s freshness, ask your fishmonger or look for a reputable source.
Additionally, customize your ceviche with different herbs, spices, or vegetables based on your preferences; for example, diced mango or cucumber can add a delightful twist. Finally, ceviche is best enjoyed the same day it’s made, as the fish will continue to “cook” in the lime juice, altering its texture over time.
Feijoada: Brazil’s Hearty Black Bean Stew
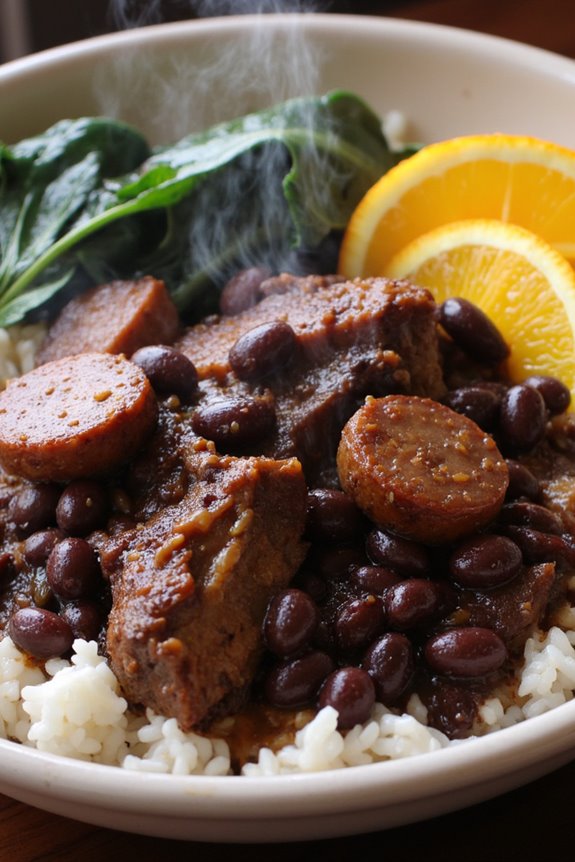
Feijoada is often considered the national dish of Brazil, celebrated for its rich flavors and nourishing ingredients. This hearty black bean stew is a comforting meal that brings together a variety of meats, spices, and, of course, the star of the dish: black beans.
Traditionally served on Wednesdays or Saturdays, feijoada is a communal dish that encourages sharing and togetherness. Its origins trace back to Portuguese settlers and the enslaved Africans who adapted it with local ingredients, creating a beloved staple that has transcended generations.
Cooking feijoada is a labor of love that requires some time but rewards you with a deep and robust flavor profile. The dish is typically accompanied by rice, collard greens, and orange slices, which balance the richness of the stew. This recipe serves 4 to 6 people, making it perfect for family gatherings or a cozy dinner with friends.
Ingredients:
- 1 pound black beans, soaked overnight
- 1 pound pork shoulder, cut into chunks
- 1/2 pound smoked sausage (linguiça or chorizo), sliced
- 1/2 pound beef short ribs
- 1/4 pound bacon, diced
- 1 onion, chopped
- 4 cloves garlic, minced
- 2 bay leaves
- 1 teaspoon paprika
- 1 teaspoon black pepper
- 1 teaspoon cumin
- Salt to taste
- 4 cups water or chicken broth
- 2 tablespoons olive oil
- Cooked white rice, for serving
- Collard greens, for serving
- Orange slices, for garnish
Cooking Instructions:
- Prepare the Beans: Drain the soaked black beans and set them aside. They should be soft and ready to absorb the flavors of the stew.
- Cook the Bacon: In a large, heavy-bottomed pot or Dutch oven, heat the olive oil over medium heat. Add the diced bacon and cook until it’s crispy and browned, about 5-7 minutes. Use a slotted spoon to remove the bacon and set it aside, leaving the rendered fat in the pot.
- Sauté the Aromatics: In the same pot, add the chopped onion and sauté until translucent, about 4-5 minutes. Then, add the minced garlic and sauté for an additional minute until fragrant.
- Brown the Meats: Add the pork shoulder, smoked sausage, and beef short ribs to the pot. Brown the meat on all sides, which should take about 8-10 minutes. This step adds depth to the flavors.
- Combine Ingredients: Return the cooked bacon to the pot and add the soaked black beans. Stir in the bay leaves, paprika, black pepper, cumin, and salt. Mix everything well to ascertain the spices coat the meats and beans evenly.
- Add Liquid and Simmer: Pour in the water or chicken broth, making sure the ingredients are covered. Bring the mixture to a boil, then reduce the heat to low, cover the pot, and let it simmer for about 2-3 hours. Stir occasionally, ensuring nothing sticks to the bottom.
- Check for Doneness: After 2-3 hours, check the beans and meats; they should be tender and the flavors well combined. If the stew is too thick, add a bit more water or broth to reach your desired consistency.
- Serve: Remove the bay leaves before serving. Ladle the feijoada into bowls and serve it hot over a bed of cooked white rice. Pair it with sautéed collard greens and garnish with fresh orange slices for a burst of citrus that complements the dish beautifully.
Extra Tips:
To enhance the flavor of your feijoada, consider marinating the meats in a mixture of garlic, cumin, and black pepper for a few hours or overnight before cooking. This allows the spices to penetrate the meat more deeply.
Additionally, feel free to customize the recipe by adding other types of meats, such as turkey or additional sausages, based on your preferences. Finally, the leftovers taste even better the next day, making feijoada an excellent dish for meal prep or future dinners. Enjoy this Brazilian classic with friends and family for a truly heartwarming experience!
Empanadas: Stuffed Pastries From Argentina

Empanadas are a beloved staple in Argentine cuisine, known for their flaky, golden crust and savory fillings. These delightful pastries can be found throughout South America, each country adding its own unique twist to the dish. Traditionally, empanadas are filled with a variety of ingredients, including meats, cheese, vegetables, and spices, making them versatile for any meal of the day.
Whether served as a snack, appetizer, or main dish, empanadas are certain to please any palate. Preparing empanadas at home is a rewarding experience that allows you to customize the filling to your liking. The dough is made from simple ingredients and can be rolled out and cut into circles before being filled and baked or fried to perfection.
This recipe is a classic approach to making Argentine empanadas, filled with a mixture of ground beef, onions, and spices—perfect for serving 4-6 people.
Ingredients:
- 2 cups all-purpose flour
- 1/2 cup unsalted butter, chilled and cubed
- 1/2 teaspoon salt
- 1/4 cup cold water
- 1 pound ground beef
- 1 medium onion, finely chopped
- 1 hard-boiled egg, chopped
- 1/2 cup green olives, chopped
- 1 teaspoon paprika
- 1 teaspoon cumin
- Salt and pepper to taste
- 1 egg, beaten (for egg wash)
Cooking Instructions:
- Make the Dough: In a large bowl, combine the flour and salt. Add the chilled butter and mix with your fingers or a pastry cutter until the mixture resembles coarse crumbs. Gradually add cold water, mixing until a dough forms. Knead the dough briefly on a floured surface, wrap in plastic wrap, and refrigerate for at least 30 minutes.
- Prepare the Filling: In a skillet over medium heat, add the ground beef and cook until browned, breaking it apart with a wooden spoon. Drain excess fat. Add the chopped onion and sauté until translucent. Stir in the chopped hard-boiled egg, green olives, paprika, cumin, and season with salt and pepper. Remove from heat and let the mixture cool.
- Roll Out the Dough: On a floured surface, roll out the chilled dough until it’s about 1/8 inch thick. Use a round cutter or a glass to cut out circles of dough, about 4-5 inches in diameter.
- Fill the Empanadas: Place a generous spoonful of the beef filling in the center of each dough circle. Be careful not to overfill, as this can cause the empanadas to burst during cooking. Fold the dough over to create a half-moon shape and press the edges together to seal. Use a fork to crimp the edges for an added decorative touch.
- Bake or Fry the Empanadas: Preheat the oven to 375°F (190°C) if baking. Place the empanadas on a baking sheet lined with parchment paper. Brush the tops with beaten egg for a golden finish. Bake for 20-25 minutes or until golden brown. Alternatively, heat oil in a deep pan and fry the empanadas until golden and crispy, about 3-4 minutes per side.
- Serve: Allow the empanadas to cool slightly before serving. They can be enjoyed warm as an appetizer or main dish, paired with chimichurri sauce or a side salad.
Extra Tips:
When making empanadas, feel free to experiment with different fillings such as chicken, cheese, or vegetables to cater to your taste preferences. Additionally, if you want a shortcut, you can use store-bought dough, which saves time while still delivering delicious results.
Make sure to keep the dough wrapped when not in use to prevent it from drying out. If you’re frying the empanadas, verify the oil is hot enough to avoid them soaking up too much oil. Enjoy your cooking adventure!
Churrasco: the Perfect Grilled Steak From Brazil
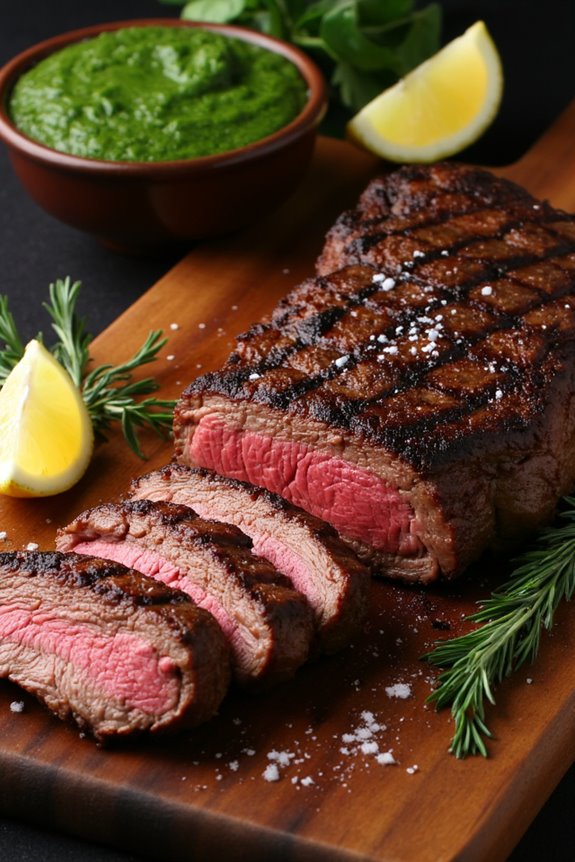
Churrasco is a traditional Brazilian dish that celebrates the art of grilling meat, particularly beef. Known for its rich flavors and tender texture, this dish is often prepared during festive gatherings and family barbecues. The secret to a perfect churrasco lies in the quality of the meat, the seasoning, and the grilling technique.
Traditionally, various cuts of beef, such as picanha, flank steak, or sirloin, are used, marinated simply with salt to highlight the natural flavors.
When grilling churrasco, the meat is typically skewered and cooked over an open flame or charcoal. The result is a beautifully charred exterior that locks in the juices and tenderness of the meat. Often served with chimichurri sauce, rice, or fresh salads, this dish embodies the spirit of Brazilian cuisine and is sure to impress guests at any gathering.
Ingredients (Serves 4-6)
- 2 to 3 pounds of beef (picanha, flank steak, or sirloin)
- 2 tablespoons coarse salt
- 2 tablespoons olive oil (optional)
- Freshly ground black pepper (optional)
- Lemon wedges for serving (optional)
- Chimichurri sauce for dipping (optional)
Cooking Instructions
- Select the Meat: Choose a high-quality cut of beef, such as picanha or flank steak. Look for well-marbled meat, as this will enhance the flavor and tenderness when grilled.
- Prepare the Meat: Trim any excess fat from the meat if necessary, but leave a thin layer for added flavor during grilling. Cut the meat into large chunks or leave it whole, depending on your preference for serving.
- Season the Meat: Generously sprinkle the coarse salt over the meat, guaranteeing an even coating. For additional flavor, you may also add freshly ground black pepper. Let the seasoned meat sit at room temperature for about 30 minutes to absorb the flavors.
- Preheat the Grill: Prepare your grill for high heat. If using a charcoal grill, allow the coals to turn white and hot. For a gas grill, preheat on high for 10-15 minutes.
- Skewer the Meat (if desired): If you prefer skewered meat, thread the chunks of beef onto metal or soaked wooden skewers. This helps with even cooking and makes for an impressive presentation.
- Grill the Meat: Place the seasoned meat directly over the hot grill. Cook for about 5-7 minutes on each side for medium-rare, depending on the thickness of the cut. Avoid flipping too often to achieve a nice char.
- Check for Doneness: Use a meat thermometer to check the internal temperature. Aim for 130-135°F (54-57°C) for medium-rare. Adjust grilling time according to your desired level of doneness.
- Rest the Meat: Once cooked to your liking, remove the meat from the grill and let it rest for 5-10 minutes. This allows the juices to redistribute, guaranteeing a juicy bite.
- Slice and Serve: Slice the meat against the grain into thin pieces and serve with chimichurri sauce, lemon wedges, and your choice of sides.
Extra Tips
To elevate your churrasco to the next level, consider marinating the meat in a mixture of olive oil, garlic, and herbs for a few hours before grilling. This will add an extra layer of flavor.
Additionally, verify your grill is well-oiled to prevent sticking, and keep a close eye on the meat to avoid overcooking. Churrasco is all about simplicity and quality, so use fresh ingredients and enjoy the process of grilling with family and friends.
Lomo Saltado: a Fusion of Flavors From Peru
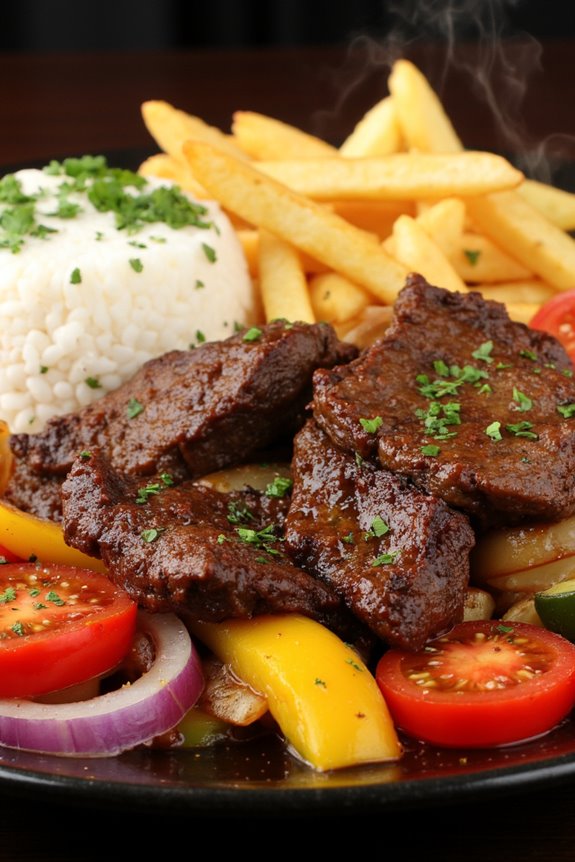
Lomo Saltado is a traditional Peruvian dish that beautifully marries the culinary influences of Chinese immigrants with local Peruvian ingredients. This vibrant stir-fry features marinated strips of beef, fresh vegetables, and a savory sauce, all served over a bed of fluffy rice and paired with crispy fries. The combination of flavors—sweet, savory, and slightly tangy—creates a delicious and satisfying meal, perfect for family gatherings or entertaining guests.
Every bite of Lomo Saltado reflects the rich cultural history of Peru, showcasing how diverse culinary traditions can blend harmoniously. This dish isn’t only a celebration of flavors but also a great way to introduce the concept of fusion cuisine to your own kitchen. The key to a perfect Lomo Saltado lies in the quality of the ingredients and the balance of flavors.
The marinated beef should be cooked quickly at high heat to achieve that tender, juicy texture, while the vegetables retain their crunch. Served with a side of rice and fries, it’s a hearty meal that will impress anyone at the table.
Ingredients (Serves 4-6):
- 1 lb (450 g) flank steak, sliced into thin strips
- 2 tablespoons soy sauce
- 1 tablespoon red wine vinegar
- 1 tablespoon vegetable oil
- 1 medium red onion, sliced
- 1 medium tomato, sliced into wedges
- 1 yellow bell pepper, sliced
- 2 cloves garlic, minced
- 1 teaspoon cumin
- Salt and pepper to taste
- Fresh cilantro, chopped (for garnish)
- 4 cups cooked white rice
- 4 cups French fries (store-bought or homemade)
Cooking Instructions:
- Marinate the Beef: In a bowl, combine the sliced flank steak with soy sauce, red wine vinegar, minced garlic, cumin, salt, and pepper. Mix well to guarantee the beef is evenly coated. Let it marinate for at least 15-30 minutes at room temperature to enhance the flavors.
- Heat the Oil: In a large skillet or wok, heat the vegetable oil over medium-high heat. Allow the oil to get hot but not smoking, as this is vital for achieving a good sear on the beef.
- Cook the Beef: Add the marinated beef strips to the hot skillet in a single layer. Let them sear without stirring for about 2-3 minutes until browned. Then, stir-fry for an additional 2 minutes until the beef is cooked through but still tender. Remove the beef from the skillet and set aside.
- Sauté the Vegetables: In the same skillet, add the sliced red onion, yellow bell pepper, and tomato. Stir-fry for about 3-4 minutes until the vegetables are slightly tender but still crisp. The flavors will meld beautifully during this process.
- Combine Everything: Return the cooked beef to the skillet with the sautéed vegetables. Stir everything together and cook for another 1-2 minutes to allow the flavors to combine. Taste and adjust seasoning if necessary.
- Serve: Plate the cooked white rice and top it generously with the Lomo Saltado mixture. Serve with a side of crispy French fries and garnish with chopped fresh cilantro.
Extra Tips: For an authentic touch, consider using Peruvian yellow chili pepper (aji amarillo) in the dish for an added layer of flavor and a hint of spice. If you prefer a spicier kick, feel free to add sliced jalapeños or a dash of hot sauce to the stir-fry.
Additionally, making sure that all your ingredients are prepped and ready before you start cooking will help you maintain a quick cooking process, which is essential for achieving the best texture in your beef and vegetables. Enjoy your culinary journey through Peru with this delightful Lomo Saltado!
Pastel De Choclo: Chilean Corn Pie

Pastel De Choclo, or Chilean Corn Pie, is a delightful and comforting dish that perfectly embodies the flavors of South American cuisine. This traditional Chilean recipe combines a savory filling of seasoned meat, onions, and hard-boiled eggs, all topped with a creamy layer of blended corn mixture. The dish isn’t only wholesome and filling, but it also showcases the vibrant ingredients that are a staple in Chilean cooking.
It’s often enjoyed during family gatherings and celebrations, making it a beloved favorite among locals.
Preparing Pastel De Choclo is a delightful experience that allows you to explore the rich flavors and textures of corn. The base of the pie consists of fresh corn kernels blended into a smooth mixture, which is then layered over the savory filling. This recipe is perfect for serving 4-6 people, making it ideal for a family dinner or a small gathering with friends.
With a few simple ingredients and steps, you’ll be able to create this delicious dish that’s sure to impress.
Ingredients (Serves 4-6):
- 2 cups of fresh corn kernels (or 1 can of corn)
- 1 cup of milk
- 1 tablespoon of butter
- 1 pound ground beef
- 1 medium onion, chopped
- 2 cloves of garlic, minced
- 2 hard-boiled eggs, sliced
- 1 tablespoon of paprika
- 1 teaspoon of cumin
- Salt and pepper to taste
- 1/2 cup of black olives, pitted and sliced (optional)
- 1/4 cup of chopped fresh basil or parsley (for garnish)
Cooking Instructions:
- Prepare the Corn Mixture: In a blender or food processor, combine the fresh corn kernels and milk. Blend until you achieve a smooth mixture. If using canned corn, drain it before blending. Once blended, set it aside.
- Cook the Meat Filling: In a large skillet over medium heat, melt the butter and add the chopped onion. Sauté the onion for about 3-4 minutes until it becomes translucent. Add the minced garlic and cook for an additional minute.
- Add the Ground Beef: Increase the heat to medium-high and add the ground beef to the skillet. Break it up with a spatula and cook until browned, about 5-7 minutes. Season the mixture with paprika, cumin, salt, and pepper to taste.
- Layer the Filling: Once the beef is fully cooked, remove it from the heat. In a greased baking dish, spread half of the meat mixture evenly on the bottom. Layer the sliced hard-boiled eggs over the meat, followed by the optional black olives if using. Pour the remaining meat mixture on top, spreading it evenly.
- Add the Corn Topping: Carefully pour the blended corn mixture over the meat filling, spreading it out evenly to cover the entire surface. Use a spatula to smooth the top.
- Bake the Pie: Preheat your oven to 375°F (190°C). Place the baking dish in the oven and bake for about 30-35 minutes, or until the corn topping turns a light golden brown and is set.
- Serve: Once baked, remove the Pastel De Choclo from the oven and let it cool for a few minutes. Garnish with fresh basil or parsley before serving. Cut into squares and enjoy!
Extra Tips:
For an even richer flavor, consider adding sautéed bell peppers or corn kernels to the meat filling. If you’re short on time, you can use frozen corn instead of fresh. Just make sure to thaw and drain it before blending.
Additionally, feel free to customize the filling with other ingredients like chicken or vegetables to suit your taste. Enjoy your cooking experience and the delightful taste of this traditional Chilean dish!
Pão De Queijo: Brazilian Cheese Bread

Pão De Queijo, or Brazilian cheese bread, is a delightful gluten-free treat that hails from the vibrant country of Brazil. These small, cheese-filled rolls are characterized by their crispy exterior and chewy, airy interior. Traditionally made with tapioca flour, which gives them their unique texture, Pão De Queijo is often enjoyed as a snack, breakfast item, or appetizer, making them a versatile addition to any meal.
The combination of cheese and tapioca creates a flavor and texture that are truly irresistible, and once you pop one in your mouth, you’ll want to keep coming back for more.
The origin of Pão De Queijo can be traced back to the state of Minas Gerais, where it has become a staple in Brazilian cuisine. With its easy-to-follow recipe, you can easily recreate these delicious cheese breads in the comfort of your own kitchen. They’re best served warm, straight from the oven, and can be paired with a variety of dips or enjoyed plain.
Whether you’re hosting a gathering or simply indulging in a cozy night in, Pão De Queijo is sure to impress your guests and satisfy your cravings.
Ingredients (Serves 4-6 people):
- 1 cup of milk
- 1/2 cup of vegetable oil
- 1 teaspoon of salt
- 2 cups of tapioca flour
- 2 large eggs
- 1 cup of grated cheese (traditionally Minas cheese or mozzarella)
- 1/2 cup of grated Parmesan cheese (optional)
Instructions:
- Preheat the Oven: Begin by preheating your oven to 375°F (190°C). This guarantees that your Pão De Queijo will bake evenly and develop a beautiful golden-brown crust.
- Combine Milk, Oil, and Salt: In a medium saucepan, combine the milk, vegetable oil, and salt. Heat the mixture over medium heat until it comes to a gentle boil. Stir occasionally to prevent sticking.
- Add Tapioca Flour: Once the mixture is boiling, remove it from the heat and gradually add the tapioca flour. Stir vigorously with a wooden spoon until the dough comes together and is smooth. This step is essential for achieving the right texture.
- Cool the Dough: Allow the dough to cool for a few minutes until it’s manageable to touch. This makes it easier to mix in the eggs and cheese without cooking them.
- Incorporate Eggs: Add the eggs one at a time to the dough, mixing well after each addition. The dough will become sticky, but continue to stir until fully incorporated.
- Add Cheese: Fold in the grated cheese (both the mozzarella and Parmesan, if using) into the dough. Mix until the cheese is evenly distributed throughout.
- Shape the Dough: With your hands, form small balls of dough, about the size of a golf ball. Place them on a baking sheet lined with parchment paper, leaving space between each ball as they’ll expand while baking.
- Bake: Place the baking sheet in the preheated oven and bake for 15-20 minutes or until the cheese bread is puffed up and lightly golden on the outside.
- Serve Warm: Remove the Pão De Queijo from the oven and let them cool for a few minutes on a wire rack. Serve warm for the best texture and flavor.
Extra Tips:
For the best results, make sure your ingredients are at room temperature before starting. This will help the dough mix more easily and evenly.
Additionally, feel free to experiment with different types of cheese to customize the flavor of your Pão De Queijo. Cheddar, gouda, or even a spicy pepper jack can add a unique twist to this traditional recipe.
Enjoy your delicious cheese bread fresh from the oven, and store any leftovers in an airtight container for later enjoyment!
Sancocho: A Flavorful Colombian Soup
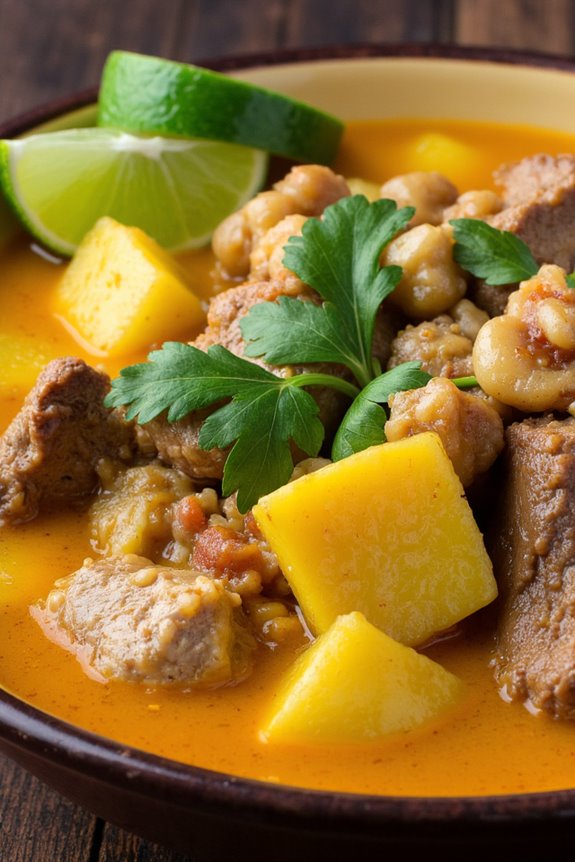
Sancocho is a traditional Colombian soup that embodies the heart and soul of South American cuisine. This hearty dish is often prepared for family gatherings, celebrations, and special occasions, bringing people together over a warm bowl of comfort. With its rich flavor profile and variety of ingredients, Sancocho is a satisfying meal that captures the essence of Colombian culture.
Typically, it combines different types of meats, starchy vegetables, and aromatic herbs, resulting in a dish that’s both nourishing and delicious. The origins of Sancocho can be traced back to various regions in Latin America, with each country offering its own unique twist on the recipe.
In Colombia, the soup is often made with chicken, beef, or fish, along with yucca, plantains, and corn. The combination of these ingredients, simmered slowly, creates a depth of flavor that’s simply irresistible. Whether served as a main course or a starter, Sancocho is sure to impress your family and friends with its vibrant taste and inviting aroma.
Ingredients (Serves 4-6)
- 1 pound chicken pieces (bone-in, skinless)
- 1 pound beef stew meat (or pork, if preferred)
- 1 large onion, chopped
- 2 cloves garlic, minced
- 2 medium potatoes, peeled and cubed
- 1 large yucca root, peeled and cut into chunks
- 2 green plantains, peeled and sliced
- 2 ears of corn, cut into halves
- 6 cups chicken or beef broth
- 1 teaspoon cumin
- 1 teaspoon paprika
- Salt and pepper to taste
- Fresh cilantro, for garnish
- Lime wedges, for serving
Cooking Instructions
- Prepare the Ingredients: Start by gathering all your ingredients. Make certain to wash, peel, and chop the vegetables as necessary. This will help streamline the cooking process and guarantee you have everything ready for the pot.
- Brown the Meats: In a large pot, heat a tablespoon of oil over medium-high heat. Add the chicken pieces and beef stew meat, browning them on all sides. This step enhances the flavor of the meat and adds depth to the soup. Once browned, remove the meats from the pot and set them aside.
- Sauté Aromatics: In the same pot, add the chopped onion and minced garlic. Sauté for about 3-4 minutes until the onion becomes translucent. This will create a flavorful base for your Sancocho.
- Combine Ingredients: Return the browned meats to the pot. Add the cubed potatoes, yucca chunks, sliced plantains, and corn. Stir everything together to combine the flavors, and then season with cumin, paprika, salt, and pepper.
- Add Broth and Simmer: Pour in the chicken or beef broth, making sure all ingredients are submerged. Bring the mixture to a boil, then reduce the heat to low and let it simmer for about 45 minutes to an hour. This slow cooking allows the flavors to meld together beautifully and guarantees the meats are tender.
- Check for Doneness: After simmering, taste the soup and adjust the seasoning if necessary. The meats should be tender, and the vegetables should be cooked through but not mushy. If the soup is too thick, you can add more broth or water to achieve your desired consistency.
- Serve: Ladle the hot Sancocho into bowls, and garnish with fresh cilantro. Serve it with lime wedges on the side for an added zing. Enjoy it with some crusty bread or rice for a complete meal.
Extra Tips
When making Sancocho, feel free to experiment with different proteins such as fish or a mix of meats, depending on your preference.
Also, remember that the longer you let the soup simmer, the richer the flavors will be. If you’re preparing it ahead of time, be aware that the soup may thicken as it cools, so you might need to add a bit more broth when reheating.
Finally, don’t hesitate to customize your Sancocho by adding other vegetables like carrots or bell peppers for added nutrition and flavor!
Dulce De Leche: a Sweet Treat Across the Region
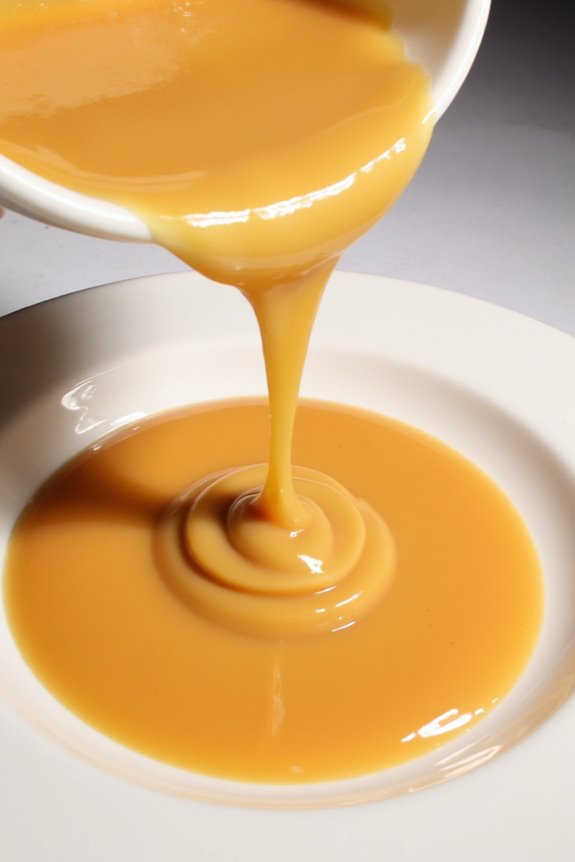
Dulce de leche, a beloved confection throughout South America, is a rich and creamy caramel-like sauce that delights the senses. Its name translates to “sweet milk,” and it’s made by slowly heating sweetened milk until it transforms into a thick, golden-brown spread.
Originating in countries like Argentina and Mexico, this versatile treat can be enjoyed in various ways—spread on toast, drizzled over desserts, or used as a filling for cakes and pastries. The allure of dulce de leche lies not only in its delicious flavor but also in its simple preparation, making it a cherished recipe in many households.
Making dulce de leche at home is an incredibly satisfying process. With just a few ingredients, you can create a delightful treat that captures the essence of South American culinary traditions. While patience is key, as the mixture requires time to cook and caramelize, the result is a smooth and luscious sauce that’s worth every moment.
Gather your ingredients, and let’s explore this sweet journey!
Ingredients (serves 4-6 people):
- 1 can (14 oz) of sweetened condensed milk
- 1/2 teaspoon of baking soda
- 1/4 teaspoon of sea salt
- 1 teaspoon of vanilla extract (optional)
Cooking Instructions:
- Prepare the Ingredients: Start by gathering all your ingredients. You’ll need a can of sweetened condensed milk, baking soda, sea salt, and vanilla extract for added flavor. Make sure to have a heavy-bottomed saucepan ready to guarantee even heating.
- Combine the Ingredients: Open the can of sweetened condensed milk and pour it into the saucepan. Add the baking soda and sea salt. The baking soda helps to prevent crystallization and enhances the caramelization process, while the salt balances the sweetness.
- Heat the Mixture: Place the saucepan over medium-low heat. Stir the mixture continuously with a whisk or wooden spoon to prevent it from sticking to the bottom of the pan. This initial stage will take about 5-10 minutes, and you should see the mixture beginning to bubble.
- Simmer: Once the mixture starts to bubble, reduce the heat to low. Continue to cook, stirring frequently, for about 30-45 minutes. As it cooks, the color will deepen to a golden brown, and the consistency will thicken. Be patient and avoid increasing the heat to prevent burning.
- Check for Doneness: After about 30 minutes, start checking the consistency. You want it to be thick enough to coat the back of a spoon. If you prefer a thicker dulce de leche, continue cooking for an additional 10-15 minutes until you reach the desired consistency.
- Add Vanilla: If using, stir in the vanilla extract during the last few minutes of cooking for a deeper flavor. Remove the pan from heat once it reaches the desired thickness.
- Cool and Store: Allow the dulce de leche to cool slightly in the pan before transferring it to a glass jar or airtight container. It will thicken further as it cools. Store in the refrigerator for up to two weeks.
Extra Tips:
When making dulce de leche, patience is essential—avoid rushing the cooking process to guarantee the perfect caramel flavor. If you find the mixture is thickening too much while cooking, you can add a splash of milk to adjust the consistency.
Additionally, remember that dulce de leche can be used in various desserts such as ice creams, cakes, and pastries, so feel free to experiment with different ways to enjoy this delightful treat!
Quinoa Salad: a Nutrient-Rich Dish From Bolivia
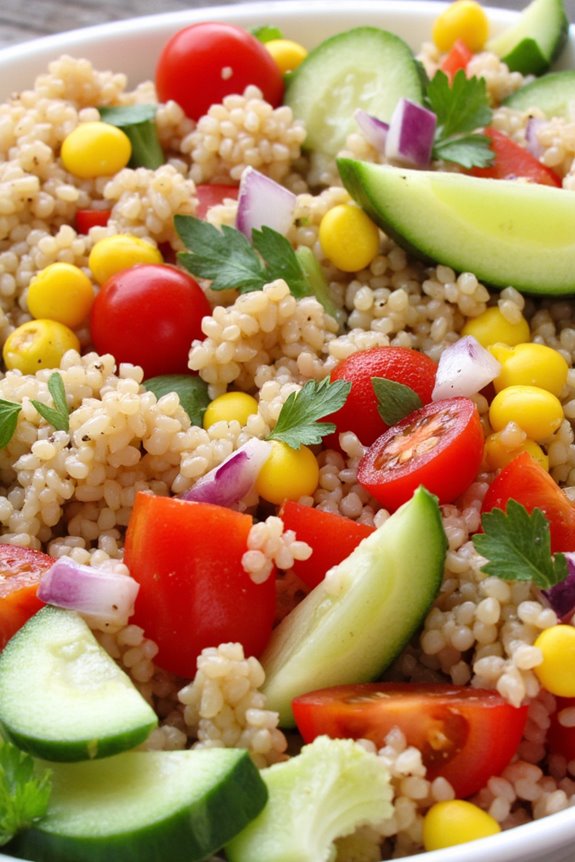
Quinoa Salad, a vibrant and nutritious dish from Bolivia, isn’t just a feast for the eyes but also a powerhouse of health benefits. Quinoa, often referred to as the “mother grain,” is an ancient seed that’s gluten-free and packed with essential amino acids, fiber, vitamins, and minerals.
This salad is a perfect blend of fresh vegetables, herbs, and a zesty dressing, making it an ideal choice for a light lunch or a side dish at dinner. The combination of flavors and textures will leave you satisfied and energized.
This traditional Bolivian salad showcases the versatility of quinoa and is easily customizable based on your preferences and seasonal ingredients. Whether you’re a long-time fan of quinoa or trying it for the first time, this recipe is a delightful way to enjoy a nutrient-dense meal. It can be enjoyed on its own or paired with grilled chicken or fish for a more substantial meal.
Ingredients (Serves 4-6)
- 1 cup quinoa
- 2 cups water or vegetable broth
- 1 medium red bell pepper, diced
- 1 medium cucumber, diced
- 1 cup cherry tomatoes, halved
- 1/2 red onion, finely chopped
- 1 cup corn (fresh, canned, or frozen)
- 1/4 cup fresh parsley, chopped
- 1/4 cup fresh cilantro, chopped
- Juice of 2 limes
- 1/4 cup olive oil
- Salt and pepper, to taste
Cooking Instructions
1. Rinse the Quinoa: Begin by rinsing the quinoa under cold water. This step is vital as it removes the saponins, which can give quinoa a bitter taste. Use a fine-mesh strainer for the best results.
2. Cook the Quinoa: In a medium saucepan, combine the rinsed quinoa and water (or vegetable broth) and bring it to a boil. Once boiling, reduce the heat to low, cover, and simmer for about 15 minutes or until the quinoa is fluffy and the water is absorbed.
Remove from heat and let it sit covered for an additional 5 minutes before fluffing it with a fork.
3. Prepare the Vegetables: While the quinoa is cooking, chop the red bell pepper, cucumber, cherry tomatoes, red onion, and corn. Place all the chopped vegetables in a large mixing bowl. Make sure the pieces are uniform for even distribution in the salad.
4. Mix the Dressing: In a small bowl, whisk together the lime juice, olive oil, salt, and pepper. Adjust the seasoning according to your taste preferences. This zesty dressing will enhance the flavors of the salad.
5. Combine Ingredients: Once the quinoa has cooled slightly, add it to the bowl with the chopped vegetables. Pour the dressing over the quinoa and vegetables, and gently toss everything together to combine. Finally, fold in the chopped parsley and cilantro for added freshness.
6. Chill and Serve: For the best flavor, let the quinoa salad chill in the refrigerator for at least 30 minutes before serving. This allows the ingredients to meld together. Serve chilled or at room temperature.
Extra Tips
When preparing your Quinoa Salad, consider adding other ingredients like avocado, black beans, or feta cheese for additional flavors and textures.
You can also experiment with different herbs such as mint or basil to create your unique twist on this classic dish. If you’re short on time, you can make the quinoa in advance and store it in the refrigerator until you’re ready to assemble the salad.
This dish is also great for meal prep, as it holds up well in the fridge for several days, making it a convenient option for a healthy lunch or dinner.
Acarajé: A Brazilian Street Food Delight

Acarajé is a traditional street food originating from the northeastern region of Brazil, particularly associated with the Afro-Brazilian culture. This delightful dish is made from black-eyed peas, which are mashed and formed into round fritters, then deep-fried in palm oil to achieve a crispy exterior.
Acarajé is typically served split open and filled with a spicy mix of shrimp, vatapá (a creamy paste made from bread, nuts, and coconut milk), and a variety of other flavorful toppings. This dish not only tantalizes the taste buds but also showcases the rich culinary heritage of Brazil.
The preparation of Acarajé can be a fun and rewarding experience, allowing you to immerse yourself in the vibrant flavors of South American cuisine. While it may seem a bit labor-intensive, the end result is certainly worth the effort.
Whether enjoyed as a snack or a main dish, Acarajé is sure to impress your family and friends with its unique taste and cultural importance.
Ingredients (Serves 4-6):
- 2 cups black-eyed peas, soaked overnight
- 1 medium onion, chopped
- 1 teaspoon salt
- 1 teaspoon black pepper
- 1 teaspoon cayenne pepper (adjust to taste)
- 3 cups palm oil (for frying)
- 1 cup dried shrimp (rehydrated)
- 1 cup vatapá (recipe below)
- Sliced tomatoes (for garnish)
- Fresh cilantro, chopped (for garnish)
- Hot sauce (optional)
Cooking Instructions:
1. Prepare the Black-Eyed Peas: After soaking the black-eyed peas overnight, drain and rinse them. Remove any skins by rubbing them between your hands. This step enhances the texture of the Acarajé.
Once cleaned, place the peas in a food processor along with the chopped onion, salt, black pepper, and cayenne pepper. Blend until you achieve a smooth, thick paste.
2. Heat the Palm Oil: In a deep frying pan, heat the palm oil over medium-high heat. It’s important to use enough oil to fully submerge the fritters. To check if the oil is hot enough, you can drop a small amount of the batter into the oil; if it sizzles and rises to the surface, it’s ready for frying.
3. Form the Fritters: Using wet hands, take a portion of the black-eyed pea mixture and form it into a round ball (about the size of a golf ball). Flatten it slightly to create a patty shape.
Repeat this process until you’ve used all the batter.
4. Fry the Acarajé: Carefully place the formed fritters into the hot oil, frying them in batches to avoid overcrowding. Fry for about 4-5 minutes on each side until they turn golden brown and crispy.
Use a slotted spoon to remove them from the oil and drain on paper towels.
5. Prepare the Filling: While the Acarajé is frying, prepare the filling. If using dried shrimp, make sure they’re rehydrated by soaking them in warm water for about 30 minutes.
Mix them with the vatapá, which can be made by blending soaked bread, ground nuts, coconut milk, and spices until smooth.
6. Assemble the Acarajé: Once the fritters are cooked and slightly cooled, carefully slice them open without cutting all the way through. Fill each Acarajé with the shrimp and vatapá mixture.
Top with sliced tomatoes, chopped cilantro, and, if desired, a drizzle of hot sauce for an extra kick.
Extra Tips:
When making Acarajé, the quality of the palm oil is essential, as it contributes considerably to the flavor. If palm oil is hard to find, you can substitute with vegetable oil, but the taste will be different.
Additionally, for a more intense flavor, consider adding spices like cumin or garlic to the black-eyed pea mixture. Confirm that the oil temperature is consistent while frying to avoid greasy or undercooked fritters.
Finally, serve your Acarajé immediately after assembling for the best taste and texture!
Brigadeiro: The Brazilian Chocolate Truffle

Brigadeiro is a beloved Brazilian treat that has captured the hearts (and taste buds) of people around the world. Originating in Brazil during the 1940s, these delectable chocolate truffles are typically made from sweetened condensed milk, cocoa powder, butter, and chocolate sprinkles. Brigadeiros are a staple at birthday parties and celebrations, symbolizing joy and festivity. Their rich, fudgy texture and sweet, chocolatey flavor make them irresistible, and they’re incredibly simple to prepare, making them perfect for both novice and experienced bakers.
The magic of brigadeiro lies in their versatility. While the classic recipe is undeniably delicious, you can experiment with various flavorings and coatings to personalize them to your liking. From adding a hint of espresso to rolling them in crushed nuts or coconut, the possibilities are endless. Whether you’re looking to impress guests at a party or satisfy your sweet tooth, brigadeiros are sure to be a hit. Let’s explore how to make these delightful Brazilian chocolate truffles!
Ingredients (Serves 4-6)
- 1 can (14 ounces) sweetened condensed milk
- 2 tablespoons unsweetened cocoa powder
- 2 tablespoons unsalted butter
- A pinch of salt
- Chocolate sprinkles (for coating)
- Additional butter (for greasing your hands)
Cooking Instructions
- Prepare the Mixture: In a medium saucepan, combine the sweetened condensed milk, cocoa powder, unsalted butter, and a pinch of salt. Stir the ingredients together until they’re well mixed. This will be the base for your brigadeiro.
- Cook the Mixture: Place the saucepan over medium-low heat. Continuously stir the mixture with a wooden spoon or spatula. You want to cook it until it thickens and starts to pull away from the sides of the pan, which usually takes about 10-15 minutes. Keep an eye on it to prevent burning.
- Cool the Mixture: Once the brigadeiro mixture has thickened, remove the saucepan from the heat and transfer the mixture to a greased plate or bowl. Allow it to cool at room temperature for about 30 minutes, or until it’s cool enough to handle.
- Shape the Brigadeiros: Grease your hands with a little butter to prevent the mixture from sticking. Take small portions (about a tablespoon) of the cooled mixture and roll them into balls. Aim for a uniform size for a neat presentation.
- Coat the Brigadeiros: Place chocolate sprinkles on a plate. Roll each brigadeiro ball in the sprinkles, ensuring they’re completely covered. This adds not only flavor but also a delightful crunch to each bite.
- Serve and Enjoy: Once all the brigadeiros are coated, place them in mini paper cups or on a serving plate. They can be enjoyed immediately or stored in an airtight container in the refrigerator for a few days.
Extra Tips
For an extra twist, consider adding flavorings such as vanilla extract or a splash of liqueur to the mixture while cooking. You can also get creative with the coatings—try using crushed nuts, shredded coconut, or even powdered sugar for a different texture and flavor.
Brigadeiros can be stored in the refrigerator for up to a week, making them a great make-ahead treat for parties or gatherings. Enjoy experimenting with this classic Brazilian dessert!