

When I think of breakfast, my mind instantly goes to the vibrant and wholesome flavors from South America. Imagine starting your day with creamy arepas filled with cheese and avocado or a refreshing açaí bowl topped with colorful fruits. These dishes promise to add a burst of energy to your morning routine. If you’re ready to try something new, there’s an exciting lineup of recipes to explore. Let’s discover these delicious options together.
Arepas With Cheese and Avocado
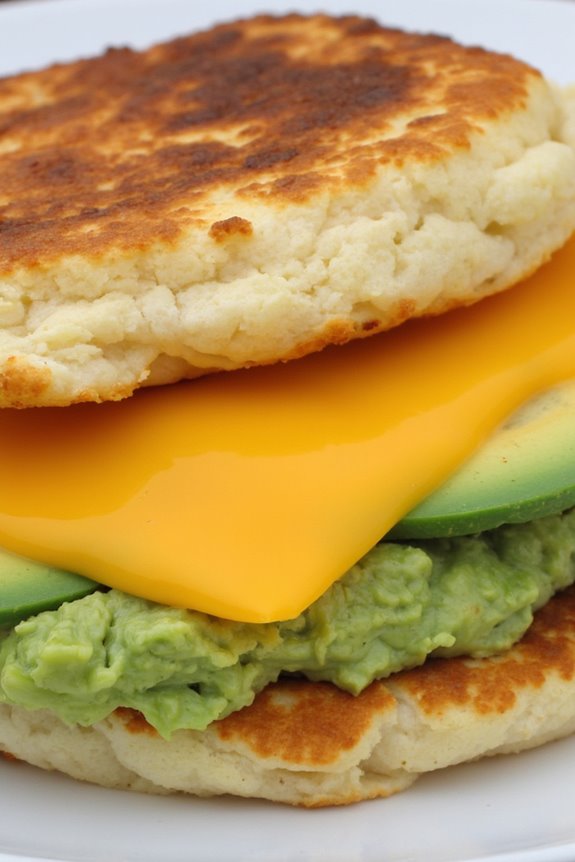
Arepas are a traditional South American staple, particularly popular in Colombia and Venezuela. These cornmeal cakes are versatile and can be filled or topped with various ingredients, making them a perfect breakfast option. This recipe focuses on a delightful combination of melted cheese and creamy avocado, creating a satisfying and flavorful dish that’s sure to please everyone at the table.
The beauty of arepas lies in their simplicity and the ease with which they can be customized. You can enjoy them fresh off the griddle or bake them for a crisper texture. Paired with cheese and avocado, arepas become a hearty breakfast that’s both filling and nutritious, providing a great start to your day. Let’s explore the ingredients and steps to create this delicious breakfast treat!
Ingredients (Serves 4-6):
- 2 cups of pre-cooked cornmeal (arepa flour)
- 2 ½ cups of warm water
- 1 teaspoon of salt
- 1 tablespoon of vegetable oil (plus extra for cooking)
- 1 cup of shredded cheese (such as mozzarella or queso blanco)
- 2 ripe avocados
- Optional: hot sauce or salsa for serving
Cooking Instructions:
- Prepare the Arepa Dough: In a large mixing bowl, combine the pre-cooked cornmeal, salt, and warm water. Mix with your hands or a spoon until a soft dough forms. Let the dough rest for about 5 minutes to allow the cornmeal to absorb the water and become pliable.
- Shape the Arepas: Divide the dough into equal portions, roughly the size of a golf ball. Flatten each ball into a disc about ½ inch thick. Make sure the edges are smooth, so they cook evenly.
- Cook the Arepas: Heat a skillet or griddle over medium heat and add a small amount of vegetable oil. Once hot, place the arepas on the skillet and cook for about 5-7 minutes on each side until they’re golden brown and slightly crispy. You can also bake them in a preheated oven at 375°F (190°C) for about 15-20 minutes after pan-frying for a crispy finish.
- Add the Cheese: Once the arepas are cooked, carefully slice them open like a pocket. Fill each arepa with a generous amount of shredded cheese, allowing it to melt slightly from the heat of the arepa.
- Prepare the Avocado: While the cheese is melting, slice the ripe avocados. You can either layer the avocado slices directly into the arepa or mash the avocado with a fork and spread it inside for a creamier texture.
- Serve: Serve the arepas warm, optionally topped with hot sauce or salsa for an extra kick. Enjoy them immediately for the best taste and texture!
Extra Tips:
When making arepas, be mindful of the dough consistency. It should be soft but not sticky; if it’s too dry, add a little more water, and if it’s too wet, incorporate a bit more cornmeal.
Additionally, feel free to experiment with different cheeses or add other fillings such as beans, meats, or vegetables to suit your taste preferences. Arepas are incredibly versatile, allowing for endless customization to keep your breakfast exciting!
Açaí Bowl With Granola and Fresh Fruits
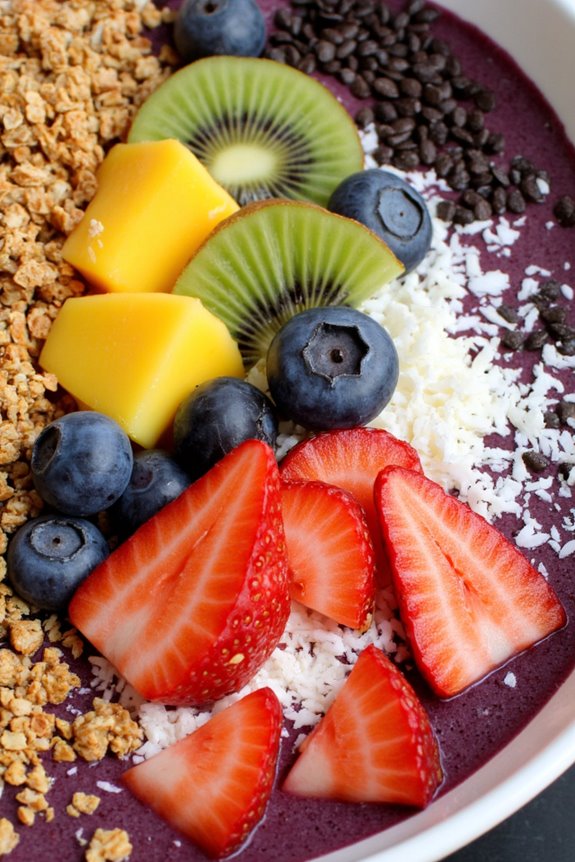
The Açaí Bowl is a vibrant and nutritious dish that hails from Brazil, offering a revitalizing start to your day. Packed with antioxidants, fiber, and healthy fats, this bowl isn’t only visually appealing but also incredibly satisfying. The base of this breakfast is a blend of frozen açaí berries, which are blended to a smooth consistency and served with a variety of toppings like granola, fresh fruits, and a drizzle of honey or agave syrup. It’s a customizable dish, allowing you to tailor it to your taste preferences and dietary needs.
To make this Açaí Bowl, you’ll need a few key ingredients that are easy to find at local grocery stores or health food markets. Once blended, the açaí mixture can be topped with an assortment of fruits, nuts, and seeds to create a balanced meal. This dish not only serves as a delicious breakfast but also makes for a great afternoon snack or light dessert. Here’s how to create your own Açaí Bowl with Granola and Fresh Fruits for 4-6 people.
Ingredients:
- 4 frozen açaí packets (100g each)
- 2 ripe bananas
- 1 cup almond milk (or any milk of choice)
- 1 tablespoon honey or agave syrup (optional)
- 1 cup granola
- 1 cup mixed fresh fruits (e.g., strawberries, blueberries, kiwi, mango)
- ¼ cup shredded coconut (optional)
- 2 tablespoons chia seeds (optional)
Cooking Instructions:
- Prepare the Açaí Base: Begin by breaking the frozen açaí packets into smaller chunks and placing them in a blender. Add the ripe bananas and almond milk. If you prefer a sweeter base, add the honey or agave syrup at this stage. Blend everything on high speed until smooth and creamy. If the mixture is too thick, you can add a little more milk to help it blend.
- Assemble the Bowls: Once your açaí mixture is ready, divide it evenly among serving bowls. Use a spatula to smooth the top of each bowl for an appealing presentation.
- Add the Toppings: Now it’s time to get creative! Start by sprinkling a generous amount of granola over each bowl. Then, arrange the mixed fresh fruits on top, creating a colorful and inviting display. You can slice the fruits into different shapes for added visual appeal.
- Finish with Extras: If desired, sprinkle shredded coconut and chia seeds over the top for added texture and nutrition. You can also drizzle a little extra honey or agave syrup over the fruit for a touch of sweetness.
- Serve Immediately: Enjoy your Açaí Bowl right away while it’s fresh and cold. The combination of textures and flavors will make for a delightful breakfast experience.
Extra Tips:
For a thicker açaí bowl, verify that your açaí packets are completely frozen before blending. If you want to enhance the nutritional profile, consider adding some spinach or protein powder to the blender.
Feel free to experiment with different toppings based on seasonal fruits or personal preferences. Not only can you include nuts or seeds, but you can also try adding nut butter or yogurt for additional creaminess. Enjoy the process of making this bowl as much as you enjoy eating it!
Chilaquiles With Salsa Verde

Chilaquiles is a traditional Mexican breakfast dish that has gained popularity throughout South America for its comforting and flavorful profile. This dish consists of crispy tortilla chips smothered in a vibrant salsa verde, often topped with creamy avocado, crumbled cheese, and a fried egg, making it a hearty meal to start the day.
It’s a versatile dish that can be adjusted to suit different tastes, whether you prefer it mild or with a bit of spice. Salsa verde, made with tomatillos and fresh herbs, adds a zesty brightness to the dish, while the tortillas provide a satisfying crunch.
Chilaquiles can be served as a main dish or as a side, and they’re particularly popular for brunch gatherings. With a few simple ingredients and straightforward steps, you can whip up this delightful breakfast in no time.
Ingredients (serving size: 4-6 people)
- 10-12 corn tortillas
- 2 cups salsa verde (homemade or store-bought)
- 1 cup shredded chicken (optional)
- 1 cup crumbled queso fresco or feta cheese
- 1 avocado, sliced
- 4-6 large eggs
- 1/4 cup chopped cilantro
- 1/2 cup sour cream (optional)
- Olive oil for frying
- Salt and pepper to taste
Cooking Instructions
1. Prepare the Tortillas: Start by cutting the corn tortillas into quarters to create triangle-shaped chips. In a large skillet, heat about 1/4 inch of olive oil over medium heat. Once the oil is hot, fry the tortilla triangles in batches until they’re golden brown and crispy, about 2-3 minutes per side.
Use a slotted spoon to remove them and let them drain on paper towels. Season lightly with salt.
2. Heat the Salsa Verde: In a separate saucepan, gently heat the salsa verde over low heat. This will enhance its flavors and prepare it for mixing with the tortilla chips. If you want a little more depth, you can add the shredded chicken to the salsa as it heats.
3. Combine Tortillas and Salsa: Once the salsa is warm, carefully add the crispy tortilla chips to the saucepan. Toss them gently to coat the chips evenly with the salsa verde, ensuring they’re well-covered but still maintain some crunch.
4. Fry the Eggs: In a non-stick skillet, add a little olive oil and heat over medium heat. Crack the eggs into the skillet and cook to your desired doneness—sunny-side-up or over-easy works well for this dish. Season with salt and pepper.
5. Assemble the Chilaquiles**: On a serving platter, spoon the sauced tortilla chips. Top them with the fried eggs**, followed by slices of avocado, crumbled cheese, and chopped cilantro. Add a dollop of sour cream on the side if you desire.
6. Serve Immediately: Chilaquiles are best enjoyed fresh and hot. Serve right away for the ultimate breakfast experience.
Extra Tips
To enhance your chilaquiles, consider adding additional toppings such as pickled onions, radishes, or jalapeños for a kick of flavor.
If you prefer a less crunchy texture, allow the chips to soak in the salsa for a minute longer before serving. For a vegetarian option, simply omit the chicken and load up on more veggies like bell peppers or black beans. Enjoy customizing your chilaquiles to suit your taste!
Pão De Queijo (Cheese Bread)
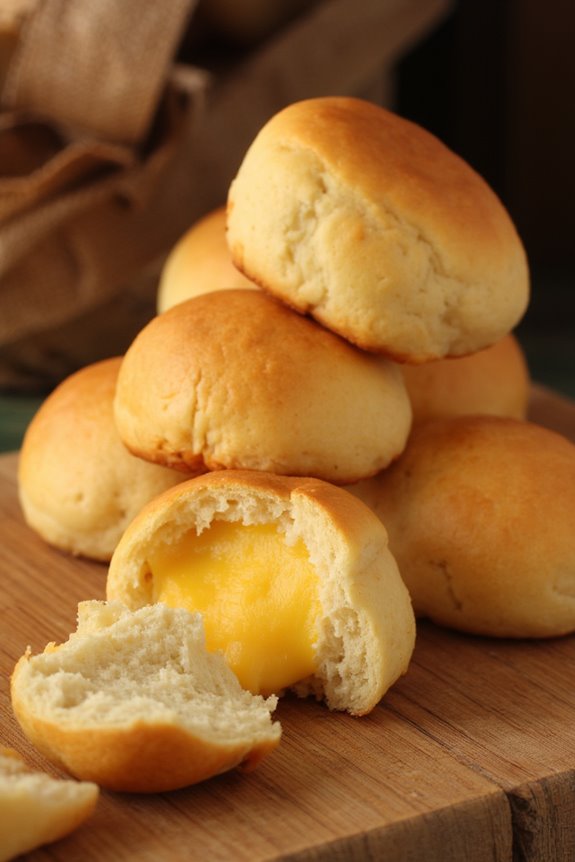
Pão De Queijo, or Brazilian Cheese Bread, is a beloved snack and breakfast staple that captures the essence of South American culinary traditions. With its chewy texture and delightful cheesy flavor, this gluten-free treat is made from tapioca flour, which gives it a unique quality that sets it apart from other bread.
The cheese used in the recipe can vary, but traditional versions often incorporate Minas cheese, a semi-hard cheese that adds a rich, savory depth to the bread. This dish isn’t only easy to prepare but also perfect for sharing, making it a favorite for family gatherings or casual brunches.
The preparation of Pão De Queijo is straightforward, allowing even novice cooks to create this delicious treat. The dough is simple to mix and can be shaped into small balls before baking, resulting in a crispy exterior with a soft, airy inside. As they bake, the irresistible aroma fills the kitchen, guaranteeing that everyone will be enthusiastic to plunge into.
Serve these delightful cheese breads warm, alongside a cup of coffee or tea, for a truly satisfying breakfast experience.
Ingredients (serving size: 4-6 people)
- 1 cup of tapioca flour
- 1/2 cup of milk
- 1/4 cup of vegetable oil
- 1 teaspoon of salt
- 1 cup of grated cheese (preferably Minas cheese or mozzarella)
- 2 large eggs
- 1/2 teaspoon of baking powder
Cooking Instructions
- Preheat the Oven: Begin by preheating your oven to 375°F (190°C). This guarantees that the bread will bake evenly and develop a golden crust.
- Combine Milk and Oil: In a small saucepan over medium heat, combine the milk, vegetable oil, and salt. Stir occasionally until the mixture comes to a gentle boil. This step helps to dissolve the salt and combine the liquids for ideal flavor.
- Mix Tapioca Flour: Once the milk and oil mixture is boiling, remove it from heat and gradually add the tapioca flour to the pot. Stir vigorously with a wooden spoon until the mixture is well combined and forms a sticky dough. It’s vital to mix while the mixture is hot to confirm the flour absorbs the liquid properly.
- Add Eggs and Cheese: Allow the dough to cool slightly, then add the eggs one at a time, mixing well after each addition. The dough should become smooth and elastic. After the eggs are incorporated, fold in the grated cheese and baking powder until fully combined.
- Shape the Dough: Use your hands or a small cookie scoop to form the dough into small balls, about the size of a golf ball. Place them on a baking sheet lined with parchment paper, leaving some space between each ball to allow for expansion during baking.
- Bake: Transfer the baking sheet to the preheated oven and bake for 15-20 minutes, or until the cheese bread is puffed and lightly golden on top. Keep an eye on them to confirm they don’t over-bake, as they can become dry.
- Cool and Serve: Once baked, remove the Pão De Queijo from the oven and let them cool for a few minutes on a wire rack. Serve warm and enjoy the cheesy delight with your favorite beverage.
Extra Tips
For the best results, use freshly grated cheese as it melts better and enhances the flavor. If you can’t find Minas cheese, mozzarella or a mix of different cheeses works well too.
Additionally, you can experiment with adding herbs or spices to the dough for extra flavor, such as oregano or chili flakes. These cheese breads are best enjoyed fresh but can be stored in an airtight container for a few days; simply reheat them in the oven for a few minutes to regain their fluffiness.
Dulce De Leche Pancakes

Dulce de leche pancakes are a delightful South American breakfast treat that combines the rich, caramel-like flavor of dulce de leche with fluffy, tender pancakes. Perfect for a leisurely weekend breakfast or brunch, these pancakes are certain to impress your family and friends. The sweetness of the dulce de leche is balanced by the lightness of the pancakes, making each bite a heavenly experience.
This dish isn’t only delicious but also simple to prepare, allowing you to indulge in a taste of South American cuisine anytime.
To make these delectable pancakes, you’ll start by preparing a basic pancake batter and then swirl in generous amounts of dulce de leche for a rich flavor. Topped with additional dulce de leche and a sprinkle of fresh fruit or nuts, these pancakes become a feast for the eyes as well as the palate. Serve them with a side of fresh fruit or a dollop of whipped cream for an unforgettable breakfast that celebrates the essence of South American flavors.
Ingredients (Serves 4-6)
- 1 cup all-purpose flour
- 2 tablespoons sugar
- 1 tablespoon baking powder
- 1/2 teaspoon salt
- 1 cup milk
- 1 large egg
- 2 tablespoons melted butter
- 1/2 cup dulce de leche (plus more for serving)
- Fresh fruit (such as bananas or strawberries) for topping (optional)
- Chopped nuts (such as walnuts or pecans) for topping (optional)
Cooking Instructions
- Prepare Dry Ingredients: In a large mixing bowl, whisk together the all-purpose flour, sugar, baking powder, and salt until combined. This guarantees that the leavening agent is evenly distributed throughout the flour for consistent pancake rise.
- Mix Wet Ingredients: In a separate bowl, whisk together the milk, egg, and melted butter until well combined. Make sure the butter isn’t too hot, or it may cook the egg when combined.
- Combine Mixtures: Pour the wet ingredients into the dry ingredients. Gently mix until just combined; it’s okay if there are a few lumps. Over-mixing can lead to tough pancakes, so be careful not to stir too much.
- Add Dulce de Leche: Gently fold in the dulce de leche into the pancake batter, creating a marbled effect. This will give you pockets of sweet caramel flavor throughout your pancakes.
- Heat the Pan: Heat a non-stick skillet or griddle over medium heat and lightly grease it with butter or cooking oil. Make sure the surface is hot enough that a drop of water sizzles when it hits the pan.
- Cook the Pancakes: Pour about 1/4 cup of the batter onto the skillet for each pancake. Cook until bubbles form on the surface and the edges look set, about 2-3 minutes. Flip the pancakes and cook for an additional 1-2 minutes on the other side until golden brown.
- Serve Warm: Remove the pancakes from the skillet and keep warm in a low oven while you cook the remaining batter. Serve the pancakes warm with additional dulce de leche drizzled on top and your choice of fresh fruit and nuts if desired.
Extra Tips
For the best results, use room temperature ingredients as they combine more easily, resulting in a fluffier pancake. If you want to add a twist, try incorporating a dash of vanilla extract or a sprinkle of cinnamon into the batter for added flavor.
Make sure to keep your pancakes warm in the oven as you cook the rest, and don’t be afraid to adjust the amount of dulce de leche to suit your sweetness preference. Enjoy your delicious dulce de leche pancakes!
Huevos Rancheros
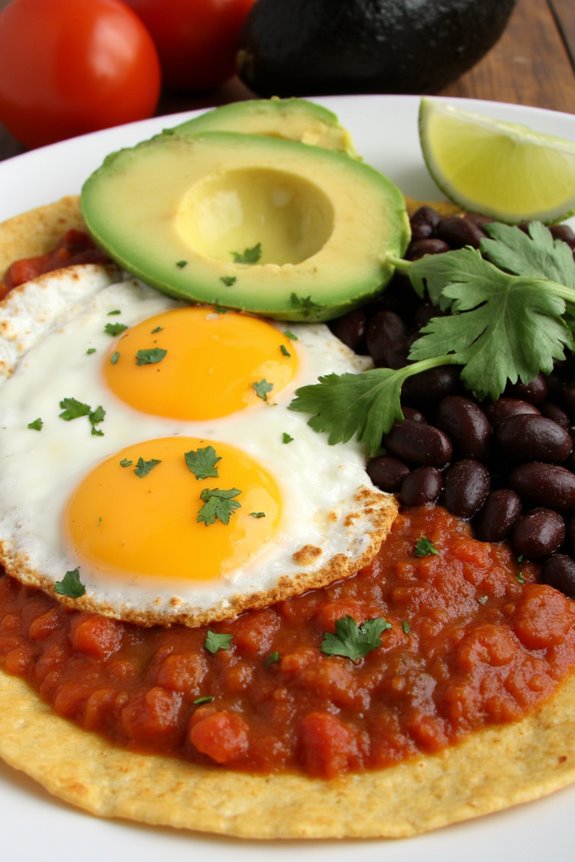
Huevos Rancheros is a traditional Mexican breakfast dish that has become a beloved staple across South America and beyond. This dish typically features fried eggs served on warm tortillas, topped with a rich and flavorful tomato sauce, often accompanied by beans, avocado, and fresh cilantro. The combination of textures and flavors makes it a hearty and satisfying meal, perfect for starting your day off right.
The rustic simplicity of Huevos Rancheros highlights the vibrant ingredients commonly found in South American cuisine, making it a delicious and nourishing choice for breakfast. To prepare Huevos Rancheros, you’ll want to focus on sourcing quality ingredients and allowing the flavors to meld together beautifully.
While the dish can be customized with various toppings and additions, the core components remain the same. This recipe will guide you through creating a classic Huevos Rancheros that serves 4-6 people, ensuring everyone can enjoy this delightful breakfast.
Ingredients
- 6 large eggs
- 4 corn tortillas
- 1 cup black beans, cooked and drained
- 2 cups diced tomatoes (fresh or canned)
- 1 medium onion, diced
- 1 clove garlic, minced
- 1 jalapeño, minced (optional)
- 1 teaspoon ground cumin
- 1 teaspoon chili powder
- 2 tablespoons olive oil
- Salt and pepper, to taste
- Fresh cilantro, chopped, for garnish
- Avocado slices, for serving
- Lime wedges, for serving
Cooking Instructions
1. Prepare the Tomato Sauce: In a medium saucepan, heat 1 tablespoon of olive oil over medium heat. Add the diced onion and sauté until translucent, about 5 minutes. Stir in the minced garlic and jalapeño (if using), cooking for an additional minute until fragrant.
Add the diced tomatoes, cumin, chili powder, salt, and pepper. Let the mixture simmer for about 10-15 minutes, stirring occasionally, until it thickens slightly.
2. Cook the Tortillas: In a separate skillet, heat the remaining tablespoon of olive oil over medium heat. Add the corn tortillas one at a time, cooking for about 30 seconds on each side until they’re warm and slightly crispy.
Keep the tortillas warm by wrapping them in a clean kitchen towel.
3. Fry the Eggs: In the same skillet, crack the eggs and cook them sunny-side up or to your desired doneness. Season with salt and pepper while they cook. This should take about 3-4 minutes, depending on how runny you prefer the yolks.
4. Assemble the Dish: On each plate, place a warm tortilla as the base. Spoon a generous amount of the cooked black beans onto the tortilla, followed by a fried egg.
Top the egg with a hearty scoop of the tomato sauce.
5. Garnish and Serve: Sprinkle fresh cilantro over the dish and serve with avocado slices and lime wedges on the side for added flavor. Enjoy your Huevos Rancheros while it’s warm!
Extra Tips
For an extra kick, you can add some crumbled queso fresco or feta cheese on top of the Huevos Rancheros. If you prefer a spicier sauce, feel free to incorporate more jalapeños or even some hot sauce.
Additionally, for a heartier version, consider adding sautéed bell peppers or chorizo to the beans. Always serve this dish immediately to enjoy the freshness of the ingredients and the texture of the eggs and tortillas!
Quinoa Porridge With Coconut and Mango
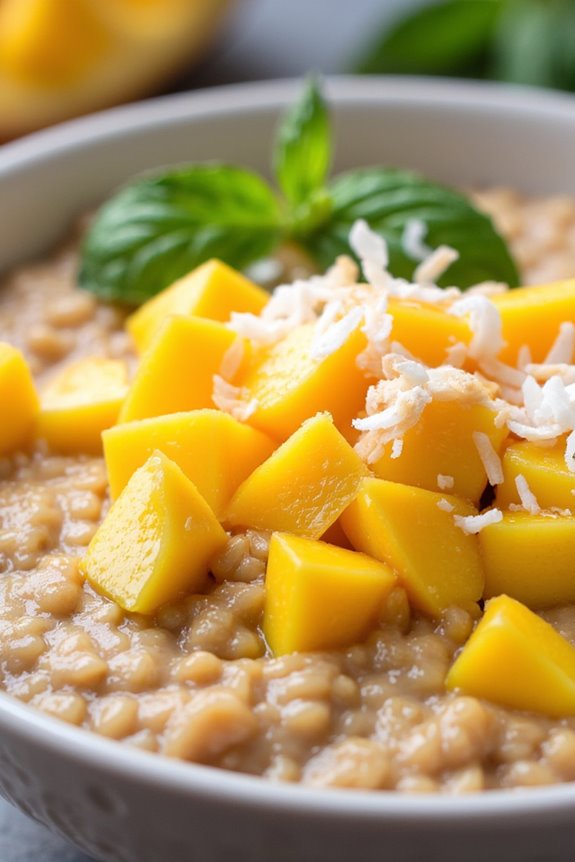
Quinoa porridge is a delightful, nutritious breakfast option that hails from the heart of South America. This dish isn’t only rich in protein but also gluten-free, making it a perfect choice for those looking for a healthy start to their day. The addition of creamy coconut milk and sweet, juicy mango elevates the flavors, creating a tropical experience that will transport your taste buds right to the shores of the Amazon.
This recipe for Quinoa Porridge With Coconut and Mango is easy to prepare and can be customized to suit your preferences. Whether you enjoy a warm bowl of porridge topped with fresh fruits or prefer to serve it cold, this dish is versatile enough to accommodate all tastes. Gather your ingredients and get ready to enjoy a vibrant and hearty breakfast that will keep you energized throughout the morning.
Ingredients (Serves 4-6):
- 1 cup quinoa
- 2 cups coconut milk
- 1 cup water
- 1 ripe mango, peeled and diced
- 2 tablespoons honey or maple syrup (optional)
- 1 teaspoon vanilla extract
- 1/2 teaspoon cinnamon
- Pinch of salt
- Shredded coconut for garnish
- Fresh mint leaves for garnish (optional)
Cooking Instructions:
- Rinse the Quinoa: Place the quinoa in a fine-mesh strainer and rinse it under cold running water for about 2 minutes. This step helps remove the saponins, which can impart a bitter taste if not washed away, ensuring a pleasant flavor in your porridge.
- Cook the Quinoa: In a medium saucepan, combine the rinsed quinoa, coconut milk, water, and a pinch of salt. Bring the mixture to a boil over medium-high heat. Once boiling, reduce the heat to low, cover the pot, and let it simmer for about 15 minutes, or until the quinoa is tender and the liquid is absorbed.
- Add Flavors: After the quinoa is cooked, remove the saucepan from the heat. Stir in the vanilla extract, honey or maple syrup (if using), and cinnamon. Mix well to incorporate all the flavors evenly, allowing the porridge to become creamy and aromatic.
- Prepare the Mango: While the quinoa is resting, peel and dice the ripe mango. Set aside some pieces for topping the porridge later. The ripe mango adds a revitalizing sweetness that complements the rich coconut flavor.
- Serve the Porridge: Spoon the warm quinoa porridge into bowls. Top each serving with the diced mango, a sprinkling of shredded coconut, and fresh mint leaves for a pop of color and flavor. If you prefer, you can also chill the porridge in the refrigerator for a cold breakfast option.
Extra Tips:
For a creamier texture, consider adding a little extra coconut milk or a splash of almond milk to the porridge after cooking. You can also experiment with different toppings such as nuts, seeds, or other fruits like bananas or berries for added nutrition and flavor.
If you have leftovers, store them in the refrigerator and reheat with a bit of water or coconut milk to revive the consistency before serving. Enjoy your Quinoa Porridge With Coconut and Mango as a deliciously satisfying start to your day!
Tostadas With Refried Beans and Avocado

Tostadas with refried beans and avocado are a delightful and hearty breakfast option that brings the vibrant flavors of South America right to your table. This dish isn’t only easy to prepare but also packed with nutrients, making it a perfect start to your day.
The crispy tostadas serve as the perfect base for creamy refried beans, topped with ripe avocado slices, fresh cilantro, and a sprinkle of cheese, creating a delightful combination of textures and flavors.
Traditionally enjoyed across various South American countries, tostadas are versatile and can be customized with your favorite toppings. Whether you prefer a spicy kick with jalapeños or a squeeze of lime for added zest, this dish can be tailored to suit your taste.
Serve it alongside fresh salsa or a light salad for a complete meal that’s sure to impress family and friends alike.
Ingredients (serves 4-6 people)
- 8 tostadas (store-bought or homemade)
- 2 cups refried beans (canned or homemade)
- 2 ripe avocados, sliced
- 1 cup crumbled queso fresco or shredded cheese
- 1/4 cup fresh cilantro, chopped
- 1 lime, cut into wedges
- Salt and pepper to taste
- Optional: sliced jalapeños or diced tomatoes for garnish
Instructions
- Prepare the Tostadas: If using store-bought tostadas, skip to the next step. For homemade tostadas, preheat your oven to 375°F (190°C). Place corn tortillas on a baking sheet and bake for about 10-15 minutes or until they’re golden brown and crispy. Keep an eye on them to prevent burning.
- Heat the Refried Beans: In a small saucepan, heat the refried beans over medium heat. Stir occasionally until warmed through, about 5-7 minutes. If the beans are too thick, you can add a little water or broth to achieve your desired consistency.
- Assemble the Tostadas: Once the tostadas are ready, take them out of the oven and let them cool slightly. Spread a generous layer of warm refried beans on each tostada.
- Add Avocado and Cheese: Place slices of avocado on top of the refried beans. Follow with a sprinkle of crumbled queso fresco or your choice of shredded cheese.
- Garnish and Serve: Finish with a sprinkle of fresh cilantro, and add salt and pepper to taste. Serve with lime wedges on the side for an extra burst of flavor. If desired, add sliced jalapeños or diced tomatoes for an additional kick.
Extra Tips
When preparing tostadas with refried beans and avocado, it’s vital to choose ripe avocados for the best flavor and texture. To ascertain they’re ripe, gently squeeze the avocado; it should yield slightly but not feel mushy.
If you’re making homemade refried beans, consider adding spices such as cumin or garlic powder for more depth of flavor. Additionally, tostadas can be made ahead of time, making them an excellent option for busy mornings or brunch gatherings.
Sopes With Eggs and Salsa

Sopes are a beloved staple in Mexican cuisine, often enjoyed as a hearty breakfast option. These thick, round cornmeal bases serve as the perfect canvas for a variety of toppings, but when combined with eggs and salsa, they become a delightful and satisfying meal. The combination of crispy sopes, fluffy eggs, and vibrant salsa creates a deliciously balanced dish that’s both filling and flavorful.
To make sopes with eggs and salsa, you can easily customize the toppings to suit your taste. Whether you prefer a spicy salsa or the addition of avocado, this dish allows for creativity while staying true to its traditional roots. Whether you’re cooking for a family or hosting friends for brunch, this recipe will surely impress and satisfy everyone at the table.
Ingredients (Serves 4-6)
- 12 small sopes (store-bought or homemade)
- 6 large eggs
- 1 cup salsa (store-bought or homemade)
- 1 cup refried beans (optional)
- 1 cup crumbled queso fresco or feta cheese
- 1/2 cup chopped fresh cilantro
- 1 avocado, sliced (optional)
- Salt and pepper to taste
- Cooking oil (for frying)
Cooking Instructions
- Prepare the Sopes: If you’re using store-bought sopes, heat them in a skillet over medium heat for about 2-3 minutes on each side until warm and slightly crispy. If you’re making homemade sopes, shape the masa into small rounds (about 3 inches in diameter) and pinch the edges to create a raised border. Cook them on a hot griddle for 2-3 minutes on each side until lightly browned, then set aside.
- Cook the Eggs: In a non-stick skillet, add a tablespoon of cooking oil and heat over medium heat. Crack the eggs into the skillet, season with salt and pepper, and cook to your desired doneness. For sunny-side-up eggs, cook for about 3-4 minutes, or until the whites are set but the yolks remain runny. If you prefer scrambled eggs, whisk the eggs in a bowl, add them to the skillet, and stir gently until fully cooked.
- Assemble the Sopes: Spread a thin layer of refried beans on each warm sope (if using). Top with a cooked egg, then generously spoon salsa over the top.
- Add Finishing Touches: Sprinkle crumbled queso fresco or feta cheese on each sope, followed by a scattering of fresh cilantro. If desired, add sliced avocado for a creamy texture and additional flavor.
- Serve: Arrange the assembled sopes on a platter and serve immediately while warm. Enjoy with extra salsa on the side for those who like a little more heat!
Extra Tips
When making sopes, it’s important to guarantee they’re cooked until just crispy on the outside, which provides a nice contrast to the soft toppings.
Additionally, feel free to experiment with different types of salsa, such as tomatillo or mango salsa, to switch up the flavor profile. This dish is also versatile; you can add cooked chorizo, diced bell peppers, or even sautéed spinach for extra nutrition and flavor.
Cocadas (Coconut Macaroons)

Cocadas are delightful South American coconut macaroons that offer a sweet and chewy texture perfect for breakfast or as a snack any time of the day. With their rich coconut flavor and simple ingredients, these treats can easily become a favorite in your household.
Originating from Latin American countries, cocadas come in various forms but typically highlight the wonderful taste of shredded coconut combined with sweetness from sugar and condensed milk.
Making cocadas is a straightforward process that requires minimal preparation and cooking time. They can be enjoyed fresh out of the oven or stored for later, making them a versatile addition to your breakfast table or as a delightful treat to accompany your afternoon coffee.
Whether you’re serving them to guests or indulging yourself, these coconut macaroons will surely impress with their deliciousness.
Ingredients (Serves 4-6)
- 2 cups shredded coconut (sweetened or unsweetened)
- 1 cup sweetened condensed milk
- 1/2 cup granulated sugar
- 1/4 teaspoon vanilla extract
- 1/4 teaspoon salt
- 2 large egg whites
- 1/4 teaspoon baking powder
Cooking Instructions
- Preheat the Oven: Begin by preheating your oven to 350°F (175°C). This step is essential as it guarantees your cocadas bake evenly and develop a lovely golden-brown color.
- Prepare the Baking Sheet: Line a baking sheet with parchment paper or lightly grease it to prevent the cocadas from sticking. This will make it easier to remove them once they’re baked.
- Mix the Ingredients: In a large mixing bowl, combine the shredded coconut, sweetened condensed milk, granulated sugar, vanilla extract, salt, egg whites, and baking powder. Mix well until all ingredients are fully incorporated, and you have a sticky mixture.
- Shape the Cocadas: Using your hands or a spoon, scoop out small portions of the mixture and shape them into small mounds or balls, about 1-2 inches in size. Place them on the prepared baking sheet, making sure there’s enough space between each mound for the cocadas to expand while baking.
- Bake: Place the baking sheet in the preheated oven and bake for approximately 15-20 minutes, or until the cocadas are golden brown on the edges. Keep an eye on them to prevent overbaking.
- Cool and Serve: Once baked, remove the cocadas from the oven and let them cool on the baking sheet for a few minutes before transferring them to a wire rack to cool completely. Enjoy them warm or store them in an airtight container.
Extra Tips
For a twist on traditional cocadas, consider adding chocolate chips or chopped nuts to the mixture for added flavor and texture.
You can also experiment with different types of coconut, such as toasted coconut, for a deeper flavor profile. If you prefer a slightly chewier texture, reduce the baking time by a couple of minutes.
Be sure to store any leftover cocadas in an airtight container at room temperature; they can last for several days and still taste delicious!
Mate Latte With Oat Milk

Mate Latte with Oat Milk is a delightful twist on the traditional Argentine beverage of mate, which is made from the leaves of the yerba mate plant. This creamy, vegan-friendly version combines the earthy flavor of mate with the smoothness of oat milk, making it a perfect addition to your breakfast routine.
Not only is it comforting and delicious, but it also provides a gentle caffeine boost to kick-start your day.
Preparing a Mate Latte with Oat Milk is simple and can be enjoyed by anyone, whether you’re a seasoned mate drinker or new to this South American classic. The combination of the herbal taste of mate and the creamy texture of oat milk creates a rich and satisfying drink that pairs wonderfully with pastries, toast, or any breakfast dish.
Gather your ingredients and get ready to enjoy this unique breakfast beverage!
Ingredients (serving size: 4-6 people):
- 1 cup of loose yerba mate
- 4 cups of water
- 2 cups of oat milk
- Sweetener of choice (honey, agave syrup, or sugar) to taste
- Cinnamon or cocoa powder for garnish (optional)
Cooking Instructions:
- Prepare the Mate: Start by boiling 4 cups of water in a kettle. Once the water reaches a rolling boil, remove it from heat and let it cool for about 5 minutes. This helps in brewing the mate without burning the leaves, which can make it taste bitter.
- Brew the Mate: Place the loose yerba mate in a French press or a large teapot. Pour the cooled water over the yerba mate leaves and let it steep for about 5 minutes. The longer you steep, the stronger the flavor will be. If you prefer a milder taste, you can steep it for a shorter period.
- Strain the Mate: Once the yerba mate has steeped to your liking, strain the liquid into a large jug or bowl, discarding the leaves. If using a French press, simply press down the plunger to separate the leaves from the brewed tea.
- Heat the Oat Milk: In a separate saucepan, gently heat the oat milk over medium heat. Be careful not to bring it to a boil, as this can cause it to curdle. Stir occasionally until it’s warm and frothy.
- Combine and Sweeten: Pour the brewed mate into cups, filling each about halfway. Then, add the warm oat milk to the cups, filling them to the brim. Sweeten to taste with honey, agave syrup, or sugar.
- Garnish and Serve: If desired, sprinkle a pinch of cinnamon or cocoa powder on top for extra flavor. Serve immediately and enjoy your Mate Latte with Oat Milk!
Extra Tips:
When making your Mate Latte, feel free to experiment with the strength of the mate and the sweetness levels to suit your taste.
If you prefer a frothy texture, you can use a milk frother after heating the oat milk, which adds a café-style finish to your drink. Additionally, you can try adding flavors like vanilla or caramel for a unique twist.
Enjoy your delicious breakfast experience!
South American Fruit Salad With Lime Dressing

South American Fruit Salad With Lime Dressing is a vibrant and revitalizing dish that’s perfect for breakfast or as a light snack. This colorful salad highlights the diverse and rich fruits native to South America, such as papaya, mango, and passion fruit, making it a delightful way to start your day. The zesty lime dressing adds a tangy flavor that enhances the sweetness of the fruits, creating a harmonious balance that’s both invigorating and satisfying.
In addition to being delicious, this fruit salad is also packed with vitamins and nutrients, making it a healthy choice for any meal. Its bright colors and varied textures will please both the eyes and the palate, inviting you to enjoy the flavors of the tropics. Whether you’re serving it at brunch, a family gathering, or simply as a treat for yourself, this dish will transport you straight to the sunny landscapes of South America.
Ingredients (Serves 4-6):
- 1 cup diced papaya
- 1 cup diced mango
- 1 cup diced pineapple
- 1 cup diced kiwi
- 1 cup diced strawberries
- 1 banana, sliced
- 1/4 cup pomegranate seeds
- 1/4 cup fresh mint leaves, chopped
- 2 tablespoons honey (optional)
- Juice of 2 limes
- Zest of 1 lime
Cooking Instructions:
- Prepare the Fruits: Start by washing all the fruits thoroughly. Peel and dice the papaya, mango, and pineapple into bite-sized pieces. Peel and slice the kiwi and banana, and hull the strawberries before cutting them into halves or quarters. Confirm that the fruits are of similar sizes for an even mix.
- Mix the Fruits: In a large mixing bowl, gently combine all the diced fruits: papaya, mango, pineapple, kiwi, strawberries, and banana. Add the pomegranate seeds and chopped mint leaves to the bowl. Be careful not to mash the fruits; you want to keep them intact for texture.
- Prepare the Lime Dressing: In a small bowl, whisk together the lime juice, lime zest, and honey (if using). The honey adds a touch of sweetness, but you can omit it if you prefer a more tart dressing. Taste the dressing and adjust lime or honey as necessary, depending on your preference.
- Combine the Dressing with the Salad: Drizzle the lime dressing over the mixed fruits in the large bowl. Gently toss the salad to confirm that all the fruits are coated with the dressing evenly. Be careful not to overmix, as this can break down the fruit.
- Chill and Serve: For the best flavor, let the salad sit in the refrigerator for at least 15-30 minutes before serving. This allows the flavors to meld together. Serve the fruit salad in individual bowls or a large serving dish, garnished with additional mint leaves if desired.
Extra Tips:
To enhance the flavor of your South American Fruit Salad With Lime Dressing, consider adding a sprinkle of chili powder or a dash of cayenne pepper to the dressing for a spicy kick. You can also experiment with seasonal fruits or local varieties to put your own twist on the dish.
For added texture, consider topping the salad with a sprinkle of toasted coconut flakes or chopped nuts before serving. Enjoy the taste of South America in every bite!