

When it comes to cooking, I’m always on the lookout for recipes that are both simple and satisfying. South American cuisine is a goldmine of flavors, and I’ve found ten delightful dishes that make cooking a breeze. From the savory empanadas to the refreshing zing of ceviche, each recipe is straightforward and requires just a few ingredients. Let me share some of these culinary treasures with you, starting with a favorite that’s sure to impress.
Empanadas: Flavorful Handheld Pies

Empanadas are a beloved staple in South American cuisine, offering a delightful combination of flaky pastry and savory filling. Originating from Spain, these portable pies have evolved into countless regional variations across Latin America, each boasting unique flavors and ingredients. From the streets of Buenos Aires to the markets of Santiago, empanadas are enjoyed as a snack, appetizer, or even a main course. They can be baked or fried, making them versatile for any occasion and perfect for sharing with family and friends.
Making empanadas from scratch may seem intimidating, but with a little practice, you can master this flavorful dish. The recipe below will guide you through creating delicious beef empanadas, filled with seasoned ground meat, onions, and spices, all encased in a golden, flaky crust. Whether you’re hosting a gathering or simply indulging in comfort food, these empanadas are sure to please everyone at the table.
Ingredients (Serves 4-6)
- 2 cups all-purpose flour
- 1/2 teaspoon salt
- 1/2 cup unsalted butter, cold and cubed
- 1/4 cup ice water
- 1 pound ground beef
- 1 onion, finely chopped
- 2 cloves garlic, minced
- 1 teaspoon ground cumin
- 1 teaspoon paprika
- Salt and pepper to taste
- 1 egg, beaten (for egg wash)
Cooking Instructions
1. Prepare the Dough: In a large mixing bowl, combine the all-purpose flour and salt. Add the cold, cubed butter and use your fingers or a pastry cutter to mix until the mixture resembles coarse crumbs. Gradually add the ice water, mixing until the dough comes together.
Form the dough into a ball, wrap it in plastic wrap, and refrigerate for at least 30 minutes.
2. Cook the Filling: In a large skillet over medium heat, add the ground beef, breaking it apart with a spatula. Cook until browned, about 5-7 minutes. Drain excess fat if necessary.
Add the chopped onion and minced garlic to the skillet. Cook until the onion is soft and translucent, about 3-4 minutes. Stir in the cumin, paprika, salt, and pepper, and cook for an additional minute. Remove from heat and let the mixture cool.
3. Roll Out the Dough: Once the dough has chilled, remove it from the refrigerator. On a lightly floured surface, Roll Out the Dough to about 1/8-inch thickness.
Use a round cutter or a plate to cut out circles of dough, approximately 4-6 inches in diameter.
4. Fill the Empanadas: Place a tablespoon of the beef filling in the center of each dough circle. Be careful not to overfill, as this can make sealing difficult.
Fold the dough over the filling to create a half-moon shape. Press the edges together firmly to seal, then crimp with a fork or pinch the edges to guarantee they’re well sealed.
5. Bake or Fry: Preheat your oven to 400°F (200°C) if baking. Place the empanadas on a baking sheet lined with parchment paper.
Brush the tops with the beaten egg for a golden finish. Bake for 20-25 minutes until golden brown. If frying, heat oil in a deep skillet over medium-high heat. Fry the empanadas in batches for 3-4 minutes on each side until golden and crispy. Drain on paper towels.
6. Serve: Allow the empanadas to cool slightly before serving. Enjoy them warm, perhaps with a side of chimichurri or hot sauce for dipping.
Extra Tips
For a twist on the classic beef filling, feel free to experiment with different proteins such as chicken, pork, or even a vegetarian option using beans or cheese.
Additionally, you can include spices like oregano or chili powder to enhance the flavor. If you have leftover filling, it can be stored in the refrigerator for a few days and used for future empanada making.
Remember to verify the dough is chilled before rolling out for the best texture, and don’t be afraid to get creative with your fillings!
Ceviche: Refreshing Citrus-Marinated Fish
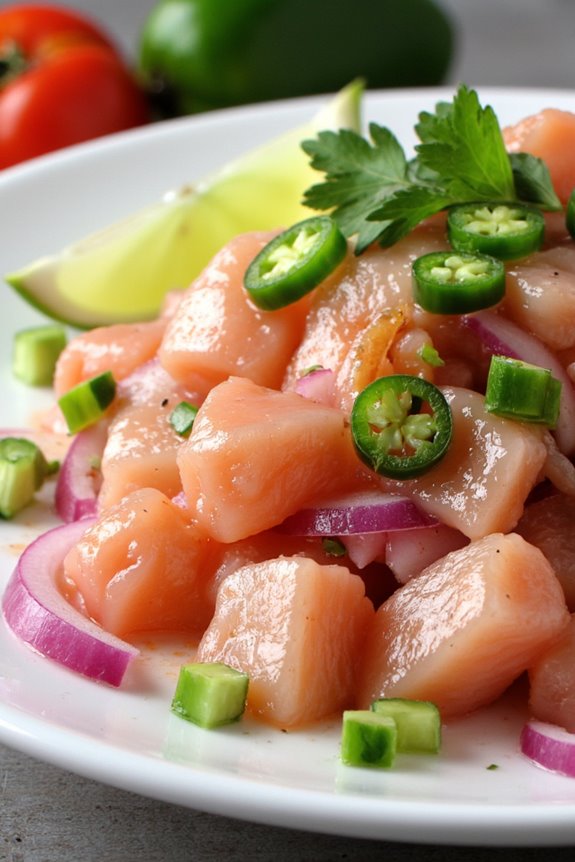
Ceviche is a vibrant and revitalizing dish that hails from the coastal regions of South America, particularly Peru. It consists of fresh fish marinated in citrus juices, typically lime or lemon, which “cooks” the fish through the acid’s chemical reaction. The dish is often enhanced with a variety of ingredients such as onions, cilantro, and chili peppers, creating a burst of flavors that’s both zesty and invigorating.
Ceviche is the perfect dish for warm weather or a gathering, as it’s light, flavorful, and can easily be prepared in advance. Making ceviche at home is an enjoyable and rewarding experience, allowing you to showcase the freshness of the seafood while experimenting with different flavor profiles.
While there are many variations, the classic ceviche is made with firm white fish, ensuring that it holds up well during the marinating process. This recipe serves 4-6 people and is ideal for sharing as an appetizer or a main course.
Ingredients:
- 1 pound of fresh firm white fish (like tilapia, snapper, or halibut), skinless and boneless
- 1 cup fresh lime juice (about 8-10 limes)
- 1 small red onion, finely sliced
- 1-2 jalapeño peppers, seeded and finely chopped
- 1/2 cup fresh cilantro leaves, chopped
- 1 teaspoon salt (to taste)
- Freshly cracked black pepper (to taste)
- 1 avocado, diced (optional, for serving)
- Tortilla chips or plantain chips (optional, for serving)
Cooking Instructions:
- Prepare the Fish: Start by cutting the fresh fish into small, bite-sized cubes (about 1/2-inch pieces). It’s crucial to use very fresh fish for ceviche, as it’s served raw. Make sure to remove any skin and bones.
- Marinate in Citrus Juice: Place the fish cubes in a glass or ceramic bowl. Pour the fresh lime juice over the fish, ensuring all pieces are submerged. Cover the bowl with plastic wrap and let it marinate in the refrigerator for at least 30 minutes to 1 hour. The lime juice will “cook” the fish, turning it opaque.
- Add Vegetables and Seasoning: Once the fish has marinated, drain about half of the lime juice, leaving some to keep the fish moist. Add the finely sliced red onion, chopped jalapeño peppers, and chopped cilantro to the fish. Mix gently to combine, ensuring the fish is coated with the other ingredients.
- Season and Serve: Season the ceviche with salt and freshly cracked black pepper to taste. If desired, add diced avocado for creaminess. Serve the ceviche chilled, either on its own or with tortilla chips or plantain chips for added crunch.
- Garnish: For an extra touch, you can garnish the ceviche with additional cilantro leaves or lime wedges before serving.
Extra Tips:
When preparing ceviche, always prioritize the freshness of your fish, and if possible, buy it from a trusted seafood market. If you’re uncertain about the fish’s freshness, ask the fishmonger for advice on what’s best for ceviche.
Additionally, feel free to experiment with different types of fish or add other ingredients such as mango or cucumber for a unique twist. Always serve ceviche immediately after preparation to enjoy the best flavors and textures.
Arepas: Versatile Cornmeal Patties
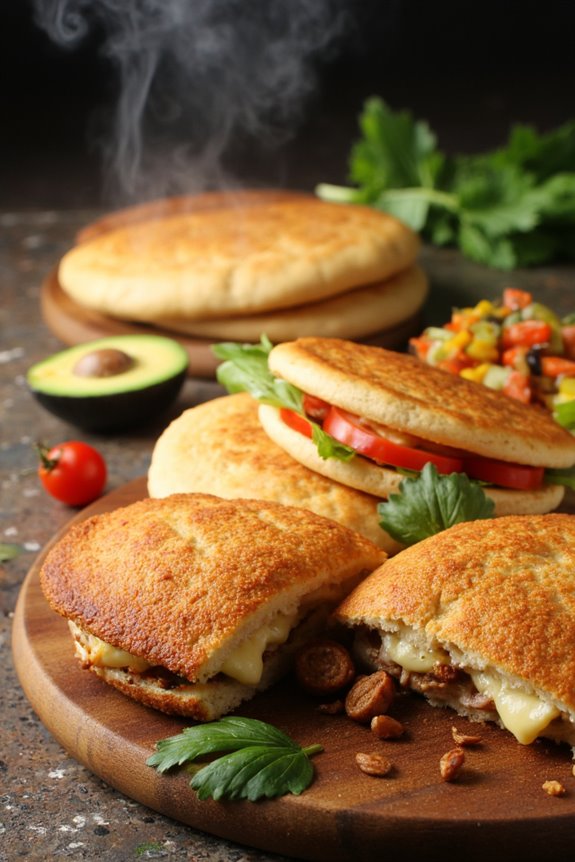
Arepas are a traditional South American dish, particularly popular in Venezuela and Colombia. These delicious cornmeal patties are made from masa harina, a special corn flour, and can be filled or topped with a variety of ingredients, making them incredibly versatile.
Whether you enjoy them for breakfast, lunch, or dinner, arepas can be customized to suit your taste. They can be grilled, baked, or fried, and are often served with cheese, meats, or vegetables, making them a perfect canvas for culinary creativity.
Making arepas is a straightforward process that requires minimal ingredients, yet the outcome is a delightful combination of crispy exterior and soft interior. In this recipe, we’ll cover how to make basic arepas that can easily be adapted to include your favorite fillings.
With a few simple steps, you’ll have a batch of freshly cooked arepas ready to be enjoyed by family and friends.
Ingredients (Serves 4-6 people)
- 2 cups masa harina
- 2 ½ cups warm water
- 1 teaspoon salt
- 1 tablespoon vegetable oil (optional for frying)
- Fillings of your choice (e.g., cheese, avocados, shredded chicken, black beans)
Cooking Instructions
1. Prepare the Dough: In a large mixing bowl, combine the masa harina and salt. Gradually add the warm water to the dry ingredients while mixing with your hands or a spoon until a soft, pliable dough forms. The dough shouldn’t be sticky; if it is, add a bit more masa harina.
2. Shape the Arepas: Divide the dough into 8-10 equal portions, depending on the size you prefer. Roll each portion into a ball and then flatten it gently to form a patty about ½ inch thick. Make sure the edges are smooth to prevent them from cracking during cooking.
3. Cook the Arepas: You can choose to grill, bake, or fry the arepas. For grilling, preheat a grill or skillet over medium heat. Place the patties on the grill and cook for about 5-7 minutes on each side until they develop a nice golden crust.
If you prefer frying, heat the vegetable oil in a skillet over medium heat and fry each arepa for 3-4 minutes on each side until golden brown.
4. Check for Doneness: The arepas are ready when they sound hollow when tapped. If you’re baking them, preheat the oven to 375°F (190°C) and bake for about 20-25 minutes, flipping halfway through.
5. Fill and Serve: Once cooked, slice the arepas open, like a pocket, and fill them with your chosen ingredients. Cheese, pulled meat, or sautéed vegetables make excellent fillings. Serve warm and enjoy!
Extra Tips
When making arepas, it’s essential to guarantee that the dough is well-kneaded to achieve the right texture. If you’re looking to add even more flavor, consider incorporating spices or herbs into the dough.
For a more authentic taste, try using fresh cheese or traditional fillings like “reina pepiada” (a chicken and avocado mixture). Arepas can also be made ahead of time and reheated in a skillet or oven for quick meals.
Enjoy experimenting with different fillings and toppings to make your arepas truly unique!
Picanha: Succulent Grilled Beef
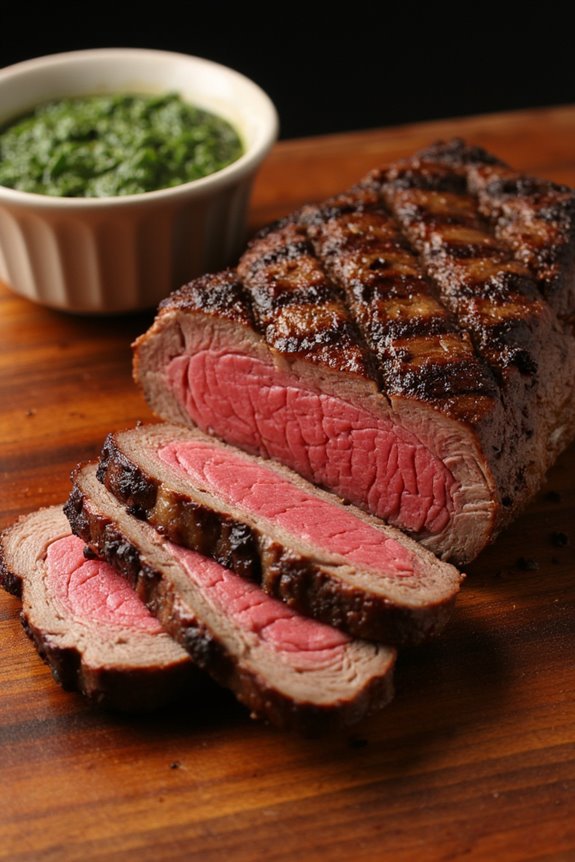
Picanha is a traditional Brazilian cut of beef that’s highly prized for its rich flavor and tenderness. Originating from the top of the rump, this cut is typically grilled with the fat cap left intact, which adds an incredible depth of flavor when cooked.
The popularity of picanha has spread across South America and beyond, making it a sought-after dish for barbecues and family gatherings. Whether you’re grilling outdoors or using a stovetop, mastering picanha will elevate your cooking game and delight your guests.
To prepare picanha, simplicity is key. This dish is often seasoned with just coarse salt, allowing the natural flavors of the beef to shine through. Traditionally, it’s skewered and cooked over an open flame, but it can also be cooked in a hot cast iron skillet. The result is a juicy, perfectly seared exterior with a tender and flavorful interior.
Serve picanha with chimichurri sauce, rice, and grilled vegetables for a complete South American feast.
Ingredients (Serves 4-6):
- 3-4 pounds picanha (top sirloin cap)
- Coarse sea salt
- Freshly ground black pepper (optional)
- Olive oil (for cooking)
- Chimichurri sauce (for serving)
Cooking Instructions:
- Prepare the Picanha: Start by trimming any excess silver skin from the picanha, but leave the fat cap intact. This fat will render during cooking and provide flavor and moisture. Slice the picanha into large pieces, about 2-3 inches thick, while keeping the fat side facing up.
- Season the Meat: Generously season the meat with coarse sea salt on all sides. If desired, you can also add freshly ground black pepper for additional flavor. Remember that the salt will enhance the natural taste of the beef, so don’t be shy with it.
- Preheat the Grill or Skillet: If you’re grilling outdoors, preheat your grill to high heat (around 400-450°F). If using a cast iron skillet, place it on the stovetop over high heat and let it get very hot before cooking the meat. You can add a drizzle of olive oil to the skillet to prevent sticking.
- Cook the Picanha: For grilling, place the picanha on the grill with the fat side down. Cook for about 5-7 minutes on each side or until you achieve a nice sear and the internal temperature reaches your desired doneness (135°F for medium-rare). If using a skillet, sear the meat on all sides for about 3-4 minutes each, ensuring the fat renders beautifully.
- Rest the Meat: Once cooked, remove the picanha from the grill or skillet and let it rest for about 10 minutes. This will allow the juices to redistribute and result in a more tender bite.
- Slice and Serve: After resting, slice the picanha against the grain into thin strips. Serve immediately with chimichurri sauce for dipping, along with your choice of side dishes such as rice, grilled vegetables, or a fresh salad.
Extra Tips:
For the best results, make sure to let the picanha come to room temperature before cooking; this will guarantee even cooking throughout.
Additionally, if you have the opportunity, consider marinating the meat for a few hours in a mixture of olive oil, garlic, and herbs for an extra layer of flavor. Always use a meat thermometer to check for doneness, as cooking times may vary based on the thickness of the meat and the heat of your grill or skillet.
Enjoy your succulent picanha!
Arroz Con Pollo: One-Pot Chicken and Rice
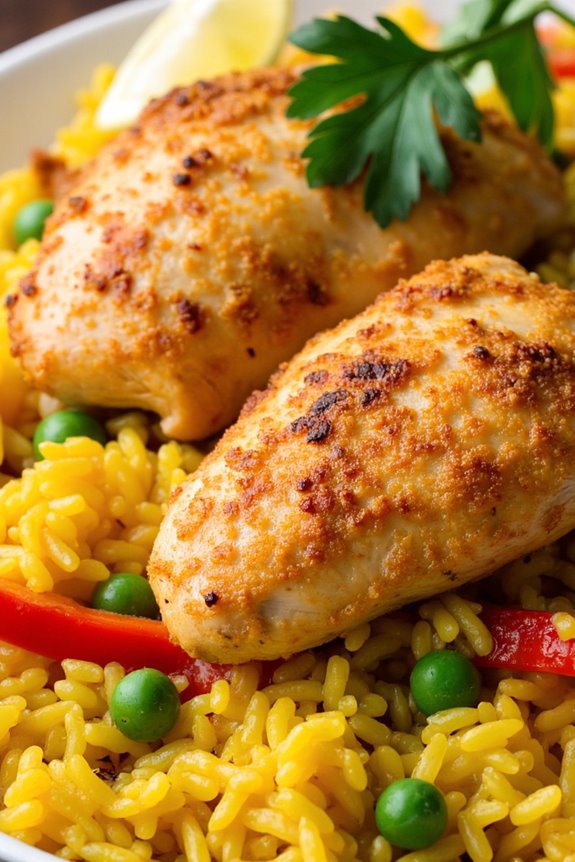
Arroz Con Pollo, which translates to “rice with chicken,” is a beloved dish in many South American countries, celebrated for its rich flavors and comforting nature. This one-pot meal combines tender chicken pieces with aromatic rice, vegetables, and an array of spices, creating a dish that’s not only satisfying but also easy to prepare. The vibrant colors from the saffron or achiote give it a delightful appearance, making it perfect for family gatherings or casual dinners.
Cooking Arroz Con Pollo is a delightful experience that fills your kitchen with enticing aromas. The beauty of this dish lies in its simplicity, as everything cooks together, allowing the flavors to meld beautifully. Whether you choose to use a traditional recipe or add your personal twist, this dish is sure to please everyone at the table.
Let’s explore the ingredients and the cooking process to create this delicious meal for 4-6 people.
Ingredients
- 4 chicken thighs and 2 chicken drumsticks (bone-in, skin-on)
- 2 cups long-grain rice
- 1 medium onion, diced
- 1 bell pepper (red or green), diced
- 2 cloves garlic, minced
- 1 cup frozen peas
- 4 cups chicken broth
- 1 teaspoon saffron threads or 1 tablespoon achiote powder
- 1 teaspoon paprika
- 1 teaspoon cumin
- 1 bay leaf
- 3 tablespoons olive oil
- Salt and black pepper, to taste
- Fresh cilantro or parsley, for garnish
- Lemon wedges, for serving
Cooking Instructions
- Prepare the Chicken: Season the chicken pieces with salt and black pepper. In a large, heavy-bottomed pot, heat the olive oil over medium-high heat. Once hot, add the chicken pieces, skin side down, and sear until browned on both sides, about 5-7 minutes per side. Remove the chicken from the pot and set aside.
- Sauté the Vegetables: In the same pot, lower the heat to medium and add the diced onion and bell pepper. Sauté for about 3-4 minutes until the vegetables are softened. Add the minced garlic and cook for an additional minute until fragrant.
- Add the Rice and Spices: Stir in the rice, saffron (or achiote), paprika, and cumin. Cook for about 2-3 minutes, stirring frequently, to toast the rice and help it absorb the flavors.
- Combine with Broth and Chicken: Pour in the chicken broth and add the bay leaf. Place the browned chicken pieces back into the pot, ensuring they’re submerged in the liquid. Bring the mixture to a boil.
- Simmer the Dish: Once boiling, reduce the heat to low, cover the pot, and let it simmer for about 25-30 minutes or until the rice is cooked and has absorbed most of the liquid. Avoid lifting the lid during this time to retain steam.
- Add Peas and Rest: After the cooking time, uncover the pot and stir in the frozen peas. Cover again and let it rest for 5 minutes off the heat. This will allow the flavors to meld further.
- Serve: Fluff the rice with a fork, remove the bay leaf, and garnish with fresh cilantro or parsley. Serve hot with lemon wedges on the side for an added zesty touch.
Extra Tips
When preparing Arroz Con Pollo, consider marinating the chicken in spices and citrus juice for a few hours or overnight to enhance the flavor.
Additionally, feel free to customize the dish by adding other vegetables such as carrots or green beans, or using different types of chicken cuts based on your preference. For a smoky flavor, you can also incorporate chorizo or smoked paprika. Enjoy experimenting and making this dish your own!
Chiles Rellenos: Stuffed Peppers Delight
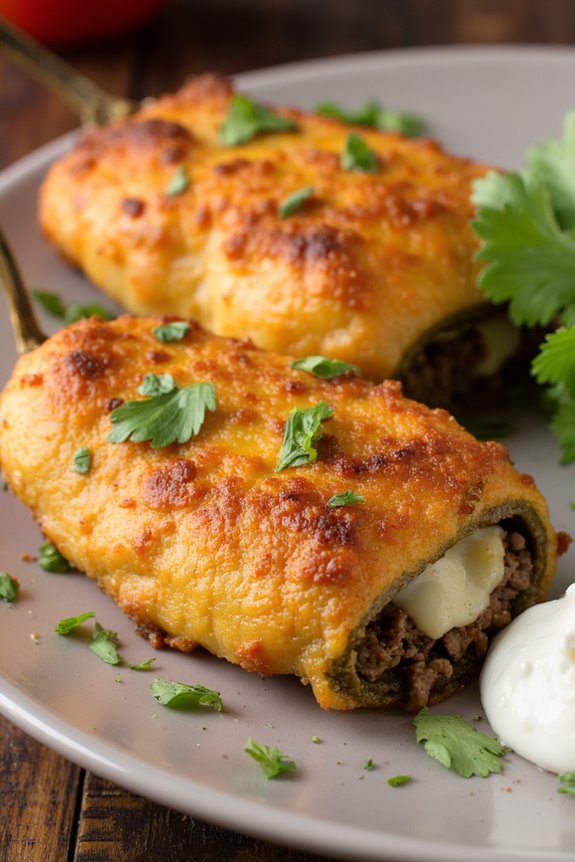
Chiles Rellenos, a traditional dish from Mexico, are delicious stuffed peppers that combine vibrant flavors and textures. The dish typically features poblano peppers, which are roasted to perfection to enhance their natural smokiness. They’re then filled with a savory mixture of cheese, meats, or vegetables, and coated in a light batter before being fried until golden brown. This recipe captures the essence of South American cuisine, offering a delightful symphony of flavors that will impress both family and guests alike.
Whether served as an appetizer or a main course, Chiles Rellenos are a celebration of culinary creativity. The preparation may seem intricate, but each step is simple and rewarding. With a crispy exterior and a warm, cheesy filling, these stuffed peppers are sure to be a hit at your dinner table. Pair them with a side of Mexican rice and refried beans for a complete meal that showcases the richness of South American food.
Ingredients (Serves 4-6):
- 6 large poblano peppers
- 1 cup shredded cheese (such as Oaxaca or Monterey Jack)
- 1/2 cup cooked ground beef or shredded chicken (optional)
- 1/2 cup finely chopped onion
- 2 cloves garlic, minced
- 1 teaspoon cumin
- 1 teaspoon paprika
- Salt and pepper to taste
- 1 cup all-purpose flour
- 4 large eggs, separated
- 1/2 cup milk
- Vegetable oil for frying
- Fresh cilantro for garnish (optional)
- Sour cream for serving (optional)
Cooking Instructions:
1. Prepare the Peppers: Start by roasting the poblano peppers. Preheat your oven to 400°F (200°C). Place the peppers on a baking sheet and roast them for about 20-25 minutes, turning occasionally, until the skins are blistered and blackened.
Once roasted, remove the peppers from the oven, cover them with a clean towel, and let them steam for about 10 minutes. This will help loosen the skin for easier peeling.
2. Make the Filling: While the peppers are steaming, prepare the filling. In a skillet over medium heat, add a tablespoon of oil and sauté the chopped onion and minced garlic until they’re translucent.
If using meat, add the ground beef or shredded chicken, followed by cumin, paprika, salt, and pepper. Cook until the meat is heated through. Remove from heat and stir in the shredded cheese until it melts slightly. Set aside.
3. Stuff the Peppers: Once the peppers have cooled, carefully peel off the charred skin. Make a slit down one side of each pepper and remove the seeds.
Fill each pepper with the cheese and meat mixture, being careful not to overstuff them. Using toothpicks, secure the opening if needed.
4. Prepare the Batter: In a mixing bowl, whisk the egg whites until they form stiff peaks. In another bowl, combine the egg yolks, flour, and milk, mixing until smooth.
Gently fold the whipped egg whites into the yolk mixture until well combined, taking care not to deflate the egg whites.
5. Fry the Peppers: In a large skillet or deep fryer, heat vegetable oil over medium heat. Once the oil is hot, dip each stuffed pepper into the batter, allowing any excess to drip off.
Carefully place the battered peppers in the hot oil and fry until golden brown on all sides, about 3-4 minutes per side. Remove the peppers and drain them on paper towels.
6. Serve: Arrange the Chiles Rellenos on a serving platter. Garnish with fresh cilantro and Serve with a dollop of sour cream if desired.
Extra Tips:
When preparing Chiles Rellenos, make certain that your oil is hot enough for frying to achieve a crispy exterior.
If you’re concerned about the heat of the peppers, you can opt for milder varieties or remove more seeds. For added flavor, consider experimenting with different cheeses or adding spices to the filling.
Always keep an eye on the frying process, as they can cook quickly and may require adjustments to the heat as needed. Enjoy this flavorful dish with a side of your choice for a memorable meal!
Feijoada: Hearty Brazilian Black Bean Stew
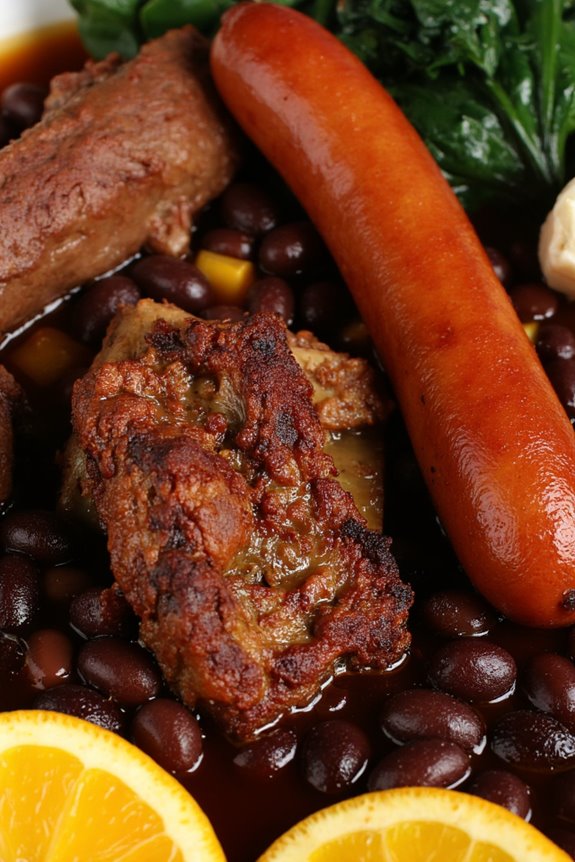
Feijoada is a traditional Brazilian dish that embodies the essence of comfort food, combining rich flavors and a variety of meats. This hearty black bean stew is often enjoyed during family gatherings and celebrations, showcasing the vibrant culinary culture of Brazil. Originating from the Portuguese, it has evolved into an iconic dish that not only warms the body but also brings people together around the table.
The heart of feijoada lies in its slow-cooked black beans, which are simmered with an assortment of smoked and fresh meats, creating a deep, savory flavor that’s simply irresistible. Typically served with rice, collard greens, and orange slices, this dish is a feast for the senses and a true representation of South American cuisine. Whether you’re looking to impress guests or simply indulge in a comforting meal, feijoada is the perfect choice.
Ingredients (Serves 4-6):
- 1 pound black beans, soaked overnight
- 1/2 pound smoked sausage, sliced
- 1/2 pound chorizo, sliced
- 1/2 pound pork shoulder, cubed
- 1/2 pound beef brisket, cubed
- 1 onion, chopped
- 4 cloves garlic, minced
- 2 bay leaves
- 1 tablespoon olive oil
- 1 teaspoon cumin
- Salt and pepper, to taste
- 4 cups chicken or beef broth
- 2 cups cooked white rice (for serving)
- 1 bunch collard greens, steamed (for serving)
- Orange slices (for garnish)
Cooking Instructions:
- Prepare the Beans: Drain the soaked black beans and rinse them under cold water. Place the beans in a large pot and cover with fresh water. Bring to a boil, then reduce the heat and simmer for about 30 minutes until the beans are tender but not mushy. Drain and set aside.
- Brown the Meats: In a large, heavy-bottomed pot or Dutch oven, heat the olive oil over medium heat. Add the smoked sausage and chorizo, cooking until browned and slightly crispy, about 5 minutes. Remove the sausages from the pot and set aside.
- Sauté Aromatics: In the same pot, add the chopped onion and minced garlic. Sauté for 3-4 minutes until the onion becomes translucent and fragrant.
- Cook the Meats: Add the cubed pork shoulder and beef brisket to the pot, browning on all sides for about 5-7 minutes. This step enhances the flavor of the stew.
- Combine Ingredients: Return the browned sausages to the pot. Add the cooked black beans, bay leaves, cumin, salt, and pepper. Pour in the chicken or beef broth, ensuring that the ingredients are submerged.
- Simmer the Stew: Bring the mixture to a boil, then reduce the heat to low. Cover and let the stew simmer for 1.5 to 2 hours, stirring occasionally. The longer it cooks, the more the flavors will meld together.
- Final Touches: Taste the stew and adjust seasoning if necessary. Remove the bay leaves before serving.
- Serve: Serve the feijoada hot over a bed of cooked white rice. Accompany it with steamed collard greens and garnish with orange slices for a revitalizing contrast.
Extra Tips:
To enhance the flavor of your feijoada, consider preparing the stew a day in advance; the flavors intensify as it sits. Additionally, you can customize the meats used based on your preference or availability. If you can’t find specific types of sausage, feel free to substitute with your favorites.
Finally, don’t forget that feijoada is often accompanied by farofa (toasted cassava flour) and a side of hot sauce for those who enjoy a little extra heat!
Lomo Saltado: Stir-Fried Beef With Fries

Lomo Saltado is a quintessential Peruvian dish that beautifully represents the fusion of Asian and South American culinary traditions. It combines marinated strips of beef with onions, tomatoes, and a splash of soy sauce, all stir-fried to perfection and served with crispy French fries. This dish isn’t only flavorful but also colorful, making it a feast for the eyes and the palate.
Often enjoyed with a side of rice, Lomo Saltado brings together the best of both worlds: the heartiness of traditional Peruvian comfort food and the vibrant flavors reminiscent of Chinese cuisine. This dish is perfect for gatherings or a family dinner, as it can serve 4 to 6 people. The preparation is straightforward, making it suitable for both novice and experienced cooks.
The key to a successful Lomo Saltado lies in the quality of the beef and the timing of each ingredient’s addition to the stir-fry, guaranteeing that everything is perfectly cooked without losing its texture and flavor. With just a few fresh ingredients, you’ll be able to create a delightful meal that will impress your guests and satisfy your cravings.
Ingredients (Serves 4-6):
- 1.5 pounds beef sirloin, sliced into thin strips
- 4 medium-sized potatoes, cut into fries
- 1 large red onion, sliced into thick wedges
- 2 medium tomatoes, sliced into wedges
- 2 cloves garlic, minced
- 1/4 cup soy sauce
- 2 tablespoons red wine vinegar
- 1 tablespoon vegetable oil
- 1 tablespoon fresh cilantro, chopped (for garnish)
- Salt and pepper to taste
- Optional: Aji amarillo (yellow chili pepper) for added spice
Cooking Instructions:
- Prepare the Potatoes: Start by cutting the potatoes into fries. Rinse them in cold water to remove excess starch, which will help them become crispier when fried. Pat them dry with a paper towel.
- Fry the Fries: Heat vegetable oil in a deep fryer or a large pot over medium-high heat. Once the oil is hot, carefully add the fries in batches. Fry until they’re golden brown and crispy, usually about 5-7 minutes. Remove them from the oil and place them on a paper towel-lined plate to absorb excess oil. Season with salt.
- Marinate the Beef: In a bowl, combine the sliced beef with soy sauce, red wine vinegar, minced garlic, salt, and pepper. Let it marinate for about 15-20 minutes to enhance the flavors.
- Stir-Fry the Vegetables: In a large skillet or wok, heat a tablespoon of vegetable oil over high heat. Add the sliced onions and stir-fry for 2-3 minutes until they start to soften. Then, add the tomato wedges and stir-fry for another minute until they begin to wilt.
- Cook the Beef: Push the vegetables to one side of the skillet and add the marinated beef to the other side. Allow it to sear for about 2-3 minutes without stirring, then mix everything together. Stir-fry for an additional 3-5 minutes until the beef is cooked through but still tender.
- Combine and Serve: Once the beef is cooked, gently mix in the fries, ensuring they’re coated with the sauce and combined with the vegetables. Cook for another minute to heat everything through. Transfer the Lomo Saltado to a serving platter and garnish with fresh cilantro.
Extra Tips:
For the best flavor, use high-quality beef sirloin and make sure not to overcrowd the pan while cooking. This guarantees that the beef sears properly rather than steams.
If you like a bit of heat, consider adding sliced aji amarillo or another chili pepper to the stir-fry. Additionally, serving Lomo Saltado with a side of steamed rice can help balance the dish. Enjoy your culinary adventure into South American cuisine!
Dulce De Leche: Creamy Caramel Spread

Dulce de leche is a classic South American treat that brings a touch of sweetness to any dessert. Originating from various countries across the continent, this creamy caramel spread is made by slowly heating sweetened milk until it transforms into a rich, golden concoction. Its velvety texture and deep flavor make it a delightful addition to pastries, cakes, ice creams, and even enjoyed straight from the jar.
Whether you’re familiar with it or trying it for the first time, dulce de leche is sure to become a favorite in your kitchen.
Making dulce de leche at home is surprisingly simple and requires just a few basic ingredients. With some patience and care, you can create a homemade version that rivals store-bought varieties. This recipe yields enough dulce de leche to serve 4-6 people, making it perfect for sharing or for indulging yourself. Let’s immerse ourselves in the preparation and bring this delicious treat to life!
Ingredients
- 1 can (14 ounces) sweetened condensed milk
- 1/4 teaspoon baking soda
- 1/2 teaspoon vanilla extract
- A pinch of salt
Cooking Instructions
- Prepare the Ingredients: Start by gathering all your ingredients. Open the can of sweetened condensed milk and pour it into a medium-sized saucepan. Add the baking soda, which helps to achieve the desired caramel color and flavor, and mix well.
- Heat the Mixture: Place the saucepan over medium-low heat. Stir the mixture continuously as it heats to guarantee that it doesn’t stick to the bottom of the pan and burn. This process will take about 30-40 minutes, so patience is key.
- Watch for Color Change: As you continue stirring, you’ll notice the color of the mixture gradually changing from a pale yellow to a rich, golden brown. This indicates that the sugars are caramelizing properly, which is essential for achieving the signature flavor of dulce de leche.
- Achieve the Right Consistency: After about 30-40 minutes, the mixture should thicken considerably and coat the back of a spoon. If you want a thicker consistency, you can cook it for an additional 5-10 minutes. Just be careful not to overcook it, as it will continue to thicken as it cools.
- Add Flavor: Once you reach the desired consistency, remove the saucepan from the heat. Stir in the vanilla extract and a pinch of salt to enhance the flavor. Let the dulce de leche cool for a few minutes before transferring it to a clean jar or container.
- Cool and Store: Allow the dulce de leche to cool completely at room temperature before sealing the jar. Store it in the refrigerator for up to two weeks. It can be enjoyed warm or cold, depending on your preference.
Extra Tips
When making dulce de leche, it’s essential to keep stirring the mixture to prevent it from burning and to confirm even cooking.
If you prefer a quicker method, you can also make dulce de leche in a pressure cooker, which can cut the cooking time considerably. Just be sure to follow the specific instructions for your pressure cooker model.
Additionally, feel free to experiment by adding different flavorings such as cinnamon or coffee for a unique twist on this classic treat!
Choclo Con Queso: Corn With Cheese Treat

Choclo Con Queso is a delightful South American dish that showcases the natural sweetness of fresh corn paired with the creamy richness of cheese. Originating from the Andean regions, this dish brings together the earthy flavors of corn and the tangy notes of cheese, creating a comforting treat that’s perfect as a snack or a side dish.
It’s a staple in many South American countries, particularly in Peru and Bolivia, where the high-quality corn, or choclo, is cherished for its unique texture and flavor.
Preparing Choclo Con Queso is a simple yet rewarding process that allows you to enjoy the vibrant flavors of South America in your own kitchen. With just a few ingredients and steps, you can whip up this delightful dish that’s sure to impress your family and friends.
Whether you serve it at a gathering or enjoy it as a cozy evening snack, this recipe is a wonderful way to celebrate the culinary traditions of South America.
Ingredients (Serves 4-6):
- 4 cups of fresh corn kernels (or 4 large ears of choclo)
- 8 oz of queso blanco or feta cheese, crumbled
- 1/2 cup of unsalted butter
- 1 teaspoon of salt (to taste)
- 1/2 teaspoon of black pepper (to taste)
- 1 tablespoon of chopped fresh cilantro or parsley (for garnish)
Cooking Instructions:
- Prepare the Corn: If using fresh ears of choclo, carefully remove the husks and silk from the corn. Using a sharp knife, cut the kernels off the cob and place them in a large bowl. If using frozen corn, simply measure out 4 cups and set aside.
- Cook the Corn: In a large saucepan, bring water to a boil. Add the fresh corn kernels (or frozen corn) and a pinch of salt. Cook for about 5-7 minutes until the corn is tender but still slightly crunchy. Drain the corn and return it to the saucepan.
- Add Butter and Seasoning: While the corn is still hot, add the unsalted butter to the saucepan. Stir well until the butter is melted and coats the corn evenly. Season the corn with salt and black pepper to taste, adjusting according to your preference.
- Incorporate the Cheese: Gently fold in the crumbled queso blanco or feta cheese into the corn mixture. Allow the cheese to warm slightly and melt into the corn, creating a creamy texture. Be careful not to overmix, as you want to keep some cheese chunks for flavor.
- Serve and Garnish: Transfer the Choclo Con Queso to a serving dish. Garnish with freshly chopped cilantro or parsley for a burst of color and flavor. Serve warm and enjoy!
Extra Tips:
When making Choclo Con Queso, using fresh corn will yield the best results regarding sweetness and texture. If fresh corn isn’t available, opt for high-quality frozen corn for a good alternative.
Additionally, feel free to experiment with different types of cheeses; some might prefer a sharper cheese for added flavor. Serve the dish immediately for the best experience, as the cheese is creamiest when warm. Enjoy this delightful treat as a side dish or as a stand-alone snack!