

Mealtime with kids can be a delightful experience filled with vibrant flavors and hands-on fun. South American cuisine offers a treasure trove of recipes that excite young taste buds and spark creativity. From colorful empanadas to customizable arepas, these dishes are perfect for little chefs. If you’re looking to turn your kitchen into a culinary adventure, explore these delightful recipes that make every meal a celebration.
Empanadas: a Fun Way to Fill With Flavor
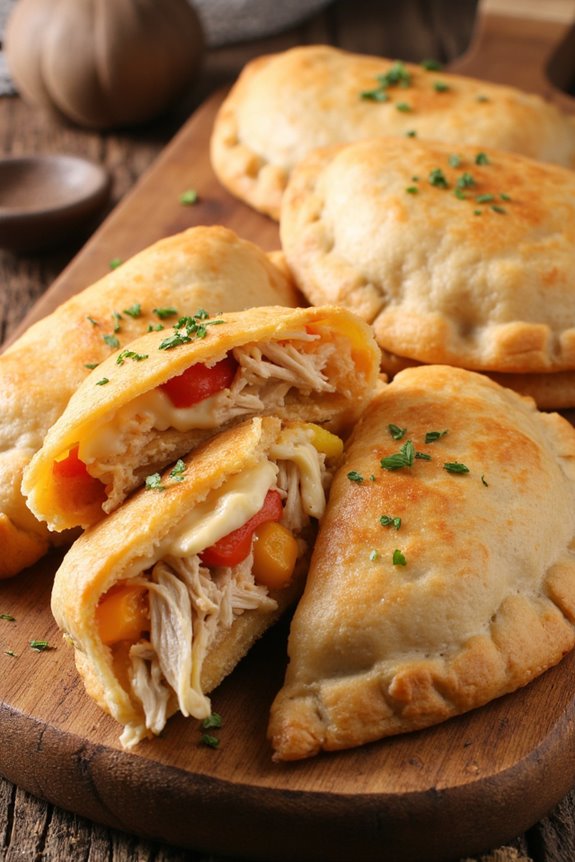
Empanadas are a delightful South American dish that kids can get excited about. These savory pastries aren’t only fun to eat but also offer a unique opportunity for little hands to help in the kitchen. With a crispy golden crust and a variety of fillings, empanadas can be customized to suit every child’s taste.
Whether filled with meat, cheese, or veggies, they provide a perfect portable meal that can be enjoyed on the go or at the dinner table. Making empanadas can be an engaging activity for the whole family. Kids can participate in preparing the dough and choosing their favorite fillings.
Once baked or fried, these little pockets of flavor make for a fantastic meal or snack. Plus, they’re great for teaching kids about different cultures and cuisines, making the cooking experience both educational and delicious!
Ingredients (Serves 4-6 people):
- 2 cups all-purpose flour
- 1/2 cup unsalted butter, chilled and diced
- 1/2 teaspoon salt
- 1/4 cup cold water
- 1 cup cooked and shredded chicken (or preferred filling)
- 1/2 cup cheese, shredded (e.g., mozzarella or cheddar)
- 1/4 cup diced bell peppers (optional)
- 1/4 cup chopped onions (optional)
- 1 egg, beaten (for egg wash)
- Oil for frying (if frying)
Cooking Instructions:
1. Prepare the Dough: In a large bowl, combine the flour and salt. Add the diced cold butter and mix it in with your fingers or a pastry cutter until the mixture resembles coarse crumbs.
Slowly add cold water, a tablespoon at a time, until the dough starts to come together. Knead gently on a floured surface until smooth. Wrap in plastic wrap and refrigerate for at least 30 minutes.
2. Prepare the Filling: In a mixing bowl, combine the cooked shredded chicken, cheese, and any additional fillings like bell peppers and onions. Mix well until all ingredients are evenly distributed. Season with salt and pepper to taste.
3. Roll Out the Dough: After chilling, remove the dough from the refrigerator. On a lightly floured surface, roll it out to about 1/8 inch thick. Use a round cutter or a glass to cut out circles of dough (approximately 4-5 inches in diameter).
4. Fill the Empanadas: Place about a tablespoon of the filling in the center of each dough circle. Be careful not to overfill, as this can make sealing difficult. Fold the dough over to create a half-moon shape and press the edges together to seal.
Use a fork to crimp the edges for a decorative finish and to guarantee they’re well sealed.
5. Cook the Empanadas: Preheat your oven to 375°F (190°C) if baking. If frying, heat oil in a deep pan over medium heat. For baking, place the empanadas on a greased baking sheet, brush the tops with the beaten egg for a golden finish, and bake for 20-25 minutes until golden brown.
For frying, carefully add empanadas to hot oil and fry until golden brown on both sides, about 3-4 minutes per side. Drain on paper towels.
6. Serve and Enjoy: Once cooked, let the empanadas cool for a few minutes before serving. They can be enjoyed warm or at room temperature. Serve with a side of salsa or dipping sauce for extra flavor.
Extra Tips:
When making empanadas, feel free to get creative with the fillings! You can use ground beef, pork, spinach, or even sweet fillings like fruit and cheese for dessert empanadas.
If you’re worried about the dough being too tough, be sure not to overwork it, and keep your ingredients cold. Finally, if you want to get ahead, the dough can be made a day in advance and stored in the refrigerator, making it easy to whip up a batch of empanadas whenever hunger strikes!
Arepas: Build Your Own Corn Cakes
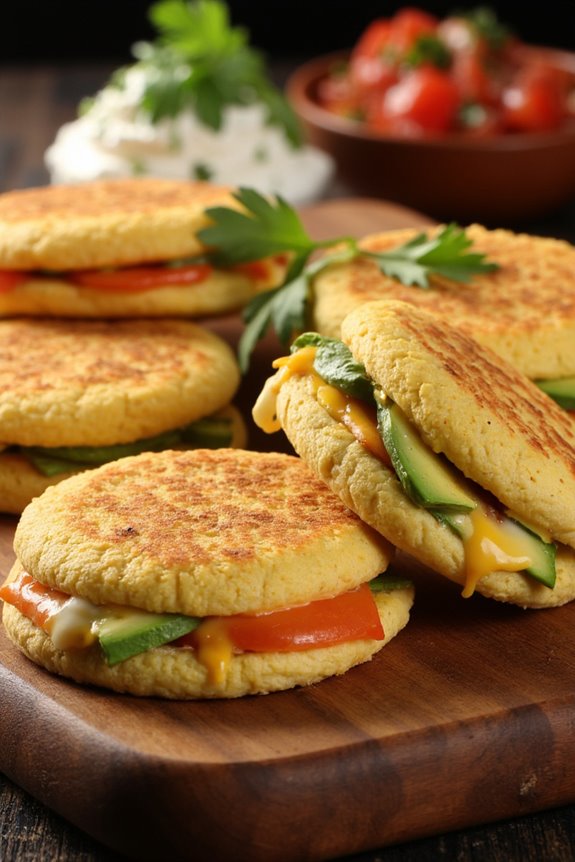
Arepas are a delightful and versatile South American dish made from cornmeal, traditionally enjoyed in countries like Venezuela and Colombia. These delicious corn cakes can be filled or topped with a variety of ingredients, making them a perfect choice for a fun family meal or an interactive cooking session with kids. The best part about making arepas is that they can be customized to suit everyone’s tastes, whether you prefer savory or sweet fillings.
Making arepas is a straightforward process that involves mixing cornmeal with water and a pinch of salt, forming the dough, and then cooking the cakes until they’re golden brown and slightly crispy. Kids will love getting involved in shaping the arepas and deciding what to fill them with. This recipe serves 4-6 people, making it an ideal meal for families or small gatherings.
Ingredients:
- 2 cups of pre-cooked cornmeal (such as P.A.N. or Masarepa)
- 2 ½ cups of warm water
- 1 teaspoon of salt
- 2 tablespoons of oil (for frying or baking)
- Optional fillings: cheese, avocado, shredded chicken, black beans, or ground beef
- Optional toppings: sour cream, salsa, or guacamole
Cooking Instructions:
- Prepare the Dough: In a large mixing bowl, combine the pre-cooked cornmeal and salt. Gradually add warm water while mixing with your hands or a spoon until the dough comes together. The mixture should be moist but not sticky. If it’s too dry, add a little more water; if it’s too wet, sprinkle in more cornmeal.
- Shape the Arepas: Divide the dough into equal portions, about the size of a golf ball. Flatten each ball between your palms to form discs that are roughly ½ inch thick. You can also make them thicker or thinner based on your preference.
- Cook the Arepas: Heat a skillet or griddle over medium heat and add a tablespoon of oil. Place the arepas in the skillet, cooking for about 5-7 minutes on each side, or until they develop a golden-brown crust. Alternatively, you can bake them in the oven at 375°F (190°C) for about 20-25 minutes, flipping halfway through for even cooking.
- Add Fillings: Once the arepas are cooked, make a small slit on the side or cut them in half to create a pocket. Fill them generously with your choice of ingredients, such as cheese, avocado, or shredded chicken.
- Serve and Enjoy: Serve the arepas warm with your favorite toppings like sour cream, salsa, or guacamole. Enjoy a fun meal where everyone can create their own unique arepa!
Extra Tips:
When making arepas, feel free to experiment with different types of fillings and toppings to cater to your family’s tastes. If you have any leftover arepas, they can be stored in the refrigerator for a couple of days and reheated in a skillet or microwave.
Additionally, for a unique twist, try adding spices or herbs to the dough for added flavor. Enjoy the creative process and make it a memorable cooking experience with your kids!
Ceviche: A Fresh and Zesty Treat

Ceviche is a delightful South American dish that’s not only invigorating but also packed with flavor, making it an excellent choice for kids who love trying new foods. Traditionally made with raw fish marinated in citrus juices, ceviche is a fun way to introduce children to the concept of cooking with acid, which “cooks” the fish without actual heat. This recipe is tailored for families, guaranteeing it’s safe, easy, and delicious, perfect for any occasion.
In addition to its vibrant flavors, ceviche is often accompanied by fresh vegetables, herbs, and spices, making it a colorful and nutritious dish. Kids will enjoy the hands-on experience of preparing the ingredients and mixing everything together. Serve it as a light meal or as an appetizer at your next family gathering, and watch as everyone enjoys this zesty treat!
Ingredients (Serves 4-6)
- 1 pound fresh white fish (like tilapia or snapper), cut into small cubes
- 1 cup freshly squeezed lime juice (about 8-10 limes)
- 1 medium red onion, thinly sliced
- 1 cup diced tomatoes
- 1 cup diced cucumber
- 1/2 cup chopped fresh cilantro
- 1-2 jalapeño peppers, seeded and finely chopped (adjust to taste)
- Salt to taste
- Tortilla chips or lettuce leaves for serving
Cooking Instructions
- Prepare the Fish: Start by rinsing the fresh fish under cold water. Pat it dry with paper towels and cut it into small, bite-sized cubes. This size will allow the fish to marinate evenly in the lime juice.
- Marinate the Fish: Place the fish cubes in a glass or ceramic bowl (avoid metal, which can react with the lime juice). Pour the freshly squeezed lime juice over the fish, making sure all pieces are fully submerged. Cover the bowl with plastic wrap and refrigerate for at least 30 minutes, allowing the fish to “cook” in the acid.
- Chop the Vegetables: While the fish is marinating, prepare the vegetables. Thinly slice the red onion, and dice the tomatoes and cucumber into small pieces. Make sure to finely chop the jalapeño peppers (removing the seeds if you prefer less heat) and the cilantro.
- Mix the Ingredients: After the fish has marinated for 30 minutes, check to see if it has turned opaque, indicating it’s ready. Drain a little of the lime juice if it seems too sour. Add the chopped vegetables, cilantro, and salt to the fish bowl. Gently toss everything together until well combined.
- Serve: Transfer the ceviche to a serving platter and garnish with additional cilantro if desired. Serve the ceviche with tortilla chips or on lettuce leaves for a fresh, crunchy bite. Enjoy the dish chilled!
Extra Tips
When preparing ceviche, it’s vital to use the freshest fish possible to guarantee both safety and flavor. Always check for a reliable source, such as a trusted fish market.
If your kids are sensitive to spice, feel free to adjust the amount of jalapeño or omit it entirely. For a fun variation, you can also include diced mango or avocado for a sweet twist.
Finally, keep in mind that ceviche is best enjoyed fresh, so try to serve it the same day it’s prepared!
Choclo Con Queso: Corn on the Cob With Cheese
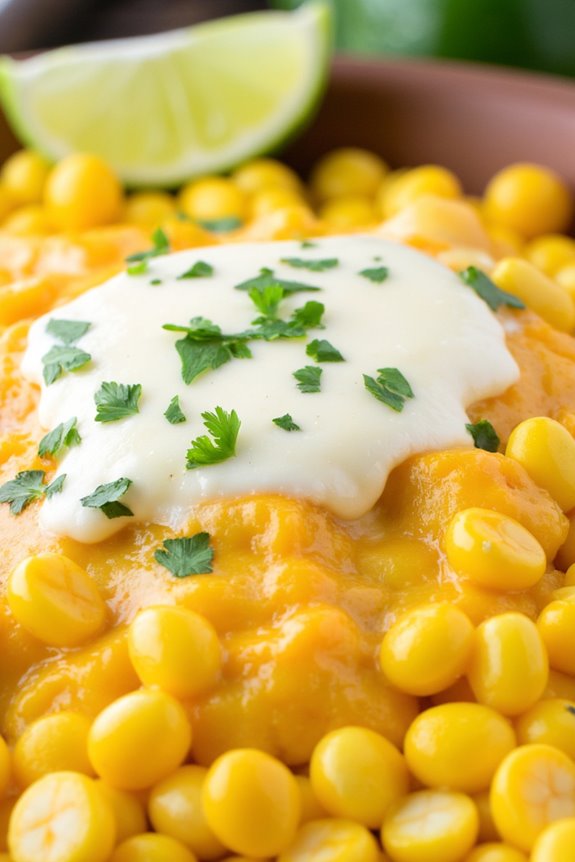
Choclo Con Queso is a delightful South American dish that brings together the simple pleasures of fresh corn and creamy cheese. This dish is popular across many countries in South America, where the sweetness of the corn complements the rich, salty flavor of the cheese.
It’s an easy and fun recipe for kids to help with, making it a perfect family cooking project. The vibrant colors and appealing flavors make it a hit at any gathering, whether it’s a casual family dinner or a festive barbecue.
In addition to being scrumptiously tasty, Choclo Con Queso is a nutritious option packed with fiber and vitamins from the corn, while the cheese adds a dose of calcium and protein. Kids will love getting involved in the preparation, from husking the corn to sprinkling on the cheese.
This dish can be enjoyed as a snack, side dish, or even a light meal. Let’s gather the ingredients and get started!
Ingredients (Serves 4-6)
- 4-6 ears of fresh corn on the cob
- 1 cup of crumbled queso fresco or any soft cheese
- 1/2 cup of butter, melted
- Salt to taste
- Freshly chopped cilantro (optional, for garnish)
- Lime wedges (optional, for serving)
Cooking Instructions
- Prepare the Corn: Start by removing the husks and silk from the ears of corn. Rinse them under cold water to clean any remaining silk. This step is essential for getting the best flavor from the corn.
- Boil the Corn: Fill a large pot with water and bring it to a boil. Once boiling, add the cleaned corn ears and let them cook for about 8-10 minutes, or until the kernels are tender. Boiling the corn guarantees it cooks evenly and retains its sweetness.
- Melt the Butter: While the corn is boiling, melt the butter in a small saucepan over low heat. This will be used to drizzle over the corn for extra flavor and richness.
- Remove and Drain the Corn: Once cooked, carefully remove the corn from the pot using tongs. Let the excess water drain off and place the corn on a serving platter.
- Add Cheese and Butter: Drizzle the melted butter over the hot corn, allowing it to soak in. Sprinkle the crumbled cheese generously over the corn while it’s still hot so that the cheese melts slightly.
- Season and Serve: Add salt to taste. If desired, garnish with freshly chopped cilantro for a pop of color and flavor. Serve the Choclo Con Queso with lime wedges on the side for squeezing over the top, enhancing the dish’s flavor profile.
Extra Tips
For the best results, choose sweet, fresh corn that’s in season. If you prefer a smoky flavor, consider grilling the corn instead of boiling it. Just keep an eye on it to prevent burning.
The cheese can be swapped for any preferred cheese, such as feta or mozzarella, to suit your family’s taste. Experiment with different toppings or spices, such as chili powder or paprika, to add an extra kick. Enjoy this dish warm for the best taste and texture!
Dulce De Leche: Sweetened Condensed Milk Delight

Dulce De Leche is a traditional South American treat that’s beloved for its rich, caramel-like flavor and creamy texture. This delightful confection is made by slowly heating sweetened condensed milk until it transforms into a smooth, thick, and sweet sauce.
Often enjoyed as a dessert topping, pastry filling, or simply spread on bread, Dulce De Leche is sure to be a hit among kids and adults alike. It’s an excellent way to introduce children to the joys of cooking, as the process is straightforward and requires minimal ingredients.
Making Dulce De Leche can be a fun and engaging activity for kids, as they can help with stirring and watching the transformation of the milk into a sweet treat. With just a few simple steps, you can whip up this delicious dessert at home. The result is a versatile sauce that can be used in various ways, from drizzling over ice cream to filling cookies or cakes.
Let’s explore the recipe for this delightful Sweetened Condensed Milk Delight!
Ingredients (Serves 4-6 people):
- 1 can (14 oz) sweetened condensed milk
- 1/4 teaspoon baking soda
- 1/4 teaspoon vanilla extract (optional)
- A pinch of salt
Cooking Instructions:
- Prepare Your Ingredients: Start by gathering all your ingredients. You’ll need a can of sweetened condensed milk, baking soda, vanilla extract (if using), and a pinch of salt. Make sure you have a saucepan or a heavy-bottomed pot ready for cooking.
- Combine Ingredients: Pour the sweetened condensed milk into the saucepan. Add the baking soda and a pinch of salt. If you want to enhance the flavor, you can also add vanilla extract at this stage. Stir the mixture gently to combine the ingredients.
- Heat the Mixture: Place the saucepan over medium-low heat. This will allow the milk to heat slowly, preventing it from burning. Keep stirring the mixture frequently to guarantee that it heats evenly and doesn’t stick to the bottom of the pan.
- Cook Until Thickened: Continue cooking and stirring for about 30-40 minutes. You’ll notice the color of the mixture gradually darkening and thickening. It should eventually turn into a golden caramel hue and have a smooth, creamy consistency.
- Cool and Store: Once the Dulce De Leche has thickened to your desired consistency, remove it from the heat. Let it cool for a few minutes before transferring it to a glass jar or container. Allow it to cool completely at room temperature, then cover and store it in the refrigerator.
- Serve and Enjoy: Your Dulce De Leche is now ready to be enjoyed! You can use it immediately as a topping for ice cream, pancakes, or in desserts.
Extra Tips:
When making Dulce De Leche, patience is key! Avoid the temptation to increase the heat, as this can lead to burning.
Stirring frequently will help prevent sticking and guarantee even cooking. If you prefer a thicker consistency, cook it a little longer, but keep in mind that it will thicken further as it cools.
Enjoy experimenting with different ways to use your homemade Dulce De Leche, and don’t hesitate to involve your kids in the process for a fun cooking experience!
Alfajores: Sweet Sandwich Cookies

Alfajores are a delightful treat that brings the sweetness of South American culture right to your kitchen. These delectable sandwich cookies are typically filled with a luscious layer of dulce de leche and rolled in coconut or powdered sugar. They aren’t only a favorite among kids but also loved by adults, making them a perfect addition to any dessert table or a special treat for an afternoon snack.
Making alfajores is an excellent way to introduce children to the joys of baking, as they can help with mixing, rolling, and assembling the cookies. The beauty of alfajores lies in their versatility; you can customize the filling and toppings to suit your taste. While traditional alfajores use dulce de leche, you can experiment with different fillings such as chocolate ganache or fruit preserves.
The delicate cookies are made with cornstarch, giving them a unique texture that melts in your mouth. This recipe is simple enough for kids to help out, and they’ll love tasting their creations once the alfajores are ready to enjoy.
Ingredients (Serves 4-6):
- 1 cup unsalted butter, softened
- 1 cup powdered sugar
- 1 large egg
- 1 teaspoon vanilla extract
- 2 cups all-purpose flour
- 1 cup cornstarch
- 1 teaspoon baking powder
- 1 cup dulce de leche
- 1/2 cup shredded coconut (optional, for rolling)
- Extra powdered sugar (for dusting)
Cooking Instructions:
- Prepare the Dough: In a large mixing bowl, cream together the softened butter and powdered sugar until the mixture is light and fluffy. This process usually takes about 3-5 minutes. Then, add the egg and vanilla extract, mixing until fully incorporated.
- Combine Dry Ingredients: In a separate bowl, whisk together the all-purpose flour, cornstarch, and baking powder. Gradually add this dry mixture to the wet mixture, stirring until a soft dough forms. Be careful not to overmix; just combine until there are no dry spots.
- Chill the Dough: Wrap the dough in plastic wrap and refrigerate for at least 1 hour. This step is essential as it helps to firm up the dough, making it easier to roll out later.
- Roll Out the Dough: Once chilled, preheat your oven to 350°F (175°C). On a lightly floured surface, roll out the dough to about 1/4 inch thick. Use a round cookie cutter to cut out circles, and place them on a baking sheet lined with parchment paper.
- Bake the Cookies: Bake the cookies in the preheated oven for about 10-12 minutes or until they’re lightly golden around the edges. Allow them to cool completely on a wire rack.
- Assemble the Alfajores: Once the cookies are cool, take one cookie and spread a generous layer of dulce de leche on the bottom. Top with another cookie to create a sandwich. If desired, roll the edges in shredded coconut for added texture and flavor.
- Dust with Powdered Sugar: Just before serving, dust the tops of the alfajores with extra powdered sugar for a sweet finish.
Extra Tips: When making alfajores, make certain that the butter is at room temperature for easier blending. If you find the dough too sticky, you can add a little more flour. Additionally, these cookies can be stored in an airtight container for up to a week, making them a great make-ahead treat. For added fun, let the kids decorate the alfajores with different toppings or fillings!
Pão De Queijo: Cheesy Brazilian Bread Balls

Pão de Queijo, a delightful Brazilian snack, is a favorite among kids and adults alike. These cheesy bread balls are naturally gluten-free, made primarily from tapioca flour, which gives them a unique chewy texture that’s hard to resist. The combination of cheese, milk, and eggs creates a rich flavor that’s both comforting and satisfying.
Additionally, they’re quick to prepare, making them a perfect treat for family gatherings or a fun cooking project with the kids. Making Pão de Queijo is an enjoyable experience that allows kids to get involved in the kitchen. They can help with mixing the ingredients and shaping the dough into little balls.
Once baked, these golden treats puff up beautifully, and their cheesy aroma fills the kitchen, making it hard to wait before diving in. Serve them warm, and watch as they disappear in no time!
Ingredients (Serves 4-6)
- 1 cup tapioca flour
- 1/2 cup milk
- 1/4 cup vegetable oil
- 1/2 teaspoon salt
- 1 large egg
- 1 cup grated cheese (such as mozzarella or Parmesan)
- 1/4 teaspoon garlic powder (optional)
Cooking Instructions
- Preheat the Oven: Begin by preheating your oven to 375°F (190°C). This guarantees that the Pão de Queijo will bake evenly and achieve that perfect golden color.
- Heat the Mixture: In a medium saucepan, combine the milk, vegetable oil, and salt. Heat this mixture over medium heat until it begins to simmer. Stir occasionally to prevent burning. This step helps to dissolve the salt and combine the flavors.
- Combine with Tapioca Flour: Once the milk mixture is simmering, remove it from the heat and gradually add the tapioca flour, stirring continuously with a wooden spoon until you get a smooth, sticky dough. This is also where the magic of the chewy texture happens, thanks to the tapioca flour.
- Cool the Dough: Allow the dough to cool for about 10 minutes. This step is essential because it prevents the egg from cooking when you add it, making sure of a smooth consistency.
- Add the Egg and Cheese: After the dough has cooled, add the egg, grated cheese, and garlic powder (if using). Mix well until all the ingredients are fully incorporated. The dough will be elastic and slightly sticky.
- Shape the Dough: With your hands, form small balls (about the size of a golf ball) from the dough and place them on a greased baking sheet. Leave some space between each ball, as they’ll puff up while baking.
- Bake: Place the baking sheet in the preheated oven and bake for 15-20 minutes, or until the Pão de Queijo are puffed and golden brown. Keep an eye on them towards the end to avoid overbaking.
- Cool and Serve: Once baked, remove the Pão de Queijo from the oven and let them cool for a few minutes before serving. They’re best enjoyed warm and fresh out of the oven!
Extra Tips
When making Pão de Queijo, feel free to experiment with different types of cheese for varied flavors; cheddar or a blend can give a nice twist.
Additionally, if you want to make them ahead of time, you can freeze the shaped dough balls and bake them directly from the freezer, adding an extra 5 minutes to the baking time. For a fun touch, consider adding herbs or spices to the dough for a unique flavor profile that your kids will love!
Sopa De Mani: Creamy Peanut Soup

Sopa de Mani, or Creamy Peanut Soup, is a traditional dish from Bolivia that isn’t only delicious but also rich in nutrients, making it a perfect meal for kids. This comforting soup is made with ground peanuts, vegetables, and spices, creating a creamy and flavorful dish that will warm the hearts and tummies of your little ones.
It’s a great way to introduce new flavors while keeping it familiar enough for kids to enjoy. This soup is typically served with a side of rice or crusty bread, which makes it a complete meal. The peanut base provides protein and healthy fats, while the vegetables add essential vitamins and minerals.
Preparing Sopa de Mani is also a fantastic opportunity to involve your children in the kitchen, as they can help with simple tasks like stirring and measuring ingredients.
Ingredients (Serves 4-6):
- 1 cup unsalted roasted peanuts
- 4 cups chicken or vegetable broth
- 1 medium onion, chopped
- 2 cloves garlic, minced
- 2 medium potatoes, peeled and diced
- 1 medium carrot, diced
- 1 medium tomato, diced
- 1 teaspoon ground cumin
- 1 teaspoon paprika
- Salt and pepper to taste
- Fresh cilantro for garnish
- Lime wedges for serving
Cooking Instructions:
- Prepare the Peanuts: Start by grinding the unsalted roasted peanuts in a food processor or blender until they reach a fine paste. If you prefer a chunkier texture, you can leave some pieces intact. Set aside.
- Sauté the Aromatics: In a large pot, heat a tablespoon of oil over medium heat. Add the chopped onion and minced garlic, sautéing for about 3-4 minutes until the onions are translucent and fragrant.
- Add the Vegetables: Stir in the diced potatoes, carrots, and tomatoes. Cook for an additional 5 minutes, allowing the vegetables to soften slightly and absorb the flavors.
- Incorporate the Broth: Pour in the chicken or vegetable broth, then bring the mixture to a boil. Once boiling, reduce the heat to a simmer and let it cook for 15-20 minutes, or until the potatoes and carrots are tender.
- Mix in the Peanut Paste: Gradually stir in the ground peanut paste, making sure it’s well incorporated. This will give the soup its creamy texture. Allow the soup to simmer for another 5-10 minutes to meld the flavors together.
- Season: Add the ground cumin, paprika, and season with salt and pepper to taste. Adjust the seasoning as necessary for your preference.
- Serve: Ladle the soup into bowls and garnish with fresh cilantro. Serve alongside lime wedges for an extra burst of flavor.
Extra Tips:
When making Sopa de Mani, feel free to customize the soup by adding other vegetables your kids enjoy, such as corn or bell peppers.
You can also adjust the thickness of the soup by adding more or less broth, depending on your preference. For a vegetarian version, be certain to use vegetable broth and consider adding beans for additional protein.
Enjoy the process of cooking together, and let your kids experiment with the garnish!
Tacos De Pescado: Fish Tacos With a Twist
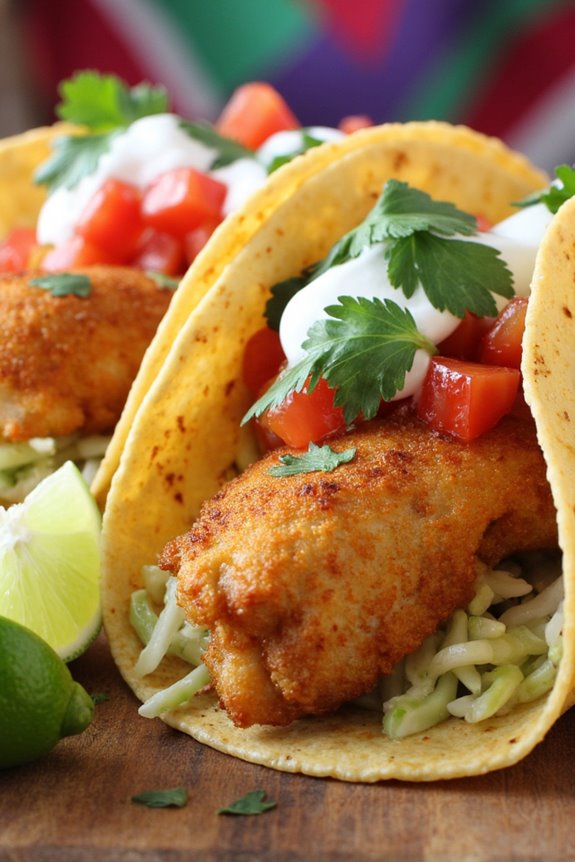
Tacos De Pescado, or fish tacos, are a delightful and healthy option that kids and adults alike will enjoy. With their crispy fish, fresh toppings, and zesty sauce, these tacos bring a taste of South America right to your kitchen.
The beauty of this dish lies in its versatility; you can customize the toppings to suit your family’s tastes. Whether you prefer crunchy cabbage, spicy salsa, or a creamy sauce, these tacos can be tailored to please even the pickiest eaters.
This recipe is perfect for a family dinner or a fun weekend meal preparation. It’s easy to make and involves simple steps that children can help with, making it a great opportunity for family bonding in the kitchen. Get ready to serve up some delicious Tacos De Pescado that will have everyone coming back for more!
Ingredients (Serves 4-6):
- 1 lb white fish fillets (such as tilapia or cod)
- 1 cup all-purpose flour
- 1 teaspoon paprika
- 1 teaspoon cumin
- 1/2 teaspoon salt
- 1/2 teaspoon black pepper
- 1/2 cup cornmeal
- 2 eggs, beaten
- 1/4 cup milk
- Vegetable oil (for frying)
- 8 small corn tortillas
- 1 cup shredded cabbage or lettuce
- 1/2 cup diced tomatoes
- 1/4 cup chopped cilantro
- Lime wedges (for serving)
- 1/2 cup creamy sauce (such as sour cream or yogurt mixed with lime juice)
Cooking Instructions:
- Prepare the Fish: Rinse the fish fillets under cold water and pat them dry with paper towels. Cut the fillets into strips or bite-sized pieces, depending on your preference for the tacos. This will make them easier to handle and eat.
- Set Up Breading Stations: In three separate bowls, set up your breading stations. In the first bowl, combine the flour, paprika, cumin, salt, and black pepper. In the second bowl, whisk together the eggs and milk until well combined. In the third bowl, place the cornmeal. This setup will allow you to easily coat the fish.
- Bread the Fish: Take each piece of fish and first coat it in the seasoned flour, shaking off any excess. Next, dip it into the egg mixture, ensuring it’s fully coated. Finally, roll it in the cornmeal to give it a crunchy texture. Repeat this process for all the fish pieces.
- Fry the Fish: In a large skillet, heat about 1/4 inch of vegetable oil over medium-high heat. Once the oil is hot (you can test this by dropping a small piece of the fish into the oil; if it sizzles, it’s ready), carefully place the coated fish pieces in the oil. Fry them for about 3-4 minutes on each side, or until they’re golden brown and cooked through. Use a slotted spoon to transfer the cooked fish to a paper towel-lined plate to drain excess oil.
- Warm the Tortillas: While the fish is frying, warm the corn tortillas in a separate skillet over low heat for about 30 seconds on each side, or until they’re pliable. This step prevents them from cracking when filled.
- Assemble the Tacos: To assemble the tacos, place a few pieces of the fried fish on each warmed tortilla. Top with shredded cabbage or lettuce, diced tomatoes, and chopped cilantro. Drizzle with the creamy sauce and serve with lime wedges on the side.
Extra Tips:
For a healthier version, you can bake the fish instead of frying it. Simply preheat the oven to 400°F (200°C), place the breaded fish on a baking sheet lined with parchment paper, and bake for about 15-20 minutes until golden brown and crispy.
Additionally, feel free to experiment with different toppings and sauces to find the combination that your family loves the most!
Yuca Fries: Crispy and Delicious

Yuca fries are a delightful South American treat that kids will love! Made from the starchy root vegetable known as yuca or cassava, these fries aren’t only crispy on the outside but also soft and fluffy on the inside. They offer a fun alternative to traditional potato fries, with a slightly nutty flavor that pairs wonderfully with various dips. Yuca fries can be enjoyed as a side dish or a snack, making them a versatile addition to any meal.
Cooking yuca fries is an easy and engaging activity for kids, allowing them to get hands-on in the kitchen. With a few simple ingredients and some basic cooking techniques, you can whip up a batch of these tasty fries in no time. Whether served with a tangy dipping sauce or enjoyed plain, yuca fries are sure to be a hit at your family table.
Ingredients (Serves 4-6):
- 2 large yuca (cassava) roots
- 4 cups of water
- 1 teaspoon of salt (for boiling)
- Vegetable oil (for frying)
- Salt (for seasoning)
Cooking Instructions:
- Prepare the Yuca: Start by carefully peeling the yuca roots. Use a sharp knife to remove the thick, brown skin, taking care to avoid cutting too deep into the flesh. After peeling, cut the yuca into quarters to make it easier to cook.
- Boil the Yuca: In a large pot, bring 4 cups of water to a boil. Add 1 teaspoon of salt to the boiling water, then carefully add the yuca pieces. Boil them for about 20-25 minutes, or until they’re tender and can be easily pierced with a fork. Drain the yuca and let it cool slightly.
- Cut into Fries: Once the yuca has cooled enough to handle, cut each quarter into fry-shaped pieces—about 1/2 inch thick. Make sure they’re roughly the same size for even cooking.
- Heat the Oil: In a large frying pan, pour enough vegetable oil to cover the bottom of the pan by about 1/2 inch. Heat the oil over medium-high heat until it reaches around 350°F (175°C). You can test the oil by dropping a small piece of yuca into it; if it sizzles, it’s ready.
- Fry the Yuca: Carefully add the yuca fries to the hot oil in batches, making sure not to overcrowd the pan. Fry them for about 5-7 minutes, or until they’re golden brown and crispy. Use a slotted spoon to remove the fries and place them on a plate lined with paper towels to absorb excess oil.
- Season and Serve: While the fries are still hot, sprinkle them with additional salt to taste. Serve the yuca fries warm with your favorite dipping sauces, such as ketchup, guacamole, or aji sauce.
Extra Tips:
When making yuca fries, it’s important to verify the oil is hot enough before adding the yuca to achieve that perfect crispiness.
If you want to avoid frying, you can also bake the yuca fries in the oven: toss them in a little oil and bake at 425°F (220°C) for about 25-30 minutes, flipping halfway through. This method is healthier and still results in a delicious fry!
Additionally, experimenting with different seasonings, such as garlic powder or paprika, can add an exciting twist to the flavor of your yuca fries.
Churrasco: Family-Friendly Grilled Meats

Churrasco is a delightful South American dish that brings families together around the grill, making it perfect for a weekend barbecue or a fun evening meal. This recipe features tender, juicy cuts of beef, marinated to perfection, and grilled to create a smoky flavor that kids and adults alike will love.
The beauty of churrasco lies not only in its taste but also in its versatility; you can serve it with a variety of sides, from rice to salads, making it a complete meal that pleases everyone at the table.
In addition to the main event, churrasco can be accompanied by chimichurri, a vibrant and flavorful sauce made with herbs, garlic, vinegar, and olive oil. This sauce adds a fresh zing that elevates the grilled meat and introduces kids to new flavors in a fun way.
Preparing churrasco is an excellent opportunity to involve children in cooking, whether they’re helping to marinate the meat, preparing the sides, or even manning the grill under adult supervision.
Ingredients (Serves 4-6):
- 2 pounds of flank steak or skirt steak
- 4 cloves of garlic, minced
- 1/4 cup olive oil
- 1/4 cup soy sauce
- 2 tablespoons red wine vinegar
- 1 tablespoon brown sugar
- 1 teaspoon black pepper
- 1 teaspoon salt
- 1 teaspoon paprika
- Fresh parsley, chopped (for garnish)
- Lemon wedges (for serving)
Cooking Instructions:
- Prepare the Marinade: In a medium bowl, combine the minced garlic, olive oil, soy sauce, red wine vinegar, brown sugar, black pepper, salt, and paprika. Whisk the ingredients together until well mixed. This marinade will infuse the meat with flavor and help tenderize it.
- Marinate the Meat: Place the flank or skirt steak in a large resealable plastic bag or a shallow dish. Pour the marinade over the meat, making sure it’s well-coated. Seal the bag or cover the dish and refrigerate for at least 1 hour, preferably overnight. This allows the flavors to penetrate the meat deeply.
- Preheat the Grill: When you’re ready to cook, preheat your grill to medium-high heat. If using a charcoal grill, allow the coals to become hot and ashy. A properly heated grill guarantees a nice sear on the meat, locking in the juices.
- Grill the Steak: Remove the steak from the marinade, letting any excess drip off. Place it on the grill and cook for about 4-6 minutes per side for medium-rare, depending on the thickness of the meat. Use a meat thermometer to check for doneness, aiming for an internal temperature of about 130°F for medium-rare.
- Rest the Steak: Once cooked to your liking, remove the steak from the grill and let it rest for about 5-10 minutes. This resting period allows the juices to redistribute throughout the meat, keeping it moist and flavorful when sliced.
- Slice and Serve: After resting, slice the steak against the grain into thin strips for tenderness. Serve the churrasco garnished with chopped fresh parsley and lemon wedges on the side. The lemon adds a revitalizing touch when squeezed over the meat.
Extra Tips:
For a delicious twist, try adding different herbs or spices to the marinade, such as cumin or oregano, for an added depth of flavor.
Also, consider grilling some veggies alongside the meat, such as bell peppers or zucchini, to create a colorful and nutritious plate.
Finally, involving kids in the grilling process can be a fun and educational experience, teaching them about cooking and food safety in a hands-on way.
Quinoa Salad: Colorful and Nutritious
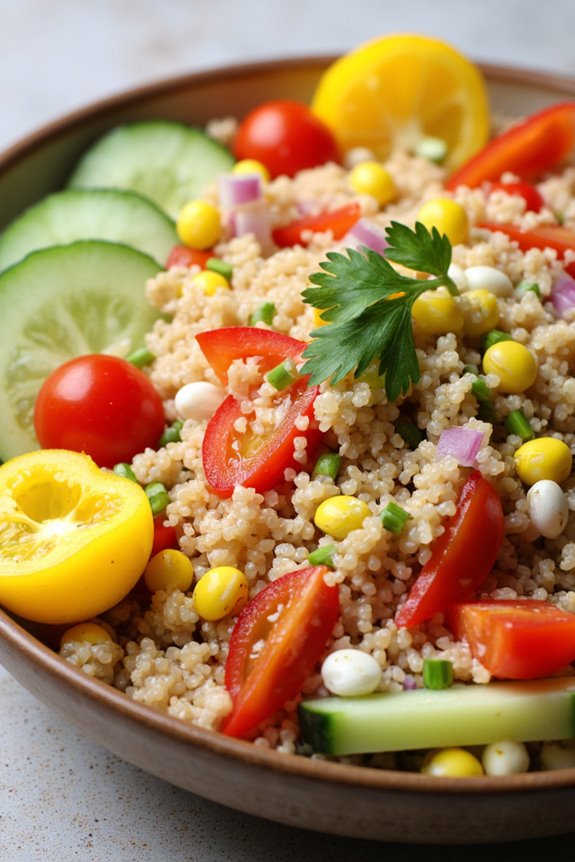
Quinoa salad is a vibrant and nutritious dish that’s perfect for kids and families alike. Packed with protein-rich quinoa, fresh vegetables, and a tangy dressing, this dish not only appeals to the eyes but also provides essential nutrients.
It’s an excellent way to introduce children to healthy eating habits while allowing them to explore the colorful array of ingredients. The best part is that this salad can be customized based on seasonal produce or personal preferences, making it a versatile choice for any meal.
Preparing this quinoa salad is a fun and interactive experience that kids can enjoy. They can help wash and chop the vegetables, mix the dressing, or even arrange the salad beautifully on plates.
This dish is perfect for lunchboxes, picnics, or as a side for dinner, offering a deliciously healthy option that’s both satisfying and filling. Let’s explore the ingredients and cooking instructions for this delightful dish!
Ingredients (Serves 4-6)
- 1 cup quinoa
- 2 cups water or vegetable broth
- 1 red bell pepper, diced
- 1 yellow bell pepper, diced
- 1 cucumber, diced
- 1 cup cherry tomatoes, halved
- 1/2 cup corn (fresh or frozen)
- 1/4 cup red onion, finely chopped
- 1/4 cup fresh parsley, chopped
- 1/4 cup olive oil
- 2 tablespoons lemon juice
- Salt and pepper to taste
Cooking Instructions
1. Rinse the Quinoa: Begin by rinsing the quinoa under cold water in a fine mesh sieve. This step is important to remove any bitterness that may occur from the natural coating called saponin.
2. Cook the Quinoa: In a medium saucepan, combine the rinsed quinoa and water or vegetable broth. Bring the mixture to a boil, then reduce the heat to low. Cover and let it simmer for about 15 minutes, or until the quinoa has absorbed all the liquid and is fluffy.
Remove from heat and let it sit covered for an additional 5 minutes, then fluff with a fork.
3. Prepare the Vegetables: While the quinoa is cooking, wash and chop all the vegetables. Dice the red and yellow bell peppers, cucumber, and red onion, and halve the cherry tomatoes. If using frozen corn, you can thaw it under warm water or microwave it for a few minutes.
4. Mix the Dressing: In a small bowl, whisk together the olive oil, lemon juice, salt, and pepper. Adjust seasoning to your taste, ensuring a balance of acidity and richness.
5. Combine Ingredients: In a large bowl, combine the cooked quinoa, chopped vegetables, corn, and parsley. Pour the dressing over the salad and gently toss everything together until well mixed.
6. Chill and Serve: For the best flavor, let the salad chill in the refrigerator for at least 30 minutes before serving. This allows the flavors to meld together beautifully.
Extra Tips
When making quinoa salad, feel free to experiment with different vegetables or add-ins such as black beans, feta cheese, or avocado for extra flavor and nutrition.
You can also prepare the quinoa in advance and store it in the refrigerator to save time on busy days. For a twist, try using lime juice instead of lemon, or add spices like cumin or paprika to the dressing to enhance the flavor profile.
Enjoy this healthy and colorful dish with your family!
Brigadeiros: Chocolate Truffles for Kids

Brigadeiros are a delightful treat from Brazil that kids absolutely love! These chocolate truffles are made with just a few simple ingredients and are perfect for birthday parties, special occasions, or just a fun family cooking session.
The best part about making brigadeiros is that kids can get involved in the process, from stirring the mixture to rolling the chocolate truffles in sprinkles. They offer a deliciously sweet flavor that’s sure to satisfy any chocolate craving.
Making brigadeiros isn’t only fun but also an excellent opportunity to introduce kids to cooking. The process is easy, and they can learn about measuring ingredients, mixing, and the importance of patience while waiting for the mixture to cool.
Once rolled, these little chocolate balls can be decorated in various ways, allowing kids to express their creativity. Get ready to whip up a batch of these tasty treats that everyone will enjoy!
Ingredients (Serves 4-6 people):
- 1 can (14 ounces) sweetened condensed milk
- 2 tablespoons unsweetened cocoa powder
- 2 tablespoons unsalted butter
- A pinch of salt
- Chocolate sprinkles or other toppings (like crushed nuts or coconut) for rolling
Cooking Instructions:
1. Combine the Ingredients: In a medium-sized saucepan, add the sweetened condensed milk, unsweetened cocoa powder, unsalted butter, and a pinch of salt. Stir the mixture well to combine all the ingredients until smooth.
2. Cook the Mixture: Place the saucepan over medium heat and Cook the Mixture, stirring constantly with a wooden spoon. Make sure to scrape the sides and the bottom of the pan to prevent the mixture from sticking and burning.
Continue cooking for about 10-15 minutes, or until the mixture thickens and starts to pull away from the sides of the pan, forming a fudgy consistency.
3. Cool the Mixture: Once the mixture has thickened, remove the saucepan from the heat and pour the brigadeiro mixture into a greased plate or dish. Allow it to cool at room temperature for about 30 minutes.
You can speed up the cooling process by placing it in the refrigerator for about 15 minutes.
4. Shape the Brigadeiros: Once the mixture has cooled, grease your hands with a little butter to prevent sticking. Take small amounts of the mixture (about a tablespoon) and roll them into small balls between your palms.
5. Coat the Brigadeiros: Pour the chocolate sprinkles (or your chosen toppings) onto a plate. Roll each brigadeiro ball in the sprinkles until they’re completely coated. Place the finished brigadeiros on a serving plate.
6. Serve and Enjoy: Once all the brigadeiros are rolled and coated, they’re ready to serve! Enjoy them fresh, or store them in an airtight container in the refrigerator for up to a week.
Extra Tips:
When making brigadeiros, it’s essential to be patient while cooking the mixture. If it’s not thick enough, the truffles won’t hold their shape.
Use a non-stick saucepan to make the process easier and avoid burning. Additionally, let the kids choose their favorite toppings to roll the brigadeiros in, making it a more personalized treat!
Don’t forget to enjoy this fun cooking experience together, as it’s not just about the final product but the memories made along the way.
Pastel De Choclo: Corn Pie for Little Chefs
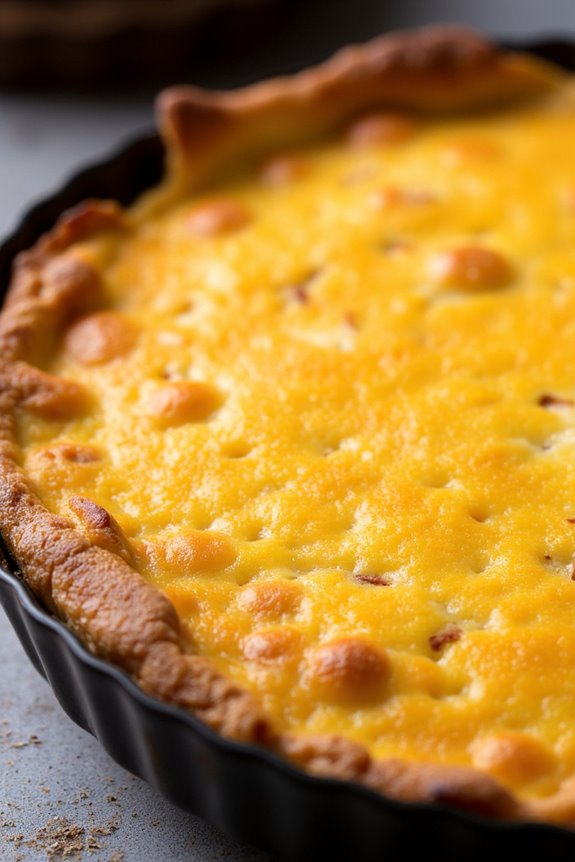
Pastel de Choclo, or Corn Pie, is a delightful dish that brings together the sweet flavors of corn and the savory goodness of meat, beautifully layered into a pie that kids will love to help make. This traditional South American dish isn’t only delicious but also allows little chefs to get hands-on in the kitchen, making it a fantastic cooking experience.
With its vibrant colors and comforting taste, this recipe is perfect for family dinners or special occasions. Making Pastel de Choclo is a fun way for kids to practice their cooking skills, from chopping vegetables to mixing ingredients. The recipe can be adjusted to include various fillings, making it versatile and adaptable to different tastes.
In this version, we’ll use a mixture of ground meat, onions, and hard-boiled eggs, all topped with a creamy corn layer that’s sure to be a hit among young diners.
Ingredients (Serves 4-6)
- 2 cups of fresh corn kernels (or canned corn)
- 1 cup of milk
- 1 tablespoon of butter
- 1 tablespoon of sugar
- 1/2 teaspoon of salt
- 1/2 teaspoon of black pepper
- 1 pound of ground beef or chicken
- 1 onion, chopped
- 2 hard-boiled eggs, chopped
- 1/2 cup of olives, chopped (optional)
- 1 teaspoon of paprika
- 1 teaspoon of cumin
- 1/4 cup of fresh basil or parsley, chopped
Cooking Instructions
- Prepare the Corn Mixture: In a blender, combine the fresh corn kernels, milk, butter, sugar, salt, and black pepper. Blend until smooth to create a creamy corn mixture. This will be the topping for your pastel. Set aside.
- Cook the Meat Filling: In a large skillet over medium heat, add a little oil and sauté the chopped onion until it becomes translucent. Next, add the ground beef or chicken to the skillet, breaking it apart with a spatula. Cook until the meat is browned and cooked through.
- Season the Meat: Once the meat is cooked, stir in the paprika, cumin, and chopped olives (if using) to enhance the flavor. Mix well and let it cook for another 2-3 minutes so the spices meld with the meat.
- Layer the Ingredients: Preheat your oven to 375°F (190°C). In a baking dish, layer the cooked meat mixture on the bottom. Evenly sprinkle the chopped hard-boiled eggs and fresh herbs over the meat. This adds extra flavor and a fun texture.
- Top with Corn Mixture: Pour the creamy corn mixture over the layered ingredients in the baking dish, ensuring it covers everything evenly. This is the crowning touch of your pastel de choclo that will bake to a delicious golden color.
- Bake the Pie: Place the baking dish in the preheated oven and bake for about 30-35 minutes or until the top is golden brown and slightly firm to the touch. Keep an eye on it to prevent burning.
- Serve and Enjoy: Once baked, remove the pastel de choclo from the oven and allow it to cool for a few minutes. Cut into squares or wedges and serve warm. Enjoy your delicious homemade corn pie!
Extra Tips
When making Pastel de Choclo, feel free to get creative with the fillings! You can use veggies like bell peppers or even chickpeas for a vegetarian version.
It’s also a great way to sneak in some extra nutrients. For a creamier texture, consider mixing in some cream cheese with the corn mixture. Finally, encourage your little chefs to help with measuring and mixing, as cooking is a fantastic way to build their confidence in the kitchen.
Mandioca: Explore the Wonders of Cassava

Mandioca, also known as cassava or yuca, is a versatile root vegetable that’s a staple in many South American countries. Its mild flavor and starchy texture make it an excellent base for various dishes. Cooking mandioca isn’t only simple but also a fun way to introduce kids to different culinary experiences. This recipe for boiled mandioca is easy to prepare and can be enjoyed on its own or as a side dish.
To enhance the dish, you can serve the boiled mandioca with a sprinkle of salt, a drizzle of olive oil, or even a side of dipping sauces. Kids will love the chewy texture and can help with some of the preparation steps, making it a great family cooking project. Let’s explore this wonderful South American delicacy that brings both nutrition and excitement to the table!
Ingredients (Serves 4-6):
- 2 pounds of fresh mandioca (cassava)
- 1 teaspoon salt
- 4 cups of water
- Olive oil (optional, for drizzling)
- Fresh herbs (optional, for garnish)
Cooking Instructions:
- Prepare the Mandioca: Start by rinsing the fresh mandioca under running water to remove any dirt. Then, use a sharp knife to carefully peel the outer skin. It’s important to remove all the tough outer layer to reveal the soft white flesh inside. Cut the peeled mandioca into 2-3 inch pieces for even cooking.
- Boil the Water: In a large pot, pour in the 4 cups of water and add the teaspoon of salt. Bring the water to a rolling boil over medium-high heat. The salt will enhance the flavor of the mandioca while it cooks.
- Cook the Mandioca: Once the water is boiling, carefully add the mandioca pieces to the pot. Reduce the heat to medium and let the mandioca cook for about 20-30 minutes, or until the pieces are tender when pierced with a fork. It’s important to stir occasionally to prevent the pieces from sticking to the bottom of the pot.
- Drain and Serve: After the mandioca is tender, remove the pot from the heat and carefully drain the water using a colander. Allow the mandioca to sit for a few minutes to let any excess water evaporate.
- Garnish and Enjoy: Transfer the boiled mandioca to a serving platter. Drizzle with olive oil if desired and sprinkle with fresh herbs for added flavor. Serve warm and enjoy this delightful South American dish!
Extra Tips: When selecting mandioca, look for firm roots without any blemishes or soft spots. Make sure to cook the mandioca thoroughly, as raw cassava contains cyanogenic compounds that can be harmful if not prepared correctly.
You can also experiment with different seasonings and toppings to personalize the dish – consider adding garlic, lime juice, or even cheese for an extra burst of flavor!