

Thinking about South American holiday meals fills me with excitement for the incredible flavors and traditions that bring us together. Each dish tells a story and adds a unique touch to our festive gatherings. From the flaky Empanadas De Carne to the sweet indulgence of Tres Leches Cake, there’s truly something for everyone. Let’s explore these delightful recipes and see how they can transform your holiday celebrations into something truly special.
Empanadas De Carne
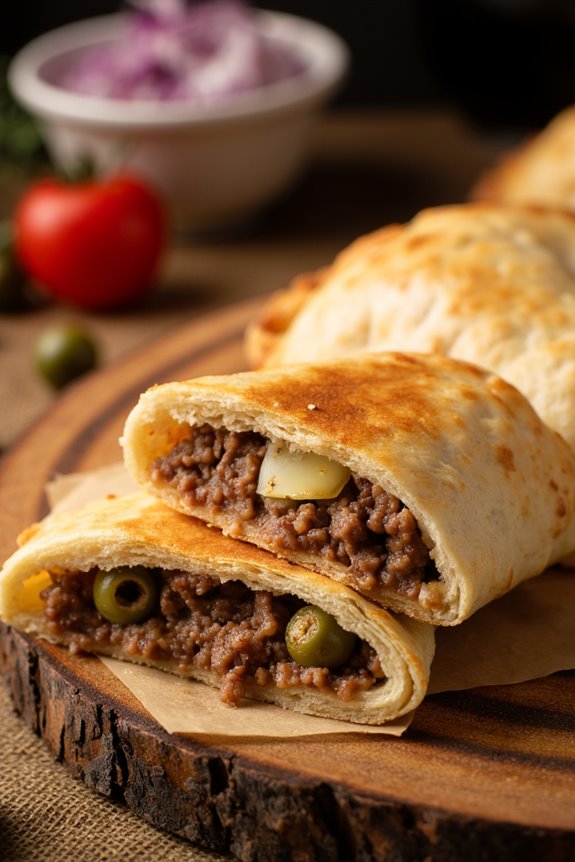
Empanadas de carne are a beloved South American dish, celebrated for their versatility and rich flavors. These delicious pastries are typically filled with a savory mixture of ground beef, onions, olives, and spices, all encased in a flaky pastry dough. Originating from Spain, empanadas have been embraced by various South American countries, each adding their unique twist to the filling and the dough. They can be baked or fried, making them a popular choice for festive occasions, family gatherings, or even as a hearty snack.
Making empanadas de carne at home is a rewarding culinary experience that allows you to customize the fillings according to your taste. This recipe yields about 4-6 servings, perfect for sharing with friends and family during your next holiday gathering. Whether you choose to serve them with a side of chimichurri or a fresh salad, these empanadas are sure to impress with their mouthwatering flavors and delightful texture.
Ingredients
- 2 cups all-purpose flour
- 1/2 cup unsalted butter (cold, cubed)
- 1/2 teaspoon salt
- 1/4 cup cold water
- 1 pound ground beef
- 1 medium onion (finely chopped)
- 1/4 cup green olives (chopped)
- 2 hard-boiled eggs (chopped)
- 1 teaspoon cumin
- 1 teaspoon paprika
- Salt and pepper to taste
- 1 egg (beaten, for egg wash)
- Oil for frying (if frying)
Cooking Instructions
- Prepare the dough: In a large mixing bowl, combine the all-purpose flour and salt. Add the cold, cubed butter to the flour mixture and use a pastry cutter or your fingers to blend until it resembles coarse crumbs. Gradually add the cold water, mixing until the dough comes together. Don’t overwork the dough. Wrap it in plastic wrap and refrigerate for at least 30 minutes.
- Make the filling: In a large skillet over medium heat, add the ground beef and cook until browned, breaking it apart with a spatula. Once browned, drain any excess fat. Add the chopped onion to the skillet and cook until softened, about 5 minutes. Stir in the chopped green olives, hard-boiled eggs, cumin, paprika, salt, and pepper. Mix well and remove from heat. Allow the filling to cool slightly.
- Roll out the dough: On a floured surface, roll out the chilled dough to about 1/8 inch thick. Use a round cutter (about 4-5 inches in diameter) to cut out circles of dough. Gather any scraps, re-roll, and cut out more circles.
- Fill the empanadas: Place a spoonful of the meat filling in the center of each dough circle, being careful not to overfill. Fold the dough over to create a half-moon shape and seal the edges by pressing down with a fork or crimping with your fingers.
- Cook the empanadas: If baking, preheat your oven to 375°F (190°C). Place the empanadas on a parchment-lined baking sheet, brush with the beaten egg, and bake for 20-25 minutes or until golden brown. If frying, heat oil in a deep pan over medium heat. Fry the empanadas in batches until golden brown, about 3-4 minutes per side. Remove and drain on paper towels.
- Serve: Allow the empanadas to cool slightly before serving. Enjoy them warm as a delicious appetizer or main dish.
Extra Tips
When making empanadas de carne, feel free to experiment with the fillings by adding ingredients like diced bell peppers, corn, or even spices like chili powder for a kick. If you prefer a vegetarian version, substitute the ground beef with lentils or mushrooms.
Also, for an extra touch of flavor, consider marinating the meat with spices for a few hours before cooking. Finally, if you’re short on time, store-bought pastry dough can be a convenient alternative to homemade dough while still delivering delicious results. Enjoy your culinary adventure!
Arepas Con Queso
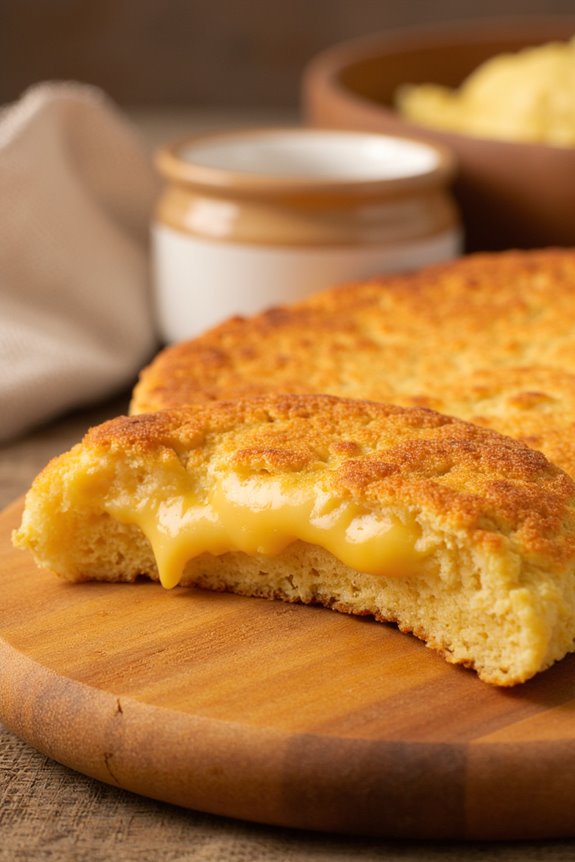
Arepas Con Queso is a delightful South American dish originating from Venezuela and Colombia. These savory cornmeal cakes aren’t only versatile but also incredibly satisfying. Traditionally stuffed with cheese, they’re a staple in many households and can be enjoyed for breakfast, lunch, or dinner.
The beauty of arepas lies in their simplicity and the ability to customize them with a variety of fillings, but the classic cheese-stuffed version remains a favorite.
Making Arepas Con Queso is a straightforward process that requires minimal ingredients. The dough is made from pre-cooked cornmeal, which gives the arepas their characteristic texture. Once cooked, the arepas are sliced open and filled with gooey, melted cheese, creating a deliciously satisfying treat.
Whether you’re preparing them for a family gathering or a cozy dinner, these arepas are sure to impress your guests and become a hit at your table.
Ingredients (serving size: 4-6 people):
- 2 cups pre-cooked cornmeal (such as arepa flour)
- 2 ½ cups warm water
- 1 teaspoon salt
- 1 tablespoon vegetable oil (for cooking)
- 1 ½ cups cheese (such as mozzarella, queso blanco, or your preferred cheese)
Cooking Instructions:
- Prepare the Dough: In a large mixing bowl, combine the pre-cooked cornmeal and salt. Gradually pour in the warm water while stirring with a spoon or your hands until a dough forms. The dough should be soft but not sticky. If it’s too dry, add a little more water; if it’s too wet, add a bit more cornmeal. Let the dough rest for about 5-10 minutes.
- Shape the Arepas: Once the dough has rested, divide it into 6-8 equal portions, depending on how large you want your arepas. Roll each portion into a ball, then flatten it into a disc about ½ inch thick. Make sure the edges are smooth and even to guarantee they cook properly.
- Cook the Arepas: Heat a skillet or griddle over medium heat and add the vegetable oil. Place the arepas in the skillet, cooking them for about 5-7 minutes on each side, or until they’ve a golden-brown crust. You might need to adjust the heat to prevent burning. The arepas should puff up slightly as they cook.
- Add the Cheese: Once the arepas are cooked, carefully slice them open horizontally, leaving one edge intact (like a pocket). Stuff each arepa with cheese, then return them to the skillet for another 1-2 minutes. Cover the skillet with a lid to help melt the cheese inside.
- Serve: Remove the arepas from the skillet and let them cool for a minute before serving. Enjoy them warm, either plain or with your favorite toppings such as avocado, salsa, or sour cream.
Extra Tips: When cooking Arepas Con Queso, the choice of cheese can greatly affect the flavor and texture. Feel free to experiment with different types of cheese or even mix them for a unique taste.
You can also add herbs or spices to the dough for extra flavor. If you’re looking for a quicker method, consider using a panini press or an electric griddle to cook multiple arepas at once, guaranteeing they’re evenly cooked and crispy.
Enjoy these delightful treats fresh, as they’re best when served warm!
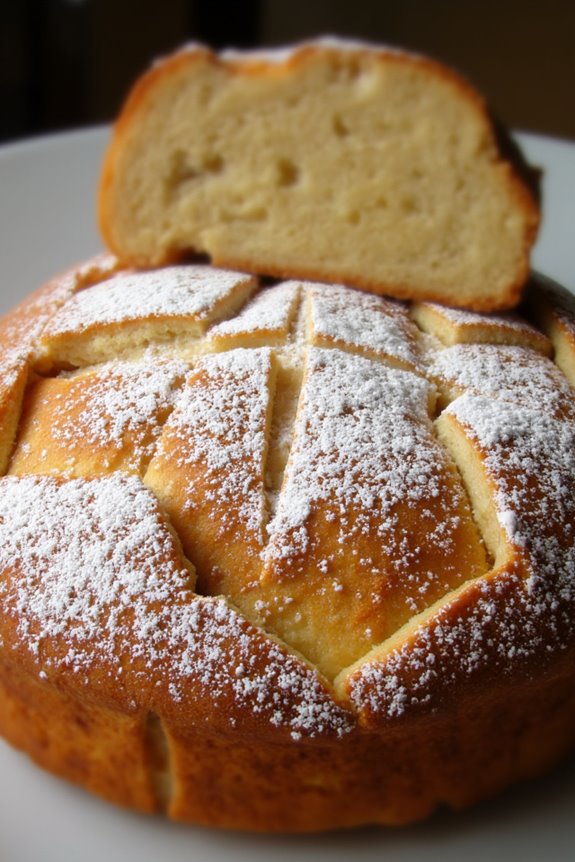
Pão De Queijo
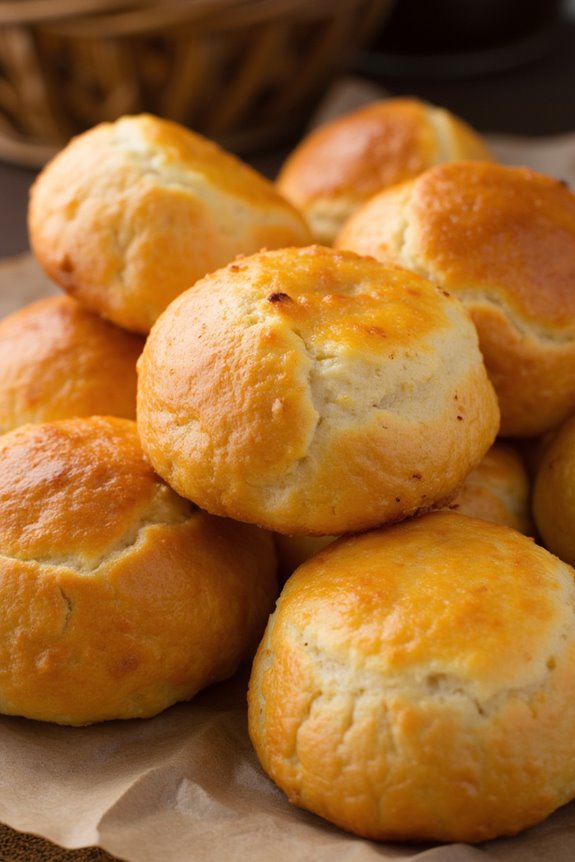
Pão de Queijo, or Brazilian cheese bread, is a delightful snack that has gained popularity far beyond its South American roots. Made primarily from tapioca flour and cheese, these little balls are crispy on the outside and chewy on the inside, making them the perfect treat for any occasion.
Whether enjoyed as a breakfast item, an appetizer, or a party snack, Pão de Queijo brings a taste of Brazil to your table, and they’re naturally gluten-free, catering to a variety of dietary needs.
The origins of Pão de Queijo can be traced back to the state of Minas Gerais, where cheese production is a long-standing tradition. Over the years, various regions have added their own twists to the classic recipe, incorporating different types of cheese and flavorings.
The simplicity of the ingredients combined with the ease of preparation makes this dish a must-try for anyone looking to expand their culinary repertoire.
Ingredients (Serves 4-6)
- 2 cups tapioca flour
- 1 cup milk
- 1/2 cup vegetable oil
- 1 teaspoon salt
- 2 large eggs
- 1 cup grated Parmesan cheese (or a mix of cheeses like mozzarella and cheddar)
- 1/2 teaspoon baking powder (optional for a lighter texture)
Cooking Instructions
- Preheat the Oven: Preheat your oven to 375°F (190°C). This guarantees that the Pão de Queijo will bake evenly and develop a golden-brown crust.
- Combine Wet Ingredients: In a medium saucepan, combine the milk, vegetable oil, and salt. Heat the mixture over medium heat until it comes to a gentle boil, stirring occasionally to prevent sticking.
- Mix with Tapioca Flour: Remove the saucepan from heat and immediately add the tapioca flour. Stir vigorously with a wooden spoon until the mixture forms a sticky dough. Allow the dough to cool slightly, so it’s comfortable to handle.
- Incorporate Eggs and Cheese: Once the dough is cool enough, add the eggs one at a time, mixing well after each addition. The dough will become smooth and elastic. Finally, fold in the grated cheese until evenly distributed throughout the dough.
- Shape the Dough: With lightly greased hands, take small portions of dough (about the size of a golf ball) and roll them into balls. Place them on a baking sheet lined with parchment paper, leaving some space between each ball for expansion during baking.
- Bake: Bake the Pão de Queijo in the preheated oven for about 15-20 minutes, or until they’re puffed up and golden brown on the outside. Keep an eye on them in the last few minutes to avoid over-baking.
- Cool and Serve: Once baked, remove the Pão de Queijo from the oven and let them cool slightly on the baking sheet. Serve warm for the best texture and flavor.
Extra Tips
When making Pão de Queijo, feel free to experiment with different types of cheese for varied flavors. Some people love to add herbs or spices, such as oregano or garlic powder, to enhance the taste further.
Keep in mind that the dough can be prepared ahead of time and stored in the refrigerator, but it’s best to bake them fresh to enjoy their chewy texture.
Finally, these delightful cheese breads can be frozen after shaping for a quick snack option later—just bake them straight from the freezer, adding a few extra minutes to the cooking time. Enjoy your culinary adventure with this beloved Brazilian treat!
Ceviche
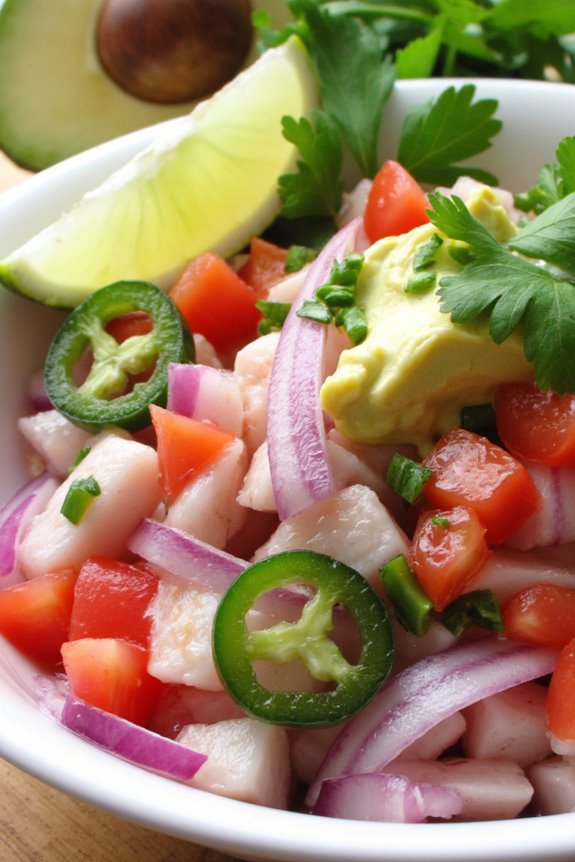
Ceviche is a revitalizing and vibrant dish that showcases the flavors of South America, particularly popular in coastal regions like Peru and Ecuador. This dish is made by marinating fresh seafood in citrus juices, typically lime or lemon, which “cooks” the fish without the use of heat. The acidity of the citrus not only imparts a zesty flavor but also changes the protein structure of the fish, making it safe to eat.
Ceviche is often served as an appetizer or a light meal and is typically accompanied by side dishes like sweet potatoes, corn, or avocado. The beauty of ceviche lies in its versatility; it can be prepared using various types of fish and seafood, and can be customized with a range of ingredients such as onions, cilantro, and chili peppers.
The combination of fresh ingredients creates a colorful and appetizing dish that’s perfect for gatherings or holiday celebrations. Whether you’re enjoying it on a sunny beach or at a festive gathering, ceviche is sure to delight your taste buds and impress your guests.
Ingredients (Serves 4-6)
- 1 pound fresh white fish fillet (such as snapper or tilapia), diced
- 1 cup freshly squeezed lime juice
- 1 small red onion, thinly sliced
- 1-2 jalapeño peppers, seeded and finely chopped
- 1 cup diced tomatoes
- 1/2 cup chopped fresh cilantro
- 1 teaspoon salt
- 1/2 teaspoon black pepper
- 1 avocado, diced (optional)
- Tortilla chips or plantain chips (for serving)
Cooking Instructions
- Prepare the Fish: Start by confirming that your fish is very fresh. Rinse the fish fillet under cold water and pat it dry with paper towels. Dice the fish into small, uniform pieces (about 1/2 inch). This guarantees even marination and texture.
- Marinate the Fish: Place the diced fish in a glass or ceramic bowl (avoid metal as it can react with the acidity). Pour the freshly squeezed lime juice over the fish, making sure it’s completely submerged. Cover the bowl with plastic wrap and refrigerate for about 30-45 minutes. The fish should turn opaque as it marinates, indicating it’s “cooked” by the citrus.
- Prepare the Vegetables: While the fish is marinating, thinly slice the red onion and finely chop the jalapeño peppers (adjust the quantity based on your spice preference). Dice the tomatoes and chop the fresh cilantro. Set these ingredients aside.
- Mix the Ceviche: Once the fish is marinated and opaque, drain about half of the lime juice from the bowl (this step is optional, depending on your acidity preference). Add the sliced onions, jalapeños, diced tomatoes, and chopped cilantro to the fish. Season with salt and black pepper, and gently toss to combine all the ingredients.
- Serve: If desired, gently fold in diced avocado for a creamy texture. Serve the ceviche chilled, either in small bowls or on a platter, with tortilla chips or plantain chips on the side for a delightful crunch.
Extra Tips
When making ceviche, the key to a delicious dish lies in using the freshest seafood possible, as this enhances both flavor and safety. If you’re uncertain about the freshness, consider purchasing fish from a reputable seafood market.
Additionally, feel free to experiment with different types of seafood like shrimp or scallops, and customize the heat level by adjusting the amount of jalapeño. Ceviche is best enjoyed fresh, so plan to serve it shortly after preparation for the best taste and texture.
Feijoada
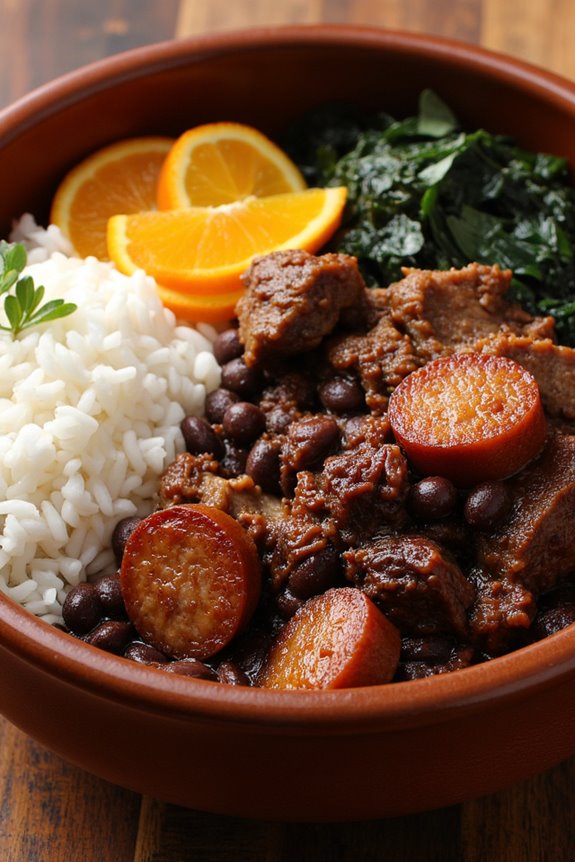
Feijoada is a traditional Brazilian stew that showcases the rich culinary heritage of South America, combining black beans with a variety of meats, typically pork and beef. This hearty dish is often considered the national dish of Brazil and is deeply rooted in the history of the country, reflecting the influences of African, Indigenous, and Portuguese cuisine.
Usually served with rice, collard greens, and orange slices, Feijoada is a comforting meal that brings family and friends together around the table.
The preparation of Feijoada may take some time, but the end result is a flavorful and satisfying dish that’s well worth the effort. The key to a successful Feijoada lies in the quality of the ingredients and the slow cooking process that allows the flavors to meld beautifully.
Whether you’re celebrating a special occasion or simply enjoying a cozy meal at home, this dish is sure to impress.
Ingredients (Serves 4-6 people):
- 1 lb black beans, soaked overnight
- 1 lb pork shoulder, cut into chunks
- 1/2 lb smoked sausage, sliced
- 1/2 lb chorizo, sliced
- 1/2 lb beef brisket, cut into chunks
- 1 onion, chopped
- 4 cloves garlic, minced
- 2 bay leaves
- 1 teaspoon cumin
- 1 teaspoon paprika
- Salt and pepper to taste
- 2 tablespoons olive oil
- 4 cups water (or enough to cover the beans)
- Cooked white rice, for serving
- Collard greens, for serving
- Orange slices, for garnish
Cooking Instructions:
- Prepare the Beans: Start by draining the soaked black beans and rinsing them under cold water. This will remove excess starch and help them cook evenly.
- Sear the Meats: In a large pot or Dutch oven, heat the olive oil over medium-high heat. Add the pork shoulder pieces and beef brisket, searing them until they’re browned on all sides. This step is essential as it locks in the flavors and adds depth to the stew.
- Add the Sausages: Once the meats are browned, add the sliced smoked sausage and chorizo to the pot. Cook for an additional 5 minutes, stirring occasionally to guarantee even cooking.
- Sauté the Aromatics: Add the chopped onion and minced garlic to the pot, stirring to combine. Cook until the onion is translucent and fragrant, about 3-4 minutes.
- Combine Ingredients: Stir in the soaked black beans, bay leaves, cumin, paprika, and season with salt and pepper. Pour in enough water to cover the beans and meat mixture, then bring to a boil.
- Simmer the Stew: Once boiling, reduce the heat to low, cover the pot, and let the stew simmer for 2 to 3 hours, stirring occasionally. This slow cooking process will allow the flavors to meld together and the beans to become tender.
- Final Adjustments: After the cooking time, taste the stew and adjust seasoning as necessary. If the stew is too thick, you can add a bit more water to reach your desired consistency.
- Serve: Remove the bay leaves before serving. Ladle the Feijoada into bowls and serve hot with cooked white rice, sautéed collard greens, and orange slices on the side for a burst of freshness.
Extra Tips:
When cooking Feijoada, feel free to customize the meats according to your preference; other options such as bacon, ham hocks, or chicken work well too.
Additionally, let the dish rest for a few hours or overnight in the refrigerator; the flavors will deepen and improve, making it even more delicious the next day.
Always remember to serve it with plenty of rice and garnishes, as they complement the richness of the stew beautifully. Enjoy your culinary journey through South America!
Alfajores

Alfajores are a beloved traditional treat in many South American countries, especially Argentina and Peru. These delightful cookies are typically made from two soft, crumbly biscuits that are filled with a rich layer of dulce de leche, then dusted with powdered sugar or coated in chocolate. The combination of textures and flavors makes alfajores a perfect dessert for holiday gatherings, where they can be enjoyed alongside a warm cup of coffee or tea.
Not only are they delicious, but they also carry a sense of nostalgia and cultural significance, often being passed down through generations.
Making alfajores at home is a rewarding experience that allows you to customize the recipe to your taste. While the basic version is heavenly on its own, you can also experiment with different fillings, such as chocolate ganache or fruit preserves, to give your cookies a unique twist.
Whether you’re preparing for a festive celebration or simply satisfying your sweet tooth, these cookies are sure to impress your family and friends. Here’s how you can make your own mouthwatering alfajores for 4-6 people.
Ingredients:
- 1 cup unsalted butter, softened
- 1 cup powdered sugar
- 2 large egg yolks
- 1 teaspoon vanilla extract
- 2 cups all-purpose flour
- 1 cup cornstarch
- 1 teaspoon baking powder
- 1 cup dulce de leche
- Powdered sugar, for dusting
Cooking Instructions:
- Prepare the Dough: In a large mixing bowl, cream the softened butter and powdered sugar together until the mixture is light and fluffy. This usually takes about 3-5 minutes. Add the egg yolks one at a time, mixing well after each addition, and then stir in the vanilla extract.
- Combine Dry Ingredients: In a separate bowl, whisk together the all-purpose flour, cornstarch, and baking powder. Gradually add this dry mixture to the butter mixture, combining until just incorporated. Be careful not to overmix; the dough should be soft but not sticky.
- Chill the Dough: Wrap the dough in plastic wrap and refrigerate for at least 30 minutes. This step is essential as it helps the dough firm up and makes it easier to roll out.
- Roll and Cut Cookies: Preheat your oven to 350°F (175°C). On a lightly floured surface, roll out the chilled dough to about 1/4 inch thick. Using a round cookie cutter (or a glass), cut out circles and place them on a baking sheet lined with parchment paper.
- Bake the Cookies: Bake the cookies in the preheated oven for about 10-12 minutes, or until the edges are lightly golden. Remove them from the oven and let them cool completely on a wire rack.
- Assemble the Alfajores: Once the cookies have cooled, spread a generous layer of dulce de leche on the bottom side of one cookie and sandwich it with another cookie. Repeat this process until all cookies are filled.
- Finish and Serve: Dust the assembled alfajores with powdered sugar for an elegant touch. They can be served immediately or stored in an airtight container for up to a week.
Extra Tips:
To enhance the flavor of your alfajores, consider adding a pinch of salt to the dough to balance the sweetness. You can also experiment with flavored dulce de leche or incorporate spices such as cinnamon or lemon zest into the dough for a unique twist.
If you have leftover cookies, they can be stored in a cool, dry place, but it’s best to keep them in a single layer to avoid sticking. Enjoy your homemade alfajores as a delightful treat for any occasion!
Chocotorta
Chocotorta is a classic Argentine dessert that marries the rich flavors of chocolate with the creamy texture of a traditional cheesecake. This no-bake cake is simple to prepare and is a beloved treat in many South American households, especially during holidays and celebrations. Its invigorating taste and delightful combination of textures make it a perfect addition to any festive table.
The main ingredients include chocolate cookies, dulce de leche, and cream cheese, resulting in a dessert that’s both indulgent and easy to make. Assembling the chocotorta requires minimal cooking skills, making it an accessible choice for both novice and experienced bakers.
The layers of chocolate cookies soaked in coffee or milk are alternated with a luscious mixture of cream cheese and dulce de leche, creating a beautiful, multi-layered cake. Once assembled, the chocotorta is chilled until firm, allowing the flavors to meld together beautifully. Serve it chilled for an invigorating treat that will delight your family and friends.
Ingredients (Serves 4-6):
- 400g chocolate cookies (like Chocolinas or similar)
- 500g dulce de leche
- 500g cream cheese (softened)
- 1 cup strong coffee or milk (for soaking)
- Cocoa powder or grated chocolate (for dusting, optional)
Cooking Instructions:
- Prepare the Cream Mixture: In a large mixing bowl, combine the softened cream cheese and dulce de leche. Use an electric mixer or a whisk to blend them together until the mixture is smooth and creamy. This will be the filling for your chocotorta, so verify there are no lumps for a velvety texture.
- Soak the Cookies: Pour the strong coffee or milk into a shallow dish. Quickly dip each chocolate cookie into the liquid, verifying they’re soaked but not soggy. This step adds moisture and flavor to the cake, so be careful not to leave them in the liquid for too long.
- Layer the Cake: In a rectangular or square dish, start layering your chocotorta. Begin with a layer of soaked cookies at the bottom of the dish. Spread a generous layer of the cream mixture over the cookies, smoothing it out evenly with a spatula.
- Repeat the Layering: Continue to alternate layers of soaked cookies and cream mixture until you reach the top or run out of ingredients. Finish with a layer of the cream mixture on top to create a beautiful presentation.
- Chill the Chocotorta: Cover the dish with plastic wrap and place it in the refrigerator for at least 4 hours, or preferably overnight. Chilling helps the layers set and the flavors develop, making it taste even better.
- Serve: Once set, remove the chocotorta from the fridge. If desired, dust the top with cocoa powder or grated chocolate for an elegant finish. Cut into slices and serve chilled.
Extra Tips:
When making chocotorta, feel free to experiment with different flavors by adding vanilla extract to the cream mixture or incorporating fruit preserves between the layers. Additionally, for a more decadent version, consider using whipped cream in the filling or adding a layer of chocolate ganache on top.
Remember that the longer you let it chill, the better the flavors will meld, so patience is key for this dessert!
Tamales
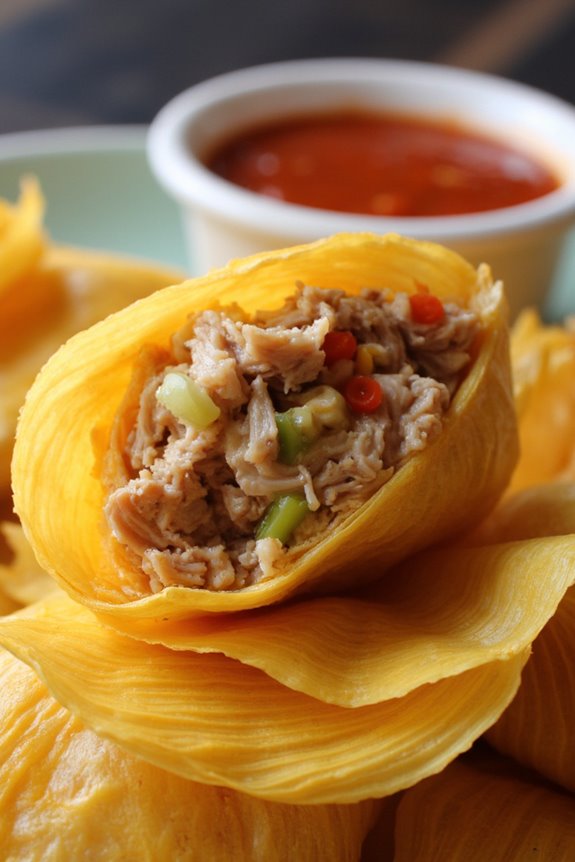
Tamales are a traditional South American dish that has become a cherished staple in many Latin American countries, especially during festive occasions and family gatherings. Made from masa (a type of corn dough), tamales are filled with a variety of ingredients, such as meats, cheeses, or vegetables, and are wrapped in corn husks before being steamed to perfection.
This dish isn’t only a culinary delight but also a symbol of cultural heritage, bringing people together as they share the experience of making and enjoying these flavorful parcels.
The process of making tamales can be a labor of love, often best enjoyed as a group activity with family and friends. Each person can take part in preparing the masa, choosing the fillings, and wrapping the tamales, making it a fun and engaging experience.
Once cooked, the tamales can be served with a side of salsa or guacamole, adding a fresh and zesty touch to this hearty meal. Whether you choose to fill your tamales with shredded pork, chicken, or a vegetarian option, they’re sure to be a hit at your holiday gatherings.
Ingredients (Serves 4-6 people)
- 2 cups masa harina
- 1 cup chicken or vegetable broth (plus more if needed)
- 1/2 cup vegetable shortening or lard
- 1 teaspoon baking powder
- 1 teaspoon salt
- 2 cups filling of choice (shredded chicken, pork, cheese, vegetables, etc.)
- 12-15 dried corn husks (soaked in warm water for 30 minutes)
- Salsa or guacamole for serving (optional)
Cooking Instructions
- Prepare the Corn Husks: Begin by soaking the dried corn husks in warm water for about 30 minutes. This will make them pliable and easier to work with when wrapping the tamales. After soaking, drain and set them aside, keeping them damp.
- Make the Masa Dough: In a large mixing bowl, beat the vegetable shortening or lard until fluffy. Gradually add the masa harina, baking powder, and salt, mixing well. Slowly add the chicken or vegetable broth until you reach a spreadable consistency, similar to peanut butter. The dough should be moist but not too sticky.
- Prepare the Fillings: While the dough is resting, prepare your filling of choice. If using meat, verify it’s cooked and shredded. If using vegetables or cheese, chop them into small, manageable pieces that can be easily wrapped in the masa.
- Assemble the Tamales: Take a soaked corn husk and lay it flat with the wider end towards you. Spread a generous spoonful of masa dough onto the husk, leaving some space at the edges. Place a spoonful of your chosen filling in the center of the dough. Fold the sides of the husk over the masa, then fold up the bottom to seal the tamale. Repeat this process for all husks.
- Steam the Tamales: Place a steamer pot on the stove with water in the bottom (not touching the tamales). Arrange the tamales upright in the steamer, open side up. Cover with a damp cloth or additional corn husks to retain moisture. Steam the tamales for about 1-1.5 hours, or until the masa separates easily from the husk.
- Serve and Enjoy: Once cooked, carefully remove the tamales from the steamer and let them cool slightly before serving. Serve with salsa or guacamole on the side for an extra kick.
Extra Tips
When making tamales, it’s important to verify that the masa is adequately seasoned and moist, as this will greatly affect the final taste and texture.
Feel free to experiment with different fillings, such as spicy chorizo or roasted vegetables, to create your unique twist. If you’re making tamales for a large gathering, consider preparing them a day in advance; they reheat beautifully and can be served warm, making them a convenient option for busy holiday celebrations.
Buñuelos

Buñuelos are a delightful South American treat, often enjoyed during festive celebrations and family gatherings. These light and crispy dough balls, made from a simple dough mixture, are typically fried until golden brown and can be served with a variety of sweet toppings or syrups.
Originating from various Latin American countries, buñuelos have gained popularity for their versatility and delicious taste. Whether enjoyed as a dessert or a snack, they’re sure to become a favorite for anyone who tries them.
The beauty of buñuelos lies in their simplicity. With just a few ingredients, you can create a satisfying and delectable dish that will impress your guests. They can be flavored in numerous ways, from adding a hint of cinnamon to drizzling with honey or sugar syrup.
Perfect for the holiday season or any occasion, buñuelos are a must-try recipe that brings a taste of South America into your kitchen.
Ingredients (Serves 4-6)
- 2 cups all-purpose flour
- 2 teaspoons baking powder
- 1 teaspoon sugar
- 1/2 teaspoon salt
- 1/2 teaspoon ground cinnamon (optional)
- 2 large eggs
- 3/4 cup milk
- 1 teaspoon vanilla extract
- Oil for frying
- Powdered sugar for dusting (optional)
- Honey or syrup for drizzling (optional)
Cooking Instructions
- Prepare the Dough: In a large mixing bowl, combine the all-purpose flour, baking powder, sugar, salt, and ground cinnamon (if using). Mix well to guarantee the dry ingredients are evenly distributed.
- Add Wet Ingredients: In a separate bowl, whisk together the eggs, milk, and vanilla extract until smooth. Gradually pour the wet mixture into the dry ingredients, stirring until a soft dough forms. It should be slightly sticky but manageable. If it’s too wet, add a little more flour.
- Knead the Dough: On a lightly floured surface, knead the dough gently for about 1-2 minutes until it becomes smooth. Avoid over-kneading, as this can make the buñuelos tough.
- Shape the Buñuelos: Divide the dough into small pieces (about the size of a golf ball). Roll each piece into a ball, then gently flatten it to form a disc shape. Aim for about 1/4 inch thickness.
- Heat the Oil: In a deep skillet or pot, pour enough oil to submerge the buñuelos (about 2-3 inches deep). Heat the oil over medium heat until it reaches 350°F (175°C). You can test if the oil is ready by dropping a small piece of dough into it; if it bubbles and rises to the surface, the oil is hot enough.
- Fry the Buñuelos: Carefully place a few buñuelos in the hot oil, making sure not to overcrowd the pan. Fry for about 2-3 minutes on each side, or until they’re golden brown. Use a slotted spoon to remove them from the oil and place them on a plate lined with paper towels to drain excess oil.
- Serve: Allow the buñuelos to cool slightly, then dust with powdered sugar if desired. Drizzle with honey or syrup before serving for added sweetness.
Extra Tips
When making buñuelos, verify the oil is at the right temperature for frying. If the oil is too hot, the outside will brown quickly while the inside remains raw; if it’s too cold, the buñuelos will absorb too much oil and become greasy.
You can experiment with different flavorings, such as adding orange zest to the dough or serving them with a chocolate sauce. Buñuelos are best enjoyed fresh, so try to serve them soon after frying for the ultimate crispy texture!
Tarta De Santiago
Tarta De Santiago, also known as Santiago Cake, is a traditional Spanish almond cake that hails from the region of Galicia. This delightful dessert isn’t only delicious but also holds cultural significance, often enjoyed during the feast of St. James.
With its distinctive flavor profile that balances the nuttiness of almonds with the sweetness of sugar, this cake is a wonderful addition to holiday festivities or any special occasion. Topped with a dusting of powdered sugar and the iconic cross of St. James, Tarta De Santiago is as beautiful as it’s tasty.
The recipe itself is simple yet requires attention to detail to achieve the perfect texture and flavor. The cake is naturally gluten-free, which makes it an excellent option for those with dietary restrictions.
Whether served with a dollop of whipped cream or accompanied by fresh fruit, this cake is sure to impress your guests. Now, let’s explore making this delightful dessert for a serving size of 4-6 people.
Ingredients:
- 200g ground almonds
- 200g granulated sugar
- 4 large eggs
- 1 teaspoon baking powder
- Zest of 1 lemon
- 1 teaspoon cinnamon powder
- Powdered sugar (for dusting)
- Butter (for greasing the cake pan)
Cooking Instructions:
- Preheat the Oven: Begin by preheating your oven to 180°C (350°F). This guarantees that your cake will bake evenly and rise properly once it’s in the oven.
- Prepare the Cake Pan: Grease a round 9-inch cake pan with butter and line the bottom with parchment paper. This step is essential to prevent the cake from sticking to the pan, allowing for a smooth release once baked.
- Mix Dry Ingredients: In a medium bowl, combine the ground almonds, granulated sugar, baking powder, and cinnamon powder. Stir the mixture well to make sure that all the dry ingredients are evenly distributed.
- Whisk Eggs and Lemon Zest: In a separate large bowl, crack the eggs and add the lemon zest. Using a whisk or electric mixer, beat the eggs until they’re frothy and pale in color. This will incorporate air into the mixture, giving the cake a light texture.
- Combine Ingredients: Gradually fold the dry mixture into the egg mixture. Be gentle when mixing to maintain the airiness of the batter. The result should be a thick but pourable batter.
- Pour into Pan: Pour the batter into the prepared cake pan, smoothing the top with a spatula to guarantee it bakes evenly.
- Bake the Cake: Place the cake in the preheated oven and bake for about 30-35 minutes, or until a toothpick inserted in the center comes out clean. Keep an eye on the cake towards the end to avoid overbaking.
- Cool the Cake: Once baked, remove the cake from the oven and let it cool in the pan for about 10 minutes. Then, carefully transfer it to a wire rack to cool completely.
- Dust with Powdered Sugar: Once the cake is fully cooled, dust the top generously with powdered sugar. For an authentic touch, you can place a stencil of the Cross of St. James on top before dusting.
Extra Tips:
When making Tarta De Santiago, using high-quality almonds will greatly enhance the flavor of the cake. If possible, opt for blanched almonds that are finely ground for a smoother texture.
Additionally, the cake can be made a day in advance, as it often tastes even better the next day as the flavors meld together. Store it in an airtight container at room temperature to keep it fresh. Enjoy your baking adventure with this iconic cake!
Picanha
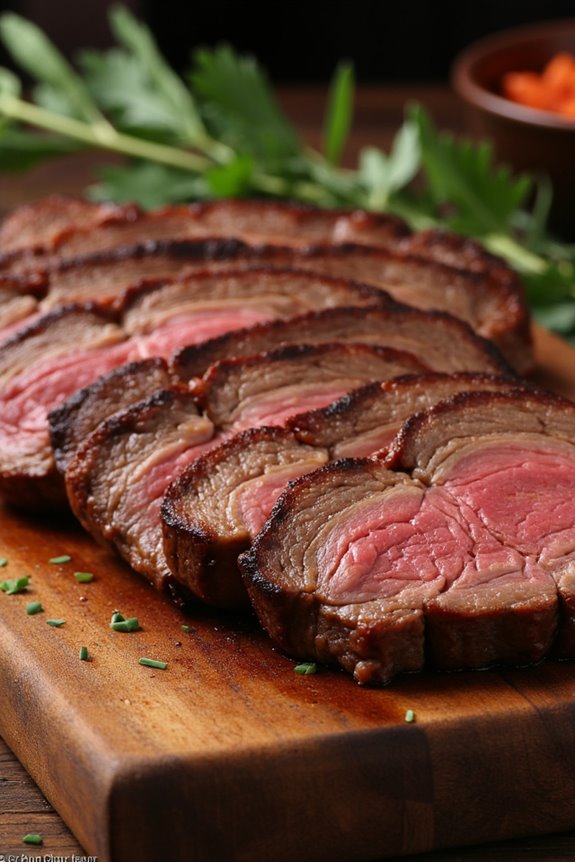
Picanha, a beloved cut of beef in Brazil, is known for its rich flavor and tenderness, making it a centerpiece of many South American holiday feasts. This cut, also known as the “rump cap,” is characterized by a thick layer of fat that keeps the meat juicy as it cooks. Traditionally, picanha is seasoned simply with coarse salt, allowing the natural flavors to shine through, and is often grilled over an open flame or on a charcoal grill.
When preparing picanha for a gathering, it’s vital to serve it sliced against the grain to enhance its tenderness. This recipe is designed to serve 4-6 people, making it perfect for family gatherings or festive occasions. Pair it with some chimichurri sauce, roasted vegetables, or a fresh salad for a complete meal that will leave your guests raving about the flavors of South America.
Ingredients for Picanha (Serves 4-6):
- 2-3 pounds picanha (rump cap)
- Coarse sea salt
- Freshly ground black pepper (optional)
- 2-3 cloves of garlic, minced (optional)
- Olive oil (for brushing, optional)
Cooking Instructions:
- Prepare the Picanha: Start by trimming any excess silver skin from the picanha, but be careful to leave a good layer of fat on one side. This fat is vital for flavor and tenderness. If desired, you can score the fat in a crosshatch pattern to help it render during cooking.
- Season the Meat: Generously season the picanha with coarse sea salt. If you prefer, you can also add freshly ground black pepper and minced garlic for additional flavor. Let the meat sit at room temperature for about 30 minutes to allow the salt to penetrate.
- Preheat the Grill: Prepare your grill for cooking by preheating it to high heat. If using charcoal, verify the coals are glowing red and covered with a light ash. For gas grills, preheat on high for about 10-15 minutes.
- Grill the Picanha: Place the picanha on the grill, fat side down. Grill for about 10-15 minutes, or until the fat is nicely browned and sizzling. Flip the meat and continue to grill for another 10-15 minutes for medium-rare, depending on the thickness of your cut. Use a meat thermometer to check for doneness; aim for an internal temperature of 130-135°F.
- Rest the Meat: Once cooked to your preferred doneness, remove the picanha from the grill and let it rest on a cutting board for at least 10 minutes. This resting period allows the juices to redistribute throughout the meat, confirming it stays moist.
- Slice and Serve: After resting, slice the picanha against the grain into thin strips. Serve it warm, accompanied by chimichurri sauce or your favorite sides.
Extra Tips:
When cooking picanha, the key isn’t to overcook it, as this cut is best enjoyed medium-rare. If you’re using a charcoal grill, consider adding some wood chips for a smoky flavor.
Additionally, if you’re grilling for a crowd, consider skewering the slices onto long metal or soaked wooden skewers, which makes for easy serving and adds a fun presentation. Don’t forget to keep the fat side up while resting to maintain moisture. Enjoy your flavorful journey into South American cuisine!
Arroz Con Leche
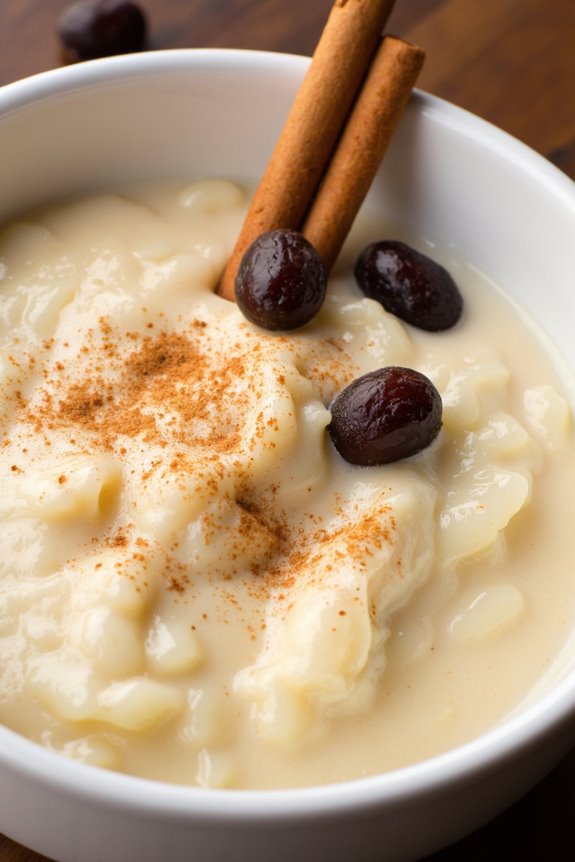
Arroz Con Leche, a traditional South American dessert, is a creamy rice pudding that has captivated taste buds for generations. This delightful dish combines the comforting flavors of rice, milk, and sugar, with a hint of cinnamon and vanilla, creating a sweet treat that’s perfect for any occasion. It’s often enjoyed during festive celebrations, family gatherings, or simply as a comforting dessert after a meal.
The recipe isn’t only easy to follow but can also be customized to suit your taste preferences, making it a versatile addition to your holiday menu. Making Arroz Con Leche is an excellent way to bring a taste of South America into your home. The recipe typically involves simple ingredients that you may already have in your pantry, and the preparation process is straightforward.
As the rice simmers and absorbs the flavors, your kitchen will fill with a warm, inviting aroma, making it hard to resist sneaking a taste before it’s fully prepared. Whether served warm or chilled, Arroz Con Leche is a delicious way to celebrate the sweet moments in life.
Ingredients (Serves 4-6):
- 1 cup of Arborio rice (or any short-grain rice)
- 4 cups of whole milk
- 1 cup of water
- 1/2 cup of granulated sugar
- 1 cinnamon stick
- 1 teaspoon of vanilla extract
- 1/4 teaspoon of salt
- Ground cinnamon for garnish (optional)
- Raisins or nuts for garnish (optional)
Cooking Instructions:
- Rinse the Rice: Begin by rinsing 1 cup of Arborio rice under cold water in a fine-mesh sieve. This step helps remove excess starch and prevents the rice from becoming overly sticky. Rinse until the water runs clear, then set the rice aside.
- Combine Ingredients: In a large saucepan, combine the rinsed rice, 4 cups of whole milk, 1 cup of water, 1/2 cup of granulated sugar, 1 cinnamon stick, and 1/4 teaspoon of salt. Stir gently to distribute the ingredients evenly.
- Cook the Rice: Place the saucepan over medium heat and bring the mixture to a gentle boil. Once boiling, reduce the heat to low, cover the saucepan, and let it simmer. Stir occasionally to prevent the rice from sticking to the bottom of the pan. Cook for approximately 25-30 minutes, or until the rice is tender and the mixture has thickened to a creamy consistency.
- Add Flavorings: After the rice has cooked, remove the saucepan from the heat and stir in 1 teaspoon of vanilla extract. This adds a wonderful depth of flavor to the pudding. If you prefer a sweeter taste, you can adjust the sugar at this stage.
- Cool and Serve: Allow the Arroz Con Leche to cool slightly before serving. You can serve it warm in individual bowls or transfer it to a larger dish to chill in the refrigerator if you prefer it cold. Garnish with a sprinkle of ground cinnamon and add raisins or nuts for an extra touch, if desired.
Extra Tips:
When making Arroz Con Leche, feel free to experiment with flavors by adding a pinch of nutmeg or a splash of coconut milk for a tropical twist. If you like a creamier consistency, you can substitute part of the whole milk with evaporated milk.
Additionally, for a richer taste, consider letting the pudding rest for a few hours before serving; this allows the flavors to meld beautifully. Don’t forget to taste along the way to adjust sweetness and flavorings to your liking!
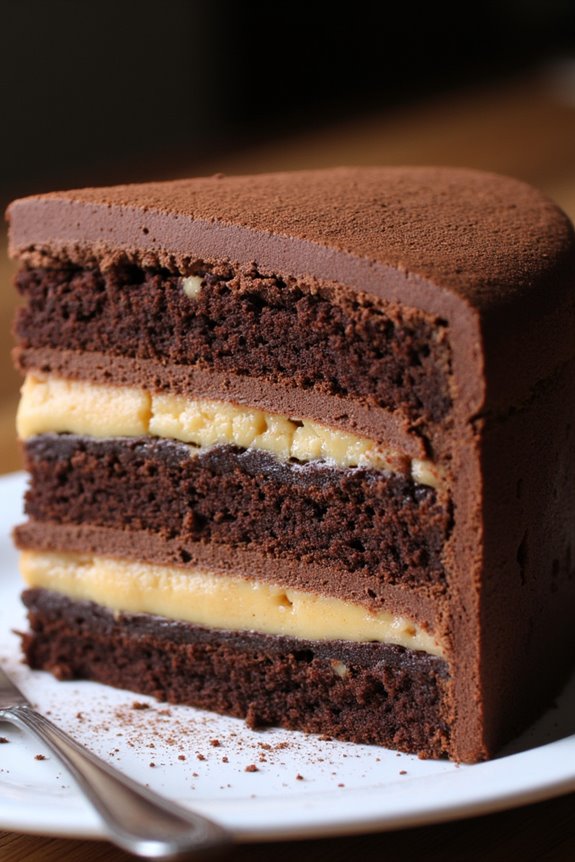
Tres Leches Cake

Tres Leches Cake, a beloved dessert in many Latin American countries, is a moist and indulgent cake soaked in a mixture of three types of milk: evaporated milk, condensed milk, and heavy cream. This rich and creamy treat is often served at celebrations and gatherings, delighting guests with its sweetness and light texture.
Whether it’s a birthday, a holiday, or just a special family dinner, Tres Leches Cake brings a festive touch and is bound to impress everyone at the table.
Making Tres Leches Cake might seem intimidating, but it’s surprisingly simple and requires basic ingredients that you might already have at home. The key to its signature flavor and texture lies in the soaking process, which allows the cake to absorb the milks and become incredibly moist.
Topped with whipped cream and fresh fruit, this cake isn’t only delicious but also visually appealing, making it a perfect centerpiece for any occasion.
Ingredients (serving size: 4-6 people):
- 1 cup all-purpose flour
- 1 ½ teaspoons baking powder
- ¼ teaspoon salt
- 5 large eggs, separated
- 1 cup granulated sugar, divided
- ½ cup whole milk
- 1 teaspoon vanilla extract
- 1 can (12 oz) evaporated milk
- 1 can (14 oz) sweetened condensed milk
- 1 cup heavy cream
- 1 cup whipped cream (for topping)
- Fresh fruit for garnish (optional)
Cooking Instructions:
- Preheat the Oven: Begin by preheating your oven to 350°F (175°C). While the oven is heating up, you can prepare your cake batter, making sure everything comes together smoothly.
- Prepare the Cake Batter: In a medium bowl, whisk together the flour, baking powder, and salt. In a separate large bowl, beat the egg yolks and ¾ cup of sugar until the mixture is pale and thick. Stir in the milk and vanilla extract until well combined. Gradually add the dry ingredients to the wet ingredients, mixing until just combined.
- Whip the Egg Whites: In another clean bowl, whip the egg whites until they form soft peaks. Gradually add the remaining ¼ cup of sugar, continuing to beat until stiff peaks form. Gently fold the egg whites into the cake batter using a spatula, being careful to maintain the airy texture.
- Bake the Cake: Pour the batter into a greased 9×13 inch baking pan, spreading it evenly. Bake in the preheated oven for approximately 25-30 minutes, or until a toothpick inserted into the center comes out clean. Allow the cake to cool in the pan for about 10 minutes, then transfer it to a wire rack to cool completely.
- Prepare the Milk Mixture: While the cake is cooling, whisk together the evaporated milk, sweetened condensed milk, and heavy cream in a bowl. Once the cake is completely cooled, poke holes all over the top of the cake using a fork or a skewer.
- Soak the Cake: Slowly pour the milk mixture over the entire cake, making sure it soaks into the holes. Cover the cake with plastic wrap and refrigerate for at least 4 hours, or overnight for the best flavor.
- Serve the Cake: Before serving, spread the whipped cream evenly over the top of the cake. If desired, garnish with fresh fruit such as strawberries or mango slices. Slice into squares and enjoy!
Extra Tips: For an extra layer of flavor, consider adding a splash of rum or cinnamon to the milk mixture. If you prefer a lighter version, you can substitute the heavy cream with coconut milk for a tropical twist.
Always make sure that the cake is well-soaked for a moist texture, and don’t hesitate to experiment with different fruits or toppings to make the dessert your own!