

When I think of Peruvian cuisine, my heart warms with the thought of its vibrant side dishes that bring any meal to life. Each recipe is a celebration of fresh ingredients and bold flavors, from tangy quinoa salads to hearty tacu tacu. These dishes are perfect companions for main courses but can easily shine on their own. If you’re eager to add a burst of flavor to your table, let’s explore some delightful options together.
Quinoa Salad With Avocado and Lime

Quinoa Salad with Avocado and Lime is a revitalizing and nutritious Peruvian side dish that highlights the versatility of quinoa, a staple grain in Peru. This salad isn’t only vibrant but also packed with healthy ingredients that come together to create a delightful combination of textures and flavors.
The nuttiness of quinoa pairs beautifully with the creamy avocado and the zesty lime dressing, making it a perfect accompaniment to any meal or a light main dish on its own. This salad is incredibly simple to prepare and can be made in advance, making it a great option for gatherings or meal prep.
The ingredients are fresh and colorful, ensuring that your plate looks as good as it tastes. Whether you’re a quinoa lover or new to this superfood, this dish is sure to impress with its taste and health benefits.
Ingredients (Serves 4-6):
- 1 cup quinoa
- 2 cups water or vegetable broth
- 1 ripe avocado, diced
- 1 cup cherry tomatoes, halved
- 1 cup cucumber, diced
- 1/4 cup red onion, finely chopped
- 1/4 cup fresh cilantro, chopped
- Juice of 2 limes
- 2 tablespoons olive oil
- Salt and pepper to taste
Cooking Instructions:
1. Rinse the Quinoa: Begin by rinsing the quinoa under cold running water for about 2-3 minutes. This helps remove the natural coating called saponin, which can make the quinoa taste bitter. Drain well.
2. Cook the Quinoa: In a medium-sized pot, combine the rinsed quinoa and water (or vegetable broth) and bring it to a boil. Once boiling, reduce the heat to low, cover, and let it simmer for about 15 minutes or until the quinoa has absorbed all the liquid.
Once cooked, fluff the quinoa with a fork and let it cool to room temperature.
3. Prepare the Vegetables: While the quinoa cools, prepare your vegetables. Dice the avocado, halve the cherry tomatoes, and chop the cucumber and red onion. Be sure to chop the cilantro finely for an even distribution throughout the salad.
4. Make the Dressing: In a small bowl, whisk together the lime juice, olive oil, salt, and pepper. Taste and adjust the seasoning if necessary, ensuring you have a balanced and zesty dressing.
5. Combine Ingredients: In a large mixing bowl, combine the cooled quinoa, diced avocado, cherry tomatoes, cucumber, red onion, and cilantro. Drizzle the lime dressing over the top and gently toss the salad until everything is well mixed and coated with the dressing.
6. Serve: Transfer the quinoa salad to a serving dish or individual plates. This salad can be served immediately or chilled in the refrigerator for an hour to enhance the flavors.
Extra Tips:
When making Quinoa Salad with Avocado and Lime, consider adding other ingredients to enhance the flavor and texture, such as black beans for protein, corn for sweetness, or bell peppers for crunch.
If you anticipate leftovers, it’s best to add the avocado just before serving to prevent browning. This dish is also highly customizable; feel free to adjust the lime juice and seasoning to your taste, or top it with feta cheese for an extra layer of flavor.
Enjoy this healthy side dish as part of your Peruvian culinary journey!
Peruvian Potato Salad
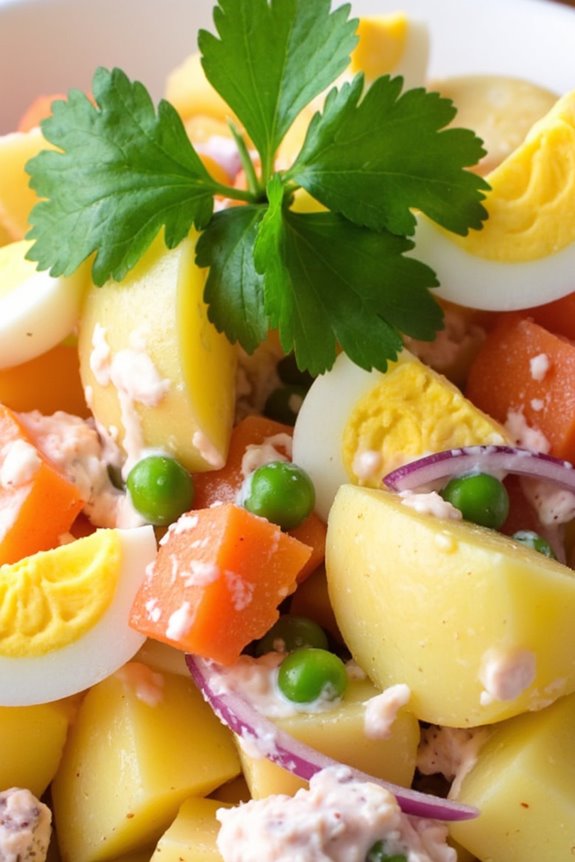
Peruvian Potato Salad, known as “Ensalada de Papa,” is a vibrant and flavorful side dish that showcases the diverse culinary heritage of Peru. This dish isn’t just a simple salad; it combines the creaminess of boiled potatoes with a medley of colorful vegetables, herbs, and a tangy dressing, making it a perfect accompaniment to your main courses.
The combination of textures and flavors makes it a favorite at family gatherings, barbecues, and festive occasions across Peru. The beauty of Peruvian Potato Salad lies in its versatility. You can customize it by adding different vegetables or adjusting the seasoning to suit your taste.
Traditionally, this salad features ingredients like peas, carrots, and hard-boiled eggs, all tossed in a creamy dressing that elevates the flavors. Whether you serve it chilled or at room temperature, it’s sure to be a crowd-pleaser.
Ingredients (Serves 4-6):
- 4 medium-sized Peruvian yellow potatoes (or any waxy potatoes)
- 2 medium carrots, diced
- 1 cup frozen peas
- 2 hard-boiled eggs, chopped
- 1/2 red onion, finely chopped
- 1/4 cup mayonnaise
- 2 tablespoons sour cream
- 1 tablespoon lime juice
- Salt and pepper to taste
- Fresh cilantro leaves, for garnish
Cooking Instructions:
- Prepare the Potatoes: Start by washing and peeling the Peruvian yellow potatoes. Cut them into quarters and place them in a large pot. Cover the potatoes with water and add a pinch of salt. Bring the water to a boil over medium-high heat and cook the potatoes until they’re fork-tender, about 15-20 minutes.
- Once cooked, drain and let them cool before cutting them into bite-sized pieces.
- Cook the Carrots and Peas: While the potatoes are cooling, bring another pot of water to a boil. Add the diced carrots and cook for about 5 minutes until they’re tender but still crisp.
- Add the frozen peas and cook for an additional 2 minutes. Drain the vegetables and rinse them under cold water to stop the cooking process. Set aside.
- Combine Ingredients: In a large mixing bowl, combine the cooled potato pieces, cooked carrots, peas, and chopped red onion. Gently toss the ingredients together to combine them evenly.
- Make the Dressing: In a separate small bowl, whisk together the mayonnaise, sour cream, lime juice, and a pinch of salt and pepper until smooth. Adjust the seasoning according to your taste preferences.
- Dress the Salad: Pour the dressing over the potato and vegetable mixture. Carefully fold the dressing into the salad until all the ingredients are well coated. Be gentle to avoid breaking the potato pieces.
- Add Eggs and Garnish: Finally, gently fold in the chopped hard-boiled eggs. Transfer the salad to a serving dish and garnish with fresh cilantro leaves. You can either serve it immediately or refrigerate it for an hour to let the flavors meld.
Extra Tips:
For a creamier texture, you can add more mayonnaise or sour cream to your desired consistency. Feel free to experiment with other ingredients like diced bell peppers or corn for added flavor and color.
If you’re preparing this salad in advance, keep the dressing separate until just before serving to maintain the freshness of the vegetables. Enjoy your Peruvian Potato Salad as a delightful side dish that’s sure to impress!
Tacu Tacu: A Hearty Bean and Rice Dish

Tacu Tacu is a traditional Peruvian dish known for its combination of rice and beans, creating a hearty and satisfying meal. Typically enjoyed as a side dish, it can also be served as a main course when paired with a protein or a flavorful sauce. This dish isn’t only delicious but also economical, making it a go-to choice for many families in Peru.
Its origin can be traced back to the Afro-Peruvian community, where it was a way to utilize leftover rice and beans, transforming them into a new and delightful meal.
The beauty of Tacu Tacu lies in its versatility. You can use any type of beans you prefer, such as canary beans, black beans, or pinto beans, along with leftover rice, which contributes to the dish’s unique texture and flavor. The mixture is pan-fried until golden and crispy on the outside, while remaining tender and flavorful on the inside.
Serve it with a fried egg on top, a drizzle of salsa criolla, or alongside a meat dish for a complete meal that’s sure to please.
Ingredients (Serves 4-6)
- 2 cups cooked rice
- 2 cups cooked beans (such as canary beans or black beans)
- 1 medium onion, finely chopped
- 2 cloves garlic, minced
- 1 teaspoon ground cumin
- 1 teaspoon paprika
- 1/2 teaspoon salt (or to taste)
- 2 tablespoons vegetable oil (for frying)
- Fresh cilantro, chopped (for garnish)
- Fried eggs (optional, for serving)
Cooking Instructions
- Prepare the Bean and Rice Mixture: In a large bowl, combine the cooked rice and cooked beans. Use a fork or potato masher to mix them together until well combined, but guarantee that the beans remain somewhat whole for texture. Season the mixture with ground cumin, paprika, and salt.
- Sauté Aromatics: In a large skillet, heat 1 tablespoon of vegetable oil over medium heat. Add the chopped onion and sauté until translucent, about 5 minutes. Add the minced garlic and cook for an additional minute until fragrant.
- Combine Mixture with Aromatics: Once the onions and garlic are cooked, add the rice and bean mixture to the skillet. Stir well to combine all ingredients. Cook for about 5-7 minutes, allowing the mixture to heat through and the flavors to meld.
- Form and Fry Tacu Tacu: Gently press the mixture down with a spatula to form a compact layer. Allow it to cook undisturbed for 5-7 minutes until the bottom is golden and crispy. Carefully flip the Tacu Tacu over by sliding it onto a large plate, then flipping it back into the skillet to crisp the other side. Add the remaining tablespoon of oil if necessary. Cook for an additional 5-7 minutes until both sides are crispy and golden.
- Serve: Once cooked, transfer the Tacu Tacu to a serving platter. Garnish with chopped cilantro. If desired, serve with fried eggs on top or alongside your favorite protein.
Extra Tips
When preparing Tacu Tacu, feel free to use leftover rice and beans to make the process easier and faster. Additionally, you can experiment with the spices by adding a pinch of chili powder for heat or using different herbs to customize the flavor to your preference.
Make sure to let the Tacu Tacu sit in the pan long enough to achieve a crispy exterior, as this contrast is key to the dish’s appeal. Enjoy your meal with a side of avocado or a fresh salad for a balanced dish!
Aji Verde: Spicy Green Sauce
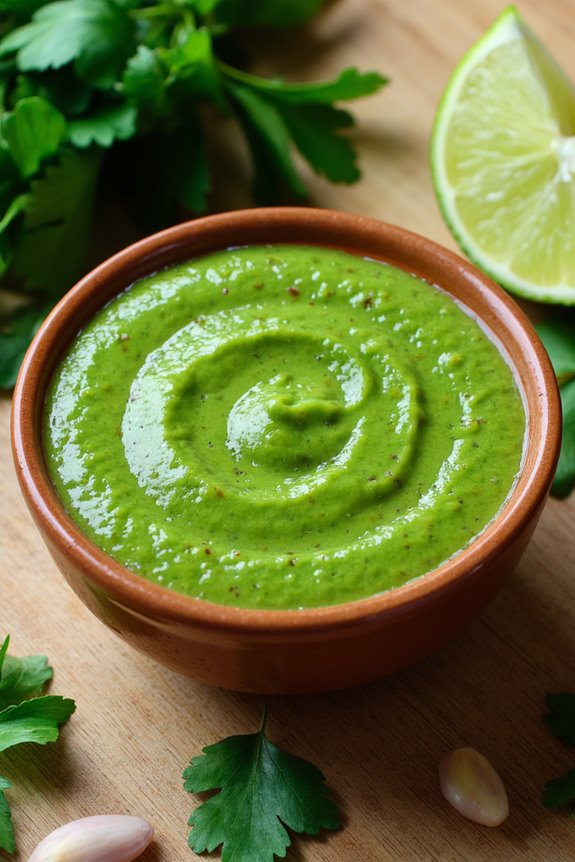
Aji Verde is a popular and vibrant Peruvian sauce that perfectly complements a variety of dishes, from grilled meats to roasted vegetables. This spicy green sauce is made with fresh ingredients, including cilantro, jalapeños, and garlic, resulting in a flavor that’s both zesty and invigorating.
Aji Verde is often served as a condiment alongside traditional Peruvian dishes like Pollo a la Brasa (rotisserie chicken) or as a dip for crispy potatoes. Its versatility makes it a staple in many homes and restaurants across Peru.
Making Aji Verde is quite simple and can be done in just a few steps. The key to achieving the right balance of heat and flavor lies in the quality of the ingredients you choose, particularly the jalapeños and cilantro. This sauce can be adjusted to your preferred spice level by either reducing the number of jalapeños or removing the seeds for a milder flavor.
Once you have prepared this sauce, you’ll want to keep it on hand for all your culinary adventures.
Ingredients (Serves 4-6 people)
- 1 cup fresh cilantro leaves, packed
- 2-3 jalapeños (adjust based on spice preference)
- 2 cloves garlic, minced
- 1/2 cup mayonnaise
- 1/4 cup sour cream
- 2 tablespoons lime juice
- 1 tablespoon olive oil
- Salt to taste
Cooking Instructions
- Prepare the Ingredients: Begin by rinsing the cilantro under cold water to remove any dirt or debris. Pat it dry with a paper towel. Next, slice the jalapeños in half and remove the seeds if you prefer a milder sauce. Mince the garlic cloves finely.
- Blend the Ingredients: In a blender or food processor, combine the fresh cilantro leaves, jalapeños, minced garlic, mayonnaise, sour cream, lime juice, and olive oil. This blend of ingredients will form the base of your Aji Verde.
- Season the Sauce: After blending, taste the sauce and add salt according to your preference. If you want to enhance the flavor further, you can add more lime juice or jalapeños based on your taste. Blend again to guarantee everything is well combined.
- Adjust Consistency: If the sauce is too thick for your liking, you can add a little water or more lime juice to reach your desired consistency. Blend once more until smooth.
- Chill and Serve: Transfer the Aji Verde to a serving bowl or airtight container. For the best flavor, let it chill in the refrigerator for at least 30 minutes before serving to allow the flavors to meld together.
Extra Tips
When making Aji Verde, feel free to experiment with the ingredients to suit your taste. For an extra kick, consider adding a small piece of avocado for creaminess or a pinch of cumin for a smoky flavor.
Additionally, Aji Verde can be stored in the refrigerator for up to a week, making it a convenient condiment to have on hand. Just give it a good stir before serving, as the ingredients may settle over time. Enjoy this vibrant sauce with your favorite Peruvian dishes or as a zesty dip for snacks!
Choclo Con Queso: Corn With Cheese
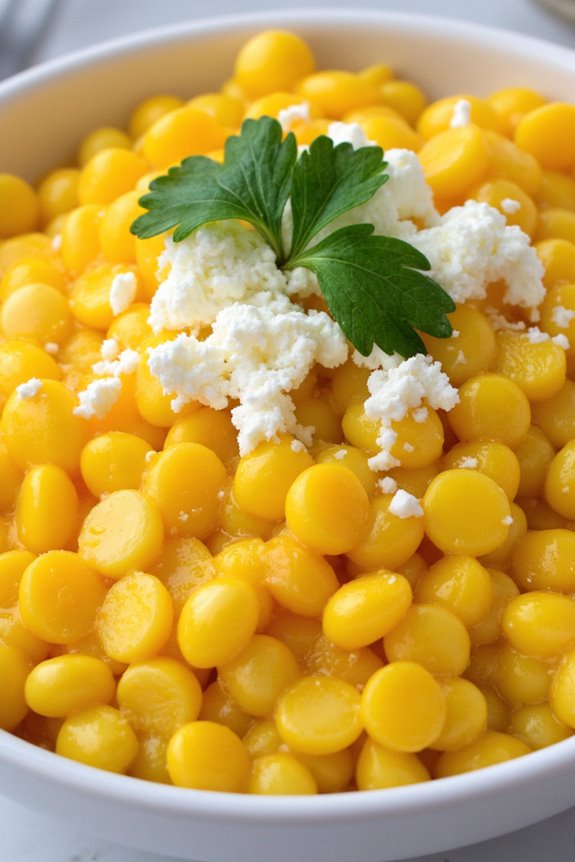
Choclo Con Queso is a delightful Peruvian side dish that combines the sweetness of fresh corn with the creaminess of cheese. This dish showcases the rich agricultural heritage of Peru, where corn, known as “choclo,” is a staple ingredient. The corn used in this recipe is typically larger and has a distinct flavor that sets it apart from the sweet corn commonly found elsewhere.
Pairing the corn with cheese creates a comforting and satisfying dish that’s perfect for any meal, whether it’s served alongside grilled meats or as part of a larger spread of traditional Peruvian fare.
This dish isn’t only delicious but also incredibly simple to prepare. With just a few ingredients, you can whip up Choclo Con Queso in no time. The combination of the warm, tender corn and the melted cheese makes for a delightful treat that’s sure to please your family and friends.
Serve it at your next gathering or enjoy it as a special treat during the week — either way, this dish is sure to be a hit!
Ingredients (Serves 4-6)
- 4 large ears of fresh choclo (Peruvian corn) or 2 cups of frozen corn kernels
- 1 cup of queso fresco (fresh cheese), crumbled or sliced
- 2 tablespoons of butter
- Salt, to taste
- Fresh cilantro, for garnish (optional)
Cooking Instructions
- Prepare the Corn: If using fresh choclo, carefully peel back the husks and remove the silk from the corn. Rinse the ears under cold water to clean them. If using frozen corn, simply measure out 2 cups and set aside.
- Cook the Corn: In a large pot, bring water to a boil, adding a pinch of salt to enhance the flavor. Add the fresh choclo to the boiling water and cook for about 10-15 minutes or until the kernels are tender. If using frozen corn, simmer for about 5-7 minutes until heated through.
- Drain and Butter the Corn: Once the corn is cooked, remove it from the pot and drain any excess water. If using fresh corn, let it cool slightly before handling. Place the corn on a serving platter and add the butter, allowing it to melt over the warm corn.
- Add the Cheese: Evenly distribute the crumbled or sliced queso fresco over the corn. The heat from the corn will slightly melt the cheese, creating a delicious combination.
- Season and Garnish: Sprinkle with a little more salt if desired, and garnish with fresh cilantro for an added touch of flavor and color.
- Serve: Serve the Choclo Con Queso warm, allowing everyone to enjoy the delightful pairing of sweet corn and creamy cheese.
Extra Tips
When preparing Choclo Con Queso, using fresh choclo will yield the best flavor and texture, but if it’s not available, frozen corn is a suitable alternative.
To elevate the dish further, consider adding a sprinkle of chili powder or a squeeze of lime juice for an extra kick. Additionally, you can experiment with different types of cheese; while queso fresco is traditional, a mild mozzarella or a tangy goat cheese can also work beautifully.
Enjoy your culinary adventure into the heart of Peruvian cuisine!
Causa Rellena: Layered Potato Dish
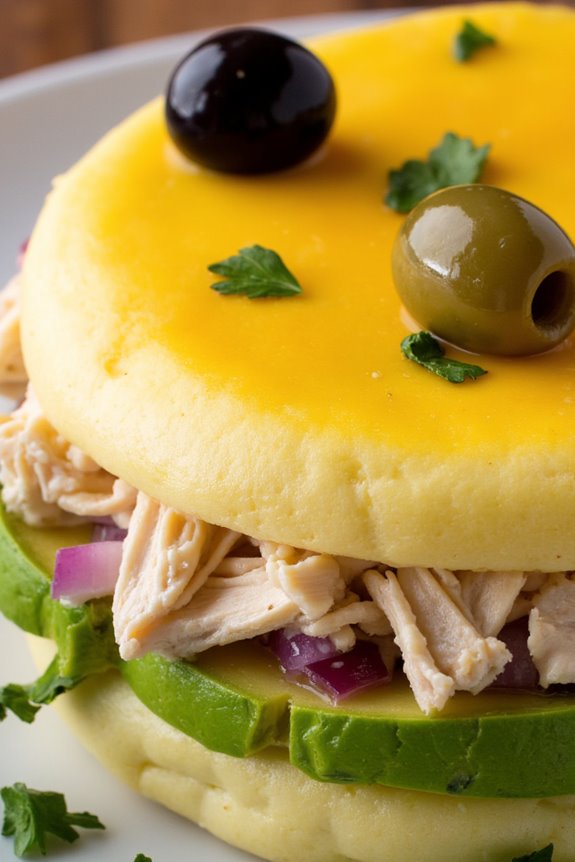
Causa Rellena is a traditional Peruvian dish that showcases the wonderful flavors of the country. This layered potato dish is made with yellow potatoes, lime juice, and a variety of fillings, typically featuring shredded chicken, avocado, and aji amarillo, a Peruvian yellow chili pepper. The vibrant colors and textures make it not only a delicious option but also an eye-catching centerpiece for any meal.
Causa Rellena is often served cold, making it a revitalizing dish perfect for warm weather or gatherings. Preparing Causa Rellena requires some attention to detail, but the end result is well worth the effort. The creamy, zesty potato layers paired with savory fillings create a harmonious blend of flavors that will impress your family and friends.
This dish can also be customized with different fillings, such as tuna or vegetables, catering to various dietary preferences. Whether you’re preparing it for a special occasion or simply want to indulge in a taste of Peru, Causa Rellena will surely delight your palate.
Ingredients (Serves 4-6):
- 1 kg yellow potatoes
- 1/4 cup lime juice
- 2 tablespoons aji amarillo paste
- 1/2 cup mayonnaise
- 1 cup shredded cooked chicken (or tuna)
- 1 avocado, sliced
- 1/4 cup diced red onion
- 1/4 cup chopped cilantro
- Salt and pepper to taste
- Olive oil (for drizzling)
- Sliced olives (for garnish)
Instructions:
- Cook the Potatoes: Begin by boiling the yellow potatoes in salted water until they’re fork-tender, which usually takes about 20-25 minutes. Once cooked, drain and let them cool. The right texture is essential for achieving the perfect creamy consistency.
- Prepare the Potato Mixture: Once the potatoes are cool enough to handle, peel them and place them in a mixing bowl. Mash them until smooth, being careful not to leave any lumps. Incorporate the lime juice, aji amarillo paste, and mayonnaise into the mashed potatoes. Season with salt and pepper to taste. Mix well until everything is fully combined.
- Prepare the Filling: In a separate bowl, combine the shredded chicken (or tuna), diced red onion, and chopped cilantro. Season this mixture with salt and pepper, and drizzle a bit of olive oil for added flavor. This filling will provide a savory contrast to the creamy potato layers.
- Assemble the Causa: In a rectangular or round dish, start layering the dish. Spread half of the potato mixture evenly at the bottom, pressing it down gently. Add a layer of the chicken filling on top, followed by a layer of sliced avocado. Finally, add the remaining potato mixture, smoothing it out to create a flat surface.
- Chill and Serve: Cover the assembled causa with plastic wrap and refrigerate for at least 1-2 hours to allow the flavors to meld and the dish to firm up. When ready to serve, gently unmold the causa onto a serving platter, slice into portions, and garnish with sliced olives.
Extra Tips:
For a more vibrant flavor, consider adding a touch of freshly squeezed lime juice to the filling or incorporating diced tomatoes or bell peppers for added texture.
Additionally, if you prefer a vegetarian option, you can replace the chicken with a mix of vegetables such as corn, peas, or even a bean salad. Be sure to taste and adjust the seasoning throughout the process, as the balance of flavors is key to making a standout Causa Rellena.
Peruvian Coleslaw

Peruvian Coleslaw, known as “ensalada de repollo,” is a revitalizing and vibrant side dish that perfectly complements the robust flavors of Peruvian cuisine. This salad features a medley of finely shredded cabbage, carrots, and other fresh vegetables, all tossed in a zesty dressing that typically includes lime juice and a hint of heat from aji amarillo or jalapeño.
Its crisp texture and tangy flavor make it an excellent accompaniment to grilled meats, seafood, or any hearty main dish, enhancing the overall dining experience. This coleslaw not only brings color to your plate but also provides a healthy dose of vitamins and nutrients.
It’s easy to prepare, requiring minimal cooking time, making it an ideal choice for weeknight dinners or gatherings. Whether served at a family barbecue or a festive celebration, Peruvian Coleslaw is sure to impress your guests with its delightful crunch and bright flavors.
Ingredients (serving size of 4-6 people):
- 4 cups green cabbage, finely shredded
- 1 cup carrots, grated
- 1 cup red cabbage, finely shredded
- 1/2 cup red onion, thinly sliced
- 1/4 cup fresh cilantro, chopped
- 1/4 cup lime juice (freshly squeezed)
- 2 tablespoons olive oil
- 1 tablespoon honey
- 1 teaspoon aji amarillo paste (or jalapeño for milder heat)
- Salt and pepper to taste
Cooking Instructions:
- Prepare the Vegetables: Start by washing all your vegetables thoroughly. Finely shred the green and red cabbage, and grate the carrots. For the red onion, slice it thinly. Place all the vegetables in a large mixing bowl, ensuring they’re well combined.
- Make the Dressing: In a separate small bowl, whisk together the lime juice, olive oil, honey, and aji amarillo paste. This dressing will add a tangy and slightly sweet flavor to your coleslaw. Adjust the seasoning by adding salt and pepper to taste.
- Combine the Salad and Dressing: Pour the dressing over the prepared vegetables in the mixing bowl. Toss everything together gently but thoroughly, ensuring that all the vegetables are evenly coated with the dressing.
- Add Fresh Herbs: After the dressing is well mixed in, add the chopped cilantro to the salad. This will enhance the freshness of the dish. Toss again lightly to incorporate the cilantro without bruising the leaves.
- Chill and Serve: Let the coleslaw sit in the refrigerator for at least 30 minutes before serving. This allows the flavors to meld together and the cabbage to soften slightly. Serve chilled as a revitalizing side dish.
Extra Tips:
For an added crunch, consider incorporating other ingredients such as sliced bell peppers or radishes. If you prefer a creamier coleslaw, you can mix in a dollop of mayonnaise or Greek yogurt to the dressing.
Adjust the heat level to your preference by varying the amount of aji amarillo or jalapeño used. This coleslaw can be prepared a few hours in advance, making it a convenient option for parties or gatherings. Enjoy the vibrant flavors and textures of this delicious Peruvian side dish!
Sautéed Chard With Garlic
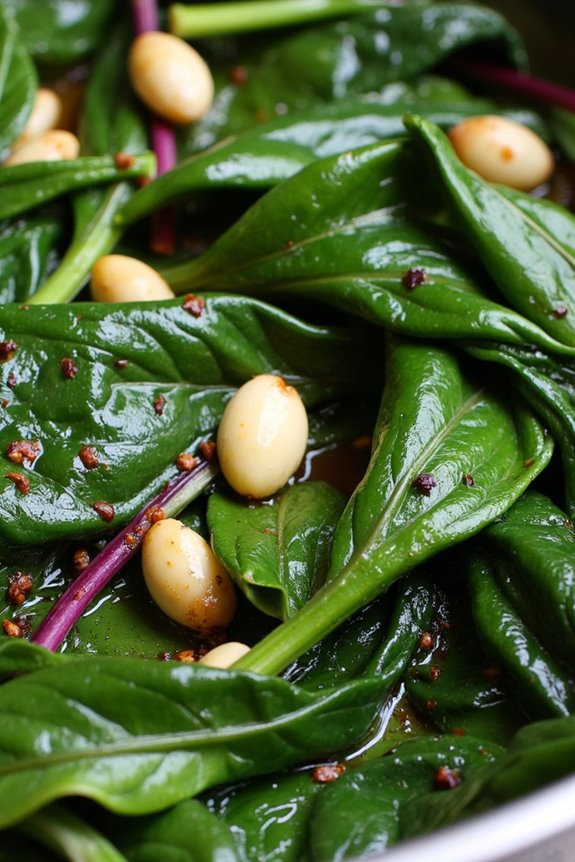
Sautéed Chard with Garlic is a vibrant and nutritious Peruvian side dish that showcases the natural flavors of Swiss chard, complemented by the aromatic essence of garlic. This dish isn’t only easy to prepare but also packed with vitamins and minerals, making it a perfect accompaniment to various main courses.
The slightly earthy taste of the chard pairs wonderfully with the savory depth of sautéed garlic, creating a delightful balance that enhances any meal. This dish can be served warm or at room temperature, making it versatile for any dining occasion.
Whether you’re hosting a family gathering or simply looking to add a healthy side to your dinner plate, Sautéed Chard with Garlic is an excellent choice. The vibrant green of the chard adds a pop of color to your table, and the simple preparation allows the ingredients to shine without being overpowered by spices or sauces.
Ingredients (Serves 4-6)
- 1 bunch Swiss chard (about 1 pound)
- 4 cloves garlic, minced
- 2 tablespoons olive oil
- 1 teaspoon salt (or to taste)
- 1/4 teaspoon black pepper (or to taste)
- 1 tablespoon lemon juice (optional)
- Red pepper flakes (optional, for a spicy kick)
Cooking Instructions
1. Prepare the Chard: Start by rinsing the Swiss chard thoroughly under cold water to remove any dirt or grit. Shake off excess water and then separate the leaves from the stems.
Chop the stems into small pieces (about 1 inch) and roughly chop the leaves into bite-sized pieces. This guarantees even cooking and a pleasant texture in the final dish.
2. Sauté the Garlic: In a large skillet, heat the olive oil over medium heat. Once the oil is hot, add the minced garlic. Sauté the Garlic for about 1-2 minutes until it becomes fragrant and slightly golden, being careful not to burn it.
Burnt garlic can impart a bitter flavor to the dish, so keep a close watch.
3. Add the Chard Stems: Next, add the chopped Swiss chard stems to the skillet. Sauté for about 2-3 minutes, stirring occasionally. The stems take longer to cook than the leaves, so giving them a head start will guarantee they’re tender by the time the dish is finished.
4. Incorporate the Chard Leaves: After the stems have softened, add the chopped chard leaves to the skillet. Season with salt and black pepper. Cook for an additional 4-5 minutes, stirring frequently, until the leaves are wilted and tender.
If you prefer a little heat, you can also sprinkle some red pepper flakes at this stage.
5. Finish with Lemon Juice: Once the chard is cooked to your liking, remove the skillet from heat and drizzle with lemon juice, if using. Toss everything together to combine the flavors.
Adjust seasoning if necessary, and it’s ready to serve.
Extra Tips
To enhance the flavor of Sautéed Chard with Garlic, consider adding some toasted nuts, such as pine nuts or almonds, for a crunchy texture.
Additionally, you can experiment with different leafy greens like kale or spinach if Swiss chard isn’t available. For a more robust flavor, try adding a splash of vegetable broth while sautéing the chard, which will also help to steam the leaves.
Enjoy this dish as a healthy side, and feel free to double the recipe if you’re serving a larger crowd!
Rocoto Relleno: Stuffed Spicy Peppers
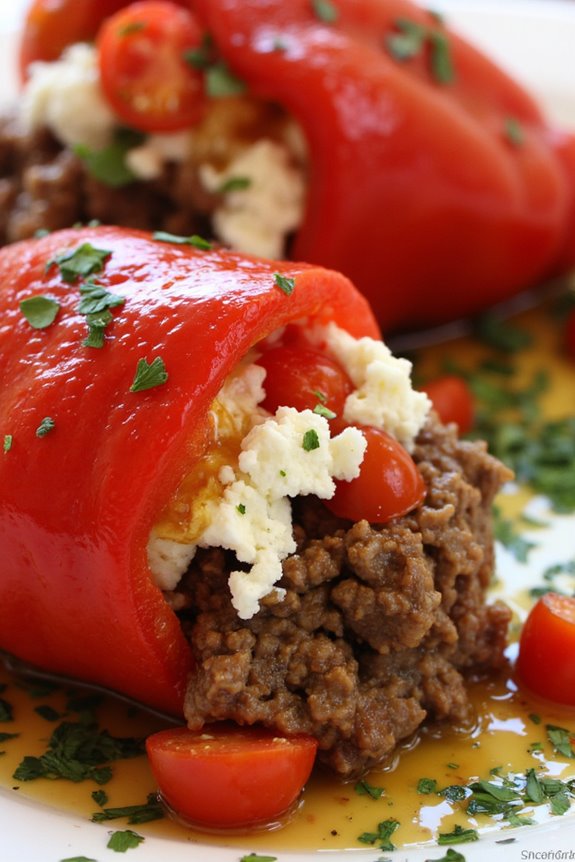
Rocoto Relleno is a vibrant and flavorful Peruvian dish that showcases the beloved rocoto pepper, known for its unique heat and sweetness. This dish originates from Arequipa, where it’s traditionally prepared with a savory filling made from a mixture of ground meat, vegetables, and spices. The rocoto pepper’s thick skin holds the filling, making it not only delicious but also visually appealing.
When baked, the peppers develop a beautiful roasted flavor that complements the rich stuffing, creating a mouthwatering experience that’s perfect as a side dish or a main course.
Preparing Rocoto Relleno requires a careful balance of flavors and textures, making it a wonderful dish to impress family and friends. The heat of the rocoto is tempered by the savory filling and creamy cheese, resulting in a delightful bite that’s sure to be a crowd-pleaser.
Served alongside a fresh salad or rice, this dish brings a taste of Peru to your table and showcases the country’s diverse culinary heritage.
Ingredients (Serves 4-6):
- 4 large rocoto peppers
- 1 pound ground beef or ground turkey
- 1 medium onion, finely chopped
- 2 cloves garlic, minced
- 1 cup diced tomatoes
- 1 cup cooked quinoa or rice
- 1 teaspoon cumin
- 1 teaspoon paprika
- Salt and pepper to taste
- 1/2 cup crumbled feta cheese or grated cheese of your choice
- 1/4 cup chopped fresh parsley or cilantro
- Olive oil for sautéing
Cooking Instructions:
- Prepare the Rocoto Peppers: Begin by washing the rocoto peppers thoroughly. Carefully slice the tops off each pepper and remove the seeds and membranes using a small spoon. This step is essential to manage the heat of the peppers. Set the cleaned peppers aside.
- Cook the Filling: In a large skillet, heat a tablespoon of olive oil over medium heat. Add the chopped onion and sauté until it becomes translucent, about 5 minutes. Next, add the minced garlic and cook for an additional minute until fragrant. Stir in the ground meat, breaking it apart with a spatula, and cook until browned, about 7-10 minutes.
- Add Vegetables and Seasoning: Once the meat is cooked through, add the diced tomatoes, cooked quinoa or rice, cumin, paprika, salt, and pepper. Stir well to combine all the ingredients, allowing them to cook together for about 5 minutes. This will enhance the flavors and meld the filling nicely.
- Stuff the Peppers: Remove the skillet from heat and stir in the crumbled feta cheese and chopped parsley or cilantro. Carefully spoon the filling into each rocoto pepper, pressing down gently to pack the mixture tightly. Be sure to fill each pepper to the brim.
- Bake the Peppers: Preheat the oven to 375°F (190°C). Place the stuffed peppers upright in a baking dish. Drizzle a little olive oil over the top of each pepper and cover the dish with aluminum foil. Bake in the preheated oven for 30 minutes. After 30 minutes, remove the foil and bake for an additional 10-15 minutes, or until the peppers are tender and slightly charred.
- Serve: Remove the rocoto relleno from the oven and let them cool for a few minutes before serving. They can be enjoyed warm, garnished with additional parsley or cilantro if desired.
Extra Tips:
To adjust the heat level of your Rocoto Relleno, consider soaking the cleaned rocoto peppers in vinegar for about 30 minutes before stuffing them. This process can slightly tone down their spiciness.
If you can’t find rocoto peppers, you can substitute them with jalapeños or poblano peppers, though the flavor will differ. Additionally, feel free to experiment with the stuffing by adding other ingredients such as olives, corn, or different types of cheese for a unique twist on this classic dish.
Sopa Seca: Peruvian Dry Soup
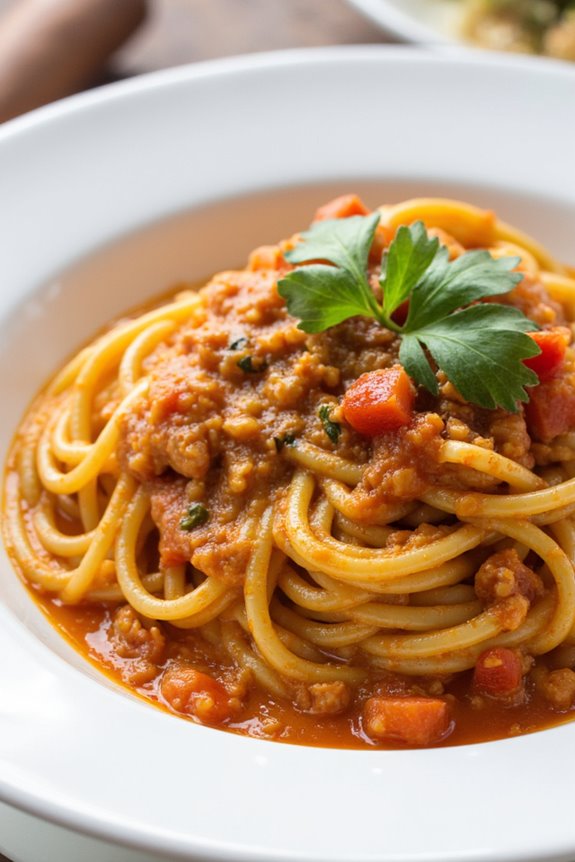
Sopa Seca, literally meaning “dry soup,” is a delicious and hearty Peruvian dish that beautifully combines flavors and textures. Unlike traditional soups, Sopa Seca is more of a thick pasta dish that’s infused with vibrant spices and ingredients, making it a unique side dish that can accompany a variety of main courses.
Its origins trace back to the coastal regions of Peru, where it’s often enjoyed alongside meats or served as a vegetarian option. This dish is versatile and can be adapted to include various proteins such as chicken, beef, or seafood, depending on your preference.
The base of Sopa Seca consists of pasta, typically spaghetti or fettuccine, that’s cooked in a rich, aromatic sauce made from a blend of herbs, spices, and other flavorful ingredients. The result is a comforting and satisfying dish that’s sure to please your family and friends.
Ingredients (Serves 4-6)
- 1 pound of spaghetti or fettuccine
- 2 tablespoons of olive oil
- 1 medium onion, finely chopped
- 4 cloves of garlic, minced
- 1 red bell pepper, diced
- 1 can (14 ounces) of diced tomatoes
- 1 cup of chicken or vegetable broth
- 1 teaspoon of ground cumin
- 1 teaspoon of paprika
- 1 teaspoon of oregano
- Salt and pepper to taste
- 1/4 cup of fresh cilantro, chopped (for garnish)
- Optional: cooked chicken, beef, or shrimp for added protein
Cooking Instructions
- Cook the Pasta: Begin by bringing a large pot of salted water to a boil. Add the spaghetti or fettuccine and cook according to package instructions until al dente. Once cooked, drain and set aside.
- Sauté the Aromatics: In a large skillet, heat the olive oil over medium heat. Add the chopped onion and sauté for about 5 minutes, or until translucent. Stir in the minced garlic and diced red bell pepper, cooking for an additional 3-4 minutes until the vegetables are tender.
- Prepare the Sauce: Add the can of diced tomatoes (with juices) into the skillet, followed by the chicken or vegetable broth. Stir in the ground cumin, paprika, oregano, and season with salt and pepper. Let the mixture simmer for about 10 minutes, allowing the flavors to meld.
- Combine Pasta and Sauce: Once the sauce has thickened slightly, add the cooked pasta to the skillet. Toss everything together until the pasta is well coated with the sauce. If you’re adding protein, mix it in at this stage and heat through for a few minutes.
- Serve and Garnish: Once everything is combined and heated through, remove the skillet from the heat. Serve the Sopa Seca warm, garnished with fresh cilantro on top.
Extra Tips
For an added depth of flavor, consider incorporating additional spices such as chili powder or fresh herbs like parsley and basil. You can also customize the dish by adding in vegetables like peas or corn for extra texture and nutrition.
If you prefer a creamier version, stir in a splash of cream or a spoonful of sour cream before serving. Enjoy this delightful Peruvian dish as a side or even as a main course!
Sweet Potato With Honey and Cinnamon

Sweet Potato With Honey and Cinnamon is a delightful Peruvian side dish that perfectly balances the natural sweetness of the sweet potatoes with the warm, aromatic flavors of honey and cinnamon. This dish is often served alongside savory meals, making it a popular choice for family gatherings and celebrations. The combination of textures and flavors not only enhances the overall dining experience but also adds a nutritious component to your meal.
Preparing this dish is relatively simple and requires minimal ingredients, making it an excellent choice for both novice cooks and seasoned chefs. The vibrant color of the sweet potatoes makes this dish visually appealing, while the honey and cinnamon elevate it to a new level of deliciousness. Whether you’re looking to impress guests or simply want to enjoy a comforting side dish, Sweet Potato With Honey and Cinnamon is sure to please.
Ingredients (serving size of 4-6 people):
- 4 medium sweet potatoes
- 1/4 cup honey
- 1 teaspoon ground cinnamon
- 2 tablespoons unsalted butter
- Pinch of salt
- Optional: chopped nuts (such as walnuts or pecans) for garnish
Cooking Instructions:
- Prepare the Sweet Potatoes: Start by washing the sweet potatoes thoroughly under running water to remove any dirt. Peel the sweet potatoes using a vegetable peeler and then cut them into bite-sized cubes. This will help them cook evenly and quickly.
- Boil the Sweet Potatoes: In a large pot, fill it with water and add a pinch of salt. Bring the water to a boil over medium-high heat. Once boiling, carefully add the cubed sweet potatoes. Cook them for about 15-20 minutes, or until they’re fork-tender. You can test their doneness by piercing a piece with a fork; it should slide in easily.
- Drain and Mash: Once the sweet potatoes are cooked, drain them in a colander and let them sit for a minute to remove excess moisture. Transfer the sweet potatoes back to the pot and use a potato masher or fork to mash them to your desired consistency.
- Add Honey and Cinnamon: In the same pot with the mashed sweet potatoes, add the unsalted butter, honey, ground cinnamon, and a pinch of salt. Mix everything together until the butter has melted and the ingredients are well combined. Taste and adjust the sweetness or cinnamon to your liking.
- Serve: Transfer the Sweet Potato With Honey and Cinnamon to a serving dish. If desired, sprinkle some chopped nuts on top for added texture and flavor. Serve warm as a delightful side dish to complement your main course.
Extra Tips: To enhance the flavor of Sweet Potato With Honey and Cinnamon, consider roasting the sweet potatoes instead of boiling them. Roasting concentrates their natural sweetness and adds a slightly caramelized flavor.
Simply toss the cubed sweet potatoes with a bit of oil, honey, and cinnamon and roast them in the oven at 400°F (200°C) for about 25-30 minutes, turning them halfway through for even cooking. This method also allows for a beautiful golden color and a more robust flavor profile.
Peruvian Fried Plantains
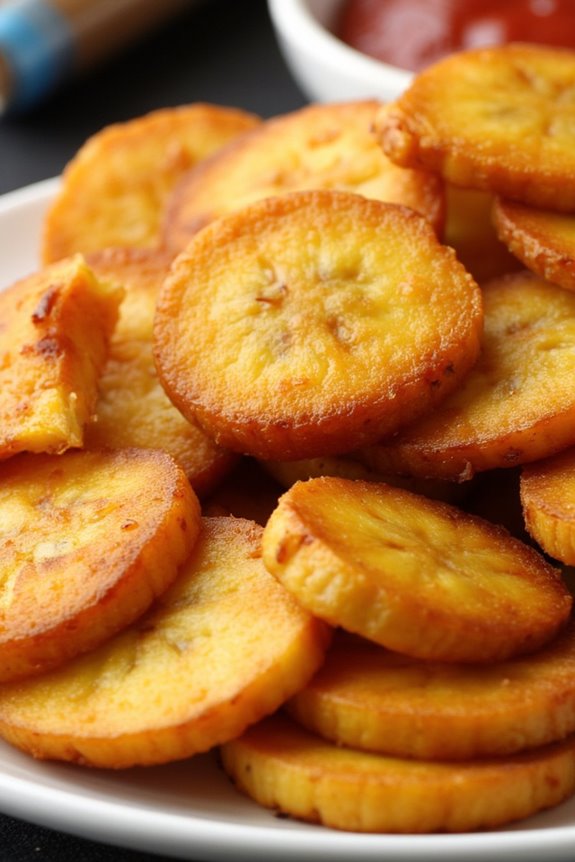
Peruvian Fried Plantains, also known as “Plátanos Fritos,” are a delightful and versatile side dish that can complement a variety of main courses. This dish involves slicing ripe plantains and frying them until they’re golden brown and caramelized. The natural sweetness of the plantains pairs beautifully with savory dishes, making them a staple in Peruvian cuisine.
Whether served alongside grilled meats, rice, or beans, these fried plantains offer a delicious contrast that enhances your meal.
Making Peruvian Fried Plantains is simple and requires minimal ingredients, making it a perfect dish for both novice cooks and seasoned chefs alike. The key to achieving the perfect fried plantains lies in using ripe plantains, which should have a yellow skin with a few black spots. This indicates that they’re sweet and ready for frying.
Once you master the technique, you can enjoy this dish any time you crave a taste of Peru.
Ingredients (Serves 4-6 people):
- 3 ripe plantains
- Vegetable oil (for frying)
- Salt (to taste)
Cooking Instructions:
- Prepare the Plantains: Start by peeling the ripe plantains. To do this, cut off both ends of each plantain and make a lengthwise slit through the skin. Gently remove the peel by pulling it away from the flesh. Once peeled, slice the plantains diagonally into about 1-inch thick pieces.
- Heat the Oil: In a large, heavy skillet or frying pan, pour in enough vegetable oil to cover the bottom of the pan by about ½ inch. Heat the oil over medium-high heat until it shimmers but isn’t smoking. You can test if the oil is hot enough by dropping in a small piece of plantain; it should sizzle immediately.
- Fry the Plantains: Carefully add the sliced plantains to the hot oil in a single layer. Avoid overcrowding the pan, as this will lower the oil temperature and result in soggy plantains. Fry them for about 2-3 minutes on each side, or until they turn golden brown and crispy.
- Drain and Season: Using a slotted spoon, remove the fried plantains from the oil and place them on a plate lined with paper towels to drain excess oil. While they’re still hot, sprinkle with salt to taste.
- Serve: Transfer the fried plantains to a serving dish and serve them warm. They can be enjoyed as a side dish or even as a snack with your favorite dipping sauce.
Extra Tips:
When frying plantains, it’s important to keep an eye on the oil temperature to avoid burning. If you find that the oil is too hot and the plantains are browning too quickly, reduce the heat slightly.
Additionally, you can experiment with different seasonings, such as garlic powder or chili flakes, for a unique twist. Fried plantains can also be enjoyed with a drizzle of lime juice or served alongside a dipping sauce like guacamole for added flavor.