

When hosting friends and family, I love to turn to vibrant Peruvian appetizers to add some flair to the menu. From zesty Ceviche De Pescado to creamy Papa a La Huancaína, each dish offers a unique taste and a pop of color. These delightful bites are sure to keep your guests happy and your table looking stunning. Curious about how to craft these flavorful creations? Let’s explore the delicious world of Peruvian appetizers together.
Ceviche De Pescado

Ceviche De Pescado is one of the most beloved appetizers in Peru, celebrated for its invigorating taste and vibrant flavors. This dish typically features fresh fish marinated in citrus juices, primarily lime or lemon, which “cooks” the fish while infusing it with zesty notes.
Traditionally, ceviche is served with a variety of accompaniments, such as sweet potatoes, corn, or avocado, making it a colorful and satisfying dish perfect for gatherings or special occasions.
The key to a great ceviche is using the freshest fish available, as its quality directly affects the flavor of the dish. In Peru, common fish varieties used for ceviche include sea bass, sole, or tilapia. The preparation is quick and easy, allowing the fish to marinate briefly and absorb the citrus flavors.
Whether you’re looking to impress guests or simply indulge in a taste of Peru, Ceviche De Pescado is sure to be a hit.
Ingredients (Serves 4-6)
- 1 lb fresh white fish fillets (such as sea bass or tilapia)
- 1 cup freshly squeezed lime juice (about 8-10 limes)
- 1 red onion, thinly sliced
- 1-2 serrano peppers, finely chopped (to taste)
- 1 cup chopped cilantro
- Salt to taste
- 1 cup cooked sweet potato, sliced (for serving)
- 1 cup corn (cooked or canned, for serving)
- 1 avocado, sliced (for serving)
Cooking Instructions
- Prepare the Fish: Start by rinsing the fish fillets under cold water to remove any impurities. Pat them dry with paper towels. Next, cut the fish into bite-sized cubes, approximately 1-inch pieces. The uniformity in size helps to guarantee even marination and texture.
- Marinate the Fish: Place the cubed fish in a glass or ceramic bowl (avoid metal, as it can react with the citrus). Pour the freshly squeezed lime juice over the fish, ensuring that all pieces are submerged. Cover the bowl with plastic wrap and refrigerate for about 15-20 minutes. The acidity from the lime juice will “cook” the fish, turning it opaque.
- Add Aromatics: After the fish has marinated, add the thinly sliced red onion, finely chopped serrano peppers, and chopped cilantro to the bowl. Gently fold the ingredients together to combine, making sure the fish is well-coated with the onion and peppers.
- Season and Serve: Taste the ceviche and add salt according to your preference. Once seasoned, serve the ceviche immediately in small bowls or on a platter. Accompany it with slices of cooked sweet potato, corn, and avocado for a complete dish.
Extra Tips
For the best results, always use the freshest fish available, and don’t marinate the ceviche for too long, as the fish can become overly “cooked” and lose its delicate texture.
Adjust the level of heat by varying the amount of serrano peppers according to your taste. Freshly chopped cilantro is a must for authentic flavor, and feel free to experiment with additional garnishes like sliced radishes or olives for added flair.
Enjoy your Ceviche De Pescado as a delightful starter or light meal that transports you straight to the heart of Peru!
Anticuchos De Corazón
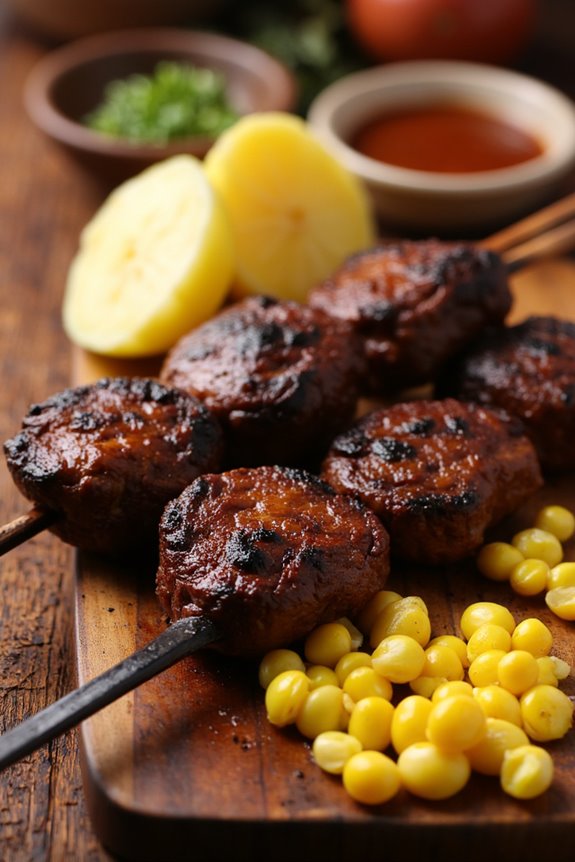
Anticuchos De Corazón is a traditional Peruvian appetizer that showcases marinated beef heart skewers, a dish that reflects the rich culinary heritage of Peru. This flavorful street food isn’t only popular for its unique taste but also for its cultural significance, as it has been enjoyed by locals for generations. The heart is tenderized and infused with a spicy marinade, then grilled to perfection, resulting in a smoky, juicy treat that’s often served with a side of vibrant sauces.
The preparation of Anticuchos De Corazón involves a few key steps, including marinating the beef heart, skewering the pieces, and grilling them to achieve that signature charred flavor. This dish is typically enjoyed with aji sauce, potatoes, or corn, making it a perfect addition to any gathering or celebration. Whether you’re looking to impress guests or simply indulge in a taste of Peru, this recipe will guide you through creating a delicious and authentic Anticuchos De Corazón.
Ingredients (Serves 4-6)
- 1 lb beef heart, cleaned and cut into 1-inch pieces
- 1/4 cup red wine vinegar
- 2 tablespoons vegetable oil
- 4 cloves garlic, minced
- 1 tablespoon ground cumin
- 1 tablespoon paprika
- 1 teaspoon oregano
- 1 teaspoon salt
- 1/2 teaspoon black pepper
- 1/2 teaspoon chili powder (optional, for extra heat)
- Skewers (soaked in water if using wooden ones)
Cooking Instructions
- Prepare the Marinade: In a large mixing bowl, combine the red wine vinegar, vegetable oil, minced garlic, ground cumin, paprika, oregano, salt, black pepper, and chili powder (if using). Whisk together until well mixed. This marinade provides the meat with flavor and helps to tenderize it.
- Marinate the Beef Heart: Add the beef heart pieces to the marinade and guarantee each piece is thoroughly coated. Cover the bowl with plastic wrap and refrigerate for at least 2 hours, or preferably overnight. Marinating allows the flavors to penetrate the meat and enhances the overall taste of the dish.
- Skewer the Meat: After marinating, take the beef heart pieces out of the refrigerator. Thread the marinated pieces onto skewers, leaving a little space between each piece to allow for even cooking. This step is essential for grilling, as it makes the pieces easy to handle and cook evenly.
- Preheat the Grill: Preheat your grill to medium-high heat. If using a charcoal grill, guarantee the coals are hot and ashed over. This high heat will help achieve a nice char on the outside of the meat while keeping it juicy inside.
- Grill the Anticuchos: Place the skewers on the grill and cook for about 4-5 minutes on each side, or until they develop a nice char and are cooked to your desired doneness. Keep an eye on them to prevent burning, and adjust the grilling time based on your heat source.
- Serve: Once cooked, remove the skewers from the grill and let them rest for a few minutes. Serve warm with aji sauce and accompaniments such as boiled potatoes or corn on the side.
Extra Tips
When preparing Anticuchos De Corazón, it’s important to choose a good quality beef heart, as it can greatly affect the taste and texture of the dish. Make sure to clean the heart thoroughly to remove any excess fat or connective tissue.
Additionally, for a more authentic flavor, consider grilling over charcoal rather than gas, as this will impart a delicious smokiness. Finally, don’t hesitate to adjust the spice levels in the marinade according to your preferences; the dish can be customized to suit your taste. Enjoy your culinary journey into Peruvian flavors!
Papa a La Huancaína
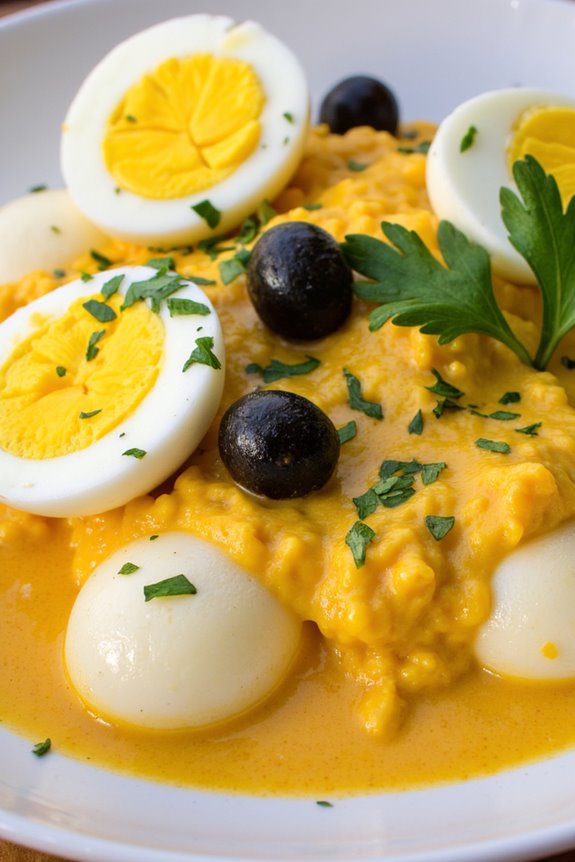
Papa a La Huancaína is a classic Peruvian appetizer that showcases the country’s rich culinary heritage. This dish features boiled potatoes smothered in a creamy, spicy cheese sauce made from aji amarillo, a unique yellow chili pepper native to Peru. It’s typically served cold and garnished with hard-boiled eggs and black olives, making it not only delicious but also visually appealing.
Historically, this dish hails from the Huancayo region of Peru and is a staple at many family gatherings and celebrations. The flavors of Papa a La Huancaína are a delightful combination of creaminess and spice, allowing the dish to stand out as a favorite among both locals and visitors. The smooth sauce complements the tender potatoes perfectly, creating a satisfying appetizer that’s certain to impress your guests.
Whether you’re hosting a special occasion or simply want to indulge in a taste of Peru, this recipe for Papa a La Huancaína is a must-try.
Ingredients (Serves 4-6)
- 4 medium-sized yellow potatoes
- 1 cup of queso fresco (or feta cheese as a substitute)
- 1/2 cup of evaporated milk
- 2-3 aji amarillo peppers (or jalapeños if unavailable)
- 1 clove of garlic
- 2 tablespoons of vegetable oil
- Salt to taste
- 2 hard-boiled eggs (for garnish)
- Black olives (for garnish)
- Fresh parsley or lettuce leaves (for serving)
Cooking Instructions
- Boil the Potatoes: Start by washing the yellow potatoes thoroughly. In a large pot, place the potatoes and cover them with water. Bring the water to a boil and add a pinch of salt. Cook the potatoes for about 20-25 minutes, or until they’re tender when pierced with a fork. Once cooked, drain the potatoes and let them cool before peeling.
- Prepare the Sauce: While the potatoes are boiling, prepare the Huancaína sauce. In a blender, add the queso fresco, evaporated milk, aji amarillo peppers (remove the seeds for less heat if desired), garlic, and vegetable oil. Blend until you achieve a smooth, creamy consistency. You can add a little water if the sauce is too thick.
- Season the Sauce: Taste the sauce and add salt as needed. Blend again to guarantee the salt is evenly distributed throughout the mixture. The sauce should have a balance of creaminess and spice, so adjust according to your preference.
- Assemble the Dish: Once the potatoes have cooled and been peeled, slice them into rounds or halves. Arrange the potato slices on a serving platter. Generously pour the Huancaína sauce over the potatoes, ensuring they’re well-coated.
- Garnish and Serve: Slice the hard-boiled eggs into quarters and arrange them on top of the potatoes. Add black olives for garnish and sprinkle fresh parsley or place the dish on a bed of lettuce leaves for an added touch. Serve chilled or at room temperature for the best flavor.
Extra Tips
To enhance the flavor of your Papa a La Huancaína, consider adjusting the spiciness of the sauce by experimenting with the amount of aji amarillo you use. If you can’t find aji amarillo, a mix of yellow bell pepper and a touch of cayenne can work as a substitute, though the flavor will differ slightly.
Additionally, for a richer taste, you can use double the amount of cheese in the sauce. Make sure to prepare the sauce ahead of time so that it can chill and the flavors meld beautifully. Enjoy the dish as part of a larger Peruvian meal or as a standout appetizer at your next gathering!
Causa Rellena
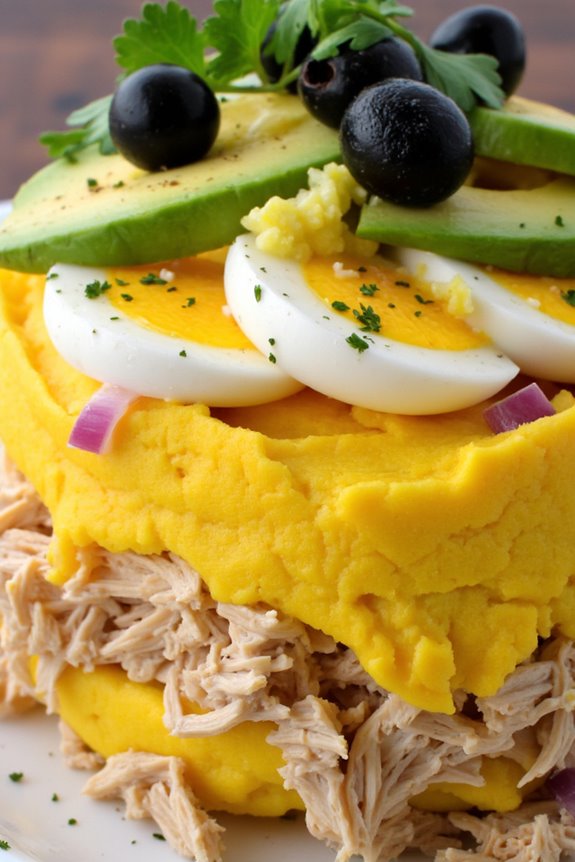
Causa Rellena is a classic Peruvian appetizer that showcases the versatility and vibrant flavors of Peruvian cuisine. This dish features a base of mashed yellow potatoes seasoned with lime juice and aji amarillo (yellow chili pepper), layered with a variety of fillings such as shredded chicken, tuna, or avocado. The dish isn’t only delicious but also visually appealing, often garnished with olives, hard-boiled eggs, and fresh herbs. It’s a perfect choice for gatherings or as a light meal that can be prepared ahead of time.
The origins of Causa Rellena can be traced back to the indigenous peoples of Peru, who used potatoes in their cooking long before the arrival of the Spanish in the 16th century. Today, this dish embodies the fusion of traditional ingredients with modern culinary techniques, making it a beloved staple in Peruvian households.
Whether you’re preparing it for a special occasion or just a cozy dinner, Causa Rellena is sure to impress your guests with its exquisite taste and presentation.
Ingredients (Serves 4-6 people):
- 2 lbs yellow potatoes
- 1/2 cup lime juice
- 2 tablespoons aji amarillo paste
- 1 teaspoon salt
- 2 cups cooked, shredded chicken (or canned tuna)
- 1/2 cup mayonnaise
- 1 small red onion, finely chopped
- 1 avocado, sliced
- 4 hard-boiled eggs, sliced
- 1/2 cup black olives, sliced
- Fresh cilantro or parsley for garnish
Cooking Instructions:
- Prepare the Potatoes: Begin by washing the yellow potatoes thoroughly to remove any dirt. Place them in a large pot, cover them with water, and bring to a boil. Cook the potatoes until they’re tender, which should take about 20-30 minutes. Once cooked, drain and let them cool before peeling.
- Mash the Potatoes: After the potatoes have cooled enough to handle, peel them and place them in a large mixing bowl. Use a potato masher or fork to mash the potatoes until smooth. It’s important to achieve a creamy consistency for the base of the Causa Rellena.
- Season the Mash: Add the lime juice, aji amarillo paste, and salt to the mashed potatoes. Mix thoroughly until all ingredients are well incorporated. Taste and adjust the seasoning if necessary. Set the mixture aside to allow the flavors to meld.
- Prepare the Filling: In a separate bowl, combine the shredded chicken (or tuna), mayonnaise, and chopped red onion. Mix well until the filling is creamy and evenly distributed. You can also add a pinch of salt and pepper to taste.
- Assemble the Causa: To assemble, take a portion of the seasoned potato mash and press it into the bottom of a serving dish or individual molds to create the first layer. Spread a generous layer of the chicken filling on top of the potato layer. Next, add another layer of the potato mash, pressing it down gently to create a smooth surface.
- Garnish and Serve: Once assembled, top the Causa Rellena with slices of avocado, hard-boiled eggs, and black olives. Finish with a sprinkle of fresh cilantro or parsley for added color and flavor. Chill in the refrigerator for at least 30 minutes before serving to enhance the flavors.
Extra Tips:
When making Causa Rellena, you can customize the filling to suit your taste preferences. Feel free to experiment with different proteins like shrimp or a vegetarian option with roasted vegetables or cheese.
Additionally, if you want to make the dish spicier, you can add more aji amarillo paste or finely chopped chili peppers to the filling. Always remember that the key to a great Causa Rellena is the quality of the ingredients, particularly the potatoes, so opt for the freshest produce available.
Tiradito
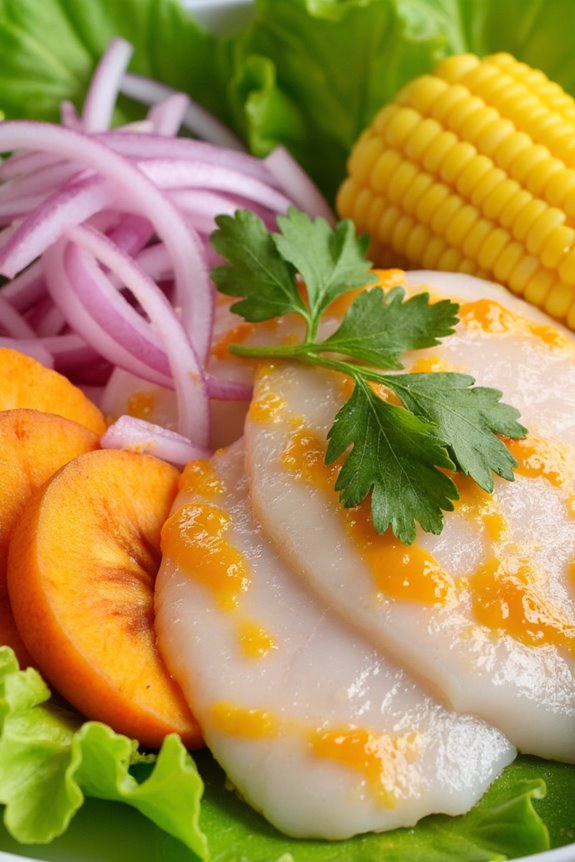
Tiradito is a vibrant and revitalizing Peruvian appetizer that beautifully showcases the country’s rich culinary heritage. This dish is often compared to ceviche, but there are key differences that set it apart. While ceviche typically features fish marinated in citrus juice and served with onions and other accompaniments, tiradito is distinguished by its more minimalist approach. The fish is sliced into thin strips, and the marinade is poured over it rather than mixed in, allowing the fresh flavors to shine through.
The origins of tiradito can be traced back to the coastal regions of Peru, where the abundance of fresh fish and a vibrant array of local ingredients come together to create a dish that’s as visually appealing as it’s delicious. The key to a perfect tiradito lies in the quality of the fish and the freshness of the ingredients. With its bright flavors and appealing presentation, tiradito is sure to impress your guests and provide a delightful introduction to Peruvian cuisine.
Ingredients (Serves 4-6)
- 1 lb (450g) fresh white fish fillet (such as tilapia, snapper, or sole)
- 1/2 cup freshly squeezed lime juice
- 1/4 cup aji amarillo paste (or substitute with aji amarillo pepper, finely chopped)
- 1/4 cup fish stock or water
- 1 small red onion, thinly sliced
- Salt to taste
- Fresh cilantro leaves, for garnish
- Sweet potato, boiled and sliced, for serving
- Corn on the cob, boiled, for serving
- Lettuce leaves, for serving
Cooking Instructions
- Prepare the Fish: Begin by verifying you have the freshest fish available. Rinse the fish fillet under cold water and pat it dry with paper towels. Using a sharp knife, cut the fish into thin strips, approximately 1/4 inch thick. Arrange the fish on a serving platter in an attractive manner.
- Make the Marinade: In a mixing bowl, combine the freshly squeezed lime juice, aji amarillo paste, and fish stock or water. Stir well to confirm the aji amarillo paste is fully dissolved and the mixture is smooth. The acidity of the lime juice will begin to “cook” the fish, so prepare the marinade right before serving.
- Marinate the Fish: Pour the marinade evenly over the arranged fish strips on the platter. Allow the fish to marinate for about 5-10 minutes. This short marination time guarantees the fish remains tender and fresh while absorbing the vibrant flavors of the marinade.
- Add Onions and Season: After marinating, sprinkle the thinly sliced red onions over the fish. Season with salt to taste. The onions add a sharp contrast to the sweetness of the fish and the heat from the aji amarillo.
- Garnish and Serve: Ultimately, garnish the dish with fresh cilantro leaves. Serve tiradito immediately with slices of boiled sweet potato, boiled corn on the cob, and lettuce leaves on the side for a complete Peruvian experience.
Extra Tips
When preparing tiradito, the key is to use the freshest fish possible, as this dish relies heavily on the quality of the ingredients. If you can’t find aji amarillo paste, you can use other types of chili paste, but the flavor will differ. Additionally, feel free to adjust the amount of lime juice and aji amarillo to suit your taste preferences; some may prefer a spicier or tangier dish.
Finally, serve tiradito immediately after preparing it for the best texture and flavor; it doesn’t hold well over time.
Empanadas De Pollo

Empanadas de Pollo, or chicken empanadas, are a cherished Peruvian appetizer that offer a delightful combination of flaky pastry and savory chicken filling. These hand-held pies are perfect for gatherings, parties, or as a tasty snack. The golden-brown crust encases a mixture of tender chicken, spices, and vegetables, making each bite a burst of flavor. Traditionally served with aji sauce or a tangy salsa, they’re sure to impress your guests.
Making empanadas from scratch may seem challenging, but the process is straightforward and rewarding. Whether you choose to make your own dough or use store-bought pastry, the key to success is in the filling. You can customize the ingredients based on your preferences, adding in more vegetables or spices as desired. Follow this recipe to create a delightful batch of empanadas de pollo that will transport you straight to the streets of Peru.
Ingredients (Serves 4-6 People)
- 2 cups all-purpose flour
- 1/2 teaspoon salt
- 1/2 cup unsalted butter, chilled and diced
- 1/4 cup cold water
- 2 cups cooked chicken, shredded
- 1 small onion, finely chopped
- 1/2 cup bell pepper, chopped
- 2 cloves garlic, minced
- 1 teaspoon cumin
- 1 teaspoon paprika
- 1/4 teaspoon black pepper
- 1/4 cup green olives, chopped (optional)
- 1 egg, beaten (for egg wash)
- Oil for frying
Cooking Instructions
- Make the Dough: In a large mixing bowl, combine the flour and salt. Add the diced butter and mix using your fingers or a pastry cutter until the mixture resembles coarse crumbs. Gradually add the cold water, mixing until the dough comes together. Knead gently for a few minutes, then wrap in plastic wrap and refrigerate for at least 30 minutes.
- Prepare the Filling: In a skillet, heat a little oil over medium heat. Add the chopped onion and bell pepper, cooking until softened, about 5 minutes. Stir in the minced garlic, cumin, paprika, and black pepper, cooking for another minute. Add the shredded chicken and olives (if using), mixing well to combine. Remove from heat and let the filling cool.
- Roll Out the Dough: Once the dough has chilled, remove it from the refrigerator. On a lightly floured surface, roll out the dough to about 1/8 inch thick. Use a round cutter or a glass to cut out circles, approximately 4-5 inches in diameter.
- Assemble the Empanadas: Place a tablespoon of the chicken filling in the center of each dough circle. Fold the dough over to create a half-moon shape and press the edges together to seal. You can crimp the edges with a fork for an extra decorative touch.
- Fry the Empanadas: In a deep skillet or pot, heat oil over medium heat. Carefully add the empanadas in batches, frying until golden brown, about 4-5 minutes on each side. Use a slotted spoon to transfer them to a paper towel-lined plate to drain excess oil.
- Serve: Serve the empanadas hot with aji sauce or your favorite salsa for dipping. Enjoy!
Extra Tips
When making empanadas de pollo, don’t hesitate to experiment with the filling! You can add ingredients like corn, diced potatoes, or even cheese for a richer flavor.
If you prefer a healthier version, consider baking the empanadas instead of frying them. Simply preheat the oven to 375°F (190°C), brush the assembled empanadas with the beaten egg, and bake for 20-25 minutes or until golden.
Enjoy your cooking adventure and the delicious flavors of Peru!
Choclo Con Queso

Choclo Con Queso is a delicious and traditional Peruvian appetizer that showcases the rich flavors of fresh corn, or choclo, paired with creamy cheese. This dish isn’t only a staple in Peruvian cuisine but also a delightful way to introduce the unique taste of Peruvian ingredients to your dining table.
The combination of sweet corn and savory cheese creates a perfect balance, making it an excellent starter or snack for any gathering. This dish is particularly popular in the Andean regions, where choclo is a common ingredient.
The preparation is simple yet satisfying, allowing the natural flavors to shine through. Whether you’re hosting a dinner party or simply craving a taste of Peru, Choclo Con Queso promises to deliver an authentic experience that will transport you to the vibrant streets of Lima.
Ingredients (Serves 4-6)
- 4-6 ears of fresh choclo (Peruvian corn)
- 8 oz of queso fresco (fresh cheese)
- Salt to taste
- A sprinkle of paprika (optional)
- Fresh cilantro for garnish (optional)
Cooking Instructions
- Prepare the Choclo: Start by removing the husks and silk from the choclo. Rinse the ears of corn under cold water to clean them thoroughly.
- Cook the Choclo: In a large pot, bring water to a boil. Once boiling, add the ears of choclo and a pinch of salt. Boil the corn for about 20-30 minutes until the kernels are tender. You can check doneness by piercing a kernel with a fork; it should be soft but still slightly firm.
- Drain the Corn: Once cooked, carefully remove the choclo from the pot using tongs. Allow the ears to cool slightly before draining the water.
- Slice the Cheese: While the choclo is cooling, cut the queso fresco into thick slices or crumbles, depending on your preference.
- Assemble the Dish: Once the choclo has cooled enough to handle, place the ears on a serving platter. Top each ear of corn with slices or crumbles of queso fresco.
- Season and Serve: Sprinkle a pinch of salt and paprika over the cheese-topped choclo for added flavor. Optionally, garnish with fresh cilantro for a touch of color and freshness. Serve immediately while the corn is still warm.
Extra Tips
For the best flavor, try to use fresh, locally-sourced choclo if available, as it will enhance the sweetness of the dish. If queso fresco is hard to find, you can substitute it with other soft cheeses like feta or goat cheese, but keep in mind that the flavor profile may vary slightly.
Additionally, serving Choclo Con Queso with a squeeze of fresh lime juice or a drizzle of olive oil can add an extra layer of brightness to this dish. Enjoy your culinary adventure into Peruvian flavors!
Pulpa De Langostino
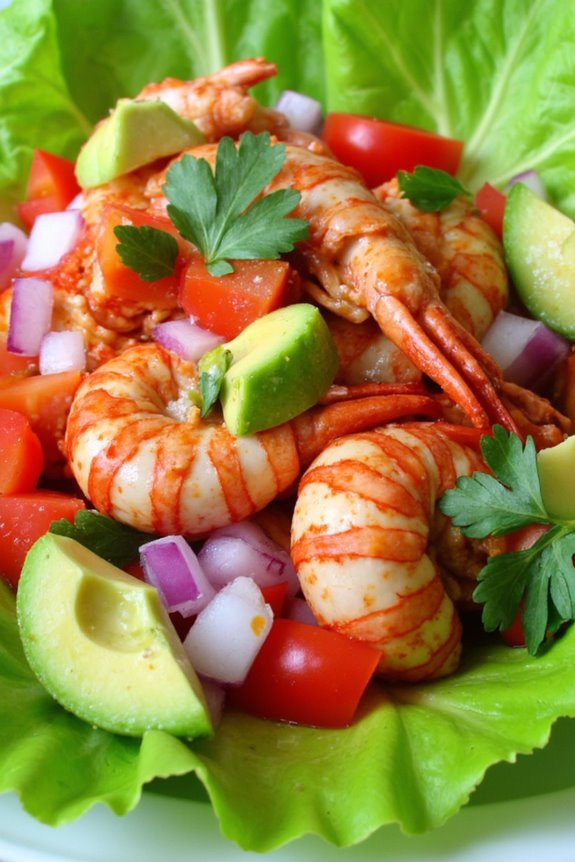
Pulpa de Langostino is a delightful Peruvian appetizer that highlights the succulent flavor of langostinos, a type of large shrimp known for their sweet taste and tender texture. This dish is often served cold, making it a revitalizing option for gatherings or as a starter before a meal. The preparation involves mixing the langostino meat with a zesty dressing that includes lime juice, cilantro, and a touch of spice, creating a harmonious blend of flavors that’s both satisfying and invigorating.
This appetizer isn’t only delicious but also visually appealing, as the vibrant colors of the ingredients come together beautifully. The langostino is typically accompanied by avocado, adding a creamy richness to the dish, while the fresh herbs and citrus provide a bright contrast. Pulpa de Langostino is perfect for impressing guests at a dinner party or enjoying on a warm day as a light meal.
Ingredients (Serves 4-6):
- 1 pound langostino meat, cooked and roughly chopped
- 1 medium red onion, finely diced
- 1 medium tomato, diced
- 1 ripe avocado, diced
- 1/4 cup fresh cilantro, chopped
- 1/4 cup freshly squeezed lime juice
- 1 teaspoon aji amarillo paste (or to taste)
- Salt and pepper, to taste
- Lettuce leaves, for serving
Cooking Instructions:
- Prepare the Langostino: If you’re using frozen langostino, make certain that it’s thoroughly thawed and drained. The meat should be cooked and ready to use; if it’s not pre-cooked, steam or boil the langostino until pink and opaque, then cool and chop it into bite-sized pieces.
- Chop the Vegetables: In a mixing bowl, add the finely diced red onion, diced tomato, and chopped cilantro. Make certain that the vegetables are fresh to provide a crisp texture and vibrant flavor to the dish.
- Mix the Dressing: In a separate small bowl, whisk together the freshly squeezed lime juice, aji amarillo paste, salt, and pepper. The lime juice will add acidity, while the aji amarillo provides a unique Peruvian heat. Adjust the seasoning to your preference.
- Combine Ingredients: In the bowl with the langostino, gently fold in the onion, tomato, and cilantro mixture. Then, pour the dressing over the top and mix carefully to make certain all ingredients are well combined without mashing the langostino.
- Add Avocado: Just before serving, gently fold in the diced avocado. This will add creaminess to the dish and balance the flavors. Be careful not to mash the avocado; you want to keep the pieces intact.
- Chill and Serve: Cover the mixture and chill in the refrigerator for at least 30 minutes to allow the flavors to meld. When ready to serve, arrange lettuce leaves on a platter and spoon the pulpa de langostino mixture on top.
Extra Tips:
When preparing Pulpa de Langostino, freshness is key. Opt for high-quality, fresh langostino for the best flavor and texture. Additionally, if you prefer a milder version, you can reduce the amount of aji amarillo paste or substitute it with a milder chili paste.
This dish can be prepared a few hours in advance, allowing the flavors to develop further; just be sure to add the avocado right before serving to keep it from browning. Enjoy this dish cold for the best taste experience!
Ocopa Arequipeña
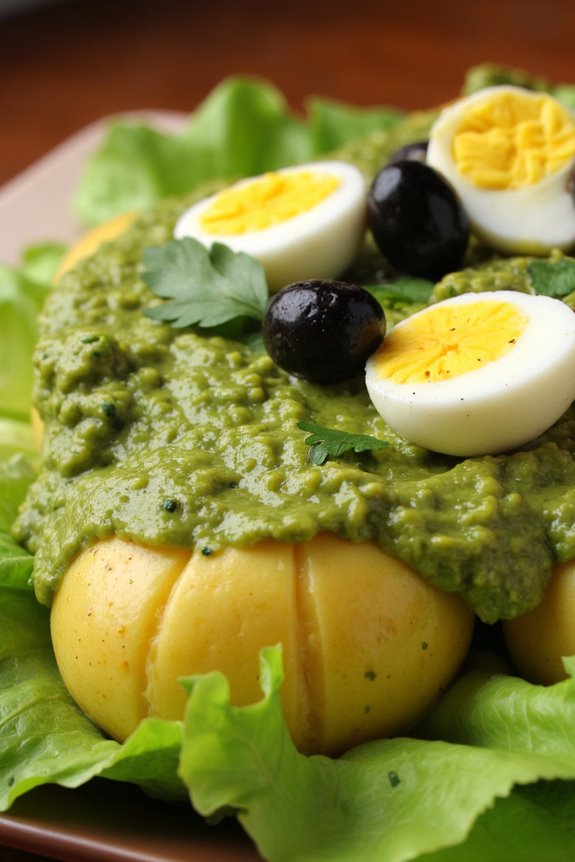
Ocopa Arequipeña is a traditional Peruvian appetizer that hails from the beautiful city of Arequipa. This delightful dish combines boiled potatoes with a creamy, aromatic sauce made primarily from fresh herbs, peanuts, and a touch of spice, making it a perfect starter for any meal or gathering.
The vibrant green color of the sauce, paired with the comforting texture of the potatoes, creates an enticing presentation that’s sure to impress your guests. To serve Ocopa Arequipeña, the boiled potatoes are typically garnished with olives and hard-boiled eggs, adding both flavor and visual appeal.
This dish isn’t only delicious but also offers a taste of Peruvian culinary culture that showcases the rich ingredients sourced from the Andean region. Whether you’re hosting a festive gathering or simply treating yourself to a unique dish, Ocopa Arequipeña is a must-try.
Ingredients (serving size: 4-6 people)
- 6 medium-sized yellow potatoes
- ½ cup peanuts (roasted and unsalted)
- 1 cup fresh cilantro leaves
- 1 cup fresh parsley leaves
- 1-2 fresh green chili peppers (adjust to taste)
- 2 cloves garlic
- ½ cup evaporated milk
- 2 tablespoons vegetable oil
- Salt to taste
- 4 hard-boiled eggs (for garnish)
- Black olives (for garnish)
- Lettuce leaves (for serving)
Cooking Instructions
1. Prepare the Potatoes: Start by washing and scrubbing the yellow potatoes to remove any dirt. Place them in a pot of salted water and bring it to a boil. Cook the potatoes until they’re tender, which usually takes about 20-25 minutes.
Once cooked, drain the potatoes and let them cool slightly before peeling.
2. Make the Sauce: In a blender, combine the roasted peanuts, fresh cilantro, parsley, green chili peppers, garlic, evaporated milk, and vegetable oil. Blend until you achieve a smooth and creamy consistency.
If the sauce is too thick, you can add a little more evaporated milk to reach your desired texture. Season the sauce with salt to taste.
3. Slice the Potatoes: Once the potatoes have cooled and been peeled, slice them into rounds or halves, depending on your preference. Arrange the potato slices on a serving platter or individual plates.
4. Assemble the Dish: Generously pour the green sauce over the arranged potato slices, ensuring they’re well-coated. The vibrant green sauce should cover the potatoes beautifully.
5. Garnish and Serve: Slice the hard-boiled eggs into quarters and place them artistically on top of the dish. Add a few black olives around the potatoes for a pop of color.
You can also serve the Ocopa Arequipeña on a bed of lettuce leaves for added freshness.
Extra Tips
When preparing Ocopa Arequipeña, feel free to adjust the spice level by varying the amount of green chili peppers used in the sauce. If you prefer a milder flavor, you can remove the seeds from the peppers before blending.
Additionally, using fresh herbs is key to achieving the authentic taste of this dish, so opt for the freshest cilantro and parsley you can find. Finally, this dish can be served warm or cold, making it versatile for any occasion. Enjoy this delightful Peruvian appetizer with friends and family!
Tacos De Pollo a La Brasa
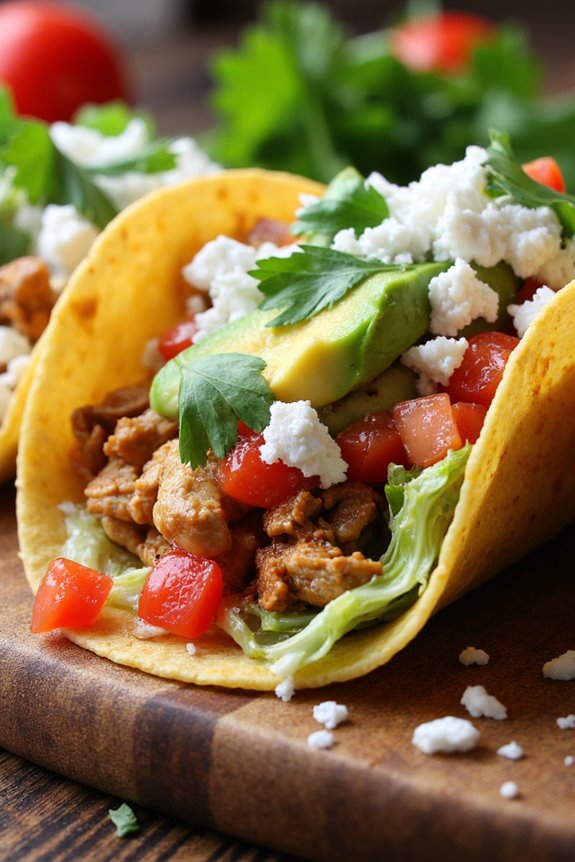
Tacos De Pollo a La Brasa is a delightful Peruvian appetizer that brings together the smoky flavors of grilled chicken with the vibrant freshness of taco ingredients. This dish is inspired by the traditional Peruvian rotisserie chicken, known as “pollo a la brasa,” which is marinated in a blend of spices and cooked to perfection.
The chicken is then shredded and served in soft corn tortillas, making for a perfect handheld treat that’s both flavorful and satisfying.
The beauty of Tacos De Pollo a La Brasa lies in its versatility. You can customize the toppings to suit your taste, whether you prefer tangy salsa, creamy avocado, or zesty pickled onions. This recipe will guide you through making delicious tacos that are sure to impress your family and friends at your next gathering.
Get ready to enjoy a burst of Peruvian flavors wrapped in a convenient taco!
Ingredients (Serves 4-6)
- 1 pound boneless, skinless chicken thighs
- 3 tablespoons olive oil
- 2 tablespoons soy sauce
- 2 tablespoons vinegar (white or apple cider)
- 1 tablespoon garlic powder
- 1 tablespoon paprika
- 1 teaspoon cumin
- 1 teaspoon black pepper
- 1 teaspoon salt
- 8 soft corn tortillas
- 1 cup diced tomatoes
- 1 cup shredded lettuce
- 1 avocado, sliced
- ½ cup crumbled queso fresco
- Lime wedges for serving
- Fresh cilantro for garnish
Cooking Instructions
1. Marinate the Chicken: In a mixing bowl, combine the olive oil, soy sauce, vinegar, garlic powder, paprika, cumin, black pepper, and salt. Whisk together until well combined.
Add the chicken thighs to the marinade, making sure they’re well-coated. Cover the bowl and refrigerate for at least 1 hour, or ideally overnight to allow the flavors to penetrate the meat.
2. Grill the Chicken: Preheat your grill or a grill pan over medium-high heat. Once hot, remove the chicken from the marinade and place it on the grill.
Cook for about 5-7 minutes on each side, or until the internal temperature reaches 165°F (75°C) and the chicken has nice grill marks. Remove the chicken from the grill and let it rest for a few minutes.
3. Shred the Chicken: Once the chicken has cooled slightly, use two forks to shred it into bite-sized pieces. This will make it easier to fill your tacos.
4. Warm the Tortillas: While the chicken is resting, warm the corn tortillas on the grill or in a dry skillet over medium heat for about 30 seconds on each side, or until they’re pliable and slightly toasted.
5. Assemble the Tacos: To Assemble the Tacos, place a generous amount of shredded chicken on each tortilla.
Top with diced tomatoes, shredded lettuce, avocado slices, and crumbled queso fresco. Optionally, sprinkle with fresh cilantro for added flavor.
6. Serve: Serve the tacos with lime wedges on the side for squeezing over the top. Enjoy your delicious Tacos De Pollo a La Brasa!
Extra Tips
For an extra burst of flavor, consider adding a drizzle of spicy salsa or a dollop of sour cream on top of your tacos.
If you prefer a bit of heat, feel free to include diced jalapeños or a splash of hot sauce. Additionally, if you have leftovers, the shredded chicken can be stored in the refrigerator for up to three days and used in salads or sandwiches, making it a great meal prep option.
Enjoy the bright flavors of Peru right at home!
Mini Causa De Atún
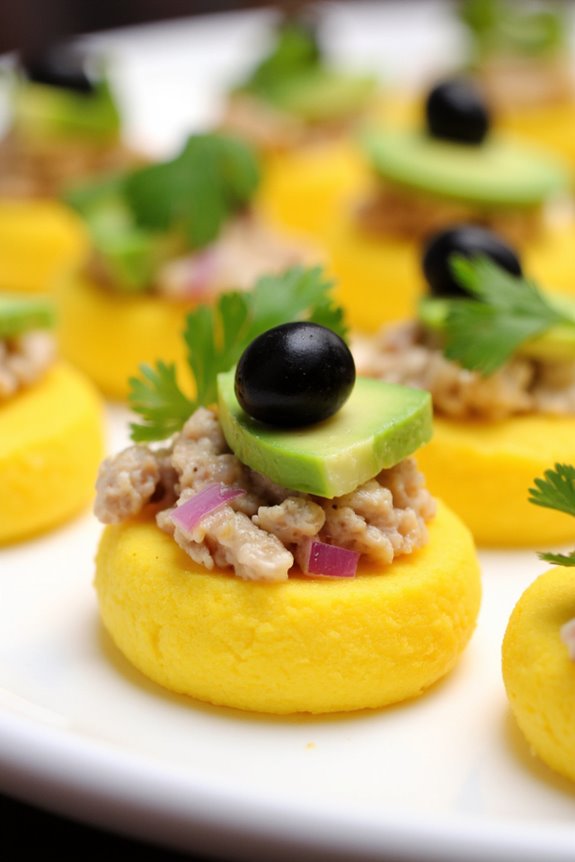
Mini Causa De Atún is a delightful Peruvian appetizer that showcases the vibrant flavors and textures of traditional Peruvian cuisine. This dish features layers of creamy mashed yellow potatoes, seasoned with lime juice and aji amarillo (yellow chili pepper), which is then filled with a savory tuna mixture.
Often served in bite-sized portions, Mini Causa De Atún makes for a perfect finger food for gatherings, parties, or as a light snack. The combination of smooth potato and zesty tuna is sure to impress your guests and leave them wanting more.
Preparing Mini Causa De Atún isn’t only delicious but also an enjoyable cooking experience. The key to a successful causa lies in the quality of the ingredients, particularly the potatoes and the tuna. The potatoes should be well-cooked, allowing for a creamy texture that holds together well. Aji amarillo adds a unique flavor that’s essential to capturing the essence of Peruvian cuisine.
Let’s explore the recipe and discover how to create this tasty appetizer.
Ingredients (Serves 4-6):
- 1 lb yellow potatoes
- 1/4 cup lime juice
- 2 tablespoons aji amarillo paste
- 1/2 teaspoon salt
- 1 can (5 oz) of tuna in water, drained
- 1/4 cup mayonnaise
- 1/4 cup finely chopped red onion
- 1/4 cup chopped fresh cilantro
- 1 avocado, sliced
- Black olives, for garnish
Cooking Instructions:
- Cook the Potatoes: Start by peeling the yellow potatoes and placing them in a pot of boiling water. Cook until they’re tender, which usually takes about 20-25 minutes. Once cooked, drain and allow them to cool slightly before mashing.
- Prepare the Potato Mixture: In a large bowl, combine the mashed potatoes with lime juice, aji amarillo paste, and salt. Mix thoroughly until you achieve a smooth and creamy consistency. Taste and adjust the seasoning if necessary. Set aside.
- Make the Tuna Filling: In another bowl, combine the drained tuna, mayonnaise, chopped red onion, and cilantro. Mix well until all the ingredients are evenly coated. This mixture should be flavorful and slightly creamy.
- Assemble the Mini Causa: Take a small amount of the potato mixture and shape it into a flat base on a serving plate. Carefully place a spoonful of the tuna filling on top of the potato base. Use a second layer of potato mixture to cap the tuna filling, creating a small cylinder or mound. Alternatively, you can use a ring mold for a more uniform shape.
- Garnish and Serve: Once all the mini causas are assembled, top each with a slice of avocado and a black olive for garnish. This adds a nice visual touch as well as extra flavor. Chill in the refrigerator for about 15 minutes before serving to allow the flavors to meld.
Extra Tips:
When making Mini Causa De Atún, it’s important to use high-quality tuna for the best flavor. You can also customize the filling by adding other ingredients like diced bell peppers or corn for added crunch.
If you can’t find aji amarillo paste, you can substitute it with a mild chili paste, but it may alter the dish’s authentic flavor. For a vegetarian option, consider replacing the tuna with a mixture of avocado and cooked corn.
Finally, serve the causas chilled for a cool bite, especially on warm days!