

When I think of Peruvian desserts, my mind fills with the delightful flavors of creamy Arroz Con Leche and the rich sweetness of Tres Leches Cake. These aren’t just dishes—they’re part of cherished family memories. Each recipe has its story and is a reflection of our vibrant culture. Curious about what makes these desserts so special? Let’s explore some beloved favorites that bring families together across Peru.
Arroz Con Leche
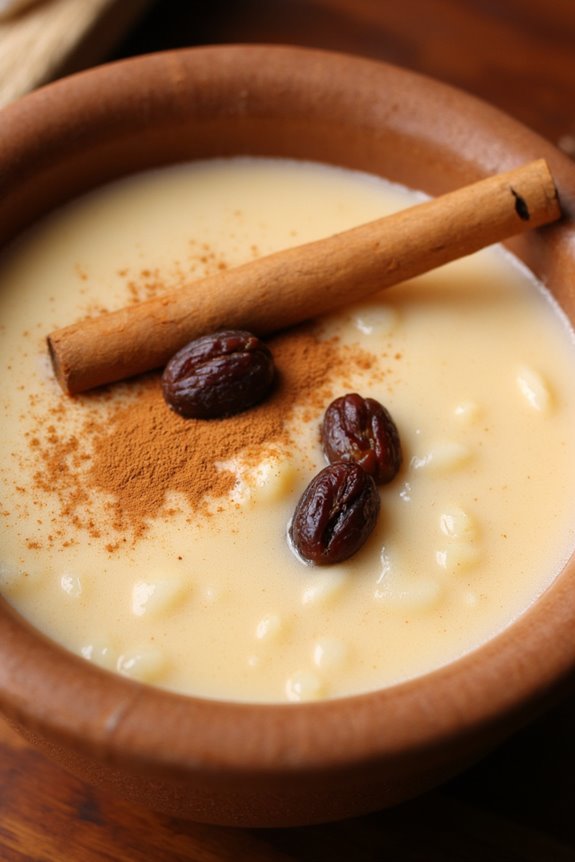
Arroz Con Leche, a beloved Peruvian dessert, translates to “rice with milk” and is a comforting rice pudding that has captured the hearts of many. This sweet dish is made using simple ingredients, such as rice, milk, sugar, and cinnamon, creating a creamy and indulgent treat. Traditionally enjoyed warm, it can also be served chilled, making it a versatile dessert for any occasion.
The dish’s origins can be traced back to the Spanish influence on Peruvian cuisine, where it has evolved over the years into a favorite comfort food. Arroz Con Leche is often garnished with a sprinkle of cinnamon or sometimes even raisins, adding texture and flavor to each delightful spoonful. Whether you’re preparing it for a family gathering or indulging in a sweet craving, this dessert is sure to impress.
Ingredients (Serves 4-6):
- 1 cup of long-grain white rice
- 4 cups of whole milk
- 1 cup of sugar
- 1 cinnamon stick
- 1 teaspoon of vanilla extract
- Pinch of salt
- Ground cinnamon for garnish (optional)
- Raisins (optional)
Cooking Instructions:
- Rinse the Rice: Begin by rinsing the long-grain white rice under cold water in a fine-mesh strainer until the water runs clear. This step removes excess starch and helps prevent the rice from becoming too sticky during cooking. Allow the rice to drain well.
- Boil the Rice: In a medium saucepan, combine the rinsed rice, 2 cups of water, and a pinch of salt. Bring the mixture to a boil over medium-high heat. Once boiling, reduce the heat to low, cover the pot, and simmer for about 15-20 minutes or until the rice is tender and the water has been absorbed.
- Add Milk and Sugar: Once the rice is cooked, add the remaining 2 cups of whole milk, sugar, and the cinnamon stick to the saucepan. Stir well to combine all the ingredients. This is the base of your pudding, and the milk will create a rich, creamy texture.
- Simmer the Mixture: Increase the heat to medium and bring the mixture to a gentle boil while stirring frequently. Once it reaches a boil, reduce the heat to low and simmer uncovered for about 25-30 minutes. Stir often to prevent the rice from sticking to the bottom of the saucepan, allowing the pudding to thicken.
- Finish with Vanilla: After the mixture has thickened and the rice is creamy, remove it from the heat. Stir in the vanilla extract, which adds a lovely flavor to the dish. If desired, you can also add raisins at this stage for extra sweetness and texture.
- Cool and Serve: Let the Arroz Con Leche cool slightly before serving. You can enjoy it warm, or refrigerate it for a few hours if you prefer it chilled. When serving, spoon the pudding into bowls and sprinkle with ground cinnamon for garnish if desired.
Extra Tips: When making Arroz Con Leche, feel free to adjust the sweetness to your taste by adding more or less sugar. If you prefer a creamier texture, you can substitute some of the whole milk with evaporated milk. For added flavor, consider infusing the milk with additional spices such as nutmeg or cloves.
Finally, remember to keep stirring the mixture while it cooks to achieve the perfect creamy consistency and prevent it from scorching at the bottom of the pan. Enjoy your homemade Arroz Con Leche!
Tres Leches Cake
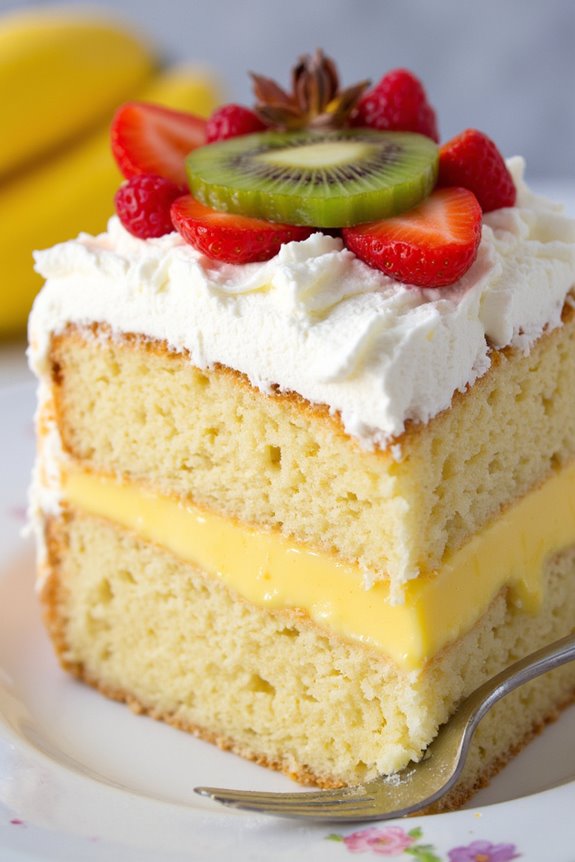
Tres Leches Cake, or “Pastel de Tres Leches,” is a traditional Latin American dessert that has gained popularity around the world. This delectable treat is a sponge cake soaked in a mixture of three types of milk: evaporated milk, condensed milk, and heavy cream. The result is a moist, rich cake that’s both sweet and satisfying.
Often topped with whipped cream and fresh fruit, Tres Leches Cake is perfect for celebrations or as a delightful everyday dessert.
The origins of Tres Leches Cake can be traced back to Latin America, where it’s a staple at various festivities, including birthdays and weddings. Its name translates to “three milks,” which signifies the unique soaking method used in its preparation.
The cake is typically light and airy, making it an excellent canvas for the creamy milk mixture that seeps in, adding a luscious texture and flavor. Once you try it, you’ll understand why it’s become a favorite in many households.
Ingredients (Serves 4-6):
- 1 cup all-purpose flour
- 1 ½ teaspoons baking powder
- ½ cup unsalted butter, softened
- 1 cup granulated sugar
- 5 large eggs
- 1 teaspoon vanilla extract
- 1 cup evaporated milk
- 1 cup condensed milk
- 1 cup heavy cream
- 1 cup whipped cream (for topping)
- Fresh fruit (optional, for garnish)
Cooking Instructions:
- Preheat the Oven: Begin by preheating your oven to 350°F (175°C). This guarantees that the cake bakes evenly and thoroughly.
- Prepare the Cake Pan: Grease a 9×13 inch baking dish with butter or cooking spray. This will prevent the cake from sticking to the pan and make it easier to serve.
- Mix Dry Ingredients: In a mixing bowl, whisk together the flour and baking powder. This helps to evenly distribute the baking powder throughout the flour, guaranteeing a uniform rise in your cake.
- Cream Butter and Sugar: In a separate large bowl, beat the softened butter and granulated sugar together until the mixture is light and fluffy. This process incorporates air into the batter, yielding a light and tender cake.
- Add Eggs and Vanilla: Add the eggs one at a time, beating well after each addition. Stir in the vanilla extract. This step enhances the flavor of the cake while guaranteeing that each egg is well incorporated.
- Combine Dry and Wet Ingredients: Gradually add the flour mixture to the butter mixture, mixing until just combined. Avoid overmixing to keep the cake fluffy.
- Bake the Cake: Pour the batter into the prepared baking dish and spread it evenly. Bake in the preheated oven for 25-30 minutes, or until a toothpick inserted in the center comes out clean. Allow the cake to cool in the pan for about 10 minutes before transferring it to a wire rack.
- Prepare the Milk Mixture: In a bowl, combine the evaporated milk, condensed milk, and heavy cream. Whisk until well blended. This is the luscious soaking mixture that makes Tres Leches Cake unique.
- Soak the Cake: Once the cake has cooled, poke holes all over the top with a fork or skewer. Pour the milk mixture evenly over the cake, allowing it to absorb all the delicious liquid. Let the cake sit for at least 1 hour, or preferably overnight in the refrigerator.
- Serve the Cake: Before serving, top the cake with whipped cream. You can also add fresh fruit for a colorful and tasty garnish. Cut into squares and enjoy the creamy goodness!
Extra Tips:
For the best Tres Leches Cake experience, allow the cake to soak overnight in the refrigerator. This guarantees that the flavors meld beautifully and the cake achieves maximum moisture.
If you prefer a less sweet cake, consider using unsweetened whipped cream for topping. Additionally, feel free to get creative with the toppings; berries, mangoes, or even a sprinkle of cinnamon can elevate this classic dessert to new heights. Enjoy your baking!
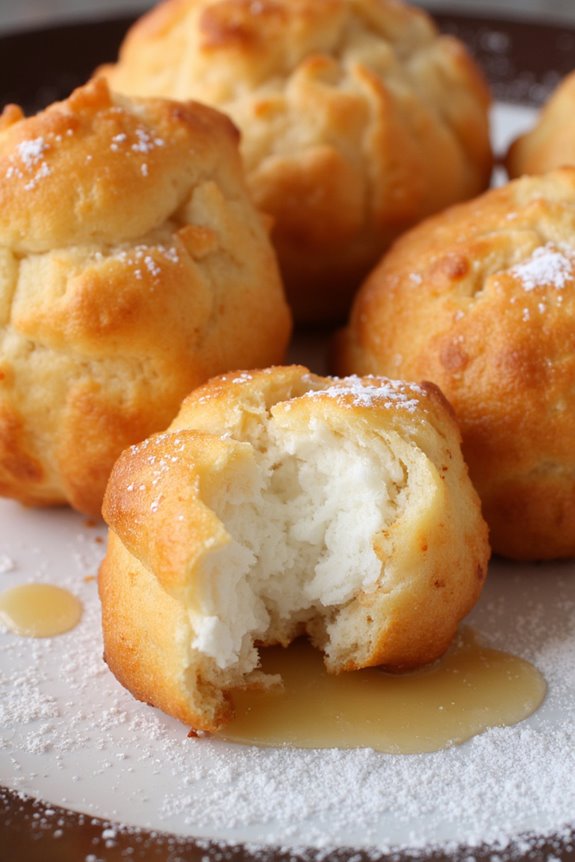
Picarones
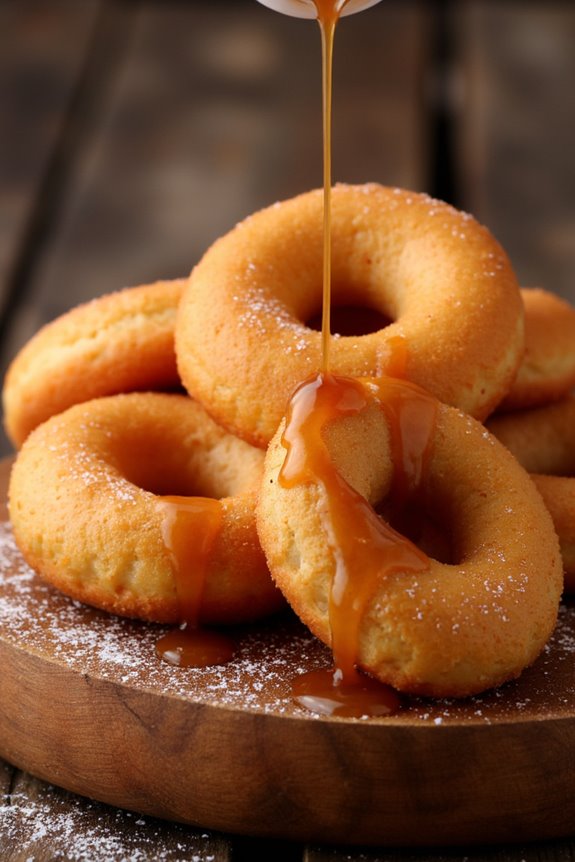
Picarones are a beloved Peruvian dessert that combines the delightful flavors of sweet potatoes and squash, creating a fascinating doughnut-like treat. Traditionally served drizzled with a syrup made from chancaca (a type of raw cane sugar), these deep-fried pastries are a favorite during festivals and celebrations, often enjoyed during the cooler months. Their unique texture and sweet, warm flavors make them a truly irresistible dessert that reflects the rich culinary traditions of Peru.
The making of picarones is an enjoyable process that brings together simple ingredients to create a dish that’s both comforting and indulgent. The dough is light and fluffy, with a hint of spice from cinnamon and anise, while the syrup adds a luscious sweetness. Whether you’re looking to impress guests at a dinner party or simply satisfy your sweet tooth, making picarones is a delightful way to experience a taste of Peru.
Ingredients (Serves 4-6 people):
- 1 cup cooked and mashed sweet potatoes
- 1 cup cooked and mashed butternut squash
- 1 ½ cups all-purpose flour
- 1 teaspoon active dry yeast
- 1 teaspoon ground cinnamon
- ½ teaspoon ground nutmeg
- ¼ teaspoon ground anise
- ½ teaspoon salt
- ½ cup warm water
- 1 cup chancaca or brown sugar (for syrup)
- 1 cup water (for syrup)
- Oil for frying
Cooking Instructions:
- Prepare the Yeast Mixture: In a small bowl, dissolve the active dry yeast in ½ cup of warm water. Allow it to sit for about 5-10 minutes until it becomes frothy. This step activates the yeast, which helps the dough rise.
- Mix the Base Ingredients: In a large mixing bowl, combine the cooked and mashed sweet potatoes and butternut squash. Stir in the ground cinnamon, nutmeg, anise, and salt. Mix thoroughly to make sure all the spices are evenly distributed.
- Combine the Mixtures: Once the yeast is frothy, add it to the sweet potato and squash mixture. Gradually add the flour while mixing until a soft, sticky dough forms. Knead the dough gently in the bowl, making sure that all ingredients are well incorporated.
- Let the Dough Rise: Cover the bowl with a clean kitchen towel and let the dough rise in a warm place for about 1 hour, or until it doubles in size. This fermentation process adds flavor and lightness to the picarones.
- Prepare the Syrup: While the dough is rising, prepare the syrup by combining the chancaca (or brown sugar) and 1 cup of water in a saucepan. Heat over medium-low, stirring until the sugar dissolves. Allow it to simmer for about 10 minutes until it thickens slightly, then set aside.
- Shape the Picarones: Once the dough has risen, heat oil in a deep frying pan over medium heat. With oiled hands, take a small piece of dough and form it into a ring shape (about the size of a doughnut). Make a hole in the center, making sure the ring is even.
- Fry the Picarones: Carefully place the formed picarones in the hot oil, frying them until golden brown on both sides (about 3-4 minutes per side). Remove from the oil and drain on paper towels to absorb excess oil.
- Serve with Syrup: Serve the picarones warm, drizzled generously with the prepared syrup. They can also be dusted with powdered sugar for an extra touch of sweetness.
Extra Tips: When making picarones, it’s crucial to keep the oil at the right temperature; too hot, and they’ll burn quickly, too cool, and they won’t cook properly. You can test the oil by dropping a small piece of dough into it; if it sizzles and rises to the surface, it’s ready.
Also, for added flavor, consider infusing the syrup with a bit of orange peel or cloves while it simmers. Enjoy your homemade picarones fresh for the best taste!
Suspiro a La Limeña
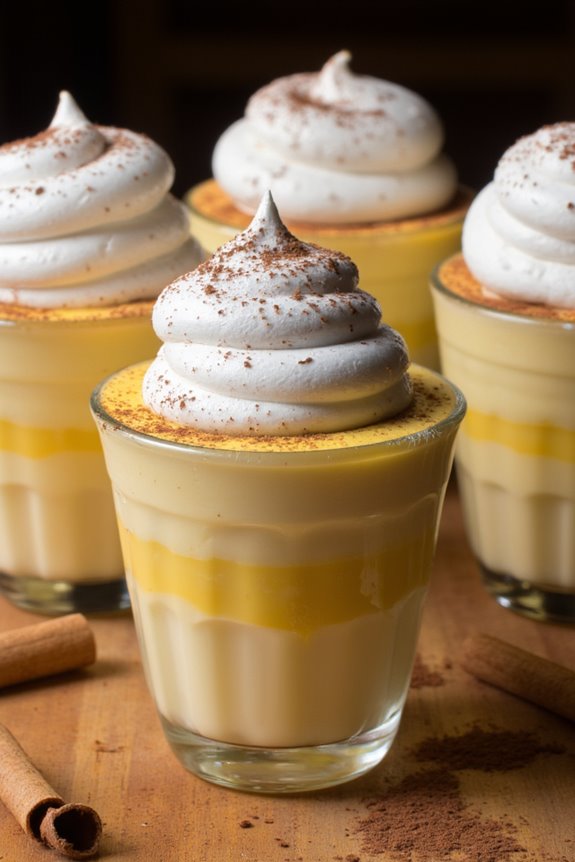
Suspiro a La Limeña is a traditional Peruvian dessert that embodies the rich culinary heritage of Lima. This delightful treat is a combination of a creamy, smooth base made from sweetened condensed milk and egg yolks, topped with a frothy meringue infused with a hint of port wine. The name “Suspiro” translates to “sigh,” which perfectly describes the heavenly experience of savoring this luscious dessert.
Often served in individual cups, it’s a popular choice for special occasions and celebrations in Peru.
The origins of Suspiro a La Limeña date back to the colonial era, blending Spanish and local influences to create a unique flavor profile. The dessert isn’t only a feast for the palate but also for the eyes, as it’s typically garnished with a sprinkle of cinnamon or chocolate shavings.
Whether you’re hosting a dinner party or simply want to indulge in a sweet treat, Suspiro a La Limeña is sure to captivate your guests and leave them wanting more.
Ingredients (Serves 4-6):
- 1 can (14 ounces) sweetened condensed milk
- 4 large egg yolks
- 1 teaspoon vanilla extract
- 1/2 cup semi-sweet or dark chocolate (grated, for garnish)
- 4 large egg whites
- 1 cup granulated sugar
- 1/4 cup port wine or red wine
- 1/2 teaspoon ground cinnamon (for garnish)
Cooking Instructions:
- Prepare the Base: In a medium saucepan over low heat, combine the sweetened condensed milk, egg yolks, and vanilla extract. Stir continuously until the mixture thickens, about 10-15 minutes. Be careful not to let it boil to avoid curdling. Once thickened, remove from heat and allow to cool slightly.
- Make the Meringue: In a clean mixing bowl, beat the egg whites with an electric mixer on medium speed until soft peaks form. Gradually add the granulated sugar, one tablespoon at a time, while continuing to beat on high speed until stiff peaks form and the mixture is glossy. This should take about 5-7 minutes.
- Incorporate the Wine: Gently fold the port wine into the meringue mixture, being careful not to deflate the egg whites. This will add a sophisticated flavor and enhance the dessert’s aroma.
- Assemble the Dessert: Spoon the thickened condensed milk mixture into individual serving cups or glasses, filling them about halfway. Then, generously pipe or spoon the meringue on top of the milk base, creating a beautiful dome shape.
- Chill and Serve: Refrigerate the assembled desserts for at least 2 hours to allow the flavors to meld and the meringue to set. Before serving, garnish with grated chocolate and a sprinkle of ground cinnamon.
Extra Tips:
When preparing Suspiro a La Limeña, verify that the egg whites are at room temperature for better volume when whipping.
Use a clean bowl and beaters, as any fat or residue can prevent the egg whites from reaching their full potential. If you want to add a twist, try varying the type of wine used or incorporating different toppings such as crushed nuts or fresh fruit.
Enjoy this dessert chilled for the best texture and flavor experience!
Alfajores
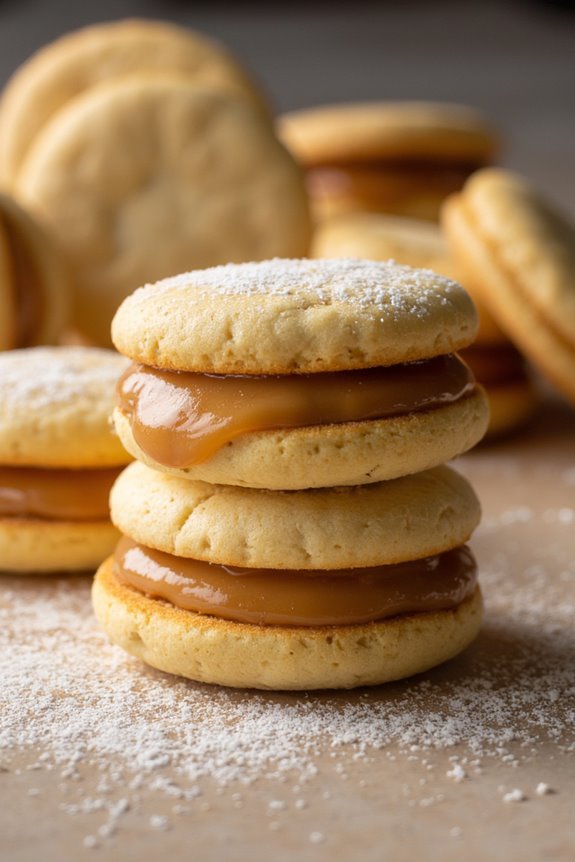
Alfajores are a popular Peruvian dessert that have captured the hearts and taste buds of many around the world. These delightful treats consist of two delicate cookies filled with a luscious layer of dulce de leche, and they’re often rolled in grated coconut or dusted with powdered sugar.
The origins of alfajores can be traced back to Mediterranean influences, but the Peruvian version has evolved into a beloved staple, often enjoyed with a cup of coffee or a warm beverage.
Making alfajores at home isn’t only rewarding but also a fun culinary project. The cookies are tender and buttery, while the filling adds a rich sweetness that balances perfectly. Whether you’re preparing them for a special occasion or just to satisfy your sweet tooth, alfajores are sure to impress your family and friends.
Ingredients (Serves 4-6):
- 1 cup unsalted butter, softened
- 1 cup powdered sugar
- 2 large egg yolks
- 1 teaspoon vanilla extract
- 2 cups all-purpose flour
- 1 cup cornstarch
- 1 teaspoon baking powder
- 1 cup dulce de leche
- ½ cup shredded coconut (optional, for rolling)
- Extra powdered sugar (for dusting)
Cooking Instructions:
- Preheat the Oven: Start by preheating your oven to 350°F (175°C). This guarantees that the cookies bake evenly and achieve a nice golden color.
- Cream the Butter and Sugar: In a large mixing bowl, combine the softened butter and powdered sugar. Use an electric mixer to cream them together until the mixture is light and fluffy. This step is vital as it incorporates air into the butter, making the cookies tender.
- Add Egg Yolks and Vanilla: Add the egg yolks and vanilla extract to the creamed mixture. Mix well until fully combined. The egg yolks will enrich the dough and contribute to the overall flavor of the cookies.
- Combine Dry Ingredients: In a separate bowl, whisk together the all-purpose flour, cornstarch, and baking powder. Gradually add this dry mixture to the wet ingredients, mixing gently until a soft dough forms. Be careful not to overmix, as this can lead to tough cookies.
- Shape the Cookies: On a lightly floured surface, roll out the dough to about ¼ inch thickness. Use a round cookie cutter (approximately 2 inches in diameter) to cut out cookie shapes. Place the cut cookies onto a baking sheet lined with parchment paper, leaving space between each cookie.
- Bake the Cookies: Bake in the preheated oven for about 10-12 minutes, or until the edges are lightly golden. Once done, remove from the oven and let them cool on the baking sheet for a few minutes before transferring them to a wire rack to cool completely.
- Assemble the Alfajores: Once the cookies are completely cooled, take one cookie and spread a generous amount of dulce de leche on the flat side. Top with another cookie, pressing gently to create a sandwich.
- Finish with Coconut (Optional): If desired, roll the edges of the alfajores in shredded coconut for added texture and flavor. Alternatively, you can dust the tops with powdered sugar for a sweet finish.
Extra Tips:
When making alfajores, it’s important to allow the cookies to cool completely before assembling them with the dulce de leche to prevent the filling from melting.
You can also experiment with different fillings, such as chocolate ganache or fruit jams, to give your alfajores a unique twist. If you want to make a larger batch, these cookies freeze well, so you can prepare them in advance and enjoy them later!
Mazamorra Morada
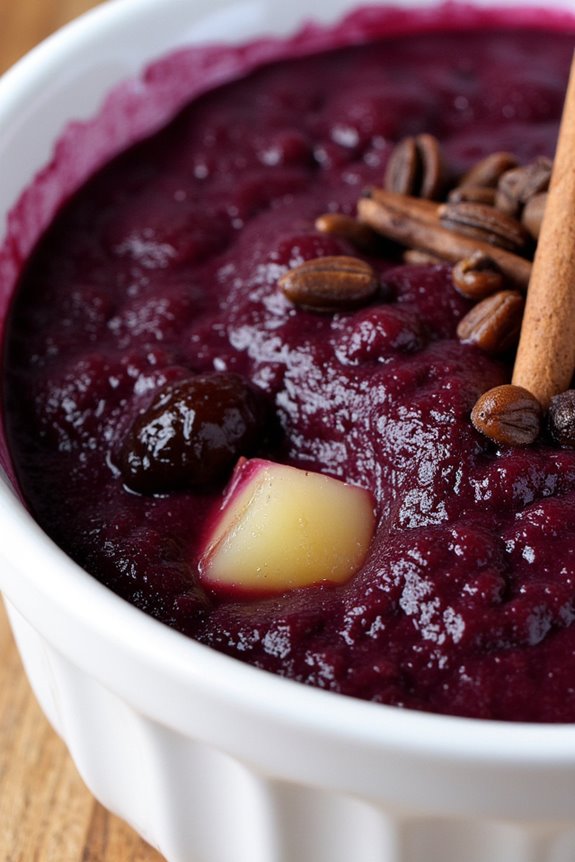
Mazamorra Morada is a traditional Peruvian dessert that embodies the rich flavors and vibrant colors of the country’s culinary heritage. Made primarily from purple corn, this sweet pudding is often flavored with fruits, spices, and a touch of sugar, making it a delightful treat for any occasion.
The deep purple hue of the dish not only makes it visually appealing but also signifies the use of a natural ingredient that’s integral to Peruvian culture. Traditionally served chilled, Mazamorra Morada is often accompanied by a side of arroz con leche (rice pudding), creating a perfect combination of textures and flavors.
The preparation of Mazamorra Morada is relatively straightforward, requiring only a few ingredients to create a deliciously satisfying dessert. Its versatility allows for various interpretations, but the classic version remains a favorite among locals and visitors alike.
Whether you’re looking to impress guests at a dinner party or simply satisfy your sweet tooth, this Peruvian dessert is sure to please.
Ingredients (Serves 4-6):
- 1 cup purple corn flour (maiz morado)
- 4 cups water
- 1 cup sugar (adjust to taste)
- 1 cinnamon stick
- 3 cloves
- 1 cup diced pineapple
- 1 cup diced apple
- 1/2 cup dried prunes, chopped
- 1/4 cup raisins
- 1 tablespoon lemon juice
- 2 tablespoons cornstarch (optional, for thickening)
- 1 tablespoon of vanilla extract (optional)
Cooking Instructions:
- Prepare the Purple Corn Mixture: In a large pot, combine the purple corn flour and water. Stir well to dissolve the flour and avoid lumps. This mixture will be the base of your Mazamorra Morada.
- Add Flavorings: Place the pot on medium heat and add the sugar, cinnamon stick, and cloves to the corn mixture. Stir the ingredients together, ensuring the sugar dissolves completely while infusing the flavors of the spices into the mixture.
- Simmer the Mixture: Allow the mixture to come to a gentle boil, then reduce the heat to low. Let it simmer for about 15-20 minutes, stirring occasionally. This process helps to thicken the mixture and deepens the flavor.
- Incorporate Fruits: Once the mixture has thickened, add the diced pineapple, apple, prunes, and raisins. Stir well to incorporate the fruits and allow them to soften and release their juices. Continue to cook for another 5-10 minutes.
- Add Lemon Juice and Optional Ingredients: Mix in the lemon juice and, if desired, add the cornstarch dissolved in a little water for extra thickness. If you prefer a sweeter note, you can also add vanilla extract at this stage. Stir thoroughly and cook for another few minutes.
- Cool and Serve: Remove the pot from heat and let the Mazamorra Morada cool to room temperature. Once cooled, transfer it to a serving dish or individual cups. Refrigerate for at least 2 hours before serving to allow it to set properly.
Extra Tips:
For an authentic twist, consider garnishing your Mazamorra Morada with a sprinkle of ground cinnamon or a few pieces of fresh fruit on top before serving.
Additionally, you can adjust the sweetness according to your preference, and feel free to experiment with other dried fruits for added texture and flavor. If you can find it, using fresh purple corn will enhance the natural flavor and color of the dish, making it even more delightful.
Enjoy this delicious dessert as a highlight of your Peruvian culinary experience!
Tarta De Choclo
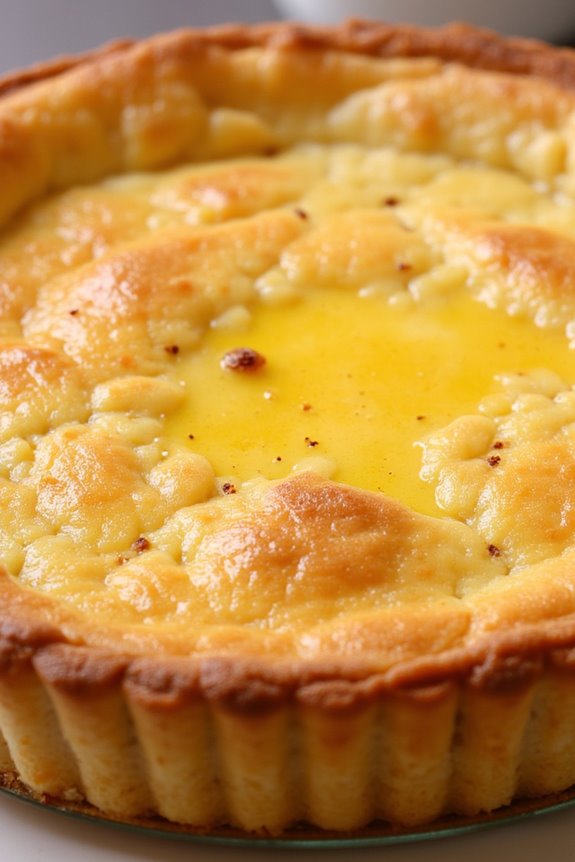
Tarta De Choclo is a delightful Peruvian corn pie that showcases the natural sweetness of corn combined with a creamy filling. This dish isn’t only a staple in Peruvian cuisine but also serves as a wonderful dessert or a sweet treat to enjoy at any time of the day. The base is made with fresh corn and a touch of sugar, while the filling typically includes a blend of milk, eggs, and a rich hint of cinnamon, offering a comforting and homely flavor that’s loved by many.
The preparation of Tarta De Choclo is quite simple, making it an excellent choice for both novice cooks and experienced bakers alike. The dish can be served warm or chilled, allowing for versatility depending on your preference. As you prepare this delightful dessert, the aroma of baking corn will fill your kitchen, making it a perfect dish for family gatherings or special occasions.
Ingredients (serving size: 4-6 people):
- 2 cups fresh corn kernels (or 1 can of sweet corn, drained)
- 1 cup milk
- 1 cup sugar
- 3 large eggs
- 1/2 cup unsalted butter, melted
- 1 teaspoon vanilla extract
- 1/4 teaspoon ground cinnamon
- 1/4 teaspoon salt
- 1 cup all-purpose flour
- 1 teaspoon baking powder
Cooking Instructions:
- Preheat the Oven: Start by preheating your oven to 350°F (175°C). This guarantees that your tarta bakes evenly, resulting in a perfectly golden crust.
- Prepare the Corn Mixture: In a blender, combine the fresh corn kernels (or canned corn), milk, sugar, eggs, melted butter, vanilla extract, and salt. Blend until smooth and well combined. This mixture forms the base of your tart, so it’s crucial to achieve a creamy consistency.
- Mix Dry Ingredients: In a separate bowl, whisk together the flour, baking powder, and ground cinnamon. This step helps to guarantee that the dry ingredients are evenly distributed before combining them with the wet mixture.
- Combine Mixtures: Gradually add the dry ingredients to the corn mixture in the blender. Blend again until just combined; avoid over-mixing to maintain a light texture.
- Prepare the Baking Dish: Grease a 9-inch pie dish or tart pan with butter or non-stick spray. This will prevent the tart from sticking and make for easier slicing once baked.
- Pour and Bake: Pour the corn mixture into the prepared baking dish. Bake in the preheated oven for 35-40 minutes, or until the top is golden brown and a toothpick inserted into the center comes out clean.
- Cool and Serve: Once baked, allow the Tarta De Choclo to cool for about 10 minutes. You can serve it warm or chilled, depending on your preference.
Extra Tips: When making Tarta De Choclo, using fresh corn will enhance the flavor considerably, but frozen corn can be a convenient substitute. For an added twist, consider incorporating some grated coconut or a sprinkle of nutmeg to the filling for an extra layer of flavor.
If you’d like a firmer texture, you can refrigerate the tart for a few hours after baking before serving. Enjoy this sweet delicacy with a dollop of whipped cream or a scoop of vanilla ice cream for a truly indulgent experience!
Helado De Lucuma
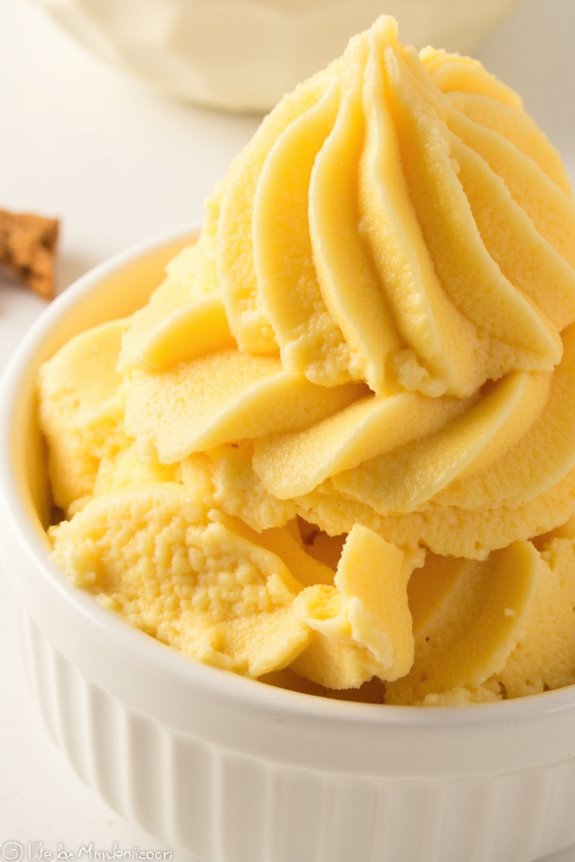
Helado De Lucuma is a delightful Peruvian dessert that showcases the unique flavor of the lucuma fruit, often referred to as the “golden eggfruit.” This creamy ice cream isn’t only delicious but also has a rich cultural significance in Peru, where lucuma is a beloved ingredient. The enchanting combination of its sweet, maple-like flavor with a hint of caramel makes this dessert a favorite among both locals and visitors.
Making Helado De Lucuma at home is a rewarding process that allows you to experience the essence of Peruvian cuisine in your own kitchen. To prepare this delightful dessert, you’ll need a few simple ingredients that come together to create a smooth and creamy texture. Whether you’re serving it after a meal or enjoying it on a hot day, Helado De Lucuma is sure to impress your family and friends.
The following recipe will guide you in making this exquisite dessert for 4-6 people, allowing you to share a taste of Peru with your loved ones.
Ingredients
- 1 cup lucuma pulp (fresh or frozen)
- 1 cup heavy cream
- 1 cup whole milk
- 3/4 cup granulated sugar
- 1 teaspoon vanilla extract
- 1/2 teaspoon salt
- 4 egg yolks
Cooking Instructions
- Prepare the Ingredients: Gather all the ingredients and verify that the lucuma pulp is thawed if using frozen pulp. This will make it easier to blend smoothly. Measure out the heavy cream, whole milk, sugar, vanilla extract, and salt, and have the egg yolks ready.
- Mix the Base: In a medium saucepan, combine the heavy cream, whole milk, and sugar. Heat the mixture over medium heat, stirring occasionally until the sugar is fully dissolved. Don’t let it come to a boil.
- Temper the Egg Yolks: In a separate bowl, whisk the egg yolks. Once the milk mixture is warm, slowly pour a small amount of it into the bowl with the egg yolks while whisking continuously. This process is known as tempering, and it helps prevent the eggs from curdling.
- Combine and Cook: Pour the tempered egg yolk mixture back into the saucepan with the remaining milk mixture. Continue to cook over medium-low heat, stirring constantly until the mixture thickens slightly and coats the back of a spoon (about 5-7 minutes). Be careful not to let it boil.
- Add Lucuma and Flavorings: Remove the saucepan from heat and stir in the lucuma pulp, vanilla extract, and salt. Mix well until the lucuma is fully incorporated.
- Cool and Chill: Allow the mixture to cool at room temperature for about 30 minutes. Then transfer it to a bowl, cover with plastic wrap, and refrigerate for at least 4 hours or until completely chilled.
- Churn the Ice Cream: Once the mixture is chilled, pour it into an ice cream maker and churn according to the manufacturer’s instructions until it reaches a soft-serve consistency. This usually takes about 20-25 minutes.
- Freeze Until Firm: Transfer the churned ice cream to an airtight container and freeze for at least 2 hours, or until it becomes firm enough to scoop.
Extra Tips
When making Helado De Lucuma, using high-quality lucuma pulp will greatly enhance the flavor of your ice cream. If you can’t find fresh or frozen lucuma, consider using lucuma powder as a substitute, but adjust the quantity to achieve the desired taste and consistency.
Additionally, for a creamier texture, let your ice cream sit at room temperature for a few minutes before serving to soften it slightly. Enjoy the experience of creating this unique Peruvian treat!
Bunuelo
Buñuelo is a delightful Peruvian dessert that has gained popularity for its sweet, fluffy texture and crispy exterior. Often enjoyed during festive occasions and family gatherings, these deep-fried pastries provide a wonderful contrast between their airy insides and their golden, crunchy outsides. Traditionally made with a simple dough flavored with cinnamon and sometimes anise, buñuelos are typically served with a drizzle of syrup or a dusting of powdered sugar.
What makes buñuelos so special is their versatility. While the basic recipe focuses on the dough, you can easily experiment with different flavorings and toppings to suit your taste. Whether you prefer them with a hint of vanilla, a sprinkle of cheese, or a generous serving of honey, buñuelos are a comforting treat that’s sure to please anyone with a sweet tooth.
Ingredients (Serving size: 4-6 people)
- 2 cups all-purpose flour
- 1 tablespoon baking powder
- 1/2 teaspoon salt
- 1 teaspoon cinnamon
- 1/4 teaspoon anise (optional)
- 2 large eggs
- 1/2 cup milk
- 1/4 cup sugar
- 1 teaspoon vanilla extract
- Vegetable oil (for frying)
- Powdered sugar (for dusting)
- Honey or syrup (for drizzling)
Cooking Instructions
- Prepare the Dough: In a large mixing bowl, combine the all-purpose flour, baking powder, salt, cinnamon, and anise (if using). Mix these dry ingredients together until well incorporated. This step is vital as it guarantees that the leavening agent is evenly distributed, resulting in fluffy buñuelos.
- Mix Wet Ingredients: In another bowl, whisk together the eggs, milk, sugar, and vanilla extract. Make sure the mixture is smooth and the sugar is dissolved. This combination will add flavor and moisture to the dough, making the buñuelos rich and tasty.
- Combine Wet and Dry Ingredients: Pour the wet mixture into the dry ingredients and stir until just combined. Avoid over-mixing; it’s okay if there are a few lumps. This keeps the buñuelos light and airy.
- Heat the Oil: In a deep frying pan or pot, heat about 2 inches of vegetable oil over medium-high heat. To check if the oil is ready, drop a small amount of the dough into the oil; if it sizzles and rises to the surface, the oil is hot enough for frying.
- Fry the Buñuelos: Using a tablespoon or small ice cream scoop, carefully drop spoonfuls of the dough into the hot oil. Fry them in batches to avoid overcrowding the pan. Cook for about 2-3 minutes on each side or until they turn golden brown. Flip them gently with a slotted spoon to guarantee even cooking.
- Drain and Serve: Once cooked, use a slotted spoon to remove the buñuelos from the oil and place them on a plate lined with paper towels to drain any excess oil. Allow them to cool slightly before dusting with powdered sugar or drizzling with honey or syrup.
Extra Tips
When making buñuelos, it’s important to maintain the right oil temperature; too hot, and they’ll burn, too cool, and they’ll absorb too much oil and become greasy. If you want to add a twist, consider incorporating citrus zest into the dough for an extra layer of flavor.
Finally, buñuelos are best enjoyed fresh, so try to serve them right after frying for the ultimate texture and taste experience!
Queso Helado
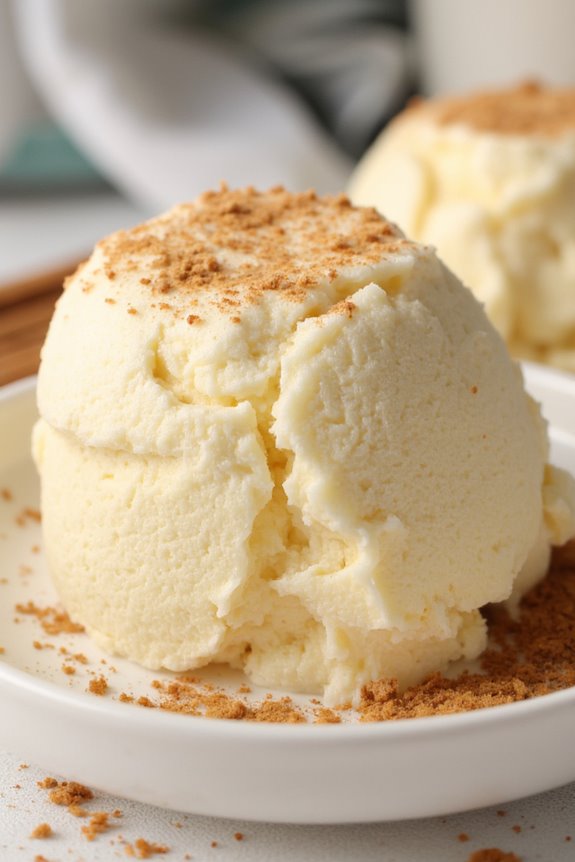
Queso Helado, which translates to “frozen cheese,” is a delightful Peruvian dessert that hails from the southern city of Arequipa. This sweet treat combines the creamy texture of cheese with the invigorating taste of coconut and spices, creating a unique and indulgent experience. Traditionally served in small squares or scoops, Queso Helado is a popular choice during hot weather or festive occasions, bringing a taste of Peru right to your table.
The dessert’s name might lead one to think of a cheese dish, but it’s actually a revitalizing frozen delicacy that’s often compared to ice cream or sorbet. With its origins rooted in the Andean culture, Queso Helado is made using simple yet flavorful ingredients, making it a fun recipe for anyone to try at home. Whether you’re hosting a summer gathering or simply looking to satisfy your sweet tooth, this dessert is sure to impress.
Ingredients (Serves 4-6):
- 1 cup of evaporated milk
- 1 cup of condensed milk
- 1 cup of coconut milk
- 1 cup of grated fresh coconut (or desiccated coconut)
- 1 cup of fresh cheese (or ricotta)
- 1 teaspoon of vanilla extract
- ½ teaspoon of ground cinnamon
- ½ teaspoon of ground nutmeg
- 1 tablespoon of cornstarch
- A pinch of salt
Cooking Instructions:
- Prepare the Cheese Mixture: In a mixing bowl, combine the fresh cheese (or ricotta) with the grated coconut. Use a fork or a whisk to blend them together until the mixture is smooth and homogeneous. This will provide a creamy base for your dessert.
- Mix the Liquids: In a separate bowl, whisk together the evaporated milk, condensed milk, and coconut milk. Confirm that the mixtures are well combined without any lumps. This step is essential for achieving the desired creamy texture of the Queso Helado.
- Combine Ingredients: Gradually add the cheese-coconut mixture into the milk mixture, stirring continuously. This helps incorporate all the flavors together. Make sure there are no clumps of cheese remaining, as this can affect the final texture of the dessert.
- Add Flavorings and Thickener: Next, stir in the vanilla extract, ground cinnamon, ground nutmeg, cornstarch, and a pinch of salt. Mix until everything is evenly distributed. The cornstarch will help thicken your mixture when it freezes.
- Chill the Mixture: Transfer the mixture into a suitable container or ice cream maker. If using a container, cover it with a lid or plastic wrap. Place it in the freezer for about 4-6 hours or until it’s fully set. If using an ice cream maker, churn according to the manufacturer’s instructions until it reaches a soft-serve consistency before transferring to the freezer.
- Serve: Once the Queso Helado is frozen solid, remove it from the freezer and let it sit for about 5-10 minutes to soften slightly before serving. Cut into squares or scoop into bowls, and garnish with a sprinkle of cinnamon or toasted coconut if desired.
Extra Tips:
For a delightful twist, consider adding chopped nuts or a splash of rum to the mixture before freezing for extra flavor. If you prefer a sweeter dessert, adjust the amount of condensed milk according to your taste. Remember to let the Queso Helado sit out for a few minutes before serving to make it easy to scoop. Enjoy this unique Peruvian treat with friends and family, as its rich flavors are sure to be a crowd-pleaser!
Turrón De Doña Pepa
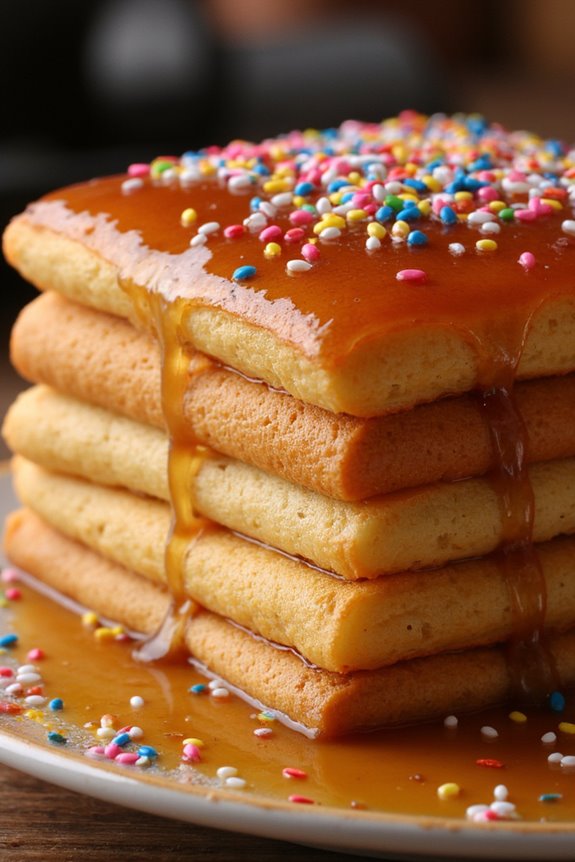
Turrón De Doña Pepa is a traditional Peruvian dessert that’s particularly popular during the celebrations of the Señor de los Milagros, a significant religious event in Peru. This sweet treat is characterized by its layered structure, made from anise-flavored dough and usually topped with a rich, sweet syrup known as ‘miel de chancaca.’ The combination of the spiced dough and the syrup creates a delightful contrast of flavors and textures, making it a beloved dessert for many.
The origins of Turrón De Doña Pepa date back to the 18th century and are often attributed to a woman named Doña Pepa, who was said to have created this dish as an offering to the Lord of Miracles. The dessert isn’t only a feast for the palate but also a visual delight, often adorned with colorful sprinkles or nuts.
The preparation of Turrón De Doña Pepa can be a fun activity for family gatherings or special occasions, as it brings together the joy of cooking and the celebration of cultural heritage.
Ingredients (serving size: 4-6 people)
- 2 cups all-purpose flour
- 1 cup sugar
- 1/2 cup unsalted butter, softened
- 3 large eggs
- 1 teaspoon anise extract
- 1/2 teaspoon baking powder
- 1/4 teaspoon salt
- 1 cup chancaca (or brown sugar)
- 1/2 cup water
- 1/2 teaspoon cinnamon powder
- Colored sprinkles for decoration (optional)
Cooking Instructions
- Prepare the Dough: In a large mixing bowl, cream together the softened butter and sugar until light and fluffy. Gradually add the eggs one at a time, mixing well after each addition. Stir in the anise extract. In a separate bowl, combine the flour, baking powder, and salt. Gradually add the dry ingredients to the wet mixture, stirring until a smooth dough forms.
- Shape the Dough: Divide the dough into small equal portions (about the size of a golf ball) and roll them into logs or strips approximately 1 inch thick. This will create the layered structure typical of Turrón De Doña Pepa.
- Bake the Dough: Preheat your oven to 350°F (175°C). Arrange the rolled dough pieces on a baking sheet lined with parchment paper, spacing them about an inch apart. Bake for 15-20 minutes or until they’re lightly golden. Remove from the oven and allow to cool completely.
- Prepare the Syrup: In a small saucepan, combine the chancaca (or brown sugar), water, and cinnamon. Heat over medium heat, stirring until the sugar is dissolved, and bring to a gentle boil. Let it simmer for about 10-15 minutes until the syrup thickens slightly.
- Assemble the Turrón: Once the dough is cooled, stack the baked strips in layers, drizzling some of the syrup between each layer. Continue stacking until all the strips are used. Pour any remaining syrup over the top of the assembled Turrón.
- Decorate and Serve: If desired, sprinkle colored sprinkles over the top for a festive look. Let the Turrón sit for at least 30 minutes to allow the syrup to soak in before serving.
Extra Tips
When making Turrón De Doña Pepa, it’s essential to ascertain that the dough isn’t overworked to maintain its light texture. The syrup can be adjusted to your desired sweetness by adding more or less sugar.
For an authentic touch, consider using whole anise seeds or even adding a hint of vanilla extract to the dough. Additionally, let the Turrón rest longer if you prefer a more syrupy consistency. Enjoy this delightful dessert with family and friends, celebrating the rich culture of Peru!
Chocotejas
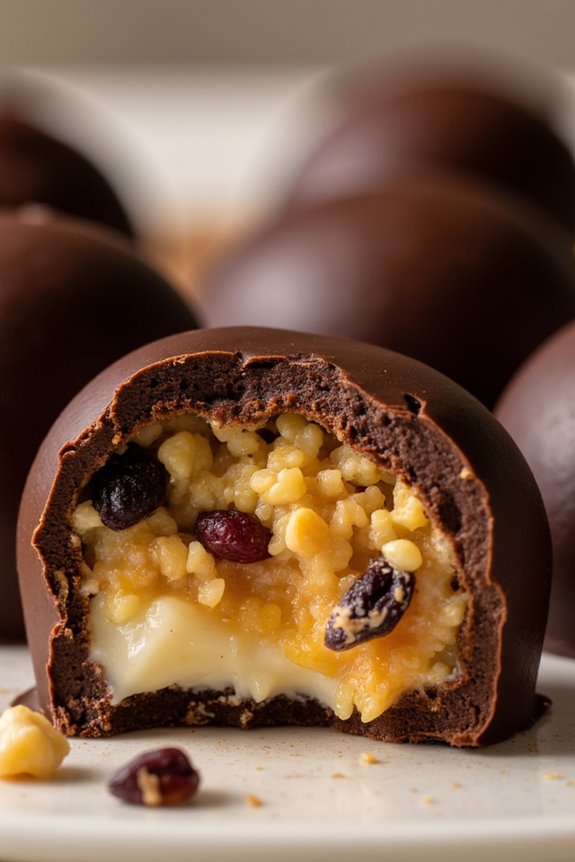
Chocotejas are a delightful Peruvian treat that combines the rich flavors of chocolate with a creamy filling, traditionally made from manjar blanco (a type of dulce de leche). These delectable confections are often filled with nuts, fruits, or even chocolate-covered fruits, and they’re a beloved dessert during festive occasions and celebrations in Peru.
The outer layer of smooth, velvety chocolate perfectly complements the sweet, indulgent filling, making chocotejas a favorite among both children and adults alike.
Making chocotejas is a rewarding experience, as you can customize the fillings to suit your taste preferences. While the process may take some time, the result is a batch of homemade treats that are certain to impress your family and friends. Following this recipe will guide you through the steps to create these delicious Peruvian chocolate treats, allowing you to enjoy a taste of Peru right in your own kitchen.
Ingredients (Serves 4-6)
- 200g dark chocolate (or milk chocolate, depending on preference)
- 1 cup manjar blanco (or dulce de leche)
- 1/2 cup crushed nuts (like walnuts or pecans)
- 1/4 cup dried fruits (like raisins or apricots, optional)
- 1 tablespoon butter (for melting chocolate)
- 1/4 teaspoon salt (to enhance flavor)
- 1/2 teaspoon vanilla extract (optional for flavoring)
Cooking Instructions
- Prepare the Filling: In a mixing bowl, combine the manjar blanco with the crushed nuts and dried fruits (if using). Mix well to guarantee that the nuts and fruits are evenly distributed throughout the filling. This will be the delicious center of your chocotejas.
- Shape the Filling: Scoop out small portions of the filling mixture and roll them into balls or small discs, about the size of a walnut. Place them on a parchment-lined tray. Once shaped, refrigerate the filling for about 30 minutes to firm up, making them easier to coat in chocolate.
- Melt the Chocolate: In a heatproof bowl, combine the dark chocolate and butter. Melt them together using a double boiler method or in the microwave at 30-second intervals, stirring in between until completely melted and smooth. Be careful not to overheat the chocolate, as it can seize.
- Coat the Filling: Once the filling has firmed up, remove it from the refrigerator. Using a fork, dip each piece into the melted chocolate, ensuring it’s fully coated. Allow any excess chocolate to drip off before placing it back onto the parchment-lined tray.
- Chill the Chocotejas: After all the pieces are coated, place the tray back in the refrigerator for at least 1 hour or until the chocolate has fully set. This will guarantee that your chocotejas have a nice, firm chocolate shell.
- Serve: Once the chocolate has hardened, your chocotejas are ready to be enjoyed! You can serve them as is or package them as gifts for friends and family.
Extra Tips
When making chocotejas, feel free to experiment with different fillings to find your favorite combination! You can try adding flavored extracts or spices to the manjar blanco for an extra kick, or even incorporate fresh fruits instead of dried ones for a unique twist.
Ascertain that the chocolate is tempered correctly for a shiny finish, and store the finished chocotejas in an airtight container to maintain their freshness. Enjoy the process and the delicious results of your homemade Peruvian dessert!
Crema Volteada
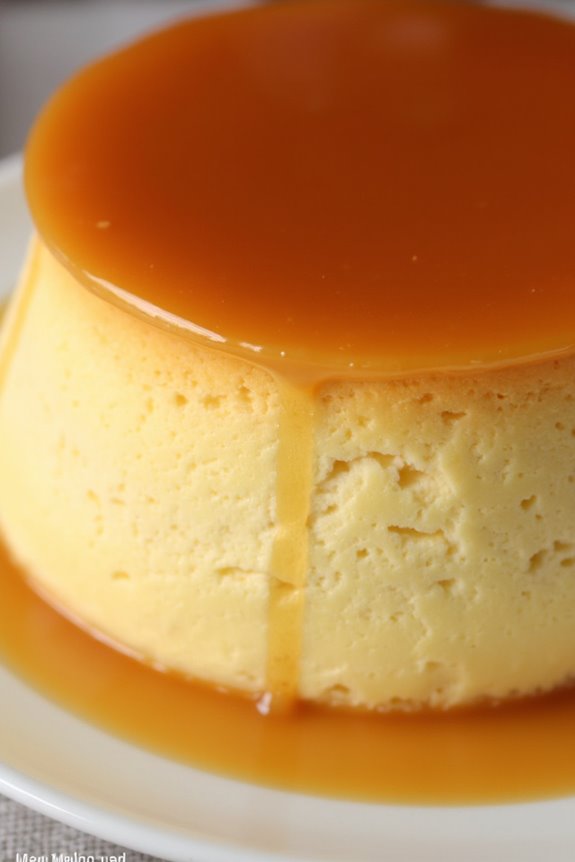
Crema Volteada is a delightful Peruvian dessert that resembles flan but has its own unique flavor and texture profile. This creamy, caramel-topped treat is made with simple ingredients that are often found in most kitchens. It’s a beloved dessert in Peru, often served on special occasions and family gatherings, where its smooth, rich taste can delight both adults and children alike.
The beauty of Crema Volteada lies in its simplicity and the comforting sweetness that it brings to the table.
To prepare Crema Volteada, you’ll need to make a caramel sauce that coats the bottom of your serving dish, followed by a creamy custard mixture that’s baked to perfection. Once chilled, it can be inverted onto a plate to showcase its glossy caramel top. This dessert not only tastes heavenly but also looks impressive, making it a great choice for entertaining guests.
Ingredients (serving size: 4-6 people):
- 1 cup granulated sugar (for caramel)
- 1/4 cup water (for caramel)
- 2 cups evaporated milk
- 1 cup condensed milk
- 4 large eggs
- 1 tablespoon vanilla extract
- 1/4 teaspoon salt
Cooking Instructions:
1. Prepare the Caramel: In a medium saucepan over medium heat, combine the granulated sugar and water. Stir gently until the sugar dissolves, then stop stirring and allow the mixture to boil until it turns a golden amber color. This should take about 8-10 minutes. Be careful not to burn the caramel.
Once it reaches the desired color, quickly pour the caramel into the bottom of a round baking dish, swirling it around to evenly coat the bottom. Set aside to let the caramel harden.
2. Mix the Custard: In a large mixing bowl, combine the evaporated milk, condensed milk, eggs, vanilla extract, and salt. Use a whisk or an electric mixer to blend the ingredients until smooth and well-combined.
Make sure there are no lumps, as this will guarantee a silky texture for your Crema Volteada.
3. Bake the Custard: Preheat your oven to 350°F (175°C). Pour the custard mixture over the hardened caramel in the baking dish. Place the baking dish in a larger oven-safe dish and fill the outer dish with hot water until it reaches halfway up the sides of the custard dish.
This water bath will help cook the custard gently and evenly. Bake for about 50-60 minutes, or until the custard is set and a toothpick inserted in the center comes out clean.
4. Cool and Chill: Once baked, remove the dish from the oven and let it cool at room temperature for about 30 minutes. Then, refrigerate for at least 4 hours, or ideally overnight, to allow the flavors to meld and the texture to firm up.
5. Serve: To Serve, carefully run a knife around the edges of the Crema Volteada to loosen it from the dish. Place a large plate over the top of the baking dish and quickly invert it.
Gently lift the baking dish off, allowing the caramel to flow over the custard. Slice and enjoy!
Extra Tips:
When making Crema Volteada, make sure that your ingredients are at room temperature for a smoother custard mixture. If you prefer a lighter custard, you can substitute some of the evaporated milk with whole milk.
Additionally, you can infuse the custard with flavors such as cinnamon or citrus zest for a unique twist. Remember to keep an eye on the caramel while cooking, as it can quickly go from perfect to burnt. Enjoy this classic Peruvian dessert with friends and family!