

There’s something so comforting about the rich, creamy goodness of Huancaína sauce. This Peruvian delight has the power to transform a variety of dishes, from classic potatoes to vibrant salads and even hearty tacos. Each recipe offers a unique twist on this versatile sauce, making it a must-try for anyone looking to spice up their meals. If you’re curious about incorporating Huancaína into your cooking, these options are sure to tantalize your taste buds. Get ready to explore these delightful recipes that promise to bring a touch of Peru to your kitchen.
Classic Huancaína Potatoes
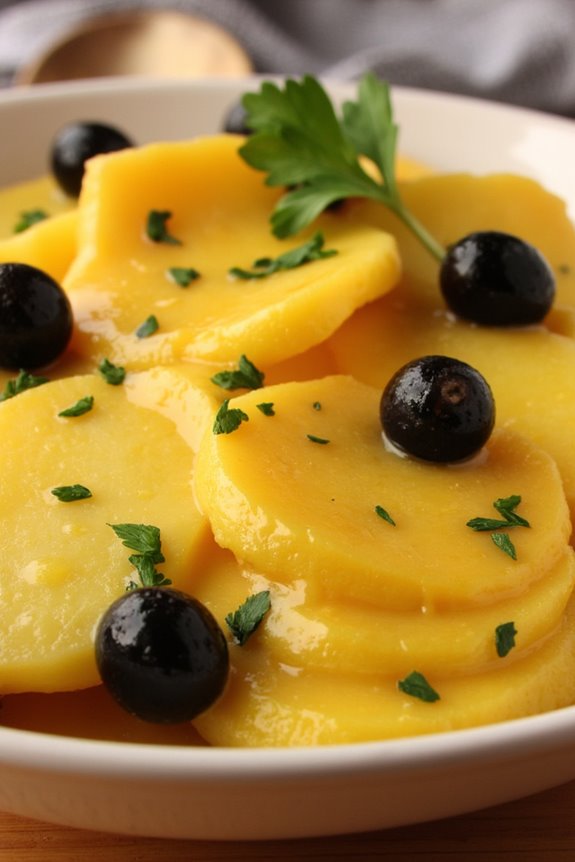
Classic Huancaína Potatoes, or “Papas a la Huancaína,” is a traditional Peruvian dish that showcases the bold flavors of Huancaína sauce. This creamy, spicy sauce is made from a unique blend of ingredients, including aji amarillo peppers, cheese, and milk, which create a rich and savory complement to the boiled potatoes.
The dish isn’t only a staple in Peruvian cuisine but also a delightful addition to any table, appealing to both potato lovers and those seeking to explore new flavors.
To prepare Classic Huancaína Potatoes, you’ll first need to prepare the Huancaína sauce, which serves as the star of the dish. The sauce can be served warm or cold, drizzled generously over the potatoes. This recipe is perfect for serving 4-6 people, making it an ideal choice for family gatherings, potlucks, or simply a comforting meal at home.
Ingredients:
- 4-6 medium-sized yellow potatoes
- 1 cup of queso fresco (or feta cheese)
- 1/2 cup of evaporated milk
- 2-3 aji amarillo peppers (or substitute with yellow bell peppers for milder flavor)
- 1 clove of garlic
- 1 tablespoon of olive oil
- Salt to taste
- Black olives (for garnish)
- Fresh parsley (for garnish)
Cooking Instructions:
1. Boil the Potatoes: Start by washing the yellow potatoes thoroughly to remove any dirt. Place the potatoes in a large pot, cover them with water, and add a pinch of salt. Bring the water to a boil over medium-high heat and let the potatoes cook for approximately 20-25 minutes or until they’re fork-tender.
Once cooked, drain the potatoes and allow them to cool slightly before peeling.
2. Prepare the Huancaína Sauce: While the potatoes are boiling, you can prepare the Huancaína sauce. In a blender, combine the queso fresco, evaporated milk, aji amarillo peppers (seeds removed), garlic, and olive oil. Blend until smooth and creamy, adjusting the consistency with more milk if needed.
Taste and season with salt according to your preference.
3. Serve the Potatoes: After peeling the boiled potatoes, slice them into rounds or halves, depending on your preference. Arrange the potato slices on a serving platter, and generously drizzle the Huancaína sauce over the top.
4. Garnish and Enjoy: Finally, garnish the dish with black olives and freshly chopped parsley for a pop of color and flavor. Serve the Classic Huancaína Potatoes warm or at room temperature, and enjoy the delicious fusion of creamy, spicy, and savory flavors.
Extra Tips: When preparing the Huancaína sauce, feel free to adjust the number of aji amarillo peppers based on your spice preference. If you can’t find fresh aji amarillo, using aji amarillo paste can be a convenient alternative.
Additionally, for a creamier sauce, consider adding a bit more cheese or milk until you reach your desired consistency. Classic Huancaína Potatoes can also be paired with a side salad or served as an appetizer at gatherings, making them a versatile dish for any occasion.
Huancaína Pasta Salad
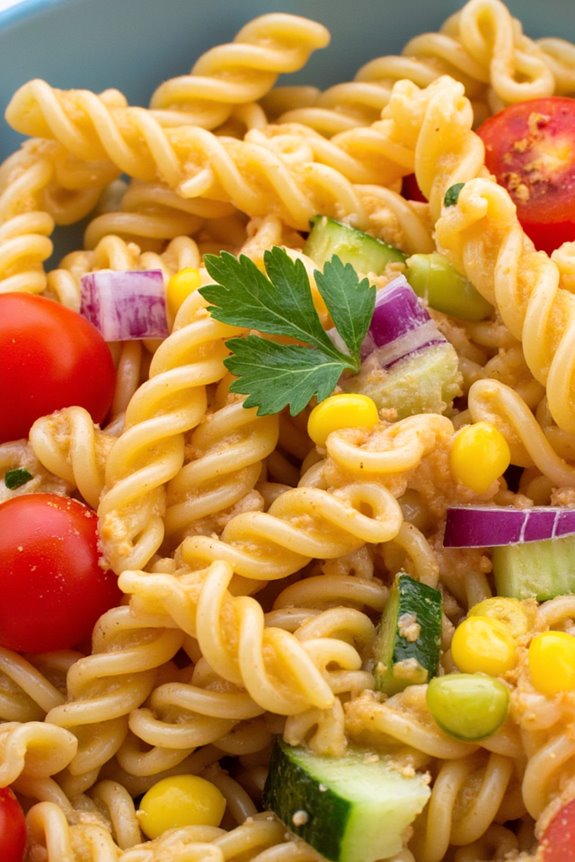
Huancaína Pasta Salad is a delightful dish that brings together the creamy richness of traditional Huancaína sauce with the heartiness of pasta. This unique combination creates a vibrant salad that’s perfect for warm weather gatherings or as a satisfying meal on its own. The Huancaína sauce, made with fresh ingredients like aji amarillo peppers, cheese, and milk, infuses the pasta with a zesty flavor that complements the crunchy vegetables mixed in.
In this recipe, we’ll showcase how to blend this Peruvian favorite into a revitalizing pasta salad that can serve 4-6 people. The addition of fresh vegetables not only enhances the taste but also adds a burst of color, making it a visually appealing dish for any occasion. Prepare to impress your family and friends with this easy-to-make yet exotic salad!
Ingredients:
- 300g pasta (fusilli or penne)
- 1 cup Huancaína sauce
- 1 cup cherry tomatoes, halved
- 1 cup cucumber, diced
- 1 cup corn kernels (fresh or canned)
- 1/2 cup red onion, finely chopped
- 1/2 cup bell pepper, diced (any color)
- 2 tablespoons olive oil
- Salt and pepper to taste
- Fresh cilantro or parsley for garnish
Cooking Instructions:
- Cook the Pasta: Begin by bringing a large pot of salted water to a boil. Add the pasta and cook according to package instructions until al dente, usually about 8-10 minutes. Once cooked, drain the pasta and rinse it under cold water to stop the cooking process and cool it down.
- Prepare the Huancaína Sauce: While the pasta is cooking, prepare the Huancaína sauce if you don’t have it ready. Blend together 2 aji amarillo peppers, 1 cup of queso fresco, 1 cup of evaporated milk, 2 tablespoons of vegetable oil, and a pinch of salt until smooth. Adjust seasoning to taste and set aside.
- Chop the Vegetables: While the pasta cools, wash and chop the vegetables. Halve the cherry tomatoes, dice the cucumber, finely chop the red onion, and dice the bell pepper. If using fresh corn, cook it briefly in boiling water and then cool it down.
- Combine Ingredients: In a large mixing bowl, combine the cooled pasta with the chopped vegetables and corn. Drizzle the olive oil over the mixture and season with salt and pepper. Toss gently to combine all ingredients evenly.
- Add the Huancaína Sauce: Pour the prepared Huancaína sauce over the pasta and vegetables. Toss everything together until the pasta is well-coated and the sauce is evenly distributed.
- Chill and Serve: Once combined, cover the salad and put it in the refrigerator for at least 30 minutes to allow the flavors to meld together. Before serving, give it a gentle stir and garnish with fresh cilantro or parsley.
Extra Tips:
For an added crunch, consider incorporating some toasted nuts or seeds, such as pine nuts or sunflower seeds.
If you prefer a spicier kick, you can add diced jalapeños or a dash of hot sauce to the Huancaína sauce.
This pasta salad can be made ahead of time, making it perfect for picnics or potlucks—just remember to keep it chilled until serving!
Grilled Chicken With Huancaína Sauce

Grilled Chicken with Huancaína Sauce is a delicious and vibrant dish that combines the smoky, juicy flavors of perfectly grilled chicken with the rich, creamy, and slightly spicy Huancaína sauce. Originating from Peru, Huancaína sauce is made primarily from fresh cheese, ají amarillo (yellow chili pepper), and milk, creating a stunning complement to grilled meats.
This dish not only dazzles the palate but also brings a touch of Peruvian culture to your dining table. To make this dish even more appealing, you can serve it with a side of boiled potatoes and a sprinkle of fresh cilantro. The creamy Huancaína sauce adds a delightful kick and enhances the overall experience of the grilled chicken, making it a perfect choice for gatherings or a cozy family dinner.
This recipe serves 4-6 people, ensuring everyone gets to enjoy this flavorful meal.
Ingredients
- 4-6 chicken breasts (boneless and skinless)
- 2 tablespoons olive oil
- Salt and pepper to taste
- 1 teaspoon garlic powder
- 1 teaspoon paprika
- 1 cup queso fresco or feta cheese
- 2 ají amarillo peppers (or substitute with yellow bell peppers)
- 1 cup evaporated milk
- 2 tablespoons lime juice
- 1 tablespoon fresh cilantro (for garnish)
Cooking Instructions
- Marinate the Chicken: In a large bowl, combine the olive oil, salt, pepper, garlic powder, and paprika. Add the chicken breasts and coat them thoroughly with the marinade. Cover the bowl with plastic wrap and let it marinate in the refrigerator for at least 30 minutes to allow the flavors to penetrate the chicken.
- Prepare the Huancaína Sauce: While the chicken is marinating, prepare the Huancaína sauce. In a blender, combine the queso fresco, ají amarillo peppers, evaporated milk, and lime juice. Blend until smooth and creamy. If the sauce is too thick, you can add a little more evaporated milk to reach your desired consistency. Set the sauce aside.
- Grill the Chicken: Preheat your grill to medium-high heat. Take the marinated chicken out of the refrigerator and place the breasts on the hot grill. Grill the chicken for about 6-7 minutes on each side, or until the internal temperature reaches 165°F (75°C) and the chicken is cooked through with nice grill marks.
- Serve the Dish: Once the chicken is grilled, remove it from the grill and let it rest for a few minutes before slicing. Arrange the grilled chicken on a serving platter and generously drizzle the Huancaína sauce over the top. Garnish with fresh cilantro.
- Presentation: Serve the dish with boiled potatoes or your favorite side. The colorful presentation, along with the creamy sauce and grilled chicken, will impress your guests and make for an enjoyable meal.
Extra Tips
When cooking Grilled Chicken with Huancaína Sauce, consider adjusting the spice level of the sauce according to your preference by adding more or fewer ají amarillo peppers.
Additionally, if you can’t find ají amarillo, using yellow bell peppers will still provide a good flavor, though it will be milder. For an added twist, you can incorporate fresh herbs like parsley or basil into the Huancaína sauce for a unique flavor profile. Enjoy your culinary adventure with this delightful Peruvian dish!
Huancaína Veggie Dip
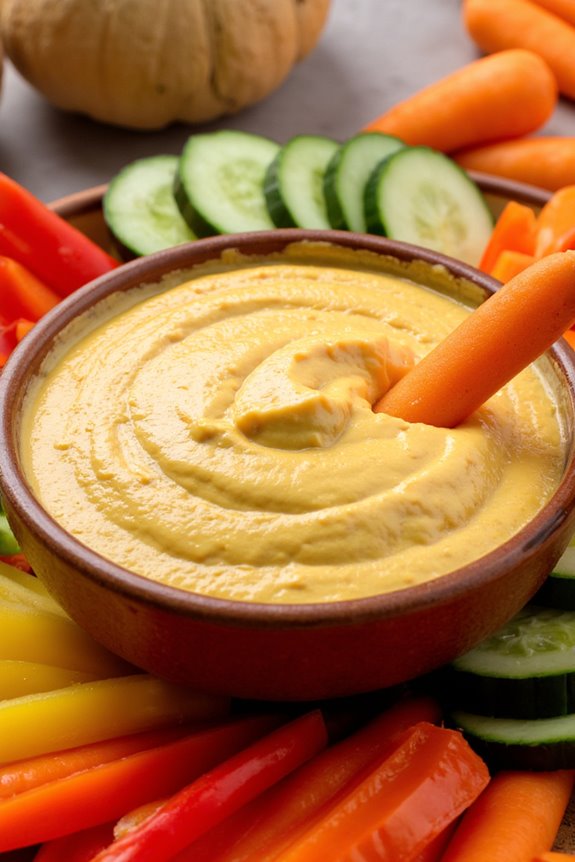
Huancaína Veggie Dip is a delightful and creamy Peruvian appetizer that brings a burst of flavor to any gathering. This dish features the famous Huancaína sauce, made from a combination of cheese, chili peppers, and spices, which pairs beautifully with fresh vegetables.
It’s perfect for serving with crunchy raw veggies like carrots, bell peppers, and cucumbers, or even as a spread on crackers or bread. Whether you’re hosting a party or looking for a healthy snack, this dip is sure to impress your guests with its vibrant color and zesty taste.
Making Huancaína Veggie Dip is straightforward and rewarding. The key to achieving the perfect texture and flavor lies in the balance of ingredients, particularly the cheese and the aji amarillo peppers, which give the sauce its signature kick.
This recipe is ideal for serving 4-6 people, making it a great addition to any appetizer platter or as a side dish for a casual meal. Let’s explore the ingredients and cooking instructions to whip up this delicious dip.
Ingredients:
- 1 cup queso fresco or feta cheese, crumbled
- 1/2 cup mayonnaise
- 1/4 cup milk
- 1-2 aji amarillo peppers, seeds removed and chopped (or yellow bell pepper for a milder flavor)
- 1 tablespoon lime juice
- 1 clove garlic, minced
- Salt and pepper to taste
- Fresh vegetables for dipping (carrots, bell peppers, cucumbers, celery)
Cooking Instructions:
- Prepare the Aji Amarillo Peppers: Start by washing the aji amarillo peppers. Cut them in half, remove the seeds, and chop them into smaller pieces. If you prefer a milder dip, you can substitute with a yellow bell pepper instead.
- Blend the Ingredients: In a blender or food processor, combine the crumbled queso fresco (or feta cheese), mayonnaise, milk, chopped aji amarillo peppers, lime juice, and minced garlic. Blend the mixture until it’s smooth and creamy. If the dip is too thick, you can add a little more milk to reach your desired consistency.
- Season the Dip: Once blended, taste the dip and add salt and pepper according to your preference. Blend again briefly to incorporate the seasoning.
- Chill the Dip: Transfer the Huancaína Veggie Dip into a serving bowl and cover it with plastic wrap. Place it in the refrigerator for at least 30 minutes to allow the flavors to meld together and the dip to chill.
- Prepare the Vegetables: While the dip is chilling, wash and cut the fresh vegetables into sticks or bite-sized pieces. Arrange them on a platter for an appealing presentation.
- Serve and Enjoy: Once the dip is chilled, serve it alongside the fresh vegetables. Enjoy this creamy, flavorful Huancaína Veggie Dip with your favorite crunchy snacks!
Extra Tips: To enhance the flavor even further, consider adding a pinch of cumin or a handful of fresh cilantro to the dip before blending. This will give it an additional layer of complexity.
You can also experiment with different types of cheese to find your preferred flavor profile. Finally, if you’re feeling adventurous, try using this dip as a spread in sandwiches or wraps for an extra kick!
Huancaína Tacos With Spicy Shrimp

Huancaína Tacos with Spicy Shrimp is a delightful dish that combines the creamy and zesty flavors of Huancaína sauce with the succulent taste of shrimp, all wrapped in warm tortillas. Originating from Peru, the Huancaína sauce is made from a blend of queso fresco, aji amarillo peppers, and spices, giving it a distinct yellow color and a rich flavor profile.
This dish brings a fusion of traditional Peruvian taste with a modern twist, making it perfect for taco night or even a festive gathering. The spicy shrimp complements the creamy Huancaína sauce beautifully, making every bite a flavorful experience. The freshness of the ingredients and the vibrant colors make this dish not only delicious but also visually appealing.
Whether you’re a seafood lover or just looking to try something new, Huancaína Tacos with Spicy Shrimp are certain to impress your family and friends.
Ingredients (Serves 4-6)
- 1 lb large shrimp, peeled and deveined
- 2 tablespoons olive oil
- 1 teaspoon smoked paprika
- 1 teaspoon garlic powder
- 1 teaspoon cayenne pepper (adjust to taste)
- Salt and pepper, to taste
- 8 small corn or flour tortillas
- 1 cup Huancaína sauce (store-bought or homemade)
- Fresh cilantro, for garnish
- Lime wedges, for serving
Cooking Instructions
- Prepare the Shrimp: In a medium bowl, combine the peeled and deveined shrimp with olive oil, smoked paprika, garlic powder, cayenne pepper, salt, and pepper. Mix well to guarantee that the shrimp are evenly coated with the spices. Let the shrimp marinate for about 15 minutes to absorb the flavors.
- Cook the Shrimp: Heat a large skillet over medium-high heat. Once hot, add the marinated shrimp to the skillet in a single layer. Cook the shrimp for 2-3 minutes on one side until they turn pink and opaque, then flip them over and cook for an additional 1-2 minutes on the other side. Remove the skillet from heat and set aside.
- Warm the Tortillas: In a separate skillet or directly over a flame, warm the tortillas for about 30 seconds on each side until they’re soft and pliable. This will enhance their flavor and texture.
- Assemble the Tacos: Lay the warm tortillas on a serving platter. Spoon a generous amount of Huancaína sauce onto each tortilla, followed by a few pieces of the spicy shrimp.
- Garnish and Serve: Top each taco with freshly chopped cilantro and serve with lime wedges on the side for squeezing over the tacos. Enjoy immediately while they’re warm and flavorful.
Extra Tips
When preparing Huancaína Tacos with Spicy Shrimp, feel free to customize the toppings based on your preferences. You can add diced tomatoes, avocado slices, or even pickled onions for an extra crunch and flavor.
If you prefer a milder sauce, consider using less cayenne pepper in the shrimp marinade. Additionally, if you’re in a hurry, you can opt for store-bought Huancaína sauce, but homemade versions tend to have a fresher taste. Enjoy your cooking experience and the delicious flavors of this Peruvian-inspired dish!
Baked Eggs in Huancaína Sauce
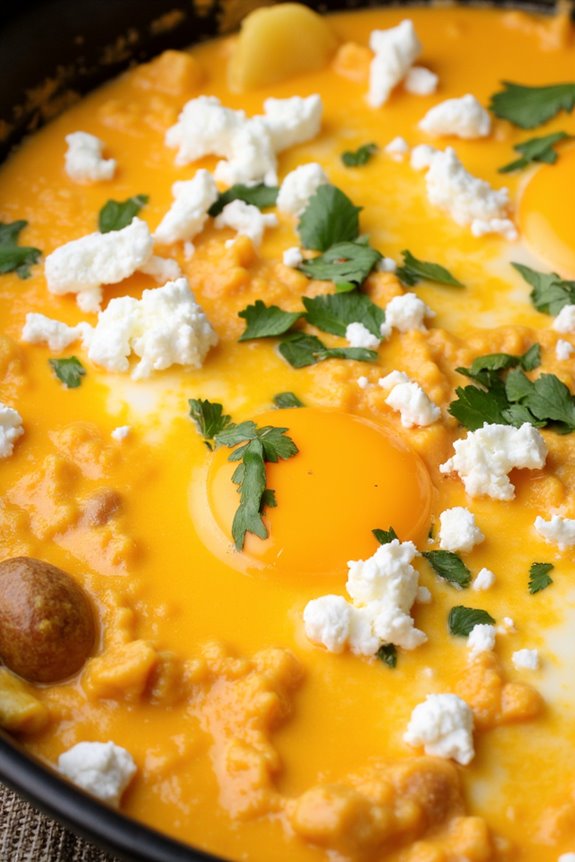
Baked Eggs in Huancaína Sauce is a delightful dish that combines the creaminess of the traditional Huancaína sauce with the comforting texture of baked eggs. This Peruvian-inspired recipe is perfect for brunch or a hearty breakfast, providing a unique twist to the standard egg dish.
The Huancaína sauce, made from a blend of cheese, aji amarillo peppers, and other ingredients, adds a rich flavor that complements the eggs beautifully. This dish isn’t only delicious but also easy to prepare, making it a great option for gatherings or family meals.
The baked eggs sit atop a bed of the vibrant sauce, creating an enticing presentation that’s sure to impress your guests. Whether served with crusty bread or fresh avocado, Baked Eggs in Huancaína Sauce is a flavorful and satisfying choice for any meal of the day.
Ingredients (Serves 4-6):
- 6 large eggs
- 2 cups cooked potatoes, diced
- 1 cup Huancaína sauce (homemade or store-bought)
- 1/2 cup crumbled queso fresco or feta cheese
- 1/4 cup chopped cilantro (for garnish)
- Salt and pepper, to taste
- Olive oil, for greasing the baking dish
Cooking Instructions:
- Preheat the Oven: Begin by preheating your oven to 375°F (190°C). This guarantees that the eggs bake evenly and the sauce heats up properly.
- Prepare the Baking Dish: Grease a medium-sized baking dish with a little olive oil to prevent sticking. This step is essential for easy serving and cleanup later.
- Arrange the Potatoes: Evenly distribute the diced, cooked potatoes in the bottom of the greased baking dish. The potatoes will serve as a flavorful base for the baked eggs, adding texture and heartiness.
- Add the Huancaína Sauce: Pour the Huancaína sauce over the layer of potatoes, making sure that they’re well-coated. The sauce will add moisture and flavor, making the dish rich and creamy.
- Crack the Eggs: Carefully crack the eggs on top of the Huancaína sauce. You can either space them evenly or cluster them depending on your preference. Be gentle to keep the yolks intact for a beautiful presentation.
- Season the Eggs: Lightly season the eggs with salt and pepper. This will enhance the flavor of the dish and complement the richness of the sauce.
- Bake the Dish: Place the baking dish in the preheated oven and bake for about 15-20 minutes, or until the egg whites are set but the yolks remain slightly runny. Keep an eye on them to avoid overcooking.
- Garnish and Serve: Once baked, remove the dish from the oven and sprinkle crumbled queso fresco and chopped cilantro on top. Serve hot, accompanied by crusty bread or avocado if desired.
Extra Tips:
For a spicier version, consider adding diced jalapeños or extra aji amarillo to the Huancaína sauce. You can also experiment by incorporating other vegetables, such as sautéed spinach or bell peppers, to add more flavor and nutrition to the dish.
If you prefer fully cooked yolks, simply extend the baking time until desired doneness. Enjoy your delicious Baked Eggs in Huancaína Sauce!
Huancaína Quesadillas

Huancaína quesadillas are a delightful fusion of flavors that combine the rich, creamy texture of Huancaína sauce with the crispy, cheesy goodness of quesadillas. Originating from Peru, Huancaína sauce is made with yellow peppers, cheese, and spices, giving it a unique and vibrant taste that perfectly complements the simplicity of quesadillas. This dish isn’t only a great appetizer but also serves as a filling snack or a light meal that can be enjoyed by everyone.
The beauty of Huancaína quesadillas lies in their versatility. You can customize them by adding your favorite fillings, such as sautéed vegetables, chicken, or beans, making each quesadilla a unique creation. Whether served with a fresh salad or alongside some guacamole, these quesadillas are sure to be a hit at your next gathering or family dinner.
Ingredients (Serves 4-6):
- 8 large flour tortillas
- 2 cups shredded cheese (such as mozzarella or a blend)
- 1 cup Huancaína sauce (homemade or store-bought)
- 1 cup cooked and shredded chicken or sautéed vegetables (optional)
- Fresh cilantro, for garnish
- Olive oil or cooking spray, for frying
Cooking Instructions:
- Prepare the Huancaína Sauce: If you’re making the sauce from scratch, blend together 2 yellow Peruvian peppers (aji amarillo), 1 cup of queso fresco or feta cheese, 1 cup of evaporated milk, a splash of lime juice, and salt to taste until smooth and creamy. Set aside.
- Assemble the Quesadillas: Take a large flour tortilla and spread a generous layer of Huancaína sauce on one side. Then sprinkle about 1/4 cup of shredded cheese evenly over the sauce. If you’re adding additional ingredients like shredded chicken or vegetables, layer them on top of the cheese. Top with another tortilla to create a sandwich.
- Heat the Pan: In a large skillet, heat a drizzle of olive oil over medium heat. Allow the oil to get hot but not smoking; you want it to be hot enough to crisp the tortillas without burning them.
- Cook the Quesadillas: Carefully place the assembled quesadilla in the hot skillet. Cook for about 3-4 minutes on one side until golden brown and crisp. Using a spatula, flip the quesadilla and cook the other side for another 3-4 minutes, ensuring the cheese is melted and the tortillas are crispy.
- Cut and Serve: Once cooked, remove the quesadilla from the skillet and let it cool for a minute. Using a sharp knife or pizza cutter, slice the quesadilla into wedges. Drizzle with additional Huancaína sauce if desired and garnish with fresh cilantro before serving.
Extra Tips:
For added flavor, consider adding a sprinkle of cumin or paprika to your Huancaína sauce for an extra kick. If you prefer a spicier quesadilla, you can include sliced jalapeños or a dash of hot sauce to the filling. Additionally, serve with a side of fresh salsa or guacamole to complement the creamy texture of the Huancaína sauce. Enjoy your delicious Huancaína quesadillas!
Huancaína Cauliflower Steaks

Huancaína Cauliflower Steaks is a delightful vegetarian dish that highlights the rich flavors of traditional Peruvian Huancaína sauce, which is typically made with Peruvian cheese, yellow chili peppers, and a touch of garlic.
This recipe transforms cauliflower into a hearty main course that’s both satisfying and bursting with flavor. The creamy sauce drizzled over the tender cauliflower steaks elevates the dish, making it perfect for family dinners, gatherings, or even as a standout side for your favorite protein.
To prepare Huancaína Cauliflower Steaks, you’ll begin by roasting thick slices of cauliflower until they’re golden brown and tender. While the cauliflower is cooking, you’ll whip up the Huancaína sauce, which is a luscious blend of ingredients that creates a creamy and spicy finish to the dish.
This recipe not only brings a taste of Peru to your kitchen but also provides a healthy, gluten-free option that everyone can enjoy.
Ingredients (Serves 4-6)
- 1 large head of cauliflower
- 3 tablespoons olive oil
- Salt and pepper to taste
- 1 cup queso fresco (or feta cheese)
- 2-3 yellow chili peppers (ají amarillo), seeds removed and chopped
- 1 clove garlic, minced
- 1 cup evaporated milk
- 1 tablespoon lime juice
- 1 tablespoon chopped fresh cilantro (for garnish)
Cooking Instructions
- Preheat the Oven: Begin by preheating your oven to 425°F (220°C). This high temperature will help achieve a nice golden-brown crust on the cauliflower steaks.
- Prepare the Cauliflower: Remove the outer leaves of the cauliflower and trim the stem. Place the cauliflower stem side down on a cutting board and slice it into 1-inch thick steaks. You should aim for about 4-6 steaks. Reserve any leftover florets for another use.
- Season the Cauliflower: Place the cauliflower steaks on a baking sheet lined with parchment paper. Drizzle olive oil over the steaks and season with salt and pepper. Make sure they’re evenly coated for maximum flavor.
- Roast the Cauliflower: Put the baking sheet in the preheated oven and roast the cauliflower for about 20-25 minutes, flipping the steaks halfway through. They should be golden brown and tender when done.
- Make the Huancaína Sauce: While the cauliflower is roasting, prepare the sauce. In a blender, combine the queso fresco, yellow chili peppers, garlic, evaporated milk, and lime juice. Blend until smooth and creamy. If the sauce is too thick, you can add a splash more of evaporated milk to reach your desired consistency.
- Serve the Dish: Once the cauliflower steaks are roasted, remove them from the oven and plate them. Generously drizzle the Huancaína sauce over each steak. Garnish with fresh cilantro for a vibrant finish.
Extra Tips
For an added depth of flavor, consider grilling the cauliflower steaks instead of roasting them for a smoky touch.
You can also adjust the heat level of the Huancaína sauce by using more or fewer chili peppers, depending on your taste preference. If you prefer a vegan version, substitute the queso fresco with a plant-based cheese or nutritional yeast for a cheesy flavor without the dairy.
Enjoy your Huancaína Cauliflower Steaks with a side of rice or quinoa for a complete meal!
Huancaína Sliders

Huancaína Sliders are a delightful fusion dish that showcases the rich and creamy flavors of Huancaína sauce, a traditional Peruvian sauce made from a blend of cheese, aji amarillo peppers, and spices.
These sliders are perfect for gatherings or a cozy dinner at home, providing a unique twist on classic sliders with the savory kick of Huancaína sauce. The sliders feature juicy beef patties topped with the creamy sauce, which adds a depth of flavor that’s both comforting and exciting.
To create these sliders, you’ll want to prepare your ingredients ahead of time to guarantee a smooth cooking process. Freshly made Huancaína sauce is key to elevating the dish, so don’t rush this part. The combination of the tender, flavorful beef patties with the creamy sauce and fresh toppings creates a mouthwatering experience that will impress your family and friends.
Serve these sliders with a side of crispy fries or a fresh salad for a well-rounded meal.
Ingredients (serving size: 4-6 people)
- 1 pound ground beef
- 1 teaspoon garlic powder
- 1 teaspoon onion powder
- Salt and pepper, to taste
- 4-6 small slider buns
- 1 cup shredded lettuce
- 1 tomato, sliced
- 1/2 cup Huancaína sauce (see separate recipe for sauce)
Cooking Instructions
- Prepare the Huancaína Sauce: If you haven’t already made your Huancaína sauce, blend together 1 cup of queso fresco, 1-2 aji amarillo peppers (to taste), 1 clove of garlic, 2 tablespoons of vegetable oil, 1 tablespoon of lime juice, and salt to taste until smooth and creamy. Set aside.
- Form the Patties: In a mixing bowl, combine the ground beef with garlic powder, onion powder, salt, and pepper. Mix gently with your hands until just combined, being careful not to overwork the meat. Form the mixture into 4-6 equal-sized patties.
- Cook the Patties: Preheat a grill or skillet over medium-high heat. Cook the patties for about 4-5 minutes on each side, or until they reach your desired level of doneness. If using cheese, place a slice on each patty during the last minute of cooking to melt.
- Toast the Buns: While the patties are cooking, split the slider buns and lightly toast them on the grill or in a toaster until golden brown.
- Assemble the Sliders: On the bottom half of each toasted bun, place a beef patty. Top with a generous spoonful of Huancaína sauce, followed by shredded lettuce and a slice of tomato. Finish by placing the top half of the bun on each slider.
- Serve: Arrange the assembled sliders on a platter and serve immediately, allowing guests to enjoy the delicious flavors of Huancaína sauce with their sliders.
Extra Tips
For an extra layer of flavor, consider adding pickled red onions or avocado slices as toppings for your sliders.
If you have any leftover Huancaína sauce, it can be used as a dip for fries or vegetables, making it a versatile addition to your meal.
Adjust the heat level of the sauce by varying the amount of aji amarillo you use, guaranteeing it suits your taste preferences.
Enjoy your sliders with a revitalizing beverage, and don’t hesitate to experiment with different toppings to personalize your Huancaína Sliders!
Roasted Vegetable Huancaína Bowl
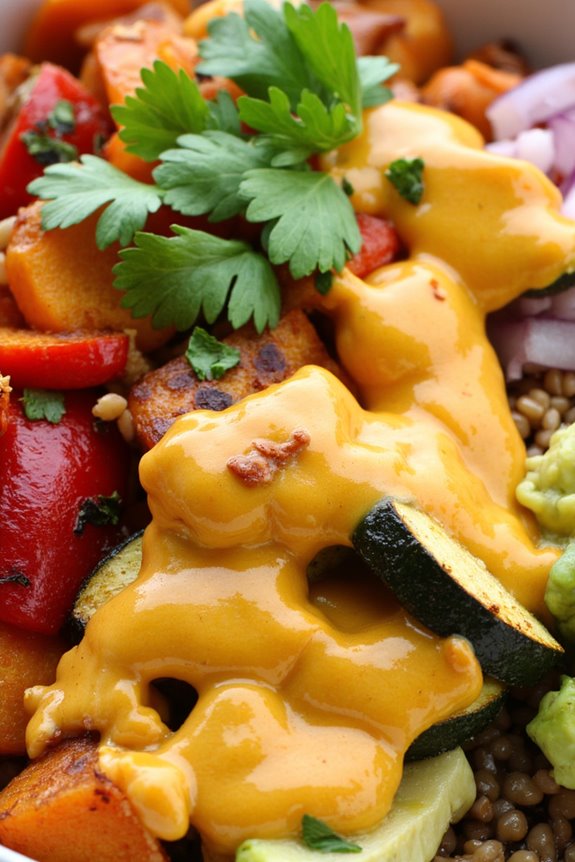
The Roasted Vegetable Huancaína Bowl is a delightful fusion of Peruvian flavors and fresh, healthy ingredients. This dish features a colorful assortment of roasted vegetables topped with a creamy Huancaína sauce, creating a comforting yet vibrant meal that’s perfect for any occasion. It’s a great way to enjoy seasonal vegetables while indulging in the rich flavors of the Andes.
The creamy sauce, made from cheese, aji amarillo peppers, and spices, adds a luscious texture and zesty kick that elevates the entire dish.
This bowl isn’t only visually appealing, but it’s also highly customizable. You can tailor the roasted vegetables to suit your preferences or whatever you have on hand, making it a versatile option for both vegetarians and meat lovers alike.
Serve it warm over a bed of quinoa or rice, and you’ll have a hearty and satisfying meal that can be enjoyed for lunch or dinner.
Ingredients (serves 4-6):
- 2 cups of sweet potatoes, diced
- 2 cups of zucchini, diced
- 1 cup of bell peppers, diced (mix of red and yellow)
- 1 cup of red onion, sliced
- 2 tablespoons of olive oil
- Salt and pepper to taste
- 1 cup of cooked quinoa or rice (optional, for serving)
- 1 cup of queso fresco or feta cheese
- 2 aji amarillo peppers (or yellow bell peppers for milder flavor)
- 1 clove of garlic
- 1 tablespoon of lime juice
- 1/4 cup of fresh cilantro, chopped
Cooking Instructions:
- Preheat the Oven: Begin by preheating your oven to 425°F (220°C). This high temperature will help to caramelize the natural sugars in the vegetables, enhancing their flavor.
- Prepare the Vegetables: In a large mixing bowl, combine the diced sweet potatoes, zucchini, bell peppers, and red onion. Drizzle with olive oil and season with salt and pepper. Toss everything together until the vegetables are evenly coated.
- Roast the Vegetables: Spread the seasoned vegetables in a single layer on a baking sheet. Roast in the preheated oven for about 25-30 minutes, or until they’re tender and nicely browned, stirring halfway through to guarantee even cooking.
- Make the Huancaína Sauce: While the vegetables are roasting, prepare the Huancaína sauce. In a blender, combine the queso fresco, aji amarillo peppers, garlic, lime juice, and a pinch of salt. Blend until smooth and creamy. If the sauce is too thick, add a splash of water to reach your desired consistency.
- Assemble the Bowls: Once the vegetables are roasted, remove them from the oven. If you’re using quinoa or rice, start by placing a serving of it at the bottom of each bowl. Top with a generous portion of roasted vegetables.
- Add Sauce and Garnish: Drizzle the creamy Huancaína sauce over the roasted vegetables. Finish with a sprinkle of fresh cilantro for added flavor and color.
Extra Tips:
When preparing the Roasted Vegetable Huancaína Bowl, feel free to experiment with different vegetables based on your taste or what’s in season.
For a protein boost, consider adding black beans or grilled chicken to the bowl. Additionally, the Huancaína sauce can be made ahead of time and stored in the refrigerator for a couple of days, making it a convenient option for meal prep.
Adjust the spice level of the sauce by using more or fewer aji amarillo peppers to suit your preference!
Huancaína Nachos
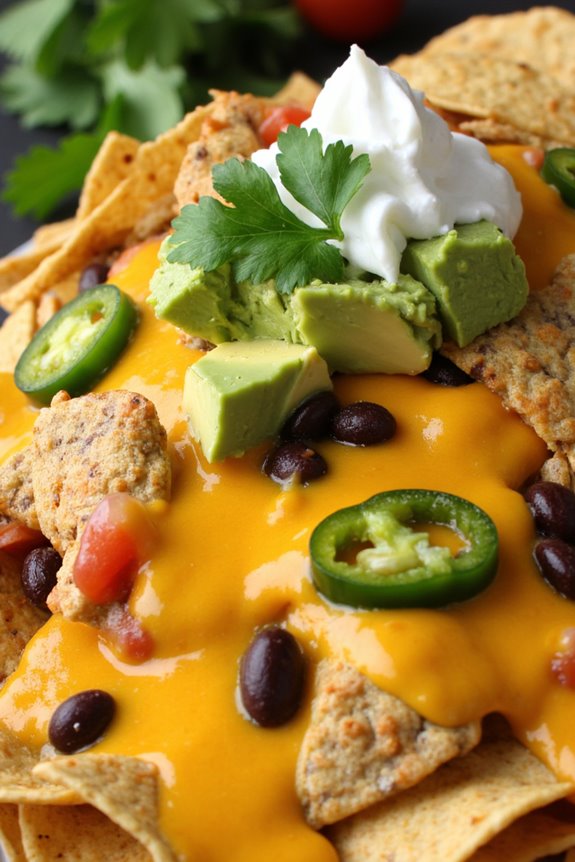
Huancaína Nachos are a delightful fusion of traditional Peruvian flavors and classic snack food. The star of this dish is the creamy Huancaína sauce, made from a blend of yellow peppers, cheese, and spices, which brings a unique zest to the crunchy tortilla chips. This dish is perfect for sharing with friends and family during game night, parties, or as a casual appetizer.
The combination of the spicy, cheesy sauce drizzled over crispy nachos creates a mouthwatering experience that will leave everyone asking for more.
To prepare Huancaína Nachos, you’ll need to gather your ingredients and follow a few simple steps. The vibrant sauce is easy to whip up and can be made in advance, making the assembly of the nachos a breeze. Once everything is ready, you can layer the tortilla chips with your favorite toppings and generously pour the Huancaína sauce over them.
The result is a savory, satisfying dish that highlights the rich culinary heritage of Peru while being universally loved.
Ingredients (Serves 4-6)
- 1 bag (10 oz) tortilla chips
- 1 cup Huancaína sauce (see recipe below)
- 1 cup shredded cheese (such as Monterey Jack or Cheddar)
- 1 cup black beans, rinsed and drained
- 1 ripe avocado, diced
- 1/2 cup sour cream
- 1/4 cup sliced jalapeños (optional)
- 1/4 cup chopped cilantro (for garnish)
Cooking Instructions
- Prepare the Huancaína Sauce: In a blender, combine 2 yellow Peruvian peppers (aji amarillo), 1 cup of crumbled feta cheese, 1/2 cup of evaporated milk, 2 tablespoons of vegetable oil, 2 cloves of garlic, and salt to taste. Blend until smooth and creamy. Adjust seasoning as needed, and set aside.
- Bake the Tortilla Chips: Preheat your oven to 350°F (175°C). Spread the tortilla chips in a single layer on a large baking sheet. Bake for about 5-7 minutes, or until they’re warmed through and slightly crispy. Keep an eye on them to guarantee they don’t burn.
- Layer the Nachos: Once the tortilla chips are ready, remove them from the oven. Start by sprinkling a generous amount of shredded cheese over the chips, followed by the black beans, diced avocado, and jalapeños if you’re using them.
- Drizzle with Huancaína Sauce: Pour the prepared Huancaína sauce evenly over the layered nachos, making certain every chip gets a taste of the creamy goodness. If desired, you can save some sauce for dipping.
- Garnish and Serve: Finally, add dollops of sour cream on top and sprinkle with chopped cilantro for an added burst of flavor. Serve immediately, and enjoy the delicious blend of textures and tastes!
Extra Tips
For an added kick, consider using a spicier variety of peppers in your Huancaína sauce or adding more jalapeños as toppings. To customize your nachos further, feel free to incorporate additional toppings such as diced tomatoes, olives, or corn.
Make sure to serve the nachos fresh out of the oven to maintain their crispiness, and don’t hesitate to make extra Huancaína sauce; it’s perfect as a dip for vegetables or breadsticks too!
Huancaína Stuffed Peppers
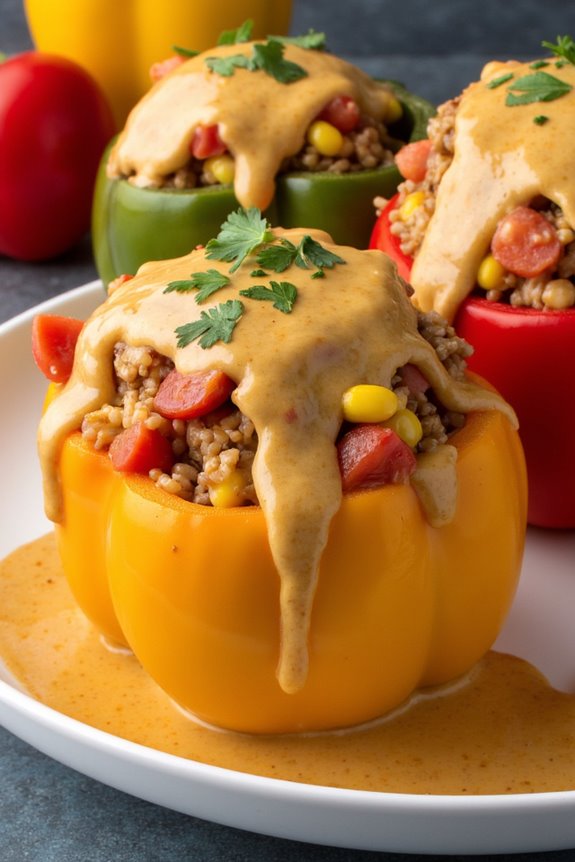
Huancaína Stuffed Peppers are a delightful dish that combines the rich flavors of traditional Peruvian Huancaína sauce with the satisfying crunch of bell peppers. This dish not only highlights the creamy and spicy sauce made from cheese, aji amarillo peppers, and milk, but it also offers a nutritious way to enjoy vegetables.
The vibrant colors of the peppers, combined with the deliciously savory filling, make for an inviting presentation that’s perfect for gatherings or a family meal. The versatility of this dish allows you to customize the stuffing according to your preferences. You can use a variety of ingredients such as quinoa, rice, or even ground meat to create a hearty filling.
The Huancaína sauce adds a unique flavor profile that elevates the entire dish, making it a memorable and satisfying experience for anyone who tries it. Whether served as an appetizer or a main course, Huancaína Stuffed Peppers are sure to impress.
Ingredients (Serves 4-6):
- 4 large bell peppers (any color)
- 1 cup cooked quinoa or rice
- 1 cup cooked shredded chicken or ground beef (optional)
- 1/2 cup corn kernels (fresh, frozen, or canned)
- 1/2 cup diced tomatoes
- 1/2 cup diced onion
- 1 teaspoon minced garlic
- 1 tablespoon olive oil
- 1 cup creamy Huancaína sauce (see recipe below)
- Salt and pepper to taste
- Fresh cilantro or parsley for garnish (optional)
Cooking Instructions:
- Prepare the Peppers: Preheat your oven to 375°F (190°C). Slice the tops off the bell peppers and carefully remove the seeds and membranes. Set the prepared peppers upright in a baking dish.
- Make the Filling: In a medium-sized skillet, heat the olive oil over medium heat. Add the diced onion and minced garlic, cooking until the onion is translucent, about 3-4 minutes. Stir in the cooked quinoa or rice, shredded chicken or ground beef (if using), corn, diced tomatoes, and season with salt and pepper to taste. Cook for an additional 2-3 minutes, allowing the flavors to meld.
- Stuff the Peppers: Spoon the filling mixture into each bell pepper, packing it gently but firmly. Leave a little space at the top to allow for bubbling during cooking.
- Prepare the Huancaína Sauce: In a blender, combine 1 cup of queso fresco (or feta cheese), 1-2 aji amarillo peppers (seeds removed), 1/2 cup of evaporated milk, 1 tablespoon of lime juice, and salt to taste. Blend until smooth and creamy. If the sauce is too thick, add a little more milk to reach your desired consistency.
- Bake the Peppers: Pour a small amount of the Huancaína sauce over the stuffed peppers, reserving some for serving. Cover the baking dish with aluminum foil and bake in the preheated oven for 25-30 minutes. Remove the foil during the last 10 minutes of baking to allow the tops to brown slightly.
- Serve: Once the peppers are tender, remove them from the oven and let them cool for a few minutes. Drizzle the remaining Huancaína sauce over the stuffed peppers and garnish with fresh cilantro or parsley before serving.
Extra Tips: To enhance the flavor of the Huancaína sauce, consider roasting the aji amarillo peppers beforehand. This adds a smoky depth to the sauce.
Also, if you’re looking for a vegetarian option, you can replace the meat with black beans or lentils for added protein. For a spicy kick, include more aji amarillo in the sauce or sprinkle some chili flakes on top before serving!
Huancaína Pizza

Huancaína Pizza is a delightful fusion dish that marries the traditional Peruvian Huancaína sauce with the beloved Italian pizza. This unique combination results in a rich, creamy, and spicy flavor that transforms your average pizza experience into something truly special.
The Huancaína sauce, made from a blend of Peruvian yellow peppers, cheese, and spices, adds a vibrant kick that complements the toppings of your choice, making it a perfect dish for gatherings or family dinners.
Creating Huancaína Pizza isn’t only fun but also allows for creativity in choosing additional toppings. You can customize it with vegetables, meats, or even seafood, all while ensuring that the Huancaína sauce remains the star of the show.
Whether you opt for a classic thin crust or a more indulgent deep-dish style, this pizza is sure to impress everyone at the table with its bold flavors.
Ingredients (serving size of 4-6 people)
- 1 pre-made pizza dough (or homemade)
- 1 cup Huancaína sauce
- 2 cups shredded mozzarella cheese
- 1 cup cooked chicken, shredded (optional)
- 1/2 cup sliced olives
- 1/2 cup diced tomatoes
- 1/2 cup sliced red onions
- Fresh cilantro, for garnish
- Olive oil, for brushing
- Salt and pepper, to taste
Cooking Instructions
- Preheat the Oven: Start by preheating your oven to 475°F (245°C). This high temperature is essential for achieving a crispy crust while ensuring that the cheese melts beautifully.
- Prepare the Dough: If using pre-made dough, follow the package instructions for rolling it out. For homemade dough, roll it out on a floured surface to your desired thickness. Transfer the rolled dough to a pizza stone or baking sheet lined with parchment paper.
- Spread the Huancaína Sauce: Pour the Huancaína sauce over the rolled-out pizza dough, spreading it evenly with the back of a spoon, leaving a small border around the edges for the crust.
- Add Toppings: Sprinkle the shredded mozzarella cheese generously over the sauce. If you’re using chicken, olives, tomatoes, and red onions, layer them on top of the cheese. Feel free to adjust the quantity of toppings based on your preference.
- Season and Brush: Lightly season the pizza with salt and pepper. Brush the edges of the crust with olive oil to promote browning.
- Bake the Pizza: Place the pizza in the preheated oven and bake for about 12-15 minutes, or until the crust is golden brown and the cheese is bubbling and slightly browned.
- Garnish and Serve: Once out of the oven, let the pizza cool for a couple of minutes. Sprinkle fresh cilantro over the top as a garnish before slicing and serving.
Extra Tips
When making Huancaína Pizza, feel free to experiment with different toppings that suit your taste. Roasted vegetables, chorizo, or even a drizzle of lime juice can elevate the dish further.
To enhance the flavor of the Huancaína sauce, consider adding a pinch of cumin or garlic powder. Finally, if you want a spicier kick, incorporate some diced jalapeños or a dash of hot sauce into the sauce mixture before spreading it on the pizza.
Enjoy your culinary adventure!