

When I think of Brazilian cuisine, vibrant colors and fresh flavors immediately come to mind. These 10 garden-ready vegetable recipes celebrate the rich produce of Brazil, each one bursting with life and nutrition. From the hearty Feijão Tropeiro to the invigorating Salada De Palmito, there’s a dish for every palate. Intrigued by how these ingredients can transform your meals? Let’s explore the delightful world of Brazilian vegetables together.
Feijão Tropeiro: A Colorful Bean Dish

Feijão Tropeiro is a traditional Brazilian dish that showcases the rich flavors of the country’s culinary heritage. This vibrant bean dish isn’t only delicious but also a satisfying option for those looking to enjoy a hearty vegetarian meal. It combines the nutty taste of beans with a medley of ingredients like bacon, collard greens, and cornmeal, creating a delightful harmony of textures and flavors.
Whether served as a main dish or as a side, Feijão Tropeiro is sure to impress with its colorful presentation and robust taste.
The name “Tropeiro” refers to the traveling merchants who transported goods across Brazil and often prepared simple, yet flavorful meals along the way. This dish exemplifies that spirit, as it’s made using readily available ingredients that are both nourishing and accessible. Perfect for gatherings or family dinners, Feijão Tropeiro serves 4-6 people and is an excellent way to introduce others to the vibrant flavors of Brazilian cuisine.
Ingredients (serves 4-6):
- 2 cups cooked black beans (or pinto beans)
- 1/2 cup cornmeal (farinha de milho)
- 4 slices of bacon, diced
- 1 medium onion, chopped
- 3 cloves garlic, minced
- 1/2 cup collard greens, finely sliced
- 1/2 cup cooked sausage, sliced (optional)
- 1 teaspoon paprika
- Salt and pepper to taste
- 2 tablespoons olive oil
- Fresh parsley, chopped (for garnish)
Cooking Instructions:
- Prepare the Ingredients: Start by cooking your beans if you aren’t using canned beans. Drain and set aside. Chop the onion, garlic, collard greens, and bacon into small pieces for easy cooking. If using sausage, slice it and set it aside as well.
- Cook the Bacon: In a large skillet over medium heat, add the diced bacon. Cook until it’s crispy and golden, which should take about 5-7 minutes. This will infuse your dish with a rich flavor.
- Sauté the Aromatics: Once the bacon is cooked, add the chopped onion and garlic to the skillet. Sauté them for about 3-4 minutes, or until the onion becomes translucent and the garlic is fragrant. Stir frequently to prevent burning.
- Add the Greens and Sausage: If you’re using sausage, add it to the skillet now along with the finely sliced collard greens. Cook for another 2-3 minutes until the greens are wilted and the sausage is heated through.
- Incorporate the Beans: Gently fold in the cooked black beans, ensuring they’re well mixed with the other ingredients. Season the mixture with paprika, salt, and pepper to taste. Allow it to cook for about 5 minutes, stirring occasionally.
- Add the Cornmeal: Gradually sprinkle the cornmeal (farinha de milho) over the mixture while stirring continuously. This will help thicken the dish and create a delightful texture. Cook for an additional 2-3 minutes, allowing the cornmeal to absorb the flavors.
- Serve and Garnish: Remove the skillet from heat and transfer the Feijão Tropeiro to a serving dish. Garnish with freshly chopped parsley on top for a pop of color and freshness. Serve warm as a main dish or side.
Extra Tips:
When preparing Feijão Tropeiro, feel free to customize the dish to your taste by adding other ingredients such as bell peppers, carrots, or even a touch of hot pepper for some heat.
The balance of flavors can be adjusted based on your preference, so don’t hesitate to experiment with the spices and herbs. Additionally, serving this dish with rice or a side salad can enhance the meal, making it even more nutritious and satisfying.
Moqueca De Legumes: Vegetable Stew With Coconut Milk
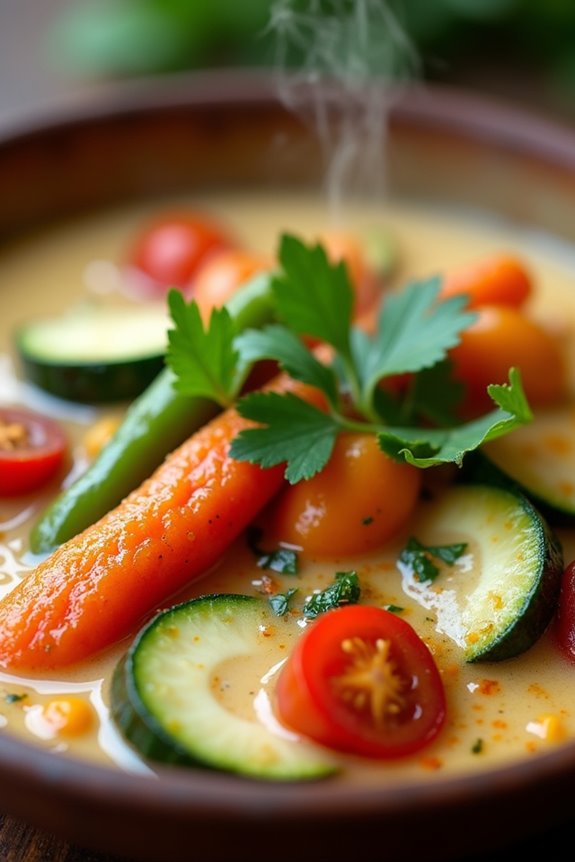
Moqueca de Legumes is a vibrant and flavorful Brazilian vegetable stew that marries the rich flavors of coconut milk with a medley of fresh vegetables. This dish is a perfect representation of Brazil’s diverse culinary traditions, showcasing the use of local ingredients and techniques.
Traditionally, moqueca is made with fish or seafood, but this vegetarian version highlights the deliciousness of seasonal vegetables, making it a hearty and satisfying option for everyone, including those who follow a plant-based diet.
The creamy coconut milk, combined with the aromatic spices and herbs, creates a savory stew that’s both comforting and invigorating. Serve it over rice or with crusty bread to soak up the delightful broth. This dish is excellent for family gatherings, and its colorful presentation is sure to impress your guests.
Whether you’re looking for a healthy meal or simply want to explore Brazilian cuisine, Moqueca de Legumes is a delightful choice.
Ingredients (Serves 4-6)
- 1 tablespoon olive oil
- 1 medium onion, chopped
- 3 cloves garlic, minced
- 1 bell pepper (red or yellow), sliced
- 2 medium zucchinis, sliced
- 2 medium carrots, sliced
- 1 cup cherry tomatoes, halved
- 1 cup green beans, trimmed and cut into 1-inch pieces
- 1 can (14 oz) coconut milk
- 2 cups vegetable broth
- 1 tablespoon lime juice
- 1 teaspoon ground cumin
- 1 teaspoon paprika
- Salt and black pepper to taste
- Fresh cilantro or parsley, chopped (for garnish)
Cooking Instructions
1. Sauté the Aromatics**: In a large pot or Dutch oven, heat the olive oil over medium heat. Add the chopped onion and sauté** for about 5 minutes until it becomes translucent.
Stir in the minced garlic and cook for an additional minute until fragrant. This step builds a flavorful base for your stew.
2. Add the Vegetables: Incorporate the sliced bell pepper, zucchinis, and carrots into the pot. Cook for about 5-7 minutes, stirring occasionally, until the vegetables start to soften.
This allows the vegetables to absorb the flavors from the onions and garlic.
3. Incorporate Remaining Vegetables: Add the cherry tomatoes and green beans to the pot, mixing well. Continue to cook for another 5 minutes.
The aim is to create a vibrant mix of vegetables that won’t only taste good but also look appealing.
4. Add Liquids and Spices: Pour in the coconut milk and vegetable broth. Stir in the lime juice, ground cumin, and paprika.
Season with salt and black pepper to taste. Bring the mixture to a gentle boil, then reduce the heat to low, allowing it to simmer for about 15-20 minutes.
This simmering step helps meld all the flavors together and allows the vegetables to cook through.
5. Final Touches: Taste the stew and adjust the seasoning if necessary. Once the vegetables are tender and the broth is rich and creamy, remove the pot from heat.
Garnish with freshly chopped cilantro or parsley before serving.
6. Serve: Ladle the moqueca into bowls and serve hot, ideally over a bed of rice or with crusty bread on the side to soak up the delicious broth.
Extra Tips
For added depth of flavor, consider marinating the vegetables in lime juice and spices for about 30 minutes prior to cooking.
This will enhance their taste and make them more aromatic. You can also customize the vegetable selection based on your preferences or seasonal availability, adding vegetables like eggplant or sweet potatoes for variety.
Additionally, if you prefer a spicy kick, feel free to add chopped chili peppers along with the other vegetables. Enjoy your culinary adventure with Moqueca de Legumes!
Couve À Mineira: Sautéed Collard Greens
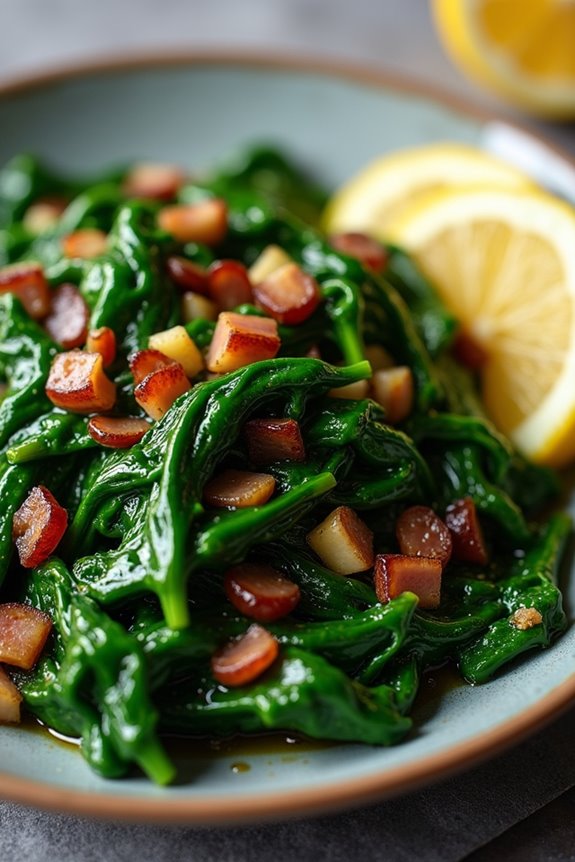
Couve À Mineira is a beloved Brazilian dish that showcases the vibrant flavors and nutrients of collard greens, a staple in Brazilian cuisine. This simple yet delicious preparation highlights the greens’ natural taste while enhancing them with the savory notes of garlic and the richness of olive oil or bacon.
Traditionally served as a side dish, it pairs beautifully with rice and beans, making it a perfect complement to any meal.
The preparation of Couve À Mineira is quick and easy, allowing you to enjoy this healthy dish in no time. With just a few ingredients, this recipe brings out the best in collard greens, ensuring that they remain crisp-tender and flavorful.
Whether you’re cooking for a family dinner or a casual gathering, this sautéed collard greens dish is sure to impress!
Ingredients (Serves 4-6)
- 1 bunch of collard greens
- 2 tablespoons olive oil (or bacon, chopped)
- 3 cloves garlic, minced
- Salt, to taste
- Black pepper, to taste
- Lemon wedges (for serving, optional)
Cooking Instructions
1. Prepare the Collard Greens: Rinse the collard greens thoroughly under cold water to remove any dirt or grit. Remove the tough stems by cutting them out with a sharp knife.
Stack the leaves on top of each other, roll them tightly, and slice them into thin strips. This technique is known as chiffonade and will help the greens cook evenly.
2. Heat the Oil or Bacon: In a large skillet or frying pan, heat the olive oil over medium heat. If you’re using bacon, add it to the pan and cook until crispy, then remove the bacon pieces and leave the rendered fat in the pan for flavor.
3. Sauté the Garlic: Once the oil is hot, add the minced garlic to the pan. Sauté for about 30 seconds, stirring constantly, until the garlic is fragrant but not browned.
Be careful not to let it burn, as burnt garlic can impart a bitter taste to the dish.
4. Add the Collard Greens: Gradually add the sliced collard greens to the skillet, stirring to coat them with the garlic-infused oil. Cook for about 5-7 minutes, stirring frequently, until the greens are tender but still vibrant green.
5. Season and Serve: Season with salt and black pepper to taste. If you reserved bacon, sprinkle it back into the pan for added flavor.
Serve the sautéed collard greens hot, with lemon wedges on the side for a bright, zesty finish.
Extra Tips
When preparing Couve À Mineira, it’s essential to not overcook the collard greens; aim for a tender-crisp texture to maintain their vibrant color and nutrients.
For added flavor, consider experimenting with other seasonings such as crushed red pepper flakes for heat or a splash of vinegar for acidity. Enjoy this dish as a delightful side to grilled meats or a hearty stew, embracing the delicious flavors of Brazilian cuisine!
Pimentão Recheado: Stuffed Bell Peppers

Pimentão Recheado, or Stuffed Bell Peppers, is a beloved dish in Brazilian cuisine that showcases the vibrant flavors and colors of fresh vegetables. This dish typically features bell peppers filled with a savory mixture of rice, beans, vegetables, and spices, making it a wholesome meal that’s both satisfying and nutritious.
The versatility of this recipe allows for various fillings, making it a great way to use up leftovers or incorporate seasonal produce. Preparing Pimentão Recheado isn’t only a great way to enjoy a hearty meal, but it also makes for a stunning presentation on the dinner table. The bright colors of the bell peppers create an eye-catching dish, while the aromatic filling offers a delightful blend of flavors.
This recipe serves 4-6 people, making it perfect for family gatherings or a cozy dinner with friends.
Ingredients
- 4 large bell peppers (any color)
- 1 cup cooked rice
- 1 cup black beans (cooked, drained, and rinsed)
- 1 small onion (chopped)
- 2 cloves garlic (minced)
- 1 medium tomato (diced)
- 1 cup corn (canned or frozen)
- 1 teaspoon cumin
- 1 teaspoon paprika
- 1 teaspoon salt
- 1/2 teaspoon black pepper
- 1/2 cup shredded cheese (optional)
- Fresh parsley (for garnish)
Cooking Instructions
1. Prepare the Bell Peppers: Preheat your oven to 375°F (190°C). Wash the bell peppers and slice off the tops, removing the seeds and membranes carefully. Set aside the tops to chop later for the filling.
2. Make the Filling: In a large skillet over medium heat, add a splash of olive oil. Sauté the chopped onions and minced garlic until they become translucent, about 3-4 minutes.
Add the diced tomato, chopped tops of the bell peppers, corn, cumin, paprika, salt, and black pepper. Cook for an additional 2-3 minutes until the mixture is well combined.
3. Combine Ingredients: In a large bowl, mix the sautéed vegetable mixture with the cooked rice and black beans. If you like, you can also add half of the shredded cheese into the mixture for extra flavor.
4. Stuff the Peppers: Carefully spoon the filling into each bell pepper until they’re generously filled. If you have any leftover filling, you can place it around the stuffed peppers in the baking dish.
5. Bake the Peppers: Place the stuffed bell peppers upright in a baking dish. If desired, sprinkle the remaining shredded cheese on top of each pepper. Cover the dish with aluminum foil and bake in the preheated oven for 30 minutes.
Remove the foil and bake for an additional 10-15 minutes, or until the peppers are tender and the cheese is melted and bubbly.
6. Serve: Once done, remove the stuffed peppers from the oven and let them cool for a few minutes. Garnish with fresh parsley before serving.
Extra Tips
For a unique twist on this classic dish, consider adding ground meat or tempeh to the filling for added protein.
You can also experiment with different spices or herbs to customize the flavor profile according to your preference. If you want to make the dish ahead of time, you can prepare the filling and stuff the peppers, then cover and refrigerate them until you’re ready to bake.
Just increase the baking time slightly if baking from cold. Enjoy your flavorful Pimentão Recheado!
Salada De Palmito: Heart of Palm Salad

Salada De Palmito, or Heart of Palm Salad, is a rejuvenating and vibrant dish that showcases the unique flavor and texture of heart of palm, a delicacy harvested from the inner core of certain palm trees. This salad is often served as an appetizer or side dish in Brazil and is loved for its lightness and versatility.
The combination of fresh ingredients not only makes it visually appealing but also contributes to a delightful explosion of flavors with each bite. The salad is typically composed of heart of palm, which has a tender and slightly nutty taste, paired with fresh vegetables such as tomatoes, onions, and greens. A zesty dressing of lime juice and olive oil brings the dish together, enhancing the natural flavors of the ingredients.
Perfect for a summer meal or a festive gathering, Salada De Palmito is guaranteed to impress your guests while offering a taste of Brazilian cuisine.
Ingredients (serving size: 4-6 people)
- 1 can (14 oz) of sliced heart of palm, drained
- 2 medium tomatoes, diced
- 1 small red onion, thinly sliced
- 1 cup of arugula or mixed greens
- 1/4 cup of fresh cilantro, chopped
- 2 tablespoons of olive oil
- 2 tablespoons of lime juice
- Salt and pepper to taste
Cooking Instructions
- Prepare the Vegetables: Start by washing and dicing the tomatoes and slicing the red onion. Make sure the tomatoes are ripe to add sweetness to the salad, and slice the onion as thinly as possible to guarantee a mild flavor.
- Chop the Heart of Palm: Open the can of heart of palm and drain the liquid. Slice the heart of palm into bite-sized pieces. This will allow them to mix well with the other ingredients and provide a good texture to the salad.
- Combine Ingredients: In a large mixing bowl, add the diced tomatoes, sliced red onion, chopped heart of palm, and arugula or mixed greens. Gently toss the ingredients together to combine without bruising the greens.
- Prepare the Dressing: In a small bowl, whisk together the olive oil, lime juice, salt, and pepper to create a simple yet flavorful dressing. Adjust the seasoning to your liking; you may prefer more lime juice for brightness or olive oil for richness.
- Dress the Salad: Pour the dressing over the salad mixture in the large bowl. Toss everything gently to guarantee the salad is evenly coated with the dressing. This step is vital as it enhances the overall flavor of the salad.
- Garnish and Serve: Before serving, sprinkle the chopped cilantro over the top of the salad for an added burst of flavor and color. Serve immediately to enjoy the freshness of the ingredients.
Extra Tips
When making Salada De Palmito, it’s important to use fresh ingredients to achieve the best flavor. If you can’t find canned heart of palm, fresh or frozen options are available at specialty stores.
Additionally, you can customize the salad by adding other ingredients such as avocado, cucumber, or bell peppers for added texture and flavor. For a touch of heat, consider adding thinly sliced jalapeños or a dash of hot sauce in the dressing. Enjoy your culinary journey into Brazilian cuisine!
Berinjela À Parmegiana: Brazilian Eggplant Parmesan

Berinjela À Parmegiana, or Brazilian Eggplant Parmesan, is a delectable vegetarian dish that brings together the rich flavors of eggplant, tomato sauce, and melted cheese, creating a comforting meal that’s loved by many. This dish is a fantastic alternative to the traditional meat-based Parmesan and is perfect for those looking to add more vegetables to their diet without sacrificing flavor.
The preparation involves layering breaded and fried eggplant slices with a savory tomato sauce and cheese, then baking it to perfection. This recipe not only highlights the versatility of eggplant but also reflects the spirit of Brazilian cuisine, which often incorporates fresh ingredients and bold flavors.
Whether you’re cooking for family or hosting a gathering with friends, Berinjela À Parmegiana is sure to impress and satisfy. Serve it alongside a simple salad or some crusty bread to soak up the delicious sauce.
Ingredients (serves 4-6):
- 2 large eggplants
- 1 teaspoon salt
- 1 cup all-purpose flour
- 2 large eggs
- 1 cup breadcrumbs
- 3 cups marinara sauce (homemade or store-bought)
- 2 cups shredded mozzarella cheese
- 1 cup grated Parmesan cheese
- 1 teaspoon dried oregano
- 1 teaspoon black pepper
- Fresh basil leaves for garnish (optional)
- Olive oil for frying
Cooking Instructions:
1. Prepare the Eggplant: Slice the eggplants into ½-inch thick rounds. Sprinkle the slices with salt and let them sit for about 30 minutes. This process helps to draw out excess moisture and bitterness from the eggplant.
Rinse the slices under cold water and pat them dry with a paper towel.
2. Bread the Eggplant: Set up a breading station with three shallow dishes: one with flour, one with beaten eggs, and one with breadcrumbs mixed with oregano, salt, and black pepper.
Dredge each eggplant slice in flour, shaking off the excess, then dip it into the beaten eggs, and finally coat it with the breadcrumb mixture. Place the breaded eggplant on a plate.
3. Fry the Eggplant: In a large skillet, heat a generous amount of olive oil over medium heat. Once the oil is hot, carefully add the breaded eggplant slices in batches, frying until golden brown on both sides, about 3-4 minutes per side.
Remove them from the skillet and place them on a paper towel-lined plate to drain excess oil.
4. Assemble the Dish: Preheat your oven to 375°F (190°C). In a baking dish, spread a thin layer of marinara sauce on the bottom.
Layer half of the fried eggplant slices over the sauce, followed by another layer of marinara sauce, half of the mozzarella, and half of the Parmesan cheese. Repeat the layers with the remaining eggplant, sauce, and cheeses.
5. Bake: Cover the baking dish with aluminum foil and bake in the preheated oven for about 25 minutes.
Then, remove the foil and bake for an additional 10-15 minutes, or until the cheese is bubbly and golden brown.
6. Garnish and Serve: Once baked, let the dish cool for a few minutes before garnishing with fresh basil leaves.
Serve hot, and enjoy your delicious Berinjela À Parmegiana!
Extra Tips:
For an even richer flavor, consider adding sautéed garlic and onions to the marinara sauce before layering it with the eggplant.
You can also experiment with different cheeses, such as provolone or gouda, to add a unique twist to your Berinjela À Parmegiana. Additionally, if you prefer a lighter version, you can bake the breaded eggplant slices instead of frying them.
Simply place them on a baking sheet, spray with a little olive oil, and bake at 375°F (190°C) for about 20 minutes before assembling the dish. Enjoy your cooking adventure!
Abóbora Assada: Roasted Pumpkin With Spices
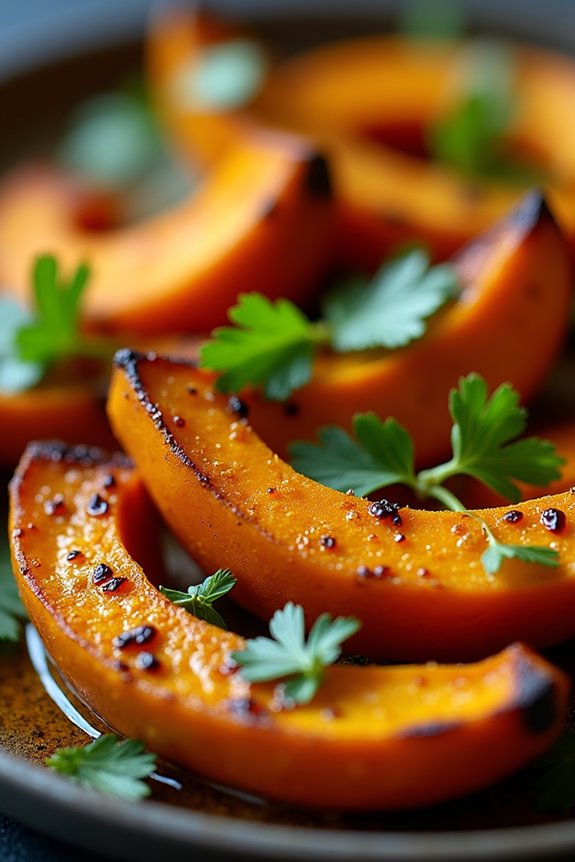
Abóbora Assada, or roasted pumpkin with spices, is a delightful and comforting dish that captures the essence of Brazilian cuisine. The sweetness of the pumpkin is beautifully complemented by an array of spices, making it a perfect side dish for any meal or a hearty vegetarian option. This recipe not only highlights the natural flavors of the pumpkin but also elevates them with the aromatic notes of garlic, cumin, and a hint of chili, making it a flavorful addition to your table.
This dish is particularly popular during the fall season when pumpkins are in abundance. Roasting the pumpkin brings out its natural sugars, resulting in a tender, caramelized texture that’s simply irresistible. Whether you serve it alongside grilled meats or as part of a vegetarian feast, Abóbora Assada is sure to impress your guests and family alike.
Ingredients (serves 4-6):
- 1 medium pumpkin (about 3-4 pounds)
- 3 tablespoons olive oil
- 2 teaspoons ground cumin
- 1 teaspoon smoked paprika
- 1 teaspoon garlic powder
- 1 teaspoon chili powder (adjust to taste)
- Salt and pepper, to taste
- Fresh herbs (such as parsley or cilantro) for garnish
Cooking Instructions:
- Preheat the Oven: Begin by preheating your oven to 400°F (200°C). This guarantees that the pumpkin will roast properly and develop a beautiful caramelization during cooking.
- Prepare the Pumpkin: Carefully cut the pumpkin in half and scoop out the seeds and stringy insides. You can save the seeds for roasting later if you like. Cut the pumpkin into wedges or cubes, depending on your preference. The pieces should be roughly uniform in size to guarantee even cooking.
- Season the Pumpkin: In a large mixing bowl, combine the olive oil, ground cumin, smoked paprika, garlic powder, chili powder, salt, and pepper. Add the pumpkin pieces to the bowl and toss them until they’re evenly coated with the oil and spice mixture.
- Arrange on a Baking Sheet: Line a baking sheet with parchment paper for easy cleanup. Spread the seasoned pumpkin pieces in a single layer on the baking sheet, making sure they aren’t overcrowded. This allows for better roasting and caramelization.
- Roast the Pumpkin: Place the baking sheet in the preheated oven and roast the pumpkin for about 25-30 minutes. Halfway through, flip the pieces to guarantee they cook evenly. The pumpkin is ready when it’s tender and has a nice golden-brown color.
- Serve and Garnish: Once roasted, remove the pumpkin from the oven and let it cool for a few minutes. Transfer the pieces to a serving platter and garnish with fresh herbs like parsley or cilantro for an added touch of freshness.
Extra Tips:
When selecting a pumpkin, opt for varieties like butternut or sugar pumpkin for their sweet flavor and smooth texture. If you want to add a touch of sweetness, drizzle a bit of honey or maple syrup over the pumpkin before roasting.
Additionally, feel free to experiment with other spices such as cinnamon or nutmeg for a different flavor profile. Roasted pumpkin can be served warm or at room temperature, making it a versatile dish for any occasion!
Vatapá De Legumes: Vegetable Vatapá
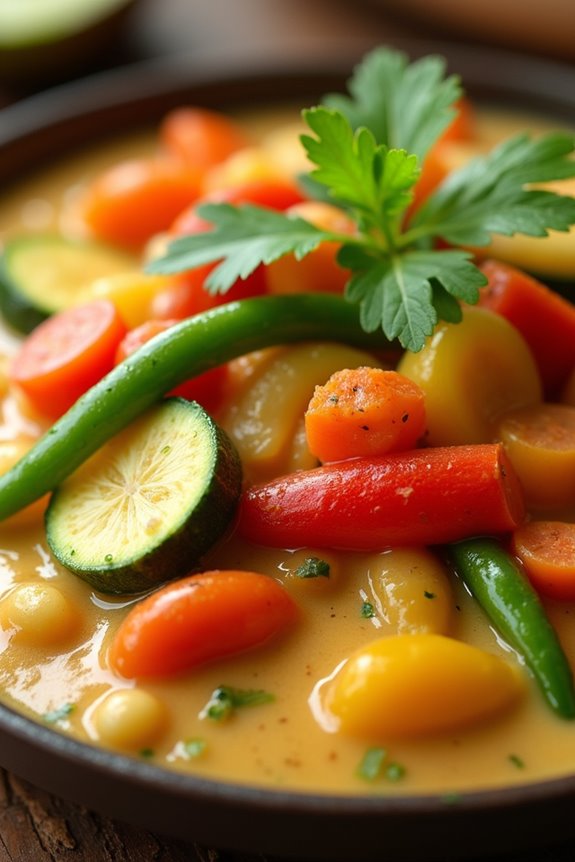
Vatapá de Legumes is a delightful Brazilian dish that showcases the vibrant flavors and textures of vegetables, all enveloped in a rich and creamy sauce. Traditionally made with seafood, this vegetarian adaptation allows for a broader audience to enjoy the delightful taste of vatapá.
The dish is a perfect representation of Brazilian cuisine, blending a variety of fresh vegetables with aromatic spices and ingredients like coconut milk, peanuts, and bread, creating a comforting and satisfying meal that’s both nutritious and delicious.
The preparation of Vatapá de Legumes isn’t only a feast for the taste buds but also a colorful spectacle for the eyes with its array of vegetables. This dish is perfect for gatherings or family dinners and can be served with rice or as a filling accompaniment to a variety of main courses.
Whether you’re familiar with Brazilian cuisine or trying it for the first time, this vegetable vatapá will surely impress and delight your guests while bringing a taste of Brazil to your table.
Ingredients (serving size: 4-6 people)
- 2 cups of diced assorted vegetables (carrots, bell peppers, zucchini, and green beans)
- 1 medium onion, chopped
- 3 cloves of garlic, minced
- 1 cup of coconut milk
- 1 cup of vegetable broth
- 1/2 cup of ground peanuts
- 2 slices of stale bread, torn into pieces
- 1 tablespoon of palm oil (or olive oil)
- 1 teaspoon of ginger, grated
- 1 teaspoon of paprika
- Salt and pepper to taste
- Fresh cilantro for garnish (optional)
- Lime wedges for serving (optional)
Cooking Instructions
- Sauté the Aromatics: In a large pan, heat the palm oil over medium heat. Add the chopped onion and sauté for about 3-4 minutes until it’s translucent. Then, add the minced garlic and grated ginger, stirring for an additional minute until fragrant. This step helps to build a flavor base for the dish.
- Cook the Vegetables: Add the diced assorted vegetables to the pan and sauté them for about 5-7 minutes until they’re slightly tender. Stir occasionally to guarantee even cooking. This step allows the vegetables to soften and absorb the flavors of the aromatics.
- Prepare the Sauce: In a blender, combine the coconut milk, vegetable broth, ground peanuts, torn bread, paprika, salt, and pepper. Blend until smooth. This mixture will create a creamy sauce that binds the dish together.
- Combine and Simmer: Pour the blended sauce over the sautéed vegetables in the pan. Stir well to combine, and allow the mixture to simmer for about 10-15 minutes on low heat, stirring occasionally. This step is essential for the sauce to thicken and for the flavors to meld together.
- Adjust Seasoning and Serve: Taste the vatapá and adjust the seasoning with additional salt and pepper if necessary. Once done, remove from heat and let it sit for a few minutes. Serve warm, garnished with fresh cilantro and lime wedges if desired.
Extra Tips
When preparing Vatapá de Legumes, feel free to customize the vegetables based on your preferences or what’s in season. Root vegetables like sweet potatoes or squash can add a lovely sweetness, while leafy greens can bring a fresh touch.
Additionally, if you prefer a spicier kick, consider adding chili flakes or diced fresh chili to the sauté. This dish can also be made ahead of time and reheated, allowing the flavors to deepen even further.
Quibe De Abobrinha: Zucchini Kibbeh

Quibe De Abobrinha, or Zucchini Kibbeh, is a delightful twist on the traditional Middle Eastern dish. This version replaces the usual bulgur wheat with finely grated zucchini, making it a lighter and healthier option while still packed with flavor. The dish is perfect for those looking to incorporate more vegetables into their meals or for anyone seeking a delicious vegetarian recipe.
It’s often served with a side of yogurt or a fresh salad, making it a revitalizing option for a summer meal or an elegant appetizer for gatherings. The combination of spices, herbs, and the natural sweetness of zucchini creates a vibrant dish that’s sure to impress both vegetarians and meat lovers alike.
The texture is satisfying, and the flavors meld beautifully as they bake together. Perfect for serving at family dinners or potlucks, Quibe De Abobrinha isn’t only nutritious but also a celebration of the culinary traditions that blend various cultures.
Ingredients (Serving Size: 4-6 people):
- 4 medium zucchinis, grated
- 1 cup fine bulgur wheat
- 1 medium onion, finely chopped
- 2 cloves garlic, minced
- 1/2 cup fresh parsley, chopped
- 1/2 cup fresh mint, chopped
- 1 teaspoon ground cumin
- 1 teaspoon ground coriander
- 1 teaspoon salt
- 1/2 teaspoon black pepper
- 1/4 cup olive oil
- 1/4 cup water
- 1/4 cup pine nuts (optional)
Cooking Instructions:
- Prepare the Zucchini: Start by washing the zucchinis thoroughly. Grate them using a box grater or food processor, and then place the grated zucchini in a clean kitchen towel. Squeeze out as much excess moisture as possible. This step is crucial to prevent the kibbeh from becoming soggy during baking.
- Soak the Bulgur: In a medium bowl, combine the fine bulgur wheat with 1/4 cup of water. Let it soak for about 20-30 minutes until it absorbs the water and becomes tender. Fluff it with a fork once it’s ready.
- Sauté the Aromatics: In a skillet over medium heat, add a tablespoon of olive oil and sauté the chopped onion until it becomes translucent, about 5 minutes. Then, add the minced garlic and cook for another minute until fragrant. Remove from heat and let it cool slightly.
- Mix the Ingredients: In a large mixing bowl, combine the grated zucchini, soaked bulgur, sautéed onion and garlic, chopped parsley, chopped mint, cumin, coriander, salt, and black pepper. If you’re using pine nuts, toast them lightly in a dry pan and add them to the mixture. Drizzle in the remaining olive oil to help bind the ingredients together.
- Prepare for Baking: Preheat your oven to 350°F (175°C). Grease a baking dish with a little olive oil. Transfer the zucchini mixture into the dish, pressing it down firmly so it holds its shape. You can smooth the top with the back of a spoon.
- Bake the Kibbeh: Place the baking dish in the preheated oven and bake for about 30-40 minutes, or until the top is golden brown and slightly crispy. Check it periodically to verify it doesn’t overcook.
- Serve: Once baked, remove from the oven and let it cool for a few minutes. Cut into squares or diamond shapes and serve warm or at room temperature with yogurt or your favorite dipping sauce.
Extra Tips:
For added flavor, consider incorporating different spices such as paprika or sumac, which can enhance the depth of taste in your Quibe De Abobrinha. Additionally, feel free to experiment with other herbs like dill or cilantro based on your preference.
If you’re looking for a variation, try adding cooked lentils or chickpeas for extra protein and texture. Finally, this dish can be prepared ahead of time and reheated, making it a perfect option for meal prep or entertaining guests. Enjoy!
Farofa De Cenoura: Carrot Farofa

Farofa de Cenoura, or Carrot Farofa, is a traditional Brazilian dish that brings a delightful mix of textures and flavors to any meal. This dish is typically served as a side, often accompanying meats, beans, or rice, making it a versatile addition to your table. The combination of finely grated carrots, manioc flour (farofa), and seasoning creates a comforting and flavorful dish that’s both easy to prepare and satisfying to eat.
The bright orange hue of the carrots not only adds a pop of color to your plate but also provides a nutritional boost. Carrots are rich in vitamins and minerals, making this dish a healthy option for any occasion. Whether you’re serving it at a family gathering, a festive celebration, or simply as a comforting dinner at home, Farofa de Cenoura is sure to impress.
Ingredients (Serves 4-6)
- 2 large carrots, grated
- 1 cup of manioc flour (farofa)
- 1 medium onion, finely chopped
- 2 cloves of garlic, minced
- 3 tablespoons of butter or olive oil
- Salt, to taste
- Black pepper, to taste
- Fresh parsley or chives, chopped (for garnish)
Cooking Instructions
- Prepare the Ingredients: Start by peeling and grating the carrots using a box grater or food processor. Finely chop the onion and mince the garlic. This preparation step is essential as it guarantees everything cooks evenly and allows the flavors to meld beautifully.
- Sauté the Aromatics: In a large skillet over medium heat, melt the butter or heat the olive oil. Add in the chopped onion and sauté for about 4-5 minutes until it becomes translucent and soft. Then, add the minced garlic and cook for an additional 1-2 minutes until fragrant. This step enhances the base flavor of the farofa.
- Add the Carrots: Stir in the grated carrots and cook for about 5-7 minutes, stirring occasionally. The carrots should soften but still retain some texture. This will add sweetness and moisture to the dish.
- Incorporate the Manioc Flour: Gradually add the manioc flour to the skillet, mixing well to combine. Continue to stir for another 5 minutes, allowing the flour to absorb the flavors and moisture from the carrots and aromatics. This step creates the signature crumbly texture of farofa.
- Season the Dish: Season the farofa with salt and black pepper to taste. Stir well to make sure the seasoning is evenly distributed. Adjust the seasoning according to your preference.
- Garnish and Serve: Once cooked, remove the skillet from heat and transfer the farofa to a serving dish. Garnish with freshly chopped parsley or chives for a burst of freshness. Serve warm as a side dish with your favorite main course.
Extra Tips
When making Farofa de Cenoura, feel free to customize it to your taste by adding ingredients such as diced bacon, nuts, or raisins for additional flavor and texture.
If you prefer a slightly richer taste, consider using bacon fat instead of butter or olive oil. Additionally, be mindful of the cooking time for the carrots; you want them to be tender but not mushy. Enjoy experimenting with this versatile dish!