

Discovering the vibrant world of South American cuisine is always a delightful journey. The warmth of arepas, the freshness of ceviche, and the heartiness of feijoada are just a few dishes that capture the heart of these rich culinary traditions. Each recipe tells its own story, offering a taste of history and culture that has endured through generations. Join me as we explore these beloved recipes and the secrets they hold. Let’s celebrate the flavors that bring us a little closer to the heart of South America.
Arepas

Arepas are a traditional South American dish, particularly popular in Venezuela and Colombia. These versatile cornmeal cakes can be grilled, baked, or fried, and can be filled or topped with a variety of ingredients, making them a favorite for breakfast, lunch, or dinner.
The base of the arepa is made from masa harina, a special corn flour that creates a deliciously soft and slightly chewy texture. Their simplicity and adaptability allow for endless combinations, whether you prefer savory or sweet fillings.
Making arepas isn’t only easy but also rewarding, as they can be customized to suit your taste. You can fill them with cheese, meats, vegetables, or even sweet treats. This recipe will guide you through crafting the perfect arepas from scratch, providing a delightful and fulfilling meal for 4-6 people.
Once you get the hang of it, you’ll find yourself experimenting with different fillings and flavors, making arepas a staple in your kitchen.
Ingredients (Serves 4-6)
- 2 cups masa harina
- 2 ½ cups warm water
- 1 teaspoon salt
- 1 tablespoon vegetable oil (optional, for frying)
- Cheese, shredded (for filling, optional)
- Cooked meat or vegetables (for filling, optional)
- Avocado, sliced (for topping, optional)
- Salsa or hot sauce (for serving, optional)
Cooking Instructions
1. Prepare the Dough: In a mixing bowl, combine the masa harina and salt. Gradually add the warm water while mixing with your hands or a spoon. Continue mixing until a soft and pliable dough forms. The dough should be moist but not sticky. If it’s too dry, add a little more water; if it’s too sticky, add a bit more masa harina.
2. Shape the Arepas: Divide the dough into 8-10 equal portions and roll each portion into a ball. Flatten each ball gently between your palms to form a disc about ½ inch thick. Make sure the edges are smooth to prevent cracking while cooking.
3. Cook the Arepas: You can choose to grill, bake, or fry the arepas. For grilling, preheat your grill to medium heat and cook the arepas for about 5-7 minutes on each side, until they develop a golden-brown crust.
For baking, preheat your oven to 375°F (190°C) and place the arepas on a baking sheet; bake for 20-25 minutes, flipping halfway through. If frying, heat vegetable oil in a skillet over medium heat and fry the arepas for 4-5 minutes per side until they’re golden and crispy.
4. Fill the Arepas: Once cooked, let the arepas cool slightly. Use a knife to cut a pocket into each arepa, being careful not to cut all the way through. Fill the pockets with your choice of shredded cheese, cooked meat, or vegetables.
5. Serve: Serve the arepas warm, accompanied by sliced avocado and salsa or hot sauce if desired. Enjoy your delicious homemade arepas!
Extra Tips
When making arepas, you can experiment with different flavors by adding spices or herbs to the dough, such as cumin or cilantro.
If you’re looking for a cheesy variation, try mixing in crumbled feta or mozzarella directly into the dough before shaping. Additionally, arepas can be made ahead of time and reheated in a toaster or oven, making them a convenient option for meal prep.
Ceviche
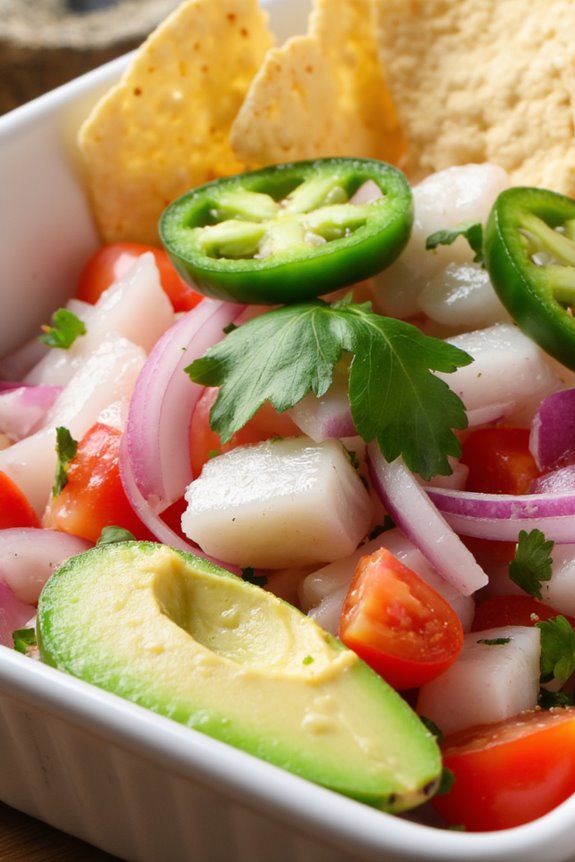
Ceviche is a vibrant and invigorating dish that originates from the coastal regions of South America, particularly popular in countries like Peru and Ecuador. This dish celebrates the freshness of seafood, typically made with raw fish that’s cured in citrus juices, primarily lime or lemon, combined with a medley of spices and vegetables. The acid from the citrus not only cooks the fish but also enhances its natural flavors, making ceviche a delightful appetizer or light meal that’s perfect for warm weather.
The beauty of ceviche lies in its versatility; you can customize it with various types of seafood, vegetables, and seasonings to suit your taste. Classic ceviche often includes ingredients such as onions, cilantro, and chili peppers, adding layers of flavor and texture. Enjoyed with tortilla chips or served in a bowl, ceviche is a culinary experience that brings the taste of the ocean directly to your table.
Ingredients (Serves 4-6)
- 1 lb fresh white fish (like tilapia, snapper, or halibut), diced into small cubes
- 1 cup fresh lime juice (about 8-10 limes)
- 1 small red onion, thinly sliced
- 1-2 jalapeño peppers, finely chopped (adjust to taste)
- 1 cup diced tomatoes (preferably Roma tomatoes)
- 1 cup chopped fresh cilantro
- 1 avocado, diced
- Salt, to taste
- Pepper, to taste
- Tortilla chips or tostadas, for serving
Cooking Instructions
- Prepare the Fish: Start by selecting the freshest fish available. Rinse the fish under cold water and pat it dry with paper towels. Dice the fish into small, uniform cubes to guarantee even curing in the lime juice. Place the diced fish in a large glass or ceramic bowl.
- Cure the Fish: Pour the fresh lime juice over the diced fish, making sure that all pieces are submerged. The acidity of the lime juice will “cook” the fish. Cover the bowl with plastic wrap and let it marinate in the refrigerator for 30 to 60 minutes, depending on how well-done you prefer the fish. Stir occasionally to guarantee even curing.
- Add Vegetables and Seasoning: After the marination time, check the fish to see if it has turned opaque, indicating it’s “cooked.” Add the thinly sliced red onion, chopped jalapeños, diced tomatoes, and chopped cilantro to the bowl. Gently fold the ingredients together, being careful not to break apart the fish.
- Season and Serve: Taste the ceviche and add salt and pepper to your liking. If desired, gently fold in the diced avocado for a creamy texture. Serve the ceviche chilled in individual bowls or on a platter, accompanied by tortilla chips or tostadas for dipping.
Extra Tips
When making ceviche, freshness is key; always choose the highest quality fish and seafood available. If you’re unsure about the freshness, consider purchasing from a reputable fish market.
Additionally, feel free to experiment with different types of seafood, such as shrimp or scallops, and adjust the level of acidity and spice according to your preference. Ceviche is best enjoyed fresh, so try to consume it within a few hours of preparation for the best flavor and texture.
Empanadas

Empanadas are a beloved dish throughout South America, featuring a flaky pastry filled with a variety of savory ingredients. Originating from Spain, these delicious pockets have been embraced by many cultures, with each country adding its unique twist to the recipe. The fillings can range from seasoned meats and vegetables to cheese and even sweet fruit mixtures. Their versatility makes them a perfect choice for appetizers, snacks, or even main courses, catering to all taste preferences.
Making empanadas from scratch might seem intimidating, but the process is quite simple and rewarding. Whether you choose to bake or fry them, the golden-brown crust and the flavorful filling will leave everyone asking for seconds. This recipe will guide you through creating a classic beef empanada filling, but feel free to experiment with other ingredients and flavors to suit your palate!
Ingredients (serving size: 4-6 people)
- 2 cups all-purpose flour
- 1/2 cup unsalted butter, cold and cubed
- 1/2 teaspoon salt
- 1/4 cup cold water
- 1 pound ground beef
- 1 medium onion, finely chopped
- 1/2 red bell pepper, finely chopped
- 2 cloves garlic, minced
- 1 teaspoon ground cumin
- 1 teaspoon paprika
- Salt and pepper to taste
- 1 egg, beaten (for egg wash)
Cooking Instructions
- Prepare the Dough: In a large mixing bowl, combine the flour and salt. Add the cold, cubed butter and mix until the mixture resembles coarse crumbs. Gradually add the cold water, mixing until the dough comes together. Knead the dough for a few minutes until smooth, then wrap in plastic wrap and refrigerate for at least 30 minutes.
- Make the Filling: While the dough is chilling, heat a skillet over medium heat. Add the ground beef and cook until browned, breaking it up with a spoon as it cooks. Once the beef is browned, add the chopped onion, red bell pepper, and minced garlic. Sauté until the vegetables are softened, about 5 minutes. Stir in the cumin, paprika, salt, and pepper. Remove from heat and let it cool.
- Roll Out the Dough: After the dough has chilled, remove it from the refrigerator and divide it into two portions. On a floured surface, roll out one portion of the dough to about 1/8 inch thick. Use a round cutter or a glass to cut out circles (about 4-5 inches in diameter).
- Fill the Empanadas: Place a tablespoon of the beef filling in the center of each dough circle. Be careful not to overfill. Fold the dough over to make a half-moon shape, sealing the edges by pressing them together. For a decorative touch, you can crimp the edges with a fork.
- Bake or Fry: Preheat the oven to 375°F (190°C) if baking. Place the empanadas on a baking sheet lined with parchment paper, brush the tops with the beaten egg, and bake for about 25-30 minutes until golden brown. If frying, heat oil in a deep pan and fry the empanadas until golden and crispy, about 3-4 minutes per side. Drain on paper towels.
- Serve: Allow the empanadas to cool slightly before serving. They can be enjoyed warm or at room temperature, and are perfect with a side of chimichurri or salsa.
Extra Tips
When making empanadas, feel free to get creative with your fillings! You can use chicken, cheese, spinach, or even a blend of vegetables for a vegetarian option. If you want a little heat, consider adding diced jalapeños or a pinch of chili powder to the meat mixture.
For added flavor, let the filling cool completely before filling the dough to avoid sogginess. Empanadas can also be made ahead of time—just freeze them before baking or frying, and cook them straight from the freezer when you’re ready to enjoy!
Feijoada

Feijoada is a traditional Brazilian stew that embodies the rich culinary heritage of South America. This hearty dish is made with black beans and a variety of meats, often including pork, beef, and sausage, simmered together to create a deeply flavorful and satisfying meal. Typically served with rice, collard greens, and orange slices, feijoada isn’t only a crowd-pleaser but also a wonderful way to bring friends and family together for a communal dining experience.
The origins of feijoada are often traced back to the Portuguese influence on Brazilian cuisine, with local adaptations that incorporate indigenous and African ingredients and techniques. While each household may have its unique twist on the recipe, the essence of feijoada remains the same: a celebration of flavors and culture that reflects the diversity of Brazil itself. Prepare to savor every bite of this delicious stew!
Ingredients (serving size: 4-6 people):
- 1 lb black beans
- 1 lb pork shoulder, cut into cubes
- 1/2 lb smoked sausage, sliced
- 1/2 lb chorizo or spicy sausage, sliced
- 1/2 lb beef chuck, cut into cubes
- 4 cups chicken or beef broth
- 1 large onion, chopped
- 4 cloves garlic, minced
- 2 bay leaves
- 1 tsp paprika
- 1 tsp cumin
- Salt and pepper to taste
- 2 tablespoons olive oil
- 2 cups cooked white rice (for serving)
- Fresh collard greens (for serving)
- Orange slices (for garnish)
Cooking Instructions:
- Prepare the Beans: Start by rinsing the black beans under cold water. Soak them in water overnight or for at least 6 hours to guarantee they cook evenly. Drain and set aside.
- Brown the Meats: In a large, heavy-bottomed pot or Dutch oven, heat the olive oil over medium heat. Add the pork shoulder and beef chuck, browning them on all sides. This step adds depth to the stew by building flavor. Once browned, transfer the meats to a plate and set aside.
- Sauté Aromatics: In the same pot, add the chopped onion and minced garlic. Sauté for about 5 minutes, or until the onion becomes translucent and fragrant. This will create a flavorful base for the stew.
- Add Remaining Ingredients: Return the browned meats to the pot along with the sliced smoked sausage and chorizo. Stir in the soaked black beans, bay leaves, paprika, cumin, and enough chicken or beef broth to cover the ingredients (approximately 4 cups). Season with salt and pepper.
- Simmer the Stew: Bring the mixture to a gentle boil, then reduce the heat to low. Cover the pot and let it simmer for 2 to 3 hours, stirring occasionally. The longer it simmers, the more the flavors will meld together, and the beans will become tender.
- Finish and Serve: Once the meat is tender and the beans are cooked through, remove the bay leaves. Adjust seasoning if necessary. Serve the feijoada hot over a bed of white rice, accompanied by sautéed collard greens and garnished with fresh orange slices.
Extra Tips: To enhance the flavors of your feijoada, consider using a mix of meats such as beef ribs or even spare ribs for added richness. If you prefer a vegetarian version, substitute the meats with mushrooms and additional vegetables, and use vegetable broth instead.
For the best results, let the stew cool and refrigerate it overnight; the flavors will deepen even more, and it can be reheated for an even tastier meal the next day. Enjoy your homemade feijoada with good company!
Asado

Asado is a traditional South American barbecue that brings together family and friends to enjoy an array of grilled meats. Originating from countries like Argentina and Uruguay, this dish isn’t just about cooking; it’s a social event that celebrates the rich culture and flavors of the region.
The centerpiece of an asado is usually beef, often cooked over a wood or charcoal fire, which imparts a unique smoky flavor. Accompanied by chimichurri sauce and various side dishes, asado is a feast that highlights the quality of the meat and the art of grilling.
Aside from the meat, asado can include a variety of other items such as sausages, chicken, and vegetables, making it a versatile dish suitable for any palate. The preparation requires patience and care, as the goal is to achieve perfectly cooked, juicy meat with a crispy exterior.
Whether you’re hosting an outdoor gathering or enjoying a quiet dinner, asado is sure to delight your senses and create lasting memories.
Ingredients (Serves 4-6):
- 3-4 pounds of beef ribs or flank steak
- 1 pound of chorizo sausages
- 1 pound of chicken thighs (optional)
- 4-6 medium-sized potatoes
- 2 bell peppers (red and yellow), cut into strips
- 1 onion, cut into wedges
- Salt, to taste
- Black pepper, to taste
- Olive oil, for drizzling
- Fresh parsley, for garnish
Cooking Instructions:
- Prepare the Grill: Start by lighting your charcoal or wood grill. Allow the coals to burn until they’re covered with white ash, indicating they’re ready for cooking. This typically takes about 30 minutes. If using a gas grill, preheat it to medium-high heat.
- Season the Meat: While the grill is heating, generously season the beef ribs or flank steak with salt and black pepper. If desired, you can marinate the meat with olive oil and minced garlic for extra flavor, allowing it to sit for at least 30 minutes.
- Cook the Meat: Once the grill is ready, place the beef on the grill grates, cooking it for about 5-7 minutes on each side for medium-rare, depending on the thickness. For the sausages, place them on the grill and cook until they’re browned and cooked through, about 10-12 minutes, turning occasionally.
- Add Vegetables: While the meat is cooking, toss the potatoes, bell peppers, and onion in olive oil, salt, and pepper. Place them on the grill in a grill basket or wrapped in foil. Cook the vegetables for about 15-20 minutes, turning occasionally, until they’re tender and slightly charred.
- Finalize Cooking: Keep an eye on the meat and vegetables to guarantee they don’t overcook. Use a meat thermometer to check the internal temperature of the beef, aiming for 130°F for medium-rare. Once cooked to your liking, remove everything from the grill.
- Rest the Meat: Allow the meat to rest for about 10 minutes before slicing. This helps retain the juices, assuring the meat is tender and flavorful.
- Serve: Slice the beef against the grain and arrange it on a platter with the grilled sausages and vegetables. Garnish with fresh parsley for a pop of color. Serve with chimichurri sauce on the side.
Extra Tips:
To enhance the flavor of your asado, consider adding a few sprigs of rosemary or thyme to the coals while grilling for an aromatic touch.
Experimenting with different cuts of meat can also lead to delightful variations, as each cut has its unique texture and flavor. Finally, don’t forget to enjoy the process and the company of your loved ones, as asado is as much about the experience as it’s about the food!
Pão De Queijo

Pão De Queijo, or Brazilian cheese bread, is a delightful and gluten-free snack that hails from the beautiful country of Brazil. These small, chewy, and cheesy rolls are made primarily from tapioca flour, which gives them their unique texture. Often enjoyed at breakfast or as a snack, they’re incredibly popular not just in Brazil but around the world.
When baked, Pão De Queijo puffs up beautifully, creating a golden crust that encases a soft, cheesy interior. The beauty of Pão De Queijo lies in its simplicity and versatility. You can experiment with different cheeses to suit your taste, whether it’s the traditional Brazilian cheese, Minas cheese, or a mix of mozzarella and Parmesan for a different flavor profile.
These cheesy delights are sure to be a hit with family and friends, making them an excellent choice for gatherings or a cozy night in.
Ingredients (Serves 4-6):
- 2 cups tapioca flour
- 1 cup whole milk
- 1/2 cup vegetable oil
- 1 teaspoon salt
- 2 large eggs
- 1 cup grated cheese (preferably a mix of mozzarella and Parmesan)
- 1/2 teaspoon baking powder (optional for added fluffiness)
Cooking Instructions:
- Preheat the Oven: Begin by preheating your oven to 375°F (190°C). This guarantees that the Pão De Queijo will cook evenly and achieve that perfect golden-brown color.
- Heat the Milk and Oil: In a medium saucepan, combine the whole milk, vegetable oil, and salt. Heat the mixture over medium heat until it comes to a gentle boil. Stir occasionally to prevent burning. Once it boils, remove it from heat.
- Combine Tapioca Flour: In a large mixing bowl, add the tapioca flour. Gradually pour the hot milk and oil mixture over the flour while stirring continuously with a spatula until it forms a smooth dough. It’s important to work quickly while the mixture is hot, as this helps to activate the tapioca flour.
- Incorporate Eggs and Cheese: Allow the dough to cool for a few minutes. Once it’s warm but manageable, add the eggs one at a time, mixing well after each addition. After the eggs are fully incorporated, fold in the grated cheese and the optional baking powder. The dough should be soft and slightly sticky.
- Shape the Breads: Lightly grease a baking sheet or line it with parchment paper. Using your hands, shape the dough into small balls, about the size of a golf ball, and place them on the prepared baking sheet, leaving some space between each ball to allow for rising.
- Bake: Place the baking sheet in the preheated oven and bake for 15-20 minutes, or until the Pão De Queijo are puffed up and golden brown. Keep an eye on them towards the end of cooking to avoid over-browning.
- Serve: Once baked, remove them from the oven and let them cool for a few minutes on a wire rack. Serve warm for the best texture and flavor.
Extra Tips: For a more intense flavor, try adding herbs or spices to the dough, such as garlic powder, oregano, or black pepper. If you find the dough too sticky to handle, you can wet your hands slightly with water or oil for easier shaping.
Pão De Queijo is best enjoyed fresh out of the oven, but they can also be stored in an airtight container and reheated in the oven for about 5-10 minutes to regain their delightful texture.
Sancocho

Sancocho is a traditional South American stew that varies by region, but is typically made with a combination of meats and root vegetables. This comforting dish is perfect for family gatherings or special occasions, as it brings everyone together around the table. The rich flavors, tender meats, and hearty vegetables make for a satisfying meal that warms the soul.
Each country has its own twist on the recipe, but the essence of Sancocho remains the same, showcasing the diverse culinary heritage of South America.
In this recipe, we’ll prepare a classic Sancocho that features chicken and beef, along with a variety of vegetables like yucca, plantains, and corn. It’s a one-pot wonder that allows the ingredients to meld beautifully, resulting in a flavorful broth that’s both nourishing and delicious. Serve it with a side of avocado and rice for a complete meal that’s certain to impress your family and friends.
Ingredients (Serves 4-6)
- 1 lb chicken pieces (thighs or drumsticks)
- 1 lb beef (chuck or shank), cut into chunks
- 6 cups water
- 2 medium onions, chopped
- 4 garlic cloves, minced
- 2 medium tomatoes, diced
- 2 medium potatoes, peeled and cubed
- 1 medium yucca (cassava), peeled and cut into chunks
- 2 ripe plantains, peeled and cut into thick slices
- 2 ears of corn, cut into halves
- 1 bell pepper, chopped
- 1 bunch of cilantro, chopped
- 1 tablespoon ground cumin
- Salt and pepper to taste
- Lime wedges, for serving
Cooking Instructions
- Prepare the Meat: In a large pot, combine the chicken pieces and beef chunks. Pour in the water and bring it to a boil over medium-high heat. Once boiling, reduce the heat to low, skimming off any foam that rises to the surface. This will help create a clear broth.
- Add Aromatics: Add the chopped onions, minced garlic, and diced tomatoes to the pot. Stir well to combine and let it simmer for about 10 minutes. This step will infuse the broth with aromatic flavors that enhance the overall taste of the Sancocho.
- Incorporate Vegetables: Once the broth has developed flavor, add in the cubed potatoes, yucca chunks, plantain slices, and corn halves. Stir to guarantee the vegetables are submerged in the broth. Allow the stew to simmer for another 20-25 minutes, or until the vegetables are tender.
- Season the Stew: After the vegetables are cooked through, add the chopped bell pepper, cilantro, and ground cumin to the pot. Season with salt and pepper to taste. Allow the Sancocho to simmer for an additional 10 minutes to let the flavors meld together.
- Serve: Once cooked, remove the pot from heat. Ladle the Sancocho into bowls, making sure each serving has a good mix of meat and vegetables. Serve with lime wedges on the side for squeezing over the stew. Enjoy with rice or avocado if desired.
Extra Tips
When making Sancocho, feel free to customize the recipe by adding or substituting different meats or vegetables based on your preference or seasonal availability.
For a spicier kick, consider adding some chopped jalapeños or a splash of hot sauce. Additionally, letting the Sancocho sit for a few hours or overnight in the refrigerator will deepen the flavors, making it taste even better the next day.
Enjoy this delightful stew with family and friends, and don’t hesitate to experiment with variations to make it your own!
Chiles En Nogada
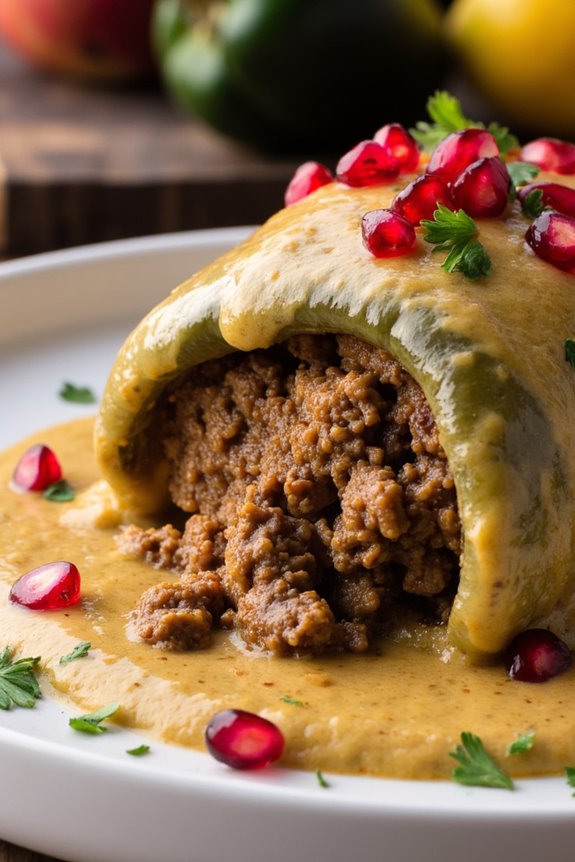
Chiles En Nogada is a traditional Mexican dish that beautifully showcases the colors of the Mexican flag with its green, white, and red presentation. This dish is typically served during the Mexican Independence Day celebrations in September, but it can be enjoyed year-round thanks to its rich flavors and unique combination of ingredients. The main components of the dish are poblano peppers stuffed with a savory-sweet mixture of meat, fruits, and spices, all topped with a creamy walnut sauce and sprinkled with pomegranate seeds for an exquisite finish.
The origins of Chiles En Nogada can be traced back to the 1820s, created in honor of Agustín de Iturbide, a hero of Mexico’s independence. This dish encapsulates the spirit of Mexican cuisine, blending a variety of textures and flavors that tantalize the palate. The sweetness of the sauce, the warmth of the spices, and the freshness of the pomegranate create a truly memorable dining experience.
Ingredients (Serves 4-6)
- 6 large poblano peppers
- 1 lb ground beef (or pork)
- 1 cup diced tomatoes
- 1 medium onion, finely chopped
- 2 cloves garlic, minced
- 1/2 cup diced peaches
- 1/2 cup diced pears
- 1/2 cup raisins
- 1/2 teaspoon cinnamon
- 1/2 teaspoon cumin
- Salt and pepper to taste
- 1 cup walnuts, soaked in water for 2 hours
- 1 cup milk
- 1/4 cup sugar
- 1/4 teaspoon vanilla extract
- 1 cup pomegranate seeds
- Fresh parsley, chopped for garnish
Cooking Instructions
- Prepare the Poblano Peppers: Start by roasting the poblano peppers over an open flame or under a broiler until their skin is charred and blistered. Once roasted, place them in a plastic bag or covered bowl for about 10 minutes to steam. This will make peeling the skin easier. After steaming, carefully peel off the skin, make a slit on one side of each pepper, and remove the seeds.
- Cook the Filling: In a large skillet, heat a tablespoon of oil over medium heat. Add the chopped onion and minced garlic, sautéing until they become translucent. Then, add the ground meat, breaking it apart with a spoon. Cook until the meat is browned. Stir in the diced tomatoes, peaches, pears, raisins, cinnamon, cumin, salt, and pepper. Let the mixture simmer for about 10-15 minutes until the flavors meld together and the fruits soften slightly.
- Stuff the Peppers: Once the filling is cooked, carefully stuff each roasted poblano pepper with the meat mixture, ensuring they’re generously filled. Place the stuffed peppers in a baking dish, ready for the walnut sauce.
- Make the Walnut Sauce: Drain the soaked walnuts and place them in a blender. Add the milk, sugar, and vanilla extract, blending until smooth and creamy. If the sauce is too thick, you can add more milk to reach the desired consistency.
- Assemble and Serve: Pour the walnut sauce over the stuffed peppers in the baking dish, ensuring they’re well coated. Garnish with pomegranate seeds and chopped parsley for a pop of color. Serve immediately, and enjoy this festive dish while it’s warm!
Extra Tips
When preparing Chiles En Nogada, it’s important to use ripe fruits for the filling, as they add natural sweetness and enhance the overall flavor of the dish. Additionally, if you’re short on time, the filling can be made a day in advance, allowing the flavors to deepen overnight. Just be sure to reheat it before stuffing the peppers.
Also, for a vegetarian version, you can substitute the meat with a mixture of mushrooms, lentils, and additional vegetables for a hearty alternative. Enjoy the vibrant flavors and history behind this iconic dish!
Mohinga
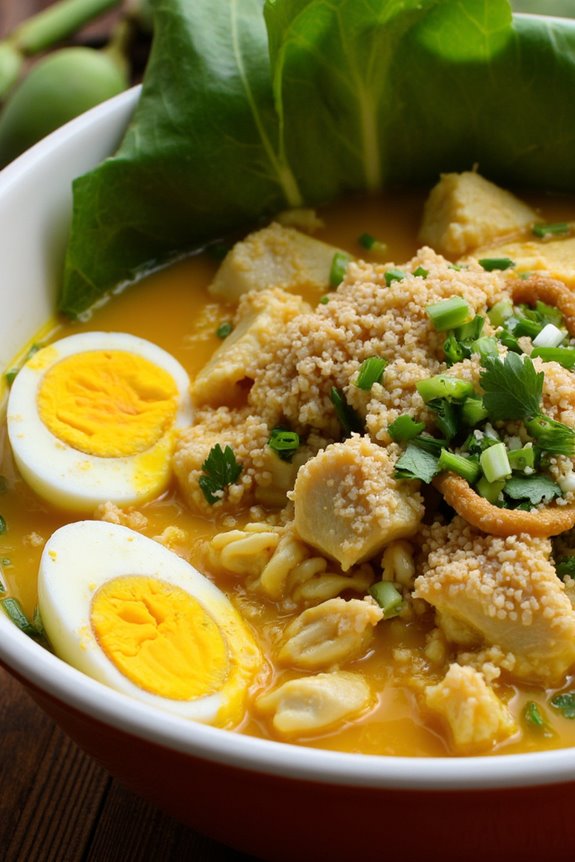
Mohinga is a beloved traditional dish from Myanmar, often considered the national dish of the country. This aromatic fish soup is typically enjoyed as a breakfast item, though its savory and rich flavors make it a perfect meal at any time of the day. The dish is characterized by its unique combination of ingredients that create a harmonious balance of flavors, including fish, lemongrass, and rice noodles.
It’s often garnished with a variety of toppings that add texture and freshness, making mohinga a favorite for both locals and visitors alike. The beauty of mohinga lies in its versatility. While the base recipe remains consistent, variations may include different types of fish, additional vegetables, or varying levels of spiciness.
The heart of the dish is the broth, which is simmered to perfection, allowing the flavors to meld together beautifully. Whether you’re familiar with Burmese cuisine or trying it for the first time, this recipe will guide you in creating an authentic and delicious bowl of mohinga that’s sure to impress.
Ingredients (serves 4-6):
- 500g catfish (or any white fish)
- 200g rice noodles
- 1 tablespoon vegetable oil
- 1 onion, finely chopped
- 2 cloves garlic, minced
- 1 stalk lemongrass, chopped
- 1 teaspoon ginger, grated
- 1 teaspoon turmeric powder
- 6 cups water or fish stock
- 1 tablespoon fish sauce
- 2 tablespoons lime juice
- 1 teaspoon salt
- 1 tablespoon sugar
- 2 boiled eggs, halved (for garnish)
- Fresh cilantro, chopped (for garnish)
- Green onions, chopped (for garnish)
- Crispy fried garlic (for garnish)
- Banana leaf or lettuce leaves (for serving)
Cooking Instructions:
- Prepare the Fish: Start by cleaning the fish thoroughly. If using catfish, remove the skin and cut the fish into chunks. Set aside. This step guarantees that the fish is ready to be cooked evenly in the broth.
- Cook the Noodles: In a separate pot, bring water to a boil and cook the rice noodles according to package instructions. Once cooked, drain and set aside. This will allow the noodles to absorb the flavors of the soup when served.
- Make the Broth: In a large pot, heat the vegetable oil over medium heat. Add the chopped onion, minced garlic, chopped lemongrass, and grated ginger. Sauté until the onions are translucent and fragrant, about 3-5 minutes. This step builds a flavorful base for the broth.
- Add Spices and Water: Stir in the turmeric powder, then add the water or fish stock. Bring the mixture to a boil. This will infuse the broth with the rich flavors of the spices and aromatics.
- Simmer the Fish: Once boiling, reduce the heat to low and add the fish pieces to the pot. Allow the fish to simmer gently for about 10-15 minutes or until cooked through. This guarantees the fish is tender and imparts its flavor into the broth.
- Season the Broth: Stir in the fish sauce, lime juice, salt, and sugar. Taste and adjust the seasoning if necessary. This final step balances the flavors and adds depth to the broth.
- Assemble the Dish: To serve, place a portion of the cooked rice noodles in a bowl, ladle the hot fish broth over the noodles, and top with halved boiled eggs, chopped cilantro, green onions, and crispy fried garlic. This creates a beautiful presentation and enhances the flavor profile of the dish.
- Serve Immediately: Serve the mohinga hot, optionally accompanied by banana leaves or lettuce leaves for an authentic touch. Enjoy your meal while it’s fresh and warm!
Extra Tips:
When making mohinga, feel free to experiment with the type of fish used, as different varieties can lend distinct flavors to the broth. Additionally, if you prefer a thicker soup, consider blending a portion of the broth with some of the fish to create a creamier texture.
Finally, serving mohinga with a selection of condiments, such as chili flakes or extra lime, allows each person to customize their bowl to their liking. Enjoy the process of making this flavorful dish, and don’t forget to savor every bite!
Dulce De Leche
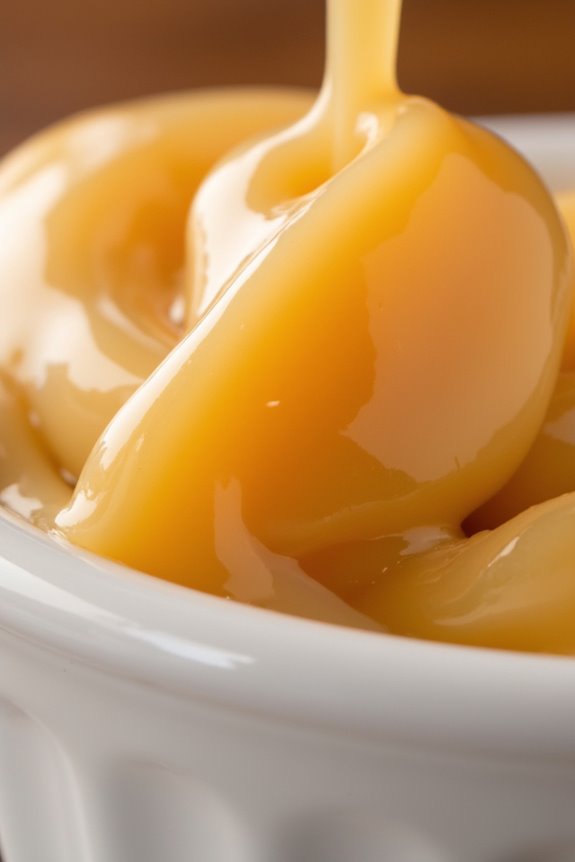
Dulce de leche is a creamy, caramel-like sauce that’s a beloved treat across South America, particularly in countries like Argentina, Uruguay, and Chile. Made from just two simple ingredients, this rich confection is perfect for drizzling over desserts, spreading on toast, or enjoying straight from the jar. Its name translates to “sweet milk,” and the process of making it involves slowly simmering milk and sugar until it thickens and takes on a deep golden hue.
This versatile treat can be enjoyed in various forms, from a filling in pastries to a topping for ice cream or pancakes. Although it takes some time to prepare, the result is undeniably worth the effort. With a little patience and the right technique, you can create a delicious homemade dulce de leche that will impress your family and friends.
Ingredients (serving size: 4-6 people):
- 4 cups whole milk
- 1 cup granulated sugar
- 1/2 teaspoon baking soda
- 1 teaspoon vanilla extract (optional)
Cooking Instructions:
- Combine Ingredients: In a heavy-bottomed saucepan, combine the whole milk, granulated sugar, and baking soda. The baking soda helps to prevent the milk from curdling and gives the dulce de leche its rich color.
- Heat Mixture: Place the saucepan over medium heat and stir the mixture constantly until the sugar is completely dissolved. Be careful not to let the milk boil at this stage, as you want to gradually bring it to a simmer.
- Simmer: Once the mixture reaches a simmer, reduce the heat to low. Continue to stir frequently to prevent the milk from sticking to the bottom of the pan. Allow the mixture to simmer gently for about 1 to 1.5 hours, or until it thickens and changes to a light caramel color.
- Watch for Thickness: As the dulce de leche cooks, keep an eye on its consistency. It should be thick enough to coat the back of a spoon. If you prefer a thicker consistency, you can continue cooking it for an additional 10-15 minutes.
- Add Flavor: Once the desired thickness is achieved, remove the saucepan from the heat and stir in the vanilla extract if using. This step adds an extra layer of flavor to the dulce de leche.
- Cool and Store: Allow the dulce de leche to cool slightly before transferring it to a clean glass jar or airtight container. It will continue to thicken as it cools. Store it in the refrigerator for up to a month.
Extra Tips: When making dulce de leche, patience is key. Don’t rush the cooking process, as quick cooking can result in a grainy texture. If you notice any lumps while cooking, you can use an immersion blender to smooth it out. Additionally, make sure to stir frequently to prevent burning, especially as it thickens. Enjoy experimenting with different uses for your homemade dulce de leche!
Pisco Sour

Pisco Sour is a classic South American cocktail that hails from Peru, renowned for its invigorating taste and smooth texture. Made with pisco, a grape brandy produced in the winemaking regions of Peru and Chile, this cocktail blends citrusy flavors with a frothy top, thanks to egg white. The combination of sweet, sour, and a hint of bitterness from the Angostura bitters creates a uniquely balanced drink that’s perfect for any occasion.
Whether you’re hosting a party or simply looking to enjoy a delightful drink at home, mastering the Pisco Sour will surely impress your guests.
To create the perfect Pisco Sour, it’s important to use high-quality ingredients, starting with a good pisco. The cocktail is typically served chilled in a coupe glass and garnished with a few dashes of bitters, which not only adds visual appeal but also enhances the flavor profile. This cocktail embodies the spirit of South American culture and is a must-try for anyone looking to explore the region’s culinary delights.
Ingredients (serving size: 4-6 people)
- 1 cup pisco
- 1/2 cup freshly squeezed lime juice
- 1/2 cup simple syrup (1 part water, 1 part sugar)
- 2 egg whites
- Ice cubes
- Angostura bitters (for garnish)
- Lime slices (for garnish)
Instructions
- Prepare Simple Syrup: In a small saucepan, combine equal parts water and sugar. Heat over medium heat, stirring occasionally until the sugar fully dissolves. Allow the simple syrup to cool before using it in the cocktail.
- Mix Ingredients: In a cocktail shaker, add the pisco, freshly squeezed lime juice, simple syrup, and egg whites. It’s essential to use fresh lime juice for the best flavor, so squeeze the limes right before mixing.
- Dry Shake: Before adding ice, perform a “dry shake” by sealing the shaker and shaking vigorously for about 15 seconds. This step helps to emulsify the egg whites, creating a frothy texture in the final cocktail.
- Add Ice and Shake: Open the shaker and fill it with ice cubes. Seal the shaker again and shake vigorously for another 15-20 seconds. This chilling process will prepare your cocktail for serving.
- Strain and Serve: Using a fine mesh strainer, pour the mixture into chilled coupe glasses. This will guarantee a smooth and frothy texture without any ice shards.
- Garnish: Add a few dashes of Angostura bitters on top of the froth for flavor and visual appeal. Optionally, you can garnish with a slice of lime on the rim of the glass.
Extra Tips
When making a Pisco Sour, it’s vital to use fresh ingredients for the best taste, especially the lime juice. If you’re concerned about using raw egg whites, consider using pasteurized egg whites or an egg white substitute for safety.
Additionally, feel free to adjust the sweetness by modifying the amount of simple syrup according to your taste preferences. Enjoy your cocktail chilled and serve it immediately for the best experience!
Locro

Locro is a traditional South American stew that showcases the rich culinary heritage of the Andes, particularly popular in Argentina, Bolivia, and Ecuador. This hearty dish is often served during national holidays and special occasions, as it brings together various ingredients that symbolize comfort and community.
The base of locro consists of corn, potatoes, and a variety of meats, typically served with a sprinkle of spices and herbs that elevate its flavor profile. Each region has its own variations, allowing for personal touches that reflect local tastes and ingredients.
Making locro isn’t only about the ingredients but also about the process. The slow cooking method allows the flavors to meld beautifully, resulting in a rich and satisfying meal. It’s perfect for sharing with friends and family, making it a popular choice for gatherings.
Whether you’re celebrating a festive occasion or simply craving a warm and filling dish, locro is a fantastic choice that will surely delight your taste buds.
Ingredients (serving size: 4-6 people):
- 1 cup of dried hominy corn
- 2 medium potatoes, peeled and cubed
- 1 medium onion, chopped
- 2 cloves of garlic, minced
- 1 carrot, chopped
- 1 cup of pumpkin or squash, cubed
- 200g of chorizo sausage, sliced
- 200g of beef, cut into bite-sized pieces
- 1 bay leaf
- 1 teaspoon of paprika
- Salt and pepper to taste
- Fresh parsley, chopped (for garnish)
- 6 cups of water or beef broth
Cooking Instructions:
- Soak the Corn: Begin by soaking the dried hominy corn in water overnight. This step is essential as it helps to soften the corn and reduces cooking time. Drain and rinse the corn before using.
- Prepare the Base: In a large pot, heat a little oil over medium heat. Add the chopped onion and minced garlic, sautéing until they become translucent and fragrant, around 5 minutes. This will form a flavorful base for your locro.
- Brown the Meats: Add the sliced chorizo and beef to the pot. Cook until the meat is browned on all sides, about 6-8 minutes. Browning the meat adds depth to the flavor of the stew.
- Add Vegetables and Spices: Stir in the chopped carrot, pumpkin (or squash), and cubed potatoes. Add the soaked hominy corn, bay leaf, paprika, salt, and pepper. Mix everything well to combine the ingredients.
- Simmer the Stew: Pour in the water or beef broth and bring the mixture to a boil. Once boiling, reduce the heat to low and cover the pot. Allow the locro to simmer for about 1.5 to 2 hours, stirring occasionally, until the corn and potatoes are tender and the flavors have melded together.
- Final Seasoning and Serve: Taste the stew and adjust the seasoning with salt and pepper as needed. Remove the bay leaf before serving. Ladle the locro into bowls and garnish with fresh parsley.
Extra Tips: For an even richer flavor, consider adding a smoked meat, such as smoked beef or bacon, to the stew. If you prefer a vegetarian version, you can omit the meat and use vegetable broth, adding more vegetables or beans for protein.
Locro can also be made in advance and tastes even better the next day, making it an excellent option for meal prep.
Tacos Al Pastor

Tacos Al Pastor is a delicious Mexican street food that has its roots in the culinary traditions of Lebanese immigrants who brought their shawarma techniques to Mexico. The dish features marinated pork that’s cooked on a vertical spit, known as a trompo, and is typically served in small corn tortillas.
With its vibrant flavors from spices and pineapple, Tacos Al Pastor has become a beloved staple in Mexican cuisine, often garnished with onions, cilantro, and fresh salsa.
Making Tacos Al Pastor at home is a rewarding experience that allows you to savor the authentic taste of this classic dish. The marinated pork is tender and juicy, while the fresh toppings add a burst of flavor. This recipe serves 4 to 6 people, making it perfect for a family dinner or a gathering with friends. Get ready to impress your guests with this mouthwatering dish!
Ingredients (Serves 4-6):
- 2 pounds pork shoulder, thinly sliced
- 1 cup pineapple, diced
- 1/2 cup onion, finely chopped
- 1/2 cup fresh cilantro, chopped
- 8-10 small corn tortillas
- 3 cloves garlic, minced
- 1/4 cup orange juice
- 1/4 cup vinegar (white or apple cider)
- 2 tablespoons adobo sauce (from canned chipotle peppers)
- 1 tablespoon chili powder
- 1 teaspoon cumin
- 1 teaspoon dried oregano
- Salt and pepper to taste
- Lime wedges (for serving)
Cooking Instructions:
- Prepare the Marinade: In a large bowl, combine the minced garlic, orange juice, vinegar, adobo sauce, chili powder, cumin, oregano, salt, and pepper. Mix well to create a marinade that will infuse the pork with flavor.
- Marinate the Pork: Add the thinly sliced pork shoulder to the marinade, ensuring each piece is well coated. Cover the bowl with plastic wrap and refrigerate for at least 2 hours, or preferably overnight. This allows the flavors to penetrate the meat deeply.
- Cook the Pork: Preheat your grill or stovetop grill pan over medium-high heat. Remove the marinated pork from the fridge and let it come to room temperature. Grill the pork slices for about 4-5 minutes on each side, or until they’re cooked through and slightly charred. If using a trompo, layer the meat on the spit and cook it vertically.
- Prepare the Toppings: While the pork is cooking, chop the onion and cilantro, and prepare the diced pineapple. These will serve as fresh toppings for your tacos.
- Warm the Tortillas: In a separate pan, warm the corn tortillas on medium heat for about 30 seconds on each side until they’re soft and pliable. Keep them warm by wrapping them in a clean kitchen towel.
- Assemble the Tacos: Once the pork is cooked, slice it into bite-sized pieces. Place a generous portion of the meat on each tortilla, followed by the chopped onion, cilantro, and diced pineapple. Squeeze fresh lime juice over the top for added flavor.
- Serve and Enjoy: Serve the tacos immediately with extra lime wedges and your favorite salsa on the side. Enjoy the delicious flavors of Tacos Al Pastor with family and friends!
Extra Tips:
For an authentic taste, consider using a vertical spit (trompo) to cook the pork, as it allows the meat to cook evenly and develop a crispy outer layer.
If you don’t have a trompo, grilling or broiling the marinated pork works well too. Additionally, feel free to customize your toppings according to your preference; diced avocados or pickled jalapeños can add even more flavor.
Finally, using fresh, quality ingredients will greatly enhance the overall taste of your Tacos Al Pastor. Enjoy your cooking experience!
Choclo Con Queso

Choclo con queso is a traditional South American dish that highlights the delightful combination of corn and cheese. Originating from the Andean regions, this dish celebrates the natural sweetness of fresh corn, often referred to as “choclo” in Spanish. The dish isn’t only a staple in various South American countries but also brings a taste of nostalgia for many who grew up enjoying it.
Whether served as a side dish or a light meal, choclo con queso is both comforting and satisfying. This dish is incredibly simple to prepare yet delivers a burst of flavor that can elevate any meal. The key to a successful choclo con queso lies in selecting the freshest corn and the right type of cheese. The creamy, melted cheese pairs beautifully with the tender, sweet kernels, creating a delightful harmony of flavors.
Perfect for gatherings or family dinners, choclo con queso is sure to become a favorite.
Ingredients (Serves 4-6)
- 4 cups fresh corn kernels (or 4-6 ears of choclo)
- 1 ½ cups queso fresco or mozzarella cheese, crumbled or shredded
- ½ cup milk
- 4 tablespoons butter
- 1 teaspoon salt
- ¼ teaspoon black pepper
- ¼ teaspoon paprika (optional)
- Fresh cilantro or parsley for garnish (optional)
Cooking Instructions
- Prepare the Corn: If using fresh corn, shuck the ears and remove the kernels with a sharp knife. You should have about 4 cups of corn kernels. If using frozen corn, make sure it’s thawed and drained.
- Cook the Corn: In a large pot, bring water to a boil and add a pinch of salt. Add the corn kernels and cook for about 5-7 minutes until tender. Drain the corn and set aside.
- Combine Ingredients: In a large mixing bowl, combine the cooked corn, crumbled or shredded cheese, milk, butter, salt, black pepper, and paprika (if using). Mix well until all ingredients are thoroughly combined.
- Transfer to Baking Dish: Preheat your oven to 350°F (175°C). Pour the corn and cheese mixture into a greased baking dish, spreading it evenly.
- Bake: Place the baking dish in the preheated oven and bake for 25-30 minutes, or until the cheese is melted and bubbly, and the top is golden brown.
- Garnish and Serve: Once out of the oven, let it cool for a few minutes. Garnish with fresh cilantro or parsley if desired. Serve warm as a side dish or a light meal.
Extra Tips
When preparing choclo con queso, the quality of your ingredients can greatly impact the flavor. Opt for the freshest corn available, as it will enhance the sweetness of the dish.
If you can’t find queso fresco, mozzarella is a great alternative, but consider adding a sprinkle of grated Parmesan for extra flavor. For a spicier kick, you can mix in some diced jalapeños or a dash of hot sauce. Enjoy this dish fresh out of the oven for the best texture and taste!