

Chilean cuisine is a delightful journey through flavors that are both comforting and vibrant. Each dish, from the hearty Pastel De Choclo to the irresistible Empanadas, offers a taste of Chile’s rich culture and tradition. If you’re looking to add a touch of South America to your kitchen, these recipes are a must-try. Let’s explore some Chilean favorites that are sure to inspire your next cooking adventure. Get ready to enjoy the essence of Chile with every bite!
Pastel De Choclo

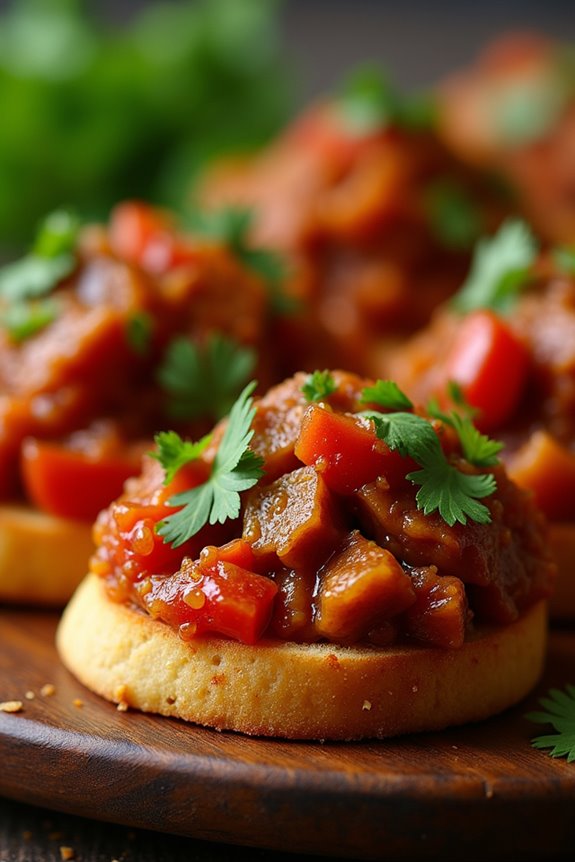
Pastel de Choclo is a beloved traditional Chilean dish that beautifully showcases the country’s abundant corn harvest. This savory corn pie is a comforting blend of flavors, featuring a layer of spiced ground meat, a mix of onions, olives, and hard-boiled eggs, all topped with a sweet corn puree.
It’s a perfect dish for family gatherings or special occasions, as it brings people together over a hearty meal that’s both satisfying and flavorful. This dish not only highlights the sweetness of corn but also incorporates various textures and tastes, making it an exciting option for anyone looking to explore Chilean cuisine.
The combination of the corn topping with the savory filling creates a delightful contrast that will have everyone coming back for seconds. Now, let’s explore the ingredients and cooking instructions to recreate this delicious Pastel de Choclo at home!
Ingredients (serving size: 4-6 people)
- 4 cups of sweet corn kernels (fresh or frozen)
- 1 cup of milk
- 2 tablespoons of butter
- 1 teaspoon of sugar
- 1 teaspoon of salt
- 1 pound of ground beef
- 1 large onion, finely chopped
- 2 cloves of garlic, minced
- 1 teaspoon of paprika
- 1 teaspoon of cumin
- 1 cup of black olives, pitted and sliced
- 2 hard-boiled eggs, chopped
- Fresh basil or parsley for garnish (optional)
Cooking Instructions
- Prepare the Corn Mixture: In a blender or food processor, combine the sweet corn kernels, milk, butter, sugar, and salt. Blend until smooth and creamy. This will serve as the sweet corn topping for your pastel. Set aside.
- Cook the Meat Filling: In a large skillet over medium heat, add the ground beef. Cook until browned, breaking it up with a spatula. Drain any excess fat. Add the chopped onion and minced garlic to the skillet. Sauté until the onion is translucent and fragrant, about 5 minutes.
- Season the Meat: Stir in the paprika and cumin, mixing well to combine. Allow the spices to infuse the meat for another minute. Add the sliced black olives and chopped hard-boiled eggs to the meat mixture, stirring gently to combine all ingredients. Remove from heat.
- Assemble the Pastel: Preheat your oven to 375°F (190°C). In a greased baking dish, layer the meat filling evenly at the bottom. Spoon the corn mixture over the top, spreading it out to cover the meat completely.
- Bake the Dish: Place the assembled pastel in the preheated oven and bake for about 30-40 minutes or until the top is golden brown and slightly crisp. You may want to broil it for the last 5 minutes for an extra crispy top.
- Serve: Remove the pastel from the oven and let it sit for a few minutes before slicing. Garnish with fresh basil or parsley if desired, and serve hot.
Extra Tips
When preparing Pastel de Choclo, feel free to customize the filling to your taste. You can include additional vegetables such as bell peppers or even swap the ground beef for chicken or a vegetarian alternative.
For a more complex flavor, consider adding a touch of chili powder for some heat or a splash of red wine while cooking the meat. Enjoy this dish with a side salad for a complete meal!
Empanadas

Chilean Empanadas are a beloved traditional dish that brings together a delicious filling encased in a flaky pastry, making them a perfect snack or meal option. These savory pastries can be filled with a variety of ingredients, but the most popular version includes a mixture of ground beef, onions, olives, hard-boiled eggs, and spices.
The empanadas are often baked to golden perfection, resulting in a crispy outer layer and a flavorful filling that’s bound to delight the taste buds.
Making Chilean Empanadas can be a fun and rewarding experience, perfect for gatherings or family dinners. This dish isn’t only versatile but also allows for creativity in the kitchen, as you can easily adjust the filling to suit your preferences.
With a little preparation, you can enjoy homemade empanadas that are just as good as those found in a traditional Chilean eatery.
Ingredients (serves 4-6 people):
- 2 cups all-purpose flour
- 1/2 teaspoon salt
- 1/2 cup unsalted butter, chilled and diced
- 1/4 cup cold water
- 1 pound ground beef
- 1 medium onion, finely chopped
- 2 hard-boiled eggs, chopped
- 1/2 cup black olives, chopped
- 1 teaspoon cumin
- 1 teaspoon paprika
- Salt and pepper to taste
- 1 egg, beaten (for egg wash)
Cooking Instructions:
1. Prepare the Dough: In a large mixing bowl, combine the flour and salt. Add the diced butter and mix until the mixture resembles coarse crumbs. Gradually add the cold water, mixing until the dough comes together.
Knead the dough on a lightly floured surface for about 5 minutes until smooth. Wrap in plastic wrap and refrigerate for at least 30 minutes.
2. Make the Filling: In a large skillet, heat a tablespoon of oil over medium heat. Add the chopped onion and sauté until translucent, about 5 minutes.
Add the ground beef, breaking it apart as it cooks. Season with cumin, paprika, salt, and pepper. Cook until the beef is browned and cooked through. Remove from heat and stir in the chopped hard-boiled eggs and olives. Allow the filling to cool.
3. Roll Out the Dough: After the dough has chilled, divide it into 8 equal pieces. On a floured surface, roll each piece into a circle about 1/8 inch thick.
Confirm the circles are large enough to hold a generous amount of filling (about 3 to 4 inches in diameter).
4. Fill the Empanadas: Preheat the oven to 400°F (200°C). Place a generous tablespoon of the beef filling in the center of each dough circle.
Fold the dough over the filling to create a half-moon shape. Press the edges together to seal, then crimp the edges with a fork or your fingers to make sure they’re secure.
5. Bake the Empanadas: Place the empanadas on a baking sheet lined with parchment paper. Brush the tops with the beaten egg for a golden finish.
Bake in the preheated oven for 20-25 minutes, or until the empanadas are golden brown.
6. Serve: Remove the empanadas from the oven and let them cool slightly before serving. Enjoy them warm, perhaps with a side of pebre (a Chilean salsa) for added flavor.
Extra Tips:
When making empanadas, feel free to experiment with different fillings such as chicken, cheese, or vegetables to suit dietary preferences.
If you’re short on time, you can also use store-bought pastry dough to speed up the process. Additionally, for an extra crispy texture, consider frying the empanadas instead of baking them.
Just make sure to adjust the cooking time accordingly, and always monitor the temperature of the oil to prevent burning. Enjoy your culinary adventure with this classic Chilean dish!
Ceviche
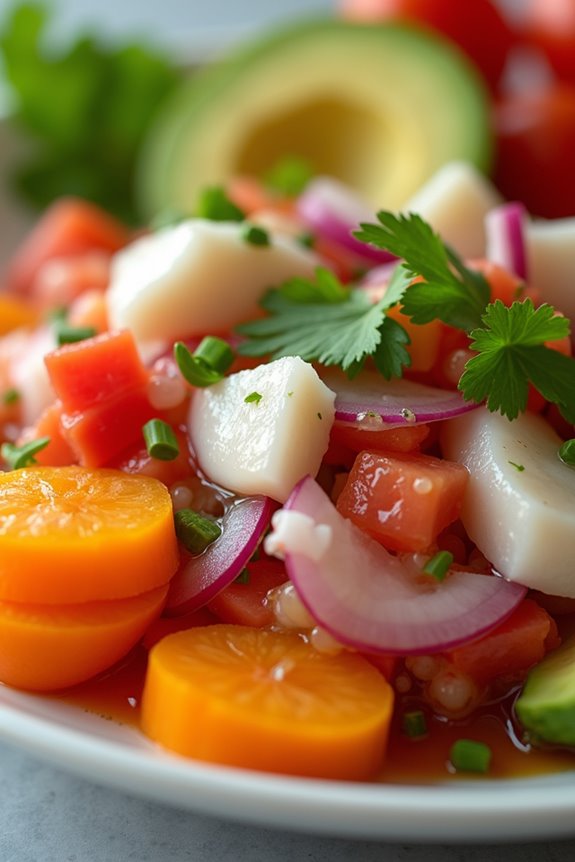
Ceviche is a quintessential Chilean dish that showcases the country’s rich maritime heritage. This invigorating seafood delicacy combines fresh fish or shellfish, typically marinated in citrus juices, with a medley of vegetables and herbs. The acidity of the lime or lemon juice “cooks” the fish, resulting in a bright and zesty flavor that’s perfect for warm weather or as a light appetizer.
Often served with a side of avocado or sweet potato, ceviche isn’t only delicious but also packed with nutrients, making it a favorite among health-conscious eaters.
The preparation of ceviche is relatively simple, yet it requires the freshest ingredients to truly shine. Traditionally, white fish such as corvina or tilapia is used, but you can also substitute with shrimp or scallops, depending on your preference.
The key to a successful ceviche lies in balancing the flavors of the marinade—citrus, spice, and aromatics—while ensuring that the fish isn’t over-marinated, which can lead to a rubbery texture.
Ingredients (Serves 4-6):
- 1 lb fresh white fish (such as corvina or tilapia), diced
- 1 cup fresh lime juice
- 1 small red onion, thinly sliced
- 1 medium tomato, diced
- 1 jalapeño or serrano chili, finely chopped (optional for spice)
- 1/2 cup fresh cilantro, chopped
- Salt, to taste
- Freshly ground black pepper, to taste
- 1 avocado, diced (for serving)
- Sweet potato, boiled and sliced (for serving)
Cooking Instructions:
- Prepare the Fish: Start by selecting the freshest fish available. Rinse the fish under cold water, pat it dry with paper towels, and then dice it into small, bite-sized pieces. Place the diced fish in a glass or ceramic bowl; avoid using metal containers as they can react with the citrus.
- Marinate the Fish: Pour the fresh lime juice over the diced fish, ensuring it’s fully submerged. The acidity of the lime juice is what “cooks” the fish, so make sure to cover the bowl with plastic wrap. Refrigerate for about 30 minutes to 1 hour, depending on how “cooked” you prefer the fish. The fish should turn opaque and firm as it marinates.
- Prepare the Vegetables: While the fish is marinating, thinly slice the red onion and dice the tomato. If you like some heat, finely chop the jalapeño or serrano chili. The freshness of these vegetables will add a nice crunch to the ceviche.
- Combine Ingredients: Once the fish has marinated, remove it from the refrigerator. Drain some of the lime juice if the mixture is too acidic for your taste. Add the sliced red onion, diced tomato, chopped chili (if using), and cilantro to the bowl with the fish. Gently fold everything together to combine, being careful not to break the fish apart.
- Season and Serve: Season the ceviche with salt and freshly ground black pepper to taste. Serve the ceviche chilled, garnished with diced avocado and alongside boiled sweet potato slices. This adds a creamy texture and sweetness that complements the tangy ceviche beautifully.
Extra Tips:
To achieve the best flavor and texture in your ceviche, always use the freshest seafood available, preferably the same day it’s caught. If you’re unsure about the freshness, ask your fishmonger for recommendations.
Additionally, feel free to customize your ceviche with other ingredients like mango or cucumber for a delightful twist. For those who prefer a milder flavor, you can reduce the amount of lime juice and add a splash of orange juice for a sweeter profile.
Enjoy your ceviche with crispy tortilla chips or plantain chips for an added crunch!
Asado
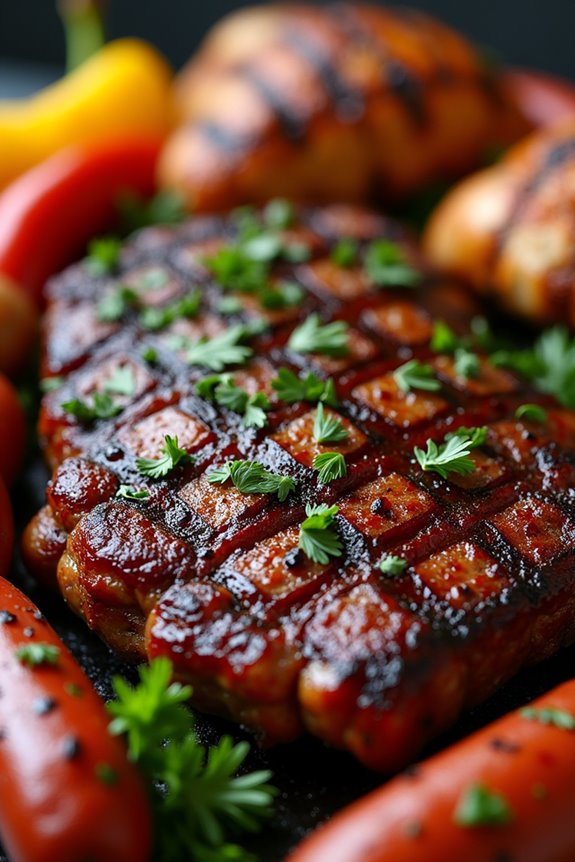
Asado is a traditional Chilean barbecue that brings friends and family together to enjoy a delightful feast. It typically features various cuts of meat, often accompanied by side dishes and sauces that enhance the flavors of the grilled items. The experience of cooking asado is just as important as the food itself, as it often involves gathering around the grill, sharing stories, and enjoying good company.
Whether you’re a seasoned grill master or a novice, preparing an asado is sure to create lasting memories.
The heart of an asado is its variety of meats, which are marinated, seasoned, and cooked over an open flame or charcoal for a smoky, savory flavor. In Chile, it’s common to include cuts like beef short ribs, sausages, and even chicken. Each family has their own special recipes and techniques, making every asado unique.
This recipe is designed to serve 4-6 people and will guide you through the preparation and cooking process, guaranteeing your asado is a hit.
Ingredients
- 2 lbs beef short ribs
- 1 lb chorizo sausage
- 1 lb chicken thighs (bone-in, skin-on)
- 4 cloves garlic, minced
- 1 tablespoon salt
- 1 teaspoon black pepper
- 2 teaspoons paprika
- 1 tablespoon olive oil
- 1 lemon, juiced
- Fresh parsley, chopped (for garnish)
Cooking Instructions
- Prepare the Marinade: In a large bowl, combine the minced garlic, salt, black pepper, paprika, olive oil, and lemon juice. Mix well to create a marinade. This mixture will infuse the meats with flavor and help tenderize them.
- Marinate the Meat: Add the beef short ribs, chorizo, and chicken thighs to the marinade. Make sure each piece of meat is well-coated. Cover the bowl with plastic wrap and let it marinate in the refrigerator for at least 2 hours, or preferably overnight for maximum flavor.
- Prepare the Grill: Preheat your grill to medium-high heat. If using charcoal, allow the coals to turn white and ashy. This guarantees a steady and efficient cooking temperature.
- Grill the Meats: Start by placing the beef short ribs on the grill, cooking them for about 4-5 minutes on each side. Next, add the chorizo sausage and chicken thighs to the grill. Cook the sausages until they’re browned and cooked through (about 6-8 minutes), and the chicken thighs until they reach an internal temperature of 165°F (about 7-10 minutes per side).
- Rest and Serve: Once all the meats are cooked, remove them from the grill and let them rest for about 5-10 minutes. This allows the juices to redistribute, making the meat more tender.
- Garnish and Enjoy: After resting, slice the meats and arrange them on a serving platter. Garnish with freshly chopped parsley and serve with your favorite sides, such as a fresh salad, grilled vegetables, or pebre sauce.
Extra Tips
When preparing your asado, feel free to experiment with different cuts of meat and marinades based on your personal taste. You can also add vegetables like bell peppers, onions, or corn to the grill for a colorful and delicious side.
Remember to keep an eye on the grill temperature, as it can vary; adjust the heat as needed to guarantee even cooking. Finally, don’t forget to enjoy the process and the company of those gathered around with you!
Completo

Completo is a beloved Chilean street food that has gained popularity for its delicious combination of flavors and textures. This iconic hot dog is more than just your average sausage in a bun; it’s a delightful medley of toppings that elevates it to a culinary experience. Traditionally, a Completo is topped with a generous helping of avocados, mayonnaise, sauerkraut, and diced tomatoes, creating a satisfying dish that’s both savory and invigorating.
The beauty of Completo lies in its versatility, allowing you to customize it according to your taste preferences. Whether you’re a fan of spicy toppings or prefer a milder flavor profile, the Completo can be adapted to suit your palate. Serving this dish at a barbecue or family gathering is sure to impress your guests and transport them to the streets of Chile.
Ingredients (serving size: 4-6 people):
- 4-6 hot dog sausages
- 4-6 hot dog buns
- 2 ripe avocados
- 1 cup mayonnaise
- 1 cup sauerkraut
- 1 cup diced tomatoes
- 1/2 cup chopped onions (optional)
- 1 tablespoon lemon juice
- Salt and pepper to taste
Cooking Instructions:
1. Prepare the Avocado Topping:
Start by halving the avocados, removing the pits, and scooping the flesh into a bowl. Mash the avocado with a fork until smooth, then mix in the lemon juice, salt, and pepper to taste. Set aside.
2. Cook the Sausages:
Grill or boil the hot dog sausages until they’re heated through and have a nice char if grilled. This usually takes about 5-7 minutes on a grill or 8-10 minutes in boiling water. Make certain they’re fully cooked before proceeding.
3. Warm the Buns:
If desired, lightly toast the hot dog buns on the grill or in an oven for a few minutes until they’re warm and slightly crispy. This step adds a pleasant texture to the Completo.
4. Assemble the Completo:
Place a hot dog sausage inside each bun. Start by adding a generous layer of mashed avocado on top of the sausage, followed by a dollop of mayonnaise.
5. Add the Remaining Toppings:
Next, add the sauerkraut and diced tomatoes on top of the mayonnaise. If you like, sprinkle some chopped onions for added flavor.
6. Serve and Enjoy:
Once all toppings are added, serve the Completo immediately while the sausages are still warm. Enjoy your delicious Chilean creation!
Extra Tips:
To enhance your Completo experience, consider adding additional toppings such as sliced jalapeños for heat, or even a drizzle of hot sauce for an extra kick. You can also experiment with different types of sausages, such as chicken or beef, to find your perfect combination.
Finally, don’t forget to have extra napkins on hand, as Completo can get messy but oh-so-delicious!
Pebre
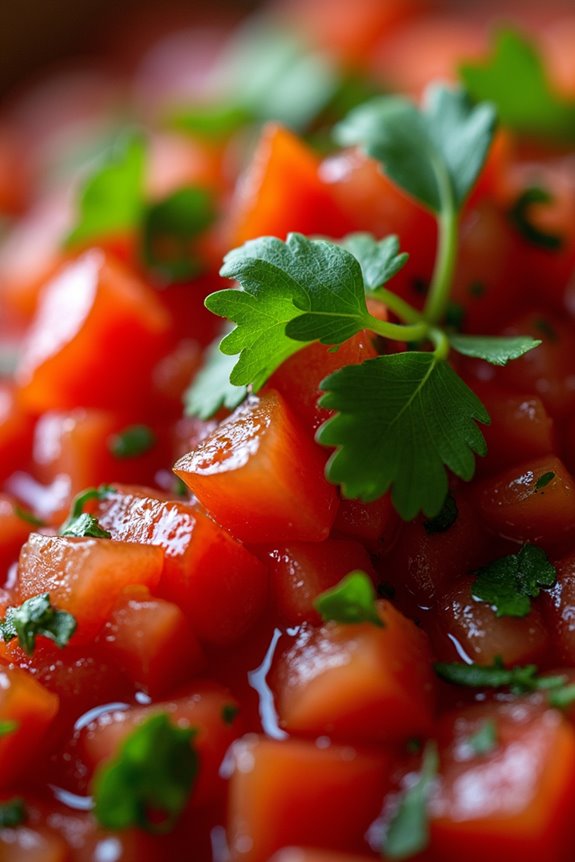
Pebre is a traditional Chilean condiment that adds a burst of flavor to many dishes. This zesty sauce is made primarily from fresh herbs, tomatoes, and a touch of spice, making it an essential accompaniment for a variety of meals, particularly grilled meats and empanadas. Its fresh ingredients and vibrant flavors reflect the rich culinary heritage of Chile, and it embodies the spirit of Chilean cuisine.
Making pebre is simple and requires no cooking, which makes it an ideal addition to summer barbecues or any gathering. The key to a delicious pebre is using fresh, high-quality ingredients, particularly ripe tomatoes and fresh cilantro. Once prepared, this condiment can be served immediately or allowed to marinate for a bit to enhance the flavors further.
Ingredients (Serves 4-6)
- 4 medium ripe tomatoes, finely diced
- 1 small red onion, finely chopped
- 1 cup fresh cilantro, chopped
- 1-2 jalapeño peppers, finely chopped (adjust for desired spice level)
- 2 tablespoons olive oil
- 2 tablespoons red wine vinegar
- Salt and pepper to taste
- Juice of 1 lime (optional)
Cooking Instructions
- Prepare the Vegetables: Begin by washing all your vegetables thoroughly. Dice the tomatoes into small pieces, ensuring to remove excess seeds and juice for a less watery pebre. Finely chop the red onion and jalapeño peppers, making sure to remove the seeds from the jalapeños if you prefer a milder flavor.
- Chop the Cilantro: Rinse the cilantro under cold water and shake off excess moisture. Use a sharp knife to chop the cilantro roughly. This herb is key to the fresh taste of pebre, so be generous with it!
- Mix the Ingredients: In a mixing bowl, combine the diced tomatoes, chopped red onion, cilantro, and jalapeño. Stir gently to combine the ingredients without crushing the tomatoes.
- Add the Dressing: Drizzle the olive oil and red wine vinegar over the mixture. Season with salt and pepper to taste. If you’re using lime juice, add it now for an extra kick of flavor. Mix everything together until well incorporated.
- Let it Rest: Allow the pebre to sit for at least 15-30 minutes before serving. This resting period allows the flavors to meld together beautifully.
- Serve: Serve the pebre alongside grilled meats, as a topping for empanadas, or even with bread. Enjoy the fresh burst of flavors that this Chilean condiment brings to your meal!
Extra Tips
When making pebre, feel free to adjust the ingredients according to your taste preferences. For a smokier flavor, consider adding a bit of smoked paprika or using roasted tomatoes.
If you enjoy more heat, you can include additional jalapeños or even other types of chili peppers. Pebre can be stored in the refrigerator for up to a week, making it a convenient make-ahead option for gatherings.
Porotos Granados
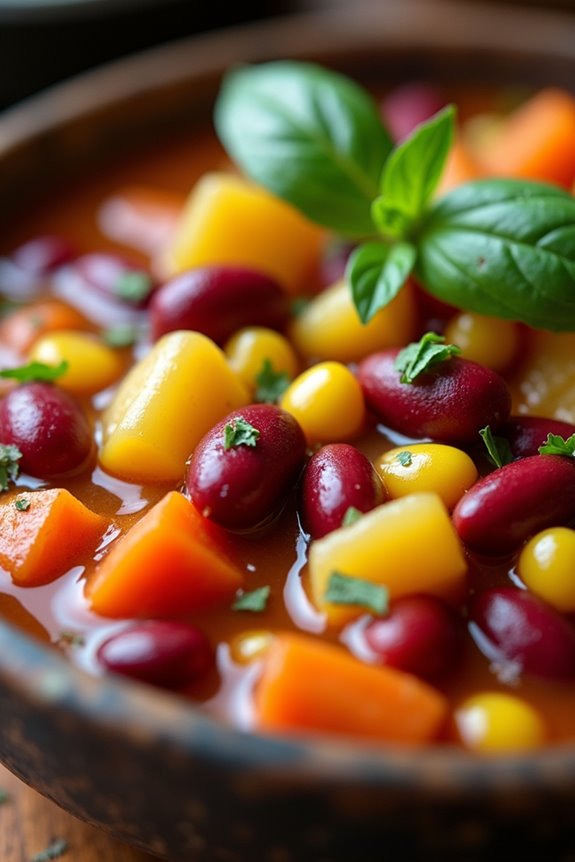
Porotos Granados is a traditional Chilean dish that beautifully showcases the country’s rich agricultural heritage, particularly its bean cultivation. This hearty stew features fresh, seasonal ingredients, making it a popular choice during the summer months when both corn and beans are at their peak. A comforting and nutritious meal, Porotos Granados is perfect for family gatherings or a cozy dinner at home. The dish is typically served with a side of crusty bread, allowing you to soak up the flavorful broth.
The foundation of Porotos Granados consists of fresh cranberry beans, often referred to as “porotos.” These beans are combined with a variety of vegetables, such as onions, garlic, and corn, along with spices that enhance the dish’s natural flavors. The result is a vibrant and satisfying stew that not only fills the belly but also warms the heart.
Ingredients (serving size: 4-6 people)
- 2 cups fresh cranberry beans (or canned)
- 1 cup fresh corn kernels (or frozen)
- 1 medium onion, chopped
- 2 cloves garlic, minced
- 1 medium tomato, diced
- 1 medium carrot, diced
- 1 medium potato, diced
- 2 cups vegetable broth
- 1 teaspoon paprika
- 1 teaspoon cumin
- 2 tablespoons olive oil
- Salt and pepper to taste
- Fresh basil or cilantro for garnish (optional)
Cooking Instructions
- Prepare the Beans: If using fresh cranberry beans, shell them from their pods. If using canned beans, drain and rinse them under cold water. Set them aside.
- Sauté the Aromatics: In a large pot, heat the olive oil over medium heat. Add the chopped onion and minced garlic. Sauté for about 5 minutes, or until the onion becomes translucent and fragrant.
- Add the Vegetables: Stir in the diced carrot and potato, cooking for an additional 5 minutes until they start to soften. This step helps to build a flavorful base for the stew.
- Incorporate the Corn and Tomato: Add the fresh corn kernels and diced tomato to the pot. Stir everything together and cook for another 3-4 minutes, allowing the tomato to break down slightly and release its juices.
- Season the Mixture: Sprinkle in the paprika and cumin, mixing well to guarantee the spices coat the vegetables evenly. Season with salt and pepper to your taste.
- Add the Broth and Beans: Pour in the vegetable broth and carefully add the prepared beans. Bring the mixture to a boil, then reduce the heat to a simmer. Cover the pot and let it cook for about 20-25 minutes, stirring occasionally, until the vegetables are tender and the flavors meld together.
- Adjust Consistency and Serve: If the stew is too thick, add a bit more broth or water to reach your desired consistency. Once done, taste and adjust the seasoning if necessary. Serve hot, garnished with fresh basil or cilantro if desired.
Extra Tips
For a richer flavor, consider adding a splash of white wine or a tablespoon of tomato paste during the sautéing stage. If you prefer a thicker stew, you can mash some of the beans with a fork or blend a portion of the stew before serving.
This dish is highly versatile, so feel free to experiment with other vegetables like zucchini or bell peppers. Enjoy your Porotos Granados with a side of crusty bread or over rice for a complete meal!
Chorrillana
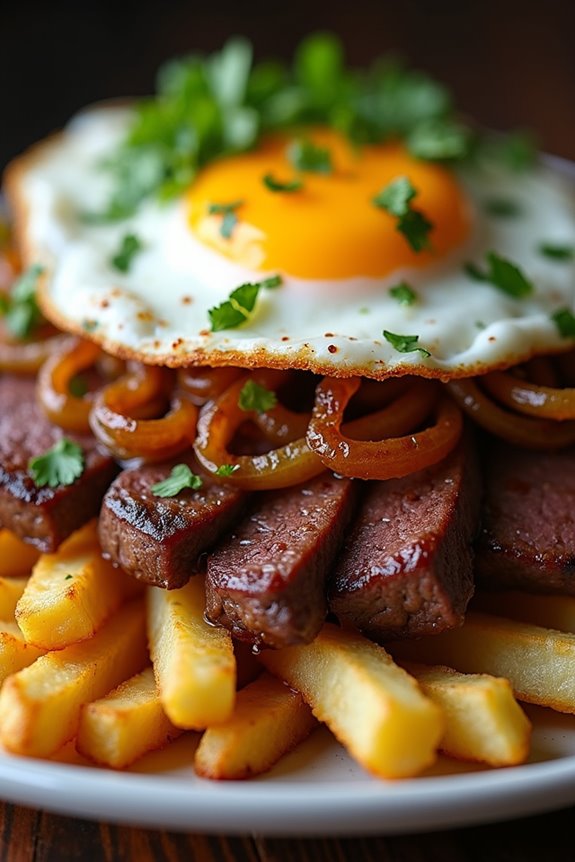
Chorrillana is a beloved Chilean dish that embodies the spirit of comfort food, often enjoyed in casual settings like bars or family gatherings. The dish features a hearty combination of crispy French fries topped with sautéed onions, juicy beef, and a drizzle of rich, savory sauce. This satisfying plate isn’t only a visual treat but also a delightful explosion of flavors, making it a favorite among locals and visitors alike.
Traditionally, Chorrillana is served as a shared plate, perfect for social occasions where friends and family gather to enjoy a meal together. The blend of textures—from the crispy fries to the tender beef and soft onions—creates a harmonious balance that’s hard to resist. Whether you’re looking to impress guests or simply indulge in a comforting dish, Chorrillana is bound to be a hit at your table.
Ingredients (Serves 4-6)
- 1.5 lbs (680g) beef sirloin, thinly sliced
- 4 large potatoes, cut into fries
- 2 medium onions, sliced
- 3 tablespoons vegetable oil
- 2 tablespoons soy sauce
- 1 tablespoon Worcestershire sauce
- 1 teaspoon paprika
- Salt and pepper to taste
- Fresh cilantro, chopped (for garnish)
- Optional: Fried eggs (to top each serving)
Cooking Instructions
1. Prepare the Fries: Start by peeling and cutting the potatoes into fries. Rinse them under cold water to remove excess starch, which helps achieve a crisper texture. Pat them dry with a clean kitchen towel to guarantee they fry well.
Heat vegetable oil in a deep fryer or a large skillet over medium-high heat. Once the oil is hot, carefully add the fries in batches, avoiding overcrowding the pan. Fry until they’re golden brown and crispy, which should take about 5-7 minutes. Remove them from the oil and let them drain on paper towels. Season with salt immediately.
2. Cook the Beef: In a separate skillet, heat 1 tablespoon of vegetable oil over medium-high heat. Add the sliced beef sirloin and season with salt, pepper, and paprika. Sauté the beef for about 4-5 minutes until it’s browned and cooked through.
Once done, remove the beef from the skillet and set it aside.
3. Sauté the Onions: In the same skillet used for the beef, add another tablespoon of oil if needed and toss in the sliced onions. Sauté them for about 5 minutes until they’re soft and translucent.
Once the onions are cooked, return the beef to the skillet. Add the soy sauce and Worcestershire sauce, mixing everything well to combine the flavors. Allow it to cook together for an additional 2-3 minutes.
4. Assemble the Chorrillana: On a large serving platter, layer the crispy fries at the bottom. Top them generously with the beef and onion mixture.
If desired, garnish with freshly chopped cilantro for a burst of flavor and color. For an extra indulgent touch, place a fried egg on top of each serving.
5. Serve and Enjoy: Serve the Chorrillana hot and enjoy it immediately while the fries are still crispy. This dish is perfect for sharing, so gather your friends and family around the table!
Extra Tips
For an authentic experience, consider pairing Chorrillana with a side of Chilean pebre, a fresh salsa made with tomatoes, onions, cilantro, and chili peppers. This adds a revitalizing contrast to the rich and savory flavors of the dish.
Additionally, feel free to customize your Chorrillana by adding other toppings such as avocado slices or jalapeños for a spicy kick. If you want to save time, you can also use frozen fries, but making them from scratch will enhance the overall quality of the dish. Enjoy your culinary adventure into Chilean cuisine!
Paila Marina
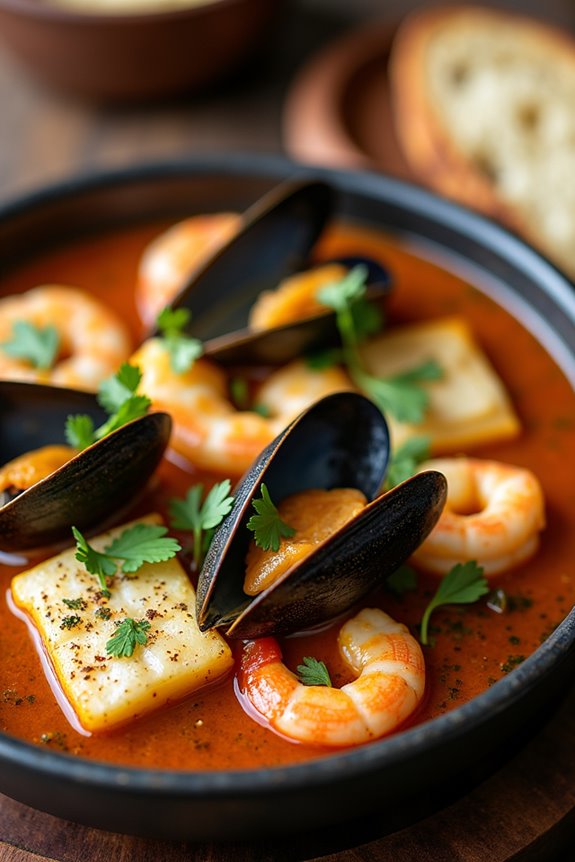
Paila Marina is a traditional Chilean seafood stew that captures the essence of the Pacific Ocean, showcasing vibrant flavors and a hearty combination of fresh seafood. This dish isn’t only a celebration of the diverse marine life found along the Chilean coast but also a cherished part of local culinary culture, often enjoyed during family gatherings and special occasions.
The rich broth, infused with herbs and spices, provides a warm and inviting base for the fresh ingredients, making it a comforting option for seafood lovers.
To prepare Paila Marina, you’ll need an assortment of fresh seafood, including fish, clams, mussels, and shrimp. The dish is typically garnished with cilantro and served with crusty bread to soak up the delicious broth. The balance of flavors in this dish, from the tanginess of lime juice to the warmth of chili, makes it a delightful experience for the palate.
Whether you’re an experienced cook or a beginner, this recipe will guide you through the steps to create a truly authentic Paila Marina.
Ingredients (serves 4-6):
- 500g of white fish (such as hake or cod), cut into chunks
- 300g of shrimp, peeled and deveined
- 300g of mussels, cleaned
- 300g of clams, cleaned
- 1 medium onion, finely chopped
- 3 cloves of garlic, minced
- 1 red bell pepper, diced
- 2 tomatoes, peeled and diced
- 1 teaspoon of paprika
- 1 teaspoon of ground cumin
- 1 teaspoon of chili flakes (adjust to taste)
- 4 cups of fish or seafood stock
- 1 cup of white wine
- Juice of 1 lime
- Fresh cilantro, chopped (for garnish)
- Olive oil
- Salt and pepper to taste
Cooking Instructions:
- Sauté the Base: In a large pot, heat a couple of tablespoons of olive oil over medium heat. Add the chopped onion and sauté until it becomes translucent, about 5 minutes. Stir in the minced garlic and diced red bell pepper, cooking for an additional 2-3 minutes until fragrant. This forms the flavorful base of your stew.
- Add Tomatoes and Spices: Once the vegetables are softened, add the diced tomatoes, paprika, ground cumin, and chili flakes. Season with salt and pepper to taste. Cook this mixture for about 5 minutes, allowing the tomatoes to break down and meld with the spices, creating a rich and aromatic sauce.
- Pour in Liquids: Slowly pour in the white wine, stirring well to deglaze the pot and lift any flavorful bits stuck to the bottom. After a minute, add the seafood stock and bring the mixture to a gentle boil. This will form the broth for your Paila Marina.
- Introduce the Seafood: Once the broth is boiling, add the chunks of white fish, shrimp, mussels, and clams to the pot. Cover and cook for about 5-7 minutes, or until the seafood is cooked through and the mussels and clams have opened. This step is essential for ensuring the seafood is tender and infused with the broth’s flavors.
- Finish with Lime and Cilantro: After the seafood is cooked, remove the pot from the heat. Stir in the lime juice and adjust the seasoning if necessary. Allow the stew to sit for a couple of minutes to let the flavors meld together before serving.
- Serve and Garnish: Ladle the Paila Marina into bowls, garnish with freshly chopped cilantro, and serve immediately with crusty bread on the side for dipping.
Extra Tips:
For the best flavor, use the freshest seafood available and consider adding other local varieties like octopus or squid if they’re accessible.
You can also adjust the spice levels to your preference by modifying the amount of chili flakes. If you prefer a thicker broth, allow it to simmer uncovered for a few extra minutes to reduce.
Enjoy your Paila Marina with a chilled glass of white wine for an authentic Chilean dining experience!
Sopaipillas
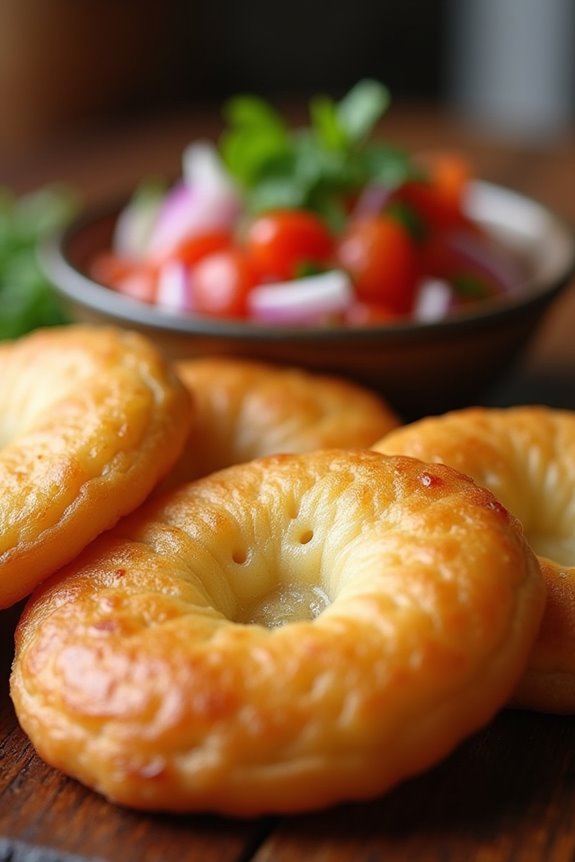
Sopaipillas are a delightful and traditional Chilean treat, perfect for any occasion. These golden-brown fried pastries have a light and fluffy texture, making them a favorite among both locals and visitors. Often enjoyed with a sprinkle of sugar or served with pebre (a Chilean condiment made of tomatoes, onion, and cilantro), they’re versatile enough to be a sweet or savory snack.
Making sopaipillas is a fun family activity, and they can be easily prepared in under an hour. The dough for sopaipillas is made from simple ingredients, allowing the flavors to shine through. With a crisp exterior and a soft, airy interior, they truly embody the essence of Chilean comfort food.
Whether you enjoy them as a snack, a side dish, or a dessert, sopaipillas are sure to impress your friends and family.
Ingredients (Serves 4-6):
- 2 cups all-purpose flour
- 1 teaspoon baking powder
- 1 teaspoon salt
- 1 tablespoon sugar
- 1/4 cup unsalted butter, softened
- 1/2 cup warm water
- Oil for frying
- Optional: powdered sugar or pebre for serving
Cooking Instructions:
- Prepare the Dough: In a large bowl, combine the all-purpose flour, baking powder, salt, and sugar. Mix these dry ingredients well. Then, add the softened butter to the mixture and blend it with your fingers or a fork until it resembles coarse crumbs.
- Add Water and Form Dough: Gradually pour in the warm water while mixing the dough with your hands or a wooden spoon. Continue to knead until the dough is smooth and elastic, about 5-7 minutes. If the dough is too sticky, add a little more flour until it reaches the right consistency.
- Roll Out the Dough: Once the dough is ready, cover it with a clean kitchen towel and let it rest for about 15-20 minutes. After resting, divide the dough into small balls, roughly the size of a golf ball. Use a rolling pin to roll each ball out into a circle, about 1/4 inch thick.
- Cut and Shape: Using a knife or a pizza cutter, cut the rolled dough into small squares or triangles. If desired, you can cut a small slit in the center of each piece to allow steam to escape while frying.
- Heat the Oil: In a deep frying pan or pot, heat oil over medium-high heat until it reaches about 350°F (175°C). To test if the oil is ready, drop a small piece of dough in; if it sizzles and rises to the surface, the oil is hot enough.
- Fry the Sopaipillas: Carefully place a few pieces of dough into the hot oil, being sure not to overcrowd the pan. Fry them for about 2-3 minutes on each side or until they’re puffed and golden brown. Use a slotted spoon to transfer them to a paper towel-lined plate to drain excess oil.
- Serve: Once all the sopaipillas are fried, serve them warm with a dusting of powdered sugar for a sweet treat or alongside pebre for a savory option. Enjoy!
Tips:
When making sopaipillas, be sure to keep the dough covered while you’re working to prevent it from drying out. You can also experiment with different seasonings or fillings, such as cheese or sweetened condensed milk, to create variations of this classic dish.
If you have leftovers, they can be stored in an airtight container for a couple of days, but they’re best enjoyed fresh and warm!
Mote Con Huesillo

Mote Con Huesillo is a beloved traditional Chilean drink, especially popular during the hot summer months. This invigorating beverage combines sweetened dried peaches (huesillos) with a unique mixture of wheat (mote), sugar, and cinnamon.
It often serves as both a dessert and a thirst-quencher, making it a staple at street fairs, festivals, and family gatherings. The delightful combination of flavors and textures in Mote Con Huesillo makes it a delightful experience that transports you to the heart of Chilean culture.
Preparing Mote Con Huesillo may seem intricate, but it’s quite straightforward once you gather your ingredients and follow the steps. Not only does this recipe provide an invigorating treat, but it also brings a piece of Chilean heritage into your home.
The key is to allow the peaches to soak and soften, which renders them sweet and juicy, while the mote adds a chewy texture that complements the drink beautifully.
Ingredients (Serves 4-6 people):
- 1 cup of dried peaches (huesillos)
- 1 cup of wheat grains (mote)
- 1 cup of sugar (or to taste)
- 4 cups of water (for soaking the peaches)
- 4 cups of water (for cooking the mote)
- 1 cinnamon stick
- 1 teaspoon of vanilla extract (optional)
- Fresh mint leaves for garnish (optional)
Cooking Instructions:
- Soak the Dried Peaches: Begin by rinsing the dried peaches under cold water to remove any dust or impurities. Place the peaches in a bowl and cover them with 4 cups of water. Let them soak for at least 4 hours, or preferably overnight, to soften.
- Cook the Mote: Rinse the wheat grains thoroughly. In a pot, bring 4 cups of water to a boil, then add the rinsed mote. Reduce the heat and let it simmer for about 30-40 minutes, or until the grains are tender but still chewy. Once cooked, drain any excess water and set aside.
- Prepare the Sweetened Peach Syrup: In another pot, combine the soaked peaches (discard the soaking water), 1 cup of sugar, the cinnamon stick, and 2 cups of fresh water. Bring the mixture to a boil, then reduce the heat and let it simmer for approximately 15-20 minutes until the peaches are tender and the syrup has thickened slightly.
- Combine Mote and Syrup: Once the peaches are cooked, remove the pot from heat. If desired, stir in the vanilla extract for added flavor. In a serving pitcher or bowl, combine the cooked mote and the peach syrup, mixing gently to combine.
- Serve Chilled: Allow the Mote Con Huesillo to cool down to room temperature, then refrigerate for at least 1 hour before serving. When ready to serve, pour the mixture into individual glasses, ensuring each glass contains both the peaches and the mote. Garnish with fresh mint leaves if desired.
Extra Tips: When making Mote Con Huesillo, feel free to adjust the sweetness to your preference. If you prefer a thicker syrup, simmer it a bit longer to concentrate the flavors.
Additionally, you can experiment with adding other spices, such as cloves or nutmeg, to enhance the flavor profile. This dish is best served chilled, making it perfect for hot days. Enjoy your Mote Con Huesillo as a delightful treat that embodies the essence of Chilean summer!
Curanto
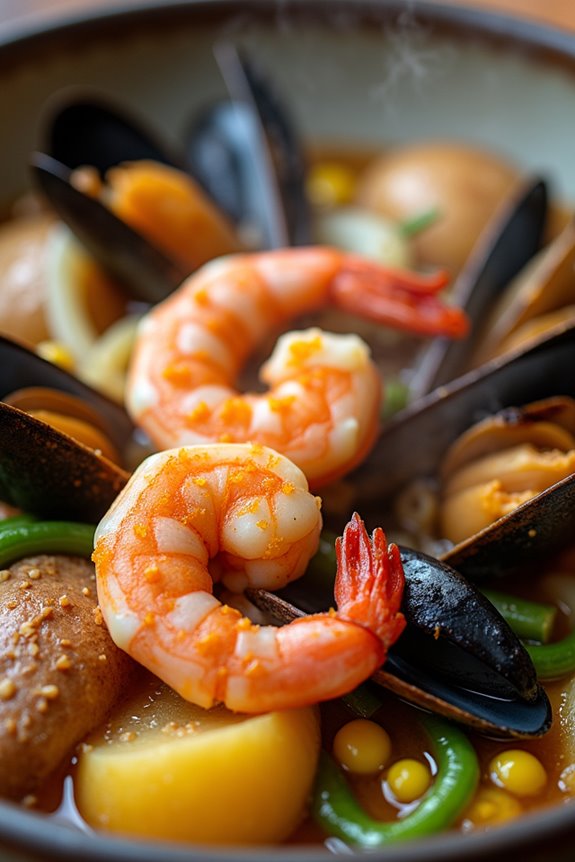
Curanto is a traditional Chilean dish that originates from the island of Chiloé and has deep roots in the indigenous Mapuche culture. This hearty, communal meal is unique for its method of cooking, which involves layering various ingredients and cooking them underground with hot stones. The result is a delicious medley of flavors, featuring seafood, meats, vegetables, and spices.
Curanto is often enjoyed during large gatherings and celebrations, making it a symbol of community and sharing among friends and family.
The preparation of Curanto requires some time and effort, but the end result is worth it. While the traditional method involves digging a pit in the ground, you can also use a large pot or a steam pot to achieve a similar effect. This recipe provides a simplified version that retains the essence of Curanto while making it accessible for home cooks. Gather your friends and family, and get ready to enjoy this delightful taste of Chilean culture!
Ingredients (serving size: 4-6 people)
- 1 lb. of mussels, cleaned
- 1 lb. of clams, cleaned
- 1 lb. of shrimp, peeled and deveined
- 2 chicken thighs, cut into pieces
- 1 lb. of pork ribs, cut into pieces
- 4 medium-sized potatoes, peeled and quartered
- 2 medium onions, sliced
- 2 cups of corn (fresh or frozen)
- 1 cup of green beans, trimmed
- 1 tablespoon of paprika
- 1 tablespoon of oregano
- Salt and pepper to taste
- 1 cup of water
- Banana leaves or aluminum foil for wrapping
Cooking Instructions
- Prepare the ingredients: Start by cleaning all seafood thoroughly under cold running water. Peel and devein shrimp, clean the mussels and clams, and cut the chicken and pork into bite-sized pieces. Prepare the vegetables by peeling and quartering the potatoes, slicing the onions, and trimming the green beans.
- Season the meats: In a large bowl, mix the chicken and pork with paprika, oregano, salt, and pepper. Confirm that the meats are well-coated with the seasoning. This step is essential as it adds depth and flavor to the entire dish.
- Layer the ingredients: If using banana leaves, lay them out on a large flat surface or a large pot. Start by placing a layer of potatoes at the bottom, followed by the seasoned chicken and pork. Next, add the sliced onions, green beans, corn, and finally, the seafood (mussels, clams, and shrimp) on top.
- Add water: Pour the cup of water over the layered ingredients. This will create steam during the cooking process, which is vital for cooking everything evenly.
- Wrap the ingredients: If you’re using banana leaves, fold them over the top to create a sealed package. If using aluminum foil, tightly cover the pot with the foil, making certain that no steam escapes.
- Cook: If using a large pot, place it over medium heat. Allow it to cook for about 30-40 minutes, depending on the heat. If you’re using a traditional pit method, place the wrapped ingredients on hot stones and cover with soil, cooking for about 1-2 hours.
- Serve: Once cooked, carefully unwrap the banana leaves or foil, allowing the steam to escape. Serve the Curanto hot directly from the pot or on a large platter, encouraging everyone to dig in.
Extra Tips
When making Curanto, feel free to customize the ingredients based on your preferences or local availability. You can add other meats like beef or even substitute with vegetarian options such as mushrooms or tofu.
The key to a successful Curanto is confirming that everything is well-seasoned and cooked through. Don’t be afraid to experiment with different spices and herbs to find the perfect flavor that suits your taste. Enjoy your Curanto with some fresh bread and a glass of Chilean wine for an authentic experience!
Chancho En Piedra
Chancho En Piedra is a traditional Chilean dish that highlights the country’s rich culinary heritage. This savory meal is a delightful combination of pork, spices, and fresh ingredients, all crushed together to create a flavorful paste that’s typically served with bread. The name literally translates to “pork on stone,” which refers to the traditional method of preparing the dish by using a mortar and pestle. The result is a deliciously aromatic blend that showcases the rustic flavors of Chilean cuisine.
This dish is often enjoyed as a hearty appetizer or a main course, especially during gatherings and celebrations. Its unique texture and taste make it a favorite among both locals and visitors alike. The preparation may seem simple, but the depth of flavor achieved through the careful selection and combination of ingredients is what makes Chancho En Piedra a true culinary gem.
Ingredients (Serves 4-6)
- 1 kg pork shoulder (or pork belly)
- 4 cloves garlic, minced
- 1 tablespoon salt
- 1 tablespoon black pepper
- 1 tablespoon paprika
- 1 teaspoon cumin
- 1 teaspoon oregano
- 2 tablespoons olive oil
- 1 medium onion, finely chopped
- 2 medium tomatoes, diced
- 1 bunch of fresh cilantro, chopped
- Fresh bread, for serving
Cooking Instructions
- Prepare the Pork: Begin by cutting the pork shoulder into smaller chunks to make it easier to work with. This will allow for a more even cooking process and help the flavors meld together during the preparation.
- Season the Meat: In a large bowl, combine the minced garlic, salt, black pepper, paprika, cumin, and oregano. Rub this spice mixture all over the pork pieces, ensuring they’re well-coated. Allow the pork to marinate for at least 30 minutes to absorb the flavors.
- Cook the Pork: Heat the olive oil in a large skillet over medium heat. Add the seasoned pork to the skillet and cook until browned on all sides, approximately 10-15 minutes. This step is essential for developing a rich flavor profile.
- Add Onions and Tomatoes: Once the pork is browned, add the chopped onion to the skillet. Sauté until the onions are translucent, about 5 minutes. Then, add the diced tomatoes and cook for an additional 5-10 minutes, allowing the tomatoes to soften and create a sauce.
- Mash the Ingredients: Transfer the cooked pork, onions, and tomatoes to a mortar and pestle (or a large bowl). Use the pestle to pound the ingredients together until you achieve a chunky paste. If you don’t have a mortar and pestle, a fork or potato masher can also work for this step.
- Finish with Cilantro: Once you have your desired consistency, stir in the chopped cilantro for a fresh, herbaceous kick. Taste and adjust the seasoning if necessary.
- Serve: Serve the Chancho En Piedra warm, accompanied by fresh bread. Guests can spread the mixture onto the bread for a delightful and satisfying bite.
Extra Tips
When preparing Chancho En Piedra, feel free to adjust the spices according to your taste preference. Some may enjoy adding a touch of chili flake for heat or using different herbs for a unique twist.
Additionally, if you prefer a smoother paste, you can process the mixture in a food processor instead of using a mortar and pestle. Remember, the key to a great Chancho En Piedra lies in the quality of the pork and the freshness of the ingredients, so choose wisely!