

When I think about hosting gatherings, Brazilian appetizers are my go-to for adding a burst of flavor and cultural flair. There’s nothing quite like the cheesy delight of Pão De Queijo or the savory crunch of Coxinha. Each bite is a little taste of tradition. From crispy Bolinho De Bacalhau to succulent Picanha Skewers, there’s something for everyone to enjoy. Are you ready to impress your guests with these bold flavors?
Pão De Queijo (Cheese Bread)
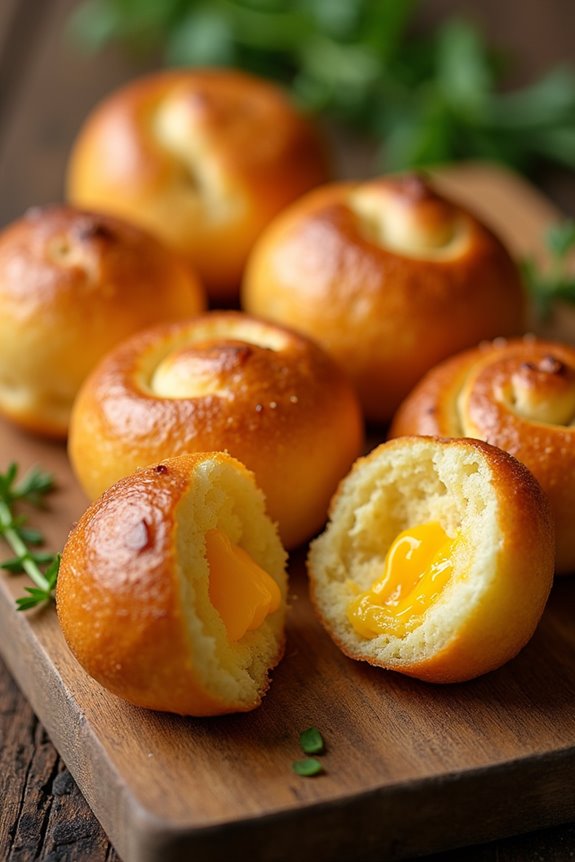
Pão De Queijo, a beloved Brazilian appetizer, is a delightful cheese bread that’s soft, chewy, and bursting with flavor. Originating from the state of Minas Gerais, this gluten-free treat is made primarily from tapioca flour and cheese, making it a unique and delicious addition to any gathering.
Whether served as a snack or as part of a meal, Pão De Queijo is certain to please both locals and visitors alike with its irresistible aroma and texture.
The beauty of Pão De Queijo lies in its simplicity and versatility. It’s a great way to introduce Brazilian cuisine to your palate, and the ingredients are relatively easy to find. With a few basic components, you can whip up a batch of these cheesy delights that are perfect for dipping in sauces or enjoying on their own.
Once you try making these mouth-watering cheese breads at home, you might find them becoming a staple in your kitchen.
Ingredients (Serves 4-6 people):
- 1 cup of milk
- 1/2 cup of vegetable oil
- 1 teaspoon of salt
- 2 cups of tapioca flour
- 1 cup of grated Parmesan cheese
- 2 large eggs
- 1/2 cup of shredded mozzarella cheese (optional)
Cooking Instructions:
- Preheat the Oven: Start by preheating your oven to 375°F (190°C). This guarantees that the Pão De Queijo will bake evenly and achieve a golden-brown crust.
- Combine Wet Ingredients: In a medium saucepan over medium heat, combine the milk, vegetable oil, and salt. Stir the mixture occasionally until it comes to a gentle boil. This step is important as it helps to infuse the flavors into the dough.
- Add Tapioca Flour: Once the mixture is boiling, remove it from the heat and immediately add the tapioca flour. Stir vigorously with a wooden spoon until the dough comes together and pulls away from the sides of the pan. It should be smooth and slightly sticky.
- Cool the Dough: Allow the dough to cool for about 10-15 minutes. This step is essential so that when you add the eggs, they won’t cook in the hot dough.
- Incorporate Eggs and Cheese: Once the dough has cooled, add the eggs one at a time, mixing well after each addition. Then, add the grated Parmesan cheese and shredded mozzarella (if using). Mix until everything is well combined and the dough becomes slightly elastic.
- Shape the Balls: Using your hands, form small balls of dough, about the size of a golf ball, and place them on a baking sheet lined with parchment paper. Make sure to leave some space between each ball as they’ll expand while baking.
- Bake: Place the baking sheet in the preheated oven and bake for 15-20 minutes, or until the tops are golden brown and the cheese breads have puffed up beautifully.
- Serve Warm: Once baked, remove the Pão De Queijo from the oven and let them cool for a few minutes. Serve them warm for the best texture and flavor.
Extra Tips: For an even cheesier flavor, feel free to experiment with different types of cheese, such as cheddar or a mix of your favorites.
If you prefer a lighter texture, you can blend the mixture using a food processor after adding the eggs and cheese. This will create a smoother batter. Additionally, make sure to enjoy them fresh out of the oven, as they’re best served warm and will lose their delightful texture if left to sit for too long.
Coxinha (Chicken Croquettes)

Coxinha is a beloved Brazilian appetizer that has captured the hearts and taste buds of many around the world. This delightful dish features a savory filling made from shredded chicken, seasoned to perfection, and encased in a dough that’s both tender and slightly crispy once fried.
Traditionally shaped like a teardrop, these little croquettes are often enjoyed at parties, celebrations, or as a snack any time of the day. With their irresistible flavor and texture, Coxinhas are bound to be a hit at your next gathering.
Making Coxinha can be a labor of love, but the results are worth every effort. The process involves preparing the chicken filling, making the dough, and then assembling and frying the croquettes. While the steps may seem intricate, following this recipe will guide you through to achieve the perfect Coxinha that will impress your family and friends.
Ingredients (serving size: 4-6 people):
- 2 cups shredded cooked chicken
- 1 medium onion, finely chopped
- 2 cloves garlic, minced
- 1 tablespoon olive oil
- 1 teaspoon paprika
- Salt and pepper to taste
- 1 cup chicken broth
- 2 cups all-purpose flour
- 1 tablespoon butter
- 1 large egg
- 1 cup breadcrumbs
- Oil for frying
Cooking Instructions:
1. Prepare the Chicken Filling: In a skillet over medium heat, add the olive oil and sauté the chopped onion and minced garlic until they’re translucent.
Stir in the shredded chicken, paprika, salt, and pepper. Add the chicken broth and let it simmer for about 10 minutes, allowing the flavors to meld together. Once done, remove from heat and let it cool.
2. Make the Dough: In a saucepan, combine the chicken broth (used in the filling), butter, and a pinch of salt. Bring it to a boil.
Once boiling, add the flour all at once and stir vigorously with a wooden spoon until the mixture forms a smooth dough that pulls away from the sides of the pan. Remove from heat and let it cool slightly.
3. Shape the Coxinha: Once the dough is cool enough to handle, take a small piece (about the size of a golf ball) and flatten it in your palm.
Place a spoonful of the chicken filling in the center, then fold the dough over the filling and shape it into a teardrop or drumstick shape, making sure the filling is completely sealed inside. Repeat this process until all the dough and filling are used.
4. Prepare for Frying: Set up your breading station. In one bowl, beat the egg, and in another bowl, place the breadcrumbs.
Dip each shaped Coxinha into the egg, allowing any excess to drip off, then coat it with breadcrumbs, pressing slightly to make sure they adhere well.
5. Fry the Coxinha: Heat oil in a deep frying pan over medium heat. Once the oil is hot (around 350°F or 175°C), carefully add the breaded Coxinhas in batches, making sure not to overcrowd the pan.
Fry them for about 4-5 minutes or until golden brown, turning occasionally for even cooking. Use a slotted spoon to remove them and place them on a paper towel-lined plate to drain excess oil.
6. Serve: Serve the Coxinhas hot, accompanied by your favorite dipping sauce or simply enjoy them as they are.
Extra Tips:
For extra flavor in your Coxinha, consider adding finely chopped herbs such as cilantro or parsley to the chicken filling.
Additionally, you can experiment with different fillings, like cheese or vegetables, for a fun twist on this classic dish. If you’re looking to prepare them in advance, you can freeze the uncooked Coxinhas and fry them straight from the freezer, adding a couple of extra minutes to the frying time. Enjoy your delicious Coxinhas!
Empanadas
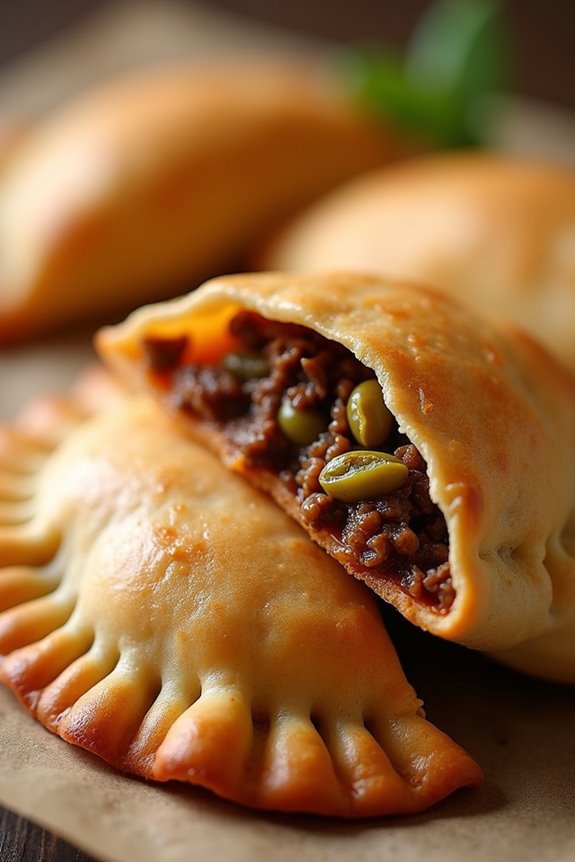
Empanadas are a beloved appetizer in Brazil, featuring a flavorful filling enveloped in a golden, flaky pastry. These delightful hand-held pockets can be filled with a variety of ingredients, ranging from savory meats and cheeses to vegetables and spices, making them a versatile choice for any gathering.
Often enjoyed during festive occasions or as a delicious snack, empanadas are sure to impress your guests with their deliciousness.
Making empanadas at home may seem intimidating, but with the right ingredients and a little patience, you’ll be enjoying these tasty treats in no time. The key to perfect empanadas is in the dough, which should be tender yet sturdy enough to hold the filling without breaking.
Once you master the basic recipe, feel free to experiment with different fillings to suit your taste.
Ingredients (serves 4-6 people):
- 2 cups all-purpose flour
- 1/2 teaspoon salt
- 1/4 cup unsalted butter, cold and cubed
- 1/4 cup cold water
- 1 cup cooked ground beef (or chicken, cheese, or vegetables)
- 1/2 onion, finely chopped
- 1 garlic clove, minced
- 1 teaspoon cumin
- 1 teaspoon paprika
- 1/2 cup olives, chopped (optional)
- 1 egg, beaten (for egg wash)
- Oil for frying (or baking)
Cooking Instructions:
1. Prepare the Dough: In a large mixing bowl, combine the flour and salt. Add the cold, cubed butter and mix with your fingers or a pastry cutter until the mixture resembles coarse crumbs. Gradually add the cold water, mixing until the dough comes together.
Don’t overwork the dough. Wrap it in plastic wrap and refrigerate for at least 30 minutes.
2. Make the Filling: In a skillet over medium heat, add a little oil and sauté the chopped onion until translucent. Add the minced garlic and cook for another minute. Stir in the cooked ground beef, cumin, and paprika.
If using olives, mix them in as well. Cook for about 5 minutes until everything is heated through. Remove from heat and let it cool.
3. Roll Out the Dough: Once the dough has rested, divide it into equal portions (about 8-10 pieces). On a lightly floured surface, roll each piece into a circle about 1/8 inch thick. Aim for a diameter of around 4-6 inches.
4. Fill the Empanadas: Place a spoonful of the filling in the center of each dough circle. Be careful not to overfill, as this may cause them to burst while cooking. Moisten the edges of the dough with water, fold the circle in half, and press the edges together to seal.
You can crimp the edges with a fork for a decorative touch.
5. Cook the Empanadas: You can either fry or bake the empanadas. For frying, heat oil in a deep skillet over medium heat. Fry the empanadas in batches until golden brown, about 3-4 minutes on each side.
For baking, preheat the oven to 375°F (190°C), place the empanadas on a baking sheet lined with parchment paper, brush with the beaten egg, and bake for about 25-30 minutes or until golden brown.
6. Serve and Enjoy: Once cooked, remove the empanadas from the oil or oven and let them cool slightly before serving. They can be enjoyed warm or at room temperature, perfect for dipping in salsa or your favorite sauce.
Extra Tips: When preparing empanadas, feel free to get creative with the fillings! You can use shredded chicken, cheese, or even a mix of sautéed vegetables for a vegetarian option.
If you prefer a healthier version, consider baking them instead of frying; just make sure to brush them with egg wash for that golden finish. Finally, serve them with a side of chimichurri or spicy sauce for an added flavor kick!
Picanha Skewers
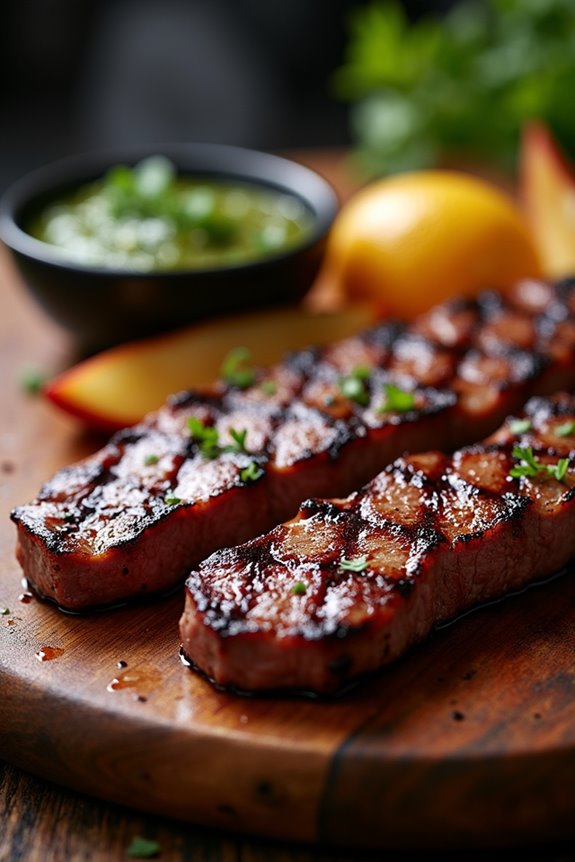
Picanha skewers are a quintessential Brazilian appetizer that showcases the rich, beefy flavor of picanha, a cut of meat renowned for its tenderness and distinctive fat cap. Traditionally grilled over an open flame, these skewers are a popular choice at Brazilian barbecues, known as churrascos. The preparation is simple but emphasizes quality ingredients, making it a favorite among meat lovers.
When paired with chimichurri sauce or a side of farofa, picanha skewers become a delightful gourmet experience that transports you straight to the vibrant streets of Brazil.
To make perfect picanha skewers, it’s vital to select a good quality cut of picanha, which is typically sourced from grass-fed cattle. The ideal cooking method involves grilling to achieve a beautiful sear while keeping the meat juicy and flavorful. Whether you’re hosting a gathering or enjoying a casual dinner, these skewers are sure to impress your guests with their mouthwatering taste and aromatic appeal.
Ingredients (Serves 4-6)
- 2 lbs picanha (top sirloin cap), trimmed
- 2 tablespoons kosher salt
- 1 tablespoon black pepper
- 1 teaspoon garlic powder
- 1 teaspoon smoked paprika
- 1 tablespoon olive oil
- Skewers (wooden or metal)
Cooking Instructions
- Prepare the Meat: Begin by trimming the picanha of any excess silver skin or connective tissue. Cut the picanha into 1 to 1.5-inch thick strips, ensuring to cut against the grain to maintain tenderness when cooked.
- Season the Meat: In a mixing bowl, combine the kosher salt, black pepper, garlic powder, and smoked paprika. Rub the seasoning mixture generously over the picanha strips, ensuring all sides are well coated. Let the meat marinate for at least 30 minutes at room temperature to allow the flavors to penetrate.
- Preheat the Grill: If using a charcoal grill, light the coals and allow them to burn until covered with white ash. For a gas grill, preheat it to a medium-high setting. The grill needs to be hot enough to create a nice sear on the meat.
- Prepare the Skewers: If using wooden skewers, soak them in water for at least 30 minutes to prevent burning. Thread the picanha strips onto the skewers, folding them into a “C” shape if desired to create a better surface for grilling.
- Grill the Skewers: Place the skewers on the grill and cook for about 4-6 minutes per side, depending on the thickness of the meat and your preferred level of doneness. Aim for medium-rare, which is around 130°F (54°C) internal temperature.
- Rest the Meat: Once cooked, remove the skewers from the grill and let them rest for about 5 minutes. This allows the juices to redistribute throughout the meat, ensuring every bite is tender and flavorful.
- Serve: Serve the picanha skewers hot off the grill, optionally with chimichurri sauce or a sprinkle of fresh herbs for added flavor.
Extra Tips
When preparing picanha skewers, consider experimenting with different marinades or spices to suit your taste preferences. If you’re looking for added flavor, try marinating the meat overnight.
Additionally, using a meat thermometer can help you monitor the doneness more accurately. Remember to let the skewers rest before serving, as this step is essential for juicy, flavorful meat. Enjoy your picanha skewers with traditional Brazilian sides such as farofa or rice for a complete meal experience!
Bolinho De Bacalhau (Codfish Balls)
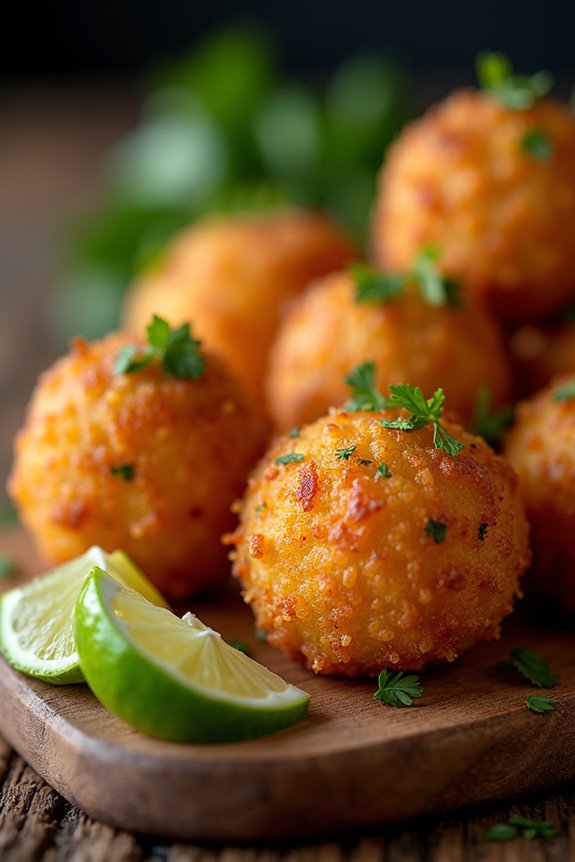
Bolinho De Bacalhau, or codfish balls, is a beloved Brazilian appetizer that showcases the Portuguese influence on Brazilian cuisine. These savory treats are made with salted codfish, mashed potatoes, and a blend of herbs and spices. The result is a crispy exterior that gives way to a flavorful, fluffy filling, making them a perfect addition to any gathering or celebration.
Traditionally served with a squeeze of lime and a side of hot sauce, they can be enjoyed as finger food or as a part of a larger meal.
Making Bolinho De Bacalhau may seem intimidating, but with some careful preparation and a few simple ingredients, you can create this delightful dish at home. The key to achieving the perfect texture is to verify the codfish is properly desalted and flaked before mixing it with the other ingredients.
Once fried, these codfish balls are sure to impress your family and friends with their delicious taste and appealing presentation.
Ingredients (serving size: 4-6 people)
- 1 lb salted codfish
- 2 medium potatoes
- 1 small onion, finely chopped
- 2 garlic cloves, minced
- 2 tablespoons chopped fresh parsley
- 1 tablespoon chopped fresh cilantro
- 2 large eggs
- 1 teaspoon black pepper
- 1 teaspoon paprika
- Salt to taste
- Vegetable oil for frying
- Lime wedges for serving
- Hot sauce for serving (optional)
Cooking Instructions
- Desalting the Codfish: Begin by rinsing the salted codfish under cold water to remove excess salt. Place the codfish in a pot and cover it with water. Bring the water to a simmer, then remove from heat and let the codfish soak for at least 24 hours, changing the water several times. Once desalted, drain and flake the codfish into small pieces.
- Cooking the Potatoes: While the codfish is soaking, peel and dice the potatoes into chunks. Place them in a pot of salted water and bring to a boil. Cook until tender, about 15-20 minutes. Drain the potatoes and mash them until smooth. Allow the mashed potatoes to cool slightly.
- Preparing the Mixture: In a large bowl, combine the flaked codfish, mashed potatoes, finely chopped onion, minced garlic, parsley, cilantro, eggs, black pepper, paprika, and salt. Mix everything together until well combined. You should have a thick, cohesive mixture that holds its shape.
- Forming the Balls: With your hands, take small portions of the mixture and roll them into balls, about the size of a golf ball. Place them on a plate or tray lined with parchment paper. Verify they’re well-shaped and compact to prevent them from falling apart while frying.
- Frying the Codfish Balls: In a deep skillet or frying pan, heat vegetable oil over medium heat. Carefully add the codfish balls in batches, making sure not to overcrowd the pan. Fry until golden brown on all sides, about 3-4 minutes per batch. Use a slotted spoon to remove the balls and let them drain on paper towels.
- Serving: Serve the Bolinho De Bacalhau warm, garnished with lime wedges and a side of hot sauce if desired. Enjoy as a delightful appetizer or snack at your next gathering!
Extra Tips
When making Bolinho De Bacalhau, it’s essential to verify the cod is perfectly desalted for a balanced flavor. If you find the mixture too wet, you can add a little flour or breadcrumbs to help bind the ingredients together.
Frying in small batches allows for even cooking and prevents the oil temperature from dropping too much. Additionally, for added flavor, consider experimenting with spices like cumin or adding a dash of lemon zest to the mixture.
Serve immediately for the best texture, as they’re crispiest when freshly fried!
Pastel (Savory Pastry)

Pastel is a beloved Brazilian street food that consists of a thin, flaky pastry filled with an array of savory fillings. Originating from the street markets and fairs in Brazil, these delicious pastries are a staple at gatherings, festivals, and casual dining experiences. The pastry is typically deep-fried to achieve a crispy, golden-brown exterior, while the filling can range from cheese and ground meat to vegetables and even sweet options. Their irresistible crunch and satisfying flavors make them a favorite among locals and visitors alike.
Making Pastel at home is a rewarding culinary experience that can bring a taste of Brazil to your kitchen. The dough is simple to prepare with just a few ingredients, and the filling can be customized to suit your preferences. Whether you choose to stick with traditional fillings or experiment with your own creations, Pastel is sure to impress your family and friends. This recipe yields enough Pastel for a serving size of 4-6 people, perfect for sharing or enjoying as a snack.
Ingredients
- 2 cups all-purpose flour
- 1/2 teaspoon salt
- 1 tablespoon vegetable oil
- 1/2 cup warm water
- 1 cup ground beef (or desired filling such as cheese or vegetables)
- 1 small onion, finely chopped
- 2 cloves garlic, minced
- 1/2 teaspoon paprika
- Salt and pepper to taste
- Oil for frying
Cooking Instructions
- Make the Dough: In a large mixing bowl, combine the all-purpose flour and salt. Add the vegetable oil and mix with your fingers until the mixture resembles coarse crumbs. Gradually add the warm water, mixing until the dough comes together. Knead the dough on a floured surface for about 5-7 minutes until it’s smooth and elastic. Wrap in plastic wrap and let it rest for at least 30 minutes.
- Prepare the Filling: In a skillet over medium heat, add a tablespoon of oil. Once hot, add the chopped onion and sauté until translucent. Then, add the minced garlic and sauté for an additional minute. Add the ground beef (or your choice of filling) and cook until browned. Season with paprika, salt, and pepper. Remove from heat and let it cool slightly.
- Roll Out the Dough: After resting, divide the dough into smaller portions. On a floured surface, roll out each portion into a thin sheet, about 1/8 inch thick. Cut the dough into rounds or squares, depending on your preference for shape.
- Fill the Pastry: Place a spoonful of the filling in the center of each dough cutout, leaving space around the edges. Be careful not to overfill, as this can make sealing difficult.
- Seal the Pastel: Fold each pastry over the filling to create a half-moon shape (or keep it rectangular if using squares). Press the edges together firmly, then use a fork to crimp the edges for a decorative touch and to guarantee they’re securely sealed.
- Fry the Pastel: Heat oil in a deep frying pan over medium heat. Once the oil is hot, carefully place a few Pastel in the pan, being careful not to overcrowd. Fry until they’re golden brown and crispy, typically about 2-3 minutes on each side. Remove with a slotted spoon and drain on paper towels.
- Serve and Enjoy: Serve the Pastel warm with your favorite dipping sauce, such as hot sauce or a tangy vinaigrette. Enjoy them as a snack or appetizer at your next gathering!
Extra Tips
When preparing Pastel, verify that the oil is hot enough before frying; this will help achieve that perfect crispy texture. Additionally, you can experiment with different fillings based on your preference—try adding chopped olives, herbs, or even spices for an extra flavor kick.
If you want to make a healthier version, consider baking the Pastel instead of frying them. Just brush them with a little oil and bake at 375°F (190°C) until golden brown. Enjoy your culinary adventure!
Linguiça (Brazilian Sausage)
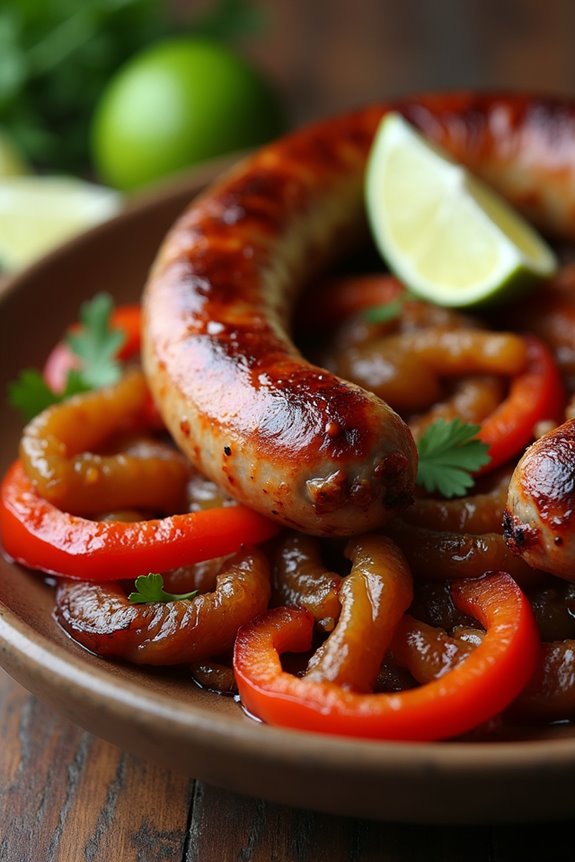
Linguiça is a traditional Brazilian sausage that’s savory, smoky, and bursting with flavor. Often enjoyed as an appetizer, it’s typically made from pork marinated in garlic, spices, and sometimes red wine, giving it a unique taste that’s distinctly Brazilian.
It can be grilled, baked, or fried, making it versatile enough to suit any gathering or celebration. In Brazil, it’s commonly served with a side of farofa (toasted cassava flour) and a squeeze of lime, complementing its rich flavors perfectly.
This recipe isn’t only delicious but also easy to prepare, making it an ideal choice for any event, from casual barbecues to festive gatherings. With the right ingredients and a few simple steps, you can create an authentic Brazilian experience right in your kitchen.
So gather your friends or family, and get ready to enjoy some mouth-watering Linguiça that will transport you straight to Brazil!
Ingredients (Serves 4-6)
- 1 pound linguiça (Brazilian sausage)
- 2 tablespoons olive oil
- 1 medium onion, sliced
- 3 cloves garlic, minced
- 1 bell pepper, sliced (any color)
- 1 teaspoon smoked paprika
- 1 teaspoon black pepper
- 1 teaspoon salt
- 1 tablespoon fresh parsley, chopped (for garnish)
- Lime wedges (for serving)
Cooking Instructions
- Preheat the Grill or Skillet: If you’re grilling, preheat your grill to medium-high heat. For a skillet, heat it over medium heat. This guarantees that the sausage cooks evenly and gets a nice char.
- Prepare the Sausage: While the grill or skillet is heating up, remove the linguiça from its casing if necessary. You can keep it whole or slice it into bite-sized pieces, depending on your preference.
- Cook the Onions and Peppers: In a separate pan, add the olive oil and heat it over medium heat. Add the sliced onion and bell pepper, cooking until they’re softened and slightly caramelized, which should take about 5-7 minutes. Stir occasionally to prevent burning.
- Add Garlic and Spices: Once the onions and peppers are cooked, add the minced garlic, smoked paprika, black pepper, and salt. Stir everything together and cook for another 2-3 minutes until the garlic becomes fragrant.
- Cook the Linguiça: If grilling, place the whole sausages on the grill and cook for about 10-15 minutes, turning occasionally until browned and cooked through. If using a skillet, add the sausage pieces to the pan with the onions and peppers and cook for about 8-10 minutes, stirring frequently until browned and heated through.
- Garnish and Serve: Once the linguiça is cooked, remove it from the heat and toss it with the sautéed onions and peppers. Transfer to a serving platter, sprinkle with fresh parsley, and serve with lime wedges on the side for squeezing over the dish.
Extra Tips
When cooking linguiça, be mindful of its fat content; the sausage can render quite a bit of grease, especially when grilled. To keep your dish from becoming too oily, consider using a grill pan or draining excess fat during cooking.
Additionally, feel free to customize your dish by adding other vegetables like zucchini or corn for extra flavor and texture. Pairing it with a rejuvenating salad or a traditional Brazilian dip like molhinho can elevate your appetizer experience. Enjoy!
Acarajé (Black-Eyed Pea Fritters)

Acarajé is a traditional Brazilian street food originating from the state of Bahia, where it reflects the rich cultural heritage of African influences. This delectable dish features deep-fried fritters made primarily from black-eyed peas, and they’re often filled with a spicy shrimp paste, served with a tangy sauce, and garnished with various toppings. The combination of crispy exterior and flavorful filling makes Acarajé an irresistible appetizer that’s bound to impress your guests.
The preparation of Acarajé may seem a bit involved, but the end result is well worth the effort. The key to achieving the perfect texture lies in soaking and grinding the black-eyed peas, which creates a dough that’s both light and airy when fried. Traditionally, Acarajé is served with vatapá (a creamy shrimp paste), caruru (okra stew), and a sprinkle of dried shrimp, making it a flavor-packed dish that encapsulates the essence of Brazilian cuisine.
Ingredients (Serves 4-6 People)
- 2 cups black-eyed peas (dried)
- 1 onion, chopped
- 1-2 cloves garlic, minced
- 1 teaspoon salt
- 1 teaspoon cayenne pepper (or to taste)
- 1 teaspoon palm oil (plus more for frying)
- 1 cup cooked shrimp, chopped
- 1/2 cup vatapá (optional)
- 1/2 cup caruru (optional)
- Diced tomatoes and onions for garnish (optional)
- Fresh cilantro for garnish (optional)
Cooking Instructions
- Soak the Black-Eyed Peas: Begin by soaking the black-eyed peas in water for at least 8 hours or overnight. This softens the peas and makes them easier to grind. Make sure to use enough water to cover the peas fully.
- Prepare the Batter: After soaking, drain the peas and rinse them. In a food processor, combine the soaked peas, chopped onion, minced garlic, salt, and cayenne pepper. Blend until you achieve a smooth and thick batter. You may need to add a little water to help with blending, but be careful not to make it too runny.
- Heat the Oil: In a deep frying pan or pot, heat enough palm oil over medium heat to submerge the fritters. The oil should reach a temperature of about 350°F (175°C). Test the oil by dropping a small amount of batter into it; if it sizzles and rises to the surface, it’s ready.
- Fry the Fritters: Using a spoon or your hands, scoop a portion of the batter and carefully drop it into the hot oil. Fry the fritters in batches to avoid overcrowding the pan. Cook for about 4-5 minutes on each side, or until they turn golden brown and crispy. Once cooked, remove them with a slotted spoon and drain on paper towels.
- Prepare the Filling: While the fritters are frying, mix the chopped shrimp with a bit of salt, cayenne pepper, and palm oil in a separate bowl. Set aside for assembly.
- Assemble the Acarajé: Once the fritters have cooled slightly, slice them open gently to create a pocket. Stuff each fritter with the shrimp mixture, and if desired, add a spoonful of vatapá or caruru. Garnish with diced tomatoes, onions, and fresh cilantro.
Extra Tips
When making Acarajé, using fresh ingredients is key to enhancing the flavor of the dish. If you want to experiment, consider adding spices like paprika or black pepper to the batter for an extra kick.
Additionally, verify the oil is hot enough before frying; if the temperature is too low, the fritters will absorb too much oil and become greasy. Finally, Acarajé is best enjoyed fresh from the fryer, so try to serve them immediately for the ultimate experience!
Moqueca Bites (Fish Stew Bites)
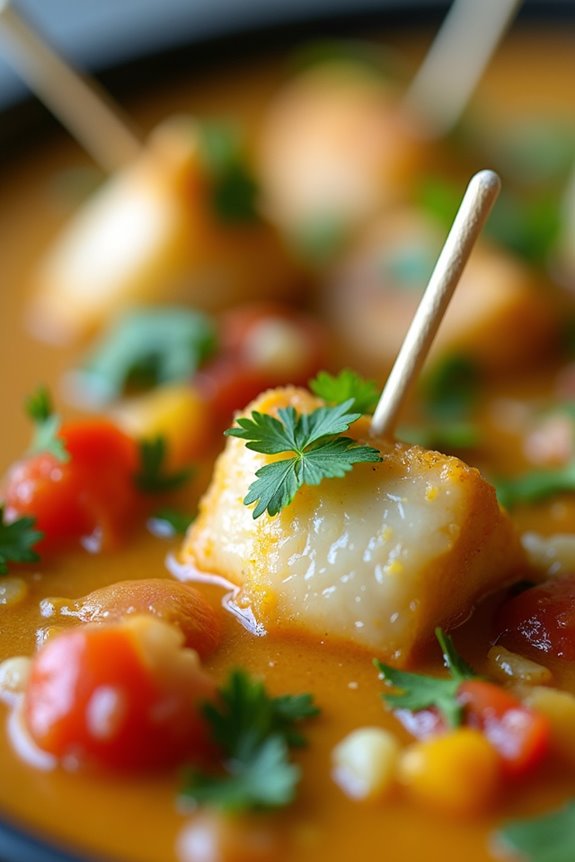
Moqueca is a traditional Brazilian fish stew that beautifully showcases the vibrant flavors of the country’s coastal cuisine. This dish is typically made with fresh fish, aromatic herbs, and rich coconut milk, creating a delightful harmony of tastes.
In this recipe, we’ll transform the classic moqueca into bite-sized appetizers that are perfect for sharing at parties or gatherings. The Moqueca Bites will encapsulate the essence of the original dish while providing a fun twist that everyone will enjoy.
To prepare these flavorful bites, we’ll marinate the fish to infuse it with the bold flavors typical of moqueca, then combine it with a luscious coconut sauce and serve it in small, easy-to-eat portions. Each bite will be a burst of tropical goodness, making them an irresistible treat for your guests. Pair them with toothpicks or mini skewers for an elegant presentation, and watch them disappear from the platter in no time!
Ingredients (serving size: 4-6 people):
- 1 lb white fish fillets (such as cod or tilapia), cut into bite-sized pieces
- 1 lime, juiced
- 1 teaspoon salt
- 1/2 teaspoon black pepper
- 1 tablespoon olive oil
- 1 medium onion, finely chopped
- 2 cloves garlic, minced
- 1 bell pepper (red or yellow), diced
- 1 cup coconut milk
- 1/2 cup diced tomatoes (canned or fresh)
- 1 tablespoon fresh cilantro, chopped
- 1 tablespoon fresh parsley, chopped
- 1 teaspoon paprika
- 1 teaspoon cumin
- 1/2 teaspoon red pepper flakes (optional, for heat)
- 1/4 cup green onions, sliced (for garnish)
Cooking Instructions:
- Marinate the Fish: In a medium bowl, combine the fish pieces with lime juice, salt, and black pepper. Gently toss to guarantee all pieces are coated. Allow the fish to marinate for about 15-20 minutes to absorb the flavors.
- Sauté Aromatics: In a large skillet, heat olive oil over medium heat. Add the chopped onion and garlic, and sauté until the onion becomes translucent, about 3-4 minutes. This step builds the flavor base for the dish.
- Add Vegetables: Stir in the diced bell pepper and cook for an additional 3 minutes until it starts to soften. This will add texture and sweetness to the Moqueca Bites.
- Prepare the Sauce: Pour in the coconut milk and add the diced tomatoes, paprika, cumin, and red pepper flakes (if using). Stir well to combine all ingredients. Allow the mixture to simmer for about 5 minutes, so the flavors meld together.
- Cook the Fish: Gently add the marinated fish pieces to the skillet. Carefully stir to coat the fish with the sauce. Cook for another 5-7 minutes, or until the fish is cooked through and flakes easily with a fork. Be cautious not to overcook the fish to maintain its tender texture.
- Finish and Garnish: Once the fish is cooked, remove the skillet from heat. Stir in the chopped cilantro and parsley for a fresh burst of flavor.
- Serve: Using toothpicks or mini skewers, assemble the Moqueca Bites by placing one piece of fish along with some sauce on each skewer. Arrange them on a serving platter and sprinkle with sliced green onions for garnish.
Extra Tips: When making Moqueca Bites, confirm that you choose fresh fish for the best flavor and texture. If you want to add more depth to the dish, consider incorporating other seafood, such as shrimp or octopus.
Additionally, the coconut milk can be adjusted to your preference; use more for a creamier sauce or less for a lighter dish. Always taste and adjust the seasoning before serving, as different fish can absorb flavors differently. Enjoy your cooking!
Shrimp Vatapá
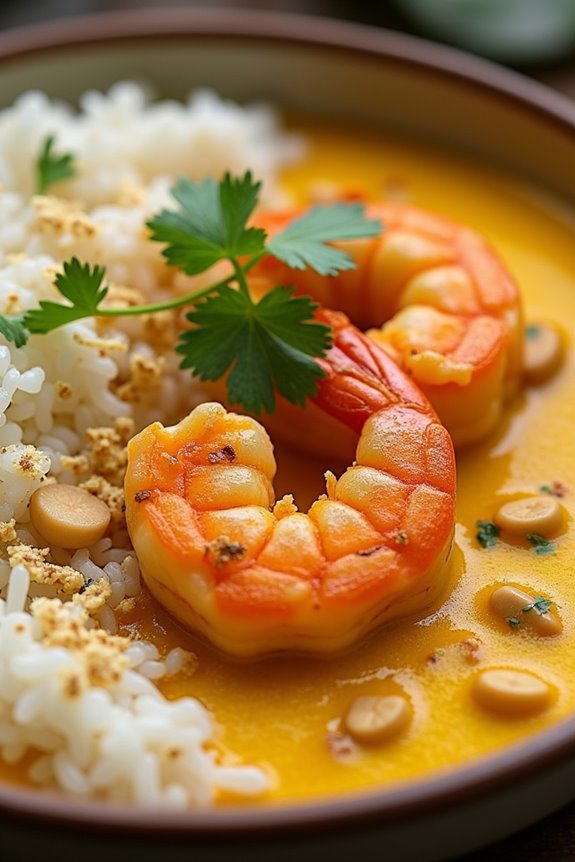
Shrimp Vatapá is a traditional Brazilian dish that hails from the northeastern region of the country. Known for its rich flavors and creamy texture, this dish combines shrimp with a variety of ingredients, including bread, coconut milk, and spices, creating a delicious appetizer that’s perfect for gatherings or a family meal.
Its roots can be traced back to African cuisine, and it’s often served with acarajé, a popular street food made from black-eyed peas. This dish isn’t only flavorful but also showcases the vibrant culinary culture of Brazil.
The combination of ingredients creates a unique balance of sweetness and savoriness, making Shrimp Vatapá a delightful experience for the palate. Whether you’re hosting a party or simply want to enjoy a taste of Brazil at home, this recipe is sure to impress your guests and family alike.
Ingredients (Serves 4-6 people)
- 500g shrimp, peeled and deveined
- 1 cup coconut milk
- 2 cups bread (preferably stale), torn into pieces
- 1 medium onion, chopped
- 2 cloves garlic, minced
- 1/2 cup palm oil (or olive oil)
- 1/2 cup peanuts, roasted and ground
- 1 teaspoon ground cumin
- 1 teaspoon ground coriander
- 1/2 teaspoon chili powder (adjust to taste)
- Salt to taste
- Fresh cilantro, chopped (for garnish)
- Juice of 1 lime
Cooking Instructions
- Prepare the Shrimp: In a saucepan, heat palm oil over medium heat. Add the chopped onion and minced garlic, sautéing until the onion is translucent and fragrant. Add the shrimp and cook for about 3-4 minutes or until they turn pink and opaque. Remove the shrimp and set aside.
- Make the Base: In the same saucepan, add the torn pieces of bread and pour in the coconut milk. Stir to combine and let it soak for about 5 minutes, allowing the bread to soften.
- Blend the Mixture: After soaking, transfer the bread and coconut milk mixture into a blender. Add the ground peanuts, cumin, coriander, chili powder, and salt. Blend until you achieve a smooth and creamy consistency.
- Combine and Cook: Return the blended mixture to the saucepan and add the cooked shrimp back in. Mix well and let it simmer on low heat for about 10-15 minutes, stirring occasionally. The mixture should thicken and the flavors will meld together beautifully.
- Finish and Serve: Once cooked, remove from heat and stir in the lime juice. Taste and adjust seasoning if necessary. Serve hot, garnished with fresh cilantro, alongside some rice or as a dip with bread.
Extra Tips
When preparing Shrimp Vatapá, using fresh shrimp will enhance the flavor considerably, but frozen shrimp can be a convenient alternative if fresh isn’t available.
Be mindful not to overcook the shrimp during the initial sautéing; they should just turn pink, as they’ll continue cooking when combined with the sauce. Additionally, feel free to adjust the seasoning and spice levels according to your preference, as some may prefer a milder or spicier dish.
Enjoy this delightful appetizer with a revitalizing caipirinha for a true Brazilian experience!
Cheese-Stuffed Peppers
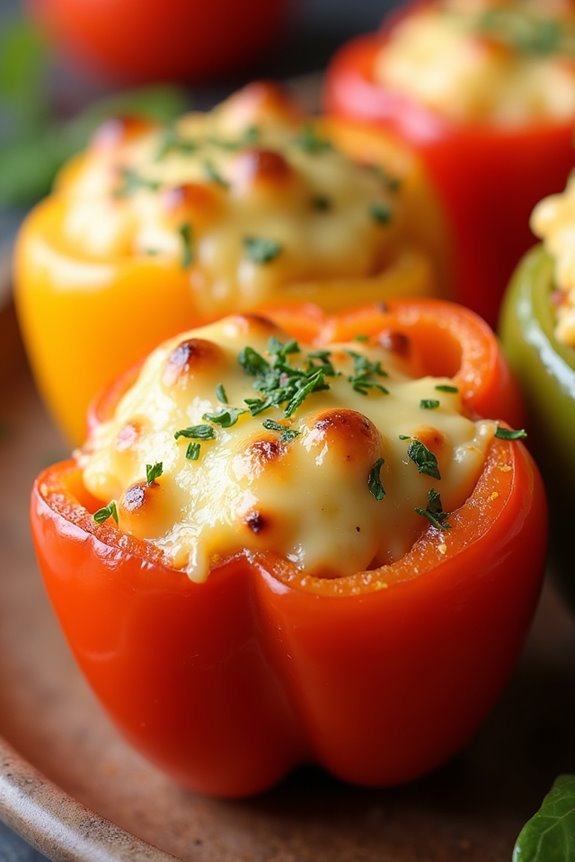
Cheese-Stuffed Peppers, known as “Pimentões Recheados com Queijo” in Brazil, are a delightful and savory appetizer that showcases the rich and diverse flavors of Brazilian cuisine.
These vibrant peppers are filled with a creamy cheese mixture that melts beautifully during baking, resulting in a dish that’s not only visually appealing but also deliciously satisfying. Perfect for gatherings or as a snack, these stuffed peppers can be customized with different cheeses and spices, making them versatile and fun to prepare.
To make Cheese-Stuffed Peppers, you’ll need to choose sweet bell peppers, which can be any color—red, yellow, or green. The sweetness of the peppers contrasts perfectly with the rich, cheesy filling. This recipe is designed to serve approximately 4-6 people, making it ideal for a small party or family gathering.
The combination of textures from the crunchy pepper skin to the creamy cheese filling will surely please your guests and leave them asking for the recipe.
Ingredients (serving size: 4-6 people):
- 4 large bell peppers (any color)
- 1 cup of cream cheese, softened
- 1 cup of shredded mozzarella cheese
- 1/2 cup of grated Parmesan cheese
- 1/4 cup of chopped fresh parsley (or cilantro)
- 1 clove of garlic, minced
- 1 teaspoon of paprika
- Salt and pepper to taste
- Olive oil (for drizzling)
Cooking Instructions:
- Preheat the Oven: Preheat your oven to 375°F (190°C). This guarantees that your stuffed peppers will cook evenly and the cheese will melt perfectly.
- Prepare the Peppers: Wash the bell peppers thoroughly and slice the tops off. Remove the seeds and membranes from inside the peppers to create enough space for the filling. Set aside the tops to use later if desired.
- Make the Cheese Filling: In a medium-sized bowl, combine the softened cream cheese, shredded mozzarella cheese, grated Parmesan cheese, chopped parsley, minced garlic, paprika, salt, and pepper. Mix well until all ingredients are fully incorporated and the mixture is creamy.
- Stuff the Peppers: Using a spoon, carefully fill each bell pepper with the cheese mixture. Pack the filling slightly to guarantee they’re well-stuffed. You can use a spatula to help push the filling down into the peppers if needed.
- Prepare for Baking: Place the stuffed peppers upright in a baking dish. Drizzle a little olive oil over the top of each pepper to enhance flavor and help with browning.
- Bake: Cover the baking dish with aluminum foil and bake in the preheated oven for about 25 minutes. After 25 minutes, remove the foil and bake for an additional 10-15 minutes, or until the peppers are tender and the cheese is bubbly and golden.
- Serve: Once cooked, remove the peppers from the oven and let them cool for a few minutes. You can serve them warm either on their own or with a side of your favorite dipping sauce.
Extra Tips:
When preparing Cheese-Stuffed Peppers, feel free to experiment with different types of cheese or add ingredients like cooked sausage or vegetables to the filling for more flavor.
Additionally, for a spicy twist, consider incorporating diced jalapeños or chili flakes into your cheese mixture. If you’re short on time, you can also use pre-made cheese spreads or dips as a filling base.
Finally, for a beautiful presentation, garnish the finished dish with extra chopped herbs before serving.
Farofa (Toasted Cassava Flour)
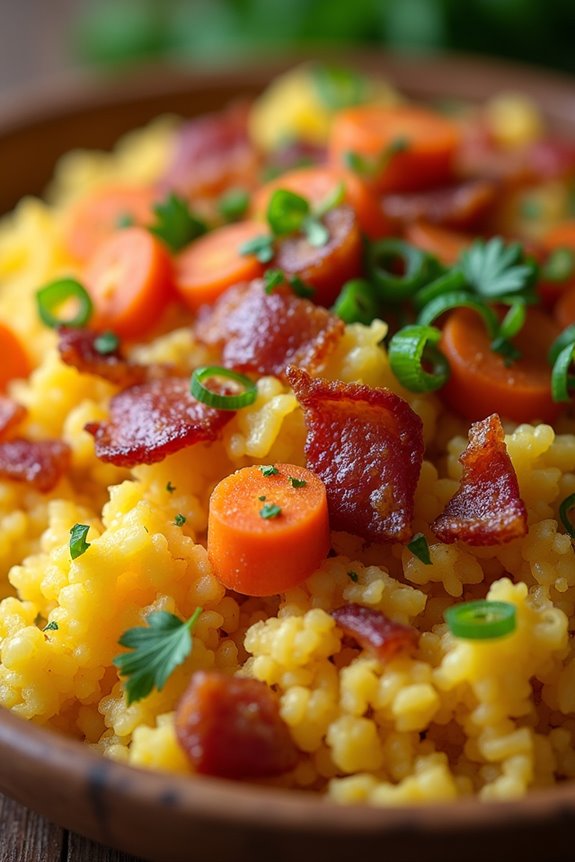
Farofa is a beloved Brazilian dish made from toasted cassava flour, known for its rich, nutty flavor and delightful texture. It often accompanies meats, stews, or can simply be enjoyed on its own as a savory side dish. This versatile preparation isn’t only easy to make but also allows for a variety of toppings and mix-ins, making it a perfect addition to any meal.
Traditionally served during festive occasions, farofa brings warmth and comfort to the table, showcasing the heart of Brazilian cuisine.
The base of farofa is cassava flour, which is expertly toasted to enhance its flavor and aroma. In this recipe, we incorporate ingredients such as onions, garlic, and bacon, though you can easily adapt it to suit your dietary preferences. Whether you’re cooking for a family gathering or a casual dinner, this recipe yields a delicious serving size of 4-6 people and is sure to impress your guests with its authentic Brazilian flair.
Ingredients (Serves 4-6):
- 2 cups cassava flour
- 4 tablespoons unsalted butter
- 1 medium onion, finely chopped
- 2 cloves garlic, minced
- 4 ounces bacon, diced
- 1/2 cup green onions, chopped
- 1/2 cup carrots, grated
- Salt and pepper, to taste
- Optional: chopped fresh parsley for garnish
Cooking Instructions:
- Cook the Bacon: In a large skillet over medium heat, add the diced bacon. Cook until crispy, stirring occasionally, for about 5-7 minutes. Once done, use a slotted spoon to remove the bacon and set it aside on a paper towel, leaving the rendered fat in the skillet.
- Sauté the Aromatics: In the same skillet with the bacon fat, add the chopped onion and cook for about 3-4 minutes until it becomes translucent. Then, add the minced garlic and sauté for an additional minute until fragrant.
- Add the Carrots: Stir in the grated carrots and cook for another 2-3 minutes, allowing them to soften slightly. The mixture should be vibrant and aromatic at this point.
- Toast the Cassava Flour: Gradually add the cassava flour to the skillet, stirring continuously to combine with the vegetable mixture. Toast the flour for about 5-10 minutes, or until it turns a light golden brown, making sure it doesn’t burn.
- Combine Ingredients: Return the cooked bacon to the skillet and mix in the chopped green onions. Season with salt and pepper to taste. Stir everything together until well combined, allowing the flavors to meld for about 2 minutes.
- Serve: Remove from heat and transfer the farofa to a serving dish. If desired, garnish with chopped fresh parsley for added color and flavor. It can be served warm or at room temperature.
Extra Tips:
When preparing farofa, feel free to customize it by adding other ingredients like nuts, raisins, or even different vegetables to suit your taste.
For a gluten-free version, confirm that the cassava flour is certified gluten-free. Additionally, keep an eye on the toasting process, as it can quickly go from perfectly toasted to burnt if left unattended. Enjoy experimenting with various toppings and enjoy this delightful Brazilian dish at your next meal!
Guaraná Cocktails

Guaraná Cocktails are a revitalizing and vibrant Brazilian drink that combines the unique flavor of guaraná with a variety of other ingredients, creating a delightful beverage that’s perfect for any social gathering or celebration. Guaraná, a fruit native to the Amazon, is known for its sweet taste and energizing properties, making it an excellent base for cocktails.
These drinks not only offer a taste of Brazil but also provide a fun and interactive experience for guests as they sip on this exotic concoction.
In this recipe, we’ll explore how to make Guaraná Cocktails that serve 4-6 people. The combination of guaraná soda, fresh fruits, and a splash of your favorite spirit guarantees that everyone at your gathering will enjoy this delightful drink.
Whether you’re hosting a barbecue, a birthday party, or just a casual get-together, these cocktails will add a tropical twist to your event.
Ingredients (Serves 4-6):
- 2 cups guaraná soda
- 1 cup vodka (or cachaça for a traditional twist)
- 1 cup fresh pineapple juice
- 1/2 cup fresh lime juice
- 1/2 cup fresh strawberries, hulled and sliced
- 1/2 cup fresh mint leaves, loosely packed
- Ice cubes
- Lime wedges and mint sprigs for garnish
Cooking Instructions:
- Prepare the Fruits: Start by washing and preparing your fresh fruits. Hull and slice the strawberries, and if you haven’t already done so, squeeze fresh limes for juice. This step guarantees that all your ingredients are fresh and ready to mix, enhancing the flavor of the cocktails.
- Mix the Juices: In a large pitcher, combine the fresh pineapple juice and lime juice. Stir well to guarantee that the juices are thoroughly mixed. This mixture forms the base of your cocktail, balancing the sweetness of the guaraná soda with the tartness of lime.
- Add the Alcohol: Pour in the vodka (or cachaça) to the pitcher with the juice mixture. Stir gently to combine. This step allows the flavors to meld together, creating a deliciously revitalizing cocktail that maintains the tropical vibe.
- Incorporate the Guaraná Soda: Slowly pour in the guaraná soda to the pitcher, stirring gently to avoid losing the carbonation. The soda adds a fizzy, sweet element that’s essential for the cocktail’s revitalizing taste, making it a perfect summer drink.
- Add Fresh Fruits and Mint: Gently fold in the sliced strawberries and mint leaves into the mixture. This step infuses the cocktail with additional freshness and flavor, as the mint provides an aromatic touch that elevates the overall experience.
- Serve Over Ice: Fill glasses with ice cubes, then pour the Guaraná Cocktail mixture over the ice. This keeps the drinks cool and revitalizing, perfect for serving on a hot day or during a lively gathering.
- Garnish and Enjoy: Garnish each glass with a lime wedge and a sprig of mint. This final touch not only adds a pop of color but also enhances the aromatic profile of the drink, making it visually appealing and inviting.
Extra Tips:
When making Guaraná Cocktails, feel free to get creative with your fruit choices! You can add slices of kiwi, mango, or even a splash of coconut water for a tropical twist.
Additionally, adjusting the sweetness is easy; if you prefer a sweeter cocktail, add more guaraná soda or a splash of simple syrup. For a non-alcoholic version, simply omit the vodka or cachaça and replace it with additional guaraná soda or sparkling water for a revitalizing mocktail experience.
Enjoy your revitalizing Brazilian adventure!