

When I think of Colombian cuisine, the vibrant colors and bold flavors always come to mind. The vegetarian dishes are a delightful showcase of everything from hearty potatoes to tropical fruits. Each recipe is like a little story, inviting you to savor the essence of Colombia. Curious about how these wonderful ingredients come together in 11 unique recipes? Let’s explore the culinary treasures that await you.
Ajiaco Santafereño With Corn and Potatoes
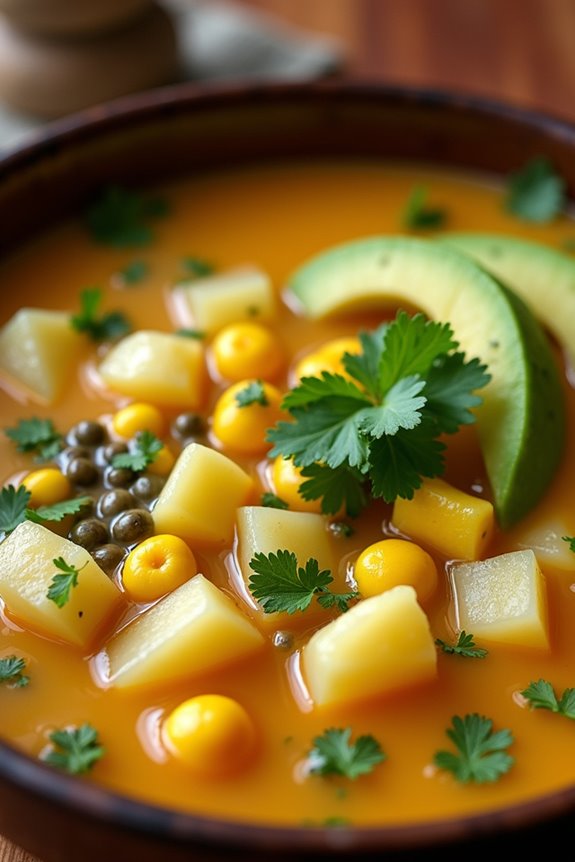
Ajiaco Santafereño is a traditional Colombian soup, beloved for its hearty blend of flavors and comforting ingredients. This vegetarian version of the classic dish showcases the rich taste of corn and potatoes, making it a delightful option for those who prefer a meatless meal. The combination of different types of potatoes, along with the unique touch of guascas (a Colombian herb), provides a depth of flavor that’s both satisfying and nutritious.
This soup isn’t only easy to prepare but also perfect for a family gathering or a cozy dinner with friends. By using fresh ingredients, you can create a vibrant and flavorful dish that pays homage to Colombian culinary traditions. Serve it with a side of avocado and capers for an authentic experience that will transport you straight to the heart of Colombia.
Ingredients (Serves 4-6 people):
- 2 tablespoons olive oil
- 1 medium onion, chopped
- 3 cloves garlic, minced
- 4 medium potatoes (2 yellow and 2 white), peeled and diced
- 2 cups corn kernels (fresh or frozen)
- 8 cups vegetable broth
- 1 teaspoon guascas (dried)
- Salt and pepper to taste
- 1 cup heavy cream (optional for richness)
- Fresh cilantro, chopped (for garnish)
- Avocado, sliced (for serving)
- Capers (for serving)
Cooking Instructions:
- Sauté the Aromatics: In a large pot, heat the olive oil over medium heat. Add the chopped onion and sauté until translucent, about 3-4 minutes. Then, add the minced garlic and cook for another minute, allowing the garlic to become fragrant without burning.
- Add the Potatoes and Corn: Stir in the diced potatoes and corn kernels. Cook for about 5 minutes, stirring occasionally, to lightly brown the potatoes and infuse them with the flavors from the onion and garlic.
- Pour in the Broth: Carefully add the vegetable broth to the pot, ensuring the potatoes and corn are submerged. Bring the mixture to a boil, then reduce the heat to low and let it simmer for about 20-25 minutes, or until the potatoes are tender.
- Season the Soup: Once the potatoes are cooked, stir in the guascas, salt, and pepper. Allow the soup to simmer for an additional 5 minutes to let the flavors meld together.
- Blend for Creaminess (Optional): For a creamier texture, you can use an immersion blender to blend a portion of the soup. Blend to your desired consistency, but be careful not to puree all of it—some chunks are nice for texture.
- Serve: Ladle the Ajiaco Santafereño into bowls. If desired, swirl in some heavy cream for added richness. Garnish with fresh cilantro, and serve with slices of avocado and capers on the side.
Extra Tips:
To enhance the flavor of your Ajiaco Santafereño, consider using homemade vegetable broth for a deeper taste. If you can’t find guascas, you can substitute with a mix of dried oregano and thyme, although it won’t replicate the exact flavor.
This soup can also be made ahead of time and reheated, making it a convenient option for busy days. Remember to adjust the seasoning before serving, as flavors can deepen during storage. Enjoy your culinary journey through Colombian cuisine!
Arepas De Choclo With Fresh Cheese

Arepas de choclo are a delightful Colombian dish made from fresh corn, offering a unique twist on traditional arepas. This dish is perfect for those looking to explore the vibrant flavors of Colombian cuisine while keeping it vegetarian. The combination of sweet corn and creamy fresh cheese creates a wonderful texture and taste that will surely impress your family and friends.
These arepas can be served as a main dish or as a side, making them versatile for any meal. The fresh corn used in this recipe can be found at local farmers’ markets or grocery stores. If you can’t find fresh corn, frozen corn can be used as a substitute, though the flavor may vary slightly. Arepas de choclo are often enjoyed with hogao (a Colombian sauce made from tomatoes and onions) or simply on their own, allowing the natural sweetness of the corn and the richness of the cheese to shine through.
Ingredients (Serves 4-6):
- 4 cups fresh corn kernels (or frozen corn, thawed)
- 1 cup fresh cheese (such as queso blanco or farmer’s cheese), crumbled
- 1 cup cornmeal (preferably precooked)
- 1/2 cup milk (or plant-based milk)
- 1 tablespoon sugar
- 1 teaspoon salt
- 1/4 teaspoon baking powder
- Butter or oil for cooking
Cooking Instructions:
- Prepare the Corn Mixture: In a blender or food processor, combine the fresh corn kernels and milk. Blend until you achieve a smooth mixture. If using frozen corn, confirm it’s fully thawed before blending.
- Combine Ingredients: In a large mixing bowl, combine the blended corn mixture with the cornmeal, sugar, salt, and baking powder. Stir until well combined and a dough-like consistency forms. The mixture should be moist but firm enough to shape.
- Incorporate the Cheese: Gently fold in the crumbled fresh cheese into the corn mixture. This step adds a lovely creaminess to the arepas as they cook.
- Shape the Arepas: With your hands, take portions of the mixture and shape them into thick patties, about ½ inch thick. Confirm they’re evenly shaped for consistent cooking.
- Cook the Arepas: Heat a skillet or griddle over medium heat and add butter or oil to coat the surface. Once hot, place the arepas in the pan. Cook for about 4-5 minutes on each side or until they develop a golden-brown crust and are cooked through.
- Serve: Once cooked, remove the arepas from the skillet and serve them warm. They can be enjoyed alone or with a side of hogao or your favorite dipping sauce.
Extra Tips:
When making arepas de choclo, feel free to experiment with different types of cheese to find your preferred flavor. Additionally, if your mixture feels too wet, you can add a bit more cornmeal to achieve the right consistency.
For an added twist, consider adding herbs or spices to the batter for extra flavor. These arepas are best enjoyed fresh, but they can be stored in an airtight container in the refrigerator for a couple of days and reheated on a skillet. Enjoy your cooking experience!
Ensalada De Frutas With Tropical Flavors

Ensalada De Frutas, or fruit salad, is a vibrant and invigorating dish that embodies the essence of Colombian cuisine. Bursting with tropical flavors, this salad showcases a variety of fresh fruits that not only tantalize the taste buds but also provide a healthy and nutritious option. Ideal for warm days or as a delightful dessert, this dish is often enjoyed during gatherings and celebrations, making it a staple in many Colombian households.
The combination of sweet, juicy fruits paired with a hint of lime and sugar elevates this simple dish into a tropical feast.
To prepare Ensalada De Frutas, you can choose from an array of seasonal fruits that are readily available in your region. Common choices include bananas, mangoes, papayas, and pineapples, all of which contribute to the dish’s colorful presentation and delicious taste.
The addition of lime juice not only enhances the flavors but also adds an invigorating zing that balances the sweetness of the fruits. This recipe serves 4-6 people, making it perfect for a family gathering or a fun summer party.
Ingredients (Serves 4-6):
- 2 ripe bananas
- 1 ripe mango
- 1 small papaya
- 1 cup of fresh pineapple chunks
- 1 cup of strawberries, hulled and halved
- 1 lime (for juice)
- 2 tablespoons of sugar (adjust according to taste)
- Fresh mint leaves (for garnish, optional)
Cooking Instructions:
- Prepare the Fruits: Begin by washing all the fruits thoroughly under running water. Peel the bananas, mango, and papaya. Cut the bananas into bite-sized slices, the mango into cubes, and the papaya into small pieces. For the pineapple, use pre-cut chunks or slice a fresh pineapple into bite-sized pieces. The strawberries should be hulled and halved.
- Mix the Fruits: In a large mixing bowl, gently combine all the prepared fruits. Be careful while mixing to avoid bruising the more delicate fruits like strawberries and bananas. This will create a colorful medley that will be visually appealing.
- Add Lime Juice and Sugar: Squeeze the juice of the lime over the mixed fruits. Sprinkle the sugar evenly over the top. The lime juice will add an invigorating tartness, while the sugar will enhance the sweetness of the fruits. Toss gently to coat all the fruits evenly with lime juice and sugar.
- Chill: For best results, cover the bowl with plastic wrap or a lid and let the salad chill in the refrigerator for about 30 minutes. This allows the flavors to meld together and the salad to be served cold, which is particularly invigorating on a hot day.
- Serve: Once chilled, give the salad a gentle toss before serving. If desired, garnish with fresh mint leaves for an extra touch of flavor and presentation. Serve in individual bowls or on a large platter.
Extra Tips:
For a unique twist on your Ensalada De Frutas, consider adding other tropical fruits such as kiwi or passion fruit for additional flavor and texture. You can also experiment with a drizzle of honey instead of sugar or even include a sprinkle of coconut flakes for a bit of crunch.
This salad is very versatile, so feel free to adjust the ingredients based on what’s in season or your personal preferences. Enjoy your deliciously fresh Colombian fruit salad!
Patacones With Avocado and Salsa
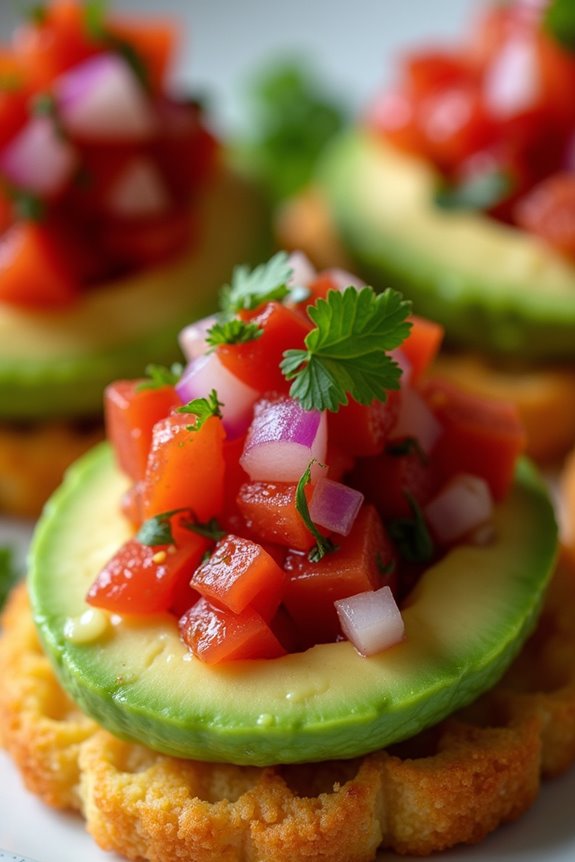
Patacones, also known as tostones, are a beloved Colombian snack made from green plantains that are fried, smashed, and then fried again until crispy. This delightful dish is typically enjoyed with a variety of toppings, but one of the most popular combinations is with fresh avocado and a zesty salsa.
The crunchy texture of the patacones pairs perfectly with the creamy avocado and the vibrant flavors of the salsa, creating a delicious appetizer or side dish that everyone will love.
Making patacones is a straightforward process but requires a bit of patience to achieve the perfect crunch. With the right combination of ingredients and some careful frying, you can serve up a plate of these golden bites that are sure to impress your family and friends.
Whether you’re enjoying them as a snack, a side dish, or even a light meal, patacones with avocado and salsa are a tasty way to explore Colombian cuisine.
Ingredients (Serves 4-6)
- 2 green plantains
- Vegetable oil (for frying)
- 1 ripe avocado
- 1 lime (juiced)
- Salt (to taste)
- 1 cup diced tomatoes
- 1/4 cup chopped red onion
- 1/4 cup chopped fresh cilantro
- 1 jalapeño (finely chopped, optional)
- Pepper (to taste)
Cooking Instructions
1. Prepare the Plantains: Start by peeling the green plantains. Cut off the ends, and make a slit along the length of each plantain to help remove the skin. Once peeled, cut the plantains into 1-inch thick slices.
2. Fry the Plantain Slices: Heat about 1-2 inches of vegetable oil in a large skillet over medium heat. Once the oil is hot (you can test it by dropping a small piece of plantain in; it should sizzle), carefully add the plantain slices. Fry them for about 3-4 minutes on each side until they’re lightly golden but not fully cooked.
Remove them from the oil and drain on paper towels.
3. Smash the Plantains: Use the bottom of a flat plate or a tostonera (a special tool for smashing plantains) to press down on each fried slice until they’re flattened to about 1/2 inch thick.
4. Fry Again: Return the smashed plantains to the hot oil and fry them for an additional 2-3 minutes on each side until they’re golden brown and crispy. Drain again on paper towels and sprinkle with salt while they’re still hot.
5. Prepare the Avocado Salsa: In a bowl, mash the ripe avocado and mix in lime juice and salt to taste. In another bowl, combine diced tomatoes, red onion, cilantro, jalapeño, and season with salt and pepper. Mix well.
6. Assemble the Dish: Place the crispy patacones on a serving platter. Top each patacón with a generous spoonful of the mashed avocado followed by a spoonful of the fresh salsa.
Extra Tips
When frying the plantains, verify the oil is at the right temperature to avoid soggy patacones. If the oil is too cool, they’ll absorb too much oil and become greasy.
You can also experiment with different toppings; black beans, cheese, or a spicy sauce can add more flavor to your patacones. Finally, serve them immediately after frying for the best texture and taste, as they tend to lose their crispness over time.
Enjoy your delicious Colombian patacones!
Sopa De Lentejas With Cilantro and Vegetables

Sopa de Lentejas is a traditional Colombian lentil soup that isn’t only hearty and nutritious but also bursting with flavor. This dish is packed with vegetables and enhanced with the fresh taste of cilantro, making it a perfect vegetarian option for anyone looking to enjoy a comforting meal. The combination of lentils and vegetables provides a rich source of protein and fiber, making it a fulfilling choice for lunch or dinner.
Cooking this soup is a straightforward process that requires minimal preparation time. The lentils soak up the flavors of the vegetables and spices, creating a delightful harmony of tastes. Whether you’re a seasoned cook or a beginner in the kitchen, this recipe will guide you through each step to create a delicious and wholesome Sopa de Lentejas that can be enjoyed by the whole family.
Ingredients (Serves 4-6):
- 1 cup dried lentils (green or brown)
- 1 medium onion, chopped
- 2 garlic cloves, minced
- 1 medium carrot, diced
- 1 medium potato, diced
- 1 medium bell pepper, diced
- 2 medium tomatoes, chopped
- 1 teaspoon ground cumin
- 1 teaspoon paprika
- 4 cups vegetable broth
- 1 cup fresh cilantro, chopped
- 2 tablespoons olive oil
- Salt and pepper to taste
- Juice of 1 lime (optional)
Cooking Instructions:
- Prepare the Lentils: Begin by rinsing the dried lentils under cold water until the water runs clear. This helps remove any dust or impurities. If you have time, you can soak the lentils in water for about an hour to reduce cooking time, but this step is optional.
- Sauté the Vegetables: In a large pot, heat the olive oil over medium heat. Add the chopped onions and garlic, sautéing them until the onions become translucent and fragrant, which usually takes about 3-4 minutes. This step adds a flavorful base to the soup.
- Add the Vegetables: Stir in the diced carrots, potatoes, and bell pepper. Cook for another 5-6 minutes, allowing the vegetables to soften slightly. This enhances their natural sweetness and adds depth to the flavor of the soup.
- Incorporate Spices and Lentils: Add the chopped tomatoes, ground cumin, paprika, and rinsed lentils to the pot. Stir well to combine all the ingredients, letting the spices coat the vegetables and lentils for 1-2 minutes. This allows the spices to bloom and intensify.
- Add Broth and Simmer: Pour in the vegetable broth and bring the mixture to a boil. Once boiling, reduce the heat to low and cover the pot. Let the soup simmer for about 30-40 minutes, or until the lentils are tender. Stir occasionally to prevent sticking, and enjoy the delightful aroma filling your kitchen.
- Finish with Cilantro and Seasoning: Once the lentils are cooked, stir in the chopped cilantro and season the soup with salt and pepper to taste. If desired, add a squeeze of lime juice for an extra kick of flavor. Allow the soup to sit for a few minutes before serving to let the flavors meld together.
Extra Tips:
For a more textured soup, consider blending a portion of the soup with an immersion blender before adding the cilantro. This creates a creamier consistency while still keeping the hearty chunks of vegetables.
Additionally, feel free to customize the vegetable mix according to what you have on hand or to suit your taste preferences. Adding a pinch of chili powder can also give the soup a spicy kick if desired. Enjoy your Sopa de Lentejas with crusty bread or avocado slices for a complete meal!
Empanadas De Espinaca With Cheese

Empanadas de espinaca with cheese are a delightful Colombian dish that combines the richness of cheese with the nutritious goodness of spinach, all wrapped in a crispy pastry.
These empanadas aren’t only perfect for vegetarian diets but also make for an excellent appetizer or snack at gatherings and parties. The flaky crust paired with the savory filling is sure to please everyone, from vegetarians to meat lovers alike.
Making empanadas may seem challenging at first, but with a little practice, you’ll find that they’re quite simple to prepare. The key is in the dough and the filling. The dough should be perfectly tender and flaky, while the filling should be well-seasoned, allowing the flavors of the spinach and cheese to shine through.
Serve these empanadas warm with a side of your favorite dipping sauce for an irresistible treat.
Ingredients (Serves 4-6):
- 2 cups of all-purpose flour
- 1/2 teaspoon of salt
- 1/4 cup of unsalted butter, softened
- 1/2 cup of cold water
- 2 cups of fresh spinach, chopped
- 1 cup of cheese (preferably queso blanco or mozzarella), shredded
- 1 small onion, finely chopped
- 2 cloves of garlic, minced
- 1 tablespoon of olive oil
- 1/2 teaspoon of black pepper
- 1/2 teaspoon of cumin
- Oil for frying
Cooking Instructions:
1. Prepare the Dough: In a mixing bowl, combine the flour and salt. Add the softened butter and mix until the mixture resembles coarse crumbs. Gradually add the cold water, mixing until a dough forms. Knead the dough on a lightly floured surface for a few minutes until smooth.
Wrap it in plastic wrap and let it rest for at least 30 minutes.
2. Make the Filling: In a skillet, heat the olive oil over medium heat. Add the chopped onion and garlic, sautéing until they become translucent and fragrant, about 3-5 minutes.
Add the chopped spinach to the skillet and cook until wilted. Remove from heat and stir in the shredded cheese, black pepper, and cumin. Allow the mixture to cool slightly.
3. Roll Out the Dough: Once the dough has rested, divide it into equal portions (about 12 pieces). On a floured surface, roll each piece into a circle about 5-6 inches in diameter. The thickness should be about 1/8 inch.
4. Fill the Empanadas: Place a spoonful of the spinach and cheese filling on one half of each dough circle. Be careful not to overfill, as this can cause them to burst while cooking.
Fold the dough over to create a half-moon shape, pressing the edges together to seal. Use a fork to crimp the edges for extra security.
5. Fry the Empanadas: Heat oil in a deep frying pan over medium heat. Once hot, carefully add the empanadas (working in batches if necessary) and fry them for about 3-4 minutes on each side, or until golden brown.
Use a slotted spoon to remove them from the oil and drain on paper towels.
6. Serve and Enjoy: Allow the empanadas to cool slightly before serving. You can serve them as they’re or with a dipping sauce of your choice, such as aji sauce or salsa.
Extra Tips:
For a healthier option, you can bake the empanadas instead of frying them. Preheat your oven to 375°F (190°C), brush the empanadas with olive oil, and bake for about 20-25 minutes or until golden brown.
Additionally, you can experiment with different cheeses or add other vegetables like mushrooms or peppers to the filling for added flavor. Enjoy your cooking adventure with these delicious empanadas!
Champiñones Al Ajillo With Garlic and Herbs
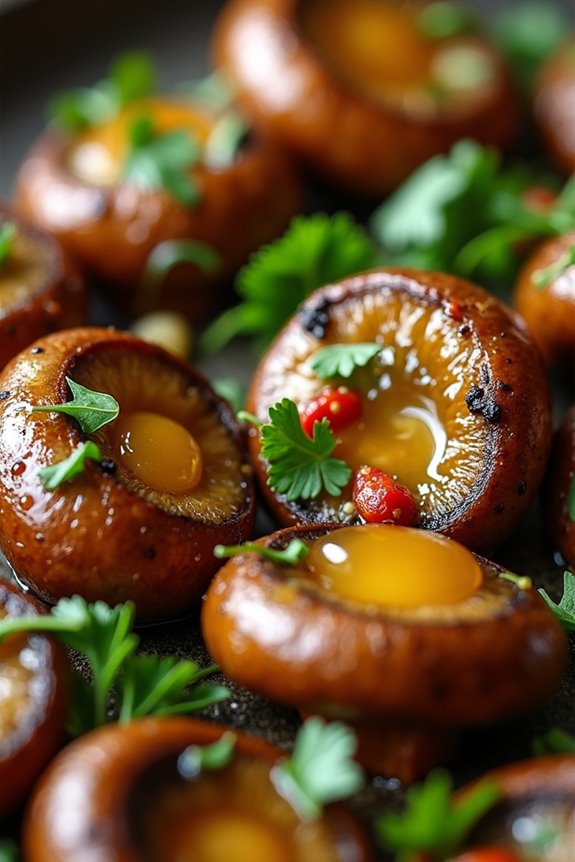
Champiñones Al Ajillo, or sautéed mushrooms with garlic and herbs, is a classic Colombian dish that showcases the rich flavors of fresh ingredients. This vegetarian recipe highlights the earthy taste of mushrooms while infusing them with aromatic garlic and a medley of herbs.
It’s a simple yet elegant dish perfect as a side or a main course, especially when paired with rice or crusty bread. The preparation of Champiñones Al Ajillo is straightforward, making it accessible for cooks of all skill levels. With just a few ingredients, you can create a dish that bursts with flavor and celebrates the essence of Colombian cuisine.
Whether you’re entertaining guests or enjoying a quiet dinner at home, this recipe will surely impress with its delightful taste and vibrant presentation.
Ingredients (Serves 4-6)
- 500g fresh mushrooms (button or cremini)
- 4 cloves garlic, minced
- 1/4 cup olive oil
- 1 teaspoon red pepper flakes (optional)
- 1/4 cup fresh parsley, chopped
- 1 tablespoon fresh thyme, chopped (or 1 teaspoon dried thyme)
- Salt and pepper to taste
- Juice of 1 lemon
Cooking Instructions
1. Prepare the Mushrooms: Clean the mushrooms by wiping them with a damp cloth or paper towel to remove any dirt. Avoid rinsing them under water, as mushrooms can absorb moisture and become soggy.
Slice the mushrooms into quarters or halves depending on their size, ensuring they’re evenly cut for uniform cooking.
2. Sauté the Garlic: In a large skillet, heat the olive oil over medium heat. Add the minced garlic and sauté for about 1-2 minutes until fragrant but not browned.
Stir frequently to prevent burning, as burnt garlic can impart a bitter taste to the dish.
3. Cook the Mushrooms: Add the sliced mushrooms to the skillet, stirring to coat them in the garlic-infused oil. Cook for about 5-7 minutes, or until the mushrooms have released their moisture and are tender.
If using, sprinkle in the red pepper flakes for a touch of heat.
4. Add Herbs and Season: Once the mushrooms are cooked, add the chopped parsley, thyme, salt, and pepper to taste. Stir everything together and cook for an additional 2-3 minutes, allowing the herbs to release their flavors into the dish.
5. Finish with Lemon Juice: Just before serving, squeeze the juice of one lemon over the mushroom mixture. This brightens the flavors and adds a revitalizing zing.
Give everything a final stir and remove from heat.
Extra Tips
When cooking Champiñones Al Ajillo, feel free to experiment with different types of mushrooms for varied textures and flavors. Shiitake, portobello, or oyster mushrooms can add unique tastes to the dish.
Additionally, serving the dish immediately while it’s hot will enhance its flavors, but it can also be made ahead of time and reheated gently on the stove. Adjust the garlic and herbs to suit your taste preferences, and consider garnishing with additional fresh herbs before serving for a pop of color.
Quinoa Salad With Black Beans and Mango
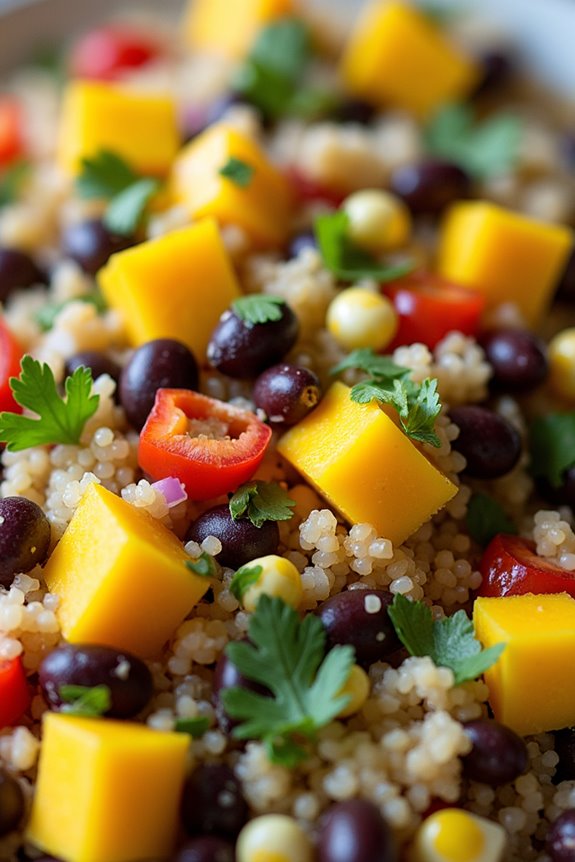
Quinoa Salad with Black Beans and Mango is a vibrant and nutritious dish that perfectly embodies the flavors of Colombian cuisine while catering to vegetarian lifestyles. This salad isn’t only visually appealing with its bright colors but is also packed with protein, fiber, and essential vitamins.
Quinoa serves as a hearty base, complemented by the earthy richness of black beans and the sweet, tropical flavor of fresh mango. Together, these ingredients create a revitalizing and satisfying meal that can be served as a main course or a side dish.
This dish is versatile and can be enjoyed cold or at room temperature, making it an excellent option for picnics, potlucks, or as a meal prep choice for the week ahead. The combination of textures and flavors will excite your palate, while the health benefits will leave you feeling energized.
Whether you’re a seasoned vegetarian or just looking to incorporate more plant-based meals into your diet, this Quinoa Salad with Black Beans and Mango is sure to become a favorite.
Ingredients (Serves 4-6):
- 1 cup quinoa
- 2 cups water or vegetable broth
- 1 can (15 oz) black beans, rinsed and drained
- 1 ripe mango, diced
- 1 red bell pepper, diced
- 1 small red onion, finely chopped
- 1 cup corn (fresh or canned)
- 1/4 cup fresh cilantro, chopped
- 1 lime, juiced
- 2 tablespoons olive oil
- 1 teaspoon cumin
- Salt and pepper to taste
Cooking Instructions:
- Rinse the Quinoa: Begin by rinsing the quinoa under cold running water in a fine-mesh sieve to remove any bitterness. This step is essential for achieving a pleasant flavor in the finished dish.
- Cook the Quinoa: In a medium saucepan, combine the rinsed quinoa and 2 cups of water or vegetable broth. Bring to a boil, then reduce the heat to low, cover, and simmer for about 15 minutes or until all the liquid is absorbed. Remove from heat and let it sit covered for 5 minutes, then fluff with a fork.
- Prepare the Vegetables: While the quinoa is cooking, prepare the vegetables. Dice the mango, red bell pepper, and finely chop the red onion. If using fresh corn, you can cut the kernels off the cob.
- Mix the Salad: In a large mixing bowl, combine the cooked quinoa, black beans, diced mango, bell pepper, onion, corn, and cilantro.
- Make the Dressing: In a small bowl, whisk together lime juice, olive oil, cumin, salt, and pepper. Adjust the seasoning to your taste.
- Combine Everything: Pour the dressing over the quinoa salad and gently mix until everything is well coated. Taste and adjust seasoning if necessary.
- Chill and Serve: For the best flavor, cover the salad and let it chill in the refrigerator for at least 30 minutes before serving. This allows the ingredients to meld together beautifully.
Extra Tips:
When preparing Quinoa Salad with Black Beans and Mango, consider using ripe mango for the best sweetness and flavor. If you can’t find fresh mango, canned mango can be a suitable substitute, but be sure to drain it well.
You can also customize this salad by adding other ingredients such as avocado, jalapeños for heat, or even nuts for added crunch. Finally, if you’re making this salad ahead of time, keep the dressing separate until you’re ready to serve to maintain the freshness of the ingredients.
Tacos De Tofu With Avocado and Pico De Gallo
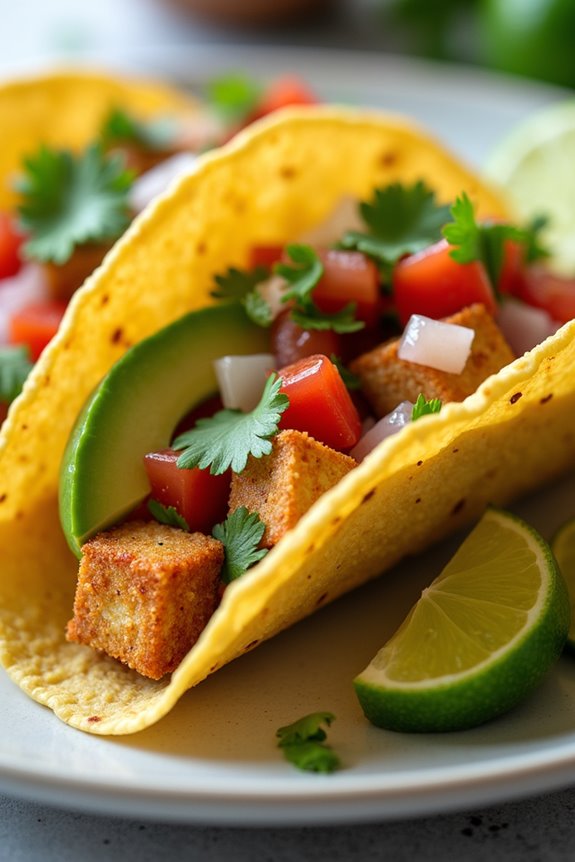
Tacos de Tofu with Avocado and Pico de Gallo is a delightful vegetarian dish that brings the vibrant flavors of Colombia right to your table. This hearty meal combines marinated tofu with the creaminess of avocado and the fresh zest of pico de gallo, creating a satisfying and nutritious option for any occasion.
Ideal for gatherings or a casual dinner at home, these tacos are sure to please both vegetarians and meat-lovers alike. The dish isn’t only packed with flavor but is also incredibly versatile. You can tailor the toppings to your liking, adding your favorite ingredients or adjusting the spices to fit your palate.
Serve these tacos with a side of rice or beans for a complete meal, and enjoy the colorful presentation that will impress your guests. Let’s explore the ingredients and cooking instructions to whip up this delicious dish for 4-6 people.
Ingredients:
- 1 block (14 oz) firm tofu, drained and pressed
- 2 tablespoons olive oil
- 2 tablespoons soy sauce
- 1 teaspoon chili powder
- 1 teaspoon cumin
- 1 teaspoon garlic powder
- Salt and pepper, to taste
- 8 small corn or flour tortillas
- 2 ripe avocados, sliced
- 1 cup pico de gallo (store-bought or homemade)
- Fresh cilantro, for garnish
- Lime wedges, for serving
Cooking Instructions:
- Prepare the Tofu: Start by cutting the pressed tofu into bite-sized cubes. This will allow the tofu to absorb the flavors of the marinade better. A firm tofu works best for this recipe as it holds its shape during cooking.
- Marinate the Tofu: In a large bowl, combine olive oil, soy sauce, chili powder, cumin, garlic powder, salt, and pepper. Add the tofu cubes to the marinade, ensuring they’re well-coated. Let the tofu marinate for at least 20 minutes to allow the flavors to penetrate.
- Cook the Tofu: Heat a non-stick skillet over medium-high heat. Once hot, add the marinated tofu cubes to the skillet. Cook for about 8-10 minutes, turning occasionally until the tofu is golden brown and slightly crispy on all sides. This step enhances the texture and adds depth to the dish.
- Warm the Tortillas: In another skillet or on a grill, warm the tortillas for about 30 seconds on each side until they’re pliable. Warming the tortillas makes them easier to fold and adds a nice touch of warmth to the tacos.
- Assemble the Tacos: To assemble, place a few pieces of the cooked tofu in the center of each tortilla. Top with sliced avocado and a generous spoonful of pico de gallo. Feel free to add more toppings like cheese or hot sauce if you desire.
- Garnish and Serve: Sprinkle fresh cilantro over the assembled tacos for added freshness. Serve the tacos with lime wedges on the side so everyone can squeeze fresh lime juice over their tacos for an extra zing.
Extra Tips:
For a more robust flavor, consider grilling the tofu instead of pan-frying it. You can also make your pico de gallo by combining diced tomatoes, onions, cilantro, jalapeños, lime juice, and salt.
If you want to add a bit of heat, include diced jalapeños or a splash of hot sauce. This dish can be easily customized with additional toppings like shredded lettuce, cheese, or roasted veggies, making it a versatile and enjoyable meal for everyone.
Ceviche Vegetariano With Cauliflower and Citrus
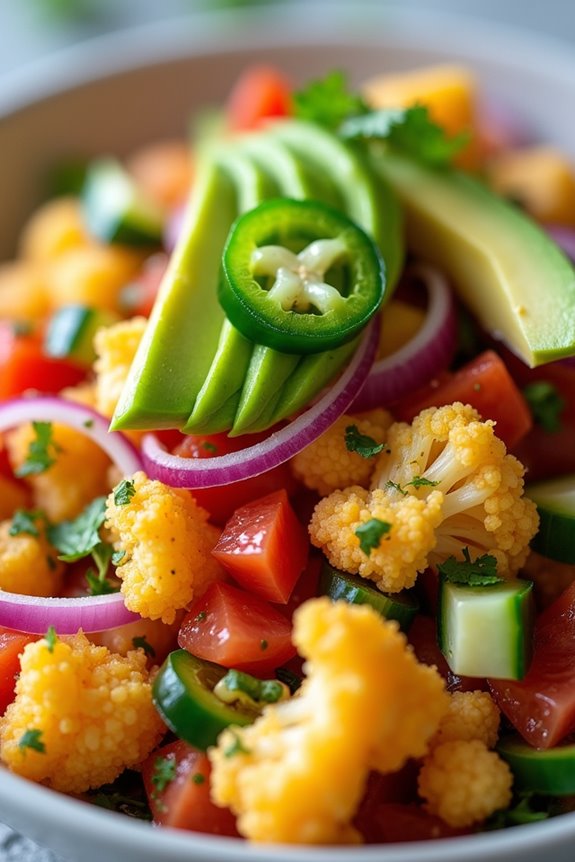
Ceviche is a traditional Colombian dish typically made with fresh fish, marinated in citrus juices and mixed with various ingredients to create a revitalizing appetizer. However, this vegetarian version, Ceviche Vegetariano with Cauliflower and Citrus, provides an exciting twist that captures the essence of the original dish without using seafood. The crisp cauliflower mimics the texture of fish while absorbing the zesty flavors of the marinade, making it a delightful and colorful addition to any meal.
This dish is perfect for gatherings and serves as a wonderful option for vegetarians and non-vegetarians alike. Pair it with tortilla chips or serve it over a bed of greens for a light and satisfying meal. The bright citrus notes combined with the crunch of the cauliflower and the vibrant colors of the vegetables make this ceviche not only delicious but visually appealing as well.
Ingredients (Serving Size: 4-6 people)
- 1 medium cauliflower, cut into small florets
- 1 cup freshly squeezed lime juice
- 1 orange, juiced
- 1 small red onion, finely chopped
- 1 medium tomato, diced
- 1 small cucumber, diced
- 1 jalapeño pepper, finely chopped (optional, for heat)
- 1/4 cup fresh cilantro, chopped
- Salt to taste
- Black pepper to taste
- Avocado slices (for garnish)
- Tortilla chips (for serving, optional)
Cooking Instructions
- Prepare the Cauliflower: Start by bringing a large pot of salted water to a boil. Once boiling, add the cauliflower florets and blanch them for about 2-3 minutes. This will help soften the cauliflower slightly while still keeping a good crunch. After the time is up, drain the cauliflower and immediately transfer it to a bowl of ice water to stop the cooking process. Let it cool for a few minutes, then drain again and set aside.
- Make the Marinade: In a mixing bowl, combine the freshly squeezed lime juice and orange juice. This citrus mixture will serve as the base for your ceviche, providing acidity and flavor. Stir well to mix the juices thoroughly.
- Combine Ingredients: To the bowl with the citrus marinade, add the blanched cauliflower florets, chopped red onion, diced tomato, diced cucumber, and jalapeño (if using). Gently toss everything together to guarantee the cauliflower is well-coated with the marinade and all the vegetables are evenly distributed.
- Season and Chill: Add salt and black pepper to taste. Mix again, tasting to adjust the seasoning as needed. Cover the bowl with plastic wrap and refrigerate for at least 30 minutes to allow the flavors to meld. This chilling step is essential as it enhances the overall taste of the ceviche.
- Garnish and Serve: Once chilled, remove the ceviche from the refrigerator. Just before serving, stir in the chopped cilantro for a fresh touch. Serve the ceviche in individual bowls, garnished with avocado slices on top. If desired, accompany it with tortilla chips for a crunchy contrast.
Extra Tips
For the best flavor, consider letting the ceviche marinate for a few hours in the refrigerator, as this will deepen the citrus flavor and allow the vegetables to soak in the marinade. Additionally, feel free to customize the dish by adding other vegetables like bell peppers or radishes for extra crunch and color.
If you’re looking for a spicier kick, increase the amount of jalapeño or add a dash of hot sauce just before serving. Enjoy this revitalizing dish as an appetizer or light meal!
Dulce De Guayaba With Cheese and Crackers

Dulce de guayaba, or guava paste, is a beloved treat in Colombia, often enjoyed with cheese and crackers for a delightful combination of sweet and savory flavors. This simple yet delicious dish makes for a perfect appetizer or snack, showcasing the tropical sweetness of guava paired beautifully with the creaminess of cheese.
It’s an excellent choice for gatherings, adding a touch of Colombian culture to your table while pleasing your guests’ palates.
Preparing Dulce de Guayaba with cheese and crackers isn’t only easy but also quick, making it a go-to option for those unexpected moments when you’re entertaining. The harmony of textures and flavors creates a satisfying experience, as the sweet guava paste melts in your mouth, balanced by the salty cheese and the crunch of the crackers.
Whether you’re serving it at a party or enjoying it as a casual snack, this dish is sure to impress.
Ingredients (Serves 4-6 people):
- 1 cup dulce de guayaba (guava paste)
- 8 oz white cheese (such as queso fresco or panela)
- 1 box of saltine crackers or water crackers
- Fresh mint leaves (for garnish, optional)
Cooking Instructions:
- Prepare the Ingredients: Start by gathering all your ingredients. Make certain the guava paste is at room temperature for easier slicing. Slice the white cheese into thin pieces that can be easily placed on the crackers.
- Slice the Guava Paste: Using a sharp knife, cut the dulce de guayaba into squares or rectangles. Aim for pieces that are roughly the same size as the cheese pieces to guarantee a harmonious assembly.
- Assemble the Dish: On a serving platter, arrange the crackers in a single layer. Place a slice of guava paste on top of each cracker, followed by a slice of cheese. You can alternate the order if you prefer, but this arrangement typically offers a delightful balance of flavors.
- Garnish and Serve: If desired, add a few fresh mint leaves for a pop of color and an aromatic touch. Serve the platter immediately to enjoy the contrast of flavors at their best.
Extra Tips:
When preparing Dulce de Guayaba with cheese and crackers, you can experiment with different types of cheese to find your preferred flavor combination. Soft cheeses like cream cheese or even sharp cheeses can add different notes to the dish.
Additionally, consider adding some sliced fruit or nuts on the platter for a more diverse snacking experience. This dish can be made ahead of time, but it’s best assembled just before serving to maintain the freshness of the crackers and cheese.
Enjoy!