

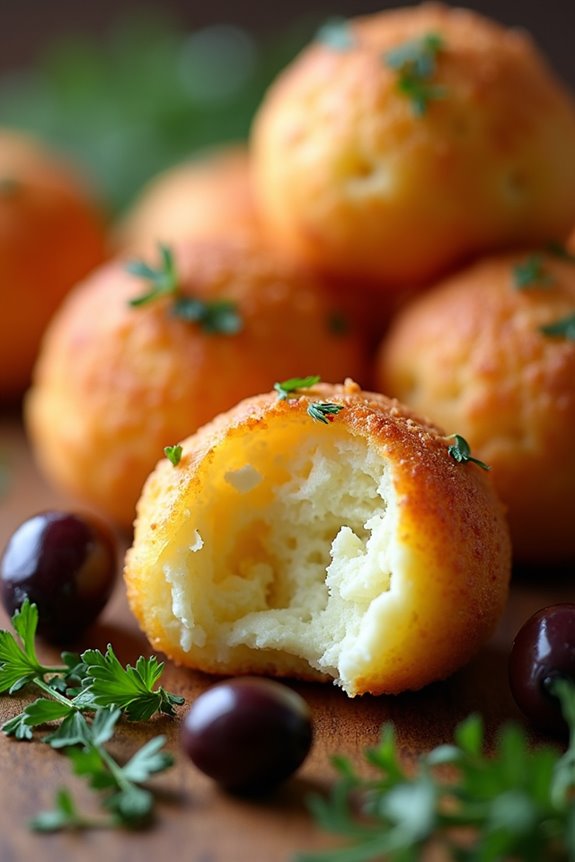
When I first tasted Brazilian cheese balls, I was completely won over by their delightful combination of chewy texture and savory flavors. Each bite reminds me of a vibrant gathering filled with joy and enticing aromas. I’ve curated 13 amazing recipes featuring this loved snack, from the traditional Pão De Queijo to intriguing twists like Spinach and Feta. These mouthwatering bites are just perfect for any occasion. Trust me, you won’t want to miss out on trying them!
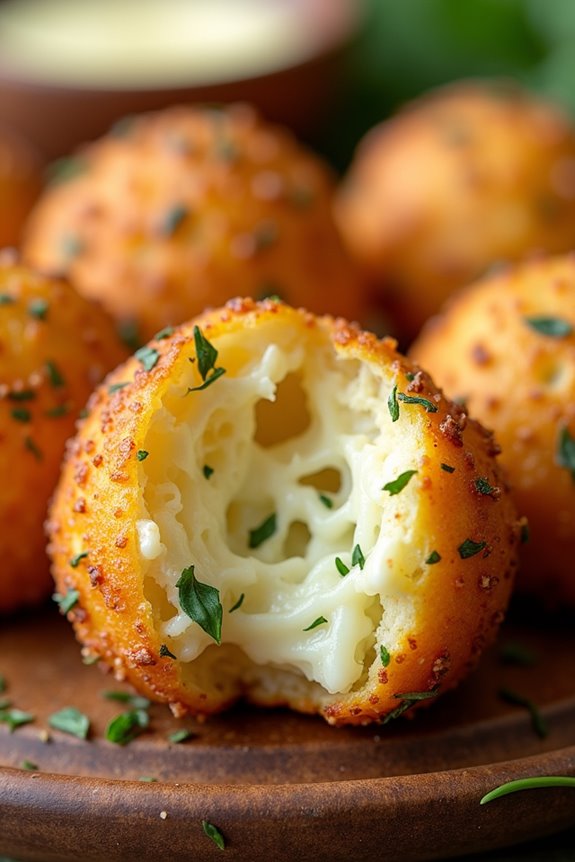
Classic Pão De Queijo

Pão de Queijo, or Brazilian cheese bread, is a deliciously chewy and cheesy snack that has captured the hearts of food lovers around the world. This savory treat is made with tapioca flour, which gives it a unique texture that’s both light and airy, while the cheese adds a rich flavor that makes it irresistible.
Originating from the state of Minas Gerais, Pão de Queijo is often enjoyed as a breakfast item, but it can also be served as an appetizer or snack at any time of the day.
The beauty of Pão de Queijo lies in its simplicity and the use of gluten-free ingredients, making it a fantastic option for those with dietary restrictions. With just a handful of ingredients, you can whip up a batch of these cheesy delights in no time.
Whether you’re hosting a gathering or simply craving a comforting bite, these cheese balls are sure to satisfy.
Ingredients (Serving size: 4-6 people):
- 1 cup of tapioca flour
- 1/2 cup of milk
- 1/2 cup of vegetable oil
- 1/2 teaspoon of salt
- 1 cup of shredded cheese (preferably a mix of mozzarella and Parmesan)
- 2 large eggs
- 1/2 teaspoon of baking powder (optional for extra fluffiness)
Cooking Instructions:
- Preheat the Oven: Begin by preheating your oven to 375°F (190°C). This guarantees that the Pão de Queijo will bake evenly and reach the perfect golden brown color.
- Heat the Mixture: In a medium saucepan, combine the milk, vegetable oil, and salt. Heat over medium heat until the mixture is just about to boil. Stir occasionally to prevent burning.
- Combine with Tapioca Flour: Once the milk mixture is hot, remove it from heat and add the tapioca flour. Stir well until the mixture is smooth and there are no lumps. It might be a bit sticky, but that’s normal.
- Cool the Dough: Allow the dough to cool for about 10 minutes. This step is important so that you don’t scramble the eggs in the next step.
- Add the Eggs and Cheese: Once the dough has cooled slightly, add the eggs one at a time, mixing well after each addition. Then, fold in the shredded cheese until evenly combined.
- Shape the Cheese Balls: Use your hands to shape the dough into small balls, about the size of a golf ball. Place them on a baking sheet lined with parchment paper, making sure to leave some space between each ball to allow for expansion during baking.
- Optional Baking Powder: If you’re using baking powder for added fluffiness, sprinkle it over the cheese balls before placing them in the oven.
- Bake: Place the baking sheet in the preheated oven and bake for 15-20 minutes, or until the cheese balls are puffed and golden brown. Keep an eye on them to avoid over-browning.
- Cool and Serve: Once baked, remove the Pão de Queijo from the oven and allow them to cool for a few minutes before serving. Enjoy them warm for the best taste!
Extra Tips:
To enhance the flavor of your Pão de Queijo, consider experimenting with different types of cheese, such as Gruyère or cheddar, to suit your taste preferences.
You can also add herbs or spices like garlic powder or oregano to elevate the flavor profile. If you have leftovers, they can be stored in an airtight container and reheated in the oven or microwave, but they’re best enjoyed fresh out of the oven!
Spinach and Feta Cheese Balls

Spinach and Feta Cheese Balls are a delightful twist on the classic Brazilian cheese ball, known as “pão de queijo.” These savory treats combine the earthy flavor of spinach with the tanginess of feta cheese, creating a delicious snack or appetizer that’s perfect for any gathering.
The crispy outer layer gives way to a soft, cheesy interior, making them irresistible to guests of all ages. Not only are they packed with flavor, but they’re also easy to prepare, making them a great addition to your culinary repertoire.
These cheese balls are versatile and can be served warm or at room temperature, making them ideal for parties or as a midday snack. Pair them with a tangy dipping sauce or serve them alongside a fresh salad for a complete meal.
Whether you’re hosting a festive gathering or simply craving a cheesy treat, Spinach and Feta Cheese Balls are sure to impress everyone at the table.
Ingredients (Serves 4-6)
- 2 cups fresh spinach, chopped
- 1 cup feta cheese, crumbled
- 1 cup grated mozzarella cheese
- 1/2 cup ricotta cheese
- 1/2 cup all-purpose flour
- 2 large eggs
- 1 teaspoon garlic powder
- 1/2 teaspoon onion powder
- 1/4 teaspoon black pepper
- 1/4 teaspoon salt
- 1/2 cup breadcrumbs (for coating)
- Olive oil (for frying)
Cooking Instructions
- Prepare the Spinach: In a medium-sized pan over medium heat, sauté the chopped spinach until wilted, about 2-3 minutes. Remove from heat and let it cool slightly. This step helps to reduce moisture in the spinach, which is essential for the texture of the cheese balls.
- Mix the Cheese Mixture: In a large mixing bowl, combine the sautéed spinach, feta cheese, mozzarella cheese, and ricotta cheese. Mix well until all the cheeses are evenly incorporated. The combination of different cheeses provides a rich flavor and creamy texture that enhances the cheese balls.
- Add Dry Ingredients: To the cheese mixture, add the all-purpose flour, garlic powder, onion powder, black pepper, and salt. Stir until just combined, ensuring not to overmix. The flour helps bind the ingredients together, making it easier to form the cheese balls.
- Incorporate Eggs: Crack the eggs into the mixture and mix until fully combined. The eggs act as a binder, giving the cheese balls structure and helping them hold their shape during cooking.
- Form the Cheese Balls: Using your hands, scoop out a tablespoon of the mixture and roll it into a ball shape. Repeat this process until all the mixture is shaped into balls. This step allows you to control the size of the cheese balls, ensuring they cook evenly.
- Coat and Prepare for Frying: Roll each cheese ball in breadcrumbs to create a crispy outer layer. This coating adds texture and prevents the cheese balls from becoming too greasy when fried.
- Fry the Cheese Balls: In a large skillet, heat olive oil over medium-high heat. Once the oil is hot, carefully add the cheese balls in batches, frying until golden brown on all sides, about 4-5 minutes. Make sure not to overcrowd the pan, as this can lower the oil temperature and lead to soggy cheese balls.
- Drain and Serve: Once cooked, transfer the cheese balls to a paper towel-lined plate to drain any excess oil. Serve warm with your favorite dipping sauce or alongside a fresh salad.
Extra Tips
For an extra burst of flavor, consider adding herbs such as dill or parsley to the cheese mixture. You can also experiment with different cheese varieties or even add chopped sun-dried tomatoes or olives for a Mediterranean twist.
If frying isn’t your preferred cooking method, these cheese balls can also be baked in a preheated oven at 375°F (190°C) for about 20-25 minutes, or until golden brown, for a healthier option. Enjoy your delicious Spinach and Feta Cheese Balls!
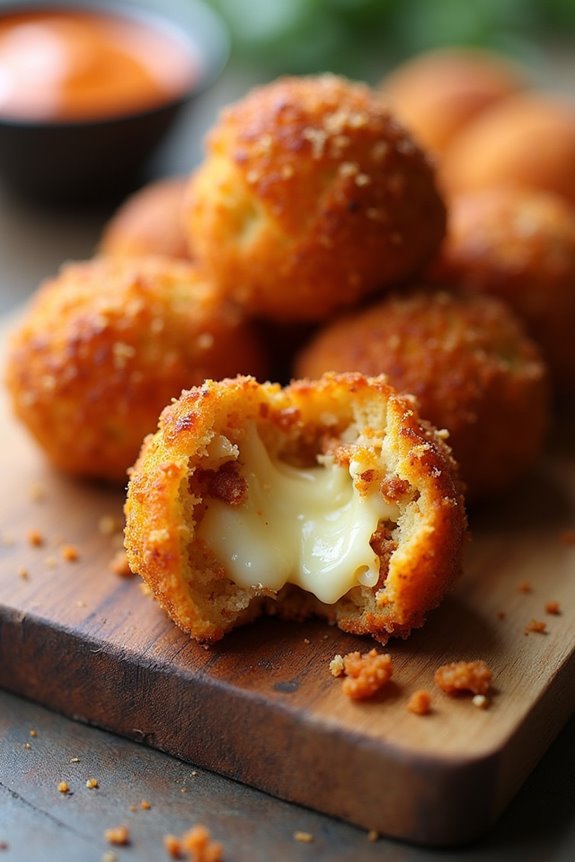
Bacon and Cheese Pão De Queijo

Pão De Queijo, a beloved Brazilian snack, is known for its irresistible cheesy flavor and chewy texture. This delightful cheese bread is made with tapioca flour, which gives it a unique consistency that’s both gluten-free and deliciously addictive.
In this recipe, we elevate the classic pão de queijo by adding crispy bacon and an extra layer of cheese, making it a perfect appetizer or snack for gatherings and parties. The combination of salty bacon and gooey cheese creates a savory treat that’s hard to resist.
Whether you’re enjoying them fresh out of the oven or at room temperature, these cheesy bites are certain to impress your guests. With just a few simple ingredients and steps, you can whip up a batch of Bacon and Cheese Pão De Queijo that everyone will love.
Ingredients (Serves 4-6):
- 1 cup tapioca flour
- 1/2 cup milk
- 1/4 cup vegetable oil
- 1/2 teaspoon salt
- 1/2 cup grated Parmesan cheese
- 1/2 cup shredded mozzarella cheese
- 2 large eggs
- 1/2 cup cooked and crumbled bacon
- 1/4 teaspoon garlic powder (optional)
Cooking Instructions:
- Preheat the Oven: Begin by preheating your oven to 375°F (190°C). This guarantees that your pão de queijo will bake evenly and become golden brown.
- Combine Wet Ingredients: In a medium saucepan, combine the milk, vegetable oil, and salt. Heat this mixture over medium heat until it comes to a gentle boil, stirring occasionally to prevent sticking.
- Add Tapioca Flour: Once the milk mixture is boiling, remove it from the heat and immediately add the tapioca flour to the saucepan. Stir vigorously with a wooden spoon until the mixture is well combined and forms a dough.
- Cool the Dough: Allow the dough to cool for about 10 minutes. This step is essential to avoid cooking the eggs when they’re added next.
- Incorporate Eggs and Cheese: After the dough has cooled slightly, add the eggs one at a time, mixing well after each addition. Then fold in the grated Parmesan cheese, shredded mozzarella, crumbled bacon, and garlic powder (if using) until well combined.
- Shape the Dough: Using your hands, form small balls of dough, about the size of a golf ball, and place them on a parchment-lined baking sheet. Leave some space between each ball as they’ll expand while baking.
- Bake: Place the baking sheet in the preheated oven and bake for 15-20 minutes, or until the pão de queijo are puffed up and golden brown on the outside.
- Cool and Serve: Once baked, remove from the oven and let them cool for a few minutes. Serve warm or at room temperature for the best taste.
Extra Tips:
For an extra cheesy flavor, feel free to experiment with different types of cheese or add additional toppings such as herbs or spices to the dough.
Additionally, if you want to prepare the dough in advance, you can freeze the shaped balls and bake them directly from the freezer—just add a couple of extra minutes to the baking time. Enjoy these delightful treats fresh out of the oven for the ultimate cheesy experience!
Jalapeño Cheddar Cheese Balls

Jalapeño Cheddar Cheese Balls are a delightful twist on the classic Brazilian cheese ball, infusing a spicy kick of jalapeño with the rich, creamy flavor of cheddar cheese. These bites offer a perfect balance of heat and savory goodness, making them an excellent appetizer for any gathering or a delicious snack for movie night.
With their crispy exterior and gooey inside, they’re sure to be a crowd-pleaser and will have everyone coming back for seconds.
Making Jalapeño Cheddar Cheese Balls is an easy and enjoyable process. The combination of cheese, jalapeños, and seasonings creates a flavor-packed treat that’s both satisfying and simple to prepare. Plus, they can be made ahead of time and frozen, allowing you to whip them out whenever you’re in the mood for something cheesy and delicious.
So let’s delve into the recipe and get ready to impress your guests!
Ingredients (Serves 4-6 people):
- 1 cup shredded cheddar cheese
- 1 cup cream cheese, softened
- 1/4 cup finely chopped fresh jalapeños (seeds removed for less heat)
- 1/2 cup breadcrumbs
- 1/4 cup grated Parmesan cheese
- 1 teaspoon garlic powder
- 1 teaspoon onion powder
- 1/2 teaspoon salt
- 1/4 teaspoon black pepper
- 1 egg, beaten (for egg wash)
- Vegetable oil (for frying)
Cooking Instructions:
- Prepare the Cheese Mixture: In a large mixing bowl, combine the shredded cheddar cheese and softened cream cheese. Use a fork or spatula to blend them together until smooth and well incorporated. This mixture will serve as the base for your cheese balls.
- Add Jalapeños and Seasoning: Fold in the finely chopped jalapeños, garlic powder, onion powder, salt, and black pepper. Mix until the jalapeños and seasonings are evenly distributed throughout the cheese mixture, guaranteeing each bite will pack a flavorful punch.
- Form the Cheese Balls: With your hands, take small portions of the cheese mixture and roll them into 1-inch balls. Place the formed cheese balls on a plate or a lined baking sheet. This step is essential as it shapes the final product and guarantees even frying.
- Coat the Cheese Balls: Set up a breading station by placing the breadcrumbs in a shallow dish. Dip each cheese ball into the beaten egg to coat, then roll it in the breadcrumbs until fully covered. This will create a crispy outer layer once fried.
- Heat the Oil: In a deep skillet or frying pan, pour enough vegetable oil to cover the bottom of the pan (about 1 inch deep). Heat the oil over medium-high heat until it reaches around 350°F (175°C). You can test the oil by dropping in a small piece of bread; if it sizzles and bubbles, it’s ready for frying.
- Fry the Cheese Balls: Carefully add the cheese balls to the hot oil in batches, making sure not to overcrowd the pan. Fry them for about 3-4 minutes on each side or until they’re golden brown and crispy. Use a slotted spoon to remove them from the oil and place them on a paper towel-lined plate to drain excess oil.
- Serve and Enjoy: Once all the cheese balls are fried, serve them warm. They can be enjoyed on their own or with dipping sauces like ranch, salsa, or a spicy aioli for an extra kick.
Extra Tips:
To enhance the flavor of your Jalapeño Cheddar Cheese Balls, consider adding other spices or herbs such as cumin or cilantro to the cheese mixture. If you prefer a milder version, reduce the amount of jalapeños or use milder peppers.
Additionally, you can prepare the cheese balls ahead of time and freeze them before frying; just fry them straight from the freezer, adding a couple of extra minutes to the cooking time. This makes them a convenient option for last-minute gatherings!
Garlic and Herb Pão De Queijo
Garlic and Herb Pão De Queijo, a delightful twist on the traditional Brazilian cheese bread, combines the rich, cheesy goodness of Pão De Queijo with the aromatic flavors of garlic and fresh herbs.
This fusion results in a snack that isn’t only irresistible but also perfect for gatherings, family dinners, or even just a cozy night at home. The chewy texture and savory taste make these cheese balls a favorite among both adults and children alike.
Making this dish is surprisingly simple. With just a handful of ingredients, you can whip up a batch of these cheesy delights that will fill your kitchen with a tantalizing aroma.
Whether you serve them warm as an appetizer or enjoy them as a side dish, Garlic and Herb Pão De Queijo will surely become a household staple. Let’s explore the recipe and get cooking!
Ingredients (serving size: 4-6 people)
- 1 cup tapioca flour
- 1 cup milk
- 1/2 cup vegetable oil
- 1 teaspoon salt
- 2 cloves garlic, minced
- 1/2 cup grated Parmesan cheese
- 1/2 cup shredded mozzarella cheese
- 1/4 cup fresh parsley, chopped
- 1 tablespoon fresh rosemary, chopped
- 1 tablespoon baking powder
- 2 large eggs
Cooking Instructions
- Preheat the Oven: Start by preheating your oven to 375°F (190°C). This guarantees that your Pão De Queijo will bake evenly and achieve that perfect golden color.
- Prepare the Dough Mixture: In a medium saucepan, combine the milk, vegetable oil, and salt. Place the saucepan over medium heat and bring the mixture to a gentle boil. Stir occasionally to prevent the milk from scorching.
- Add Tapioca Flour: Once the milk mixture comes to a boil, remove it from the heat. Gradually add the tapioca flour to the saucepan, stirring vigorously with a wooden spoon until the mixture is well combined and smooth. It will become a sticky dough.
- Incorporate Eggs and Cheese: Allow the dough to cool slightly, then add the eggs one at a time, mixing well after each addition. Next, fold in the grated Parmesan, shredded mozzarella, minced garlic, chopped parsley, chopped rosemary, and baking powder. Confirm everything is thoroughly combined; the dough will be slightly sticky.
- Shape the Cheese Balls: Using your hands or a small ice cream scoop, take portions of the dough and roll them into balls, about the size of a golf ball. Place the cheese balls onto a lined baking sheet, leaving some space between each ball for them to expand while baking.
- Bake: Place the baking sheet in the preheated oven and bake for 20-25 minutes, or until the cheese balls are puffed up and golden brown on the outside. Keep an eye on them to prevent over-baking.
- Serve and Enjoy: Once baked, remove the Pão De Queijo from the oven and let them cool for a few minutes. Serve warm and enjoy the cheesy, garlicky goodness!
Extra Tips
For an even more flavorful experience, consider experimenting with different cheeses or herbs according to your preference.
You can also add a pinch of red pepper flakes for a spicy kick or substitute the parsley and rosemary with other herbs like thyme or basil.
If you have leftovers, store them in an airtight container and reheat them in the oven for a few minutes before serving to restore their delightful texture. Enjoy your homemade Garlic and Herb Pão De Queijo!
Sweet Potato and Cheese Balls

Sweet Potato and Cheese Balls are a delightful twist on traditional Brazilian cheese balls, known as “pão de queijo.” The combination of sweet potatoes and cheese creates a unique flavor profile that’s both savory and slightly sweet.
These cheese balls are perfect as an appetizer, snack, or even a party treat. With their crispy exterior and gooey cheese center, they’re sure to be a hit among family and friends.
Making Sweet Potato and Cheese Balls is both fun and easy, making it a great recipe for home cooks of all levels. The use of sweet potatoes not only adds a beautiful color to the dish but also infuses it with nutrients and a hint of sweetness that pairs wonderfully with the cheese.
Serve them warm and watch as they disappear quickly!
Ingredients (Serves 4-6):
- 2 medium sweet potatoes
- 1 cup of shredded mozzarella cheese
- 1 cup of grated Parmesan cheese
- 1 large egg
- 1 cup of tapioca flour
- 1/2 teaspoon of salt
- 1/4 teaspoon of black pepper
- 1/4 teaspoon of garlic powder
- Oil for frying (optional)
Cooking Instructions:
1. Cook the Sweet Potatoes: Begin by peeling and dicing the sweet potatoes into small cubes. Boil them in a pot of salted water for about 15-20 minutes or until they’re fork-tender.
Drain and let them cool slightly before mashing them into a smooth puree. This step is essential as it forms the base of your cheese balls.
2. Mix the Ingredients: In a large mixing bowl, combine the sweet potato puree, mozzarella cheese, and Parmesan cheese. Mix well until the cheeses are evenly distributed.
Then add the egg, tapioca flour, salt, black pepper, and garlic powder. Stir until all the ingredients are well incorporated, and you have a dough-like consistency.
3. Shape the Balls: With your hands, take small portions of the mixture and roll them into balls about the size of a golf ball. This should yield approximately 12-15 cheese balls.
Make sure they’re compact enough to hold their shape during cooking.
4. Fry or Bake: If you prefer frying, heat oil in a deep frying pan over medium heat. Once hot, carefully add the cheese balls in batches, frying them for about 3-4 minutes on each side until they’re golden brown.
If baking, preheat your oven to 375°F (190°C) and place the cheese balls on a lined baking sheet. Bake for about 20-25 minutes or until golden and firm to the touch.
5. Serve: Once cooked, remove the cheese balls from the frying oil or oven and allow them to cool for a few minutes.
Serve warm, and enjoy the gooey cheese filling with the sweet potato flavor shining through!
Extra Tips:
For an extra layer of flavor, consider adding herbs such as chopped parsley or chives to the mixture before shaping the balls.
If you want a spicier kick, adding a pinch of cayenne pepper can elevate the taste. Additionally, if you’re looking to make these in advance, you can shape the cheese balls and freeze them before frying or baking.
Just remember to extend the cooking time slightly if cooking from frozen. Enjoy experimenting with different cheeses or even adding cooked bacon bits for a savory twist!
Truffle Parmesan Cheese Puffs

Truffle Parmesan Cheese Puffs are a delightful addition to any gathering, combining the rich flavors of truffle oil and Parmesan cheese into a light, fluffy bite-sized treat.
These cheese puffs are crispy on the outside and soft on the inside, making them an irresistible snack that pairs perfectly with cocktails or can be enjoyed on their own. The unique flavor of truffle oil elevates this dish, making it a gourmet experience everyone will love.
Making Truffle Parmesan Cheese Puffs is simple and requires minimal ingredients, yet the result is an elegant appetizer that will impress your guests.
Whether you’re hosting a party or simply indulging in a special treat at home, these cheese puffs are sure to be a hit. Let’s explore the ingredients and steps to create these delicious bites.
Ingredients (for 4-6 people):
- 1 cup water
- 1/2 cup unsalted butter
- 1 cup all-purpose flour
- 1/2 teaspoon salt
- 4 large eggs
- 1 cup grated Parmesan cheese
- 2 tablespoons truffle oil
- Freshly ground black pepper (to taste)
- Optional: chopped fresh herbs (like chives or parsley) for garnish
Cooking Instructions:
1. Preheat the Oven: Begin by preheating your oven to 400°F (200°C). This guarantees that your cheese puffs will bake evenly and achieve the perfect golden-brown color.
2. Prepare the Dough: In a medium saucepan, combine 1 cup of water and 1/2 cup of unsalted butter. Bring this mixture to a boil over medium heat.
Once it reaches a boil, remove it from the heat and quickly stir in 1 cup of all-purpose flour and 1/2 teaspoon of salt until a smooth dough forms.
3. Incorporate Eggs: Allow the dough to cool slightly for a few minutes. Then, add 4 large eggs one at a time, mixing well after each addition until the dough is smooth and glossy.
This step is vital as it helps to create the right texture for the cheese puffs.
4. Add Cheese and Flavor: Stir in 1 cup of grated Parmesan cheese and 2 tablespoons of truffle oil. Mix until the cheese is evenly distributed throughout the dough.
Add freshly ground black pepper to taste, adjusting according to your preference.
5. Shape the Puffs: Line a baking sheet with parchment paper. Using a pastry bag or a spoon, drop rounded tablespoons of the dough onto the prepared baking sheet, spacing them about 2 inches apart.
This allows room for the puffs to expand while baking.
6. Bake the Cheese Puffs: Place the baking sheet in the preheated oven and bake for 20-25 minutes or until the cheese puffs are puffed up and golden brown.
Avoid opening the oven door during baking to guarantee they rise properly.
7. Serve and Garnish: Once baked, remove the cheese puffs from the oven and let them cool slightly on the baking sheet.
If desired, garnish with chopped fresh herbs before serving warm.
Extra Tips:
For an extra layer of flavor, consider experimenting with different types of cheese, such as Gruyère or aged cheddar, in addition to Parmesan.
Additionally, if you want a more pronounced truffle flavor, feel free to drizzle a little extra truffle oil over the puffs just before serving.
These cheese puffs are best enjoyed fresh, but you can also store any leftovers in an airtight container for up to two days; simply reheat them in the oven for a few minutes to restore their crispiness.
Mediterranean Pão De Queijo
Pão de Queijo, the beloved Brazilian cheese bread, can be given a delightful Mediterranean twist by incorporating flavors like feta cheese, olives, and herbs. This version retains the chewy, airy texture of the original while introducing a savory taste profile that’s perfect for serving as an appetizer or snack at gatherings.
The combination of ingredients not only enhances the flavor but also adds a touch of elegance to this traditional dish.
Making Mediterranean Pão de Queijo is a straightforward process that results in cheesy, golden-brown bites that are perfect for sharing. Whether served warm or at room temperature, these cheese balls are sure to impress your guests. Pair them with a side of tzatziki or a fresh salad to create a complete Mediterranean-inspired meal.
Ingredients (Serves 4-6):
- 1 cup tapioca flour
- 1/2 cup milk
- 1/4 cup olive oil
- 1/2 teaspoon salt
- 1/2 teaspoon baking powder
- 1 large egg
- 1 cup shredded mozzarella cheese
- 1/2 cup crumbled feta cheese
- 1/4 cup chopped kalamata olives
- 2 tablespoons chopped fresh parsley
- 1 tablespoon chopped fresh oregano
Cooking Instructions:
- Preheat the Oven: Set your oven to 375°F (190°C) and line a baking sheet with parchment paper. Preheating guarantees that your cheese balls cook evenly and develop a nice golden crust.
- Combine Wet Ingredients: In a medium saucepan, combine the milk, olive oil, and salt. Heat the mixture over medium heat until it begins to simmer, stirring occasionally. This step helps to infuse the oil with flavor and prepares the base for your dough.
- Mix in Dry Ingredients: Once the mixture is simmering, remove it from the heat and quickly add the tapioca flour and baking powder. Stir with a wooden spoon until the dough starts to come together. It will be sticky but should form a cohesive mass. Allow it to cool for a few minutes.
- Incorporate Egg and Cheeses: After the dough has cooled slightly, add the egg and mix well until fully incorporated. Then, fold in the shredded mozzarella, crumbled feta, chopped olives, parsley, and oregano. This step adds texture and flavor to your dough.
- Shape the Cheese Balls: With your hands, take small portions of the dough and roll them into balls about the size of a golf ball. Place them on the prepared baking sheet, spacing them about an inch apart to allow for expansion during baking.
- Bake: Place the baking sheet in the preheated oven and bake for 15-20 minutes, or until the cheese balls are puffed and lightly golden on top. Keep an eye on them to avoid over-browning.
- Cool and Serve: Once baked, remove the cheese balls from the oven and let them cool for a few minutes on the baking sheet. Serve warm or at room temperature, accompanied by your favorite dips or sides.
Extra Tips:
For an even more flavorful Mediterranean Pão de Queijo, consider adding sun-dried tomatoes or roasted red peppers to the mixture.
You can also experiment with different cheeses to find the perfect blend that suits your palate. These cheese balls freeze well, so feel free to prepare a larger batch and store them in an airtight container; just bake them directly from frozen, adding a couple of extra minutes to the cooking time.
Enjoy your culinary adventure!
Spicy Chorizo Cheese Balls
Spicy Chorizo Cheese Balls are a delightful twist on the traditional Brazilian cheese bread, known as Pão de Queijo. This recipe combines the rich and savory flavors of spicy chorizo sausage with the gooey, melty goodness of cheese, creating a perfect appetizer or snack for any gathering. The combination of the spicy sausage and creamy cheese guarantees that each bite is packed with flavor, making these cheese balls a crowd-pleaser at parties or family dinners.
The beauty of these cheese balls lies not only in their taste but also in their texture. The outer layer becomes crispy while the inside remains soft and cheesy, thanks to the mix of tapioca flour and shredded cheese. They’re easy to make and can be served with a variety of dipping sauces, such as spicy mayo or a tangy salsa, to enhance their flavor even further. Let’s immerse ourselves in this cheesy, spicy treat!
Ingredients (Serving Size: 4-6 People)
- 1 cup tapioca flour
- 1/2 cup milk
- 1/4 cup vegetable oil
- 1/2 teaspoon salt
- 1 cup shredded mozzarella cheese
- 1/2 cup crumbled spicy chorizo sausage (cooked)
- 2 large eggs
- 1/4 teaspoon black pepper
- 1/4 teaspoon cayenne pepper (optional for extra heat)
Cooking Instructions
- Preheat the Oven: Start by preheating your oven to 375°F (190°C). This guarantees that your cheese balls will bake evenly and achieve that perfect golden-brown color.
- Prepare the Dough: In a medium saucepan, combine the milk, vegetable oil, and salt. Bring the mixture to a gentle boil over medium heat, stirring occasionally. Once boiling, remove the saucepan from the heat and immediately add the tapioca flour. Stir continuously until the mixture forms a smooth dough.
- Incorporate the Cheese and Chorizo: Allow the dough to cool slightly, then add in the shredded mozzarella cheese and the cooked chorizo sausage. Mix well to guarantee that the cheese and sausage are evenly distributed throughout the dough.
- Add the Eggs and Seasonings: Crack the eggs into the mixture and add the black pepper and cayenne pepper, if using. Mix everything together until the eggs are fully incorporated and the mixture is well combined.
- Shape the Cheese Balls: Using your hands or a cookie scoop, form the dough into small balls, about 1 inch in diameter. Place the balls on a baking sheet lined with parchment paper, leaving some space between each ball to allow for spreading.
- Bake the Cheese Balls: Place the baking sheet in the preheated oven and bake for 20-25 minutes, or until the cheese balls are puffed and golden brown. Keep an eye on them to prevent over-browning.
- Serve and Enjoy: Once baked, remove the cheese balls from the oven and let them cool for a few minutes before serving. Enjoy these delicious spicy chorizo cheese balls warm, with your favorite dipping sauces on the side.
Extra Tips
When making Spicy Chorizo Cheese Balls, it’s crucial to use fresh chorizo for the best flavor. If you want to make them ahead of time, you can prepare the dough and shape the balls, then freeze them on a baking sheet. Once frozen, transfer them to a zip-top bag and store them in the freezer. When you’re ready to bake, simply add a few extra minutes to the baking time.
For an even cheesier experience, feel free to mix different types of cheese into the dough!
Rosemary and Goat Cheese Bites

Rosemary and Goat Cheese Bites are an elegant and flavorful addition to any gathering or party. These delightful cheese balls are a perfect blend of creamy goat cheese, fragrant rosemary, and a hint of garlic, all rolled into bite-sized morsels that are bound to impress your guests.
Whether served as an appetizer or a party snack, they bring a touch of sophistication and are incredibly easy to make. This recipe isn’t only simple but also allows for creativity in presentation. Pair these bites with a selection of crackers or fresh vegetables, and you have a stunning platter that will be the highlight of your event.
The combination of fresh herbs and creamy cheese creates a wonderful contrast in flavors and textures, making these bites irresistible.
Ingredients (Serves 4-6 people):
- 8 oz goat cheese, softened
- 1/4 cup cream cheese, softened
- 2 tablespoons fresh rosemary, finely chopped
- 1 clove garlic, minced
- 1/4 teaspoon black pepper
- 1/4 teaspoon salt
- 1/2 cup walnuts or pecans, finely chopped
- Fresh rosemary sprigs, for garnish
Cooking Instructions:
- Prepare the Cheese Mixture: In a mixing bowl, combine the softened goat cheese and cream cheese. Using a fork or a hand mixer, blend the two cheeses together until smooth and creamy. This guarantees that the flavors meld well and the texture is easy to work with.
- Add Flavorings: Once the cheese mixture is smooth, add the finely chopped fresh rosemary, minced garlic, black pepper, and salt. Mix well until all ingredients are evenly incorporated. The rosemary and garlic will infuse the cheese with a delightful aroma and taste.
- Form the Bites: With clean hands, scoop out a tablespoon of the cheese mixture and roll it into a small ball, about the size of a walnut. Place the formed cheese balls on a plate or baking sheet lined with parchment paper. Continue until all the mixture is shaped into balls.
- Coat the Bites: Once all the cheese balls are formed, roll each one in the finely chopped walnuts or pecans until evenly coated. This adds a nice crunch and nutty flavor that complements the creamy bites beautifully.
- Chill and Serve: Place the coated cheese balls in the refrigerator for at least 30 minutes to firm up. This helps the flavors to meld further and makes them easier to handle. Once chilled, transfer them to a serving platter and garnish with fresh rosemary sprigs for an elegant touch.
Extra Tips:
When preparing Rosemary and Goat Cheese Bites, feel free to experiment with other herbs or nuts based on your preferences. For a bit of spice, consider adding a pinch of red pepper flakes to the cheese mixture.
Additionally, these bites can be made ahead of time and stored in the refrigerator for a couple of days, making them a convenient option for busy hosts. Just remember to let them sit at room temperature for a few minutes before serving to enhance the flavors.
Ham and Swiss Pão De Queijo

Ham and Swiss Pão De Queijo, a delightful twist on the traditional Brazilian cheese bread, combines the rich flavors of ham and Swiss cheese with the chewy, gluten-free texture of Pão De Queijo. This savory snack is perfect for any gathering, whether it’s a festive celebration or a cozy family dinner.
The charming little cheese balls aren’t only delicious but also incredibly easy to make, allowing you to impress your guests without spending hours in the kitchen. In this recipe, we’ll guide you through the process of creating these cheesy delights that are certain to become a favorite in your household.
With a few simple ingredients and straightforward steps, you can whip up a batch of Ham and Swiss Pão De Queijo that captures the essence of Brazilian cuisine while adding a unique twist. Let’s get started on this cheesy adventure!
Ingredients (Serves 4-6 people):
- 1 cup tapioca flour
- 1/2 teaspoon salt
- 1/4 cup water
- 1/4 cup milk
- 1/4 cup vegetable oil
- 2 large eggs
- 1 cup shredded Swiss cheese
- 1/2 cup diced ham
Cooking Instructions:
- Preheat the Oven: Begin by preheating your oven to 375°F (190°C). This guarantees that your cheese balls will cook evenly and develop a nice golden crust.
- Prepare the Wet Ingredients: In a medium saucepan, combine the water, milk, and vegetable oil. Heat the mixture over medium heat until it begins to simmer, making sure to stir occasionally to prevent burning.
- Combine with Dry Ingredients: Once the mixture is simmering, remove it from heat and add the tapioca flour and salt. Stir vigorously with a wooden spoon until a dough forms. It will be sticky but should come together.
- Incorporate Eggs: Allow the dough to cool for a few minutes, then add the eggs, one at a time, mixing well after each addition. The dough will become smooth and elastic as you incorporate the eggs.
- Add Cheese and Ham: Fold in the shredded Swiss cheese and diced ham until they’re evenly distributed throughout the dough. This will enhance the flavor and create pockets of deliciousness in each bite.
- Shape the Balls: Using your hands, roll the dough into small balls about the size of a golf ball. Place them on a baking sheet lined with parchment paper, leaving some space between each ball to allow for expansion.
- Bake: Place the baking sheet in the preheated oven and bake for 15-20 minutes, or until the cheese balls are puffed up and golden brown on top. Keep an eye on them to guarantee they don’t overcook.
- Cool and Serve: Once baked, remove them from the oven and let them cool for a few minutes on a wire rack. Serve warm and enjoy the gooey, cheesy goodness!
Extra Tips:
When making Ham and Swiss Pão De Queijo, feel free to experiment with different cheeses or add herbs and spices for extra flavor.
For a spicier kick, consider incorporating some chopped jalapeños or red pepper flakes into the dough. Also, these cheese balls can be frozen before baking; just place them on a baking sheet in the freezer, and once frozen solid, transfer them to a zip-top bag.
You can bake them straight from the freezer when you’re ready to enjoy them—just add a few extra minutes to the baking time!
Blue Cheese and Walnut Cheese Balls

Blue Cheese and Walnut Cheese Balls are a delightful twist on the traditional Brazilian cheese ball, known as “pão de queijo.” While the classic version is typically made with a blend of cheeses and tapioca flour, this recipe incorporates the rich, tangy flavors of blue cheese and the earthy crunch of walnuts.
These cheese balls make a perfect appetizer for gatherings, parties, or even as a snack to enjoy on your own. The combination of creamy blue cheese with the toasted walnuts creates an irresistible flavor profile that will have your guests coming back for more.
Making these cheese balls is a straightforward process that can be completed in under an hour. The mixture is rolled into bite-sized balls and then baked until golden brown. Serve them warm with a side of your favorite dipping sauce or enjoy them on their own. This recipe isn’t only delectable but also showcases the versatility of Brazilian cheese balls in a whole new light.
Ingredients (serving size: 4-6 people):
- 1 cup blue cheese, crumbled
- 1 cup cream cheese, softened
- 1 cup walnuts, finely chopped and toasted
- 1 cup shredded mozzarella cheese
- 1/2 cup grated Parmesan cheese
- 1/2 cup all-purpose flour
- 1 teaspoon garlic powder
- 1/2 teaspoon black pepper
- 1/4 teaspoon salt
- 1 tablespoon fresh parsley, chopped (for garnish)
- Olive oil (for brushing)
Cooking Instructions:
- Preheat the Oven: Start by preheating your oven to 375°F (190°C). This guarantees that your cheese balls will bake evenly and achieve a nice golden color.
- Prepare the Cheese Mixture: In a large mixing bowl, combine the crumbled blue cheese, softened cream cheese, shredded mozzarella, and grated Parmesan. Use a fork or a spatula to mix until the cheeses are well combined and smooth.
- Add the Walnuts and Seasoning: Stir in the finely chopped and toasted walnuts, garlic powder, black pepper, and salt into the cheese mixture. Mix until the walnuts are evenly distributed throughout the cheese mixture.
- Incorporate the Flour: Gradually add the all-purpose flour to the cheese mixture, mixing until fully combined. The dough should be slightly sticky but manageable. If it’s too sticky, you can add a bit more flour.
- Form the Cheese Balls: Using your hands, take small portions of the dough and roll them into balls about 1 inch in diameter. Place them on a baking sheet lined with parchment paper, leaving space between each ball.
- Brush with Olive Oil: Lightly brush each cheese ball with olive oil to help them crisp up during baking. This step adds flavor and enhances the appearance of the cheese balls.
- Bake: Place the baking sheet in the preheated oven and bake for 20-25 minutes, or until the cheese balls are golden brown and slightly puffed. Keep an eye on them to prevent burning.
- Garnish and Serve: Once baked, remove the cheese balls from the oven and let them cool slightly. Garnish with chopped parsley before serving. Enjoy these cheese balls warm for the best flavor and texture.
Extra Tips: When making Blue Cheese and Walnut Cheese Balls, feel free to experiment with different nuts or cheeses if you’re looking for a variation. Pecans or almonds can work beautifully in place of walnuts, and you might try a combination of cheeses for a unique flavor twist.
Additionally, if you find the dough too sticky, you can refrigerate it for about 15-20 minutes to make it easier to handle. Remember to serve these cheese balls hot for the best experience, as the gooey, melty interior is part of their charm!
Nutty Pão De Queijo With Pecans
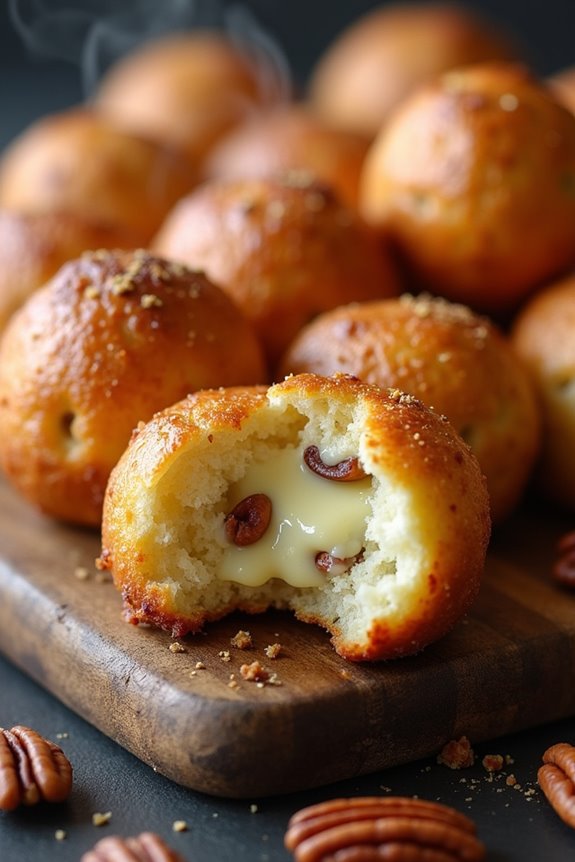
Pão de queijo, a traditional Brazilian cheese bread, is beloved for its chewy texture and rich, cheesy flavor. This nutty variation incorporates pecans, adding a delightful crunch and a hint of nuttiness that complements the cheese beautifully.
The combination of tapioca flour and cheese results in a unique bread that’s gluten-free and perfect for any occasion, whether as a snack, appetizer, or party food. The process is straightforward, making it an accessible dish for both seasoned cooks and kitchen novices alike.
To make Nutty Pão de Queijo with Pecans, you’ll need just a handful of ingredients. The key to achieving the perfect consistency lies in the careful mixing of the wet and dry ingredients, which creates that signature chewy texture.
Once baked, the rolls should be golden and slightly crispy on the outside, while remaining soft and cheesy on the inside. Serve them warm, and watch them disappear in no time!
Ingredients (Serves 4-6 people):
- 1 cup of tapioca flour
- 1/2 cup of milk
- 1/4 cup of vegetable oil
- 1 teaspoon of salt
- 1 cup of grated cheese (such as mozzarella or parmesan)
- 1/2 cup of finely chopped pecans
- 2 large eggs
- 1 teaspoon of baking powder
- Optional: 1/2 teaspoon of garlic powder for added flavor
Cooking Instructions:
- Preheat the Oven: Begin by preheating your oven to 375°F (190°C). This guarantees that the Pão de Queijo will bake evenly and achieve the desired golden color.
- Combine Wet Ingredients: In a medium saucepan, combine the milk, vegetable oil, and salt. Heat the mixture over medium heat until it just begins to boil, stirring occasionally to prevent it from scorching.
- Mix in Tapioca Flour: Once the milk mixture reaches a boil, remove it from the heat and immediately stir in the tapioca flour. Mix until fully combined and a sticky dough forms. Let this mixture cool slightly for about 5 minutes.
- Add Eggs and Cheese: After the dough has cooled a bit, add the eggs one at a time, mixing well after each addition. Then fold in the grated cheese and chopped pecans until everything is well incorporated.
- Incorporate Baking Powder: Gently mix in the baking powder (and garlic powder, if using) until fully blended into the dough. The dough will be sticky but should hold together.
- Shape the Dough: Using your hands or a small ice cream scoop, form small balls of dough, about the size of a golf ball, and place them on a baking sheet lined with parchment paper, leaving some space between each ball.
- Bake: Place the baking sheet in the preheated oven and bake for 15-20 minutes, or until the Pão de Queijo are puffed up and golden brown on top.
- Cool and Serve: Remove from the oven and let them cool for a few minutes on a wire rack before serving. Enjoy them warm for the best experience!
Extra Tips:
For an even richer flavor, consider using a combination of cheeses, such as a mix of mozzarella and sharp cheddar.
Be mindful not to overmix the dough after adding the eggs, as this can affect the texture. Also, you can make the dough ahead of time and refrigerate it if needed; just allow it to come to room temperature before baking. Enjoy experimenting with different nuts or herbs for additional flavor variations!