

When I think of Argentinian baking, the rich, creamy sweetness of Alfajores de Dulce de Leche melting in my mouth comes to mind. Each recipe is a little piece of tradition and flavor that can make any day feel special. From the flaky layers of Facturas to the indulgent Chocotorta, these treats are perfect for sharing or enjoying on your own. Ready to explore these delightful recipes? Let’s get started!
Alfajores De Dulce De Leche
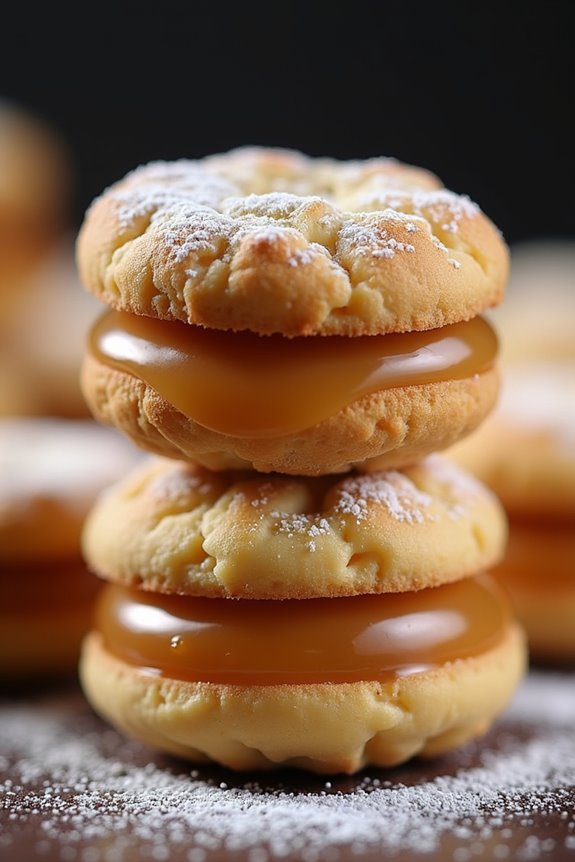
Alfajores de Dulce de Leche are a beloved traditional Argentinian treat, characterized by their soft, crumbly cookies filled with rich, creamy dulce de leche and often coated in chocolate or dusted with powdered sugar.
These delightful cookies are perfect for special occasions, tea time, or simply as a sweet indulgence to enjoy with a cup of coffee. The combination of the buttery cookie and the sweet caramel filling creates a melt-in-your-mouth experience that’s hard to resist.
Making alfajores isn’t only a rewarding experience but also a great way to introduce a taste of Argentina into your kitchen. While the process involves a few steps, the end result is worth every minute spent preparing them.
Once you have mastered the technique, you can easily scale the recipe up for larger gatherings or special celebrations. Let’s plunge into this delicious dessert!
Ingredients (Serves 4-6 people):
- 1 cup unsalted butter, softened
- 1 cup granulated sugar
- 2 large egg yolks
- 1 whole egg
- 2 cups all-purpose flour
- 1 cup cornstarch
- 1 teaspoon baking powder
- 1 teaspoon vanilla extract
- 1 cup dulce de leche
- Powdered sugar, for dusting (optional)
- Chocolate coating (optional)
Cooking Instructions:
1. Prepare the Dough: In a large mixing bowl, cream the softened unsalted butter and granulated sugar together until light and fluffy. This should take about 3-5 minutes.
Once combined, add the egg yolks and the whole egg, mixing until fully incorporated. Next, stir in the vanilla extract.
2. Combine Dry Ingredients: In a separate bowl, sift together the all-purpose flour, cornstarch, and baking powder. Gradually add this dry mixture to the wet ingredients, mixing until a soft dough forms.
Be careful not to overmix, as this can make the cookies tough.
3. Chill the Dough: Wrap the dough in plastic wrap and refrigerate for at least 1 hour. Chilling helps firm up the dough, making it easier to roll out and cut into shapes.
4. Roll and Cut: Preheat the oven to 350°F (175°C). On a lightly floured surface, roll out the chilled dough to a thickness of about 1/4 inch.
Use a round cookie cutter to cut out circles. Place the cookies on a baking sheet lined with parchment paper, leaving space between each.
5. Bake the Cookies: Bake the cookies in the preheated oven for about 10-12 minutes or until the edges are lightly golden.
Keep an eye on them, as they can bake quickly. Once done, remove them from the oven and let them cool on a wire rack.
6. Assemble the Alfajores: Once the cookies are completely cooled, spread a generous amount of dulce de leche on the flat side of one cookie, then sandwich it with another cookie.
Press gently to confirm they stick together.
7. Coat or Dust: If desired, you can dip the assembled alfajores in melted chocolate or simply dust them with powdered sugar for a classic touch.
Extra Tips:
For the best results, verify your butter is at room temperature before mixing, as this will help achieve a smooth and creamy texture.
If you want to elevate the flavor, consider adding a hint of lemon zest or a splash of rum to the dough. When storing your alfajores, keep them in an airtight container; they’ll taste even better the next day as the flavors meld together.
Enjoy your homemade alfajores de dulce de leche with friends and family, and don’t hesitate to experiment with different fillings or toppings!
Facturas
Facturas are delightful Argentinian pastries that come in various shapes and sizes, typically enjoyed with coffee for breakfast or an afternoon snack. These sweet treats can be filled or topped with a range of ingredients such as dulce de leche, cheese, or fruit.
The dough is soft, flaky, and incredibly versatile, making facturas a favorite among locals and a must-try for anyone interested in Argentinian cuisine. Traditionally, these pastries are made using a laminated dough, similar to that of croissants, which results in a light and airy texture.
Whether you prefer them with a simple glaze or a rich filling, preparing facturas at home is a rewarding experience. This recipe will guide you through making a basic version of facturas that can be customized to your liking, perfect for serving 4-6 people.
Ingredients
- 4 cups all-purpose flour
- 1 cup milk, warmed
- 1/2 cup unsalted butter, melted
- 1/4 cup sugar
- 1 packet (2 1/4 teaspoons) instant yeast
- 1/2 teaspoon salt
- 2 large eggs
- 1 teaspoon vanilla extract
- Additional butter for brushing
- Optional toppings: powdered sugar, dulce de leche, or icing
Cooking Instructions
- Prepare the Dough: In a large mixing bowl, combine the warm milk, melted butter, sugar, yeast, and salt. Allow this mixture to sit for about 5 minutes until it becomes frothy. This step guarantees the yeast activates properly.
- Mix the Wet Ingredients: Add the eggs and vanilla extract to the yeast mixture and whisk until fully combined. This will create a rich base for the dough.
- Combine with Flour: Gradually add the flour to the wet ingredients, mixing with a wooden spoon or your hands until the dough begins to form. It should be slightly sticky but manageable.
- Knead the Dough: Transfer the dough to a floured surface and knead for about 8-10 minutes until it becomes smooth and elastic. This step develops the gluten, which is vital for the texture of the facturas.
- First Rise: Place the kneaded dough in a lightly greased bowl, cover it with a damp cloth, and let it rise in a warm place for about 1 hour, or until it has doubled in size.
- Shape the Facturas: Once risen, punch down the dough and roll it out to about 1/4 inch thickness. Cut out shapes using a knife or cookie cutter. You can make traditional shapes like “vigilantes” (rectangles) or “tortitas” (rounds).
- Second Rise: Place the shaped pastries on a baking sheet lined with parchment paper. Cover them again with a damp cloth and let them rise for another 30-45 minutes until puffed.
- Preheat Oven: While the pastries are rising, preheat your oven to 375°F (190°C).
- Bake the Facturas: Brush the risen pastries with melted butter before placing them in the oven. Bake for 15-20 minutes, or until they’re golden brown.
- Cool and Serve: Allow the facturas to cool slightly before serving. You can dust them with powdered sugar or fill them with dulce de leche or icing as desired.
Extra Tips
When making facturas, don’t be afraid to experiment with fillings and toppings to suit your taste. You can try adding chocolate chips, fruit preserves, or even savory fillings like cheese.
Confirm that your kitchen is warm during the rising periods, as yeast thrives in warmth. If it’s a chilly day, you can turn on your oven to its lowest setting for a minute, then turn it off, and place the dough inside to rise.
Enjoy your homemade facturas with a lovely cup of coffee for an authentic Argentinian experience!
Chocotorta
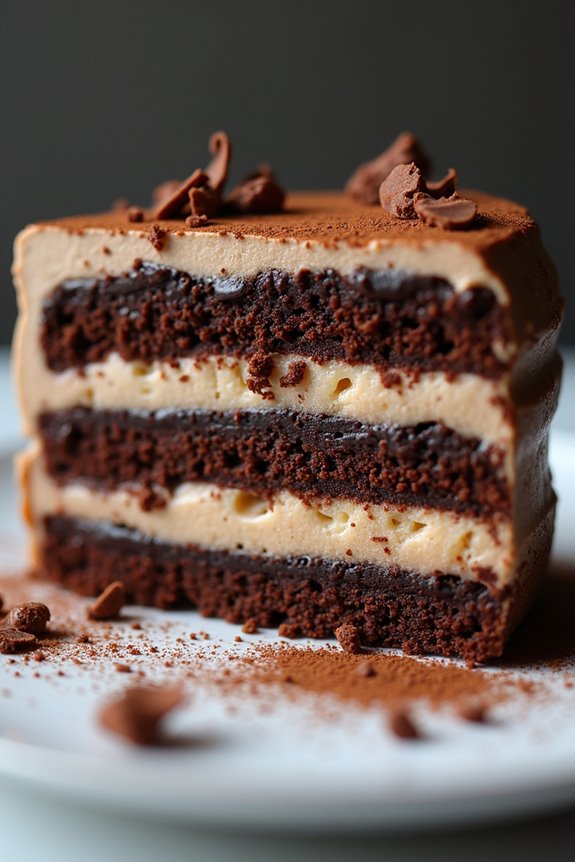
Chocotorta is a beloved Argentinian dessert that combines layers of chocolate cookies and a creamy filling made from cheese and dulce de leche. This no-bake cake is incredibly simple to prepare, making it a popular choice for gatherings and special occasions. With its rich flavors and delightful texture, chocotorta is certain to please both children and adults alike, providing a taste of Argentina that everyone can enjoy.
The magic of chocotorta lies in its versatility and ease of preparation. The base of the dessert consists of chocolate cookies, which are traditionally dipped in coffee or milk to soften them before layering. The filling is made from a mixture of cream cheese and dulce de leche, resulting in a creamy, sweet delight that complements the crunchy cookies perfectly. This dessert can be made ahead of time, allowing the flavors to meld together for an even more delicious treat.
Ingredients (Serves 4-6 people):
- 2 packs of chocolate cookies (such as Chocolinas)
- 500g cream cheese, softened
- 400g dulce de leche
- 1 cup brewed coffee (cooled)
- 1 tablespoon cocoa powder (optional, for dusting)
- Chocolate shavings or grated chocolate (optional, for garnish)
Cooking Instructions:
- Prepare the Filling: In a mixing bowl, combine the softened cream cheese and dulce de leche. Using a hand mixer or a whisk, blend the ingredients together until the mixture is smooth and creamy. This filling will provide the rich flavor and texture for the layers of your chocotorta.
- Dip the Cookies: Take the chocolate cookies and dip each one briefly into the cooled coffee. Confirm they’re soaked but not overly soggy, as they need to hold their shape when layered. This step adds moisture and flavor to the cookies, making them a perfect complement to the creamy filling.
- Layer the Cake: In a rectangular or square dish, start layering your chocotorta. Begin with a layer of the dipped cookies at the bottom of the dish, covering the entire base. Then spread a layer of the cream cheese and dulce de leche mixture over the cookies, smoothing it out evenly. Repeat this process, layering cookies and filling until all ingredients are used, finishing with a layer of the cream mixture on top.
- Chill the Chocotorta: Cover the dish with plastic wrap and refrigerate the chocotorta for at least 4 hours, or overnight if possible. Chilling allows the flavors to meld and helps the dessert set, making it easier to slice and serve.
- Serve and Garnish: Once chilled, remove the chocotorta from the refrigerator. If desired, dust the top with cocoa powder and garnish with chocolate shavings or grated chocolate for an extra touch. Slice into servings and enjoy this delicious Argentinian treat!
Extra Tips: When preparing chocotorta, feel free to experiment with different flavors by adding ingredients such as vanilla extract to the cream mixture or using flavored coffee for dipping the cookies. For a more indulgent version, consider adding layers of fresh fruit or nuts between the layers. Always remember to refrigerate the cake for the best texture and flavor, as it truly benefits from resting in the fridge.
Panqueques Con Dulce De Leche
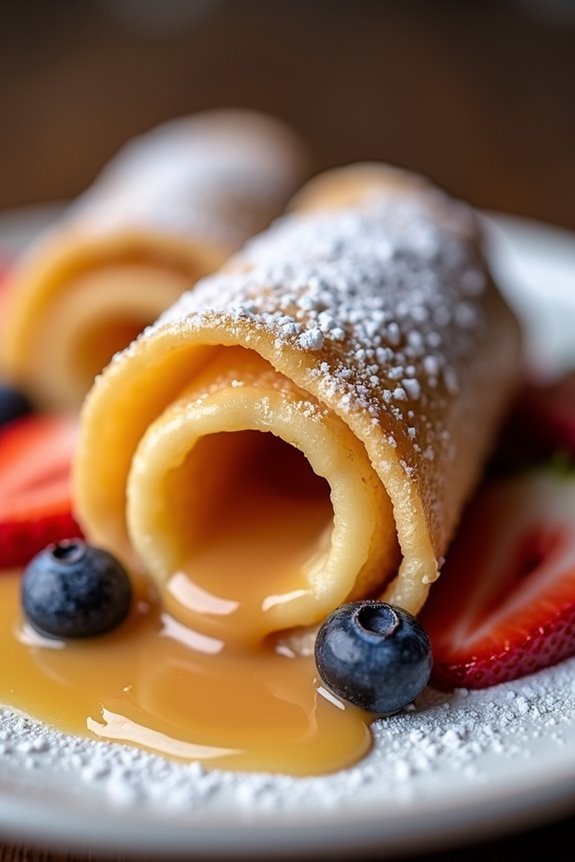
Panqueques con dulce de leche is a beloved Argentine dessert that combines the delicate texture of crepes with the rich sweetness of dulce de leche, a caramel-like sauce made from sweetened condensed milk. This dish is often enjoyed as a treat during celebrations or as a delightful end to any meal.
The thin pancakes are rolled or folded and generously filled with the luscious dulce de leche, making for a decadent dessert that’s guaranteed to satisfy any sweet tooth.
Making panqueques is a straightforward process, perfect for both novice and experienced cooks alike. With just a few ingredients, you can create a dish that feels elegant and indulgent.
Whether you serve them warm or at room temperature, these crepes can be topped with fruits, whipped cream, or a sprinkle of powdered sugar for an extra touch. Gather your ingredients, and let’s get started on this delicious Argentine treat.
Ingredients (Serves 4-6 people)
- 1 cup all-purpose flour
- 2 large eggs
- 1 1/2 cups milk
- 2 tablespoons sugar
- 1 tablespoon vegetable oil or melted butter
- 1 teaspoon vanilla extract
- Pinch of salt
- 1 cup dulce de leche
- Optional: powdered sugar or fruit for serving
Cooking Instructions
1. Prepare the Batter: In a mixing bowl, whisk together the flour, sugar, and salt. In another bowl, beat the eggs, then add the milk, vegetable oil (or melted butter), and vanilla extract. Gradually pour the wet mixture into the dry ingredients while whisking until you achieve a smooth batter without lumps.
Let the batter rest for about 15-30 minutes; this will help the pancakes become more tender.
2. Cook the Pancakes: Heat a non-stick skillet or crepe pan over medium heat and lightly grease it with oil or butter. Pour about 1/4 cup of the batter into the center of the pan and quickly swirl it around to spread it evenly into a thin layer.
Cook for about 1-2 minutes until the edges begin to lift and the bottom is lightly golden. Flip the pancake and cook for another minute on the other side. Repeat with the remaining batter, stacking the cooked pancakes on a plate.
3. Fill with Dulce de Leche: Once all pancakes are cooked, take one pancake and spread a generous layer of dulce de leche over one side. Roll or fold the pancake to enclose the filling.
Repeat this process with all the pancakes until they’re filled.
4. Serve: Arrange the filled panqueques on a serving platter. You can optionally dust them with powdered sugar or serve with fresh fruits on the side for added flavor and presentation. Enjoy them warm or at room temperature.
Extra Tips
When making panqueques, confirm that your pan is sufficiently hot but not too hot, as this can lead to uneven cooking or burning.
If the batter is too thick, you can thin it out with a little more milk until you reach the desired consistency. Additionally, you can customize the filling by adding chocolate spread or fresh fruit along with the dulce de leche for a unique twist.
Finally, try to serve them fresh for the best taste, but they can be stored in the refrigerator for a few days if needed.
Bizcocho De Batata
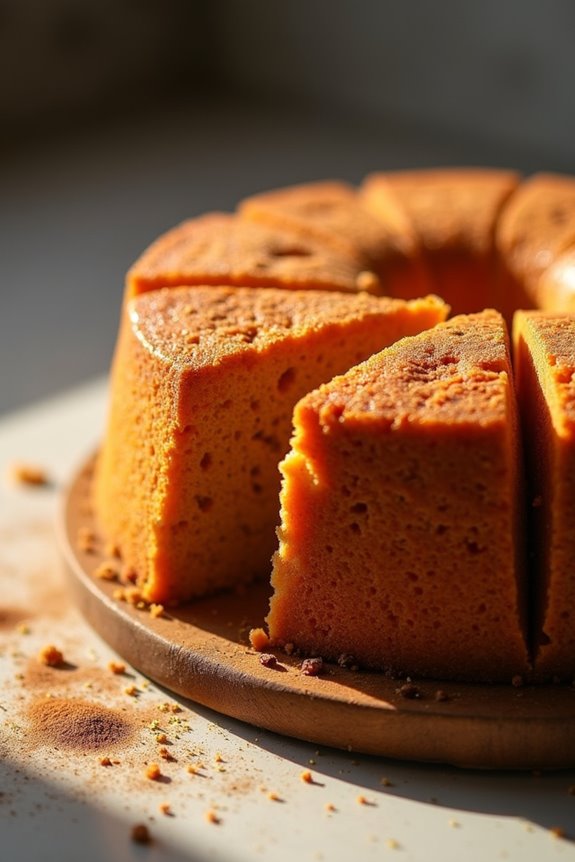
Bizcocho De Batata is a traditional Argentinian sweet potato cake that beautifully combines the natural sweetness of sweet potatoes with the rich flavor of cinnamon and vanilla. This delightful dessert isn’t only simple to make but also a comforting treat that’s often served during family gatherings and celebrations.
Its moist texture and aromatic spices make it a favorite among both children and adults alike.
To prepare this cake, you’ll need some basic ingredients that are commonly found in Argentinian baking. The process involves cooking the sweet potatoes until they’re tender, mashing them, and then mixing them with other ingredients to form a batter.
Once baked, the Bizcocho De Batata can be enjoyed warm or at room temperature, making it a versatile dessert for any occasion.
Ingredients (Serves 4-6):
- 2 large sweet potatoes (about 1 pound total)
- 1 cup all-purpose flour
- 1 cup sugar
- 1 teaspoon baking powder
- 1 teaspoon ground cinnamon
- 1/4 teaspoon salt
- 3 large eggs
- 1/2 cup milk
- 1/4 cup vegetable oil
- 1 teaspoon vanilla extract
Cooking Instructions:
1. Prepare the Sweet Potatoes: Begin by peeling the sweet potatoes and cutting them into chunks. Place them in a pot of boiling water and cook for about 15-20 minutes, or until they’re fork-tender.
Once cooked, drain the water and allow the sweet potatoes to cool slightly.
2. Mash the Sweet Potatoes: In a large mixing bowl, use a potato masher or fork to mash the sweet potatoes until smooth and free of lumps. Set aside to cool completely.
3. Preheat the Oven: Preheat your oven to 350°F (175°C). Grease a 9-inch round cake pan or line it with parchment paper for easy removal after baking.
4. Mix Dry Ingredients: In a separate bowl, whisk together the flour, sugar, baking powder, cinnamon, and salt until well combined. This step guarantees that the leavening agent is evenly distributed throughout the flour.
5. Combine Wet Ingredients: In another bowl, whisk the eggs, milk, vegetable oil, and vanilla extract until fully incorporated.
6. Combine Mixtures: Gradually add the dry ingredients to the sweet potato mixture, alternating with the wet mixture. Mix gently until just combined; be careful not to overmix as this can make the cake dense.
7. Pour and Bake: Pour the batter into the prepared cake pan, smoothing the top with a spatula. Bake in the preheated oven for 30-35 minutes, or until a toothpick inserted in the center comes out clean.
8. Cool and Serve: Once baked, remove the cake from the oven and let it cool in the pan for 10 minutes. Then, transfer it to a wire rack to cool completely before slicing and serving.
Extra Tips:
When making Bizcocho De Batata, it’s important to verify that the sweet potatoes are completely cooled before combining them with the other ingredients, as this helps prevent curdling of the eggs.
Additionally, feel free to customize the flavors by adding nuts or raisins to the batter for added texture. Dust the finished cake with powdered sugar or serve it with a dollop of whipped cream for an extra special touch. Enjoy your delicious homemade cake!
Tarta De Ricota
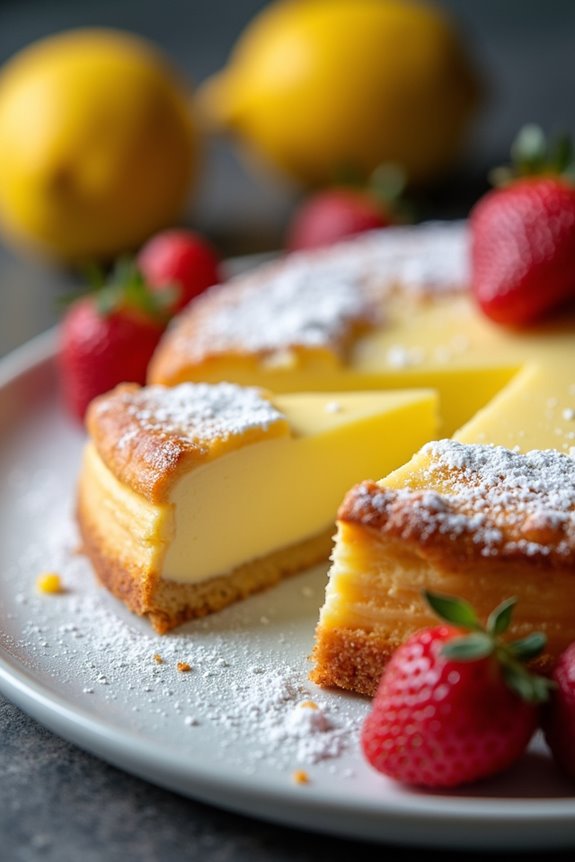
Tarta De Ricota is a traditional Argentinian dessert that showcases the delightful flavors of ricotta cheese. This creamy and slightly sweet tart is perfect for any occasion, whether it be a family gathering or a special celebration. Its rich texture combined with a crumbly crust makes it a favorite among both locals and visitors to Argentina.
The beauty of this dish lies in its simplicity and the ability to customize it with various toppings, such as fresh fruits or a drizzle of chocolate.
The base of the Tarta De Ricota is a buttery pastry crust that cradles the smooth ricotta filling, which is often flavored with lemon zest or a hint of vanilla. This decadent dessert can be served chilled or at room temperature, making it a versatile choice for entertaining.
Once you master this recipe, you’ll be able to impress your friends and family with your Argentine baking skills. Let’s plunge into the ingredients and cooking instructions for this beloved dish.
Ingredients (Serves 4-6 people):
- 1 ½ cups all-purpose flour
- ½ cup unsalted butter, softened
- ¼ cup granulated sugar
- 1 large egg
- 1 teaspoon vanilla extract
- 1 pinch of salt
- 2 cups ricotta cheese
- ¾ cup powdered sugar
- 2 large eggs
- Zest of 1 lemon
- 1 teaspoon vanilla extract
- Optional: Fresh fruits or chocolate for topping
Cooking Instructions:
1. Prepare the Dough: In a mixing bowl, combine the all-purpose flour, softened butter, granulated sugar, and a pinch of salt. Using your fingertips or a pastry cutter, mix the ingredients until the mixture resembles coarse crumbs.
Add the egg and vanilla extract, stirring until the dough comes together. If the dough is too crumbly, you can add a teaspoon of cold water.
2. Chill the Dough: Form the dough into a disk, wrap it in plastic wrap, and refrigerate it for at least 30 minutes. Chilling the dough helps it to firm up, making it easier to roll out and preventing it from shrinking while baking.
3. Preheat the Oven: Preheat your oven to 350°F (175°C). This confirms that your tart will bake evenly.
4. Roll Out the Dough: On a lightly floured surface, roll out the chilled dough to fit a 9-inch tart pan. Carefully transfer the rolled dough to the tart pan, pressing it into the edges. Trim any excess dough hanging over the sides.
5. Blind Bake the Crust: Place a piece of parchment paper over the crust and fill it with pie weights or dried beans. Bake in the preheated oven for 15 minutes, then remove the weights and parchment paper and bake for an additional 10 minutes, or until the crust is lightly golden. Allow it to cool.
6. Prepare the Filling: In a large bowl, mix the ricotta cheese, powdered sugar, eggs, lemon zest, and vanilla extract until smooth and well combined. It’s important to verify that there are no lumps in the ricotta for a creamy texture.
7. Fill the Tart: Pour the ricotta mixture into the cooled tart shell, spreading it evenly.
8. Bake the Tart: Return the tart to the oven and bake for 30-35 minutes, or until the filling is set and lightly golden on top. You can check for doneness by gently shaking the tart; it should be firm but slightly jiggly in the center.
9. Cool and Serve: Once baked, remove the tart from the oven and allow it to cool to room temperature. You can then refrigerate it for a few hours before serving. This enhances the flavors and helps the tart to set further.
Extra Tips:
When making Tarta De Ricota, feel free to experiment with flavorings in the filling. You can add a splash of orange juice or a hint of almond extract for a unique twist.
If you want to serve it with a topping, fresh berries or a fruit compote pair beautifully with the creamy ricotta. Additionally, be cautious not to overbake the tart, as it can lead to a dry filling.
Enjoy your culinary journey to Argentina with this delightful dessert!
Budín De Pan
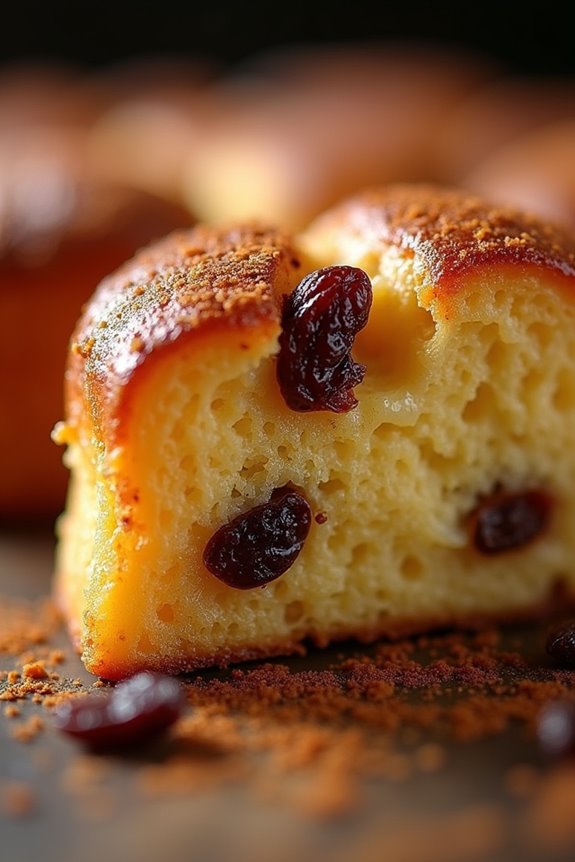
Budín De Pan, an exquisite Argentinian bread pudding, is a delightful dessert that transforms stale bread into a rich and comforting dish. This traditional recipe is beloved for its simplicity and versatility, allowing it to adapt to various ingredients based on what you have on hand.
Typically flavored with cinnamon, vanilla, and sometimes a hint of citrus, Budín De Pan is both a satisfying treat and a clever way to reduce food waste.
To prepare this classic dessert, you’ll need day-old bread, which serves as the base, soaking up a custard mixture made of milk, eggs, sugar, and spices. This allows for a wonderfully moist and flavorful end result. Often served warm or at room temperature, it’s a fantastic way to end a meal or to enjoy as a sweet afternoon snack.
Ingredients (Serves 4-6):
- 6 cups of stale bread (preferably French or brioche)
- 2 cups of milk
- 1 cup of sugar
- 4 large eggs
- 1 teaspoon of vanilla extract
- 1 teaspoon of ground cinnamon
- 1/2 cup of raisins (optional)
- Butter for greasing the baking dish
Cooking Instructions:
- Preheat the Oven: Begin by preheating your oven to 350°F (175°C). This guarantees that your Budín De Pan will cook evenly and develop a lovely golden crust.
- Prepare the Bread: Tear the stale bread into small pieces and place it in a large mixing bowl. If you’re using raisins, sprinkle them over the bread pieces. This will allow the bread to absorb the flavors better as it soaks in the custard.
- Make the Custard Mixture: In a separate bowl, whisk together the milk, sugar, eggs, vanilla extract, and ground cinnamon until well combined. Make sure there are no lumps, and the sugar is fully dissolved.
- Combine Bread and Custard: Pour the custard mixture over the torn bread, making certain that all the pieces are well coated. Allow the mixture to sit for about 15-20 minutes, stirring occasionally, so the bread can soak up the liquid thoroughly.
- Prepare the Baking Dish: While the bread is soaking, grease a medium-sized baking dish with butter. This will prevent the Budín De Pan from sticking to the sides during baking.
- Transfer to Baking Dish: Once the bread has soaked up the custard, transfer the mixture into the greased baking dish. Spread it out evenly to ensure consistent baking.
- Bake: Place the baking dish in the preheated oven and bake for about 45-50 minutes, or until the top is golden brown and a toothpick inserted in the center comes out clean.
- Cool and Serve: Remove the Budín De Pan from the oven and let it cool for about 10-15 minutes before serving. This will help it set slightly, making it easier to slice.
Extra Tips:
For added flavor, consider incorporating a splash of rum or bourbon into the custard mixture, as it accentuates the sweetness of the bread pudding.
You can also experiment with different types of bread and add-ins such as nuts or chocolate chips, depending on your preference. Serve it warm with a drizzle of caramel sauce or a scoop of vanilla ice cream for an indulgent treat that will impress your family and friends!
Pionono
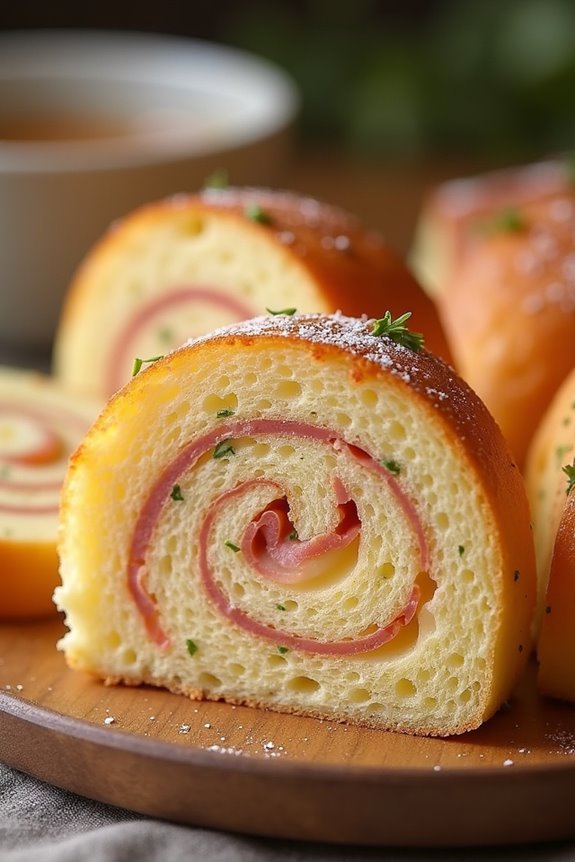
Pionono is a delightful Argentinian rolled cake that’s both versatile and delicious. Traditionally, this dish features thin layers of sponge cake filled with various fillings, often savory or sweet. It’s a popular choice for parties and gatherings, where it can be sliced into beautiful rounds, showcasing the colorful fillings.
The beauty of pionono lies in its adaptability; you can experiment with different fillings such as ham and cheese, vegetables, or even sweet spreads like dulce de leche.
To make a classic pionono, you’ll need to prepare a light and airy sponge cake that rolls easily without cracking. Once baked, the cake is spread with a filling of your choice, rolled up tightly, and chilled before slicing. This dish isn’t only visually appealing but also provides a delightful combination of flavors and textures that will impress your guests.
Ingredients (Serves 4-6)
- 4 large eggs
- 100g granulated sugar
- 100g all-purpose flour
- 1 teaspoon baking powder
- A pinch of salt
- 2 tablespoons of milk
- 200g of your choice of filling (e.g., ham and cheese, roasted vegetables, or dulce de leche)
- Optional: fresh herbs or spices for savory fillings
Cooking Instructions
- Preheat the Oven: Begin by preheating your oven to 180°C (350°F). Preparing your oven in advance guarantees that your sponge cake bakes evenly and rises well.
- Prepare the Baking Pan: Line a rectangular baking pan (approximately 10×15 inches) with parchment paper. This will prevent the cake from sticking and make it easier to roll later.
- Whip the Eggs: In a large mixing bowl, beat the eggs with granulated sugar using an electric mixer on high speed until the mixture is thick, pale, and tripled in volume (about 5-7 minutes). This step is vital for creating a fluffy sponge cake.
- Incorporate Dry Ingredients: Gently sift together the flour, baking powder, and salt. Gradually fold in the dry ingredients into the egg mixture using a rubber spatula, being careful not to deflate the batter.
- Add Milk: Fold in the milk to the batter, which will help keep the cake moist. Mix until just combined.
- Bake the Cake: Pour the batter into the prepared baking pan, spreading it evenly. Bake in the preheated oven for about 10-12 minutes, or until the cake is lightly golden and springs back when touched.
- Cool the Cake: Once baked, remove the cake from the oven and allow it to cool in the pan for a few minutes. Then, carefully invert the cake onto a clean kitchen towel lightly dusted with powdered sugar. Remove the parchment paper.
- Roll the Cake: While the cake is still warm, gently roll it with the towel from one end to the other. This helps shape the cake while it cools completely. Allow it to cool rolled up for about 30 minutes.
- Fill the Cake: Once cooled, unroll the cake carefully. Spread your choice of filling evenly over the surface, leaving a small border around the edges.
- Final Roll: Roll the cake back up tightly without the towel, starting from one end. Wrap the rolled pionono in plastic wrap and refrigerate for at least 1 hour to set.
- Slice and Serve: Before serving, remove the pionono from the fridge, slice it into rounds, and arrange on a platter. Enjoy!
Extra Tips
When making pionono, make sure that your eggs are at room temperature before beating them, as this helps achieve a better volume.
Additionally, be gentle when folding in the dry ingredients to maintain the airiness of the batter. If you’re using a savory filling, consider adding some fresh herbs or spices for an extra flavor kick.
Finally, be certain to chill the rolled pionono adequately to make slicing easier and to help the flavors meld together beautifully.
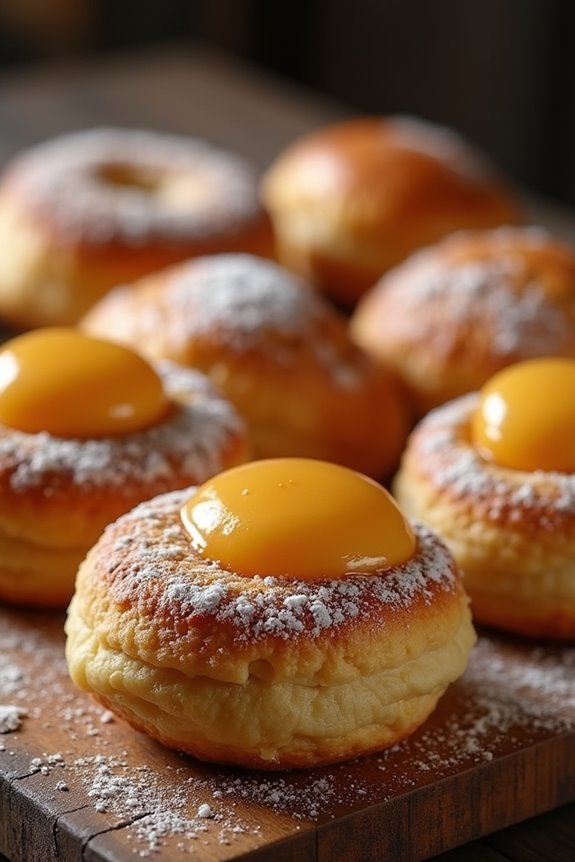
Empanadas De Dulce

Empanadas De Dulce are a delightful sweet treat hailing from Argentina, perfect for dessert lovers looking for a unique addition to their baking repertoire. These delightful pastries are typically filled with a sweet filling, often made from dulce de leche, fruit jams, or chocolate, and wrapped in a buttery, flaky crust. The combination of flavors and textures makes them an irresistible option for gatherings, celebrations, or simply a special treat at home.
Making Empanadas De Dulce isn’t only a rewarding baking experience but also allows for customization based on personal preferences. You can experiment with different fillings and even add a sprinkle of cinnamon or sugar on top before baking for an added touch. These empanadas can be enjoyed warm right out of the oven, or at room temperature, making them versatile for any occasion.
Ingredients (Servings: 4-6 people)
- 2 cups all-purpose flour
- 1/2 teaspoon salt
- 1/2 cup unsalted butter, chilled and cubed
- 1/4 cup cold water
- 1/2 cup dulce de leche (or your preferred filling)
- 1 egg (for egg wash)
- 1 tablespoon sugar (optional, for sprinkling)
- Cinnamon (optional, for sprinkling)
Cooking Instructions
- Prepare the Dough: In a large mixing bowl, combine the all-purpose flour and salt. Add the cubed butter and use your fingers or a pastry cutter to mix until the mixture resembles coarse crumbs. Gradually add cold water, one tablespoon at a time, until the dough comes together. Be careful not to overwork the dough. Wrap the dough in plastic wrap and refrigerate for at least 30 minutes.
- Roll Out the Dough: Once the dough has chilled, lightly flour a clean surface and roll out the dough to about 1/8 inch thick. Use a round cutter (about 4-5 inches in diameter) to cut out circles from the rolled dough. Gather the scraps, re-roll, and cut out more circles until all dough is used.
- Fill the Empanadas: Preheat your oven to 375°F (190°C). Take one dough circle and place about a tablespoon of dulce de leche in the center. Be careful not to overfill. Moisten the edges of the dough with water, fold the circle in half to create a half-moon shape, and press the edges to seal. Use a fork to crimp the edges for a decorative touch.
- Prepare for Baking: Place the filled empanadas on a baking sheet lined with parchment paper. In a small bowl, whisk the egg and brush it over the tops of the empanadas for a golden finish. If desired, sprinkle with sugar and cinnamon.
- Bake the Empanadas: Bake in the preheated oven for 20-25 minutes, or until the empanadas are golden brown. Remove from the oven and let cool slightly before serving.
- Serve: Enjoy your warm Empanadas De Dulce as a delicious dessert. They can be served plain or with a drizzle of extra dulce de leche on the side.
Extra Tips
When making Empanadas De Dulce, verify your dough is well-chilled to achieve that flaky texture. Don’t hesitate to experiment with different fillings such as fruit preserves, Nutella, or even a mix of nuts and chocolate for a gourmet twist.
If you find that your empanadas are leaking filling while baking, try sealing them more tightly or reducing the amount of filling used. Additionally, these empanadas can be made ahead of time and frozen before baking; just add a few extra minutes to the baking time if you choose to bake them straight from the freezer.
Enjoy your baking adventure!
Galletitas De Manteca
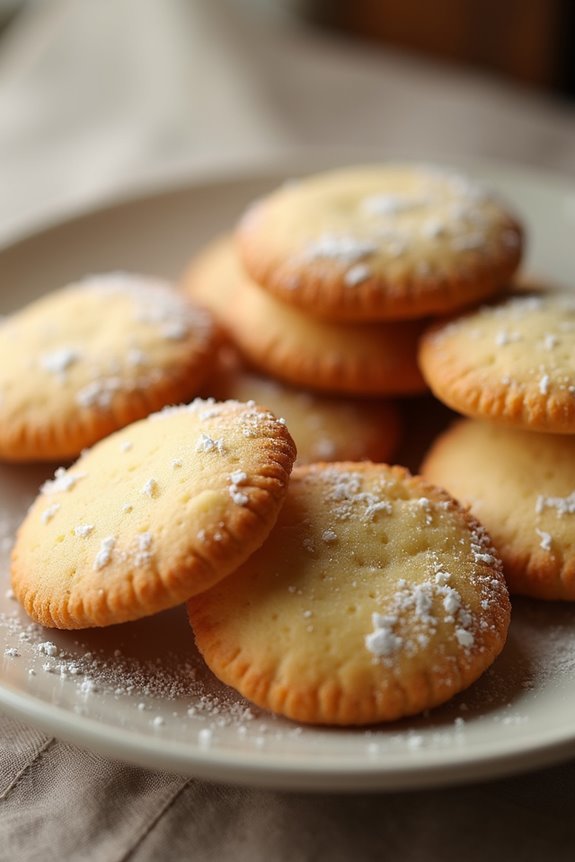
Galletitas De Manteca, or buttery cookies, are a delightful treat originating from Argentina that boasts a rich, melt-in-your-mouth texture. These simple yet delicious cookies are perfect for tea time, as a dessert after a meal, or just as a sweet snack throughout the day. With their buttery flavor and slight crispness, these cookies are sure to be a hit with family and friends alike.
The beauty of Galletitas De Manteca lies in their versatility. You can easily adapt the recipe by adding chocolate chips, nuts, or even a sprinkle of powdered sugar for a touch of sweetness. These cookies aren’t only easy to make, but they also require minimal ingredients, making them an ideal choice for both novice and seasoned bakers. Let’s explore this scrumptious recipe!
Ingredients (serving size: 4-6 people)
- 1 cup unsalted butter, softened
- 1 cup granulated sugar
- 1 large egg
- 2 teaspoons vanilla extract
- 2 ½ cups all-purpose flour
- 1 teaspoon baking powder
- ½ teaspoon salt
- Optional: powdered sugar for dusting
Cooking Instructions
- Preheat the Oven: Begin by preheating your oven to 350°F (175°C). This guarantees that your cookies will bake evenly and achieve the desired golden color.
- Cream the Butter and Sugar: In a large mixing bowl, combine the softened butter and granulated sugar. Using an electric mixer, beat the mixture on medium speed until it becomes light and fluffy. This step is vital as it helps incorporate air into the dough, resulting in a lighter texture.
- Add the Egg and Vanilla: Once the butter and sugar are well combined, add the egg and vanilla extract to the mixture. Continue to beat until everything is thoroughly blended. The egg acts as a binding agent, contributing to the overall structure of the cookies.
- Combine Dry Ingredients: In a separate bowl, whisk together the all-purpose flour, baking powder, and salt. Gradually add this dry mixture to the wet ingredients, mixing on low speed until just combined. Be careful not to overmix, as this can lead to tough cookies.
- Shape the Cookies: Using a spoon or cookie scoop, drop rounded tablespoons of dough onto ungreased baking sheets, leaving some space between each cookie as they’ll spread while baking. You can slightly flatten the tops with your fingers for a more uniform shape.
- Bake the Cookies: Place the baking sheets in the preheated oven and bake for 12-15 minutes, or until the edges are lightly golden. Keep an eye on them, as baking times can vary depending on your oven.
- Cool the Cookies: Once baked, remove the cookies from the oven and let them cool on the baking sheets for about 5 minutes. Then, transfer them to a wire rack to cool completely. This cooling process helps them set properly and enhances their flavor.
- Optional Dusting: If desired, sprinkle powdered sugar over the cooled cookies for an extra touch of sweetness and presentation.
Extra Tips
When making Galletitas De Manteca, make sure your butter is at room temperature for easier blending. This will help you achieve a perfect creamy texture.
Additionally, feel free to experiment with flavors by incorporating lemon zest or almond extract instead of vanilla for a unique twist.
Store the cookies in an airtight container to keep them fresh, and they can also be frozen for later enjoyment—just make sure to layer them with parchment paper to prevent sticking. Enjoy your baking!
Rosquitas
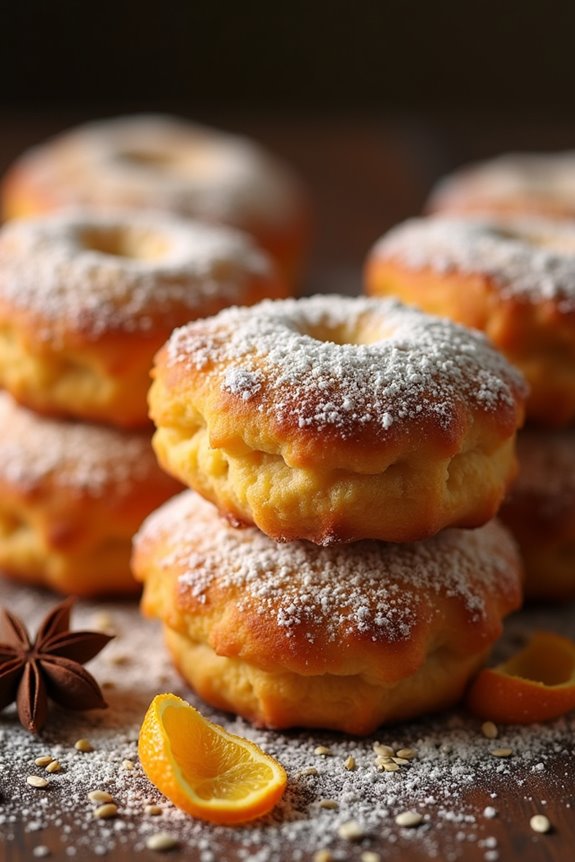
Rosquitas are delightful Argentinian pastries that are reminiscent of doughnuts but with their unique twist. These small, ring-shaped treats are typically made with a simple dough that’s lightly sweetened and often flavored with anise or orange zest, providing a fragrant aroma.
They’re often enjoyed as a snack or dessert, and pair wonderfully with a cup of coffee or tea. Whether you’re looking to impress guests or simply indulge in a homemade treat, making Rosquitas is a rewarding and fun experience.
The beauty of Rosquitas lies not only in their taste but also in their texture. They’re crispy on the outside with a soft, tender interior. The dough is easy to work with, making it a perfect recipe for those who are new to baking.
Once fried to golden perfection, these pastries can be dusted with powdered sugar for an extra touch of sweetness. Let’s explore this Argentinian favorite and create a batch of Rosquitas that you and your loved ones will cherish.
Ingredients (Serves 4-6):
- 2 cups all-purpose flour
- 1/2 cup granulated sugar
- 1/4 cup unsalted butter, softened
- 2 large eggs
- 1/2 cup milk
- 1 tablespoon baking powder
- 1 teaspoon vanilla extract
- Zest of 1 orange (optional)
- 1/2 teaspoon anise seeds (optional)
- Oil for frying
- Powdered sugar for dusting (optional)
Cooking Instructions:
- Prepare the Dough: In a large mixing bowl, combine the flour, granulated sugar, and baking powder. Mix well to verify the baking powder is evenly distributed. In a separate bowl, whisk together the softened butter, eggs, milk, vanilla extract, orange zest, and anise seeds until well blended. Gradually add the wet ingredients to the dry ingredients, mixing until a soft dough forms.
- Knead the Dough: Turn the dough out onto a lightly floured surface. Knead the dough gently for about 2-3 minutes until it becomes smooth and elastic. Be careful not to over-knead, as this can result in tough Rosquitas.
- Shape the Rosquitas: Divide the dough into small pieces (about the size of a golf ball). Roll each piece into a rope about 1/2 inch thick and then shape it into a ring by connecting the ends. Press gently to seal, making sure there are no gaps.
- Heat the Oil: In a deep frying pan or pot, heat about 2 inches of oil over medium heat. You can test if the oil is hot enough by dropping a small piece of dough into it; if it bubbles and rises, the oil is ready.
- Fry the Rosquitas: Carefully place a few Rosquitas into the hot oil, being cautious not to overcrowd the pan. Fry them for about 2-3 minutes on each side, or until they’re golden brown. Use a slotted spoon to remove them from the oil and place them on a paper towel-lined plate to drain any excess oil.
- Dust and Serve: Once all the Rosquitas are fried and drained, dust them with powdered sugar if desired. Serve warm or at room temperature, and enjoy!
Extra Tips:
For an extra flavor boost, consider infusing the oil with a bit of orange zest or cinnamon sticks while it heats. This will give your Rosquitas a delightful aroma as they fry.
Additionally, if you prefer a sweeter treat, feel free to add a bit more sugar into the dough or dip the finished Rosquitas in a simple syrup. Storing them in an airtight container will keep them fresh for a few days, but they’re best enjoyed fresh out of the fryer. Happy baking!
Pastera
Pastera, also known as “Empanada de Pastera,” is a traditional Argentinian pastry that’s often filled with a variety of ingredients. This dish is beloved for its flaky crust and versatile filling options, making it a popular choice for gatherings and family meals.
While the classic fillings often include meats, cheeses, or vegetables, the beauty of pastera lies in its adaptability: you can create a filling that reflects your own tastes and the ingredients you have on hand. Whether you’re looking to impress guests or simply enjoy a comforting dish at home, pastera won’t disappoint.
The preparation of pastera involves making a rich pastry crust and then filling it with a savory mixture before baking it to perfection. The golden-brown exterior gives way to a delightful filling that’s both flavorful and satisfying.
Traditionally served as an appetizer or a main course, pastera can be enjoyed hot or at room temperature, making it a versatile dish for any occasion. Let’s explore the recipe and create this delicious Argentinian treat!
Ingredients (Serves 4-6)
- 3 cups all-purpose flour
- 1 teaspoon salt
- 1 cup unsalted butter, chilled and cubed
- 1/2 cup cold water
- 1 lb ground beef (or preferred filling)
- 1 onion, finely chopped
- 2 cloves garlic, minced
- 1/2 red bell pepper, diced
- 1 teaspoon cumin
- 1 teaspoon paprika
- Salt and pepper to taste
- 1 egg, beaten (for egg wash)
Cooking Instructions
1. Prepare the Dough: In a large mixing bowl, combine the flour and salt. Add the chilled cubed butter and mix with your fingers or a pastry cutter until the mixture resembles coarse crumbs. Gradually add the cold water, mixing until the dough comes together.
Form the dough into a ball, wrap in plastic wrap, and refrigerate for at least 30 minutes.
2. Cook the Filling: In a large skillet over medium heat, add a drizzle of oil and sauté the chopped onion until it becomes translucent. Add the minced garlic and diced red bell pepper, cooking for an additional 2-3 minutes.
Then, add the ground beef, cumin, paprika, salt, and pepper. Cook until the beef is browned and fully cooked. Remove from heat and let the filling cool slightly.
3. Roll Out the Dough: After the dough has chilled, take it out of the refrigerator. On a floured surface, divide the dough into smaller portions. Roll out each portion into a thin circle, about ¼ inch thick, ensuring that the edges are slightly thicker for support.
4. Assemble the Pastera: Place a tablespoon of the cooled filling in the center of each dough circle. Be careful not to overfill, as this can make sealing difficult.
Fold the dough over the filling to create a half-moon shape. Press the edges together to seal, and use a fork to crimp the edges for a decorative touch.
5. Bake the Pastera: Preheat your oven to 375°F (190°C). Place the assembled pasteras on a baking sheet lined with parchment paper. Brush the tops with the beaten egg to give them a golden color.
Bake in the preheated oven for about 25-30 minutes or until the pasteras are golden brown and flaky.
6. Serve: Once baked, remove from the oven and allow to cool slightly before serving. Enjoy your pastera warm or at room temperature, and consider serving it with a side of chimichurri sauce or a fresh salad.
Extra Tips
To enhance the flavor of your pastera, consider adding herbs such as oregano or parsley to the filling mixture. You can also experiment with different types of cheeses or vegetables to create a unique filling that suits your taste.
If you have leftover dough, it can be frozen for future use. Additionally, pasteras can be made in advance and reheated in the oven, making them an excellent option for meal prep or entertaining.
Torta Rogel

Torta Rogel is a traditional Argentinian dessert that captivates with its layers of delicate pastry and luscious dulce de leche. This cake is an iconic representation of Argentine baking, often served during special occasions and celebrations. The combination of crispy layers and sweet, creamy filling creates a delightful contrast that’s bound to please any palate.
While it may seem intricate, the art of making Torta Rogel is well worth the effort, and the result is a stunning centerpiece for any dessert table. To prepare Torta Rogel, you’ll need to master the art of making thin pastry layers, which are then baked to perfection and assembled with rich dulce de leche and a touch of meringue. Each bite reveals the harmonious balance of texture and flavor, making this cake a beloved treat in Argentina. With patience and attention to detail, you can bring a slice of Argentine culture into your kitchen.
Ingredients (Serves 4-6):
- 2 cups all-purpose flour
- 1/2 cup unsalted butter, softened
- 1/2 cup sugar
- 1 large egg
- 1/4 teaspoon salt
- 1/4 cup cold water
- 2 cups dulce de leche
- 3 egg whites
- 1/2 cup granulated sugar (for meringue)
- 1 teaspoon vanilla extract
- Zest of 1 lemon (optional)
Cooking Instructions:
- Prepare the Dough: In a large mixing bowl, combine the flour, softened butter, sugar, egg, and salt. Mix until the mixture resembles coarse crumbs. Gradually add the cold water, mixing until a dough forms. Knead gently for a minute until smooth. Wrap in plastic wrap and refrigerate for at least 30 minutes.
- Roll Out the Dough: Preheat your oven to 350°F (175°C). Divide the chilled dough into equal portions (about 8-10 pieces). On a lightly floured surface, roll out each piece into a thin circle, about 1/8 inch thick. Use a plate or a cake pan to cut out perfect circles.
- Bake the Layers: Place the rolled-out dough circles on parchment-lined baking sheets. Bake them in the preheated oven for 8-10 minutes or until they’re lightly golden. Once baked, let them cool completely on a wire rack.
- Assemble the Cake: Once the pastry layers are cool, spread a generous layer of dulce de leche on top of one of the circles. Place another circle on top and repeat the process until all layers are stacked, finishing with a layer of dulce de leche on top.
- Make the Meringue: In a clean mixing bowl, beat the egg whites until soft peaks form. Gradually add the granulated sugar while continuing to beat until the meringue is glossy and holds stiff peaks. Fold in the vanilla extract and lemon zest if using.
- Top the Cake: Spread the meringue on the top layer of the cake, creating peaks for decoration if desired. Use a kitchen torch to lightly brown the meringue for a beautiful finish, or place it under a broiler for a few seconds, watching closely to avoid burning.
- Chill and Serve: Refrigerate the assembled Torta Rogel for at least 2 hours before serving to allow the flavors to meld and the cake to set. Slice and enjoy!
Extra Tips:
When making Torta Rogel, verify that your dough is rolled out as thinly as possible for a lighter texture. If you find the dough difficult to handle, let it rest for a few more minutes before rolling.
Additionally, for an added twist, consider infusing the dulce de leche with a hint of coffee or chocolate for a unique flavor profile. This cake can also be prepared a day in advance, allowing it to develop even richer flavors overnight in the fridge.