

When it comes to desserts that warm the heart, Brazilian puddings are a top pick. Each recipe brings back fond memories of family gatherings and kitchens filled with delightful aromas. From the creamy Pudim de Leite Condensado to the tropical Pudim de Coco, there’s something for every taste. I can’t wait to see which one of these comforting recipes will become your new favorite. Let’s take a look at these delightful treats and their unique charms.
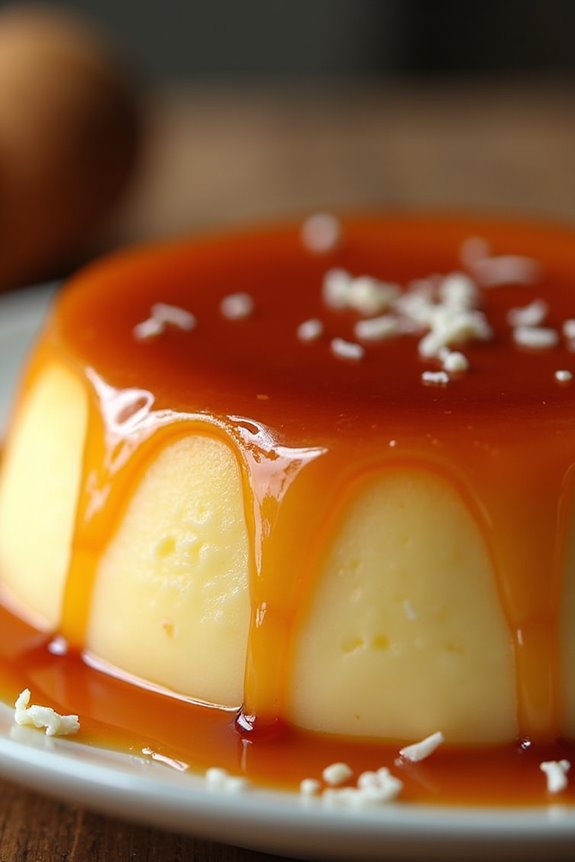
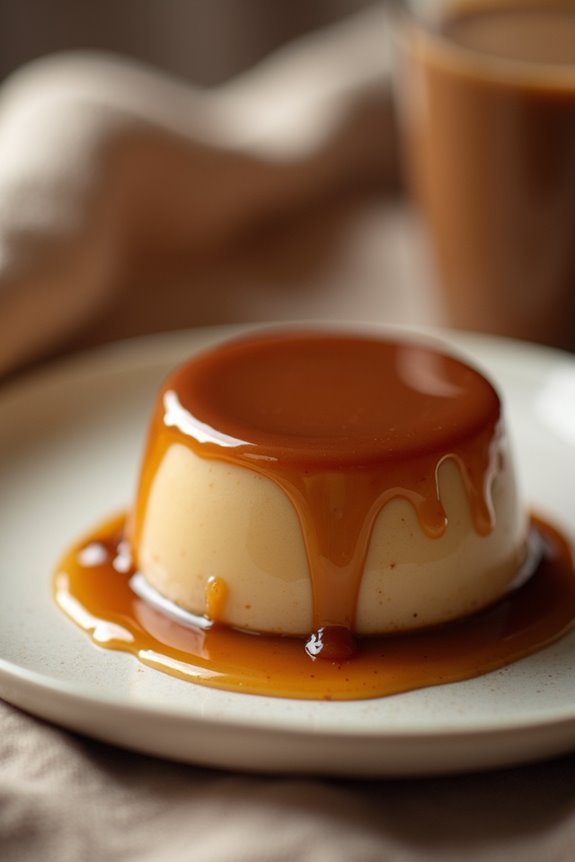
Pudim De Leite Condensado (Condensed Milk Pudding)

Pudim De Leite Condensado is a beloved Brazilian dessert that combines the creamy richness of condensed milk with the smoothness of eggs and milk, resulting in a luscious pudding that’s both indulgent and comforting. This classic recipe is often served chilled and is perfect for any occasion, from family gatherings to festive celebrations.
The pudding is typically topped with a caramel sauce that adds a delightful sweetness and a beautiful glaze, making it a stunning centerpiece for your dessert table.
Making Pudim De Leite Condensado is a straightforward process, but it does require some attention to detail to guarantee a silky texture and balanced flavor. With just a few simple ingredients and the right techniques, you can create a pudding that will impress your family and friends. This recipe serves 4-6 people, making it an ideal treat for small gatherings or a sweet finish to a weeknight dinner.
Ingredients
- 1 can (14 oz) sweetened condensed milk
- 2 cans (14 oz each) whole milk (use the empty condensed milk can for measurement)
- 3 large eggs
- 1 cup granulated sugar (for caramel)
- 1/4 cup water (for caramel)
- 1 teaspoon vanilla extract (optional)
Cooking Instructions
- Prepare the Caramel: In a medium saucepan over medium heat, combine the sugar and water. Stir gently until the sugar dissolves, then stop stirring and let it boil. Watch closely as the mixture turns a golden brown. Once it reaches the desired caramel color, quickly pour it into a round baking dish, swirling to coat the bottom evenly. Be careful as the caramel will be extremely hot. Set aside to cool and harden.
- Blend the Pudding Mixture: In a blender, combine the sweetened condensed milk, whole milk, eggs, and vanilla extract (if using). Blend on high until the mixture is smooth and well combined, about 1-2 minutes.
- Pour into the Caramel-Coated Dish: Once the caramel has cooled and hardened, carefully pour the pudding mixture over the caramel layer in the baking dish.
- Bake in a Water Bath: Preheat your oven to 350°F (175°C). Place the baking dish with the pudding mixture inside a larger baking pan. Fill the larger pan with hot water until it reaches halfway up the sides of the pudding dish. This water bath will help the pudding cook evenly.
- Bake: Bake in the preheated oven for about 1 hour, or until the pudding is set and a toothpick inserted into the center comes out clean. The top may still be slightly wobbly, but it will firm up as it cools.
- Cool and Refrigerate: Once baked, remove the pudding from the water bath and let it cool at room temperature. Once cooled, cover it with plastic wrap and refrigerate for at least 4 hours, or preferably overnight, to allow the flavors to meld and the pudding to set fully.
- Unmold and Serve: To serve, run a knife around the edges of the pudding to loosen it from the dish. Invert a serving plate over the top of the pudding and carefully flip it over, allowing the pudding to slide out and reveal the caramel topping. Slice and serve chilled.
Extra Tips
For the best results, make sure your ingredients are at room temperature before blending, as this will help guarantee a smoother texture.
Additionally, if you prefer a richer flavor, you can substitute part of the whole milk with cream. When inverting the pudding onto a plate, do it over the sink or a surface that can handle any potential spills, as the caramel can be messy.
Finally, if you have leftovers, store them covered in the refrigerator for up to 3 days; the pudding will continue to develop its flavor as it sits.
Quindim (Coconut Pudding)
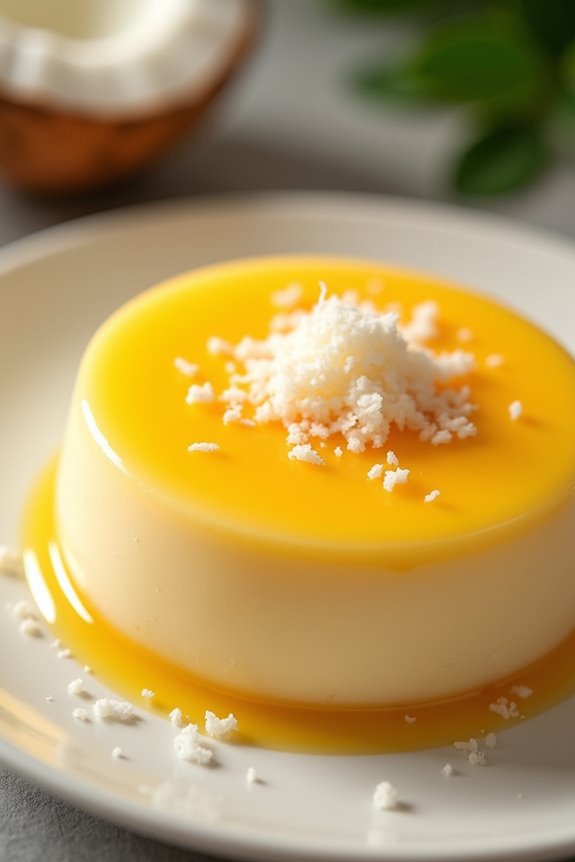
Quindim is a delightful Brazilian dessert that showcases the tropical flavor of coconut combined with the richness of egg yolks and sugar. This bright yellow pudding isn’t only an indulgent treat but also a stunning centerpiece for any gathering. The smooth, glossy texture and sweet, coconut-infused flavor make it a favorite among dessert lovers.
Its origins can be traced back to Portuguese convents, where nuns would create this sweet delicacy, and it has since become a beloved staple in Brazilian cuisine.
Making Quindim is a straightforward process that requires only a handful of ingredients. The pudding is baked in a water bath to guarantee it cooks evenly and achieves the perfect consistency. Once baked, the Quindim is cooled and then inverted to reveal a shiny top, often garnished with additional coconut or served with a drizzle of caramel sauce. This treat is perfect for parties, family gatherings, or simply to enjoy at home with a cup of coffee.
Ingredients (Serves 4-6)
- 1 cup shredded unsweetened coconut
- 1 cup sugar
- ½ cup butter, softened
- 6 egg yolks
- ½ cup whole milk
- 1 teaspoon vanilla extract
- 1 tablespoon baking powder
- A pinch of salt
Cooking Instructions
- Preheat the Oven: Start by preheating your oven to 350°F (175°C). This is essential to guarantee that the Quindim bakes evenly and achieves the right texture.
- Prepare the Baking Dish: Grease a muffin tin or individual ramekins with butter to prevent sticking. If using a larger mold, make sure it’s well-greased for easy removal later.
- Mix the Ingredients: In a large mixing bowl, combine the softened butter and sugar. Cream them together until light and fluffy. Then, add the egg yolks one at a time, mixing well after each addition. This step is vital for incorporating air into the mixture, which will help provide a light texture.
- Incorporate Remaining Ingredients: Gradually add the shredded coconut, whole milk, vanilla extract, baking powder, and a pinch of salt to the mixture. Stir gently until all ingredients are well combined. Be careful not to overmix, as you want to maintain the airy texture.
- Fill the Molds: Pour the mixture evenly into the prepared muffin tin or ramekins, filling each mold about three-quarters full. This allows space for the pudding to rise during baking.
- Bake in a Water Bath: Place the filled molds in a larger baking dish and fill the dish with hot water until it reaches halfway up the sides of the molds. This water bath helps regulate the temperature and keeps the Quindim from drying out. Bake in the preheated oven for about 25-30 minutes, or until the tops are set and slightly golden.
- Cool and Unmold: Once baked, remove the Quindim from the oven and let it cool at room temperature for about 10 minutes. Carefully run a knife around the edges to loosen them, then invert the molds onto a serving plate. The shiny top should be facing up.
- Serve: Allow the Quindim to chill in the refrigerator for a couple of hours before serving. This dessert can be enjoyed on its own or garnished with extra shredded coconut or a drizzle of caramel sauce.
Extra Tips
For the best results, guarantee that all ingredients are at room temperature before beginning the recipe, as this helps create a smooth batter. If you prefer a more intense coconut flavor, consider using coconut milk instead of whole milk.
Additionally, you can experiment with different molds or shapes to present the Quindim in a unique way. Be sure to keep an eye on the baking time, as different ovens may vary, and overbaking can lead to a dry texture. Enjoy your homemade Quindim!
Pudding De Chocolate (Chocolate Pudding)
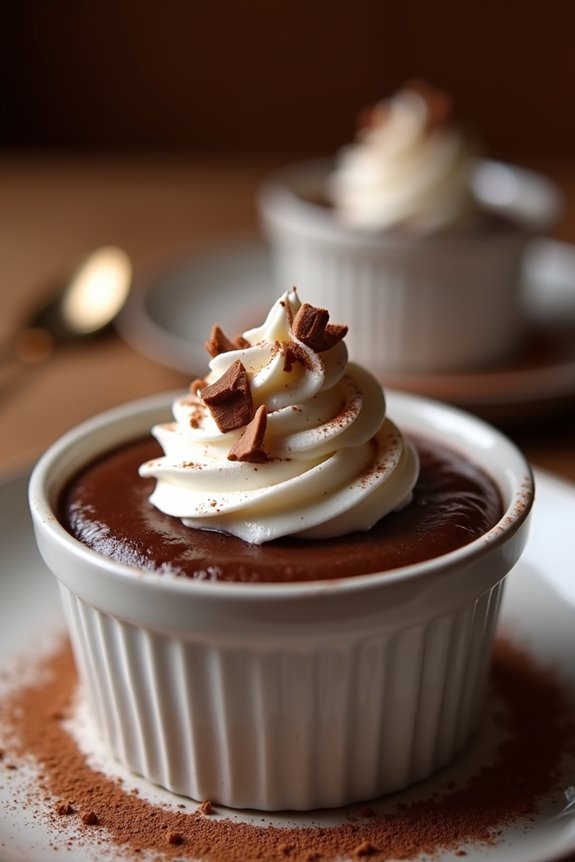
Pudding De Chocolate, or Brazilian Chocolate Pudding, is a delightful dessert that captures the rich flavors of chocolate in a smooth, creamy texture. This beloved treat is perfect for any occasion, whether you’re hosting a dinner party or simply looking to satisfy your sweet tooth.
The simplicity of this recipe makes it accessible for both novice and experienced bakers alike, allowing anyone to enjoy a taste of Brazil right in their kitchen.
To make this indulgent dessert, you’ll need a few key ingredients that are typically found in most pantries. The process involves melting chocolate, combining it with milk and sugar, and then thickening the mixture with cornstarch. Topped with whipped cream or chocolate shavings, this pudding is sure to impress your family and friends.
Gather your ingredients and get ready to create a luscious chocolate experience that will leave everyone wanting more.
Ingredients (Serves 4-6):
- 2 cups whole milk
- 1 cup granulated sugar
- 1/2 cup unsweetened cocoa powder
- 1/4 cup cornstarch
- 1/2 teaspoon vanilla extract
- 1/4 teaspoon salt
- 4 ounces dark chocolate (at least 60% cocoa), chopped
- Whipped cream (for serving)
- Chocolate shavings or cocoa powder (for garnish)
Cooking Instructions:
- Combine Dry Ingredients: In a medium saucepan, whisk together the sugar, cocoa powder, cornstarch, and salt until well combined. This will help guarantee that the cornstarch dissolves evenly when the liquid is added.
- Add Milk: Gradually pour in the whole milk while continuously whisking the dry ingredients. This helps to create a smooth mixture and prevents any lumps from forming.
- Cook the Mixture: Place the saucepan over medium heat. Continue to stir constantly until the mixture begins to thicken and starts to bubble. This should take about 5-7 minutes. Be sure to scrape the bottom and sides of the pan to prevent the pudding from sticking and burning.
- Incorporate Chocolate: Once the pudding has thickened, remove it from the heat. Add the chopped dark chocolate and vanilla extract, stirring until the chocolate has completely melted and the mixture is smooth and glossy.
- Chill the Pudding: Pour the pudding into individual serving dishes or a single large bowl. Cover with plastic wrap, making sure the wrap touches the surface of the pudding to prevent a skin from forming. Refrigerate for at least 2 hours or until set.
- Serve: Once chilled, serve the pudding topped with whipped cream and sprinkle with chocolate shavings or a dusting of cocoa powder for added flair.
Extra Tips:
For a richer flavor, consider using a combination of dark and milk chocolate. You can also experiment with different toppings, such as fresh berries or nuts, to add a unique twist to your pudding.
If you’re feeling adventurous, try adding a splash of coffee or a pinch of cinnamon to the mixture while cooking to enhance the chocolate flavor even further. Enjoy your homemade Pudding De Chocolate, and don’t forget to share with friends and family!
Pudim De Coco (Coconut Flan)
Pudim de Coco, or Coconut Flan, is a classic Brazilian dessert that offers a delightful balance of creaminess and sweetness. This traditional pudding is infused with the rich flavor of coconut, making it a favorite among coconut lovers. The silky texture and caramelized topping make it not only delicious but also visually appealing, perfect for any occasion.
Whether you’re celebrating a special event or simply indulging in a sweet treat, this dessert is sure to impress.
The preparation of Pudim de Coco is relatively straightforward, requiring only a few key ingredients. Once you have the components ready, the flan is baked in a water bath, which helps achieve its smooth consistency. This recipe serves approximately 4 to 6 people, making it an ideal dessert for gatherings or family dinners.
Let’s explore the ingredients and cooking instructions to create this delightful Brazilian pudding.
Ingredients (Serves 4-6):
- 1 cup granulated sugar (for caramel)
- 1 cup coconut milk
- 1 cup sweetened condensed milk
- 3 large eggs
- 1 teaspoon vanilla extract
- 1 cup shredded unsweetened coconut
- 1 cup whole milk
Cooking Instructions:
- Prepare the Caramel: Begin by making the caramel for the flan. In a medium saucepan over medium heat, add the granulated sugar. Stir continuously until the sugar melts and turns a golden amber color. Quickly pour the caramel into a round flan mold or a glass baking dish, swirling it around to coat the bottom evenly. Be careful, as the caramel will be very hot.
- Blend the Ingredients: In a blender, combine the coconut milk, sweetened condensed milk, eggs, vanilla extract, shredded coconut, and whole milk. Blend on high speed until the mixture is smooth and well combined. This step is vital as it incorporates air into the mixture, which contributes to the flan’s light texture.
- Pour the Mixture: Once blended, pour the coconut mixture gently over the caramel layer in the mold. Make sure to do this slowly to avoid disrupting the caramel layer at the bottom.
- Prepare the Water Bath: Preheat your oven to 350°F (175°C). Place the flan mold inside a larger baking dish and fill the outer dish with hot water until it reaches halfway up the sides of the flan mold. This water bath will help cook the flan evenly and prevent it from cracking.
- Bake the Flan: Carefully place the baking dish in the preheated oven. Bake for approximately 1 hour, or until the flan is set and a knife inserted in the center comes out clean. If the flan is still jiggly, continue baking for an additional 10-15 minutes.
- Cool and Unmold: Once baked, remove the flan from the oven and let it cool at room temperature for about 30 minutes. Then, refrigerate for at least 4 hours, or overnight for the best results. To unmold, run a knife around the edges of the flan and invert it onto a serving plate. The caramel will flow over the top, creating a beautiful glaze.
Extra Tips: When making Pudim de Coco, confirm that all your ingredients are at room temperature before mixing them together for a smoother blend. If you prefer a richer coconut flavor, you can use coconut cream instead of whole milk. Additionally, you can garnish the flan with toasted coconut flakes or fresh fruit for added texture and presentation.
Enjoy this delightful dessert chilled!
Arroz Doce (Sweet Rice Pudding)

Arroz Doce, or Sweet Rice Pudding, is a beloved Brazilian dessert that showcases the delightful combination of creaminess and sweetness. Traditionally made with rice, milk, sugar, and cinnamon, this comforting dish is often enjoyed during family gatherings, holidays, or simply as a sweet treat. The creamy texture and aromatic flavor profile make it a favorite among both children and adults alike.
Making Arroz Doce is relatively simple and requires just a few ingredients. The dish can be customized with additional flavors such as vanilla or lemon zest, adding a unique twist to the classic recipe. Whether served warm or chilled, this delightful pudding is sure to satisfy your sweet tooth and bring a taste of Brazil to your home.
Ingredients (Serves 4-6):
- 1 cup of short-grain rice
- 4 cups of whole milk
- 1 cup of sugar
- 1 cinnamon stick
- 1 teaspoon of vanilla extract (optional)
- 1 pinch of salt
- Ground cinnamon (for garnish)
Cooking Instructions:
- Rinse the Rice: Begin by rinsing the short-grain rice under cold water in a fine-mesh strainer. This step is important to remove excess starch, which helps prevent the rice from becoming too gummy during cooking.
- Cook the Rice: In a medium-sized pot, combine the rinsed rice with 2 cups of water and a pinch of salt. Bring the mixture to a boil over medium heat. Once boiling, reduce the heat to low, cover the pot, and let it simmer for about 15-20 minutes, or until the rice is tender and the water is absorbed.
- Add Milk and Sugar: Once the rice is cooked, add the 4 cups of whole milk and 1 cup of sugar to the pot. Stir well to combine. The addition of milk will create the creamy texture that’s characteristic of Arroz Doce.
- Flavor the Mixture: Add the cinnamon stick and vanilla extract (if using) to the pot. Stir the mixture gently and bring it to a simmer over medium heat. Be sure to keep an eye on it to prevent it from boiling over.
- Simmer the Pudding: Reduce the heat to low and let the mixture simmer for about 30-40 minutes, stirring occasionally. This will allow the rice to absorb the flavors and the pudding to thicken to your desired consistency. If the pudding becomes too thick, you can add a bit more milk.
- Remove from Heat: Once the desired consistency is reached, remove the pot from the heat. Discard the cinnamon stick and let the pudding cool slightly before serving.
- Serve and Garnish: Spoon the Arroz Doce into individual serving bowls or a large dish. Sprinkle ground cinnamon on top for garnish and serve warm or chilled, depending on your preference.
Extra Tips:
For a creamier texture, consider using a combination of whole milk and coconut milk. You can also experiment with different spices like nutmeg or cardamom for added flavor. If you prefer a sweeter pudding, feel free to adjust the sugar according to your taste.
Finally, remember that Arroz Doce can be stored in the refrigerator for a few days, making it a great make-ahead dessert option!
Manjar Branco (Coconut and Almond Pudding)
Manjar Branco is a traditional Brazilian dessert that showcases the rich and delightful flavors of coconut and almonds. This creamy pudding isn’t only a treat for the taste buds but also a feast for the eyes, often served with a sweet syrup or fresh fruit. Its smooth texture and subtle sweetness make it a beloved choice for family gatherings and festive occasions.
Whether you’re a seasoned cook or a novice in the kitchen, this recipe is straightforward and rewarding, offering a glimpse into Brazilian culinary culture.
The preparation of Manjar Branco involves a few simple ingredients, primarily coconut milk and almond extract, which infuse the pudding with a tropical essence. This dessert is typically chilled and served cold, allowing the flavors to meld beautifully. It can be garnished with toasted coconut flakes or a drizzle of fruit syrup for added flair.
Follow this recipe to create a delightful Manjar Branco that will impress your family and friends, serving 4-6 people.
Ingredients:
- 1 cup of coconut milk
- 1 cup of whole milk
- 1 cup of sugar
- 1/2 cup of cornstarch
- 1/2 teaspoon of almond extract
- 1/4 teaspoon of salt
- 1/2 cup of shredded coconut (unsweetened, for garnish)
- 1/2 cup of toasted almonds (for garnish)
- 1/2 cup of fruit syrup or berry sauce (optional for serving)
Cooking Instructions:
- Combine the Ingredients: In a medium saucepan, whisk together the coconut milk, whole milk, sugar, cornstarch, almond extract, and salt. Ascertain that there are no lumps from the cornstarch; a smooth mixture is key to a silky pudding.
- Heat the Mixture: Place the saucepan over medium heat. Continuously stir the mixture with a wooden spoon or whisk to prevent it from sticking to the bottom of the pan. As the mixture heats up, it will start to thicken.
- Cook Until Thickened: Continue stirring until the pudding thickens and starts to bubble, which should take about 5-7 minutes. Once it reaches a custard-like consistency, remove it from the heat.
- Pour into Molds: Quickly pour the thickened pudding into individual serving cups or a large mold. If using a mold, ascertain it’s lightly greased with cooking spray or oil to facilitate easy removal later.
- Chill the Pudding: Allow the pudding to cool at room temperature for about 30 minutes. Then, cover the cups or mold with plastic wrap and refrigerate for at least 4 hours, or until completely set.
- Unmold and Serve: If you used a large mold, gently run a knife around the edge of the pudding to loosen it, then invert it onto a serving plate. If using cups, you can serve directly. Garnish with shredded coconut, toasted almonds, and drizzle with fruit syrup if desired.
Extra Tips:
For an enhanced flavor, consider infusing the milk mixture with a cinnamon stick or a few cardamom pods while heating, then remove them before pouring into molds.
Additionally, using fresh coconut can elevate the dish further; simply grate fresh coconut and fold it into the pudding before chilling. Remember to let the pudding sit at room temperature for a few minutes before unmolding, as this will make it easier to release from the mold.
Enjoy your Manjar Branco as a light and invigorating dessert!
Pudim De Café (Coffee Pudding)
Pudim De Café is a delightful Brazilian dessert that combines the rich flavors of coffee with the creamy texture of traditional pudding. This delectable dish is a favorite among coffee lovers and is perfect for those looking to satisfy their sweet tooth with a hint of caffeine. The pudding is typically served chilled, making it an ideal treat for warm weather or as a revitalizing end to a hearty meal. Its smooth consistency and aromatic profile will leave you wanting more.
Making Pudim De Café isn’t only easy but also a rewarding experience that fills your kitchen with the enticing smell of brewed coffee. This pudding is an elegant dessert that can be served at gatherings or simply enjoyed at home. The recipe yields about 4-6 servings, making it perfect for sharing with friends and family. Let’s explore the ingredients and the steps to create this delicious coffee pudding.
Ingredients (Serves 4-6):
- 1 cup brewed strong coffee, cooled
- 1 cup sweetened condensed milk
- 1 cup whole milk
- 3 large eggs
- 1 cup sugar (for caramel)
- ¼ cup water (for caramel)
- 1 teaspoon vanilla extract
Cooking Instructions:
1. Prepare the Caramel: In a small saucepan, combine 1 cup of sugar and ¼ cup of water. Heat over medium heat, stirring gently until the sugar dissolves. Once dissolved, stop stirring and allow it to cook until it turns a golden amber color. This should take about 8-10 minutes. Be careful not to let it burn.
Once ready, quickly pour the caramel into a round baking dish, tilting the dish to coat the bottom evenly. Set aside to cool and harden.
2. Blend the Ingredients: In a blender, combine the cooled brewed coffee, sweetened condensed milk, whole milk, eggs, and vanilla extract. Blend on medium speed for about 1-2 minutes until the mixture is smooth and well combined.
3. Pour the Mixture: Carefully pour the blended coffee mixture over the hardened caramel in the baking dish, ensuring that you don’t disturb the caramel layer.
4. Bake in a Water Bath: Preheat your oven to 350°F (175°C). Place the baking dish in a larger roasting pan and fill the roasting pan with hot water halfway up the sides of the baking dish. This water bath will help the pudding cook evenly and prevent it from cracking.
Bake for about 50-60 minutes or until a knife inserted in the center comes out clean.
5. Cool and Refrigerate: Once baked, remove the pudding from the oven and the water bath. Allow it to cool at room temperature for about 30 minutes, then cover it with plastic wrap and refrigerate for at least 4 hours or overnight for best results.
6. Serve: To Serve, run a knife around the edges of the pudding to loosen it from the dish. Place a serving plate on top of the baking dish and carefully invert it to release the pudding onto the plate. The caramel will flow over the top, creating a beautiful presentation.
Extra Tips:
For a richer coffee flavor, consider using espresso instead of brewed coffee. You can also add a sprinkle of cocoa powder or finely grated chocolate on top before serving for a touch of decadence.
If you want to make it a bit more indulgent, serve with whipped cream or a dollop of vanilla ice cream. Make sure to store any leftovers in the refrigerator, and enjoy the pudding within a few days for the best flavor and texture.
Pavê (Layered Pudding Dessert)

Pavê is a traditional Brazilian dessert that consists of layers of cream, cookies, and sometimes chocolate or fruit. This delightful treat is perfect for any occasion, whether it’s a family gathering, birthday party, or holiday celebration.
The beauty of pavê lies in its simplicity and versatility; you can customize it with different flavors and textures to suit your preferences. It’s often compared to a trifle, but with a distinctly Brazilian twist that makes it uniquely delicious.
The base of pavê typically includes a creamy filling made from condensed milk, cream, and sometimes chocolate or fruit purée. The layers are assembled by alternating between the creamy filling and crisp cookies, often dipped in coffee or milk for added flavor.
Once assembled, the dessert is chilled to allow the flavors to meld together, resulting in a rich and indulgent pudding that will impress anyone who tries it.
Ingredients (Serves 4-6)
- 1 can (14 oz) sweetened condensed milk
- 1 cup heavy cream
- 1 cup milk
- 1 teaspoon vanilla extract
- 1 cup chocolate cookies (like Maria or Digestive biscuits)
- 1 cup grated chocolate or chocolate shavings (for topping)
- 1 cup brewed coffee (optional, for dipping cookies)
- 1 tablespoon cocoa powder (optional, for added chocolate flavor)
Cooking Instructions
1. Prepare the Cream Mixture: In a large mixing bowl, combine the sweetened condensed milk, heavy cream, milk, and vanilla extract. Use an electric mixer on medium speed to beat the mixture until it becomes smooth and slightly thickened. This should take about 3-5 minutes. Set this aside for later.
2. Prepare the Cookies: If you’re using coffee to dip the cookies, brew a cup and let it cool slightly. Dip each cookie quickly into the coffee (if using), making sure they’re moist but not soggy. If you prefer a non-coffee option, you can skip this step or dip the cookies in milk instead.
3. Assemble the Layers: In a rectangular or square dish, start layering by spreading a thin layer of the cream mixture at the bottom. Next, add a layer of the dipped cookies, ensuring they’re evenly spread out.
Repeat the process by adding another layer of cream followed by cookies. Continue this layering until you run out of ingredients, finishing with a layer of cream on top.
4. Chill the Dessert: Once assembled, cover the dish with plastic wrap or aluminum foil and place it in the refrigerator. Allow the pavê to chill for at least 4 hours, or preferably overnight. This chilling time is essential as it helps the flavors meld and the cookies to soften.
5. Garnish and Serve****: Before serving, sprinkle the top with grated chocolate or chocolate shavings for a decorative touch. You can also dust it with cocoa powder if you want an extra chocolate kick. Cut into squares and serve chilled.
Extra Tips
For a unique twist, consider adding fruit layers such as sliced bananas or strawberries between the layers of cream and cookies.
Additionally, you can experiment with flavored cookies, like vanilla or lemon, to change the overall flavor profile of the dessert. If you want to make a more decadent version, try incorporating melted chocolate into the cream mixture.
Just remember to let the pavê chill adequately so that it sets perfectly, yielding a delightful dessert that’s both creamy and satisfying.
Bolo De Rolo (Rolled Cake Pudding)
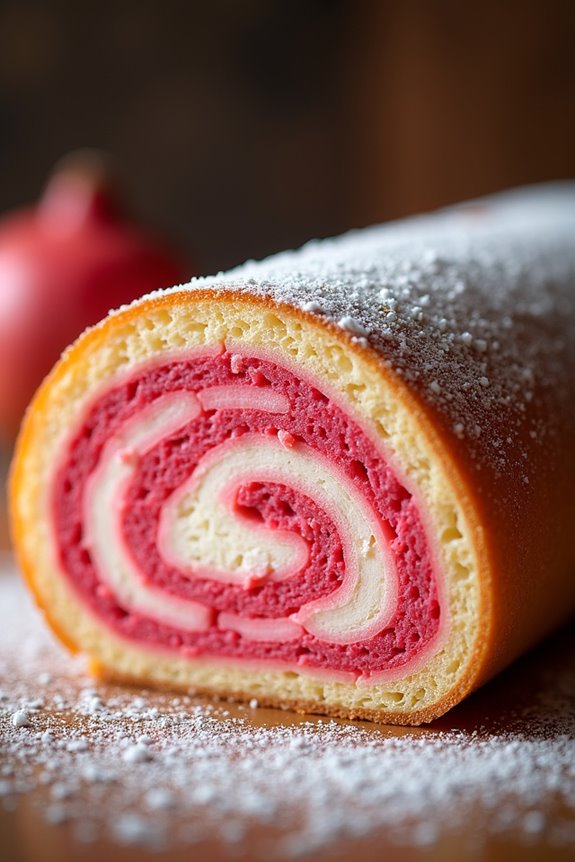
Bolo De Rolo is a traditional Brazilian dessert that showcases the beauty of simplicity and flavor. This rolled cake pudding is made with layers of a thin sponge cake filled with a rich guava paste, creating a delightful combination of sweetness and texture. The cake’s origins trace back to the state of Pernambuco, where it has become a beloved symbol of Brazilian cuisine, often served during celebrations and family gatherings.
With its vibrant appearance and delicious taste, Bolo De Rolo is bound to impress anyone who takes a bite.
Making Bolo De Rolo may seem intimidating at first, but with the right approach, it can be a fun and rewarding experience. The key to achieving the perfect rolled cake is to make certain the sponge cake is light and fluffy while maintaining enough flexibility to roll without cracking. Once you’ve mastered this technique, you’ll be able to create a stunning dessert that not only looks beautiful but also melts in your mouth.
Ingredients (serving size: 4-6 people)
- 4 large eggs
- 1 cup granulated sugar
- 1/2 cup unsalted butter, softened
- 1 cup all-purpose flour
- 1 teaspoon baking powder
- 1/4 teaspoon salt
- 1/2 cup guava paste, softened
- Powdered sugar, for dusting
Cooking Instructions
- Preheat the Oven: Begin by preheating your oven to 350°F (175°C). This step is vital as a consistent temperature will help the cake rise properly and maintain its fluffiness.
- Prepare the Baking Pan: Line a 15×10-inch jelly roll pan with parchment paper and lightly grease it. This guarantees that the cake will easily release from the pan after baking, allowing for a smooth rolling process.
- Mix the Egg Mixture: In a large mixing bowl, combine the eggs and granulated sugar. Beat the mixture with an electric mixer on high speed for about 5-7 minutes, or until it becomes pale, fluffy, and has doubled in volume. This aeration is key to achieving a light sponge cake.
- Combine Dry Ingredients: In a separate bowl, whisk together the flour, baking powder, and salt. This helps to evenly distribute the leavening agent, making certain the cake rises evenly.
- Incorporate the Dry Ingredients: Gently fold the dry ingredients into the egg mixture using a spatula. Be careful not to deflate the batter; use a folding motion to incorporate the flour until just combined.
- Add Butter: Gradually add the softened butter to the batter while continuing to fold gently. This will enrich the cake and add moisture.
- Pour and Bake: Spread the batter evenly into the prepared jelly roll pan. Bake in the preheated oven for 12-15 minutes or until the cake is golden brown and springs back when lightly pressed.
- Cool and Roll the Cake: Once baked, remove the cake from the oven and let it cool in the pan for about 5 minutes. Carefully invert the cake onto a clean kitchen towel sprinkled with powdered sugar, then gently peel away the parchment paper. While the cake is still warm, start rolling it from one end using the towel to help shape it. Allow the rolled cake to cool completely.
- Add the Filling: Once cooled, unroll the cake gently. Spread a thin layer of softened guava paste evenly over the surface of the cake.
- Final Roll: Carefully roll the cake back up without the towel, ensuring the guava paste is tightly sealed within. Wrap it in plastic wrap and refrigerate for at least an hour to set.
- Serve: Once set, unwrap the cake and dust with powdered sugar before slicing into rounds. Serve chilled or at room temperature.
Extra Tips
When making Bolo De Rolo, it’s important to choose a high-quality guava paste for the best flavor. Feel free to experiment with different fillings, such as coconut or chocolate, to add your personal touch.
To prevent the cake from cracking while rolling, make sure you don’t over-bake it; the cake should still be slightly soft and pliable. Additionally, practice makes perfect, so don’t be discouraged if your first attempt isn’t flawless—enjoy the process and the delicious reward!
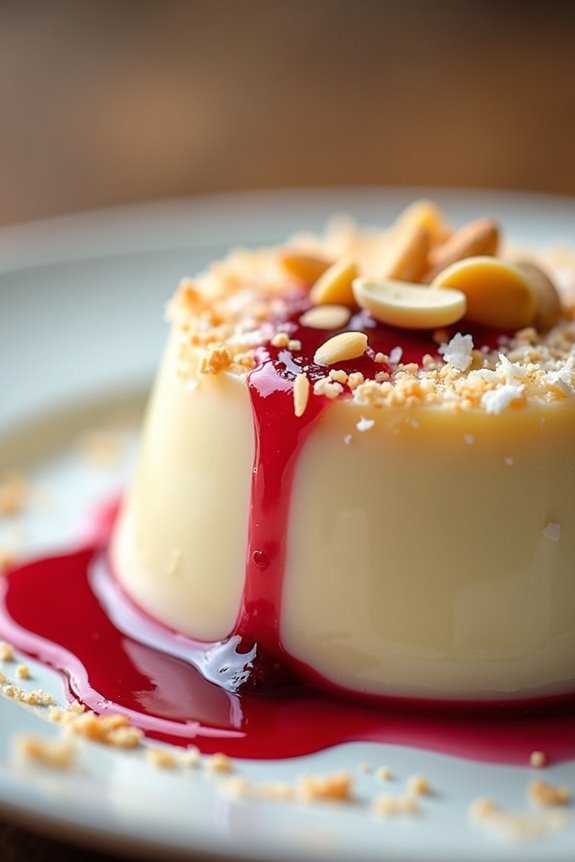
Pudding De Frutas (Fruit Pudding)
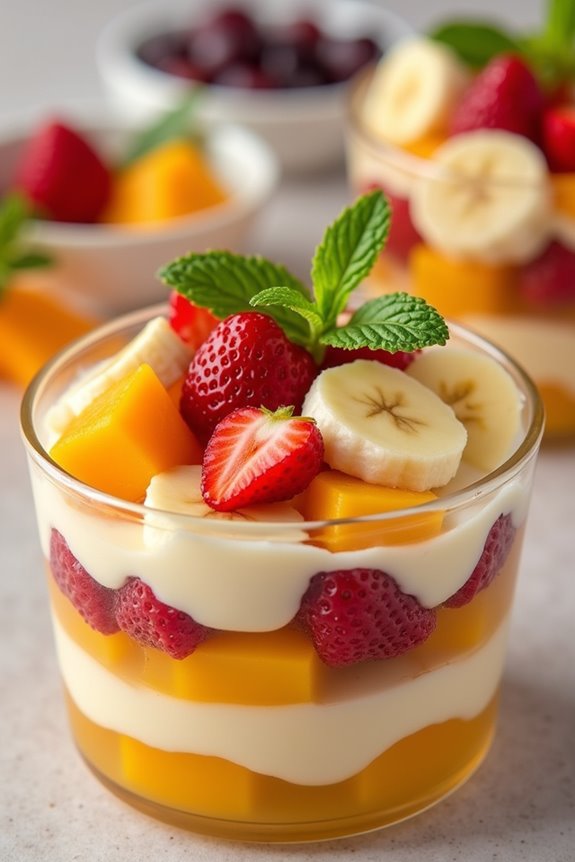
Pudding De Frutas is a delightful Brazilian dessert that combines the vibrant flavors of fresh fruits with a creamy pudding base. This dessert is a perfect way to showcase seasonal fruits, making it a versatile option for any occasion. The pudding isn’t only delicious but also visually appealing, as it can be layered with various fruits to create a colorful presentation.
This recipe is straightforward and allows for customization based on your favorite fruits or what you have on hand. The base of this pudding is made with a simple mixture of milk, sugar, and cornstarch, which thickens beautifully when cooked. The addition of vanilla and a touch of cream makes it rich and indulgent.
To elevate the dish further, fresh fruits like bananas, strawberries, and mangoes are commonly used. This pudding can be served chilled, making it a revitalizing treat, especially during the warmer months.
Ingredients (Serves 4-6):
- 2 cups of whole milk
- 1 cup of heavy cream
- 1 cup of granulated sugar
- 1/4 cup of cornstarch
- 1 teaspoon of vanilla extract
- 1/4 teaspoon of salt
- 2 ripe bananas, sliced
- 1 cup of strawberries, hulled and quartered
- 1 cup of mango, diced
- Fresh mint leaves for garnish (optional)
Cooking Instructions:
- Prepare the Pudding Base: In a medium saucepan, combine the milk, heavy cream, and granulated sugar. Heat the mixture over medium heat, stirring occasionally until the sugar is fully dissolved and the mixture is warm but not boiling.
- Thicken the Pudding: In a small bowl, mix the cornstarch with a few tablespoons of cold water to create a slurry. Slowly pour the slurry into the warm milk mixture, whisking continuously to prevent lumps. Continue to cook, stirring constantly, until the mixture thickens and begins to bubble, approximately 5-7 minutes.
- Add Flavoring: Once thickened, remove the saucepan from the heat and stir in the vanilla extract and salt. Allow the pudding to cool slightly before transferring it to a bowl or individual serving cups.
- Layer the Fruits: After the pudding has cooled for about 10 minutes, begin layering the sliced bananas, strawberries, and diced mangoes into the pudding. You can alternate layers or simply mix the fruits into the pudding for a more colorful presentation.
- Chill the Pudding: Cover the pudding with plastic wrap or a lid and refrigerate for at least 2 hours, or until it’s fully chilled and set.
- Serve: Once chilled, serve the pudding in individual bowls or cups, garnished with fresh mint leaves if desired. Enjoy your delicious Pudding De Frutas!
Extra Tips:
To enhance the flavor of your Pudding De Frutas, consider using a variety of fruits for added texture and taste. You can also experiment with different flavorings, such as almond extract or coconut milk, to create unique variations.
If you want a more decadent dessert, try adding a drizzle of chocolate or caramel sauce on top before serving. Additionally, feel free to adjust the sweetness according to your preference by modifying the amount of sugar.
Gelatina (Gelatin Dessert)
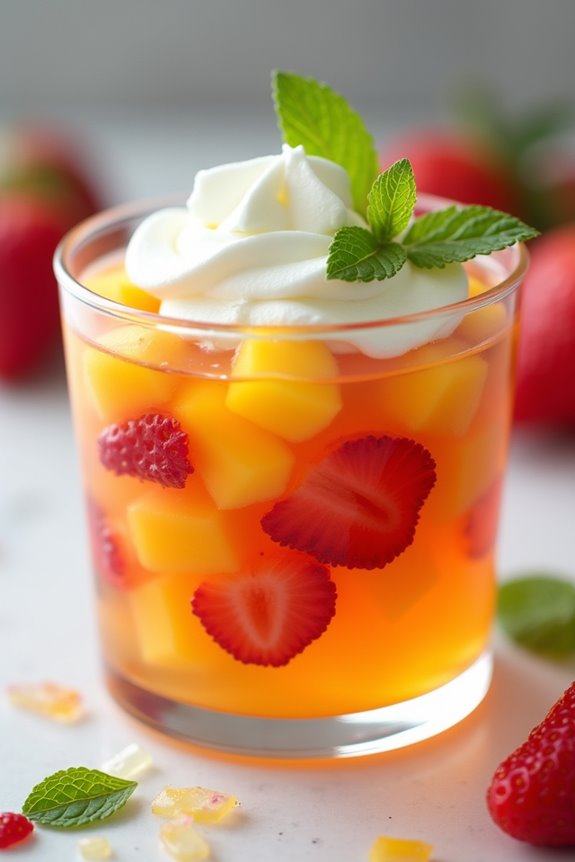
Gelatina is a beloved dessert in Brazil, often served at family gatherings and celebrations. This colorful and invigorating treat is made by combining flavored gelatin with fruit, making it not only a feast for the eyes but also a delightful burst of flavor in every bite.
It’s easy to prepare and can be customized with different flavors and fruits according to personal preferences, making it a versatile choice for any occasion. The beauty of gelatina lies in its simplicity and the joy it brings to both children and adults alike.
Whether enjoyed on its own, with whipped cream, or as part of a more elaborate dessert presentation, gelatina is sure to please. With just a few basic ingredients, you can create a delightful dessert that captures the essence of Brazilian cuisine.
Ingredients (Serves 4-6 people)
- 2 cups boiling water
- 1 package (about 3 oz) flavored gelatin (any color or flavor)
- 1 cup cold water
- 1 cup fruit (such as diced strawberries, mangoes, or peaches)
- 1/2 cup sweetened condensed milk (optional)
- 1/2 cup whipped cream (for serving, optional)
Cooking Instructions
1. Dissolve the Gelatin: In a mixing bowl, pour the boiling water over the flavored gelatin. Stir well for about 2-3 minutes until the gelatin is completely dissolved and there are no granules left.
This step is vital as it guarantees a smooth texture in the finished dessert.
2. Add Cold Water****: Once the gelatin is dissolved, add the cold water to the mixture. Stir thoroughly to combine.
The cold water helps to cool the mixture down, preparing it for the next step and making sure that it sets properly.
3. Incorporate the Fruit: Gently fold in your choice of diced fruit into the gelatin mixture. This not only adds flavor but also creates a visually appealing dessert with bursts of color.
Make sure to distribute the fruit evenly throughout the mixture.
4. Pour into Molds: Carefully pour the gelatin mixture into a mold or individual serving cups. If you’re using a mold, lightly grease it with cooking spray to help with the unmolding process later on.
Fill the containers until nearly full, leaving a small space at the top.
5. Chill Until Set: Place the gelatin in the refrigerator and allow it to chill for at least 4 hours, or until fully set.
This step is necessary as it gives the gelatin its firm, sliceable texture.
6. Serve: Once set, carefully unmold the gelatin if using a mold. You can do this by briefly dipping the mold in warm water to loosen it.
Serve the gelatina chilled, topped with sweetened condensed milk or whipped cream if desired.
Extra Tips
When preparing gelatina, feel free to experiment with different flavors of gelatin and assorted fruits to tailor it to your taste.
Adding layers of different flavored gelatins can also create a beautiful striped effect, but remember to allow each layer to set before adding the next.
For a fun twist, consider incorporating other ingredients such as shredded coconut or nuts for added texture.
Finally, serving gelatina in clear cups can showcase the vibrant colors and make for an attractive presentation.