

When it comes to Brazilian desserts, sweetened condensed milk is the star ingredient that brings a touch of magic to every bite. From the classic brigadeiro to the smooth pudim, these treats are as rich in tradition as they are in flavor. I’ve put together a list of 12 creamy desserts that are sure to satisfy your sweet tooth. Each confection is a little piece of nostalgia waiting to be discovered. Let’s explore these dreamy delights together!
Brigadeiro
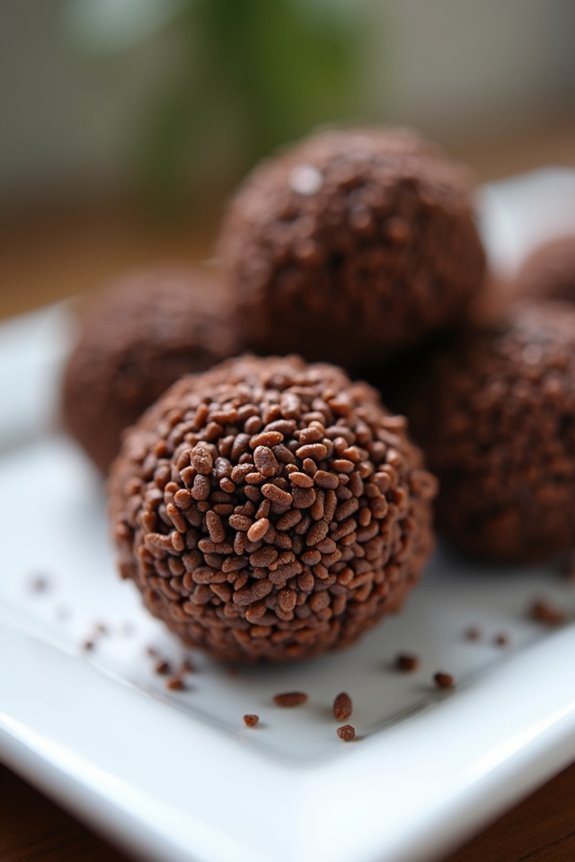
Brigadeiro is a beloved Brazilian dessert that has become a favorite treat not only in Brazil but around the world. This delightful sweet is made from a few simple ingredients and features a rich chocolate flavor that melts in your mouth.
Traditionally served at birthday parties and celebrations, brigadeiro is a nostalgic treat for many Brazilians and is often rolled in chocolate sprinkles before serving, giving it a delightful texture and appearance. Making brigadeiros is a fun and easy cooking project that can be enjoyed by both experienced chefs and beginners alike.
To create brigadeiros, you’ll need a few basic ingredients, and the process is straightforward. The key to achieving the perfect brigadeiro lies in the cooking time and technique, which allows the mixture to reach the right consistency for rolling.
Once you master this recipe, you can experiment with different toppings and flavors to customize your brigadeiro experience. Enjoy making these delicious treats for your next gathering or simply as a sweet indulgence for yourself.
Ingredients (serving size: 4-6 people):
- 1 can (14 ounces) sweetened condensed milk
- 2 tablespoons unsweetened cocoa powder
- 2 tablespoons unsalted butter
- Chocolate sprinkles (for rolling)
- Pinch of salt
Cooking Instructions:
- Combine Ingredients: In a medium-sized saucepan, combine the sweetened condensed milk, cocoa powder, unsalted butter, and a pinch of salt. Stir the ingredients together until they’re well mixed and there are no lumps of cocoa powder.
- Cook the Mixture: Place the saucepan over medium heat. Continue to stir the mixture constantly to prevent it from sticking to the bottom of the pan. Cook for about 10-15 minutes, or until the mixture thickens and starts to pull away from the sides of the pan. You’ll know it’s ready when you can see the bottom of the pan as you stir.
- Cool the Mixture: Once the brigadeiro mixture has thickened, transfer it to a greased plate or dish. Allow it to cool at room temperature for about 30 minutes. This cooling step is vital for making it easier to handle when forming the balls.
- Form the Brigadeiros: Once cooled, grease your hands with a little butter to prevent sticking. Take small amounts of the brigadeiro mixture and roll them into small balls, about the size of a cherry.
- Roll in Sprinkles: After rolling each brigadeiro ball, roll them in chocolate sprinkles until they’re completely covered. This not only adds flavor but also gives them an attractive finish.
- Serve: Place the coated brigadeiros in small paper cups or on a serving plate. Enjoy them immediately or store them in an airtight container for up to a week.
Extra Tips:
For an extra twist on your brigadeiros, consider experimenting with different toppings such as crushed nuts, coconut flakes, or even different flavored sprinkles.
Additionally, you can customize the chocolate flavor by using different types of cocoa powder or even adding a splash of vanilla extract for enhanced flavor. Remember to keep the brigadeiros stored in a cool place, as heat can cause them to lose their shape.
Have fun making these treats and share them with family and friends!
Beijinho
Beijinho, which translates to “little kiss” in Portuguese, is a beloved Brazilian dessert made primarily from condensed milk, coconut, and sugar. These delightful little treats are often rolled in granulated sugar or shredded coconut, making them a favorite at birthday parties and special celebrations throughout Brazil.
The combination of sweet, creamy condensed milk with the tropical flavor of coconut creates a melt-in-your-mouth experience that’s both comforting and indulgent.
Making Beijinho is quick and simple, requiring only a few ingredients and minimal cooking time. It’s a fantastic dessert to prepare with family or friends, as everyone can join in on the fun of rolling the sweet mixture into little balls.
Whether you’re looking to impress guests or simply satisfy your sweet tooth, Beijinho is sure to bring a taste of Brazil to your kitchen.
Ingredients (Serves 4-6)
- 1 can (14 ounces) sweetened condensed milk
- 1 cup shredded coconut (unsweetened)
- 1 tablespoon unsalted butter
- 1 teaspoon vanilla extract
- Granulated sugar or extra shredded coconut for rolling
Cooking Instructions
1. Prepare the Mixture: In a medium saucepan, combine the sweetened condensed milk, shredded coconut, unsalted butter, and vanilla extract. Stir the mixture well to combine all ingredients evenly. This forms the base for your Beijinho.
2. Cook the Mixture: Place the saucepan over medium-low heat. Cook while stirring continuously to prevent the mixture from sticking to the bottom of the pan. This process usually takes about 10-15 minutes, or until the mixture thickens and begins to pull away from the sides of the pan.
You’ll know it’s ready when you can see the bottom of the pan briefly as you stir.
3. Cool the Mixture: Once thickened, remove the saucepan from the heat and transfer the mixture to a greased plate or shallow dish. Allow it to cool to room temperature. This step is important as it will make the mixture easier to handle when rolling into balls.
4. Form the Balls: Once the mixture has cooled, grease your hands with a little butter or oil to prevent sticking. Take small portions of the mixture and roll them into balls about the size of a cherry. Aim for uniformity in size for a pleasing presentation.
5. Coat the Balls: Roll each ball in granulated sugar or shredded coconut to coat. This adds a lovely texture and additional flavor to the Beijinho. Place the coated balls on a serving platter.
6. Serve: Your Beijinho is now ready to be enjoyed! You can Serve them immediately or refrigerate them for an hour to firm up a bit more.
Extra Tips
When making Beijinho, feel free to experiment with the flavor by adding a pinch of salt or a splash of coconut extract for an extra coconut kick.
If you prefer a different coating, consider using crushed nuts or chocolate sprinkles for a unique twist. Always make certain you’re stirring the mixture continuously while cooking to achieve that perfect consistency without burning.
Finally, Beijinho can be stored in an airtight container in the refrigerator for up to a week, making them a great make-ahead treat!
Pudim
Pudim is a classic Brazilian dessert that’s loved for its creamy texture and rich caramel flavor. This delightful flan-like dish is made primarily with condensed milk, eggs, and milk, creating a smooth and decadent treat that’s perfect for any occasion. The combination of these simple ingredients results in a dessert that isn’t only easy to prepare but also impressive enough to serve at gatherings or special celebrations.
To make the perfect pudim, patience is key, especially when it comes to caramelizing the sugar, which gives the dessert its signature sweetness and beautiful color. Once baked and chilled, the pudim is inverted onto a serving plate to reveal a glossy caramel topping. This dessert is often enjoyed with a cup of coffee or as a sweet finish to a meal, making it a beloved staple in Brazilian households.
Ingredients (Serves 4-6):
- 1 cup granulated sugar (for caramel)
- 1 can (14 ounces) sweetened condensed milk
- 2 cups whole milk
- 3 large eggs
- 1 teaspoon vanilla extract
- A pinch of salt
Cooking Instructions:
- Prepare the Caramel: In a medium saucepan over medium heat, add the granulated sugar. Stir constantly until the sugar melts and turns a deep golden brown color. Be careful not to let it burn. Once melted, quickly pour the caramel into a round baking dish, tilting the dish to coat the bottom evenly. Set aside to cool and harden.
- Blend the Mixture: In a blender, combine the sweetened condensed milk, whole milk, eggs, vanilla extract, and a pinch of salt. Blend on high speed until the mixture is smooth and well combined, about 1-2 minutes.
- Pour into the Dish: Carefully pour the blended mixture over the hardened caramel in the baking dish. Make sure to do this gently to avoid disturbing the caramel layer at the bottom.
- Prepare for Baking: Preheat your oven to 350°F (175°C). Place the baking dish in a larger roasting pan. Fill the roasting pan with hot water until it reaches halfway up the sides of the baking dish. This water bath will help the pudim cook evenly and prevent it from cracking.
- Bake the Pudim: Bake in the preheated oven for about 1 hour, or until the pudim is set and a toothpick inserted into the center comes out clean.
- Cool and Refrigerate: Once baked, remove the pudim from the oven and the water bath. Let it cool at room temperature for about 30 minutes, then refrigerate for at least 4 hours or overnight to allow it to fully set.
- Serve: To serve, run a knife around the edges of the pudim to loosen it. Carefully invert the pudim onto a serving plate, allowing the caramel sauce to flow over the top. Slice and enjoy!
Extra Tips:
When making pudim, it’s important to keep a close eye on the caramel as it can quickly go from perfectly golden to burnt. If you prefer a lighter caramel flavor, you can reduce the amount of sugar used. Additionally, for an extra touch, consider adding a splash of coconut milk for a tropical twist, or infuse the milk with spices like cinnamon or nutmeg to enhance the flavor profile.
Always remember to let the pudim chill completely before serving for the best texture.
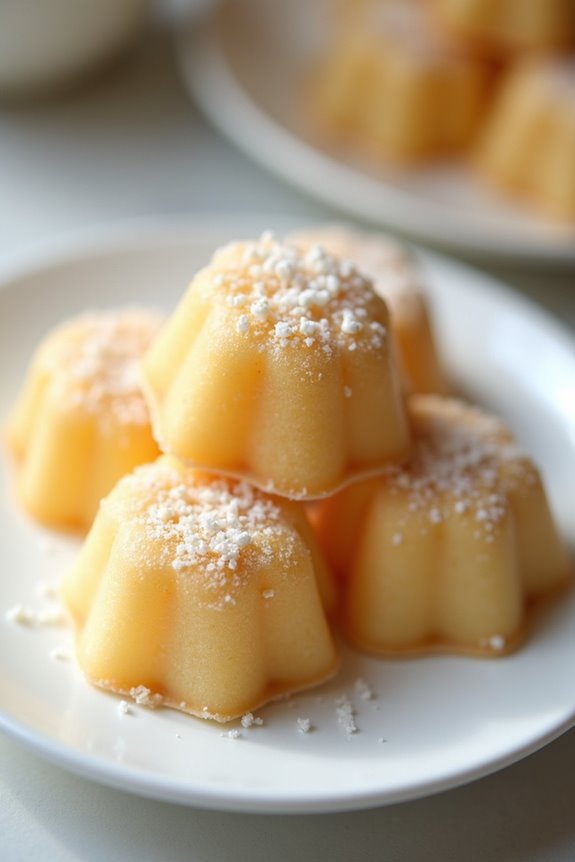
Quindim
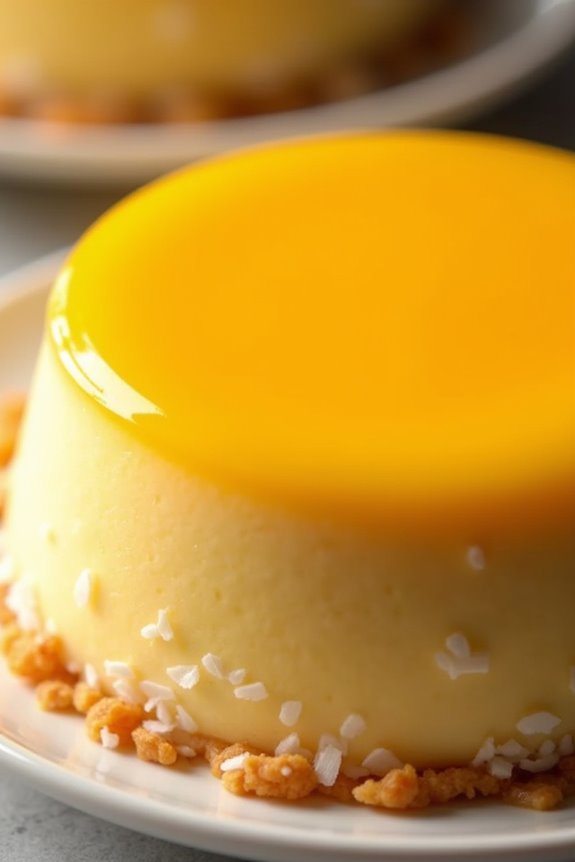
Quindim is a traditional Brazilian dessert that beautifully showcases the magic of condensed milk and coconut. This delightful sweet treat is characterized by its bright yellow color and glossy surface, making it a standout on any dessert table. With a rich, custard-like texture and a sweet coconut flavor, Quindim is a beloved favorite in Brazil, often enjoyed at parties, celebrations, or as an indulgent afternoon snack. The combination of egg yolks, sugar, and shredded coconut creates a symphony of flavors that’s both comforting and delightful.
Making Quindim is a straightforward process, allowing you to bring a piece of Brazilian culture into your kitchen. While it may look sophisticated, this dessert requires minimal ingredients and can be easily prepared at home. The key to achieving the perfect consistency lies in carefully mixing the ingredients and baking them to perfection. Once you serve Quindim chilled, it will win over the hearts of anyone who takes a bite!
Ingredients (Serves 4-6)
- 1 cup sweetened shredded coconut
- 1 cup sweetened condensed milk
- 1/2 cup sugar
- 6 large egg yolks
- 1/2 cup whole milk
- 1 tablespoon unsalted butter, melted
- 1 teaspoon vanilla extract
- A pinch of salt
Cooking Instructions
- Preheat the Oven: Begin by preheating your oven to 350°F (175°C). This guarantees that the Quindim cooks evenly and achieves the perfect texture.
- Prepare the Baking Dish: Grease a muffin tin or individual ramekins with a little melted butter to prevent the Quindim from sticking. You can also sprinkle a bit of sugar in the bottom of each compartment for added sweetness and a delightful caramelized touch.
- Mix the Ingredients: In a mixing bowl, combine the egg yolks, sugar, and melted butter. Whisk them together until well blended. Then add the sweetened condensed milk, whole milk, shredded coconut, vanilla extract, and a pinch of salt. Mix everything together until you have a smooth, homogeneous batter.
- Fill the Molds: Pour the mixture into the prepared muffin tin or ramekins, filling each about three-quarters full. This allows room for the mixture to rise as it bakes.
- Bake the Quindim: Place the filled muffin tin or ramekins in a larger baking dish filled with hot water, creating a water bath. This step helps to gently cook the custard, preventing it from curdling. Bake for about 25-30 minutes or until the edges are set and the center is slightly jiggly.
- Cool and Serve: Once baked, remove the Quindim from the oven and allow it to cool at room temperature. Then, refrigerate for at least 2 hours before serving. To unmold, gently run a knife around the edges and invert onto a plate.
Extra Tips
When making Quindim, using fresh ingredients will enhance the flavor and texture of your dessert, particularly the eggs and coconut. If you prefer a more intense coconut flavor, consider using unsweetened shredded coconut.
Additionally, be careful not to overbake, as this can lead to a dry texture. For a decorative touch, you can garnish the Quindim with toasted coconut flakes or a sprinkle of grated lime zest before serving. Enjoy your delicious Brazilian treat!
Bolo De Rolo

Bolo De Rolo is a traditional Brazilian dessert that’s both visually stunning and deliciously satisfying. This rolled cake is known for its thin layers of sponge cake spread with a sweet and creamy guava paste, which gives it a beautiful spiral design when sliced. The combination of the soft cake and the rich filling creates a delightful treat that can be enjoyed by all.
Whether served at parties or as a cozy dessert at home, Bolo De Rolo is certain to impress with its unique flavor and elegant presentation.
Making Bolo De Rolo requires some attention to detail, but the results are well worth the effort. The cake is baked in a rectangular pan, rolled while warm, and then chilled to help it maintain its shape. The guava paste adds a traditional Brazilian touch, but feel free to experiment with different fillings to suit your taste.
This recipe serves 4-6 people, making it perfect for small gatherings or family celebrations.
Ingredients
- 4 large eggs
- 1 cup granulated sugar
- 1 cup all-purpose flour
- 1/2 teaspoon baking powder
- 1/4 cup unsalted butter, melted
- 1/2 cup guava paste, softened (or your choice of filling)
- Powdered sugar, for dusting (optional)
Instructions
- Preheat the Oven: Start by preheating your oven to 350°F (175°C). This guarantees that your cake will bake evenly and rise properly.
- Prepare the Baking Pan: Line a 12×16 inch (30×40 cm) baking pan with parchment paper and lightly grease it. This will prevent the cake from sticking and make it easier to roll later.
- Mix the Batter: In a large mixing bowl, whisk together the eggs and granulated sugar until the mixture is pale and fluffy. This should take about 5-7 minutes. The air incorporated during this step is essential for a light and airy cake.
- Combine Dry Ingredients: In a separate bowl, sift together the flour and baking powder. Gradually add this dry mixture to the egg and sugar mixture, folding gently to combine. Be careful not to deflate the batter.
- Add Butter: Drizzle the melted butter into the batter and gently fold it in until fully incorporated. This adds richness to the cake and helps keep it moist.
- Bake the Cake: Pour the batter into the prepared baking pan and spread it evenly. Bake in the preheated oven for about 10-12 minutes or until the edges are lightly golden and a toothpick inserted into the center comes out clean.
- Roll the Cake: Once baked, remove the cake from the oven and let it cool for about 5 minutes. Then, invert the cake onto a clean kitchen towel dusted with powdered sugar. Carefully peel off the parchment paper. While the cake is still warm, roll it up tightly with the towel from one short end to the other. Allow it to cool completely in this rolled shape.
- Prepare the Filling: While the cake cools, soften the guava paste in a microwave or on the stove until it’s spreadable.
- Assemble the Cake: Once the cake has cooled completely, unroll it gently. Spread the softened guava paste evenly over the surface, then carefully re-roll the cake without the towel, forming a tight log.
- Chill and Serve: Wrap the rolled cake in plastic wrap and refrigerate for at least 1 hour to set. When ready to serve, slice the cake into rounds, dust with powdered sugar if desired, and enjoy!
Extra Tips
When making Bolo De Rolo, ascertain that your ingredients are at room temperature for the best results. This helps achieve a smoother batter and a more even cake texture.
If you find it difficult to roll the cake, you can cover it with a damp cloth to keep it moist while rolling, or practice a bit with a smaller batch first. Experimenting with different fillings, such as dulce de leche or chocolate, can also create unique variations of this classic dessert.
Cocada
Cocada is a delightful Brazilian dessert that showcases the rich flavors of coconut and sweetened condensed milk. This traditional treat is popular for its chewy texture and sweet, tropical taste, making it an irresistible option for those with a sweet tooth.
Often enjoyed during festive occasions or as a casual snack, cocada can be served in various forms, from bars to small bites, and is a great way to bring a taste of Brazil to your home kitchen.
Making cocada is surprisingly simple, requiring just a few ingredients that come together to create a deliciously sweet confection. The key to a perfect cocada is to use fresh, shredded coconut, which can be found in many supermarkets or specialty stores.
This recipe yields a serving size of 4-6 people, making it ideal for sharing with family and friends.
Ingredients:
- 2 cups fresh shredded coconut
- 1 cup sweetened condensed milk
- 1 cup granulated sugar
- 1/2 cup whole milk
- 1 teaspoon vanilla extract
- A pinch of salt
Cooking Instructions:
1. Prepare the Baking Dish****: Start by greasing a square baking dish (approximately 8×8 inches) with butter or cooking spray. This will prevent the cocada from sticking to the dish once it cools and sets.
2. Combine Ingredients: In a medium saucepan over medium heat, combine the sweetened condensed milk, granulated sugar, whole milk, vanilla extract, and a pinch of salt. Stir the mixture thoroughly until the sugar dissolves and the mixture is well blended.
3. Add Coconut: Once the mixture is heated through, add the fresh shredded coconut to the saucepan. Stir well to guarantee that the coconut is evenly coated with the sweetened milk mixture.
4. Cook the Mixture: Continue to cook the coconut mixture over medium heat, stirring frequently. Allow it to simmer gently for about 10-15 minutes, or until the mixture begins to thicken and pull away from the sides of the pan.
Be careful not to let it burn, so keep stirring regularly.
5. Transfer to Baking Dish: Once the mixture has thickened, remove it from the heat and pour it into the prepared baking dish. Use a spatula to spread it out evenly, smoothing the top as needed.
6. Cool and Set: Allow the cocada to cool at room temperature for about 1 hour, then transfer it to the refrigerator to set for another 1-2 hours. This will help it firm up, making it easier to cut into pieces.
7. Cut and Serve: Once set, remove the cocada from the refrigerator and cut it into squares or rectangles. Serve on a platter and enjoy!
Extra Tips:
For added flavor, consider incorporating nuts like chopped almonds or walnuts into the coconut mixture before cooking.
You can also experiment with different variations by adding a touch of lime zest for a citrus twist or some chocolate chips for a sweet contrast.
To store leftover cocada, keep it in an airtight container at room temperature for up to a week, or refrigerate for longer freshness. Enjoy your homemade cocada with a cup of coffee or tea for the perfect treat!
Canjica
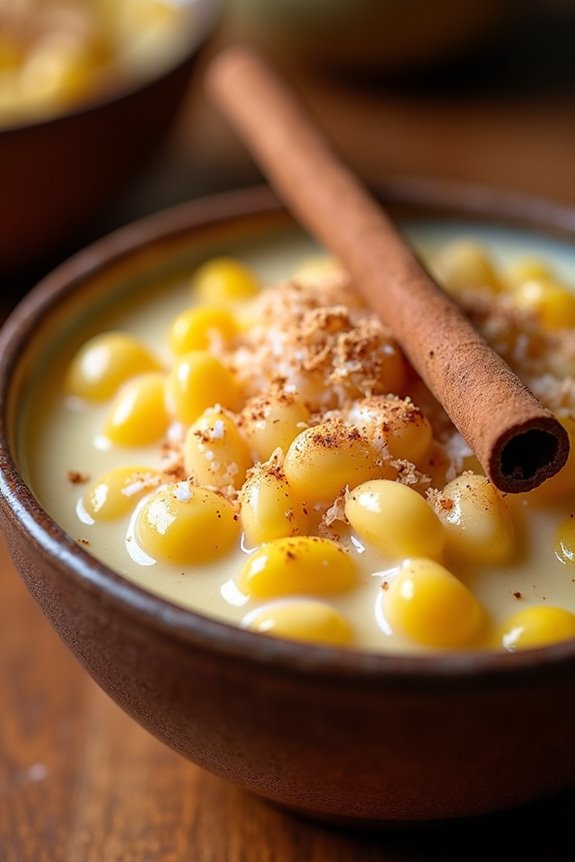
Canjica is a traditional Brazilian dessert made from hominy corn, which is cooked slowly with milk, sugar, and spices until it reaches a creamy consistency. This dish is particularly popular during the Festa Junina, a festival celebrated in Brazil in June, but it can be enjoyed year-round. The combination of sweetened condensed milk, coconut, and cinnamon gives Canjica a comforting and delightful flavor that warms the soul.
The beauty of Canjica lies in its versatility. While the classic version is made with just a few ingredients, you can easily customize it by adding different toppings or mix-ins such as peanuts, chocolate, or even fruit. In this recipe, we’ll focus on the traditional preparation, ensuring that you capture the authentic taste of this beloved Brazilian treat.
Ingredients (Serves 4-6)
- 1 cup of hominy corn (dried)
- 4 cups of water
- 1 can (14 oz) of sweetened condensed milk
- 2 cups of whole milk
- 1 cup of grated coconut (fresh or dried)
- 1 teaspoon of ground cinnamon
- 1 pinch of salt
- 1/2 cup of sugar (adjust to taste)
- Cinnamon sticks (for garnish, optional)
Cooking Instructions
- Soak the Hominy Corn: Begin by rinsing the hominy corn under cold water. Place it in a large bowl and cover it with water. Let it soak for at least 8 hours or overnight. This step is essential as it softens the corn and reduces cooking time.
- Cook the Hominy: After soaking, drain the corn and transfer it to a large pot. Add 4 cups of fresh water and a pinch of salt. Bring it to a boil over medium-high heat. Once boiling, reduce the heat to low and simmer uncovered for about 1.5 to 2 hours, or until the corn is tender. Stir occasionally to prevent sticking.
- Combine with Milk: Once the hominy is cooked and tender, add the sweetened condensed milk, whole milk, sugar, grated coconut, and ground cinnamon to the pot. Stir well to combine all the ingredients.
- Simmer: Continue to cook the mixture over low heat for another 30 minutes, stirring frequently. This allows the flavors to meld and the mixture to thicken to a creamy consistency. If it becomes too thick, you can add a little more milk to reach your desired texture.
- Serve: Once the Canjica is ready, remove it from the heat and let it cool slightly. Serve warm or chilled in bowls, garnished with cinnamon sticks if desired. You can also sprinkle additional grated coconut on top for an extra touch.
Extra Tips
For an added layer of flavor, consider incorporating other spices like nutmeg or vanilla extract to the Canjica. If you prefer a richer taste, you can substitute whole milk with coconut milk for a creamier texture.
Additionally, for those who enjoy a crunch, topping the dessert with roasted peanuts or almonds can provide a delightful contrast to the creamy base. Enjoy this comforting dessert with friends and family for a taste of Brazilian tradition!
Pavê

Pavê is a beloved Brazilian dessert that beautifully combines layers of creamy goodness with crunchy elements, making it a delightful treat for any occasion. Traditionally made with biscuits soaked in coffee or chocolate, it’s layered with a rich condensed milk cream that elevates the dish to a whole new level.
This no-bake dessert is perfect for gatherings, family celebrations, or simply when you want to indulge in something sweet and satisfying. The versatility of pavê allows for various flavor combinations, including chocolate, fruit, or even nuts.
The beauty of this dessert lies in its simplicity, as it requires minimal cooking, allowing you to spend more time enjoying your company rather than being stuck in the kitchen. Here, we present a classic chocolate pavê recipe that will surely impress your guests and satisfy your sweet tooth.
Ingredients (Serves 4-6):
- 1 can of sweetened condensed milk
- 2 cups of milk
- 1 tablespoon of cornstarch
- 1 teaspoon of vanilla extract
- 1 cup of heavy cream
- 200g of chocolate (bittersweet or milk, based on preference)
- 1 package of chocolate biscuits (like Maria or Negresco)
- 1 cup of brewed coffee (optional)
- Chocolate shavings or cocoa powder for garnish
Cooking Instructions:
1. Prepare the Cream Mixture****: In a medium saucepan, combine the sweetened condensed milk, 1 cup of milk, cornstarch, and vanilla extract. Whisk together until well mixed. Cook over medium heat, stirring constantly, until the mixture thickens and starts to bubble. This should take about 5-7 minutes.
Once thickened, remove from heat and let it cool slightly.
2. Melt the Chocolate: In a separate bowl, break the chocolate into small pieces and melt it. You can do this in a microwave in short bursts, stirring in between, or using a double boiler. Once melted, allow it to cool slightly before combining it with the cream mixture.
3. Combine the Mixtures: Gradually pour the melted chocolate into the cream mixture, whisking continuously until fully incorporated and smooth.
4. Whip the Heavy Cream: In a large bowl, Whip the Heavy Cream until stiff peaks form. Gently fold this whipped cream into the chocolate cream mixture, being careful not to deflate the whipped cream. This will give your pavê a light and airy texture.
5. Assemble the Pavê: If using coffee, dip each biscuit briefly into the coffee to soak them slightly (do not soak too long, or they’ll become too soggy). In a rectangular or square dish, start by layering half of the dipped biscuits on the bottom.
Pour half of the chocolate cream mixture over the biscuits, spreading it evenly. Repeat this process with another layer of biscuits and the remaining chocolate cream.
6. Chill the Dessert: Cover the dish with plastic wrap and refrigerate for at least 4 hours, or preferably overnight. This will allow the flavors to meld and the dessert to set properly.
7. Serve and Garnish: Once set, remove the pavê from the fridge. Before serving, you can sprinkle chocolate shavings or cocoa powder on top for an elegant finish.
Extra Tips:
When making pavê, feel free to customize the flavors to your liking. You can experiment with different types of biscuits, use fruit puree instead of chocolate, or add layers of fresh fruit for a revitalizing twist.
Confirm you allow enough time for the pavê to chill; this step is vital for achieving the right texture. Finally, if you want to add a bit of crunch, consider incorporating crushed nuts or sprinkles between the layers for added texture and flavor. Enjoy your delicious Brazilian dessert!
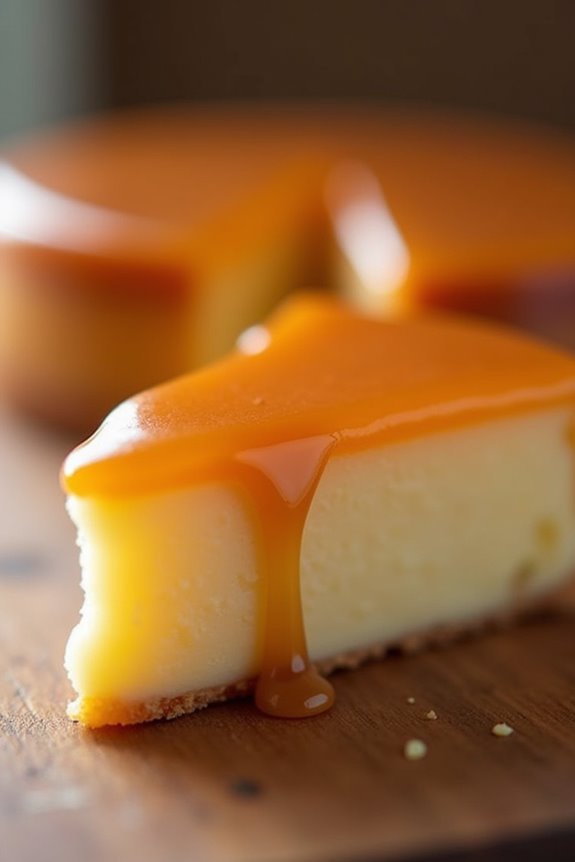
Leite Condensado Flan
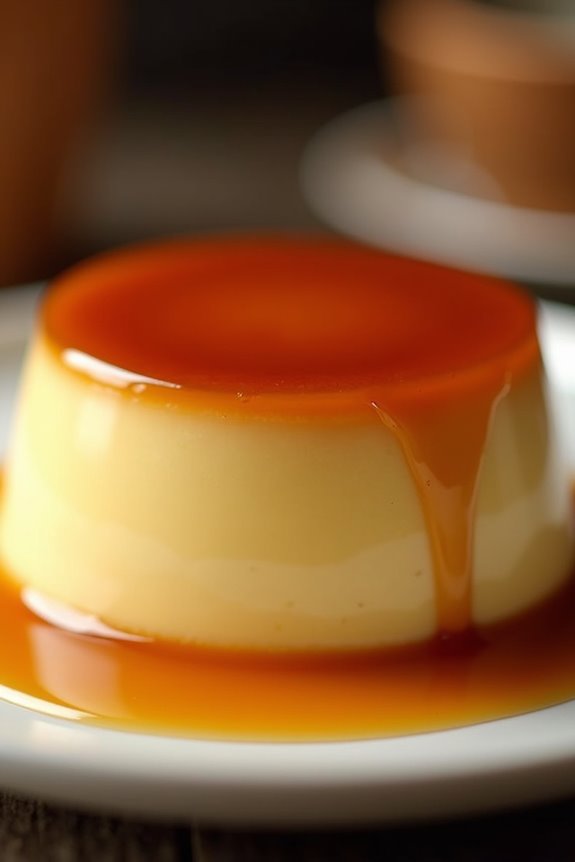
Leite Condensado Flan, also known as Brazilian condensed milk flan, is a luscious and creamy dessert that has become a staple in Brazilian cuisine. This delightful dish combines the richness of condensed milk with eggs and sugar, resulting in a smooth and velvety texture that melts in your mouth.
The flan is often topped with a caramel sauce that adds a sweet and slightly bitter contrast, making it an irresistible treat for any occasion. This dessert isn’t only simple to prepare but also requires minimal ingredients, making it a favorite among home cooks and dessert lovers alike.
Whether served at family gatherings, birthday parties, or festive celebrations, Leite Condensado Flan is sure to impress with its elegant presentation and delectable flavor. Your guests will be asking for seconds!
Ingredients (Serves 4-6):
- 1 can (14 oz) sweetened condensed milk
- 2 cups whole milk
- 3 large eggs
- 1 cup granulated sugar (for caramel)
- 1 teaspoon vanilla extract
- Pinch of salt
Cooking Instructions:
1. Prepare the Caramel:
Start by making the caramel. In a medium saucepan over medium heat, add 1 cup of granulated sugar. Allow the sugar to melt without stirring, swirling the pan gently when necessary.
Once the sugar turns a golden amber color, immediately pour the caramel into a 9-inch round cake pan, tilting the pan to coat the bottom evenly. Be careful, as the caramel will be very hot. Set aside to cool and harden.
2. Blend the Flan Mixture:
In a blender, combine the sweetened condensed milk, whole milk, eggs, vanilla extract, and a pinch of salt. Blend on medium speed for about 30 seconds until all the ingredients are smooth and well incorporated.
3. Pour the Mixture:
Carefully pour the flan mixture over the hardened caramel in the prepared cake pan. Make sure to pour slowly to avoid disturbing the caramel layer.
4. Bake the Flan:
Preheat your oven to 350°F (175°C). Place the cake pan in a larger baking dish and fill the outer dish with hot water until it reaches halfway up the sides of the flan pan.
This water bath will help cook the flan evenly. Bake in the preheated oven for about 50-60 minutes, or until the flan is set and a knife inserted in the center comes out clean.
5. Cool and Unmold:
Once cooked, remove the flan from the oven and let it cool to room temperature. Then, refrigerate for at least 4 hours or overnight to guarantee it’s completely chilled.
To unmold, run a knife around the edges of the flan, place a serving plate on top, and carefully invert the pan. The flan should slide out smoothly, with the caramel sauce cascading over it.
Extra Tips:
For a successful Leite Condensado Flan, confirm that all your ingredients are at room temperature before blending, as this helps create a smoother texture.
If you want to enhance the flavor, consider adding a splash of fresh citrus juice or zest to the mixture. To store leftovers, cover the flan with plastic wrap and keep it in the refrigerator for up to 3 days.
This dessert is best enjoyed chilled, so make sure to serve it cold for that perfect melt-in-your-mouth experience!
Torta De Limão

Torta De Limão, or Brazilian Lemon Pie, is a delightful dessert that combines a buttery crust with a rich, creamy filling made from condensed milk and fresh lime juice. This tart treat is popular in Brazilian cuisine, often served at family gatherings and celebrations. Its zesty flavor and sweet undertones make it the perfect ending to any meal, leaving guests craving more.
Creating this dessert isn’t only straightforward but also a fun way to explore the bright flavors of citrus. The combination of the crunchy biscuit base and the smooth, tangy filling creates a perfect balance that’s both invigorating and indulgent. Whether you’re an experienced baker or a novice in the kitchen, Torta De Limão is sure to impress your friends and family.
Ingredients (Serves 4-6):
- 200g of sweet biscuit crumbs (e.g., Maria biscuits or Graham crackers)
- 100g of unsalted butter, melted
- 1 can (395g) of sweetened condensed milk
- 1 cup of fresh lime juice (about 4-5 limes)
- Zest of 2 limes
- 3 large egg yolks
- 1 cup of heavy cream (for whipping)
- 2 tablespoons of powdered sugar (for whipped cream)
- Lime slices and mint leaves (for garnish, optional)
Instructions:
1. Prepare the Crust: In a mixing bowl, combine the sweet biscuit crumbs with the melted unsalted butter. Mix until the crumbs are evenly coated and the mixture resembles wet sand.
Press this mixture firmly into the bottom and up the sides of a 9-inch pie dish to form an even crust. Use a flat-bottomed glass or measuring cup to compact the crumbs. Place the crust in the refrigerator to set while you prepare the filling.
2. Make the Filling: In a large mixing bowl, whisk together the sweetened condensed milk, fresh lime juice, lime zest, and egg yolks until well combined. The mixture will thicken slightly as you combine the ingredients.
3. Fill the Crust: Remove the crust from the refrigerator and pour the lime filling into the chilled crust. Spread it evenly with a spatula, ensuring there are no air bubbles.
4. Chill the Pie: Cover the pie with plastic wrap and refrigerate for at least 4 hours, or overnight if possible, to allow the filling to set and develop its flavors.
5. Prepare the Whipped Cream: In a separate bowl, beat the heavy cream with an electric mixer until soft peaks form. Gradually add the powdered sugar and continue to beat until stiff peaks form.
Be careful not to overbeat, as it can turn into butter.
6. Serve the Pie: Once the pie is set, remove it from the refrigerator. Top the pie with the freshly whipped cream, spreading it out evenly. For an extra touch, garnish with lime slices and mint leaves. Slice and serve cold.
Extra Tips:
When making Torta De Limão, using fresh lime juice is key to achieving the best flavor. If you have leftover pie, cover it tightly with plastic wrap and store it in the refrigerator for up to 3 days.
The pie can also be made a day in advance for a more intense flavor. If you prefer a sweeter filling, feel free to adjust the sugar levels to your taste. Enjoy your dessert with a cup of coffee or tea for a delightful treat!
Curau
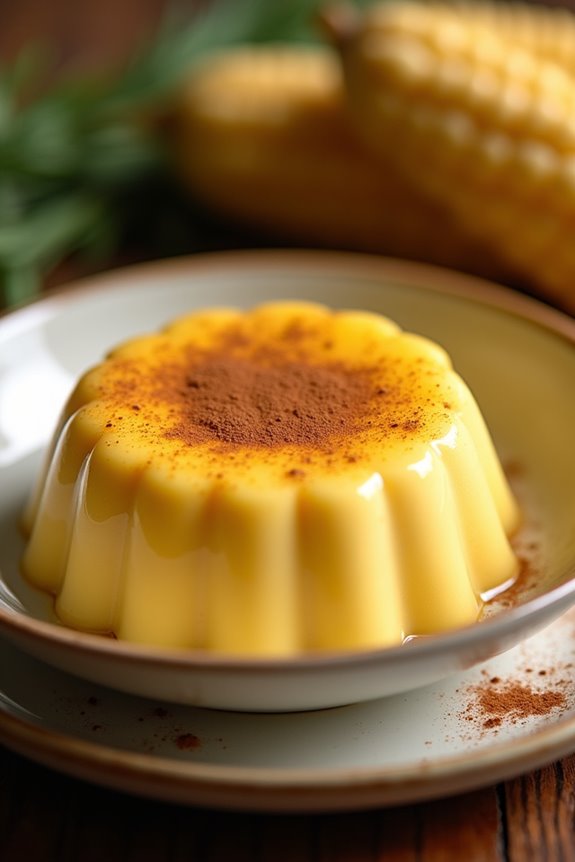
Curau is a traditional Brazilian dessert made primarily from corn, milk, and sugar, providing a delightful blend of flavors and textures. This creamy dish is especially popular during the Festa Junina, a Brazilian festival that celebrates the harvest season. The use of fresh corn gives curau its unique taste and vibrant color, making it a favorite among both locals and visitors alike.
It’s often served warm or chilled and can be topped with cinnamon for an extra hint of flavor.
The beauty of curau lies in its simplicity and versatility. You can adjust the sweetness and consistency to suit your taste, making it a perfect dessert for all occasions. Whether you’re hosting a festive gathering or simply looking to indulge in a comforting sweet treat, curau is sure to impress with its deliciously rich flavor and creamy texture.
Ingredients (Serves 4-6)
- 4 ears of fresh corn
- 2 cups of whole milk
- 1 cup of sugar (adjust based on sweetness preference)
- 1/2 teaspoon of salt
- 1 tablespoon of cornstarch (optional, for thicker consistency)
- Cinnamon powder (for topping)
Cooking Instructions
- Prepare the Corn: Start by carefully cutting the kernels off the cobs of fresh corn. Make sure to get as much of the milky substance from the cobs as possible, as this will add to the creaminess of the curau.
- Blend the Mixture: In a blender, combine the corn kernels with the whole milk, sugar, and salt. Blend until the mixture is smooth and creamy, guaranteeing there are no large chunks of corn remaining.
- Cook the Mixture: Pour the blended corn mixture into a saucepan and cook over medium heat. Stir continuously to prevent sticking and guarantee even cooking. Allow the mixture to simmer for about 10-15 minutes, or until it thickens to your desired consistency.
- Thicken (if needed): If you prefer a thicker curau, you can dissolve the cornstarch in a small amount of cold water and add it to the mixture during the final few minutes of cooking. Stir well to incorporate and cook for an additional 2-3 minutes.
- Serve: Once thickened, remove from heat and pour the curau into serving dishes. Allow it to cool slightly before serving. For an added touch, sprinkle cinnamon powder on top before serving.
Extra Tips
When preparing curau, using fresh corn is key to achieving the best flavor and texture. If fresh corn isn’t available, you can opt for canned corn, but the taste will differ slightly.
For a richer flavor, consider adding a splash of vanilla extract or even a bit of coconut milk into the mixture. Finally, curau can be made ahead of time and refrigerated. Just reheat gently before serving, and remember that the flavors often deepen after resting, making it even more delicious!
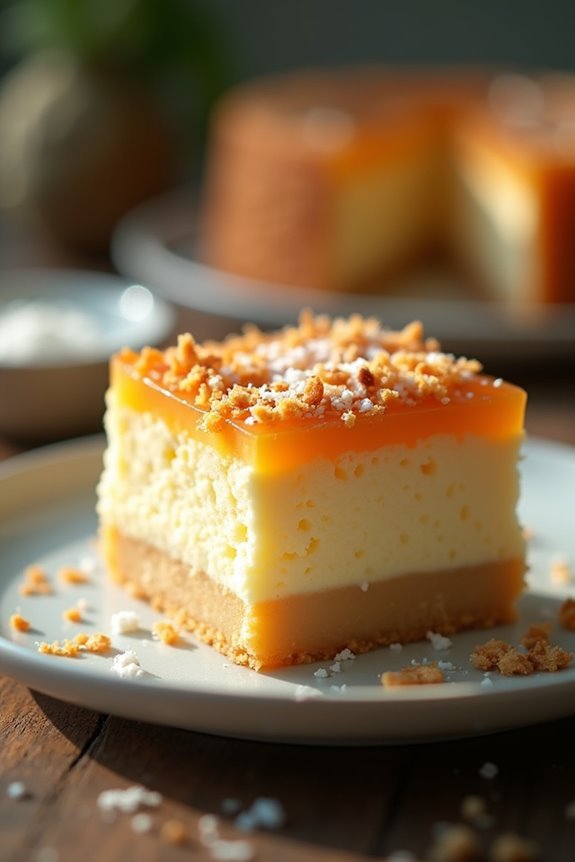
Cocada De Forno
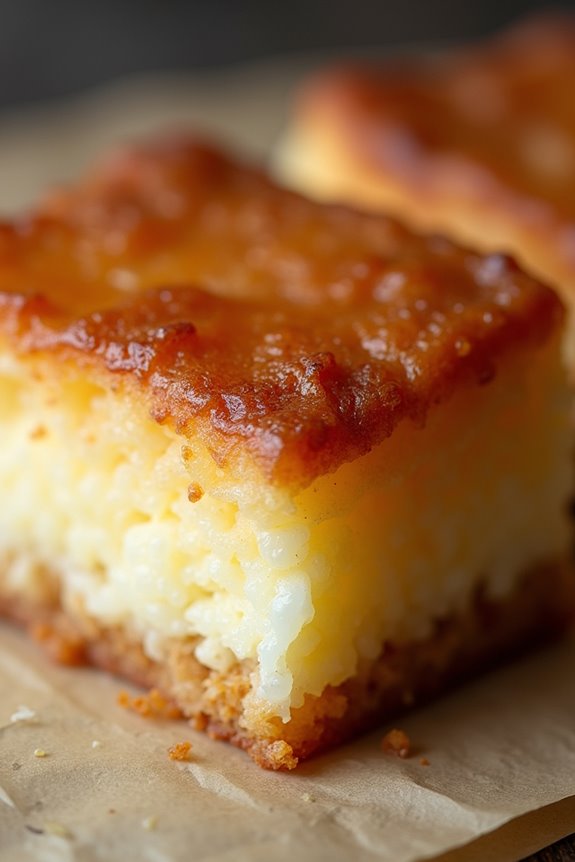
Cocada De Forno is a delightful Brazilian dessert that showcases the rich and creamy essence of condensed milk combined with the tropical sweetness of coconut. This baked coconut treat isn’t only easy to prepare but also brings a taste of Brazil to your kitchen.
It has a chewy yet slightly crumbly texture, making it a favorite among those who enjoy coconut-based desserts. With just a few simple ingredients, Cocada De Forno can be whipped up for a family gathering, a festive occasion, or simply to satisfy a sweet tooth.
The beauty of Cocada De Forno lies in its versatility; it can be enjoyed warm straight from the oven or at room temperature. The combination of sweetened condensed milk, shredded coconut, and eggs creates a luscious mixture that bakes up beautifully.
The warm, caramelized top layer contrasts wonderfully with the moist coconut filling underneath. Follow this recipe to make a delicious Cocada De Forno that will certainly impress your guests and leave everyone asking for seconds.
Ingredients (Serves 4-6)
- 1 can (14 ounces) sweetened condensed milk
- 2 cups shredded coconut (unsweetened or sweetened, depending on preference)
- 3 large eggs
- 1 teaspoon vanilla extract
- 1 tablespoon butter (for greasing)
- 1/4 cup sugar (optional, if using unsweetened coconut)
Cooking Instructions
- Preheat the Oven: Begin by preheating your oven to 350°F (175°C). Preheating is crucial to guarantee that the Cocada De Forno bakes evenly and achieves the perfect golden-brown top.
- Prepare the Baking Dish: Grease a medium-sized baking dish (approximately 8×8 inches) with butter. This will prevent the dessert from sticking to the dish, making it easier to slice and serve once baked.
- Mix Ingredients: In a large mixing bowl, combine the sweetened condensed milk, shredded coconut, eggs, and vanilla extract. If you’re using unsweetened coconut and prefer a sweeter dessert, add the optional sugar. Stir well until all the ingredients are thoroughly mixed and you achieve a consistent texture.
- Pour into Baking Dish: Carefully pour the coconut mixture into the prepared baking dish. Use a spatula to spread it evenly, guaranteeing that the mixture is distributed uniformly across the dish.
- Bake: Place the baking dish in the preheated oven and bake for 25-30 minutes, or until the top is golden brown and a toothpick inserted into the center comes out clean. Keep an eye on it towards the end of the baking time to prevent over-browning.
- Cool and Serve: Once baked, remove the Cocada De Forno from the oven and allow it to cool for about 10-15 minutes. This cooling time will help the dessert set further. Cut into squares or slices and serve warm or at room temperature.
Extra Tips
For an added twist, consider experimenting with variations by incorporating chocolate chips, nuts, or even a hint of lime zest to enhance the flavor profile of your Cocada De Forno.
If you prefer a more intense coconut flavor, opt for using freshly grated coconut instead of shredded. Additionally, serve this dessert with a scoop of vanilla ice cream or a drizzle of caramel sauce for an extra indulgent treat. Enjoy your homemade Brazilian delight!