

Discovering the flavors of Brazil while staying true to a low-carb lifestyle has been such an exciting journey. I’ve gathered a collection of Brazilian keto recipes that are both delicious and mindful of carbs. From the savory Keto Feijoada to the sweet Coconut Flan, there’s something for everyone. Each recipe adds a unique touch to your meal planning. Let’s explore these vibrant dishes that make healthy eating enjoyable.
Keto Feijoada: A Low-Carb Twist on the Classic Stew
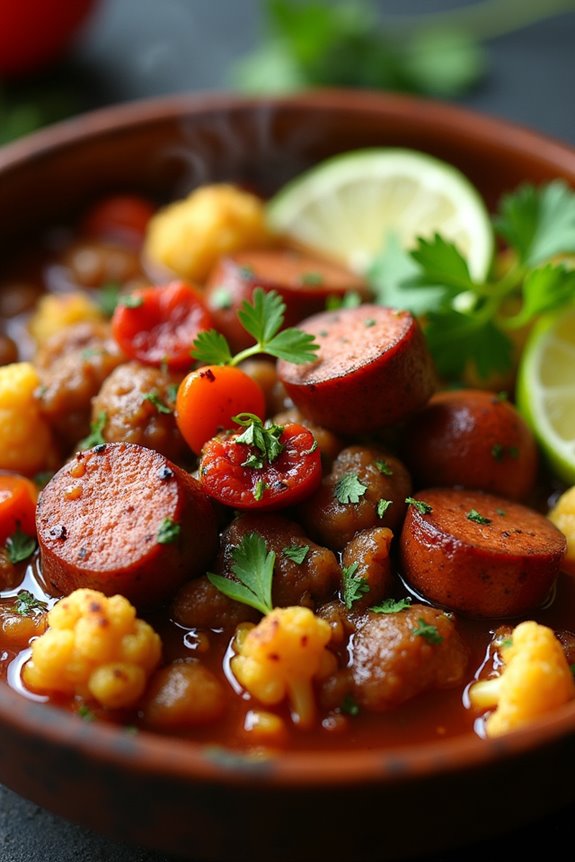
Feijoada is a traditional Brazilian stew that’s hearty and rich, typically made with various cuts of pork, black beans, and spices. This dish has long been a beloved comfort food in Brazil, often served with rice, collard greens, and orange slices.
However, for those following a ketogenic lifestyle, the traditional recipe can be too high in carbohydrates due to the beans. This Keto Feijoada maintains the essence of the classic dish while considerably reducing the carb content by replacing beans with healthy, low-carb vegetables.
In this keto-friendly version, we use a combination of meats, such as pork shoulder, sausage, and bacon, along with nutrient-dense vegetables like cauliflower and bell peppers. The result is a flavorful, satisfying stew that captures the spirit of the traditional feijoada while adhering to low-carb principles.
Perfect for family gatherings or a cozy dinner, this dish is sure to please everyone at the table, regardless of their dietary preferences.
Ingredients (Serves 4-6)
- 1 lb pork shoulder, cut into bite-sized pieces
- 1/2 lb smoked sausage, sliced
- 1/2 lb bacon, chopped
- 1 large onion, diced
- 3 cloves garlic, minced
- 1 bell pepper, diced (any color)
- 1 medium head of cauliflower, cut into florets
- 2 cups chicken broth
- 2 tablespoons olive oil
- 2 teaspoons smoked paprika
- 1 teaspoon cumin
- 1 teaspoon oregano
- Salt and pepper to taste
- Fresh cilantro, for garnish
- Lime wedges, for serving
Cooking Instructions
- Prepare the Meats: In a large pot or Dutch oven, heat 1 tablespoon of olive oil over medium heat. Add the chopped bacon and cook until crispy. Remove the bacon from the pot and set it aside, leaving the drippings in the pot.
- Sauté the Aromatics: In the same pot, add the diced onion and sauté until it becomes translucent, about 3-4 minutes. Then, add the minced garlic and diced bell pepper, cooking for an additional 2-3 minutes until fragrant.
- Brown the Pork and Sausage: Add the pork shoulder pieces and smoked sausage to the pot. Season with salt, pepper, smoked paprika, cumin, and oregano. Cook for about 5-7 minutes, stirring occasionally, until the meats are browned on all sides.
- Add the Cauliflower and Broth: Once the meats are browned, add the cauliflower florets to the pot. Pour in the chicken broth and stir well to combine all the ingredients. Bring the mixture to a boil.
- Simmer the Stew: Reduce the heat to low and cover the pot. Let the stew simmer for about 30-40 minutes, or until the pork is tender and the flavors meld together. Stir occasionally, adding more broth if necessary to prevent sticking.
- Finish and Serve: Once the stew is cooked through, stir in the reserved crispy bacon. Adjust the seasoning with more salt and pepper if needed. Serve hot, garnished with fresh cilantro and lime wedges on the side for an extra burst of flavor.
Extra Tips
When making this Keto Feijoada, feel free to customize the meats based on your preference or what you have on hand. You can also experiment with different low-carb vegetables like zucchini or green beans to add variety to the dish.
For a thicker stew, you can blend a portion of the cauliflower and return it to the pot. Additionally, allow the stew to sit for a bit before serving; like many stews, it often tastes even better the next day as the flavors continue to develop.
Cauliflower Rice With Brazilian Seasoning
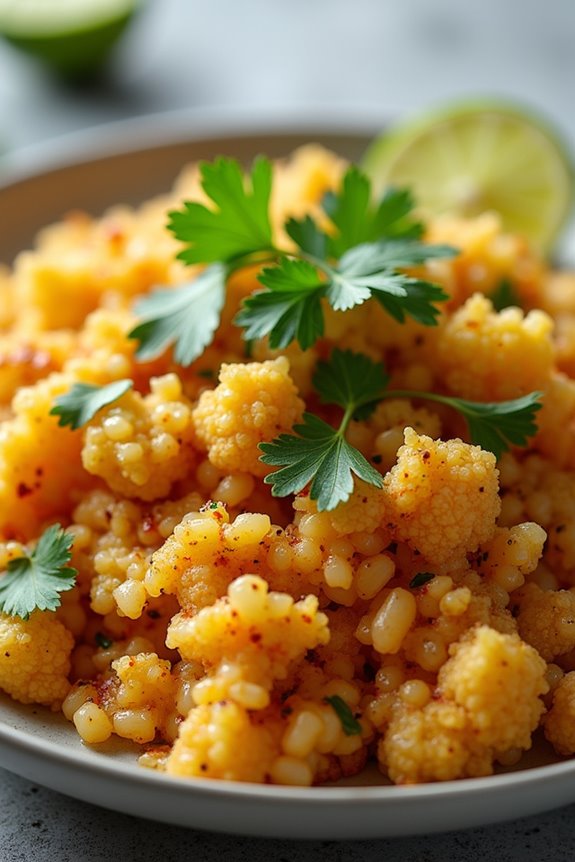
Cauliflower rice is a fantastic low-carb alternative to traditional rice, making it a popular choice for those following a ketogenic diet. This dish isn’t only easy to prepare, but it also absorbs the vibrant flavors of Brazilian cuisine, ensuring that you won’t miss the carbs at all.
By incorporating a blend of spices and fresh herbs, this cauliflower rice provides a delicious and fragrant base that can complement a variety of main dishes or be enjoyed on its own.
In this recipe, we’ll transform cauliflower into a fluffy rice-like texture that’s seasoned with classic Brazilian spices such as cumin, paprika, and fresh cilantro. The addition of sautéed onions and garlic adds depth to the dish, while a squeeze of lime juice brightens the flavors.
Perfect for serving with grilled meats, stews, or as a base for your favorite low-carb bowls, this Cauliflower Rice With Brazilian Seasoning will delight your taste buds while keeping your carb count low.
Ingredients (Serves 4-6):
- 1 large head of cauliflower (about 2-3 pounds)
- 2 tablespoons olive oil
- 1 medium onion, finely chopped
- 3 cloves garlic, minced
- 1 teaspoon ground cumin
- 1 teaspoon smoked paprika
- 1 teaspoon salt (adjust to taste)
- 1/2 teaspoon black pepper
- 1/4 cup fresh cilantro, chopped
- Juice of 1 lime
Cooking Instructions:
- Prepare the Cauliflower: Remove the leaves and stem from the cauliflower head. Cut the cauliflower into large florets. If you have a food processor, pulse the florets until they resemble rice grains. Alternatively, you can grate the cauliflower using a box grater. Set aside.
- Sauté the Aromatics: In a large skillet, heat the olive oil over medium heat. Add the chopped onion and sauté for about 3-4 minutes, until it becomes translucent. Then, add the minced garlic and cook for another minute until fragrant, being careful not to burn it.
- Cook the Cauliflower Rice: Add the processed cauliflower to the skillet with the sautéed onions and garlic. Stir well to combine and cook for about 5-7 minutes, stirring occasionally, until the cauliflower is tender but not mushy.
- Season the Rice: Sprinkle in the ground cumin, smoked paprika, salt, and black pepper. Stir thoroughly to coat the cauliflower rice evenly with the spices. Cook for an additional 2-3 minutes to allow the flavors to meld.
- Finish with Fresh Herbs and Lime: Remove the skillet from heat and fold in the chopped fresh cilantro. Squeeze the lime juice over the cauliflower rice and mix well. Taste and adjust seasoning if necessary.
- Serve: Transfer the cauliflower rice to a serving dish and enjoy as a side or base for your favorite protein.
Extra Tips:
For a more complex flavor profile, consider adding diced bell peppers or carrots along with the onions for extra color and taste.
You can also experiment with different herbs, such as parsley or green onions, depending on your preference. If you want a bit of heat, adding a pinch of red pepper flakes can elevate the dish.
Ultimately, make sure to serve this cauliflower rice fresh for the best texture and flavor, but it can also be stored in an airtight container in the fridge for up to 3 days.
Coconut Shrimp in Spicy Lime Sauce
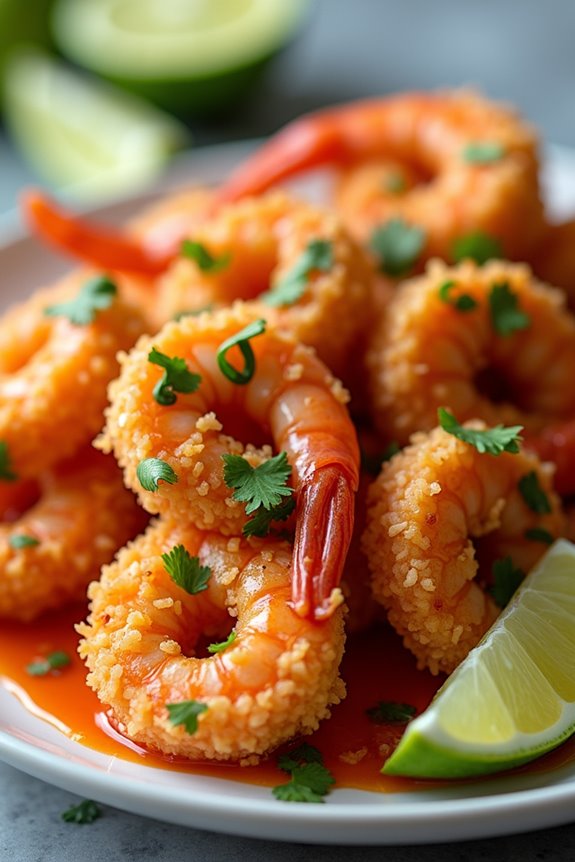
Coconut Shrimp in Spicy Lime Sauce is a delightful dish that perfectly encapsulates the vibrant flavors of Brazilian cuisine while adhering to keto dietary principles. The combination of crispy coconut-coated shrimp paired with a zesty lime sauce creates a mouthwatering experience that’s both satisfying and low in carbohydrates. This dish not only serves as a fantastic appetizer but can also be enjoyed as a main course, making it a versatile addition to your keto meal repertoire.
The preparation of Coconut Shrimp in Spicy Lime Sauce is simple and quick, making it an excellent choice for weeknight dinners or special occasions. The succulent shrimp is coated in a crunchy mixture of coconut flakes and almond flour, delivering that satisfying crunch without the carbs associated with traditional breading. The spicy lime sauce adds an invigorating kick, making this dish a favorite among seafood lovers.
Ingredients (serving size: 4-6 people)
- 1 lb large shrimp, peeled and deveined
- 1 cup unsweetened shredded coconut
- ½ cup almond flour
- 2 large eggs
- 1 teaspoon garlic powder
- 1 teaspoon paprika
- Salt and pepper to taste
- 1 tablespoon coconut oil (for frying)
- Zest of 1 lime
- Juice of 2 limes
- 1 tablespoon sriracha (adjust to taste)
- 1 tablespoon fresh cilantro, chopped (for garnish)
Cooking Instructions
- Prepare the shrimp: Start by rinsing the shrimp under cold water and patting them dry with paper towels. This helps remove excess moisture, guaranteeing a crispier coating when cooked.
- Set up the breading station: In a shallow dish, combine the unsweetened shredded coconut, almond flour, garlic powder, paprika, salt, and pepper. In another bowl, beat the eggs. This will create a three-step breading process (shrimp, egg, then coconut mixture).
- Bread the shrimp: Dip each shrimp first into the egg mixture, making sure it’s fully coated. Then transfer it to the coconut mixture, pressing lightly to guarantee the coconut adheres well. Place the breaded shrimp on a plate and repeat until all shrimp are coated.
- Heat the oil: In a large skillet, heat the coconut oil over medium-high heat. Once the oil is hot, carefully add the breaded shrimp to the skillet in a single layer, ensuring not to overcrowd the pan.
- Fry the shrimp: Cook the shrimp for about 2-3 minutes on each side until they’re golden brown and crispy. Avoid flipping them too soon to prevent the coating from falling off.
- Make the spicy lime sauce: While the shrimp is cooking, in a small bowl, whisk together the lime zest, lime juice, and sriracha. Adjust the spiciness by adding more or less sriracha according to your taste preference.
- Serve: Once the shrimp are cooked, remove them from the skillet and place them on a paper towel-lined plate to absorb excess oil. Drizzle the spicy lime sauce over the shrimp and garnish with fresh cilantro before serving.
Extra Tips
When cooking Coconut Shrimp in Spicy Lime Sauce, confirm that the oil is sufficiently hot before adding the shrimp to achieve the perfect crispy texture.
If you prefer a lighter version, you can bake the shrimp in a preheated oven at 400°F (200°C) for 15-20 minutes, turning halfway through.
Additionally, feel free to customize the spice level of the sauce by experimenting with different hot sauces or adding minced jalapeños for an extra kick.
Enjoy this dish fresh, as the crispy texture is best when served immediately!
Grilled Picanha With Garlic Butter
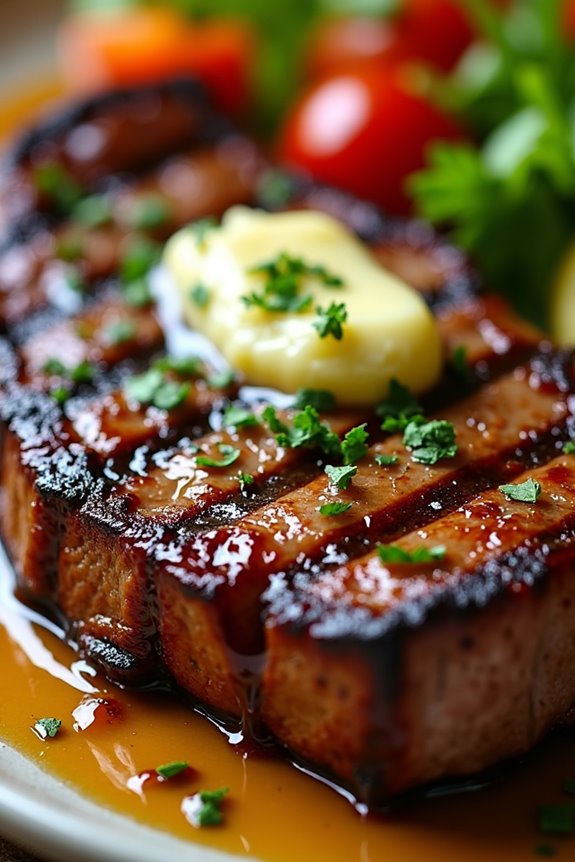
Grilled Picanha With Garlic Butter is a quintessential Brazilian dish that perfectly highlights the rich flavors of beef while maintaining the keto lifestyle. Picanha, also known as the top sirloin cap, is a flavorful cut of beef that boasts a thick layer of fat, which keeps the meat juicy and tender during cooking.
When grilled to perfection and topped with a luscious garlic butter, this dish isn’t only satisfying but also low in carbohydrates, making it ideal for those following a ketogenic diet.
This recipe is straightforward and focuses on the natural flavors of the meat, complemented by the aromatic garlic butter. Whether you’re hosting a summer barbecue or preparing a cozy dinner at home, Grilled Picanha With Garlic Butter is sure to impress. Serve this dish with a side of grilled vegetables or a fresh salad for a complete meal that aligns with your keto goals.
Ingredients (serving size of 4-6 people):
- 2 lbs picanha (top sirloin cap)
- Salt (coarse or kosher)
- Freshly ground black pepper
- 1/2 cup unsalted butter
- 4 cloves garlic, minced
- 1 tablespoon fresh parsley, chopped (for garnish)
- Optional: lemon wedges for serving
Cooking Instructions:
- Prepare the Picanha: Start by trimming any excess fat from the picanha, leaving about a 1/4 inch layer on top for flavor. Cut the picanha into thick steaks, about 1.5 inches each. Season generously with coarse salt and freshly ground black pepper on all sides. Let the meat rest at room temperature for about 30 minutes to allow the flavors to penetrate.
- Preheat the Grill: While the meat is resting, preheat your grill to high heat. If using a charcoal grill, make certain the coals are evenly distributed for direct heat cooking. For gas grills, set it to a high temperature, around 450°F to 500°F.
- Make the Garlic Butter: In a small saucepan, melt the unsalted butter over medium heat. Once melted, add the minced garlic and sauté for about 2 minutes, or until fragrant. Remove from heat and stir in the chopped parsley. Set aside.
- Grill the Picanha: Place the seasoned picanha steaks directly on the hot grill. Grill for about 4-5 minutes on each side for medium-rare, adjusting the time based on your desired doneness. Use tongs to flip the steaks only once to achieve a nice sear.
- Baste with Garlic Butter: During the last minute of grilling, brush the garlic butter generously over the steaks. This will infuse them with flavor and keep them moist.
- Rest and Serve: Once cooked to your liking, remove the picanha from the grill and let it rest for about 5-10 minutes. This allows the juices to redistribute throughout the meat. Slice against the grain, serve with remaining garlic butter, and garnish with extra parsley if desired.
Extra Tips:
When grilling picanha, it’s important to keep an eye on the temperature to prevent overcooking. Using a meat thermometer can help you achieve the perfect doneness; aim for 130°F for medium-rare.
Additionally, feel free to experiment with the garlic butter by adding herbs like rosemary or thyme for an extra layer of flavor. This dish pairs wonderfully with grilled vegetables or a simple green salad for a complete keto-friendly meal. Enjoy your authentic Brazilian experience!
Brazilian Chicken Skewers (Espetinho De Frango)

Brazilian Chicken Skewers, or Espetinho De Frango, are a delightful and flavorful dish that embodies the essence of Brazilian street food. These skewers are marinated in a mixture of herbs and spices, then grilled to perfection, resulting in juicy and tender chicken pieces that are packed with flavor. Not only are they a popular choice for outdoor gatherings, but they also fit perfectly into a keto lifestyle, making them an excellent option for those looking to enjoy delicious food without compromising their dietary goals.
The marinade is what truly elevates this dish, featuring a blend of garlic, lime juice, and spices that infuse the chicken with a zesty and aromatic profile. Whether you’re hosting a barbecue or simply looking for a quick weeknight meal, these Brazilian Chicken Skewers are sure to impress your family and friends. Serve them with a side of avocado salad or cauliflower rice for a complete and satisfying meal that everyone will love.
Ingredients (serving size: 4-6 people)
- 2 lbs boneless, skinless chicken thighs
- 1/4 cup olive oil
- 4 cloves garlic, minced
- Juice of 2 limes
- 1 tablespoon smoked paprika
- 1 tablespoon ground cumin
- 1 teaspoon salt
- 1 teaspoon black pepper
- 1 teaspoon dried oregano
- 1 teaspoon red pepper flakes (optional, for heat)
- Wooden or metal skewers
Cooking Instructions
- Prepare the Marinade: In a large mixing bowl, combine the olive oil, minced garlic, lime juice, smoked paprika, ground cumin, salt, black pepper, dried oregano, and red pepper flakes (if using). Whisk together until all ingredients are well blended.
- Marinate the Chicken: Cut the boneless, skinless chicken thighs into bite-sized pieces. Add the chicken pieces to the marinade, making sure each piece is thoroughly coated. Cover the bowl with plastic wrap and refrigerate for at least 1 hour, or up to overnight for more intense flavor.
- Preheat the Grill: If using a charcoal grill, prepare the coals for direct heat. For a gas grill, preheat it to medium-high heat. You want the grill to be hot enough to create a good sear on the chicken.
- Skewer the Chicken: If using wooden skewers, soak them in water for 30 minutes prior to grilling to prevent burning. Thread the marinated chicken pieces onto the skewers, leaving a little space between each piece for even cooking.
- Grill the Skewers: Place the skewers on the hot grill. Cook for about 5-7 minutes on each side, or until the chicken is fully cooked and has nice grill marks. The internal temperature should reach 165°F (75°C).
- Serve: Once cooked, remove the skewers from the grill and let them rest for a few minutes. Serve them warm, garnished with fresh lime wedges and herbs if desired.
Extra Tips
For an even more authentic flavor, consider adding bell peppers or onions to the skewers between the chicken pieces. These vegetables won’t only add color but also complement the flavors of the chicken beautifully.
Additionally, if you’re looking for extra moisture, brush the skewers with a little more olive oil while grilling to keep the chicken juicy. Enjoy your Keto Brazilian Chicken Skewers hot off the grill, and don’t forget to pair them with your favorite low-carb dipping sauce for that extra touch!
Zucchini Noodles With Brazilian Tomato Sauce
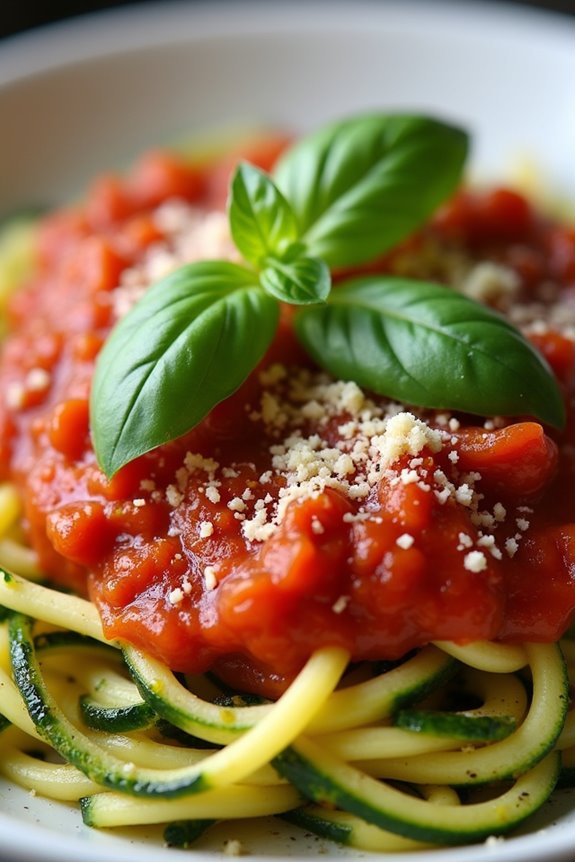
Zucchini Noodles with Brazilian Tomato Sauce is a delightful and healthy dish that perfectly embodies the flavors of Brazil while adhering to a keto lifestyle. This dish is a fantastic alternative to traditional pasta, and the zucchini noodles aren’t only low in carbs but also packed with nutrients.
The Brazilian tomato sauce, infused with herbs and spices, elevates the dish with its rich, savory flavor, making it a satisfying meal for anyone seeking a delicious low-carb option.
Preparing this dish is a breeze, making it ideal for weeknight dinners or casual gatherings with friends and family. The combination of fresh zucchini and a flavorful tomato sauce creates a beautiful harmony on the plate. This recipe serves 4-6 people, guaranteeing there’s enough for everyone to enjoy.
Whether you’re a keto dieter or simply looking for a healthier meal, Zucchini Noodles with Brazilian Tomato Sauce is sure to impress.
Ingredients:
- 4 medium zucchinis
- 2 tablespoons olive oil
- 1 medium onion, finely chopped
- 4 cloves garlic, minced
- 1 can (14 oz) crushed tomatoes
- 1 tablespoon tomato paste
- 1 teaspoon dried oregano
- 1 teaspoon dried basil
- 1 teaspoon paprika
- Salt and pepper to taste
- Fresh basil leaves, for garnish (optional)
- Grated Parmesan cheese, for serving (optional)
Cooking Instructions:
1. Prepare the Zucchini Noodles: Begin by washing the zucchinis thoroughly. Using a spiralizer or a julienne peeler, create noodles from the zucchinis. Aim for thin, even noodles to guarantee they cook uniformly. Set the zucchini noodles aside on a clean kitchen towel to absorb excess moisture.
2. Make the Brazilian Tomato Sauce: In a large skillet, heat the olive oil over medium heat. Add the finely chopped onion and sauté until translucent, which should take about 3-4 minutes.
Then, add the minced garlic and sauté for an additional minute until fragrant, being careful not to let it burn.
3. Add Tomatoes and Spices: Pour in the crushed tomatoes and tomato paste into the skillet with the onions and garlic. Stir well to combine.
Then, add the dried oregano, dried basil, paprika, salt, and pepper. Allow the sauce to simmer for about 10-15 minutes, stirring occasionally until it thickens slightly and the flavors meld together.
4. Cook the Zucchini Noodles: In another skillet, add the zucchini noodles over medium heat. Sauté them for about 3-5 minutes, just until they’re tender but still firm, avoiding overcooking.
Drain any excess moisture that may release during cooking.
5. Combine and Serve: Once the zucchini noodles are cooked, add them to the skillet with the Brazilian tomato sauce. Toss everything together gently until the noodles are well coated with the sauce.
Serve immediately, garnished with fresh basil leaves and a sprinkle of grated Parmesan cheese, if desired.
Extra Tips:
When making Zucchini Noodles with Brazilian Tomato Sauce, feel free to customize the sauce by adding additional vegetables such as bell peppers or mushrooms for extra flavor and texture.
If you prefer a spicier kick, consider adding a pinch of red pepper flakes. Always make sure to drain the zucchini noodles well after cooking to prevent the dish from becoming watery. Enjoy your healthy and delicious meal!
Keto Cheese Bread (Pão De Queijo)

Keto Cheese Bread, or Pão De Queijo, is a delightful Brazilian treat that has been adapted to fit a ketogenic diet. This savory bread is made with tapioca flour, which is naturally gluten-free and low in carbs, making it an excellent choice for those following a keto lifestyle.
The cheesy flavor combined with a slightly chewy texture makes this dish a favorite among many, regardless of dietary restrictions. Whether you’re serving it as an appetizer, snack, or side dish, Keto Cheese Bread is guaranteed to impress.
This recipe isn’t only easy to make but also quick to whip up, allowing you to enjoy warm, cheesy goodness in no time. With just a few simple ingredients, you can create a deliciously satisfying bread that pairs well with a variety of dips or can be enjoyed on its own.
Perfect for gatherings or a cozy night in, Keto Cheese Bread provides a taste of Brazil while keeping your carb count in check.
Ingredients (Serving size: 4-6 people)
- 1 cup tapioca flour
- 1 cup shredded mozzarella cheese
- 1/2 cup grated Parmesan cheese
- 2 large eggs
- 1/4 cup unsweetened almond milk
- 1/2 teaspoon salt
- 1/2 teaspoon garlic powder (optional)
- 1/2 teaspoon baking powder (optional)
Cooking Instructions
- Preheat the Oven: Begin by preheating your oven to 375°F (190°C). This allows the bread to bake evenly and achieve that perfect golden crust.
- Combine Dry Ingredients: In a large mixing bowl, combine the tapioca flour, salt, garlic powder, and baking powder. Mix them well to guarantee that the dry ingredients are evenly distributed.
- Melt the Cheese: In a microwave-safe bowl, combine the shredded mozzarella and grated Parmesan cheese. Microwave in 30-second intervals, stirring in between, until the cheese is melted and fully combined. This step will help create that gooey texture in the bread.
- Mix Wet Ingredients: In a separate bowl, whisk together the eggs and almond milk until fully combined. Make sure to beat them well for a smoother mixture.
- Combine Everything: Pour the melted cheese into the dry ingredient mixture, then add the egg and almond milk mixture. Stir everything together until a dough forms. The dough should be slightly sticky but manageable.
- Shape the Dough: Using your hands, scoop out small portions of the dough and roll them into balls, about 1 inch in diameter. Place the balls on a lined baking sheet, leaving some space between each one to allow for expansion while baking.
- Bake: Place the baking sheet in the preheated oven and bake for 15-20 minutes or until the cheese bread is puffed up and golden brown.
- Cool and Serve: Once baked, remove the cheese bread from the oven and let it cool for a few minutes. Serve warm for the best taste and texture.
Extra Tips
When making Keto Cheese Bread, feel free to experiment with different types of cheese for varying flavors. Cheddar, for instance, can add a sharp taste, while cream cheese can enhance the creaminess.
Additionally, if you prefer a bit of heat, consider adding some finely diced jalapeños or red pepper flakes into the dough. These cheese breads are best enjoyed fresh but can be stored in an airtight container for a couple of days and reheated in the oven to regain their original texture.
Spiced Beef Empanadas With Almond Flour Crust

Spiced Beef Empanadas are a delicious and satisfying dish that brings the flavors of Brazil right to your kitchen. These bite-sized pastries are filled with a savory blend of seasoned ground beef, onions, and spices, all enveloped in a gluten-free almond flour crust. Perfect as a snack, appetizer, or even a main course, these empanadas cater to those following a keto diet without sacrificing taste or authenticity.
The almond flour crust isn’t only low in carbohydrates but also adds a nutty flavor that complements the spiced beef filling beautifully. With this recipe, you can create a delightful dish that will impress your family and friends while keeping your dietary goals on track. Follow the simple steps below to whip up a batch of these scrumptious empanadas that everyone will love!
Ingredients (Serves 4-6)
- 1 lb ground beef
- 1 medium onion, finely chopped
- 2 cloves garlic, minced
- 1 teaspoon paprika
- 1 teaspoon cumin
- 1 teaspoon oregano
- Salt and pepper to taste
- 2 tablespoons olive oil
- 2 large eggs (1 for filling, 1 for egg wash)
- 2 cups almond flour
- 1/4 cup coconut oil, melted
- 1/4 teaspoon baking powder
- 1 tablespoon apple cider vinegar
Cooking Instructions
- Prepare the Filling: In a skillet over medium heat, add the olive oil and sauté the chopped onions until they become translucent, about 3-4 minutes. Then, add the minced garlic and cook for another minute until fragrant. Add the ground beef, breaking it apart with a spoon, and cook until browned, approximately 5-7 minutes. Season with paprika, cumin, oregano, salt, and pepper. Once cooked, remove from heat and let it cool slightly. Stir in one beaten egg to bind the mixture.
- Make the Dough: In a mixing bowl, combine almond flour, melted coconut oil, baking powder, and apple cider vinegar. Mix until a dough forms. If it feels too dry, add a little water, one teaspoon at a time, until it holds together without being sticky.
- Roll Out the Dough: Divide the dough into small balls (about the size of a golf ball). On a sheet of parchment paper or a clean surface, use a rolling pin to roll each ball into a thin circle, about 1/8 inch thick. Make sure the circles are large enough to hold a generous tablespoon of filling.
- Fill the Empanadas: Place a heaping tablespoon of the beef filling in the center of each dough circle. Carefully fold the dough over to form a half-moon shape. Press the edges together tightly, then crimp with a fork to seal.
- Prepare for Baking: Preheat your oven to 350°F (175°C). Line a baking sheet with parchment paper. Beat the second egg and brush the tops of the empanadas with the egg wash for a golden finish.
- Bake: Place the filled empanadas on the prepared baking sheet and bake in the preheated oven for about 20-25 minutes or until golden brown and crispy. Remove from the oven and let cool slightly before serving.
Extra Tips
For added flavor, consider incorporating cheese or olives into the beef filling for a unique twist. You can also experiment with different spices or herbs to suit your taste.
If you prefer a crispy texture, try frying the empanadas instead of baking them, using a healthy oil for frying. Serve your empanadas with a side of avocado or a sugar-free dipping sauce for an extra burst of flavor. Enjoy your culinary adventure with these Keto Spiced Beef Empanadas!
Brazilian-Style Pork Chops With Chimichurri
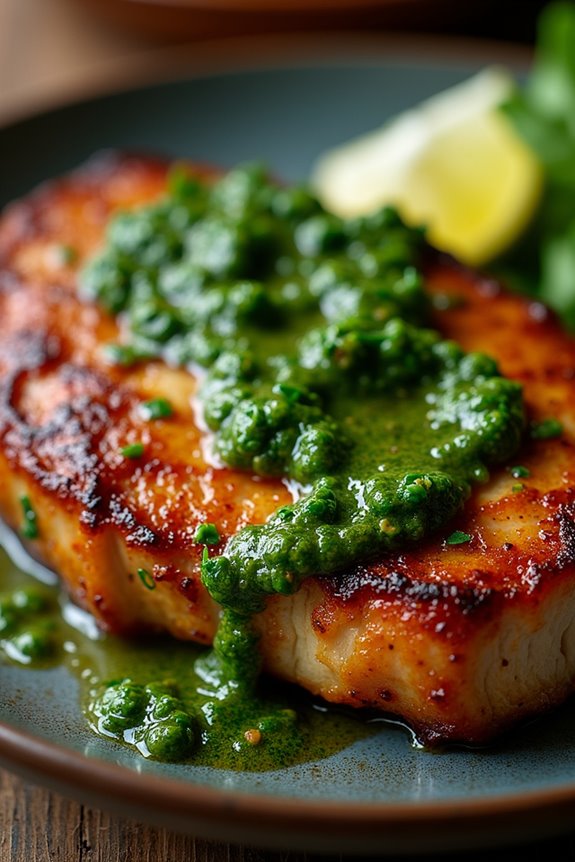
If you’re looking to spice up your dinner routine while adhering to the keto lifestyle, Brazilian-Style Pork Chops with Chimichurri is a perfect choice. This dish brings together juicy, flavorful pork chops with a vibrant chimichurri sauce, making it a delightful combination of textures and tastes. The fresh herbs in the chimichurri complement the rich pork, creating a mouthwatering meal that’s both satisfying and low in carbs.
Not only does this recipe cater to your taste buds, but it also embodies the essence of Brazilian cuisine, which is known for its bold flavors and hearty ingredients. With just a few simple steps, you can prepare a dish that not only fits your dietary requirements but also transports you to the sunny streets of Brazil. Ideal for a weeknight dinner or a weekend gathering, this recipe serves 4-6 people, ensuring there’s enough to share or enjoy as leftovers.
Ingredients:
- 4-6 bone-in pork chops (about 1 inch thick)
- 1 tablespoon olive oil
- 1 teaspoon salt
- 1 teaspoon black pepper
- 1 teaspoon garlic powder
- 1 teaspoon onion powder
- 1 teaspoon smoked paprika
- 1 cup fresh parsley, finely chopped
- 1/2 cup fresh cilantro, finely chopped
- 3 cloves garlic, minced
- 1/2 teaspoon red pepper flakes (optional)
- 1/4 cup red wine vinegar
- 1/2 cup olive oil
- Salt and pepper to taste
Cooking Instructions:
- Prepare the Pork Chops: Start by seasoning the pork chops. In a small bowl, mix together the salt, black pepper, garlic powder, onion powder, and smoked paprika. Rub this seasoning mixture evenly over both sides of each pork chop. Allow the pork chops to sit at room temperature for about 15 minutes to let the flavors penetrate the meat.
- Make the Chimichurri Sauce: While the pork chops are resting, prepare the chimichurri sauce. In a medium bowl, combine the chopped parsley, cilantro, minced garlic, and red pepper flakes if you’re using them. Add the red wine vinegar and olive oil, then mix well until all ingredients are combined. Season with salt and pepper to taste. Set aside to let the flavors meld.
- Cook the Pork Chops: Heat a large skillet over medium-high heat and add the tablespoon of olive oil. Once the oil is hot, carefully add the seasoned pork chops to the skillet. Cook for about 4-5 minutes on each side, or until the pork chops are golden brown and cooked through (internal temperature should reach 145°F). Remove the pork chops from the skillet and let them rest for a few minutes.
- Serve: Place each pork chop on a serving plate and generously spoon the chimichurri sauce over the top. You can also serve the remaining chimichurri on the side for dipping or additional flavor.
Extra Tips:
For maximum flavor, consider marinating the pork chops in the chimichurri sauce for a few hours or overnight before cooking. This not only infuses the meat with the bright and tangy notes of the sauce but also helps to tenderize the chops.
If you prefer grilling, these pork chops can also be grilled for a smoky flavor. Additionally, feel free to customize the chimichurri by adding other herbs like oregano or mint, depending on your preference. Enjoy your delicious Brazilian-style pork chops!
Avocado and Shrimp Salad With Lime Dressing
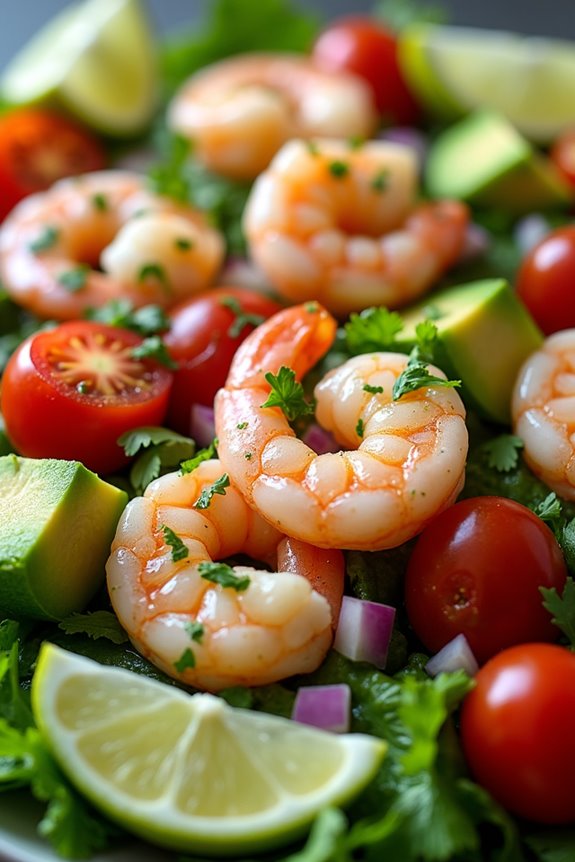
Avocado and Shrimp Salad with Lime Dressing is a revitalizing and nutritious dish that marries the rich creaminess of avocado with the delicate sweetness of shrimp. This Brazilian-inspired salad is perfect for those following a keto diet, as it’s low in carbohydrates and high in healthy fats. Packed with flavor and vibrant colors, this dish not only satisfies your taste buds but also provides a hearty serving of protein and essential nutrients.
This salad makes for an excellent appetizer or a light main course, especially on warm days. The zesty lime dressing adds a tangy touch that complements the ingredients beautifully. With just a few simple steps, you can whip up this delightful dish that will impress your family and friends alike. Let’s immerse ourselves in the ingredients and cooking instructions for this Keto Brazilian recipe.
Ingredients (Serves 4-6)
- 1 pound large shrimp, peeled and deveined
- 2 ripe avocados, diced
- 1 cup cherry tomatoes, halved
- 1/2 red onion, finely chopped
- 1/4 cup fresh cilantro, chopped
- 2 tablespoons olive oil
- 1 lime, juiced (plus extra wedges for serving)
- 1 teaspoon garlic powder
- Salt and pepper to taste
Cooking Instructions
1. Prepare the Shrimp: In a large pot of boiling salted water, add the shrimp and cook for 2-3 minutes, or until they turn pink and opaque. Be careful not to overcook them, as they can become tough.
Once cooked, drain the shrimp and transfer them to an ice bath to stop the cooking process. Drain again and set aside.
2. Mix the Dressing: In a small bowl, whisk together the olive oil, lime juice, garlic powder, salt, and pepper until well combined. This dressing will add a bright and zesty flavor to the salad.
3. Combine the Ingredients: In a large mixing bowl, combine the cooked shrimp, diced avocados, halved cherry tomatoes, chopped red onion, and cilantro. Pour the lime dressing over the mixture and gently toss until everything is evenly coated.
Be careful when mixing to avoid mashing the avocados.
4. Taste and Adjust: Before serving, taste the salad and adjust the seasoning if necessary. You can add more lime juice, salt, or pepper according to your preference.
5. Serve: Transfer the salad to a serving platter or individual bowls. Garnish with lime wedges and additional cilantro if desired. Enjoy your revitalizing Avocado and Shrimp Salad immediately!
Extra Tips
When making Avocado and Shrimp Salad, it’s important to choose ripe avocados for the best texture and flavor. To prevent the avocados from browning, you can drizzle a little extra lime juice over them before mixing.
Additionally, feel free to customize the salad by adding other keto-friendly ingredients like cucumber or bell peppers for a crunchier texture. If you’re preparing the salad ahead of time, consider keeping the dressing separate until just before serving to maintain the freshness of the avocados.
Low-Carb Moqueca: Brazilian Fish Stew
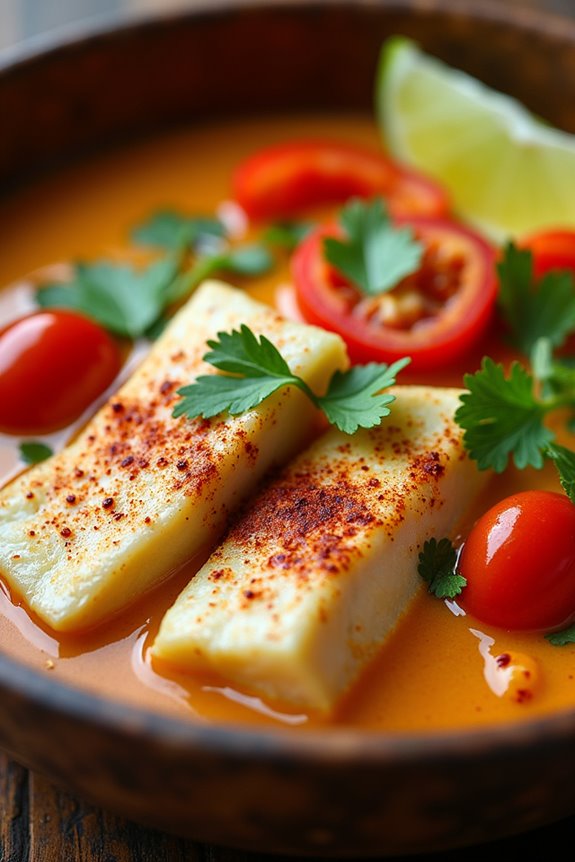
Moqueca is a traditional Brazilian fish stew that bursts with flavors and is perfect for a cozy dinner. This keto-friendly version eliminates high-carb ingredients while retaining the essence of the original dish. The combination of fresh fish, coconut milk, and vibrant spices creates a comforting and satisfying meal.
It’s not just tasty; it’s also packed with healthy fats, making it ideal for those following a ketogenic diet.
This Low-Carb Moqueca isn’t only easy to prepare but also offers a fantastic way to introduce your family and friends to Brazilian cuisine. With its colorful presentation and aromatic ingredients, it’s a dish that’s sure to impress.
Whether you’re hosting a dinner party or simply looking for a delicious weeknight meal, this recipe is a must-try that will transport your taste buds straight to Brazil.
Ingredients (Serves 4-6)
- 2 lbs white fish fillets (such as cod or tilapia)
- 1 teaspoon salt
- 1 teaspoon black pepper
- 1 tablespoon lime juice
- 2 tablespoons coconut oil
- 1 medium onion, chopped
- 4 cloves garlic, minced
- 1 red bell pepper, sliced
- 1 green bell pepper, sliced
- 1 can (14 oz) coconut milk
- 1 teaspoon paprika
- 1 teaspoon cayenne pepper (optional)
- 1 cup cherry tomatoes, halved
- 1/4 cup fresh cilantro, chopped
- Lime wedges for serving
Cooking Instructions
- Prepare the fish: Start by seasoning the fish fillets with salt, black pepper, and lime juice. Allow them to marinate for about 15-20 minutes. This step enhances the flavor of the fish and helps tenderize it.
- Heat the coconut oil: In a large pot or Dutch oven, heat the coconut oil over medium heat. Once hot, add the chopped onion and sauté for about 5 minutes or until the onions become translucent. This will build a flavorful base for the stew.
- Add garlic and bell peppers: Stir in the minced garlic and sliced red and green bell peppers. Cook for an additional 5-7 minutes, or until the peppers are soft. This will add sweetness and color to your moqueca.
- Incorporate coconut milk and spices: Pour in the coconut milk, then add the paprika and cayenne pepper (if using). Stir well to combine all ingredients and let the mixture come to a gentle simmer. This will create a rich and creamy broth.
- Cook the fish: Gently place the marinated fish fillets into the pot. Cover and simmer for 10-15 minutes, or until the fish is cooked through and flakes easily with a fork. Be careful not to overcook, as the fish can become tough.
- Add cherry tomatoes and cilantro: Just before serving, fold in the halved cherry tomatoes and chopped cilantro. Allow them to warm through for a couple of minutes. This adds freshness and a burst of flavor to the dish.
- Serve: Ladle the moqueca into bowls and serve with lime wedges on the side. The lime juice adds a wonderful brightness that complements the rich stew.
Extra Tips
For an even more authentic flavor, consider adding a splash of fish sauce or a sprinkle of grated ginger to the broth.
If you’re looking to add more vegetables, zucchini or green beans can be excellent additions. Remember to adjust the level of spices according to your personal heat preference.
Enjoy your Low-Carb Moqueca with a side of cauliflower rice for an excellent keto-friendly meal!
Keto Brigadeiro: Brazilian Chocolate Truffles

Keto Brigadeiro is a delightful twist on the traditional Brazilian sweet treat, perfect for those following a ketogenic diet. These chocolate truffles are rich, creamy, and satisfyingly sweet, all while keeping the carbohydrate count low. Made with cocoa powder, cream cheese, and a sugar substitute, Keto Brigadeiro allows you to indulge in a classic dessert without compromising your diet.
Not only are they easy to prepare, but they also make for an impressive treat to share with friends and family. This recipe is straightforward and requires minimal ingredients, making it a great choice for anyone looking to whip up something special in a short amount of time.
These truffles can be rolled in various toppings for an added crunch or flavor, such as finely chopped nuts or unsweetened coconut flakes. Enjoy the delightful taste of Brazil with this keto-friendly version of Brigadeiro that everyone will love!
Ingredients (Serves 4-6)
- 1 cup cream cheese, softened
- 1/2 cup unsweetened cocoa powder
- 1/4 cup powdered erythritol (or your preferred keto-friendly sweetener)
- 1/4 cup unsweetened almond milk
- 1 teaspoon vanilla extract
- Pinch of salt
- Unsweetened shredded coconut or crushed nuts for rolling (optional)
Cooking Instructions
- Prepare the Mixture: In a medium-sized mixing bowl, combine the softened cream cheese, unsweetened cocoa powder, powdered erythritol, almond milk, vanilla extract, and a pinch of salt. Use a hand mixer or whisk to blend the ingredients until smooth and creamy, ensuring there are no lumps. This creates a rich base for your truffles.
- Chill the Mixture: Once the mixture is well combined, cover the bowl with plastic wrap and refrigerate it for about 30-60 minutes. Chilling the mixture will help it firm up, making it easier to shape into balls later.
- Shape the Brigadeiros: After chilling, remove the mixture from the refrigerator. Using your hands, take small portions of the mixture (about the size of a teaspoon) and roll them into balls. You should be able to make approximately 12-18 truffles, depending on the size you choose.
- Coat the Truffles: If desired, roll the Brigadeiros in unsweetened shredded coconut or crushed nuts to add texture and flavor. Make sure to coat each truffle evenly for the best presentation and taste.
- Refrigerate Again: Place the coated truffles on a plate or a baking sheet lined with parchment paper. Return them to the refrigerator for about 15-20 minutes to set completely before serving.
- Serve: Once set, the Keto Brigadeiros are ready to be enjoyed! Serve them chilled, and watch as they quickly become a favorite among your guests.
Extra Tips
When making Keto Brigadeiro, feel free to experiment with different flavors by adding a splash of coffee or a few drops of mint extract to the mixture for a unique twist.
Additionally, if you find the mixture too soft to roll, simply return it to the fridge for a little longer to firm up. Store any leftovers in an airtight container in the refrigerator for up to a week, allowing you to savor these delicious treats over several days!
Coconut Flan (Pudim De Coco) With Sugar Substitute

Coconut Flan, or Pudim De Coco, is a classic Brazilian dessert that combines the rich, creamy texture of flan with the delightful flavor of coconut. This keto-friendly version uses a sugar substitute to keep the dish low in carbs while still satisfying your sweet tooth. It’s a perfect treat for those following a ketogenic diet or anyone looking to indulge without the guilt.
Flan is often enjoyed at family gatherings and celebrations, making it a beloved staple in Brazilian cuisine.
Making Coconut Flan is simpler than you might think, and it requires only a handful of ingredients. The result is a silky smooth dessert that’s not only delicious but also visually appealing. Topped with shredded coconut, this flan is sure to impress your guests and leave them wanting more.
Let’s explore the ingredients and preparation steps to create this delectable Keto Coconut Flan.
Ingredients (Serves 4-6)
- 1 can (400ml) coconut milk
- 1 cup unsweetened almond milk
- 3 large eggs
- 1/2 cup sugar substitute (like erythritol or monk fruit sweetener)
- 1/2 cup unsweetened shredded coconut
- 1 tablespoon vanilla extract
- 1 tablespoon gelatin (optional, for a firmer texture)
Cooking Instructions
1. Preheat the Oven: Preheat your oven to 350°F (175°C). This guarantees that your flan will cook evenly and have a nice, smooth texture when it’s done.
2. Prepare the Caramel****: In a small saucepan, heat 1/2 cup of water and 1/2 cup of your chosen sugar substitute over medium heat. Stir until the sweetener is fully dissolved and the mixture begins to bubble. Allow it to cook for about 5-7 minutes until it thickens into a light syrup.
Carefully pour the syrup into a round baking dish or individual ramekins, swirling to coat the bottom. Set aside to cool.
3. Blend the Flan Mixture: In a blender, combine the coconut milk, almond milk, eggs, sugar substitute, shredded coconut, and vanilla extract. Blend until the mixture is smooth and well combined.
If you prefer a firmer flan, add the gelatin at this stage and blend again to incorporate.
4. Pour into the Baking Dish: Carefully pour the flan mixture over the hardened caramel in the baking dish or ramekins. Make sure to do this gently to avoid disturbing the caramel layer.
5. Bake in a Water Bath****: Place the baking dish or ramekins in a larger baking pan and fill the outer pan with hot water until it reaches halfway up the sides of the flan dish. This water bath helps to cook the flan evenly and prevents it from cracking.
6. Bake: Bake in the preheated oven for about 50-60 minutes, or until the flan is set but still slightly jiggly in the center. You can check for doneness by inserting a knife into the center; it should come out clean.
7. Cool and Chill****: Once done, remove the flan from the oven and let it cool at room temperature. Then, refrigerate for at least 4 hours or overnight for best results.
8. Serve: To Serve, run a knife around the edges of the flan to loosen it, then invert it onto a serving plate. The caramel will flow over the top, creating a beautiful presentation. Garnish with additional shredded coconut if desired.
Extra Tips
When making Coconut Flan, it’s important to verify that all your ingredients, especially the milk and eggs, are at room temperature for the best mixing results.
If using a sugar substitute, choose one that caramelizes well to achieve the classic caramel layer. Additionally, feel free to experiment by adding different flavors like coconut extract or a pinch of nutmeg for a unique twist.
Always allow the flan to chill thoroughly before serving, as this will enhance its texture and flavor. Enjoy your Keto Coconut Flan as a delightful, guilt-free dessert!
Passion Fruit Mousse With Cream Cheese

Passion Fruit Mousse with Cream Cheese is a delightful Brazilian dessert that combines the tropical flavors of passion fruit with the rich creaminess of cream cheese, all while keeping it keto-friendly. This dish isn’t only low in carbohydrates but also high in flavor, making it perfect for those following a ketogenic diet.
The mousse is light and airy, providing a rejuvenating end to any meal, and it’s a fantastic way to impress your guests with an exotic treat.
This recipe is simple and requires minimal preparation time, allowing you to whip up a delicious dessert without too much hassle. The sweet-tart flavor of the passion fruit pairs beautifully with the cream cheese, creating a smooth and velvety texture that melts in your mouth.
Whether you serve it in individual cups or a large bowl, this Passion Fruit Mousse is bound to be a hit at your next gathering!
Ingredients (Serves 4-6):
- 1 cup fresh passion fruit pulp (about 4-6 passion fruits)
- 8 oz cream cheese, softened
- 1/2 cup powdered erythritol (or preferred keto sweetener)
- 1 cup heavy whipping cream
- 1 teaspoon vanilla extract
- A pinch of salt
Cooking Instructions:
- Prepare the Passion Fruit Pulp: Cut the passion fruits in half and scoop out the pulp into a bowl. You should have about one cup of fresh pulp. If you prefer, you can strain it to remove the seeds or leave them for added texture.
- Mix Cream Cheese and Sweetener: In a mixing bowl, add the softened cream cheese and powdered erythritol. Using an electric mixer, beat the mixture on medium speed until it becomes smooth and creamy, making sure there are no lumps.
- Incorporate Passion Fruit Pulp: Gradually add the prepared passion fruit pulp to the cream cheese mixture. Mix well until fully combined, and then add the vanilla extract and a pinch of salt. This will enhance the flavors of the mousse.
- Whip the Heavy Cream: In a separate bowl, pour in the heavy whipping cream. Using a clean electric mixer, whip the cream until stiff peaks form. This step is essential for achieving the light and airy texture of the mousse.
- Fold the Mixtures Together: Gently fold the whipped cream into the passion fruit and cream cheese mixture. Start by adding a third of the whipped cream to lighten the mixture, then gradually fold in the rest. Be careful not to deflate the whipped cream too much; you want to maintain that fluffy texture.
- Chill the Mousse: Once everything is combined, transfer the mousse into individual serving cups or a large bowl. Cover with plastic wrap and refrigerate for at least 2-3 hours, or until set.
- Serve and Enjoy: Once chilled and set, serve the Passion Fruit Mousse with Cream Cheese as is, or garnish with additional passion fruit pulp or a dollop of whipped cream for an extra touch.
Extra Tips:
When making this Passion Fruit Mousse, make sure that your cream cheese is at room temperature to avoid lumps in your mixture. You can also experiment with different sweeteners to find the perfect taste for your palate.
If you want to elevate the dessert further, consider adding a sprinkle of unsweetened cocoa powder or a few mint leaves as a garnish. This mousse can be made a day in advance, making it a convenient option for parties or gatherings!