

If you’re looking to add a burst of flavor and color to your meals, Argentinian side dishes are the way to go. From the vibrant Ensalada Rusa to the creamy Puré De Calabaza, these recipes bring a touch of Argentina to your table. Each dish is crafted with fresh ingredients and bold flavors that stand out beautifully. Perfect for complementing any main course or enjoying on their own. Let’s explore these delightful creations that will surely brighten your dining experience.
Ensalada Rusa
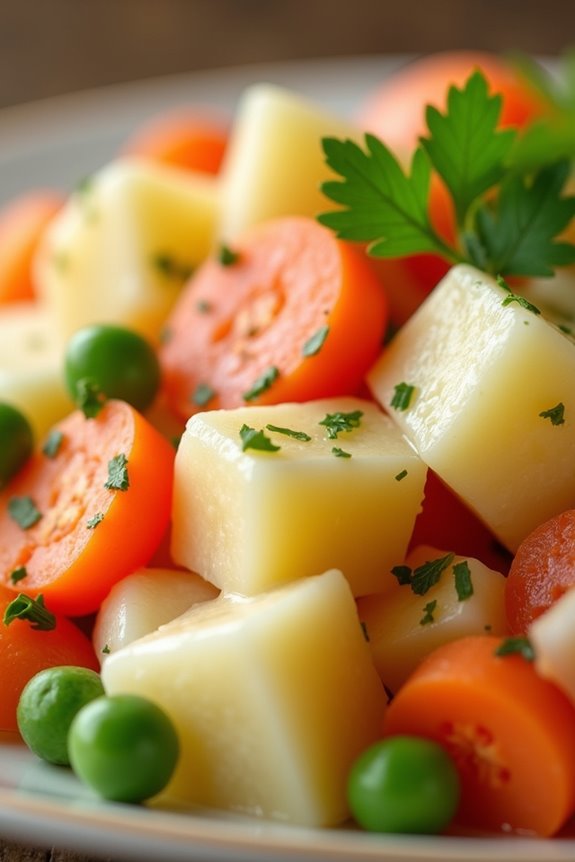
Ensalada Rusa, or Russian Salad, is a beloved Argentinian side dish that combines a colorful medley of vegetables with a creamy dressing. This dish reflects the rich culinary influences that have shaped Argentina’s gastronomic landscape, showcasing ingredients that are both accessible and delicious.
Traditionally served at gatherings and celebrations, Ensalada Rusa isn’t just a staple on Argentine tables but also a versatile dish that can be enjoyed anytime, as a side or even as a light meal on its own.
The beauty of Ensalada Rusa lies in its simplicity and the opportunity to customize it according to personal taste. Commonly made with boiled vegetables, this salad is typically dressed with mayonnaise, which binds the ingredients together and adds a rich flavor.
While the classic recipe includes potatoes, carrots, and peas, other variations may include ingredients like corn, green beans, or even diced pickles. This dish can be prepared ahead of time, making it an excellent choice for potlucks or family gatherings.
Ingredients (Serves 4-6)
- 3 medium potatoes, peeled and diced
- 2 medium carrots, peeled and diced
- 1 cup frozen peas
- 1 cup mayonnaise
- 1 tablespoon mustard (optional)
- Salt and pepper to taste
- 2-3 tablespoons chopped fresh parsley (for garnish)
Cooking Instructions
- Boil the Vegetables: In a large pot, bring salted water to a boil. Add the diced potatoes and carrots. Cook for about 10-15 minutes or until they’re tender but still firm. Add the frozen peas for the last 3-4 minutes of cooking. Drain the vegetables and let them cool in a large bowl.
- Prepare the Dressing: In a separate bowl, combine the mayonnaise and mustard (if using). Mix well until smooth. Taste the dressing and season with salt and pepper according to your preference.
- Combine Ingredients: Once the vegetables have cooled, add them to the bowl with the dressing. Gently fold the mayonnaise mixture into the vegetables until they’re evenly coated. Be careful not to mash the vegetables; they should remain intact for texture.
- Chill the Salad: Cover the salad with plastic wrap or a lid and refrigerate for at least 30 minutes to allow the flavors to meld together. This will also help the salad to become more invigorating.
- Serve: Before serving, give the salad a gentle stir. Transfer it to a serving dish and garnish with fresh chopped parsley for a pop of color. Enjoy your Ensalada Rusa chilled or at room temperature.
Extra Tips
When making Ensalada Rusa, feel free to experiment with the ingredients. You can add diced pickles, boiled eggs, or even cooked chicken for a heartier salad.
Additionally, verify that the vegetables aren’t overcooked; they should retain a bit of crunch for the best texture. If you prefer a lighter version, you can substitute Greek yogurt for part of the mayonnaise.
This dish can last in the refrigerator for up to 3 days, making it a convenient option for meal prep.
Provoleta

Provoleta is a beloved Argentinian dish that showcases the country’s rich culinary tradition. It features a thick slice of provolone cheese, which is grilled until it becomes gooey and slightly charred, offering a delightful combination of flavors and textures.
Often served as a starter or side dish, Provoleta is perfect for sharing among friends or family during an asado (Argentinian barbecue), where it pairs beautifully with crusty bread and chimichurri sauce.
Making Provoleta is quite simple, yet the results are impressively delicious. The key is to use high-quality provolone cheese and to guarantee that it’s cooked just right to achieve that perfect melting consistency without becoming too oily.
Whether you’re hosting a backyard barbecue or preparing a cozy dinner at home, this dish will surely be a hit and can bring a taste of Argentina to your table.
Ingredients (Serves 4-6)
- 1 large wheel of provolone cheese (approximately 1 lb)
- 1 tablespoon olive oil
- 1 teaspoon dried oregano
- 1 teaspoon red pepper flakes (optional)
- Freshly ground black pepper (to taste)
- Fresh parsley (for garnish)
- Crusty bread (for serving)
Cooking Instructions
- Preheat the Grill or Oven: Begin by preheating your grill to medium-high heat. If you’re using an oven, set it to broil. Make sure the grill grates are clean and lightly oiled to prevent sticking.
- Prepare the Cheese: While the grill is heating up, take the wheel of provolone cheese and pat it dry with a paper towel. This will help the cheese brown nicely. Optionally, you can score the top of the cheese lightly in a crisscross pattern to allow for better melting.
- Season the Cheese: Drizzle olive oil over the top of the cheese, guaranteeing it’s evenly coated. Sprinkle the dried oregano, red pepper flakes (if using), and freshly ground black pepper over the cheese, pressing down slightly to help the seasonings adhere.
- Grill the Cheese: Place the cheese directly on the grill or on a broiler-safe dish if using the oven. Grill for about 5-7 minutes, or until the cheese is bubbling and has a golden-brown crust. Keep a close eye on it to avoid overcooking; the cheese should be melted but still hold its shape.
- Serve Immediately: Once the cheese is ready, carefully remove it from the grill or oven. Garnish with fresh parsley and serve hot with slices of crusty bread for dipping.
Extra Tips
For an added layer of flavor, consider incorporating additional toppings such as sliced jalapeños or sundried tomatoes before grilling.
If you’re using a grill, you can also experiment with wood chips to add a smoky flavor to the cheese. Always serve Provoleta immediately after cooking, as it’s best enjoyed while it’s still warm and gooey.
Enjoy this delightful dish with a rejuvenating salad or alongside grilled meats for a complete Argentinian experience!
Choclo Con Queso

Choclo Con Queso is a delightful Argentinian side dish that showcases the simplicity and richness of corn combined with creamy cheese. This dish is particularly popular in the Andean regions of Argentina, where sweet, tender corn, known as “choclo,” is harvested and celebrated.
Often enjoyed during summer barbecues or as a side to grilled meats, Choclo Con Queso embodies the essence of comfort food while providing a nutritious option for gatherings.
Making Choclo Con Queso is a straightforward process that involves minimal ingredients, yet the flavors are rich and satisfying. The sweet corn pairs beautifully with the salty, melting cheese, creating a delightful contrast.
This dish can be served hot as an accompaniment to any meal or enjoyed as a snack on its own. Whether you’re familiar with Argentinian cuisine or trying it for the first time, Choclo Con Queso is sure to captivate your taste buds.
Ingredients (Serves 4-6)
- 4 large ears of fresh corn (choclo)
- 1 cup of queso fresco or any melting cheese (like mozzarella or provolone)
- 2 tablespoons of unsalted butter
- Salt to taste
- Freshly ground black pepper to taste
- Optional: fresh herbs (like cilantro or parsley) for garnish
Cooking Instructions
- Prepare the Corn: Begin by shucking the corn. Remove the husks and silk, then rinse the ears under cold water to clean them. Cut the kernels off the cob if desired, or you can leave them whole for a more traditional presentation.
- Cook the Corn: Place the corn in a large pot of salted boiling water. Allow it to cook for about 8-10 minutes, or until the kernels are tender and plump. If using whole ears, you can also grill them for a smoky flavor.
- Drain and Butter: Once the corn is cooked, carefully remove it from the pot and drain well. If you wish, you can cut the kernels off the cob at this point. In a large serving bowl, toss the corn with the unsalted butter while it’s still hot, allowing the butter to melt and coat the corn evenly.
- Add the Cheese: While the corn is still warm, sprinkle the cheese generously over the top. If using whole ears of corn, you can place slices of cheese directly over the corn. Cover the bowl with foil or a lid to help the cheese melt slightly.
- Season and Serve: After a few minutes, remove the cover and season with salt and freshly ground black pepper to taste. For an added touch of freshness, sprinkle chopped herbs over the top before serving.
Extra Tips
Make sure to use fresh, sweet corn for the best flavor in Choclo Con Queso. If fresh corn isn’t available, you can use frozen corn, but confirm it’s thawed and drained before cooking.
For added depth of flavor, consider grilling the corn instead of boiling it; this will impart a delicious char. Feel free to experiment with different types of cheese to suit your personal taste, and don’t hesitate to add spices or additional toppings, such as a drizzle of olive oil or a squeeze of lime juice, for an extra kick!
Papas a La Provenzal
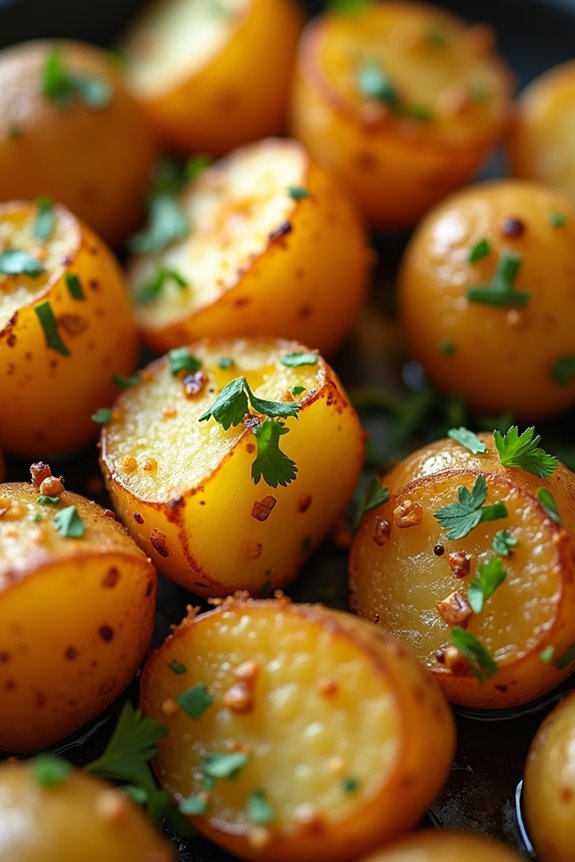
Papas a La Provenzal is a delightful Argentinian side dish that features tender potatoes infused with a rich combination of garlic and parsley. This dish isn’t only simple to prepare but also packed with flavor, making it a perfect accompaniment to grilled meats or as a standalone vegetarian option.
The name “Provenzal” refers to the treatment of the potatoes, akin to how dishes are prepared in the Provence region of France, highlighting the use of fresh herbs and aromatic flavors.
The beauty of Papas a La Provenzal lies in its versatility; you can adjust the garlic and parsley according to your taste preferences. The potatoes can be boiled or roasted, depending on your desired texture. This dish is sure to impress at your dinner table, offering a taste of Argentinian cuisine that’s both comforting and satisfying.
Ingredients (Serves 4-6)
- 2 pounds of potatoes (Yukon Gold or Red Bliss)
- 1/2 cup of fresh parsley, finely chopped
- 4-6 cloves of garlic, minced
- 1/4 cup of olive oil
- Salt, to taste
- Black pepper, to taste
- 1 tablespoon of lemon juice (optional)
Cooking Instructions
1. Prepare the Potatoes: Begin by washing the potatoes thoroughly to remove any dirt. If you prefer a more rustic presentation, you can leave the skin on; otherwise, peel the potatoes. Cut them into uniform chunks, about 1 to 2 inches in size, to guarantee even cooking.
2. Boil the Potatoes: Place the potato chunks in a large pot and cover them with cold water. Add a generous pinch of salt to the water. Bring the pot to a boil over high heat, then reduce to a simmer. Cook the potatoes for about 15-20 minutes, or until they’re fork-tender but not falling apart.
Drain the potatoes in a colander and set aside.
3. Make the Garlic-Parsley Mixture****: While the potatoes are boiling, prepare the garlic-parsley mixture. In a small bowl, combine the minced garlic, chopped parsley, olive oil, salt, and black pepper. If you like a bit of acidity, add the lemon juice to the mixture. Stir well to combine all ingredients.
4. Combine and Serve: Once the potatoes are drained, return them to the pot. Pour the garlic-parsley mixture over the potatoes and gently toss to coat evenly. Make sure each potato piece is well-covered with the flavorful mixture.
Let the potatoes sit for a few minutes to absorb the flavors before transferring them to a serving dish.
5. Garnish and Enjoy: For an extra touch, garnish the dish with additional parsley or a sprinkle of paprika. Serve warm alongside your favorite main dishes, and enjoy the delicious combination of garlic and herbs.
Extra Tips
For an added depth of flavor, consider roasting the potatoes instead of boiling them. Toss the potato chunks with olive oil, salt, and pepper, then spread them on a baking sheet and roast in a preheated oven at 425°F (220°C) for about 25-30 minutes, or until golden and crispy.
This method enhances the potatoes’ natural sweetness and gives a delightful texture. Additionally, experiment with other herbs like oregano or thyme to create your own twist on this classic dish!
Pimientos Asados
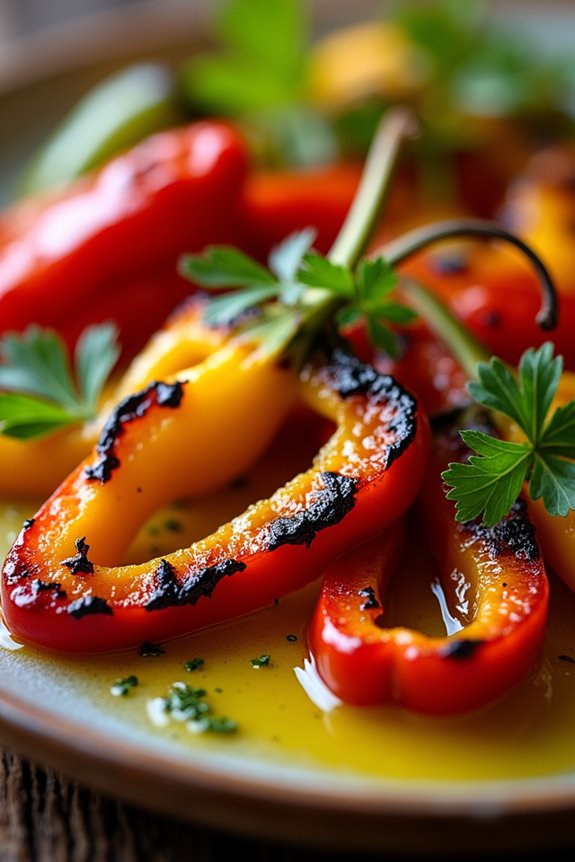
Pimientos Asados, or roasted peppers, is a beloved Argentinian side dish that celebrates the vibrant flavors of fresh bell peppers. This dish is simple yet elegant, allowing the natural sweetness of the peppers to shine through.
Whether served alongside grilled meats, tossed into salads, or used as a topping for crusty bread, Pimientos Asados adds a delightful layer of flavor that complements many Argentinian meals.
Roasting peppers brings out their rich, smoky flavor while softening their texture, making them easy to enjoy. This dish can be prepared with various types of bell peppers, including red, yellow, and green, giving you the freedom to create a colorful presentation that’s as appealing to the eye as it’s to the palate.
With just a few ingredients and straightforward techniques, you can impress your family and guests with this classic Argentinian side dish.
Ingredients (serving size: 4-6 people)
- 4 large bell peppers (any color)
- 2 tablespoons olive oil
- 1 teaspoon coarse sea salt
- 1 teaspoon black pepper
- 2 cloves garlic, minced (optional)
- Fresh parsley for garnish (optional)
Cooking Instructions
- Preheat the Oven: Begin by preheating your oven to 425°F (220°C). A hot oven is essential for roasting the peppers, as it helps to achieve the charred, smoky flavor that defines Pimientos Asados.
- Prepare the Peppers: Wash the peppers thoroughly under cold water. Cut the tops off the peppers and remove the seeds and membranes. This will guarantee that the peppers roast evenly and are easy to eat.
- Season the Peppers: In a large bowl, toss the prepared peppers with olive oil, sea salt, black pepper, and minced garlic (if using). Be certain each pepper is well-coated with the seasoning to enhance their flavor during roasting.
- Roast the Peppers: Arrange the seasoned peppers cut-side down on a baking sheet lined with parchment paper. Place the baking sheet in the preheated oven and roast for about 25-30 minutes, or until the skins are blistered and charred, and the peppers are tender.
- Cool and Peel: Once roasted, remove the baking sheet from the oven and let the peppers cool for about 10 minutes. This cooling period will make it easier to peel off the charred skin. Carefully peel the skin away from the peppers; it should come off easily.
- Serve: Slice the roasted peppers into strips or serve them whole on a platter. Drizzle with a little extra olive oil if desired and garnish with fresh parsley. Enjoy your Pimientos Asados warm or at room temperature alongside your favorite main dishes.
Extra Tips
When preparing Pimientos Asados, feel free to experiment with different types of peppers for varied flavors and colors.
For a spicier kick, consider using jalapeños or other chili peppers. Additionally, you can enhance the dish by adding a splash of balsamic vinegar or a sprinkle of feta cheese before serving.
If you have leftovers, they can be stored in an airtight container in the refrigerator for up to three days, making for a delicious topping on sandwiches or salads. Enjoy your cooking!
Ensalada De Palta
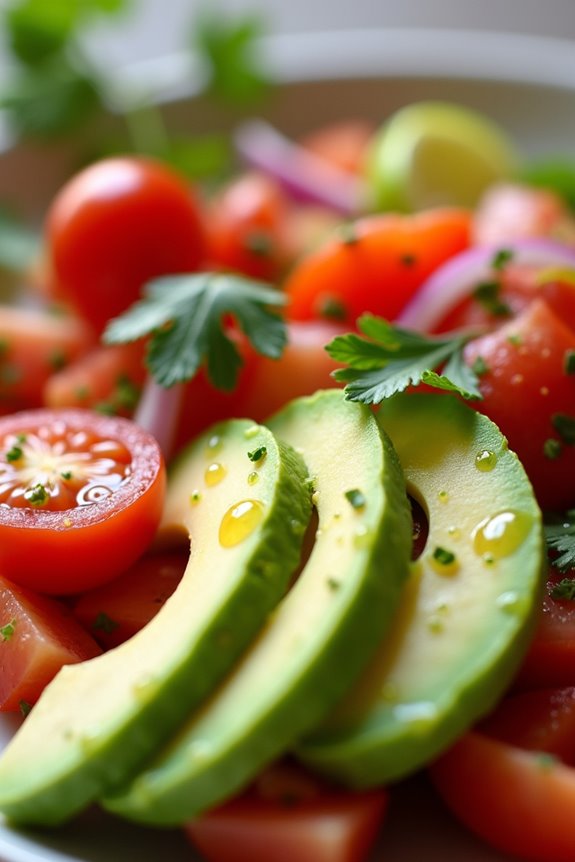
Ensalada de Palta, or Avocado Salad, is a invigorating and nutritious dish that’s popular in Argentina and throughout South America. This simple yet delightful side dish showcases the creamy texture of ripe avocados, balanced with the crunch of fresh vegetables and the tang of lime. It’s a perfect complement to any meal, especially grilled meats or as part of a larger spread of Argentinian cuisine.
Whether you’re preparing a family dinner or a casual gathering, this salad is sure to impress and satisfy. This salad isn’t just a treat for the taste buds but also a feast for the eyes with its vibrant colors. The combination of avocados, tomatoes, and onions creates a invigorating blend that’s both healthy and delicious. The lime juice dressing elevates the flavors, making every bite a burst of zest.
Serve it chilled as a side dish or enjoy it on its own for a light lunch.
Ingredients (Serves 4-6):
- 3 ripe avocados
- 2 medium tomatoes
- 1 small red onion
- 1 lime (for juice)
- 2 tablespoons olive oil
- Salt to taste
- Fresh cilantro or parsley (for garnish)
Cooking Instructions:
- Prepare the Ingredients: Start by washing the tomatoes and cilantro (or parsley). Cut the tomatoes into small cubes and set them aside. For the onions, peel and finely chop them. This guarantees that all vegetables are ready for mixing, making the assembly process quicker and easier.
- Cut the Avocados: Slice the avocados in half and remove the pit. Using a spoon, scoop the flesh out of the skin and cut it into bite-sized pieces. Be gentle to avoid mashing the avocados. Place the avocado pieces in a large bowl.
- Combine Vegetables: Add the diced tomatoes and chopped onions to the bowl with the avocados. Gently toss the ingredients together to combine them without mashing the avocados. This will create a colorful mixture that’s visually appealing.
- Dress the Salad: Squeeze the juice of one lime over the salad and drizzle in the olive oil. Sprinkle salt to taste. Use a spatula or spoon to gently mix everything together, guaranteeing that the dressing evenly coats the ingredients.
- Garnish and Serve: Finely chop some fresh cilantro or parsley and sprinkle it on top of the salad for added flavor and freshness. Serve immediately or let it chill in the refrigerator for about 15-20 minutes before serving to enhance the flavors.
Extra Tips:
When selecting avocados for your Ensalada de Palta, look for ones that are slightly soft to the touch but not overly mushy, as this indicates ripeness. If you’re making the salad ahead of time, consider adding the avocado just before serving to prevent browning.
Additionally, feel free to customize the salad by adding other ingredients such as bell peppers or corn for extra flavor and texture.
Espinacas a La Crema
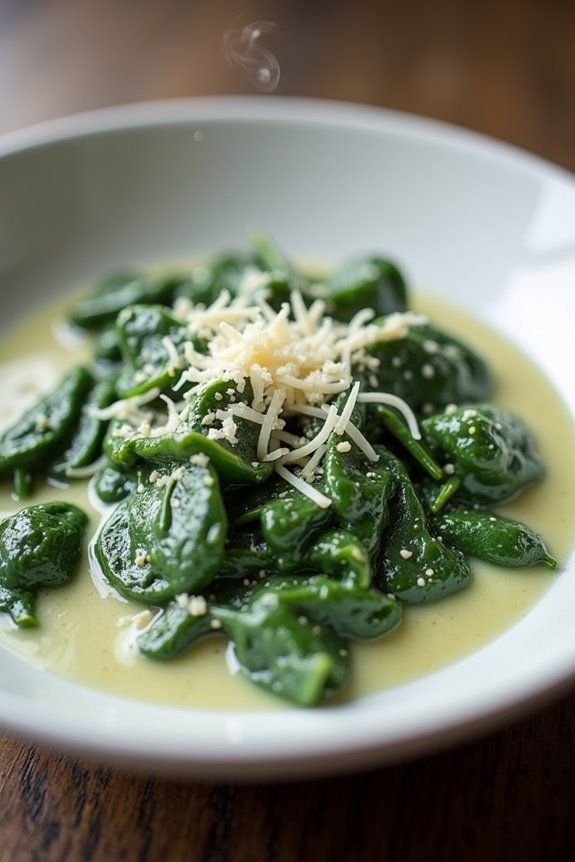
Espinacas a La Crema is a delightful Argentine side dish that showcases the rich flavor of spinach combined with a creamy sauce. This dish isn’t only a delicious accompaniment to any main course, but it also provides a nutritious boost thanks to the spinach. The creamy texture and savory flavor make it a favorite among both adults and children, making it a great addition to family meals or special occasions.
This recipe is straightforward and can be prepared in about 30 minutes, making it a perfect choice for busy weeknights or when entertaining guests. The combination of spinach, cream, and cheese creates a luxurious sauce that pairs wonderfully with meats or can be enjoyed on its own as a vegetarian option.
Ingredients (Serves 4-6)
- 1 lb fresh spinach (or 1 package of frozen spinach)
- 1 cup heavy cream
- 1 cup grated Parmesan cheese
- 2 tablespoons butter
- 1 small onion, finely chopped
- 2 cloves garlic, minced
- Salt and pepper to taste
- Nutmeg (optional, to taste)
Cooking Instructions
- Prepare the Spinach: If using fresh spinach, wash it thoroughly and remove any tough stems. In a large pot, bring salted water to a boil and blanch the spinach for 2-3 minutes until wilted. Drain and rinse under cold water to stop the cooking process. Squeeze out excess water and chop the spinach coarsely. If using frozen spinach, thaw it and drain any excess water.
- Sauté the Aromatics: In a large skillet, melt the butter over medium heat. Add the finely chopped onion and sauté for about 5 minutes until it becomes translucent. Add the minced garlic and continue to sauté for another minute, stirring frequently to avoid burning.
- Make the Cream Sauce: Pour the heavy cream into the skillet with the sautéed onions and garlic. Stir well to combine and bring the mixture to a gentle simmer. Allow it to simmer for about 2-3 minutes, stirring occasionally.
- Incorporate the Spinach: Add the chopped spinach to the cream sauce and mix well. Season with salt, pepper, and a pinch of nutmeg if desired. Stir in the grated Parmesan cheese until melted and well combined. Let it cook for an additional 3-4 minutes, allowing the flavors to meld together.
- Serve: Once the mixture is heated through and has thickened slightly, remove it from the heat. Transfer the Espinacas a La Crema to a serving dish and enjoy warm as a side to your favorite main courses.
Extra Tips
When preparing Espinacas a La Crema, feel free to experiment with the cheese; while Parmesan is traditional, mixing in some mozzarella or cream cheese can enhance the creaminess.
Additionally, for a more robust flavor, consider adding a pinch of red pepper flakes or sautéing some mushrooms along with the onions. This dish can also be made ahead of time and reheated gently, making it an excellent choice for meal prep.
Puré De Calabaza

Puré De Calabaza, or pumpkin puree, is a beloved side dish in Argentinian cuisine that’s both comforting and nutritious. This creamy dish isn’t only a great accompaniment to various meats but also serves as a delightful addition to any meal, offering a subtle sweetness and rich texture. Made primarily from roasted pumpkin, this dish is simple to prepare and showcases the vibrant flavors of seasonal produce.
To make a perfect Puré De Calabaza, selecting the right pumpkin is key. Look for a sugar pumpkin or butternut squash, as these varieties are sweeter and have a smoother texture when pureed. The key to achieving the perfect consistency lies in roasting the pumpkin to enhance its natural sweetness and deepen its flavor. Once prepared, this dish can be seasoned in a variety of ways, allowing it to complement any main course beautifully.
Ingredients (Serves 4-6):
- 2 lbs pumpkin (sugar pumpkin or butternut squash)
- 2 tablespoons olive oil
- 1 teaspoon salt
- ½ teaspoon black pepper
- ½ teaspoon ground nutmeg (optional)
- ½ cup heavy cream or milk (for a lighter version)
- Fresh parsley or cilantro for garnish (optional)
Cooking Instructions:
- Prepare the Pumpkin: Begin by preheating your oven to 400°F (200°C). Cut the pumpkin in half, scoop out the seeds and stringy insides, and then cut it into smaller wedges. This will help the pumpkin cook more evenly and quickly.
- Roast the Pumpkin: Place the pumpkin wedges on a baking sheet. Drizzle with olive oil and sprinkle with salt and black pepper. Toss the wedges to make certain they’re well coated. Roast in the preheated oven for about 25-30 minutes, or until the pumpkin is tender and easily pierced with a fork.
- Cool and Scoop: Once the pumpkin is roasted, remove it from the oven and let it cool for a few minutes. Then, using a spoon, scoop the flesh away from the skin and transfer it to a mixing bowl.
- Blend the Mixture: Using a potato masher or a food processor, puree the pumpkin until smooth. If you prefer a creamier consistency, gradually add in the heavy cream or milk while blending until you reach your desired texture.
- Season the Puré: Add the ground nutmeg if using, and adjust the seasoning with additional salt and black pepper to taste. Mix well until all ingredients are fully incorporated.
- Serve: Transfer the puré to a serving dish. If desired, garnish with fresh parsley or cilantro for a pop of color and added flavor.
Extra Tips:
When making Puré De Calabaza, feel free to experiment with flavors by adding garlic, onion, or even a touch of cinnamon for a unique twist.
If you want to make the dish ahead of time, it can be stored in the refrigerator for up to three days. Just reheat gently before serving. For a vegan option, substitute the heavy cream or milk with a plant-based alternative like coconut milk or almond milk.
Enjoy this delightful Argentinian side dish with your favorite proteins for a comforting meal!
Zanahorias Glaseadas
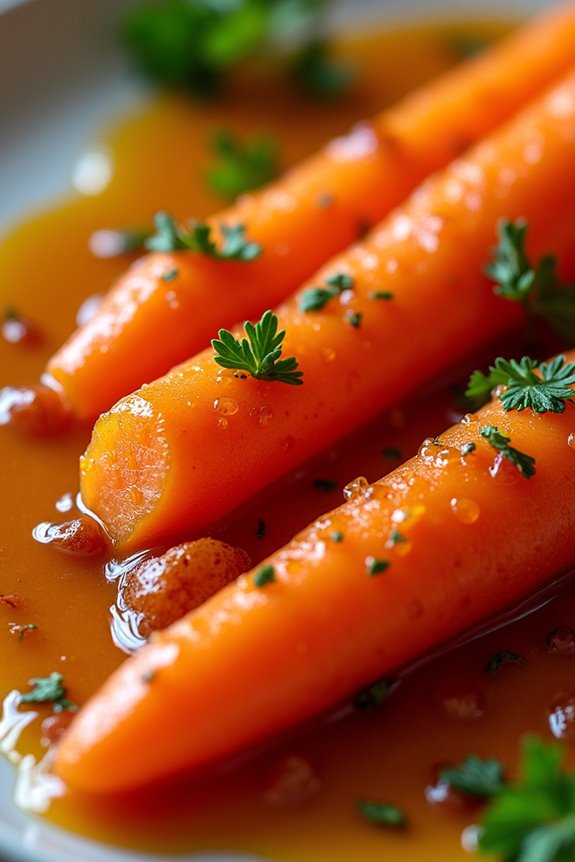
Zanahorias Glaseadas, or Glazed Carrots, is a delightful Argentinian side dish that brings a touch of sweetness and vibrancy to any meal. This dish features tender carrots glazed in a buttery, sweet sauce that enhances their natural flavor. The combination of sugar, butter, and a hint of seasoning allows the carrots to shine, making them a perfect accompaniment to grilled meats, roasted chicken, or as part of a festive spread.
The preparation for Zanahorias Glaseadas is simple and quick, making it an ideal choice for both everyday dinners and special occasions. With just a handful of ingredients, you can transform ordinary carrots into a delicious and visually appealing dish that will impress your family and friends. Whether you’re looking to add more vegetables to your meals or just want to enjoy a sweet treat, this recipe is sure to be a hit.
Ingredients (serves 4-6):
- 1 pound of carrots, peeled and cut into uniform sticks
- 2 tablespoons unsalted butter
- 2 tablespoons brown sugar
- 1 tablespoon honey
- ½ teaspoon salt
- ¼ teaspoon ground cinnamon (optional)
- Fresh parsley, chopped (for garnish)
Cooking Instructions:
- Prepare the Carrots: Start by peeling the carrots and cutting them into uniform sticks, about 2-3 inches long. This guarantees they cook evenly. You can also slice them into rounds if preferred. Rinse the carrot sticks under cold water to remove any dirt and set them aside.
- Blanch the Carrots: In a large pot, bring salted water to a boil. Add the carrot sticks and blanch them for about 3-5 minutes until they’re slightly tender but still crisp. This step helps to reduce cooking time and guarantees the carrots maintain a bright color. Once done, drain the carrots and set them aside.
- Make the Glaze: In a large skillet over medium heat, melt the butter. Once melted, add the brown sugar, honey, and salt. Stir the mixture together until it starts to bubble and the sugar has dissolved, creating a sweet glaze. If using, add the ground cinnamon for an extra layer of flavor.
- Glaze the Carrots: Add the blanched carrot sticks to the skillet with the glaze. Toss the carrots in the glaze to coat them evenly. Continue to cook for about 5-7 minutes, stirring occasionally, until the carrots are tender and the glaze has thickened slightly.
- Serve: Once the carrots are done, remove them from the heat. Transfer the glazed carrots to a serving dish and garnish with freshly chopped parsley. Serve warm and enjoy the delicious flavors!
Extra Tips:
For an even more vibrant flavor, consider adding a splash of orange juice or zest to the glaze, which complements the sweetness of the carrots beautifully. You can also experiment with different spices, like nutmeg or ginger, for a unique twist.
If you prefer a healthier version, reduce the amount of sugar and honey or substitute with maple syrup. Remember, the key to perfect Zanahorias Glaseadas is to ascertain the carrots remain slightly crunchy, so be mindful not to overcook them!
Ensalada De Remolacha
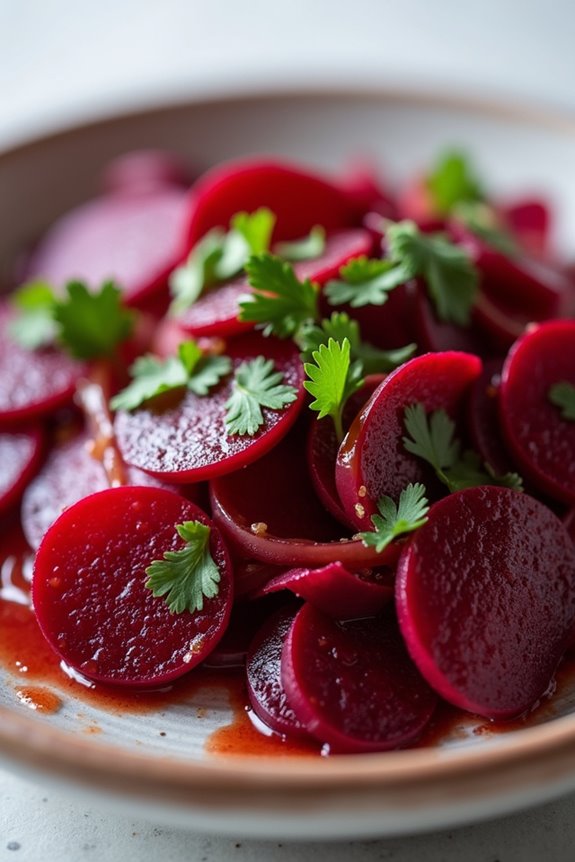
Ensalada de Remolacha, or Beet Salad, is a vibrant and nutritious Argentinian side dish that’s both simple and elegant. This dish combines the earthy sweetness of beets with a revitalizing dressing, making it a perfect accompaniment to various main courses or a delightful stand-alone salad. The bright colors and delicious flavors not only please the palate but also add a beautiful presentation to your dining table.
This salad is a traditional favorite in Argentina, often served at family gatherings and festive occasions. The beets can be prepared ahead of time, allowing the flavors to meld together beautifully. Whether you enjoy it chilled or at room temperature, Ensalada de Remolacha is a versatile dish that embodies the spirit of Argentinian cuisine.
Ingredients (Serves 4-6):
- 4 medium-sized beets
- 1 medium onion (thinly sliced)
- 2 tablespoons olive oil
- 1 tablespoon red wine vinegar
- Salt and pepper to taste
- Fresh parsley (for garnish)
Cooking Instructions:
- Prepare the Beets: Start by washing the beets thoroughly to remove any dirt. You can leave the skin on while cooking to retain their natural sweetness. Place the beets in a large pot, cover them with water, and bring to a boil. Reduce the heat and let them simmer for about 30-40 minutes, or until they’re tender when pierced with a fork.
- Cool and Peel the Beets: Once the beets are cooked, remove them from the pot and place them in a bowl of ice water or run cold water over them. This will help cool them down quickly and make the skins easier to peel. After a few minutes, gently rub the skins off the beets with your fingers.
- Slice the Beets: After peeling, slice the beets into thin rounds or wedges, depending on your preference. Aim for uniform thickness to guarantee even distribution in the salad.
- Prepare the Dressing: In a small bowl, whisk together the olive oil, red wine vinegar, salt, and pepper. Adjust the seasoning to taste, maintaining a perfect balance between acidity and richness.
- Combine Ingredients: In a large mixing bowl, add the sliced beets and the thinly sliced onion. Pour the dressing over the beets and onions, gently tossing to combine all the flavors without breaking the beets.
- Garnish and Serve: Once combined, transfer the salad to a serving dish. Garnish with freshly chopped parsley for a pop of color and freshness. You can serve it immediately or let it chill in the refrigerator for about 30 minutes to enhance the flavors.
Extra Tips:
For an extra layer of flavor, consider adding crumbled feta cheese or toasted walnuts to the salad. Both ingredients complement the sweetness of the beets beautifully.
If you’re short on time, you can use pre-cooked beets available in most grocery stores. Finally, don’t hesitate to experiment with the dressing by adding a touch of mustard or honey for a different taste profile!
Humita En Chala

Humita En Chala is a traditional Argentinian dish that showcases the delightful flavors of fresh corn, cheese, and aromatic herbs, all wrapped in corn husks and steamed to perfection. This dish is a staple in many Argentine households and is often enjoyed as a side dish or a main course. The sweet and savory filling combined with the unique texture of the corn husks creates a culinary experience that’s both comforting and satisfying.
Preparing Humita En Chala may take a little time, but the process is rewarding and the end result is a delicious treat that can bring a taste of Argentina into your home. The key to making a great Humita En Chala lies in using fresh ingredients, especially sweet corn, which adds a natural sweetness and enhances the overall flavor of the dish.
Whether you’re hosting a gathering or simply looking to try something new, this dish is sure to impress.
Ingredients (Serves 4-6):
- 6 large ears of fresh corn
- 1 cup of milk
- 1 cup of fresh cheese (such as ricotta or queso fresco)
- 1/2 cup of grated Parmesan cheese
- 1/2 cup of diced onion
- 2 tablespoons of butter
- 2 tablespoons of cornmeal
- 1 teaspoon of baking powder
- 1 teaspoon of salt
- 1/2 teaspoon of black pepper
- 1/4 cup of fresh basil or cilantro, chopped
- Dried corn husks (soaked in water for at least 30 minutes)
Cooking Instructions:
- Prepare the Corn: Start by shucking the corn and removing the kernels from the cob. You can use a sharp knife to cut the kernels off. Reserve a few husks for wrapping later. Place the kernels in a blender or food processor and blend until you have a coarse puree. This will form the base of your filling.
- Cook the Onions: In a skillet, melt the butter over medium heat. Add the diced onion and sauté until they become translucent and fragrant, which should take about 5 minutes. This step adds a depth of flavor to the filling.
- Mix the Filling: In a large bowl, combine the corn puree, sautéed onions, milk, fresh cheese, grated Parmesan, cornmeal, baking powder, salt, black pepper, and chopped herbs. Stir until all ingredients are well combined. The mixture should have a thick, creamy consistency.
- Prepare the Corn Husks: Take the soaked corn husks and carefully pat them dry with a clean kitchen towel. Lay out the husks flat on a working surface. You’ll need about 12-15 husks for wrapping the humitas.
- Assemble the Humitas: Take a husk and place about 2-3 tablespoons of the filling in the center. Fold the sides of the husk over the filling, then fold the bottom up to create a pouch. Repeat this process until all the filling is used up.
- Steam the Humitas: Place the wrapped humitas upright in a steamer basket. If you don’t have a steamer, you can use a large pot with a lid, placing a rack or a heatproof plate at the bottom. Add water to the pot (but not touching the humitas) and bring it to a boil. Cover and steam for about 30-40 minutes, or until the humitas are firm and cooked through.
- Serve and Enjoy: Once done, carefully remove the humitas from the steamer. Let them cool for a few minutes before unwrapping. Serve warm, optionally drizzled with additional melted butter or topped with more cheese.
Extra Tips:
When making Humita En Chala, it’s important to use fresh, sweet corn for the best flavor. If fresh corn isn’t available, you can use frozen corn, but be sure to thaw and drain it well before blending.
Additionally, feel free to experiment with herbs and spices in the filling to suit your taste. For a spicier kick, consider adding a pinch of chili powder or some diced jalapeños. Enjoy your culinary journey into Argentinian cuisine!
Elote Con Limón Y Queso
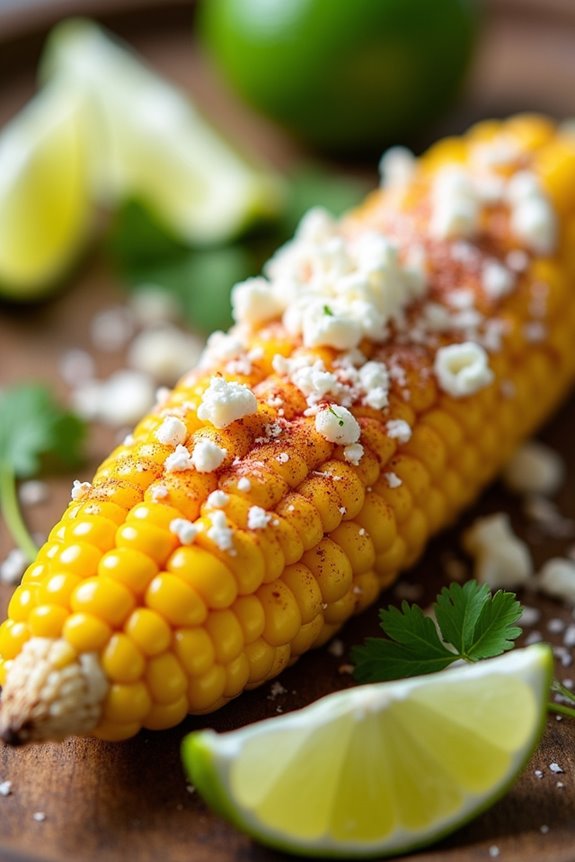
Elote Con Limón Y Queso is a delightful Mexican street food dish that has made its way into the hearts and kitchens of many, including those in Argentina. This dish features grilled corn on the cob slathered with a tangy lime juice and topped with crumbled cheese, making it a perfect side dish that pairs well with a variety of main courses.
The contrast of the sweet corn with the zesty lime and savory cheese creates a flavor explosion that’s both invigorating and satisfying.
Making Elote Con Limón Y Queso isn’t only simple but also allows for a bit of creativity. You can adjust the amount of lime juice and cheese according to your taste preferences. This dish is perfect for summer barbecues or as a side for family dinners, and it’s sure to impress your guests with its vibrant flavors and beautiful presentation.
Ingredients (Serves 4-6)
- 4-6 ears of corn, husked
- 1/2 cup crumbled queso fresco or cotija cheese
- 1/4 cup mayonnaise
- 2 tablespoons lime juice (freshly squeezed)
- 1 teaspoon chili powder (optional)
- Salt to taste
- Fresh lime wedges for serving
- Fresh cilantro (optional, for garnish)
Cooking Instructions
- Prepare the Corn: Start by husking the corn and removing all the silk strands. Rinse the corn under cold water to clean it, and then pat it dry with a paper towel.
- Preheat the Grill: Light your grill and preheat it to medium-high heat. If you’re using a grill pan on the stove, heat it until hot. This step is essential to achieve that perfect char on the corn.
- Grill the Corn: Once the grill is ready, place the corn directly on the grill grates. Cook for about 10-15 minutes, turning occasionally until the corn kernels are tender and have nice grill marks. The corn should be slightly charred for added flavor.
- Prepare the Sauce: While the corn is grilling, combine the mayonnaise, lime juice, and a pinch of salt in a small bowl. Mix well until smooth. If you like a bit of heat, you can add chili powder into the mixture or sprinkle it on top later.
- Coat the Corn: Once the corn is done grilling, remove it from the heat. Using a brush or a spoon, generously coat each ear of corn with the lime-mayo mixture. Make sure to cover all sides for a full flavor experience.
- Add Cheese and Serve: Immediately sprinkle the crumbled queso fresco or cotija cheese over the coated corn while it’s still warm. Add extra chili powder if desired. Serve with lime wedges and fresh cilantro for garnish.
Extra Tips
For an added twist, consider grilling the corn in the husk for a smokier flavor. If you can’t find queso fresco or cotija cheese, feta cheese is a great substitute.
Also, don’t be afraid to customize your Elote Con Limón Y Queso by adding toppings like chopped jalapeños or a drizzle of hot sauce for an extra kick. Enjoy this dish fresh off the grill for the best taste!
Gratinado De Berenjenas

Gratinado De Berenjenas, or Eggplant Gratin, is a classic Argentinian side dish that beautifully combines the earthy flavors of eggplant with a creamy, cheesy topping. This dish is perfect for any meal, whether as a complement to grilled meats or as a stand-alone vegetarian option. The layers of tender eggplant, rich sauce, and bubbling cheese create a delightful contrast in textures and flavors that’s bound to impress.
Making Gratinado De Berenjenas is both simple and rewarding. The key to achieving the perfect consistency is to guarantee the eggplant is properly salted and allowed to drain before cooking. This will remove excess moisture and bitterness, resulting in a deliciously creamy dish. With the right ingredients and a bit of patience, you can create a stunning and flavorful addition to your dining table.
Ingredients (serves 4-6):
- 2 large eggplants
- 1 teaspoon salt
- 2 tablespoons olive oil
- 1 medium onion, chopped
- 2 cloves garlic, minced
- 2 cups crushed tomatoes
- 1 teaspoon dried oregano
- 1 teaspoon black pepper
- 1 cup heavy cream
- 1 cup grated Parmesan cheese
- 1 cup shredded mozzarella cheese
- Fresh basil leaves for garnish (optional)
Cooking Instructions:
- Prepare the Eggplants: Slice the eggplants into ½-inch thick rounds. Sprinkle both sides with salt and place them in a colander. Allow them to drain for about 30 minutes to remove excess moisture and bitterness. Rinse the slices under cold water and pat them dry with paper towels.
- Cook the Onions and Garlic: In a large skillet, heat the olive oil over medium heat. Add the chopped onion and sauté until it becomes translucent, about 5 minutes. Then add the minced garlic and sauté for an additional minute until fragrant.
- Add the Tomatoes and Seasonings: Stir in the crushed tomatoes, oregano, and black pepper. Bring the mixture to a simmer and let it cook for about 10-15 minutes, allowing the flavors to meld together. Remove from heat and set aside.
- Cook the Eggplant: In the same skillet, add a little more olive oil if needed and cook the eggplant slices in batches until they’re golden brown on both sides, about 3-4 minutes per side. Remove from the skillet and set aside.
- Assemble the Gratin: Preheat the oven to 375°F (190°C). In a greased baking dish, layer half of the cooked eggplant slices at the bottom. Spread half of the tomato mixture over the eggplant, followed by half of the heavy cream. Then sprinkle half of the Parmesan and mozzarella cheeses over the top. Repeat the layering process with the remaining ingredients.
- Bake the Gratin: Cover the baking dish with aluminum foil and bake in the preheated oven for 25 minutes. After this time, remove the foil and bake for an additional 15-20 minutes, or until the top is golden brown and bubbly.
- Garnish and Serve: Once baked, remove from the oven and let it cool for a few minutes. Garnish with fresh basil leaves if desired, then slice and serve warm.
Extra Tips:
When preparing Gratinado De Berenjenas, be sure to let the dish rest for a few minutes after baking. This will help it set and make serving easier.
You can also experiment with different cheeses, such as Gruyère or Gouda, for added flavor. If you prefer a spicier kick, consider adding red pepper flakes to the tomato sauce.
This dish can be made ahead of time and reheated, making it a convenient option for gatherings or meal prepping. Enjoy this delightful Argentinian side dish with your favorite main courses!
Ensalada De Frutas

Ensalada De Frutas, or fruit salad, is a popular side dish in Argentina that reflects the country’s vibrant agricultural bounty. This invigorating dish brings together a colorful medley of seasonal fruits, often dressed in a light and sweet syrup or simply served with a splash of citrus juice.
It isn’t only a delightful accompaniment to any meal but also a wholesome dessert option that can be enjoyed at any time of the day. With its bright flavors and appealing presentation, Ensalada De Frutas is a staple at family gatherings and festive occasions in Argentina.
Preparing this fruit salad is as easy as it’s delicious. The key to a great Ensalada De Frutas lies in the selection of fresh, ripe fruits and the balance of flavors. This recipe is designed for a serving size of 4-6 people, making it perfect for a family meal or a small gathering.
Whether served as a side dish or a dessert, this salad provides a healthy and satisfying way to enjoy nature’s sweet treats.
Ingredients
- 2 apples, diced
- 2 pears, diced
- 1 cup grapes, halved
- 1 banana, sliced
- 1 orange, segmented
- 1 cup strawberries, halved
- 2 tablespoons honey
- 1 tablespoon lemon juice
- Fresh mint leaves for garnish
Cooking Instructions
1. Prepare the Fruits: Start by washing all the fruits thoroughly under running water. Peel the apples and pears if desired, then dice them into bite-sized pieces.
Halve the grapes and strawberries, slice the banana, and segment the orange, affirming that all pieces are similar in size for even distribution in the salad.
2. Mix the Fruits: In a large mixing bowl, combine all the prepared fruits: apples, pears, grapes, banana, orange, and strawberries.
Gently toss the fruits together to mix them evenly without mashing any of the softer fruits, such as bananas or strawberries.
3. Make the Dressing: In a small bowl, whisk together the honey and lemon juice until well combined. This dressing adds a touch of sweetness and brightness to the salad.
If you prefer a less sweet option, you can reduce the amount of honey or substitute it with agave syrup or a splash of orange juice.
4. Dress the Salad: Pour the honey-lemon dressing over the mixed fruits in the large bowl. Gently toss the salad again to guarantee that all the fruits are coated with the dressing.
Be careful not to overmix, as this can make the fruits mushy.
5. Chill and Serve: For the best flavor, allow the salad to chill in the refrigerator for at least 30 minutes before serving. This helps to meld the flavors together.
When ready to serve, garnish the salad with fresh mint leaves for a pop of color and added freshness.
Extra Tips
For a delightful twist, consider adding other fruits such as kiwi, mango, or pineapple depending on the season and personal preference.
You can also enhance the flavor by incorporating a sprinkle of cinnamon or a splash of coconut milk for a tropical flair. Adjust the sweetness of the dressing based on your taste and the natural sweetness of the fruits used.
Enjoy your Ensalada De Frutas as an invigorating treat on warm days or as a light dessert option after a hearty meal!