

Exploring the world of South American cookies is like discovering hidden gems of flavor and texture. Each recipe, from the buttery Alfajores de Dulce de Leche to the crumbly Polvorones, offers a satisfying crunch that keeps you coming back for more. These cookies capture the vibrant essence of South American culture while offering a sweet escape for every cookie lover. Join me as we explore these delicious recipes that promise to delight your taste buds.
Alfajores De Dulce De Leche
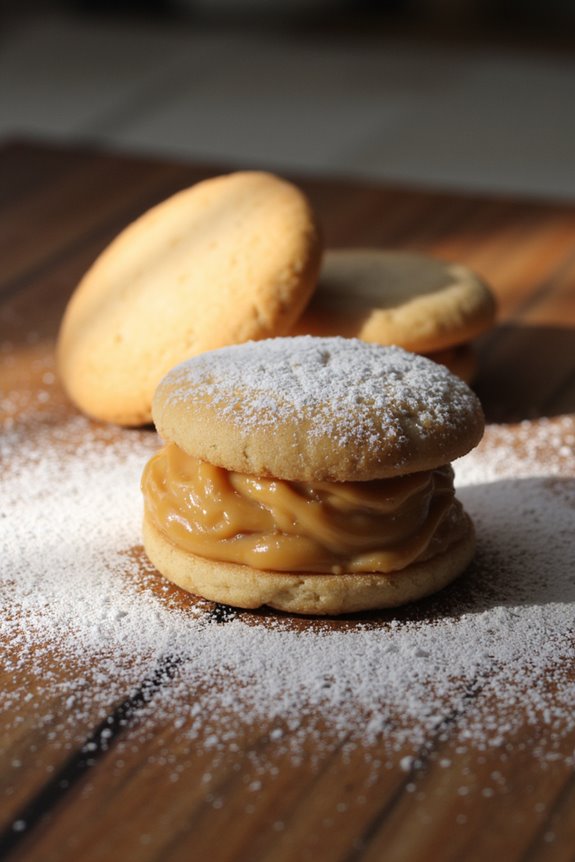
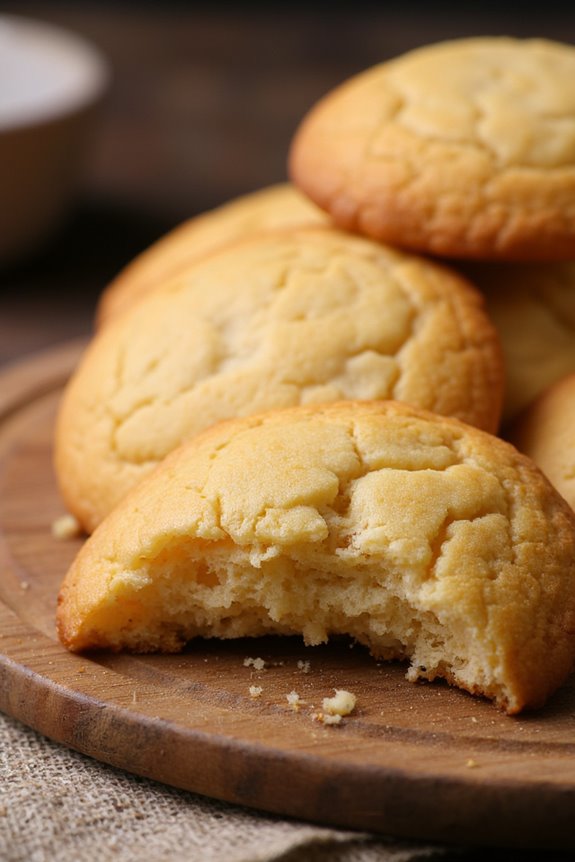
Alfajores de dulce de leche are a beloved treat across South America, especially in Argentina and Peru. These delicious cookies consist of two delicate, crumbly layers that are typically filled with rich and creamy dulce de leche, then dusted with powdered sugar or coated in chocolate. Their melt-in-your-mouth texture and delightful sweetness make them a favorite for dessert or as an afternoon snack with coffee or tea.
Making alfajores at home is a rewarding experience, allowing you to customize the flavors and fillings to suit your taste.
The history of alfajores dates back to the Moorish influence in Spain and has evolved into a cherished Latin American delicacy. Each region has its own twist on the classic recipe, but the essence remains the same: a tender cookie that perfectly complements the luscious caramel filling.
Whether you’re making these for a special occasion or simply to treat yourself, alfajores de dulce de leche are sure to impress friends and family alike.
Ingredients (serving size: 4-6 people)
- 1 cup unsalted butter, softened
- 1 cup powdered sugar
- 2 large egg yolks
- 1 teaspoon vanilla extract
- 2 cups all-purpose flour
- 1 cup cornstarch
- 1 teaspoon baking powder
- 1 cup dulce de leche
- Powdered sugar, for dusting
- Optional: chocolate for coating
Cooking Instructions
- Prepare the Dough: In a large mixing bowl, cream together the softened butter and powdered sugar until light and fluffy. This will incorporate air into the mixture, giving the cookies a delicate texture. Add the egg yolks and vanilla extract, mixing until well combined.
- Mix Dry Ingredients: In a separate bowl, whisk together the all-purpose flour, cornstarch, and baking powder. Gradually add this dry mixture to the wet ingredients, stirring until a smooth dough forms. Be cautious not to overmix, as this can result in tough cookies.
- Chill the Dough: Wrap the dough in plastic wrap and refrigerate for at least one hour. Chilling the dough helps to firm it up, making it easier to roll out and cut into shapes.
- Shape the Cookies: Preheat your oven to 350°F (175°C). On a floured surface, roll out the chilled dough to about 1/4 inch thick. Use a round cookie cutter (about 2 inches in diameter) to cut out circles of dough. Place the rounds on a parchment-lined baking sheet, leaving some space between them.
- Bake: Bake the cookies in the preheated oven for 10-12 minutes, or until the edges are slightly golden. Avoid overbaking; the cookies should remain soft and tender. Remove them from the oven and let them cool on the baking sheet for a few minutes before transferring to a wire rack to cool completely.
- Fill with Dulce de Leche: Once the cookies are completely cool, spread a generous layer of dulce de leche on the bottom of one cookie and sandwich it with another cookie on top. Press gently to secure them together.
- Dust with Powdered Sugar: Finally, dust the filled alfajores with powdered sugar just before serving. If desired, you can also dip them in melted chocolate for an extra indulgent treat.
Extra Tips
When making alfajores, verify that your butter is at room temperature for easy mixing. If you’d like to experiment with flavors, consider adding a hint of lemon zest or using flavored extracts like almond for a unique twist.
If you prefer a less sweet option, reduce the amount of powdered sugar in the dough or use a dark chocolate coating. Store the cookies in an airtight container to maintain their freshness, and enjoy them within a week for the best taste.
Polvorones
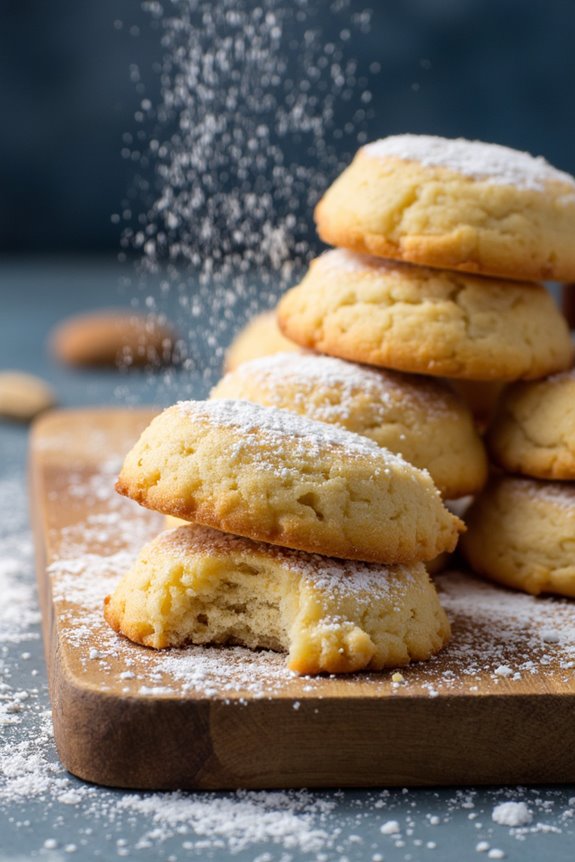
Polvorones are traditional South American cookies that are famous for their crumbly texture and rich flavor. These delightful treats are often enjoyed during festive occasions, especially in countries like Mexico and Spain, where they hold a special place in holiday celebrations.
Made from simple ingredients like flour, sugar, and nuts, polvorones are incredibly easy to prepare, making them a favorite among both novice and experienced bakers. Their melt-in-the-mouth quality is certain to impress family and friends, making them perfect for sharing.
The name “polvorones” translates to “powdery” in Spanish, which perfectly describes the texture of these cookies. The use of lard or butter gives them a rich taste, while the addition of nuts adds a delightful crunch. Dusting them with powdered sugar before serving not only enhances their appearance but also adds a touch of sweetness to each bite.
Whether served with tea or coffee, polvorones are a treat that brings warmth and joy to any gathering.
Ingredients (serving size: 4-6 people)
- 2 cups all-purpose flour
- 1 cup unsalted butter, softened
- 1 cup powdered sugar, plus extra for dusting
- 1 cup ground almonds or walnuts
- 1 teaspoon vanilla extract
- 1/4 teaspoon salt
- Optional: 1/2 teaspoon cinnamon for added flavor
Cooking Instructions
- Preheat the Oven: Begin by preheating your oven to 350°F (175°C). This step is essential to guarantee that your cookies bake evenly and develop that perfect crumbly texture.
- Toast the Flour: In a large skillet, toast the all-purpose flour over medium heat for about 5-7 minutes, stirring frequently. The flour should turn a light golden color and develop a nutty aroma. This step enhances the flavor of the cookies.
- Mix the Ingredients: In a mixing bowl, combine the toasted flour, softened butter, powdered sugar, ground almonds (or walnuts), vanilla extract, and salt. If you’re using cinnamon, add it at this stage. Mix everything together until a dough begins to form. You can use a hand mixer or your hands to incorporate the ingredients well.
- Shape the Cookies: Once the dough is well combined, take small portions and roll them into balls or shape them into discs, about 1 inch thick. Place them on a parchment-lined baking sheet, making sure to leave some space between each cookie as they’ll spread slightly while baking.
- Bake: Place the baking sheet in the preheated oven and bake for about 15-20 minutes, or until the edges are lightly golden. Keep an eye on them to prevent over-baking, as they can quickly go from perfect to too brown.
- Cool and Dust: Once baked, remove the cookies from the oven and allow them to cool on the baking sheet for a few minutes. After cooling, dust them generously with powdered sugar before transferring them to a serving plate.
Extra Tips
For the best results, try to use high-quality butter as it greatly affects the flavor of the cookies. If you want to experiment, consider adding citrus zest or using different types of nuts to create your own unique twist on the classic polvorones.
Store the cookies in an airtight container to maintain their freshness and crumbly texture for up to a week. Enjoy these delightful cookies with a cup of coffee or tea for a truly indulgent experience!
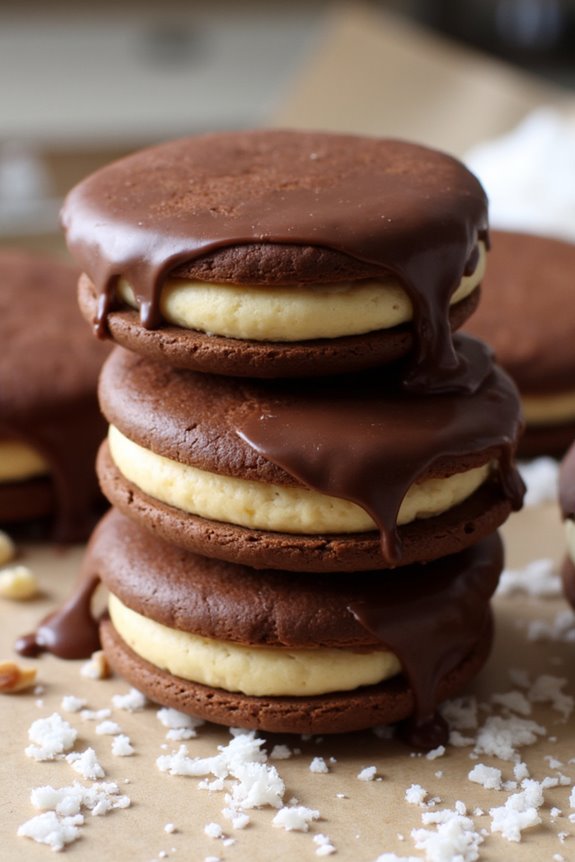
Chocotorta Cookies
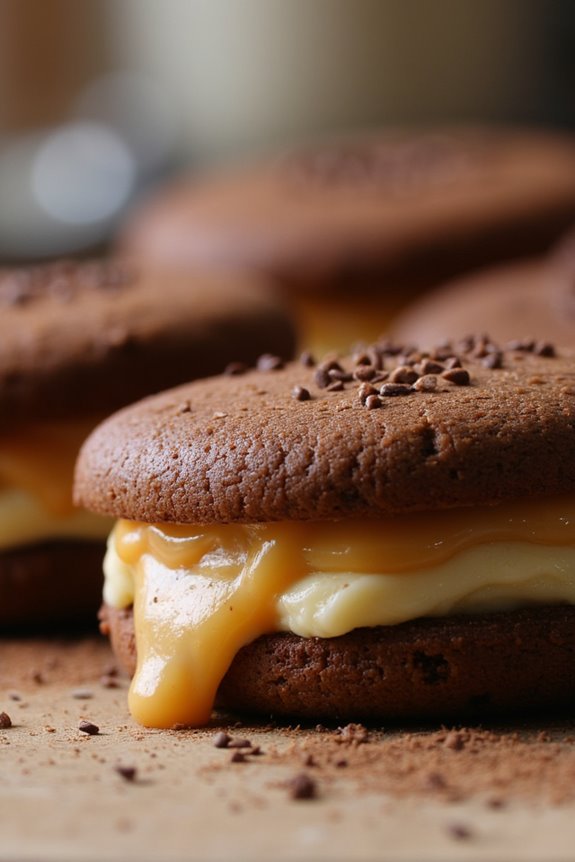
Chocotorta cookies are a delightful twist on the classic Argentine dessert known as Chocotorta, which typically features layers of chocolate cookies, dulce de leche, and cream cheese.
These cookies bring that same beloved flavor profile into a portable, bite-sized treat that’s perfect for sharing at gatherings or enjoying with a cup of coffee. With the rich, creamy filling sandwiched between chocolatey goodness, these cookies are certain to be a hit with anyone who tries them.
Making Chocotorta cookies is a straightforward process that requires minimal baking skills. The recipe combines simple ingredients to create a delicious treat where every bite captures the essence of the original dessert.
Whether you’re looking to impress guests or satisfy your own sweet tooth, these cookies are an excellent choice that pays homage to a cherished South American classic.
Ingredients (Serves 4-6 people)
- 1 cup all-purpose flour
- 1/2 cup cocoa powder
- 1/2 teaspoon baking powder
- 1/4 teaspoon salt
- 1/2 cup unsalted butter, softened
- 1 cup granulated sugar
- 1 large egg
- 1 teaspoon vanilla extract
- 1 cup dulce de leche
- 1 cup cream cheese, softened
- 1/4 cup powdered sugar
- Chocolate sprinkles (for decoration)
Cooking Instructions
- Preheat the Oven: Start by preheating your oven to 350°F (175°C). This guarantees that the cookies bake evenly and have the right texture when they come out.
- Prepare Dry Ingredients: In a medium mixing bowl, whisk together the flour, cocoa powder, baking powder, and salt. This step is vital as it helps to evenly distribute the leavening agent and prevents clumps of cocoa powder in your cookies.
- Cream Butter and Sugar: In a large mixing bowl, beat the softened butter and granulated sugar together until the mixture is light and fluffy, about 2-3 minutes. This process incorporates air into the mixture, giving your cookies a soft texture.
- Add Egg and Vanilla: Next, add the egg and vanilla extract to the butter-sugar mixture, mixing until well combined. This adds moisture and flavor to the dough.
- Combine Wet and Dry Ingredients: Gradually add the dry ingredient mixture to the wet mixture, stirring until a soft dough forms. Be careful not to overmix, as this can lead to tough cookies.
- Shape Cookies: Using a tablespoon, scoop out portions of dough and roll them into balls. Place them on a baking sheet lined with parchment paper, spacing them about 2 inches apart.
- Bake the Cookies: Place the baking sheet in the preheated oven and bake for 10-12 minutes, or until the edges are set. The centers may look slightly underbaked, but they’ll firm up as they cool.
- Prepare the Filling: While the cookies are baking, prepare the filling by mixing the dulce de leche, cream cheese, and powdered sugar in a bowl until smooth. This creamy filling will be the heart of your cookies.
- Assemble the Cookies: Once the cookies have cooled completely, take one cookie and spread a generous amount of the dulce de leche mixture on the bottom side. Top with another cookie to create a sandwich. Repeat this process with the remaining cookies.
- Decorate: If desired, roll the edges of the filled cookies in chocolate sprinkles for an extra touch of sweetness and visual appeal.
Extra Tips
When making Chocotorta cookies, make sure your butter and cream cheese are at room temperature for easier mixing and a smoother filling.
If you prefer a less sweet filling, consider adjusting the amount of powdered sugar to taste. Additionally, these cookies can be made ahead of time and stored in an airtight container for up to a week, making them a convenient treat for any occasion!
Cocadas
Cocadas are a delightful South American treat that celebrate the rich flavors of coconut. Originating from various countries in Latin America, these sweet coconut confections come in many forms, but they all share a common base of shredded coconut combined with sugar and often enriched with milk or egg whites. The result is a chewy, sweet, and satisfying bite that can be enjoyed as a snack or dessert.
Cocadas can be baked or left as a no-bake treat, depending on your preference, making them versatile for any occasion. These delicious coconut cookies aren’t only easy to make but also a hit at gatherings and celebrations. Whether you serve them at a birthday party, holiday gathering, or just as a special treat for yourself, Cocadas are sure to leave a memorable impression.
With their simple ingredients and straightforward preparation, they’re perfect for both novice and experienced bakers alike. Get ready to indulge in the sweet, tropical flavors of Cocadas!
Ingredients (Serves 4-6 people):
- 2 cups shredded coconut (unsweetened)
- 1 cup sweetened condensed milk
- 2 large egg whites
- 1/2 cup granulated sugar
- 1 teaspoon vanilla extract
- 1/4 teaspoon salt
Cooking Instructions:
- Preheat the Oven: Begin by preheating your oven to 350°F (175°C). This step is essential as it guarantees that the cocadas bake evenly and develop a lovely golden color.
- Prepare the Baking Sheet: Line a baking sheet with parchment paper. This will prevent the cocadas from sticking and make it easier to remove them once they’re baked.
- Mix the Ingredients: In a large mixing bowl, combine the shredded coconut, sweetened condensed milk, egg whites, granulated sugar, vanilla extract, and salt. Stir the mixture well until all the ingredients are thoroughly combined. The mixture should be sticky, and the coconut should be evenly coated.
- Shape the Cocadas: Using your hands or a spoon, scoop out small portions of the mixture and form them into small mounds (about 1 tablespoon each) on the prepared baking sheet. Leave some space between each mound, as they’ll spread slightly while baking.
- Bake: Place the baking sheet in the preheated oven and bake for 15-20 minutes, or until the cocadas are golden brown on the edges. Keep an eye on them to prevent burning.
- Cool: Once baked, remove the cocadas from the oven and allow them to cool on the baking sheet for a few minutes. Then, transfer them to a wire rack to cool completely. This will help them set properly.
- Serve: Once cooled, the Cocadas are ready to be enjoyed! You can serve them plain or drizzle them with a little chocolate or caramel sauce for an extra touch.
Extra Tips:
For an added twist, consider incorporating nuts such as chopped almonds or walnuts into the mixture for added texture and flavor.
You can also experiment with different extracts, like coconut or almond, to enhance the taste. If you prefer chewier cocadas, bake them for a shorter time; for a crispier texture, allow them to bake a little longer.
Finally, storing leftover cocadas in an airtight container will keep them fresh for several days, making them a perfect treat to have on hand!
Galletas De Maíz
Galletas De Maíz, or corn cookies, are a delightful treat hailing from various regions in South America. Known for their slightly sweet flavor and crispy texture, these cookies are perfect for snacking or serving with coffee or tea. Made from simple ingredients, they capture the essence of traditional South American baking and are guaranteed to impress anyone who tries them.
Whether you’re hosting a gathering or simply indulging yourself, these cookies bring warmth and comfort with every bite.
These cookies aren’t only easy to prepare but also highlight the versatility of corn flour, which is a staple in many South American households. The unique flavor of the corn adds a distinctive twist to the cookie, making them a favorite among both kids and adults alike.
With a golden appearance and a light crunch, Galletas De Maíz are a must-try for anyone interested in exploring South American cuisine.
Ingredients (Serves 4-6 people):
- 2 cups corn flour (masa de maíz)
- 1 cup sugar
- 1/2 cup unsalted butter, softened
- 1 large egg
- 1 teaspoon baking powder
- 1 teaspoon vanilla extract
- A pinch of salt
- 1/4 cup milk (or more if needed)
Cooking Instructions:
- Preheat the Oven: Start by preheating your oven to 350°F (175°C). This guarantees that the cookies will bake evenly and achieve a golden color.
- Mix Dry Ingredients: In a large mixing bowl, combine the corn flour, sugar, baking powder, and salt. Whisk these dry ingredients together until they’re thoroughly blended. This step is essential to confirm the baking powder is evenly distributed throughout the mixture.
- Cream Butter and Sugar: In a separate bowl, cream the softened butter with the remaining sugar until the mixture is light and fluffy. This may take about 3-5 minutes. Creaming incorporates air into the butter, which helps give the cookies a lighter texture.
- Add Wet Ingredients: Beat in the egg and vanilla extract into the creamed butter mixture until fully combined. The egg helps bind the ingredients together, while the vanilla enhances the overall flavor of the cookies.
- Combine Mixtures: Gradually add the dry ingredients into the wet mixture, alternating with the milk. Stir gently until the dough comes together. You may need to adjust the amount of milk to achieve a soft but not sticky dough.
- Shape Cookies: Using your hands or a spoon, scoop out portions of the dough and shape them into small balls or flatten them slightly for a more traditional cookie shape. Place them on a baking sheet lined with parchment paper, leaving space between each cookie to allow for spreading.
- Bake: Bake the cookies in the preheated oven for 15-20 minutes, or until the edges are lightly golden. Keep an eye on them to avoid overbaking, as they can become too dry.
- Cool and Serve: Once baked, remove the cookies from the oven and let them cool on the baking sheet for a few minutes before transferring them to a wire rack to cool completely. Enjoy them warm or store them in an airtight container for later.
Extra Tips: For added flavor, consider incorporating ingredients such as grated coconut, chocolate chips, or nuts into the dough. If you prefer a softer cookie, reduce the baking time slightly.
Also, be sure to use fresh corn flour for the best flavor and texture. These cookies can also be enjoyed with a dusting of powdered sugar or a drizzle of honey for a touch of sweetness.
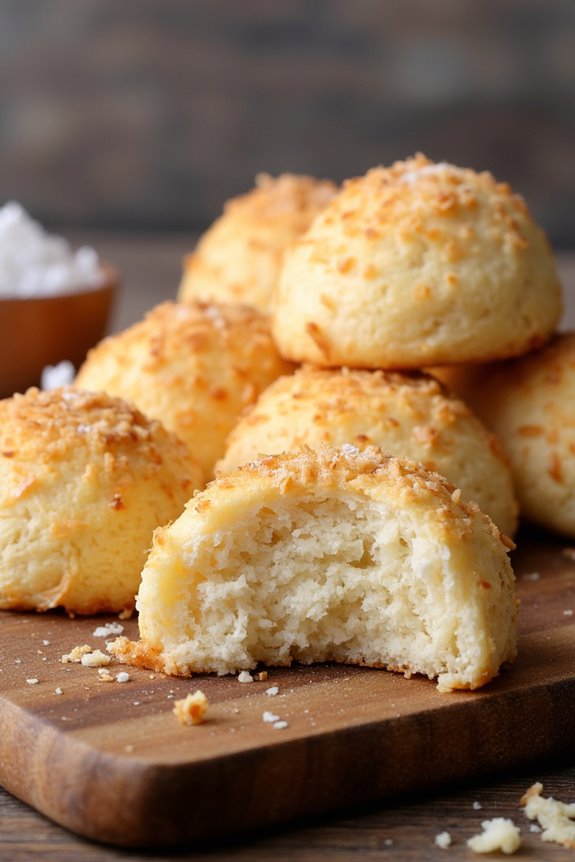
Pão De Queijo Cookies
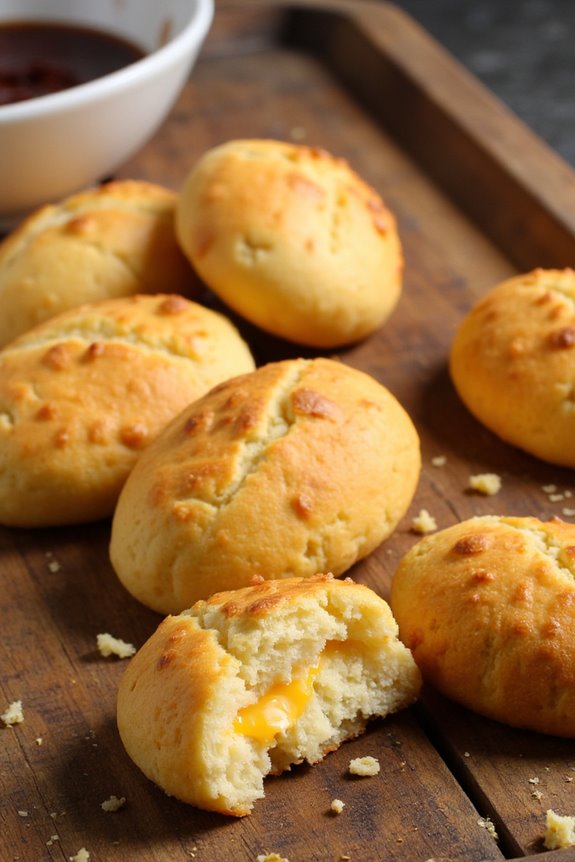
Pão De Queijo, or Brazilian cheese bread, is a beloved snack in Brazil, known for its chewy texture and cheesy flavor. These delightful treats are typically made with tapioca flour, which gives them their unique consistency. In this recipe, we’re transforming the classic Pão De Queijo into delightful cookies that maintain the essence of the traditional recipe while offering a fun twist for dessert.
With the addition of sweet elements, these cookies offer a perfect balance between savory and sweet, making them an excellent choice for any gathering. Incorporating cheese into cookies might sound unusual, but the result is a delightful snack that pairs wonderfully with coffee or tea. The cookies are easy to make and will have your friends and family craving more!
Whether you’re hosting a party or simply enjoying a cozy night at home, these Pão De Queijo Cookies will surely impress with their unique flavor and irresistible texture.
Ingredients (Serves 4-6)
- 1 cup tapioca flour
- 1/2 cup grated Parmesan cheese
- 1/2 cup shredded mozzarella cheese
- 1/4 cup unsalted butter, softened
- 1/4 cup granulated sugar
- 1 large egg
- 1 teaspoon vanilla extract
- 1/4 teaspoon salt
- 1 teaspoon baking powder
- 1/4 cup milk (or as needed)
Cooking Instructions
- Preheat the Oven: Begin by preheating your oven to 350°F (175°C). This guarantees that your cookies bake evenly and achieve the perfect golden color.
- Mix Dry Ingredients: In a mixing bowl, combine the tapioca flour, baking powder, and salt. Whisk these dry ingredients together until evenly mixed. This step is important as it helps to evenly distribute the leavening agent throughout the flour.
- Cream Butter and Sugar: In another bowl, beat the softened butter and granulated sugar together until the mixture is light and fluffy. This should take about 2-3 minutes. Creaming the butter and sugar helps to incorporate air into the dough, resulting in a lighter cookie.
- Add Cheese and Egg: Next, add the grated Parmesan cheese, shredded mozzarella cheese, egg, and vanilla extract to the butter-sugar mixture. Mix well until all ingredients are fully combined. The cheeses add a rich flavor and moisture to the cookies.
- Combine Dry and Wet Mixtures: Gradually add the dry ingredient mixture to the wet ingredients, mixing until just combined. If the dough appears too dry, add milk a tablespoon at a time until the dough is moist but not sticky.
- Shape the Cookies: Using a tablespoon or cookie scoop, portion out the dough and roll it into small balls. Place them on a parchment-lined baking sheet, spacing them about 2 inches apart. The cookies will spread while baking, so adequate spacing is essential.
- Bake: Place the baking sheet in the preheated oven and bake for 15-20 minutes, or until the cookies are lightly golden. Keep an eye on them, as baking times may vary depending on your oven.
- Cool and Serve: Once baked, remove the cookies from the oven and allow them to cool on the baking sheet for about 5 minutes. Then, transfer them to a wire rack to cool completely before serving.
Extra Tips
For an added twist, you can experiment with different types of cheese to create unique flavors. Cheddar or gouda can be great alternatives to try. Additionally, consider adding a sprinkle of herbs, like oregano or rosemary, to the dough for an extra flavor boost.
Finally, these cookies are best enjoyed fresh but can be stored in an airtight container for a few days. If they become too hard, a quick reheat in the microwave can bring back some softness. Enjoy your Pão De Queijo Cookies!
Alfajor De Chocolate
Alfajor de Chocolate is a delectable South American treat that brings together the richness of chocolate, the sweetness of dulce de leche, and the crumbly texture of traditional shortbread cookies. Originating from Spain and cherished throughout Latin America, these cookies have a unique charm that makes them perfect for any occasion.
Whether served at a festive gathering or enjoyed alongside a cup of coffee, alfajores are sure to satisfy your sweet tooth.
The beauty of alfajores lies in their versatility. While they’re often coated in powdered sugar or chocolate, this recipe focuses on the luscious chocolate coating that gives the cookies a decadent finish. The combination of the soft, melt-in-your-mouth cookie and the creamy dulce de leche filling creates an irresistible treat that’s hard to resist.
Get ready to indulge in this delightful South American confection!
Ingredients (serving size: 4-6 people)
- 1 cup unsalted butter, softened
- 1 cup granulated sugar
- 2 large eggs
- 2 teaspoons vanilla extract
- 2 cups all-purpose flour
- 1 cup cornstarch
- 1 teaspoon baking powder
- 1/2 teaspoon salt
- 1 cup dulce de leche
- 8 ounces dark chocolate, chopped
- 2 tablespoons coconut oil (optional, for chocolate coating)
Cooking Instructions
- Prepare the Dough: In a large mixing bowl, cream together the softened butter and granulated sugar until the mixture is light and fluffy. This will take about 3-5 minutes. Once well combined, add in the eggs and vanilla extract, mixing until fully incorporated.
- Combine Dry Ingredients: In a separate bowl, whisk together the all-purpose flour, cornstarch, baking powder, and salt. Gradually add the dry ingredient mixture to the wet ingredients, mixing until a soft dough forms. Be careful not to overmix.
- Chill the Dough: Divide the dough into two equal parts, flatten each into a disk, wrap in plastic wrap, and refrigerate for at least 30 minutes. Chilling the dough helps the cookies maintain their shape during baking.
- Roll and Cut: Preheat your oven to 350°F (175°C). On a lightly floured surface, roll out one disk of dough to about 1/4 inch thick. Use a round cookie cutter (about 2 inches in diameter) to cut out cookies. Place them on a baking sheet lined with parchment paper, spacing them about an inch apart.
- Bake the Cookies: Bake the cookies in the preheated oven for 10-12 minutes or until they’re lightly golden around the edges. Allow them to cool on the baking sheet for a few minutes before transferring them to a wire rack to cool completely.
- Assemble the Alfajores: Once the cookies are completely cooled, spread a generous amount of dulce de leche on the flat side of one cookie and top it with another cookie, creating a sandwich. Repeat with the remaining cookies.
- Prepare the Chocolate Coating: In a microwave-safe bowl, combine the chopped dark chocolate and coconut oil (if using). Heat in the microwave in 30-second intervals, stirring in between, until the chocolate is completely melted and smooth.
- Coat the Alfajores: Dip each assembled alfajor into the melted chocolate, ensuring they’re fully coated. Use a fork to lift them out, allowing any excess chocolate to drip off. Place the coated alfajores on a wire rack until the chocolate hardens.
Extra Tips
For an extra touch, you can sprinkle some crushed nuts or coconut flakes on top of the chocolate coating before it sets. Additionally, feel free to experiment with different flavors of fillings, such as fruit jams or flavored dulce de leche, to create your own unique twist on this classic treat.
Always store the alfajores in an airtight container to keep them fresh, as they can last up to a week!
Tequeños
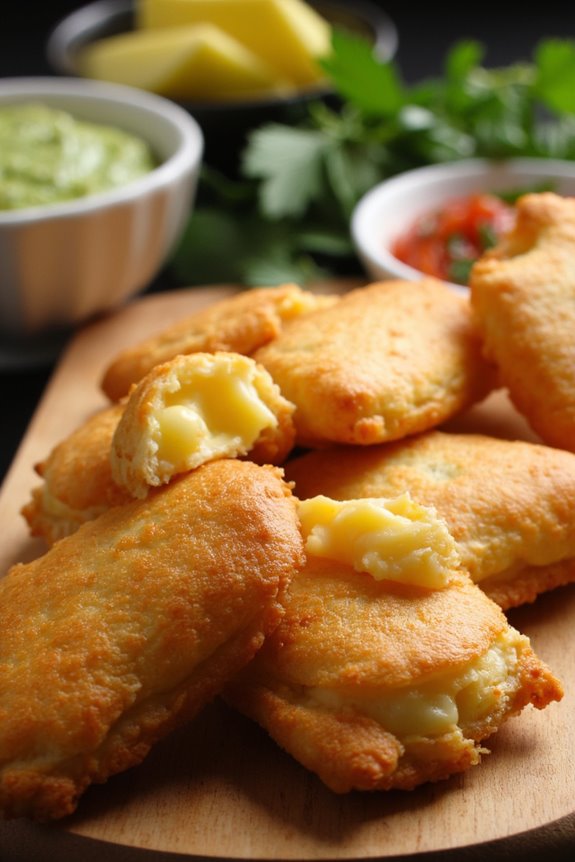
Tequeños are a beloved snack originating from Venezuela, characterized by their delightful combination of crispy dough and gooey cheese filling. Often enjoyed at parties and gatherings, these cheese sticks aren’t only easy to make but also incredibly satisfying. The key to achieving the perfect tequeños lies in the dough, which should be tender yet firm enough to hold the cheese without breaking during frying. This recipe will guide you through the process of making these tasty treats at home, allowing you to impress your family and friends with your culinary skills.
To create authentic tequeños, you’ll need a few basic ingredients that come together to form a delicious snack. While the traditional filling is made with white cheese, feel free to experiment with different types of cheese or even add herbs and spices to customize your tequeños to your liking. Perfect for dipping in guacamole, salsa, or even a spicy sauce, these tequeños are sure to be a hit at any gathering.
Ingredients (Servings: 4-6 people):
- 2 cups all-purpose flour
- 1 teaspoon baking powder
- 1/2 teaspoon salt
- 1 tablespoon sugar
- 1/4 cup unsalted butter, softened
- 1 large egg
- 1/4 cup cold water (as needed)
- 8 oz white cheese (such as queso blanco or mozzarella), cut into strips
- Oil for frying
Cooking Instructions:
- Prepare the Dough: In a large mixing bowl, combine the all-purpose flour, baking powder, salt, and sugar. Mix these dry ingredients well to guarantee they’re evenly distributed. Add the softened butter and use your fingers or a pastry cutter to work it into the flour until the mixture resembles coarse crumbs.
- Incorporate the Egg: Create a well in the center of the flour mixture and crack in the egg. Mix with a fork, gradually incorporating the flour from the sides of the well. The dough will start to come together; if it appears too dry, add cold water a tablespoon at a time until the dough is formed but not sticky.
- Knead the Dough: Transfer the dough to a lightly floured surface and knead it for about 5 minutes until it’s smooth and elastic. Wrap the dough in plastic wrap and let it rest for at least 30 minutes. This resting period allows the gluten to relax, making it easier to roll out.
- Roll Out the Dough: After resting, divide the dough into two portions. Roll out one portion on a floured surface to about 1/8-inch thickness. Using a sharp knife or pizza cutter, cut the dough into rectangles measuring about 3×5 inches.
- Fill the Tequeños: Place a strip of cheese at one end of each rectangle. Roll the dough around the cheese tightly, guaranteeing that the cheese is fully encased. Pinch the edges to seal and prevent the cheese from leaking out during frying. Repeat this process with the remaining dough and cheese.
- Fry the Tequeños: In a deep skillet or pot, heat oil over medium-high heat until it reaches 350°F (175°C). Carefully add the tequeños in batches, making sure not to overcrowd the pan. Fry for about 3-4 minutes or until they’re golden brown, turning occasionally for even cooking. Remove them with a slotted spoon and drain on paper towels.
- Serve: Serve the tequeños hot, accompanied by your favorite dipping sauces. Enjoy the crispy exterior and the warm, gooey cheese filling!
Extra Tips:
When making tequeños, confirm that the oil is at the right temperature before frying; if the oil is too cold, the tequeños will absorb excess oil and become greasy. Conversely, if the oil is too hot, they may brown too quickly on the outside while remaining uncooked inside.
For added flavor, consider mixing herbs or spices into the dough or experimenting with different cheese fillings. Additionally, tequeños can be frozen before frying; simply place them on a baking sheet until frozen solid, then transfer to a freezer bag for later use.
Galletas De Avena
Galletas De Avena, or Oatmeal Cookies, are a beloved treat across South America, cherished for their chewy texture and wholesome ingredients. These cookies aren’t only delicious but also versatile, allowing for the addition of various mix-ins like chocolate chips, nuts, or dried fruits. The combination of oats and a hint of cinnamon creates a comforting flavor that pairs perfectly with a cup of coffee or tea.
Whether enjoyed as a snack or dessert, these cookies are sure to please both kids and adults alike. Making Galletas De Avena is a straightforward process that anyone can master. With simple ingredients that are often found in most kitchens, you can whip up a batch quickly. These cookies are perfect for sharing at gatherings or simply enjoying at home. Let’s explore the recipe and discover how to create these delightful cookies.
Ingredients (Serves 4-6)
- 1 cup rolled oats
- 1 cup all-purpose flour
- 1/2 cup brown sugar
- 1/2 cup granulated sugar
- 1/2 cup unsalted butter, softened
- 1 large egg
- 1 teaspoon vanilla extract
- 1 teaspoon baking soda
- 1/2 teaspoon ground cinnamon
- 1/4 teaspoon salt
- Optional: 1/2 cup chocolate chips, nuts, or dried fruits
Cooking Instructions
1. Preheat the Oven: Begin by preheating your oven to 350°F (175°C). This guarantees that the cookies bake evenly and achieve a nice golden color.
2. Mix the Wet Ingredients: In a large mixing bowl, cream together the softened butter, brown sugar, and granulated sugar until light and fluffy. This process helps to incorporate air into the mixture, which will give your cookies a nice texture.
Then, add the egg and vanilla extract, mixing until fully combined.
3. Combine the Dry Ingredients: In a separate bowl, whisk together the rolled oats, all-purpose flour, baking soda, ground cinnamon, and salt. This step is important to evenly distribute the baking soda and spices throughout the flour.
4. Combine Wet and Dry Ingredients: Gradually add the dry mixture to the wet mixture, stirring until just combined. Be careful not to overmix, as this can result in tougher cookies.
If you’re adding chocolate chips, nuts, or dried fruits, fold them in at this stage.
5. Scoop the Dough: Using a tablespoon or cookie scoop, drop rounded portions of cookie dough onto a baking sheet lined with parchment paper. Leave some space between each cookie, as they’ll spread while baking.
6. Bake the Cookies: Place the baking sheet in the preheated oven and bake for 10-12 minutes, or until the edges are golden brown and the centers are set. Keep an eye on them to avoid overbaking.
7. Cool the Cookies: Once baked, remove the cookies from the oven and allow them to cool on the baking sheet for about 5 minutes.
Then, transfer them to a wire rack to cool completely.
Extra Tips
For added flavor and texture, consider toasting the oats in a dry skillet for a few minutes before using them in the recipe; this enhances their nutty flavor.
If you prefer chewier cookies, underbake them slightly and allow them to cool on the baking sheet, as they’ll continue to firm up.
Finally, feel free to experiment with different mix-ins like coconut flakes or chopped fruits to customize your Galletas De Avena!
Tres Leches Cookies
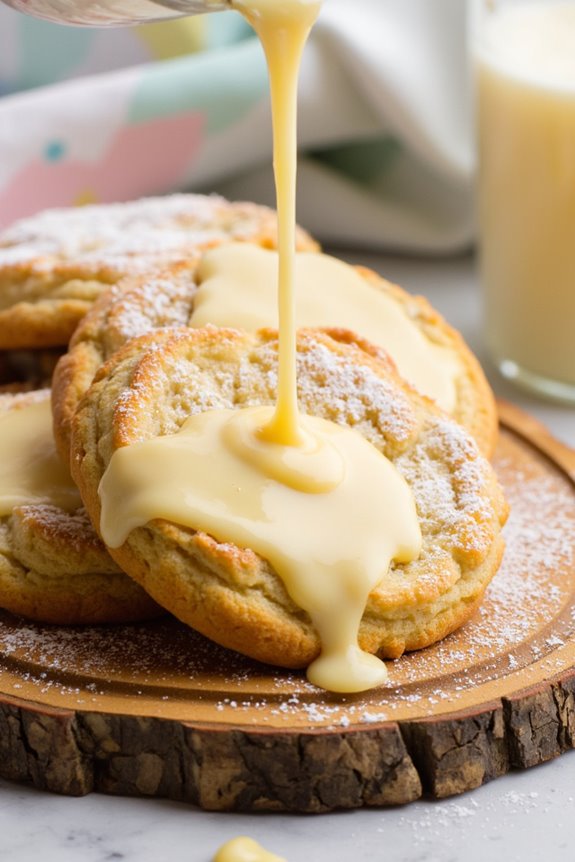
Tres Leches Cookies are a delightful twist on the traditional Tres Leches cake, which is a beloved dessert in many South American countries. These cookies capture the essence of the classic cake, combining a rich sponge-like texture with the sweetness of condensed milk, evaporated milk, and cream.
With their moist and creamy consistency, these cookies are an indulgent treat that pairs perfectly with a cup of coffee or tea. They’re ideal for gatherings, celebrations, or simply to satisfy your sweet tooth.
The beauty of Tres Leches Cookies lies not only in their flavor but also in their simplicity. They’re easy to make and require minimal ingredients, making them a great option for bakers of all skill levels.
Once baked, the cookies soak in a luscious milky mixture, allowing them to absorb all the flavors and achieve that signature moistness. Your family and friends will be impressed with this unique treat that brings the taste of South America to your kitchen.
Ingredients (Serves 4-6):
- 1 cup all-purpose flour
- 1/2 teaspoon baking powder
- 1/4 teaspoon salt
- 1/4 cup unsalted butter, softened
- 1/2 cup granulated sugar
- 1 large egg
- 1 teaspoon vanilla extract
- 1/4 cup sweetened condensed milk
- 1/4 cup evaporated milk
- 1/4 cup heavy cream
- 1 tablespoon powdered sugar (for dusting, optional)
Cooking Instructions:
- Preheat the Oven: Begin by preheating your oven to 350°F (175°C). This guarantees that your cookies will bake evenly and achieve a nice golden color.
- Prepare the Baking Sheet: Line a baking sheet with parchment paper to prevent the cookies from sticking. This will also help with easy cleanup after baking.
- Mix Dry Ingredients: In a medium bowl, whisk together the all-purpose flour, baking powder, and salt. This step is vital as it helps to evenly distribute the baking powder and salt throughout the flour.
- Cream Butter and Sugar: In a separate large bowl, cream together the softened butter and granulated sugar using an electric mixer on medium speed until light and fluffy, about 2-3 minutes. This process incorporates air into the mixture, making your cookies light.
- Add Egg and Vanilla: Beat in the egg and vanilla extract into the butter-sugar mixture until well combined. This adds moisture and flavor to the cookies.
- Combine Dry and Wet Ingredients: Gradually add the dry ingredients to the wet mixture, mixing until just combined. Be careful not to overmix, as this can lead to denser cookies.
- Scoop the Dough: Use a tablespoon or cookie scoop to drop spoonfuls of dough onto the prepared baking sheet, spacing them about 2 inches apart.
- Bake the Cookies: Place the baking sheet in the preheated oven and bake for 10-12 minutes, or until the edges are lightly golden. Keep an eye on them to avoid overbaking.
- Prepare the Tres Leches Mixture: While the cookies are baking, whisk together the sweetened condensed milk, evaporated milk, and heavy cream in a bowl. This will be the soaking mixture for the cookies.
- Soak the Cookies: Once the cookies are done baking, remove them from the oven and let them cool for about 5 minutes. Then, carefully transfer them to a serving platter and drizzle the tres leches mixture over the warm cookies, allowing them to soak for at least 15-20 minutes.
- Serve and Dust: If desired, dust the cookies with powdered sugar before serving. Enjoy your Tres Leches Cookies warm or at room temperature!
Extra Tips:
For the best results, allow the cookies to soak for longer if you prefer a more intense flavor and moisture. You can also enhance the cookies by adding a sprinkle of cinnamon or a few chocolate chips to the batter.
Keep in mind that these cookies are best enjoyed fresh, but if you have leftovers, store them in an airtight container at room temperature for a couple of days.
Galletas De Mantequilla
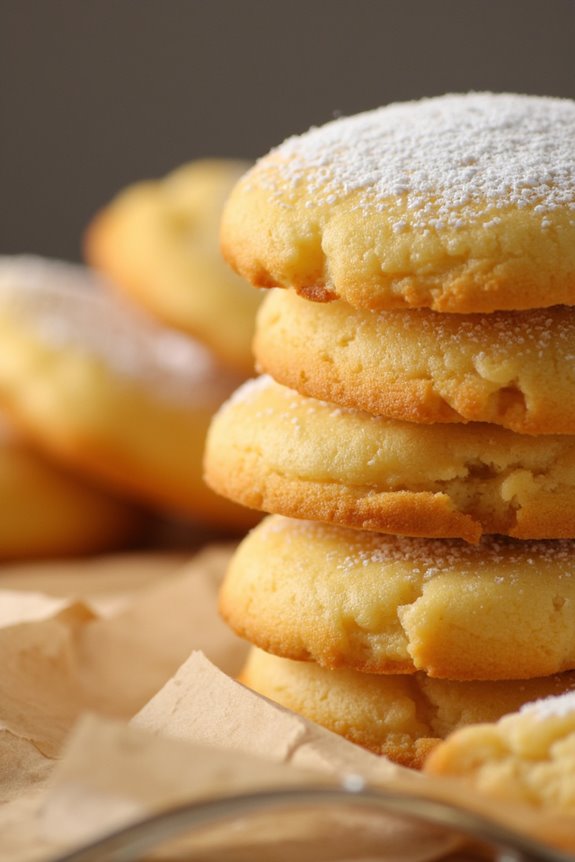
Galletas De Mantequilla, or butter cookies, are a delightful treat that’s popular throughout South America. Known for their rich, buttery flavor and crumbly texture, these cookies are a perfect accompaniment to a cup of coffee or tea. They can be enjoyed plain or decorated with powdered sugar, chocolate, or sprinkles, making them versatile for any occasion. This recipe is simple and straightforward, perfect for both novice and experienced bakers looking to indulge in a sweet South American classic.
The beauty of Galletas De Mantequilla lies in their simplicity. With just a few ingredients, you can whip up a batch of these delicious cookies that will have everyone asking for more. Their melt-in-your-mouth quality comes from the generous amount of butter used, which gives them a rich flavor that’s hard to resist.
Once you get the hang of this recipe, you can easily experiment with flavors by adding vanilla, almond extract, or even citrus zest to personalize your cookies.
Ingredients (Serves 4-6 People)
- 1 cup unsalted butter, softened
- 1 cup granulated sugar
- 2 cups all-purpose flour
- 1/2 teaspoon salt
- 1 teaspoon vanilla extract
- 1 egg yolk
- Optional: powdered sugar for dusting
Cooking Instructions
- Preheat the Oven: Begin by preheating your oven to 350°F (175°C). This guarantees that the cookies will bake evenly and develop a golden color on the outside while remaining soft on the inside.
- Cream Butter and Sugar: In a large mixing bowl, combine the softened unsalted butter and granulated sugar. Use a hand mixer or whisk to cream them together until the mixture is light and fluffy. This process incorporates air into the mixture, resulting in a lighter cookie texture.
- Add Egg Yolk and Vanilla: Once the butter and sugar are well combined, add the egg yolk and vanilla extract. Mix until fully incorporated. The egg yolk adds richness and helps bind the ingredients, while the vanilla enhances the flavor.
- Combine Dry Ingredients: In a separate bowl, whisk together the all-purpose flour and salt. Gradually add the dry mixture to the wet mixture, stirring gently until a dough forms. Be careful not to overmix, as this can lead to tougher cookies.
- Shape the Cookies: Using your hands or a cookie scoop, take small portions of the dough and shape them into balls or flatten them slightly for a traditional cookie shape. Place them on a baking sheet lined with parchment paper, leaving some space between each cookie to allow for spreading.
- Bake: Place the baking sheet in the preheated oven and bake for about 12-15 minutes, or until the edges are lightly golden. Keep an eye on them, as baking times may vary based on your oven.
- Cool and Serve: Once baked, remove the cookies from the oven and allow them to cool on the baking sheet for a few minutes before transferring them to a wire rack to cool completely. If desired, dust with powdered sugar before serving for an extra touch of sweetness.
Extra Tips
When making Galletas De Mantequilla, it’s important to use room temperature butter for easier creaming and a better texture. You can also experiment with different extracts or add-ins, such as chocolate chips or chopped nuts, to customize your cookies.
For a festive touch, consider decorating the cookies with colored icing or sprinkles. Store any leftovers in an airtight container to keep them fresh for days!
Biscoitos De Coco
Biscoitos De Coco, or coconut cookies, are a delightful treat that captures the essence of South American flavors. These cookies are particularly popular in Brazil, where they’re often enjoyed as a snack or dessert. With their crispy exterior and chewy center, they offer a wonderful contrast that will have you reaching for seconds. The primary ingredient, shredded coconut, gives these cookies their unique texture and tropical flavor, making them a favorite among coconut lovers.
Making Biscoitos De Coco is a straightforward process that requires minimal ingredients and effort. Perfect for family gatherings or casual get-togethers, these cookies can be prepared in under an hour. Once baked, they can be stored in an airtight container, guaranteeing that their deliciousness lasts for several days. So, gather your ingredients and let’s get started on creating these scrumptious coconut cookies!
Ingredients (Serves 4-6)
- 2 cups shredded coconut (unsweetened)
- 1 cup sweetened condensed milk
- 1 cup all-purpose flour
- 1 teaspoon baking powder
- 1 teaspoon vanilla extract
- Pinch of salt
- 1 egg white (optional, for added texture)
Cooking Instructions
- Preheat the Oven: Begin by preheating your oven to 350°F (175°C). This step is vital as it guarantees that the cookies bake evenly and achieve the perfect golden-brown color.
- Prepare the Baking Sheet: Line a baking sheet with parchment paper. This will prevent the cookies from sticking and make for easy cleanup after baking.
- Mix Dry Ingredients: In a large mixing bowl, combine the shredded coconut, flour, baking powder, and salt. Stir these ingredients together until they’re evenly mixed. This helps to distribute the baking powder throughout the flour, guaranteeing that the cookies rise properly.
- Combine Wet Ingredients: In a separate bowl, whisk together the sweetened condensed milk and vanilla extract. If you’re using egg white for added texture, you can add it to this mixture as well. Whisk until well combined.
- Combine Dry and Wet Mixtures: Gradually pour the wet mixture into the dry mixture, stirring continuously until a dough forms. The dough should be moist but not overly sticky. If it feels too wet, you can add a little more flour.
- Shape the Cookies: Using your hands, take small portions of the dough and roll them into balls, approximately the size of a tablespoon. Place each ball onto the prepared baking sheet, spacing them about two inches apart to allow for spreading during baking.
- Bake the Cookies: Place the baking sheet in the preheated oven and bake for 15-20 minutes, or until the cookies are lightly golden on the edges. Keep an eye on them to avoid over-baking.
- Cool and Serve: Once baked, remove the cookies from the oven and let them cool on the baking sheet for a few minutes before transferring them to a wire rack to cool completely. Enjoy your Biscoitos De Coco with a cup of coffee or tea!
Extra Tips
When making Biscoitos De Coco, feel free to experiment with the recipe by adding chocolate chips, nuts, or spices like cinnamon for an extra flavor kick. If using sweetened coconut, you may want to adjust the amount of condensed milk to avoid an overly sweet cookie.
Confirm that all your ingredients are at room temperature for the best results, and for a chewier texture, consider refrigerating the dough for 30 minutes before baking. Enjoy your baking adventure!