

As I venture into the delightful realm of Colombian desserts, I find myself enchanted by the unique blend of flavors and textures each recipe brings. From the creamy indulgence of Arequipe to the refreshing Helado De Lulo, there’s a delightful surprise in every bite. These sweet treats not only cater to my cravings but also weave a story of rich culinary heritage. Curious about which dessert will captivate your taste buds? Let’s explore these ten decadent recipes together.
Arequipe: The Creamy Caramel Spread
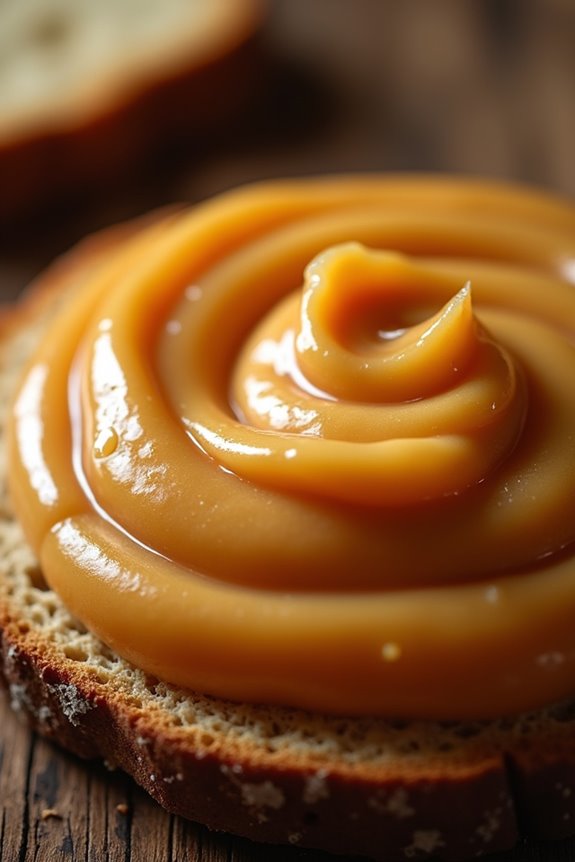
Arequipe, a beloved Colombian treat, is a rich and creamy caramel spread that has captured the hearts (and taste buds) of many. This velvety concoction is made primarily from sweetened condensed milk, resulting in a luscious texture and a deep caramel flavor. Often enjoyed with bread, cookies, or simply by the spoonful, arequipe isn’t just a dessert but a versatile delight that can elevate various dishes and snacks.
Making arequipe at home is a simple yet rewarding endeavor. While it does require patience as it cooks slowly, the end result is well worth the wait. With just a handful of ingredients, you can whip up a batch of this heavenly spread to share with family and friends or keep as a sweet treat for yourself. Get ready to indulge in the delightful experience of creating this Colombian classic!
Ingredients (Serves 4-6 people):
- 1 can (14 ounces) sweetened condensed milk
- 1/2 teaspoon baking soda
- 1 tablespoon unsalted butter
- 1/2 teaspoon vanilla extract
- A pinch of salt
Cooking Instructions:
- Prepare Your Ingredients: Begin by gathering all your ingredients. Open the can of sweetened condensed milk and set it aside. Measure out the baking soda, butter, vanilla extract, and salt. Having everything ready will streamline the cooking process.
- Combine Ingredients in a Saucepan: In a medium-sized heavy-bottomed saucepan, add the sweetened condensed milk and the baking soda. The baking soda will help to achieve that beautiful caramel color and creamy consistency, so make sure to mix it in thoroughly.
- Cook Over Low Heat: Place the saucepan over low heat, stirring continuously with a wooden spoon or silicone spatula. This step is vital as it prevents the milk from burning. Keep stirring consistently to avoid any lumps and to guarantee even cooking.
- Watch for Color Change: After about 30-40 minutes of cooking, you’ll notice the mixture starting to thicken and turn a golden brown color. Continue stirring during this process, as it can go from perfect to burnt very quickly.
- Add Butter and Flavoring: Once the mixture reaches a thick, caramel-like consistency, remove it from the heat. Stir in the unsalted butter, vanilla extract, and a pinch of salt. The butter adds richness, while the salt enhances the sweetness of the caramel.
- Cool and Store: Allow the arequipe to cool slightly before transferring it to a clean glass jar or airtight container. It will continue to thicken as it cools. Once fully cooled, seal the jar and store it in the refrigerator. Arequipe can last for several weeks when stored properly.
Extra Tips:
When making arequipe, patience is key. Avoid raising the heat to speed up the process, as this can lead to burning the mixture. Keep a close eye on it, and remember that stirring is essential to achieving that perfect smooth texture.
If you prefer a thicker consistency, cook it a little longer, but be cautious not to overdo it. Additionally, feel free to experiment with flavors by adding a splash of rum or a dash of cinnamon for a unique twist on this classic treat. Enjoy your homemade arequipe!
Tres Leches Cake: A Milky Delight

Tres Leches Cake, a beloved dessert in Colombia and many Latin American countries, is a rich and indulgent treat that perfectly balances sweetness with a light, airy texture. This cake is soaked in a mixture of three types of milk—evaporated milk, condensed milk, and heavy cream—giving it a uniquely moist and creamy quality that sets it apart from traditional cakes.
Often topped with whipped cream and fresh fruit, Tres Leches isn’t only a feast for the taste buds but also a delightful visual treat.
The origins of Tres Leches Cake can be traced back to Central America, but it has become a staple in Colombian kitchens. Whether served at birthdays, weddings, or family gatherings, this dessert is always a crowd-pleaser. Making Tres Leches Cake may seem intimidating, but with the right ingredients and steps, you can create this milky delight in your own home for a serving size of 4-6 people.
Ingredients
- 1 cup all-purpose flour
- 1 ½ tsp baking powder
- ½ tsp salt
- 5 large eggs
- 1 cup granulated sugar
- 1 tsp vanilla extract
- ½ cup whole milk
- 1 can (12 oz) evaporated milk
- 1 can (14 oz) sweetened condensed milk
- 1 cup heavy cream
- 1 cup whipped cream (for topping)
- Fresh fruit (such as strawberries or mango, for garnish)
Cooking Instructions
- Preheat the Oven: Begin by preheating your oven to 350°F (175°C). This guarantees that your cake bakes evenly and rises properly.
- Prepare the Cake Batter: In a medium bowl, whisk together the flour, baking powder, and salt. In a separate large mixing bowl, beat the eggs and sugar together until the mixture is light and fluffy, about 5-7 minutes. Stir in the vanilla extract and the milk. Gradually add the flour mixture to the wet ingredients, mixing until just combined.
- Bake the Cake: Pour the batter into a greased 9×13 inch baking dish. Bake in the preheated oven for approximately 25-30 minutes, or until a toothpick inserted in the center comes out clean. Once done, remove the cake from the oven and let it cool in the pan for about 10 minutes.
- Prepare the Milk Mixture: While the cake is cooling, combine the evaporated milk, sweetened condensed milk, and heavy cream in a mixing bowl. Stir well to make sure everything is blended together smoothly.
- Soak the Cake: Once the cake has cooled, use a fork or skewer to poke holes all over the top of the cake. This will help the milk mixture soak in more effectively. Gradually pour the milk mixture over the cake, making sure it absorbs as much as possible. Let the cake sit for at least 30 minutes to allow the flavors to meld.
- Top and Serve: Once the cake has fully absorbed the milk mixture, spread whipped cream over the top. Garnish with fresh fruit, if desired. Slice and serve chilled.
Extra Tips
When making Tres Leches Cake, be sure to allow the cake to soak in the milk mixture for sufficient time to achieve that signature moistness. If you have the time, preparing the cake the day before serving allows the flavors to deepen and the texture to become even more indulgent.
Additionally, feel free to experiment with different toppings or flavorings, such as a sprinkle of cinnamon or a drizzle of chocolate, to personalize your Tres Leches Cake!
Buñuelos: Colombian Cheese Balls

Buñuelos are a traditional Colombian dessert that brings a delightful crunch and a cheesy flavor to any table. These crispy cheese balls are often enjoyed during festive seasons and special occasions, making them a beloved staple in Colombian cuisine. With a golden-brown exterior and a soft, airy interior, buñuelos are perfect for snacking or serving as a dessert. The combination of arepa flour and cheese creates a unique texture and taste that’s both satisfying and indulgent.
Making buñuelos at home is a straightforward process that can be completed in under an hour. With just a few ingredients, you can whip up a batch of these delicious treats that will impress family and friends alike. Serve them warm, and you’ll experience the perfect blend of flavors and textures that Colombian cuisine is known for.
Ingredients (Serves 4-6):
- 2 cups arepa flour (masarepa)
- 1 cup grated cheese (such as queso fresco or mozzarella)
- 1 tablespoon sugar
- 1 teaspoon baking powder
- ½ teaspoon salt
- 1 cup warm water
- Oil for frying (vegetable or canola)
Cooking Instructions:
- Prepare the dough: In a large mixing bowl, combine the arepa flour, grated cheese, sugar, baking powder, and salt. Mix the dry ingredients together until well combined. Gradually add the warm water to the mixture, stirring continuously until a soft dough forms. The dough should be moist but not sticky; adjust with more water or flour if necessary.
- Shape the buñuelos: Once the dough is ready, divide it into equal portions, about the size of a golf ball. Roll each portion between your palms to form smooth balls. Make sure there are no cracks in the balls, as this will help them maintain their shape while frying.
- Heat the oil: In a deep frying pan or pot, pour enough oil to submerge the buñuelos (about 2-3 inches deep). Heat the oil over medium heat until it reaches 350°F (175°C). You can test the temperature by dropping a small piece of dough into the oil; if it sizzles and rises to the surface, the oil is ready.
- Fry the buñuelos: Carefully add the buñuelos to the hot oil, making sure not to overcrowd the pan. Fry them in batches for about 4-5 minutes, turning occasionally, until they’re golden brown and puffed up. Use a slotted spoon to remove the buñuelos from the oil and transfer them to a plate lined with paper towels to drain excess oil.
- Serve warm: Allow the buñuelos to cool slightly, then serve them warm as a delicious snack or dessert. They can be enjoyed on their own or with a sprinkle of powdered sugar or a drizzle of syrup for added sweetness.
Extra Tips:
To enhance the flavor of your buñuelos, consider adding a pinch of nutmeg or cinnamon to the dough mixture. Additionally, make sure the oil temperature is consistent while frying; if the oil is too hot, the buñuelos will burn before cooking through, while too cool oil will cause them to absorb excess oil.
For a unique twist, experiment with different types of cheese to find your preferred flavor profile. Enjoy your homemade buñuelos with a cup of hot chocolate or coffee for a truly authentic Colombian experience!
Natilla: Sweet Corn Pudding
Natilla is a beloved traditional Colombian dessert, especially popular during the holiday season. This creamy and sweet corn pudding is made with simple ingredients, yet it delivers a rich flavor that will surely delight anyone who tries it. The texture is smooth and velvety, making it a perfect treat to enjoy after a hearty meal or as a standalone snack.
To add a festive touch, natilla is often garnished with cinnamon or served alongside buñuelos, another Colombian holiday favorite.
Making natilla is a straightforward process that requires minimal preparation. The key to achieving the perfect consistency is to stir the mixture continuously while it cooks, guaranteeing that it thickens without forming lumps. This dessert is a wonderful way to introduce a taste of Colombia to your family and friends, bringing a touch of cultural richness to your table.
Ingredients (Serves 4-6):
- 2 cups of cornmeal
- 4 cups of whole milk
- 1 cup of sugar
- 1 cinnamon stick
- 1 teaspoon of vanilla extract
- 1/4 teaspoon of salt
- 1/4 cup of cornstarch
- 1/2 cup of water
- Ground cinnamon for garnish (optional)
Cooking Instructions:
- Prepare the Cornmeal Mixture: In a large bowl, mix the cornmeal with 1 cup of cold water to form a smooth paste. This step helps prevent lumps from forming when the mixture is cooked.
- Heat the Milk: In a saucepan over medium heat, combine the whole milk, sugar, cinnamon stick, and salt. Stir occasionally until the mixture is warm but not boiling. This infuses the milk with the flavor of cinnamon.
- Combine Mixtures: Gradually whisk the cornmeal paste into the warm milk mixture. Make sure to continuously stir to incorporate the cornmeal evenly, preventing lumps from forming.
- Thicken the Mixture: Continue to cook the mixture over medium heat, stirring constantly. As it heats up, it will begin to thicken. This process should take about 10-15 minutes. It’s important to keep stirring to achieve a smooth texture.
- Add Cornstarch: In a small bowl, dissolve the cornstarch in 1/2 cup of water. Once the cornmeal mixture has thickened, add the cornstarch mixture and stir well. This will help the natilla achieve a firmer consistency.
- Finish Cooking: Cook for an additional 5 minutes, stirring continuously until the mixture is thick and creamy. Remove the saucepan from the heat and stir in the vanilla extract.
- Cool and Serve: Pour the natilla into a greased dish or individual cups. Allow it to cool at room temperature, then refrigerate for at least 2 hours to set. Before serving, sprinkle with ground cinnamon if desired.
Extra Tips:
When making natilla, it’s essential to stir constantly to guarantee a smooth texture and prevent sticking. If you prefer a sweeter or spicier flavor, feel free to adjust the sugar or add additional spices like nutmeg or cloves.
For a unique twist, consider incorporating ingredients like grated coconut or chocolate for a delightful variation. Natilla can be stored in the refrigerator for up to three days, making it a great make-ahead dessert for gatherings!
Arroz Con Leche: Creamy Rice Pudding

Arroz con leche is a beloved Colombian dessert that showcases the rich culinary heritage of the country. This creamy rice pudding isn’t only a comfort food but also a delightful treat that can be enjoyed at any time of the year. The combination of tender rice, warm milk, and fragrant spices makes it a perfect ending to any meal, or simply a sweet snack during the day.
With its creamy consistency and comforting flavors, arroz con leche has become a staple in many Latin American households. Making arroz con leche is a straightforward process that requires minimal ingredients, but the result is a dish that feels indulgent and satisfying. This recipe serves 4-6 people, making it an excellent option for sharing with family and friends.
The key to achieving the perfect texture is to cook the rice slowly and allow it to absorb the flavors of the milk and spices. Whether you enjoy it warm or chilled, this dessert is sure to be a hit.
Ingredients:
- 1 cup long-grain rice
- 4 cups whole milk
- 1 cup water
- 1 cup sugar (adjust to taste)
- 1 cinnamon stick
- 1 teaspoon vanilla extract
- 1/2 cup raisins (optional)
- Ground cinnamon (for garnish)
- Pinch of salt
Cooking Instructions:
- Rinse the Rice: Start by rinsing the long-grain rice under cold water. This helps to remove excess starch and prevents the rice from becoming too sticky. Drain the rice well and set it aside.
- Cook the Rice: In a medium saucepan, combine the rinsed rice and 1 cup of water. Bring to a boil over medium heat, stirring occasionally. Once it reaches a boil, reduce the heat to low, cover, and let it simmer for about 15 minutes, or until the rice is tender and the water is absorbed.
- Add Milk and Spices: Once the rice is cooked, add the 4 cups of whole milk, sugar, cinnamon stick, and a pinch of salt to the saucepan. Stir well to combine all the ingredients.
- Simmer the Mixture: Increase the heat to medium and bring the mixture to a gentle simmer. Cook uncovered, stirring frequently to prevent the rice from sticking to the bottom of the pan. Allow it to simmer for about 20-25 minutes, or until the mixture thickens to your desired consistency.
- Incorporate Vanilla and Raisins: After the pudding has thickened, remove it from the heat. Stir in the vanilla extract and add the raisins if using. Allow the pudding to cool for a few minutes.
- Serve: Spoon the arroz con leche into serving dishes or bowls. It can be served warm or chilled, depending on your preference. Sprinkle some ground cinnamon on top for garnish before serving.
Extra Tips:
When making arroz con leche, feel free to experiment with the sweetness level by adjusting the amount of sugar according to your taste. Additionally, you can enhance the flavor by adding other spices such as nutmeg or cloves.
If you prefer a thicker pudding, let it cook a bit longer, and for a creamier texture, you can add a splash more milk if needed. Enjoy your delicious arroz con leche as a delightful dessert or snack, and consider serving it with a dollop of whipped cream for an extra indulgent treat!
Obleas: Thin Wafers With Sweet Treats

Obleas are a beloved Colombian treat that combines the simplicity of thin, crispy wafers with a variety of sweet fillings. Traditionally sold by street vendors, these delightful snacks consist of two circular wafers filled with delicious ingredients such as arequipe (a caramel-like spread), cheese, or other sweet toppings.
They’re easy to make at home and can be customized to suit your taste preferences, making them a perfect dessert for gatherings or a special treat for yourself.
Making obleas is a fun and straightforward process. You’ll start by preparing the thin wafers, which are typically made from a simple mixture of flour and water. Once you have your wafers ready, you can fill them with your choice of sweet fillings, allowing your creativity to shine.
Whether you prefer classic arequipe, dulce de leche, or even fruit preserves, obleas are a delightful way to explore the flavors of Colombian cuisine.
Ingredients (Serves 4-6 People)
- 1 cup all-purpose flour
- 1/2 cup water
- 1/4 teaspoon salt
- 1 tablespoon sugar
- Arequipe (or dulce de leche) for filling
- Grated cheese (optional)
- Fruit preserves (optional)
Cooking Instructions
1. Prepare the Wafer Batter: In a mixing bowl, combine the all-purpose flour, water, salt, and sugar. Stir the ingredients until you achieve a smooth batter. The consistency should be similar to pancake batter.
2. Heat the Cooking Surface: Preheat a non-stick skillet or a traditional oblea maker over medium heat. Make sure it’s hot enough to cook the wafers quickly without burning them.
3. Cook the Wafer: Pour a small amount of the batter onto the skillet, using about 2 tablespoons for each wafer. Spread the batter out into a thin, even circle. Cook for about 1-2 minutes until the edges start to lift and the surface appears dry. Flip the wafer and cook for another minute.
Repeat this process until all the batter is used, stacking the wafers on a plate.
4. Assemble the Obleas: Take one wafer and spread a generous layer of arequipe (or dulce de leche) on one side. If desired, sprinkle some grated cheese or add fruit preserves on top. Place another wafer on top to create a sandwich.
5. Serve and Enjoy: Cut the assembled obleas into quarters or serve them whole. Enjoy them fresh for the best taste and texture.
Extra Tips
When making obleas, it’s essential to keep the batter thin for the best results. If the batter is too thick, the wafers won’t be crispy.
You can also experiment with different fillings to find your perfect combination. If you want to make the process even easier, consider using a waffle iron instead of a skillet, which will give you a unique texture and flavor.
Enjoy your homemade obleas warm for the ultimate treat!
Chocoramo: Chocolate-Covered Snack
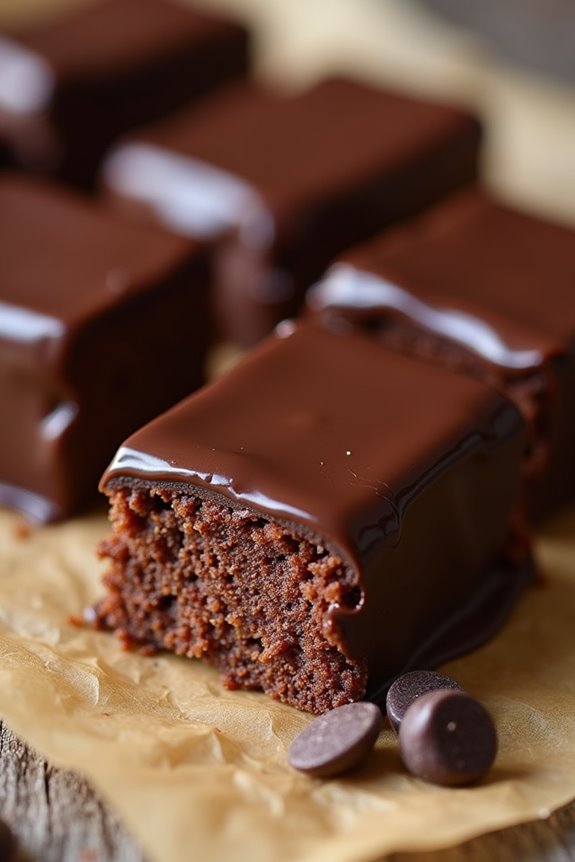
Chocoramo is a beloved Colombian dessert that combines the rich flavors of chocolate and cake in a delightful snack. Originating in Colombia, this treat features a soft cake center enveloped in a decadent layer of chocolate. It’s a popular choice for both young and old, often enjoyed with a cup of coffee or as a sweet pick-me-up during the day.
Making Chocoramo at home allows you to savor the authentic taste while adding a personal touch to this delightful dessert. While the process may seem a bit involved, the results are well worth the effort. With a few simple ingredients, you can create a delicious batch of Chocoramo that will impress your family and friends.
Whether you’re celebrating a special occasion or just indulging in a sweet craving, this chocolate-covered snack is sure to satisfy.
Ingredients (Serves 4-6 people):
- 1 cup all-purpose flour
- 1 cup granulated sugar
- 1/2 cup unsweetened cocoa powder
- 1/2 cup milk
- 1/4 cup vegetable oil
- 2 large eggs
- 1 teaspoon baking powder
- 1/2 teaspoon baking soda
- 1/4 teaspoon salt
- 1 cup semi-sweet chocolate chips
- 2 tablespoons butter
- 1 teaspoon vanilla extract
Cooking Instructions:
- Preheat the Oven: Begin by preheating your oven to 350°F (175°C). This guarantees that the cake will bake evenly and rise properly.
- Prepare the Batter: In a large mixing bowl, combine the all-purpose flour, granulated sugar, cocoa powder, baking powder, baking soda, and salt. Whisk these dry ingredients together until fully integrated.
- Mix Wet Ingredients: In a separate bowl, mix together the milk, vegetable oil, eggs, and vanilla extract. Whisk until the mixture is smooth and well combined.
- Combine Wet and Dry Ingredients: Gradually pour the wet mixture into the dry ingredients, stirring continuously until there are no lumps. The batter should be smooth and slightly thick.
- Bake the Cake: Grease a rectangular baking pan (approximately 9×13 inches) and pour the batter into it, spreading it evenly. Bake in the preheated oven for about 25-30 minutes, or until a toothpick inserted in the center comes out clean.
- Cool the Cake: Once baked, remove the cake from the oven and let it cool in the pan for about 10 minutes. Transfer the cake to a wire rack to cool completely.
- Prepare Chocolate Coating: In a microwave-safe bowl, combine the semi-sweet chocolate chips and butter. Microwave in 30-second intervals, stirring in between, until the chocolate and butter are completely melted and smooth.
- Cut and Coat the Cake: Once the cake is completely cooled, cut it into rectangular pieces (about 2 inches by 4 inches). Dip each piece into the melted chocolate, ensuring it’s fully coated, and place it on a parchment-lined baking sheet.
- Set the Chocolate: Allow the chocolate-covered cake pieces to set at room temperature or refrigerate them for a quicker setting process.
- Serve and Enjoy: Once the chocolate has hardened, your homemade Chocoramo is ready to serve! Enjoy these delightful snacks with friends and family.
Extra Tips: When preparing Chocoramo, feel free to experiment with different types of chocolate for coating, such as dark or white chocolate, for varied flavors. You can also add a pinch of sea salt on top of the chocolate coating for a delicious contrast.
If you want a more intense chocolate flavor, consider adding extra cocoa powder to the batter or infusing the milk with a hint of espresso. Store any leftovers in an airtight container to maintain their freshness. Happy cooking!
Postre De Natas: Creamy Custard Dessert
Postre De Natas is a traditional Colombian dessert that captivates with its rich, creamy texture and delightful taste. This custard-like treat is made primarily from milk and sugar, often flavored with cinnamon and a touch of vanilla, making it a beloved choice for both festive occasions and everyday indulgences.
The origins of Postre De Natas can be traced back to the colonial period, where it was crafted by blending the freshest ingredients available, embodying the essence of Colombian culinary heritage.
Preparing Postre De Natas is a straightforward process that yields a sumptuous dessert, perfect for sharing with family and friends. The combination of natural ingredients results in a dessert that not only appeals to the palate but also provides a comforting nostalgic experience.
With its silky smooth consistency and enticing aroma, Postre De Natas is sure to become a favorite in your household.
Ingredients (Serves 4-6):
- 4 cups whole milk
- 1 cup sugar
- 1 teaspoon vanilla extract
- 1 cinnamon stick
- 1/2 cup cornstarch
- 1/4 teaspoon salt
- 3 large egg yolks
- Ground cinnamon (for garnish)
Cooking Instructions:
- Prepare the Milk Mixture: In a large saucepan, combine the 4 cups of whole milk, 1 cup of sugar, and the cinnamon stick. Heat the mixture over medium heat, stirring occasionally, until the sugar dissolves and the milk is warm but not boiling. This step helps to infuse the flavors of cinnamon into the milk.
- Create the Cornstarch Slurry: In a small bowl, mix the 1/2 cup of cornstarch with 1/2 cup of cold milk (taken from the 4 cups). Stir until the cornstarch is fully dissolved. This slurry will help thicken the custard as it cooks.
- Combine and Thicken: Once the milk mixture is warm, remove the cinnamon stick. Gradually whisk in the cornstarch slurry into the warm milk mixture. Continue to cook this mixture over medium-low heat, stirring constantly, until it thickens and bubbles gently. This should take about 10-15 minutes.
- Incorporate Egg Yolks: In a separate bowl, whisk the 3 egg yolks. Slowly add a few tablespoons of the hot milk mixture into the egg yolks while whisking constantly. This process, known as tempering, prevents the yolks from curdling. Then, gradually whisk the tempered yolks back into the saucepan with the remaining milk mixture.
- Finish Cooking: Continue to cook the mixture for another 5 minutes, stirring continuously until it reaches a thick custard-like consistency. Once thickened, remove from heat and stir in the 1 teaspoon of vanilla extract.
- Chill and Serve: Pour the custard into individual serving cups or a large dish and allow it to cool to room temperature. Once cooled, cover with plastic wrap and refrigerate for at least 4 hours or until fully set. Before serving, sprinkle a little ground cinnamon on top for added flavor and garnish.
Extra Tips:
When making Postre De Natas, it’s important to stir continuously during the cooking process to prevent the custard from sticking to the bottom of the pan or forming lumps.
If you prefer a sweeter dessert, you can adjust the amount of sugar to suit your taste. Additionally, for a twist on the classic recipe, consider adding a splash of coconut milk or a pinch of nutmeg for added depth of flavor.
This dessert can be made a day in advance, making it a perfect choice for gatherings or special occasions. Enjoy your delicious Postre De Natas!
Helado De Lulo: Refreshing Lulo Ice Cream

Helado de Lulo is a tantalizing Colombian dessert that captures the essence of tropical fruit in a creamy, frozen delight. Lulo, also known as nanches or “little orange,” is a vibrant fruit with a unique tart flavor that pairs beautifully with the sweetness of sugar and the richness of cream. This invigorating ice cream is perfect for hot days or as a delightful treat after a meal.
With its bright color and zingy taste, Helado de Lulo is sure to impress family and friends alike. Making Helado de Lulo at home is a straightforward process that brings the taste of Colombia right to your kitchen. With just a few ingredients, you can create a luscious ice cream that embodies the fresh, fruity flavors of Colombian cuisine.
Whether you’re serving it as a dessert at a gathering or enjoying it as a solo treat, this ice cream will leave a lasting impression.
Ingredients (Serves 4-6):
- 2 cups fresh lulo pulp (about 8-10 lulo fruits)
- 1 cup heavy cream
- 1 cup sweetened condensed milk
- 1/2 cup whole milk
- 1/2 cup granulated sugar
- 1 teaspoon vanilla extract
- 1 tablespoon lime juice
Directions:
- Prepare the Lulo Pulp: Start by cutting the lulo fruits in half and scooping out the pulp using a spoon. Be careful not to include any seeds, as they can be quite hard. You should aim for about 2 cups of fresh pulp. Place the pulp in a blender or food processor and blend until smooth. This will create a vibrant, fruity base for your ice cream.
- Mix the Ingredients: In a large mixing bowl, combine the blended lulo pulp, heavy cream, sweetened condensed milk, whole milk, granulated sugar, vanilla extract, and lime juice. Whisk everything together until the mixture is well combined and the sugar is fully dissolved. The lime juice adds a hint of acidity that enhances the flavor of the lulo.
- Chill the Mixture: Once everything is mixed together, cover the bowl with plastic wrap and place it in the refrigerator for about 1-2 hours. This chilling step is important as it helps to guarantee a smoother texture in your ice cream.
- Churn the Ice Cream: After chilling, pour the lulo mixture into an ice cream maker. Follow the manufacturer’s instructions to churn the ice cream until it reaches a soft-serve consistency, usually about 20-25 minutes. If you don’t have an ice cream maker, you can place the mixture in a shallow dish and freeze it, stirring every 30 minutes until it reaches the desired consistency.
- Freeze Until Firm: Once the ice cream is churned, transfer it to an airtight container and smooth the top. Cover it with a lid or plastic wrap and place it in the freezer for at least 4-6 hours or until it’s firm enough to scoop.
- Serve and Enjoy: Once frozen, scoop the Helado de Lulo into bowls or cones. You can garnish it with fresh lulo slices or a sprig of mint for a beautiful presentation. Enjoy the invigorating taste of this Colombian dessert!
Extra Tips:
To achieve the best flavor and texture, use ripe lulo fruits, as they’ll be sweeter and more flavorful. If lulo isn’t available in your area, you can substitute it with other tart fruits like passion fruit or kiwi, but the unique taste of lulo is irreplaceable.
Additionally, for a creamier texture, allow the ice cream to sit at room temperature for a few minutes before scooping. This will make serving easier and enhance the overall eating experience!
Cocadas: Coconut Delights

Cocadas are a beloved Colombian treat that encapsulate the tropical essence of coconut in a sweet, chewy form. These delightful confections are often enjoyed as a snack or dessert and are made using simple ingredients. The combination of shredded coconut, sugar, and eggs results in a dish that’s both satisfying and deliciously rich. The texture can vary from soft and chewy to slightly crunchy, depending on how long you bake them. They’re perfect for any occasion, from festive celebrations to casual gatherings.
Making cocadas is a straightforward process that requires minimal effort, but the outcome is bound to impress family and friends alike. Each bite is a burst of coconut flavor, making it an ideal treat for coconut lovers. Whether you’re looking to indulge yourself or share with others, this recipe will help you create authentic Colombian cocadas that are likely to become a favorite.
Ingredients (Serves 4-6):
- 2 cups shredded coconut (fresh or unsweetened)
- 1 cup sugar
- 2 large eggs
- 1 teaspoon vanilla extract
- 1/4 teaspoon salt
Cooking Instructions:
- Preheat the Oven: Begin by preheating your oven to 350°F (175°C). This step is essential as it guarantees the cocadas will bake evenly and achieve a delightful golden color.
- Prepare Baking Sheet: Line a baking sheet with parchment paper. This will prevent the cocadas from sticking and make it easier to remove them once baked.
- Mix Ingredients: In a large mixing bowl, combine the shredded coconut, sugar, eggs, vanilla extract, and salt. Use a spatula or a wooden spoon to mix the ingredients until they’re well incorporated. The mixture should be sticky and hold together.
- Form the Cocadas: Using your hands or a spoon, scoop out portions of the mixture and form small mounds (about 1-2 inches in diameter) on the prepared baking sheet. Make sure to leave some space between each mound as they’ll spread slightly while baking.
- Bake: Place the baking sheet in the preheated oven and bake for 15-20 minutes, or until the cocadas turn golden brown on the edges. Keep an eye on them to confirm they don’t over-bake.
- Cool and Serve: Once baked, remove the cocadas from the oven and let them cool on the baking sheet for a few minutes. Then, transfer them to a wire rack to cool completely. Serve them at room temperature and enjoy!
Extra Tips:
For a variation in flavor, consider adding a sprinkle of cinnamon or a handful of chocolate chips to the mixture before baking.
If you have access to fresh coconut, using it will enhance the flavor and texture of the cocadas considerably. Make sure to store any leftovers in an airtight container to keep them fresh for days.
Enjoy your cocadas with a cup of coffee or tea for a delightful treat!