

When I think about comfort food, Peruvian cuisine is always at the top of my list. Each dish feels like a warm hug, from the zesty ceviche that adds a refreshing twist to any meal, to the comforting Aji De Gallina that feels like home on a plate. I’m excited to share these 11 essential recipes with you, each packed with unique flavors and cherished traditions. These are the culinary gems that bring people together and create unforgettable meals. Get ready to explore these delicious treasures!
Ceviche
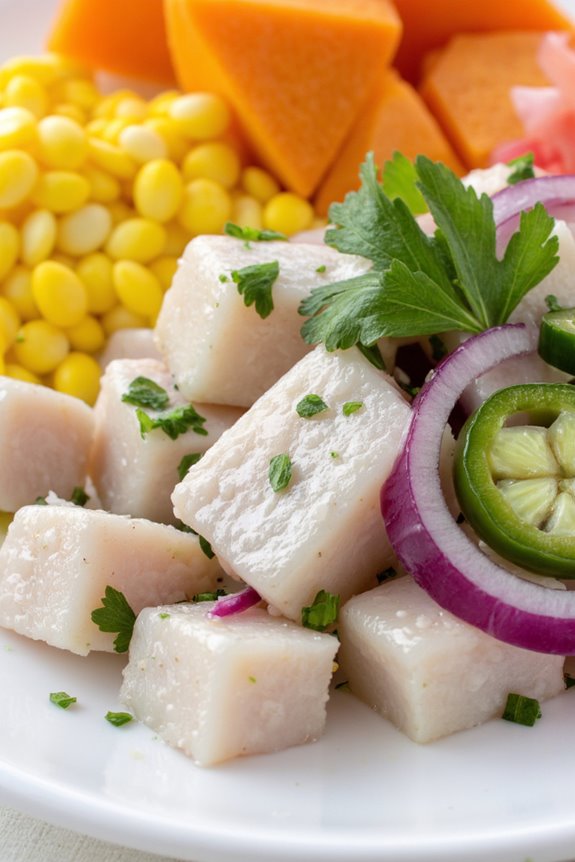
Ceviche is a quintessential dish that showcases the vibrant flavors of Peru, where fresh fish is marinated in citrus juices, primarily lime, and combined with a medley of ingredients that add depth and character. This dish isn’t only a culinary delight but also a revitalizing option, perfect for warm weather.
The acidity of the lime juice “cooks” the fish, resulting in a delicate and tangy flavor profile that’s both satisfying and energizing. Traditionally served as an appetizer, ceviche has gained international acclaim and can be found in many variations across different regions.
To prepare an authentic Peruvian ceviche, it’s vital to use the freshest fish available, as the quality of the ingredients greatly affects the dish’s overall taste. Often garnished with onions, cilantro, and a touch of chili, ceviche is best enjoyed immediately after preparation, allowing you to experience the full freshness of the ingredients. This recipe serves 4-6 people, making it perfect for gatherings or family meals.
Ingredients:
- 2 pounds fresh white fish fillets (such as sole, tilapia, or sea bass)
- 1 cup freshly squeezed lime juice
- 1 small red onion, thinly sliced
- 1-2 jalapeño peppers, seeds removed and finely chopped (adjust to taste)
- 1 cup chopped fresh cilantro
- Salt to taste
- 1 cup corn (cooked or canned)
- 1 cup sweet potatoes, boiled and sliced
- Tortilla chips (for serving)
Cooking Instructions:
- Prepare the Fish: Start by cutting the fresh fish fillets into small, bite-sized cubes. Confirm that the fish is very fresh and, if possible, ask your fishmonger for sushi-grade fish. Place the fish in a large mixing bowl.
- Marinate the Fish: Pour the freshly squeezed lime juice over the fish, making sure that all pieces are evenly coated. The lime juice should cover the fish entirely. Allow the fish to marinate for about 15-20 minutes, stirring occasionally. This step is critical as it will “cook” the fish with acidity.
- Add Vegetables: Once the fish has marinated and appears opaque, add the thinly sliced red onions, chopped jalapeños, and chopped cilantro to the bowl. Mix gently to combine all ingredients while being careful not to break the fish pieces.
- Season: Sprinkle salt over the mixture to taste. Mix gently again, adjusting seasoning if necessary. Remember that salt enhances the flavors, so add it gradually.
- Plating: To serve, place a generous scoop of the ceviche onto chilled serving plates. Garnish with cooked corn and slices of boiled sweet potatoes on the side. Optionally, serve with tortilla chips for an added crunch.
- Serve Immediately: Ceviche is best enjoyed fresh, so serve it immediately after preparation to guarantee the fish retains its texture and flavor.
Extra Tips:
When making ceviche, the quality of the fish is paramount; always seek the freshest options available. If you’re unsure about the fish’s freshness, consider using a trusted local fish market or store.
Additionally, feel free to experiment with different types of fish or seafood, such as shrimp or scallops, for variations of this dish. Remember that resting time in the marinade can be adjusted based on your preference for the texture of the fish; shorter for a firmer bite and longer for a more tender result.
Finally, pairing ceviche with a cold beverage, such as a pisco sour or a chilled beer, can elevate your dining experience.
Lomo Saltado
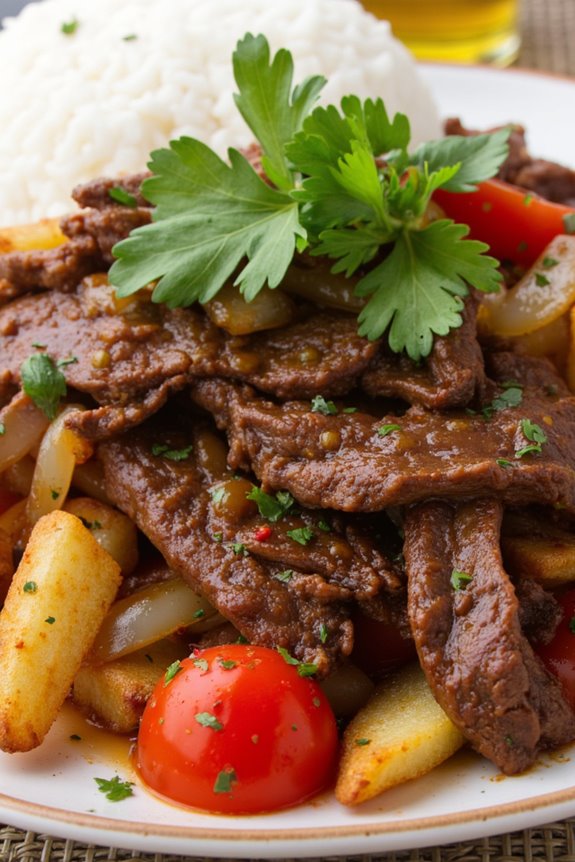
Lomo Saltado is a quintessential Peruvian dish that beautifully marries the flavors of traditional Peruvian cuisine with influences from Chinese cooking, making it a beloved staple in many households. This stir-fry dish features tender strips of beef, sautéed with onions, tomatoes, and a splash of soy sauce, served alongside crispy French fries and fluffy rice. The combination of these ingredients creates a delightful harmony of flavors and textures, making Lomo Saltado a perfect meal for both family gatherings and special occasions.
The origins of Lomo Saltado can be traced back to the Chinese immigrants who arrived in Peru in the 19th century. They brought with them their culinary traditions, which blended seamlessly with local ingredients and cooking methods. As a result, Lomo Saltado not only represents Peru’s rich cultural history but also showcases its diverse culinary landscape.
This recipe will guide you through preparing this delicious dish that serves 4-6 people, ensuring a satisfying and flavorful meal for everyone at the table.
Ingredients
- 1 lb (450g) beef sirloin, cut into strips
- 2 tablespoons vegetable oil
- 1 medium onion, sliced
- 2 medium tomatoes, sliced
- 1 tablespoon soy sauce
- 1 tablespoon red wine vinegar
- 1 teaspoon cumin
- 1 teaspoon paprika
- Salt and pepper to taste
- 4 cups cooked rice
- 4 cups French fries (store-bought or homemade)
- Fresh cilantro, chopped (for garnish)
Cooking Instructions
- Prepare the Beef: Start by cutting the beef sirloin into thin strips, about 1 inch long. This will help the meat cook quickly and evenly. Season the beef with salt, pepper, cumin, and paprika to enhance its flavor.
- Heat the Oil: In a large skillet or wok, heat the vegetable oil over medium-high heat. Make sure the pan is hot enough before adding the beef to achieve a nice sear.
- Cook the Beef: Once the oil is hot, add the seasoned beef strips to the pan in a single layer. Sear the beef for about 3-4 minutes, stirring occasionally, until it’s browned but not fully cooked through. Remove the beef from the pan and set it aside.
- Sauté the Onions and Tomatoes: In the same skillet, add the sliced onions and sauté for about 2 minutes until they become translucent. Then, add the sliced tomatoes and cook for an additional 2 minutes, allowing the tomatoes to soften.
- Combine Ingredients: Return the cooked beef to the skillet with the onions and tomatoes. Add the soy sauce and red wine vinegar, stirring everything together. Cook for another 2-3 minutes, ensuring that the beef is cooked through and well-coated with the sauce.
- Serve: Place a generous serving of cooked rice on each plate, followed by a portion of the Lomo Saltado. Add a side of French fries and garnish with fresh chopped cilantro for a burst of color and flavor.
Extra Tips
When preparing Lomo Saltado, it’s crucial to use high-quality beef for the best texture and flavor. Additionally, you can customize the dish by adding other vegetables such as bell peppers or zucchini for extra nutrition.
If you prefer a spicier kick, consider adding some sliced jalapeños or a dash of hot sauce. For a truly authentic experience, serve your Lomo Saltado with a side of Peruvian aji sauce, which adds a delightful heat and zest to the dish. Enjoy your culinary journey into the heart of Peru!
Aji De Gallina
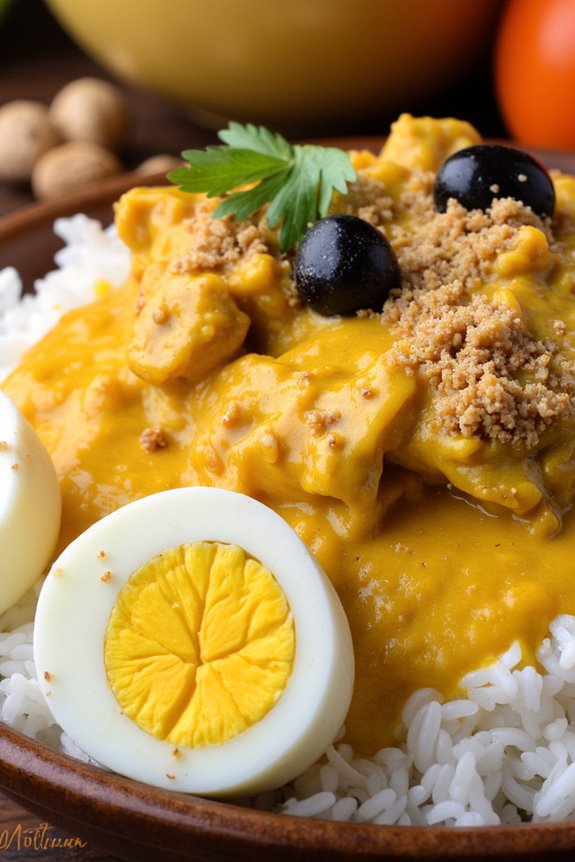
Aji De Gallina is a traditional Peruvian dish known for its rich and creamy sauce made from shredded chicken and a blend of Peruvian spices. This dish is often served over rice and garnished with hard-boiled eggs and olives, making it a colorful and flavorful meal that’s both comforting and satisfying.
The star of the dish is the aji amarillo, a yellow chili pepper that adds a unique flavor and a hint of heat, making it a beloved choice among locals and visitors alike.
The origins of Aji De Gallina can be traced back to the colonial period in Peru, where Spanish influences blended with indigenous ingredients and cooking techniques. This dish not only showcases the culinary heritage of Peru but also highlights the importance of chicken in the local diet.
Whether you’re hosting a family dinner or looking to impress your guests with a taste of Peru, Aji De Gallina is a dish that’s sure to leave a lasting impression.
Ingredients (Serves 4-6)
- 2 cups cooked, shredded chicken (preferably breast)
- 2 cups chicken broth
- 1 medium onion, finely chopped
- 3 cloves garlic, minced
- 2-3 aji amarillo peppers, deseeded and chopped (or substitute with yellow bell pepper)
- 1 cup evaporated milk
- 1 cup unsalted peanuts, ground
- 4 slices of bread, crusts removed
- 1/4 cup grated Parmesan cheese
- 1 tablespoon olive oil
- Salt and pepper to taste
- 2 hard-boiled eggs, for garnish
- Black olives, for garnish
- Cooked white rice, for serving
Cooking Instructions
1. Prepare the Aji Amarillo: If using fresh aji amarillo peppers, start by roasting them on a skillet or directly over an open flame until the skin is charred.
Once charred, place them in a bowl and cover them with plastic wrap to steam for about 15-20 minutes. This will make it easier to peel off the skin. After steaming, peel, deseed, and chop the peppers.
2. Sauté Aromatics: In a large skillet, heat the olive oil over medium heat. Add the chopped onion and sauté until it becomes translucent, about 5 minutes.
Then add the minced garlic and continue to sauté for another minute, being careful not to burn the garlic.
3. Make the Sauce: In a blender, combine the sautéed onion and garlic, roasted aji amarillo peppers, ground peanuts, bread, evaporated milk, and chicken broth.
Blend until you achieve a smooth sauce. Season with salt and pepper to taste.
4. Combine Chicken and Sauce: In the same skillet, add the shredded chicken and pour in the blended sauce. Stir well to combine, and let it cook on low heat for about 10-15 minutes, allowing the flavors to meld together.
If the sauce is too thick, you can add a bit more chicken broth to reach your desired consistency.
5. Add Cheese and Adjust Seasoning****: Once the sauce is heated through, stir in the grated Parmesan cheese and adjust the seasoning if necessary.
Cook for an additional 5 minutes, then remove from heat.
6. Serve: To serve, place a generous scoop of cooked white rice on each plate, followed by the Aji De Gallina sauce.
Garnish with slices of hard-boiled eggs and black olives for a pop of color and additional flavor.
Extra Tips
When preparing Aji De Gallina, using day-old bread can enhance the texture of the sauce.
Additionally, if you can’t find aji amarillo peppers, you can use aji amarillo paste as a substitute, but be mindful to adjust the quantity according to your desired spice level.
For an extra layer of flavor, consider adding a splash of lime juice just before serving to brighten up the dish. Enjoy this delicious taste of Peru!
Causa Rellena
Causa Rellena is a beloved traditional Peruvian dish that perfectly embodies the vibrant flavors and colorful ingredients of the country’s cuisine. This dish is fundamentally a layered cake made from mashed yellow potatoes, seasoned with lime juice, aji amarillo (yellow chili pepper), and filled with a variety of fillings, commonly tuna, chicken, or avocado.
Causa Rellena isn’t only visually appealing but also offers a beautiful balance of flavors, making it a delightful appetizer or a light main course.
The origins of Causa Rellena date back to the time of the Inca Empire, where it was prepared as a dish for special occasions. Today, it remains a staple in Peruvian households and is often served at family gatherings and celebrations. Its vibrant colors and unique combination of ingredients make it a favorite among locals and tourists alike, showcasing the rich culinary heritage of Peru.
Ingredients (Serves 4-6)
- 1 kg yellow potatoes
- 2 tablespoons aji amarillo paste
- 1/4 cup lime juice
- 1/2 cup mayonnaise
- 1 can (200g) tuna, drained (or cooked shredded chicken)
- 1/2 red onion, finely chopped
- 1 avocado, sliced
- Salt and pepper to taste
- Fresh cilantro for garnish (optional)
- Olive oil (for drizzling)
Cooking Instructions
- Cook the Potatoes: Start by boiling the yellow potatoes in salted water until they’re tender. This usually takes about 20-25 minutes. Once cooked, drain the potatoes and let them cool slightly before peeling.
- Mash the Potatoes: In a large bowl, mash the peeled potatoes until smooth. Avoid using a blender, as this can make the potatoes gummy. Add the aji amarillo paste, lime juice, salt, and pepper to taste. Mix well until all ingredients are incorporated and the mixture is smooth and creamy.
- Prepare the Filling: In a separate bowl, combine the drained tuna (or shredded chicken) with the finely chopped red onion and mayonnaise. Season with salt and pepper to taste. If you want a fresher taste, you can add chopped cilantro to the mixture.
- Assemble the Causa Rellena: Take a portion of the potato mixture and spread it evenly in a mold or on a serving plate to create the first layer. Next, add a layer of the filling mixture, followed by a layer of avocado slices. Finally, top with another layer of the potato mixture, smoothing it out to create a uniform appearance.
- Chill the Dish: Cover the assembled Causa Rellena with plastic wrap and refrigerate for at least 30 minutes to allow the flavors to meld and the dish to firm up. This will make it easier to cut and serve.
- Serve: Once chilled, remove the Causa Rellena from the refrigerator. If using a mold, carefully invert it onto a serving platter. Drizzle with olive oil and garnish with fresh cilantro, if desired. Cut into slices and serve cold.
Extra Tips
To enhance the flavors of your Causa Rellena, consider adding a bit of diced boiled egg to the filling for added texture and richness. You can also experiment with the fillings by incorporating different ingredients such as olives, corn, or even a spicy mayonnaise for an extra kick.
Presentation is key, so take your time to layer the ingredients neatly and consider adding colorful garnishes, such as sliced radishes or cherry tomatoes, to brighten up the dish. Enjoy this delightful Peruvian classic with friends and family!
Pollo a La Brasa
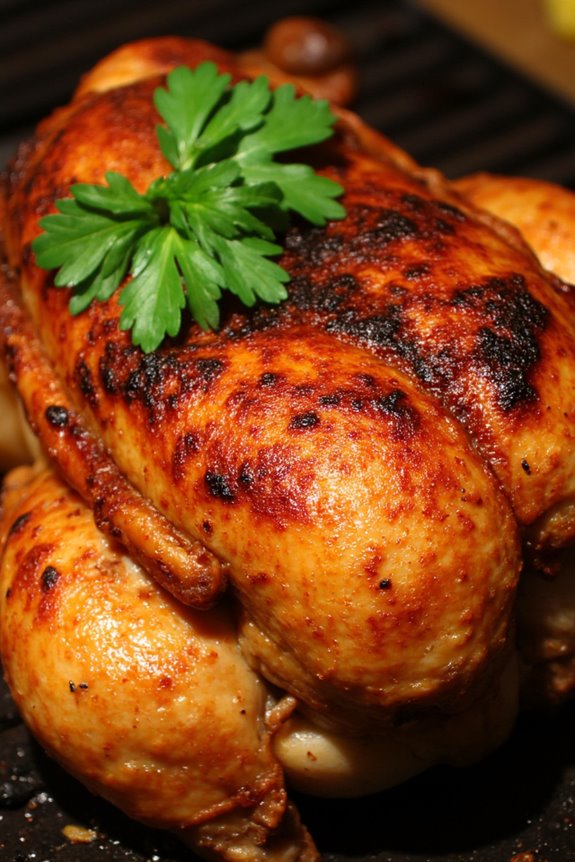
Pollo a La Brasa, or Peruvian rotisserie chicken, is a beloved dish that embodies the rich culinary heritage of Peru. Known for its deliciously crispy skin and juicy, flavorful meat, this dish has become a staple in Peruvian households and restaurants alike. The secret to its distinctive taste lies in the marinade, which typically includes a blend of spices, herbs, and citrus, creating a unique flavor that’s both aromatic and mouth-watering.
Traditionally cooked over charcoal or wood, this dish brings a smoky depth that enhances the overall experience. The beauty of Pollo a La Brasa lies not only in its taste but also in its versatility. It can be served with a variety of sides, such as fries, salad, or Peruvian rice, making it a perfect dish for family gatherings or special occasions.
The marinade can be prepared in advance, allowing the chicken to soak up all those wonderful flavors before cooking. This recipe will guide you through the process of making this iconic Peruvian dish, guaranteeing that you bring a taste of Peru to your table.
Ingredients (Serves 4-6)
- 1 whole chicken (about 3-4 pounds)
- 4 cloves of garlic, minced
- 2 tablespoons paprika
- 1 tablespoon cumin
- 1 tablespoon dried oregano
- 1 tablespoon soy sauce
- 1 tablespoon vinegar (white or red)
- 2 tablespoons olive oil
- Juice of 2 limes
- Salt and pepper to taste
- 1 teaspoon black pepper
- Fresh parsley for garnish (optional)
Cooking Instructions
1. Prepare the Marinade: In a large bowl, combine the minced garlic, paprika, cumin, oregano, soy sauce, vinegar, olive oil, lime juice, salt, and black pepper. Mix well until you have a smooth marinade. This blend of ingredients will infuse the chicken with flavors that are characteristic of Pollo a La Brasa.
2. Marinate the Chicken: Rinse the whole chicken under cold water and pat it dry with paper towels. Rub the marinade all over the chicken, both on the outside and inside the cavity. Make sure to coat it evenly for maximum flavor.
Cover the chicken with plastic wrap and refrigerate for at least 4 hours, preferably overnight. This step is essential as it allows the chicken to absorb the flavors deeply.
3. Preheat the Grill: When you’re ready to cook, preheat your grill to medium-high heat. If you’re using charcoal, let the coals burn down until they’re covered with white ash. For best results, set up a two-zone fire with one side hotter than the other to allow for indirect cooking.
4. Cook the Chicken: Place the marinated chicken on the grill, breast side up, over the cooler side (indirect heat). Close the lid and cook for about 1 hour, rotating it occasionally.
This method guarantees that the chicken cooks evenly without burning. Use a meat thermometer to check that the internal temperature reaches at least 165°F (75°C).
5. Crisp the Skin: Once the chicken is cooked through, move it to the hotter side of the grill for about 5-10 minutes to crisp up the skin. Keep an eye on it to prevent burning and turn it as needed until it reaches a golden brown color.
6. Rest and Serve: Remove the chicken from the grill and let it rest for about 10 minutes. This allows the juices to redistribute, guaranteeing moist meat.
Carve the chicken and serve it with your choice of sides, garnished with fresh parsley if desired.
Extra Tips
For an authentic touch, you can serve Pollo a La Brasa with a side of aji sauce, a spicy Peruvian condiment made from peppers, garlic, and lime juice. Additionally, consider using a brick or heavy pan to flatten the chicken while cooking, which can help achieve that perfectly crispy skin.
If grilling outdoors isn’t an option, a rotisserie setup in your oven can also yield delicious results. Remember, the longer you marinate the chicken, the more flavorful it will be, so don’t hesitate to plan ahead!
Rocoto Relleno
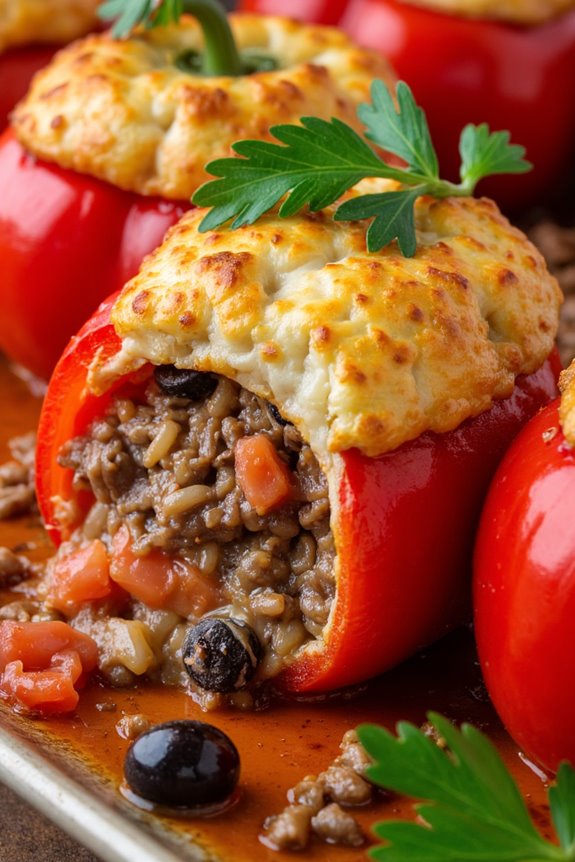
Rocoto Relleno is a traditional Peruvian dish that features a spicy rocoto pepper stuffed with a savory mixture of meat, vegetables, and spices. This dish originates from the city of Arequipa and is celebrated for its bold flavors and unique presentation. The rocoto pepper is known for its heat, similar to that of a habanero, making this dish not only a feast for the eyes but also a thrilling culinary experience for those who enjoy spicy foods.
Typically served with a side of potatoes or rice, Rocoto Relleno is a staple at Peruvian gatherings and family meals. The preparation involves carefully hollowing out the rocoto peppers, creating a flavorful filling, and then baking the stuffed peppers until they’re tender. This dish stands out not only for its taste but also for its vibrant colors, making it a beautiful addition to any table.
Ingredients (serving size of 4-6 people):
- 4 large rocoto peppers
- 500g ground beef or pork
- 1 medium onion, finely chopped
- 2 cloves garlic, minced
- 1 cup cooked rice
- 1 cup diced tomatoes
- 1/2 cup black olives, chopped
- 1/2 cup cheese (preferably queso fresco or mozzarella), grated
- 1 teaspoon cumin
- Salt and pepper to taste
- 2 tablespoons vegetable oil
- Fresh parsley, chopped (for garnish)
Cooking Instructions:
- Prepare the Rocoto Peppers: Start by carefully cutting the tops off the rocoto peppers and removing the seeds and membranes. This step is vital as it helps to reduce some of the heat while allowing the flavors of the filling to shine. Be cautious while handling the peppers; you may want to use gloves to avoid irritation.
- Cook the Filling: In a large skillet, heat the vegetable oil over medium heat. Add the chopped onions and minced garlic, sautéing until they’re translucent and fragrant. This step builds the base flavor for your filling.
- Add the Meat: Incorporate the ground beef or pork into the skillet, breaking it up with a spoon. Cook until the meat is browned and fully cooked through, about 5-7 minutes. Season with cumin, salt, and pepper. This will enhance the flavor of the meat and complement the heat of the rocoto.
- Combine Ingredients: Once the meat is cooked, stir in the diced tomatoes, cooked rice, and chopped olives. Mix everything together well and let it cook for an additional 2-3 minutes, allowing the flavors to meld. This is the heart of your filling, providing a satisfying texture and depth of flavor.
- Stuff the Peppers: Carefully spoon the filling into each rocoto pepper, pressing down gently to pack it in. Once filled, place the peppers in a baking dish. Sprinkle the grated cheese on top of each pepper, which will melt beautifully during baking.
- Bake the Peppers: Preheat your oven to 180°C (350°F). Cover the baking dish with aluminum foil and bake the peppers for about 30 minutes. Then, remove the foil and bake for an additional 10-15 minutes, or until the cheese is bubbly and golden brown. This step guarantees that the rocoto is tender while the cheese adds a delicious crust.
- Serve: Once baked, remove from the oven and let them cool slightly. Garnish with fresh parsley before serving. Rocoto Relleno is best enjoyed warm and can be served alongside potatoes or rice.
Extra Tips:
When preparing Rocoto Relleno, consider adjusting the heat level by either leaving some seeds in the peppers or opting for milder peppers if you prefer a less spicy dish.
Additionally, you can experiment with the filling by adding other ingredients such as corn or different types of cheese for a unique twist. Always taste the filling before stuffing the peppers to confirm the seasoning is to your liking. Enjoy your culinary adventure with this traditional Peruvian recipe!
Sopa a La Criolla
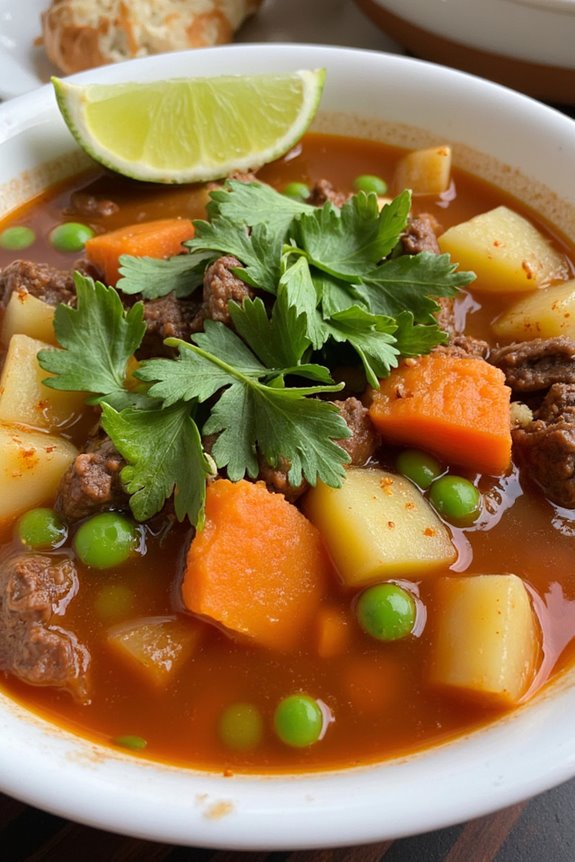
Sopa a La Criolla is a classic Peruvian soup that beautifully combines rich flavors and textures, making it a beloved comfort food across the country. This hearty dish features a savory broth, tender meat, and a variety of fresh ingredients, making it not only delicious but also nourishing. Traditionally served with a side of rice, Sopa a La Criolla is perfect for family gatherings or a cozy dinner at home.
The essence of Sopa a La Criolla comes from the blend of spices and the freshness of the vegetables used in the recipe. The soup is typically made with beef, but you can also substitute chicken or use a combination of meat for added depth of flavor. Whether you’re familiar with Peruvian cuisine or trying it for the first time, this soup will surely leave you satisfied and wanting more.
Ingredients (Serves 4-6):
- 1 lb beef (chuck or shank), cut into small cubes
- 1 medium onion, chopped
- 2 cloves garlic, minced
- 2 medium tomatoes, diced
- 1 medium carrot, sliced
- 1 medium potato, diced
- 1 cup of green peas
- 1 cup of cooked rice (for serving)
- 4 cups beef broth
- 1 tablespoon aji amarillo paste (or to taste)
- 1 teaspoon cumin
- 1 teaspoon oregano
- Salt and pepper to taste
- Fresh cilantro, chopped (for garnish)
- Lime wedges (for serving)
Cooking Instructions:
- Prepare the Meat: In a large pot over medium heat, add a splash of oil and sear the beef cubes until browned on all sides. This step enhances the flavor of the meat and lays the foundation for a rich broth.
- Sauté the Aromatics: Add the chopped onion and minced garlic to the pot with the browned beef. Sauté for about 3-5 minutes until the onion is translucent and fragrant. The sautéing process helps to build the flavor profile of the soup.
- Add Vegetables and Spices: Stir in the diced tomatoes, sliced carrot, and aji amarillo paste. Cook for another 2-3 minutes until the tomatoes begin to break down. Then, add the cumin, oregano, salt, and pepper. This step introduces the vibrant colors and fresh aromas associated with Peruvian dishes.
- Incorporate Broth and Simmer: Pour in the beef broth and bring the mixture to a gentle boil. Lower the heat and let it simmer for about 30-40 minutes, or until the beef is tender and the flavors have melded together beautifully.
- Add Potatoes and Peas: Once the meat is tender, add the diced potatoes and green peas to the soup. Continue simmering for an additional 15-20 minutes until the potatoes are soft. This step guarantees that all the ingredients cook evenly and contributes to a hearty texture.
- Serve: Taste the soup and adjust seasoning if necessary. Ladle the soup into bowls, serving it hot with a scoop of cooked rice on the side. Garnish each bowl with fresh cilantro and a wedge of lime for an extra burst of flavor.
Extra Tips:
When making Sopa a La Criolla, feel free to customize the vegetables based on what you have available or your personal preferences. Adding ingredients like zucchini or corn can provide additional flavor and nutrition.
If you’re looking for a bit more spice, consider adding sliced jalapeños or adjusting the amount of aji amarillo paste. Remember to serve the soup immediately for the best taste, and enjoy it with a squeeze of lime to brighten the flavors!
Arroz Con Pollo
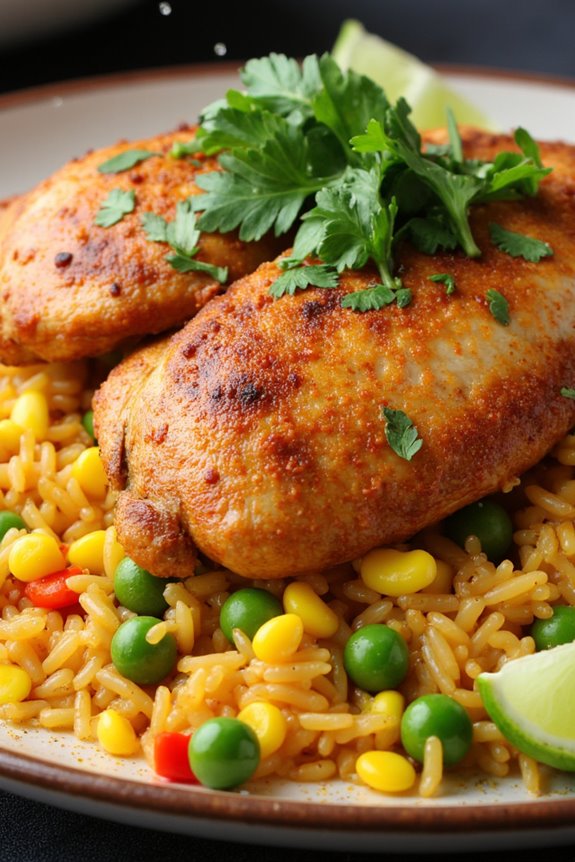
Arroz Con Pollo, or Rice with Chicken, is a beloved dish in traditional Peruvian cuisine that showcases the vibrant flavors of the region. This comforting dish combines tender, marinated chicken with fragrant rice, vegetables, and a variety of spices, resulting in a colorful and aromatic meal that’s perfect for family gatherings or celebrations.
The beauty of Arroz Con Pollo lies in its versatility; it can be adjusted to suit personal preferences or what ingredients you have on hand.
The origins of Arroz Con Pollo can be traced back to Spanish influences, but over the years, Peruvians have added their own unique twists to the recipe. The use of cilantro, a staple herb in Peruvian cooking, imparts a fresh and earthy flavor that elevates the dish.
With its balance of protein, grains, and vegetables, Arroz Con Pollo isn’t only delicious but also a wholesome option for a satisfying meal.
Ingredients (Serves 4-6)
- 4 chicken thighs, bone-in and skin-on
- 2 cups long-grain rice
- 4 cups chicken broth
- 1 medium onion, finely chopped
- 2 cloves garlic, minced
- 1 bell pepper, diced (red or green)
- 1 cup frozen peas
- 1 cup corn (fresh or frozen)
- 1 cup chopped fresh cilantro
- 1 teaspoon cumin
- 1 teaspoon paprika
- 1 teaspoon turmeric
- Salt and pepper, to taste
- 3 tablespoons vegetable oil
- 1 lime, cut into wedges (for serving)
Cooking Instructions
- Marinate the Chicken: Begin by seasoning the chicken thighs with salt, pepper, cumin, paprika, and turmeric. Let them marinate for at least 30 minutes to allow the flavors to penetrate the meat. This step is vital for developing a rich flavor in your dish.
- Sear the Chicken: In a large pot or deep skillet, heat the vegetable oil over medium-high heat. Once hot, add the marinated chicken thighs, skin-side down, and sear them for about 5-7 minutes on each side until they’re golden brown. This step locks in the juices and adds depth to the dish.
- Sauté Vegetables: Remove the chicken from the pot, and in the same pot, add the chopped onion and garlic. Sauté for about 3-4 minutes until the onion becomes translucent. Then, add the diced bell pepper and continue to sauté for another 2-3 minutes, allowing the vegetables to soften.
- Add Rice and Broth: Stir in the long-grain rice, making sure it’s well-coated with the oil and vegetable mixture. Pour in the chicken broth and bring the mixture to a boil. This step is necessary for cooking the rice evenly and infusing it with flavor.
- Combine and Cook: Once boiling, return the seared chicken thighs to the pot, placing them on top of the rice. Cover the pot with a lid, reduce the heat to low, and let it simmer for about 25-30 minutes until the rice is cooked and has absorbed all the liquid. Avoid lifting the lid during this time to guarantee proper steaming.
- Add Peas and Corn: After the rice is cooked, gently fluff it with a fork and stir in the frozen peas, corn, and chopped cilantro. Adjust the seasoning with more salt and pepper if needed. Cover again and let it sit for an additional 5 minutes to warm through.
- Serve: Serve the Arroz Con Pollo hot, garnished with lime wedges for an extra burst of flavor. Enjoy the dish with family and friends, sharing the warmth of Peruvian hospitality.
Extra Tips
To enhance the flavor, consider using homemade chicken broth instead of store-bought, as it adds a richer taste to the dish.
Additionally, feel free to customize the vegetable mix based on your preferences; adding carrots or green beans can provide more texture and color.
For an even more authentic touch, you can also top the dish with sliced avocado or serve it alongside a fresh salad.
Tacu Tacu

Tacu Tacu is a traditional Peruvian dish that embodies the spirit of resourcefulness and creativity in cooking. Originating from Afro-Peruvian culture, this dish is a delightful combination of rice and beans, often accompanied by a variety of proteins such as steak, fried eggs, or seafood. The dish represents the culinary fusion of different cultures and is popular in many households across Peru. Its comforting flavors and satisfying texture make it a beloved choice for family meals and gatherings.
The preparation of Tacu Tacu not only reflects the simplicity of its ingredients but also the deep-rooted traditions of serving wholesome and filling food. The dish is typically seasoned with spices and herbs, enhancing its taste profile while allowing the natural flavors of the rice and beans to shine through.
Whether you’re preparing a festive meal or a cozy dinner, Tacu Tacu is sure to impress your guests and bring a taste of Peru to your table.
Ingredients (Serves 4-6)
- 2 cups cooked white rice
- 2 cups cooked canary beans (or any variety of beans)
- 1 medium onion, finely chopped
- 2 cloves garlic, minced
- 2 tablespoons vegetable oil
- 1 teaspoon ground cumin
- 1 teaspoon paprika
- Salt and pepper to taste
- 2 eggs (for frying, optional)
- Fresh cilantro, chopped (for garnish)
Cooking Instructions
- Prepare the Bean Mixture: In a large bowl, combine the cooked rice and beans. Mash them together gently with a fork or potato masher until they form a cohesive mixture but still have some texture. This will help bind the ingredients together when frying.
- Sauté Aromatics: In a large skillet, heat the vegetable oil over medium heat. Add the chopped onion and cook until translucent, about 3-4 minutes. Then add the minced garlic and sauté for another minute until fragrant. Be careful not to burn the garlic.
- Combine Ingredients: Add the mashed rice and bean mixture to the skillet with the sautéed onions and garlic. Stir to combine, ensuring the mixture is evenly distributed in the skillet. Season with cumin, paprika, salt, and pepper. Cook for about 5-7 minutes, allowing the mixture to heat through and develop flavors.
- Form the Tacu Tacu: Use a spatula to flatten the rice and bean mixture into an even layer in the skillet. Allow it to cook undisturbed for about 5-8 minutes until the bottom is golden and crispy.
- Flip the Tacu Tacu: To flip, you can either carefully invert it onto a plate and then slide it back into the skillet or use another flat pan to help turn it. Cook the other side for another 5-7 minutes until it’s also golden and crispy.
- Prepare Fried Eggs (Optional): In a separate small skillet, fry the eggs to your liking (sunny-side up or over easy). This step is optional, but it adds a delicious touch to the dish.
- Serve: Once the Tacu Tacu is cooked on both sides, slide it onto a serving platter. Top with fried eggs if desired and garnish with fresh cilantro. Serve warm.
Extra Tips
When preparing Tacu Tacu, feel free to experiment with additional spices or ingredients to suit your taste. For instance, adding diced bell peppers or jalapeños can introduce extra flavor and heat.
If you have leftover Tacu Tacu, it can be stored in the refrigerator and reheated the next day, making it a great option for meal prep. Remember that the key to a perfect Tacu Tacu is the crispy texture, so don’t rush the frying process!
Anticuchos
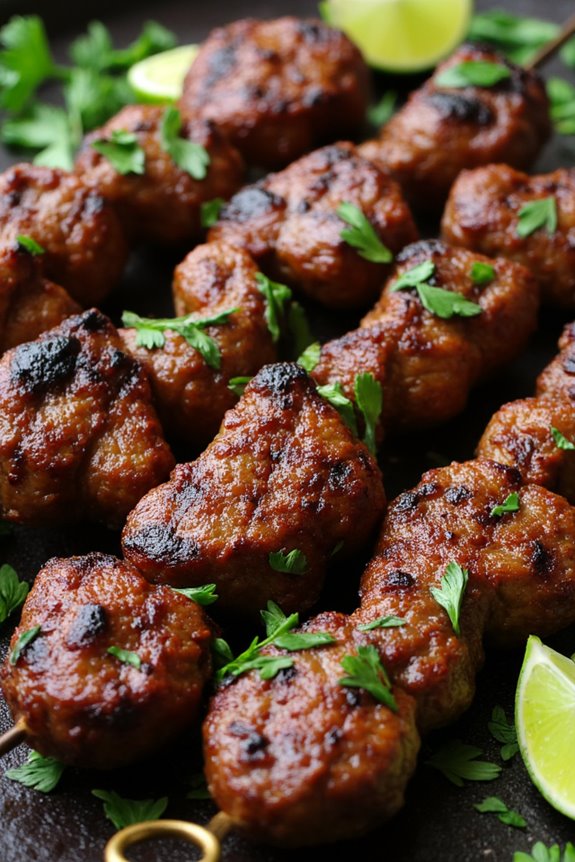
Anticuchos are a beloved traditional Peruvian street food, widely known for their rich flavors and tender meat. These skewers are typically made from beef heart, marinated in a tantalizing mix of spices and served with a side of creamy potato salad or corn on the cob. The origins of anticuchos can be traced back to the Inca Empire, where they were a popular dish among the indigenous people, often enjoyed during celebrations and festivals.
Today, they can be found in many street stalls and restaurants throughout Peru, showcasing the country’s vibrant culinary heritage. Making anticuchos at home can be a delightful experience, allowing you to savor the authentic taste of Peru. The marinade is what truly elevates this dish, combining the heat of aji pepper with the tanginess of vinegar, resulting in a flavor profile that’s both complex and satisfying.
Whether you’re an experienced cook or a novice in the kitchen, this recipe will guide you through creating a delicious batch of anticuchos that can be enjoyed at any gathering.
Ingredients for Anticuchos (serving size 4-6 people):
- 2 lbs beef heart, cleaned and cut into 1-inch cubes
- ½ cup red wine vinegar
- ¼ cup vegetable oil
- 3 cloves garlic, minced
- 1 tablespoon aji panca paste (or substitute with chili paste)
- 1 tablespoon cumin
- 1 teaspoon paprika
- Salt and pepper to taste
- 12 wooden skewers, soaked in water for 30 minutes
- Fresh parsley for garnish (optional)
- Lime wedges for serving
Cooking Instructions:
- Prepare the Marinade: In a large mixing bowl, combine the red wine vinegar, vegetable oil, minced garlic, aji panca paste, cumin, paprika, salt, and pepper. Whisk the ingredients together until well mixed to create a flavorful marinade.
- Marinate the Beef Heart: Add the beef heart cubes to the marinade, ensuring that each piece is well-coated. Cover the bowl with plastic wrap and refrigerate for at least 2 hours, or ideally overnight, to allow the flavors to penetrate the meat.
- Prepare the Skewers: After marinating, remove the beef heart from the refrigerator. Thread the marinated beef heart cubes onto the soaked wooden skewers, leaving a little space between each piece for even cooking.
- Preheat the Grill: Preheat your grill or grill pan over medium-high heat. Lightly oil the grill grates to prevent sticking.
- Grill the Anticuchos: Place the skewers on the hot grill. Cook for approximately 10-12 minutes, turning occasionally, until the meat is cooked to your desired level of doneness and has a nice char on the outside.
- Serve and Garnish: Once cooked, remove the anticuchos from the grill and let them rest for a couple of minutes. Serve the skewers on a platter, garnished with fresh parsley and lime wedges on the side for an extra burst of flavor.
Extra Tips: When preparing anticuchos, it’s important to give the beef heart plenty of time to marinate, as this will enhance the flavor and tenderness of the meat. If you can’t find beef heart, you can substitute it with other cuts of beef, but keep in mind that the texture and flavor will vary.
Additionally, feel free to experiment with other vegetables like bell peppers or onions on the skewers for added variety and color. Enjoy your culinary adventure!
Picarones

Picarones are a beloved traditional Peruvian dessert that brings the flavors of the Andes to your table. These delightful sweet potato and pumpkin doughnuts aren’t only delicious but also have a unique texture that sets them apart from other fried treats. Traditionally served with a spiced syrup made from chancaca (a type of raw sugar), picarones are perfect for any occasion, from family gatherings to festive celebrations. The combination of sweet and slightly spiced flavors makes them a favorite among both locals and visitors.
Preparing picarones can be a fun and rewarding experience, allowing you to indulge in a taste of Peruvian culture right in your kitchen. The ingredients are simple and accessible, and while the frying may seem intimidating at first, the results are definitely worth the effort. With a crispy exterior and a soft, fluffy interior, these doughnuts are sure to impress your family and friends. So, roll up your sleeves, and let’s plunge into the recipe!
Ingredients (Serves 4-6)
- 1 cup of cooked and mashed sweet potato
- 1 cup of cooked and mashed pumpkin
- 2 cups of all-purpose flour
- 1 tablespoon of brown sugar
- 1 teaspoon of active dry yeast
- 1/2 teaspoon of cinnamon
- 1/4 teaspoon of nutmeg
- 1/2 teaspoon of salt
- 1/2 cup of warm water
- Oil for frying
For the syrup:
- 1 cup of chancaca or brown sugar
- 1/2 cup of water
- 1 cinnamon stick
- 2 cloves
- Zest of 1 orange
Cooking Instructions
- Prepare the Dough: In a large bowl, combine the mashed sweet potato, mashed pumpkin, brown sugar, cinnamon, nutmeg, and salt. Mix until well combined. In a separate bowl, dissolve the active dry yeast in warm water and let it sit for about 5 minutes until frothy. Add the yeast mixture to the sweet potato and pumpkin mixture, and stir well. Gradually add the flour, mixing until a soft dough forms.
- Let the Dough Rise: Once the dough is mixed, cover the bowl with a clean kitchen towel and let it rise in a warm place for about 1 hour, or until it has doubled in size. This resting period is vital for achieving the light and airy texture of the picarones.
- Shape the Picarones: After the dough has risen, lightly flour your hands and pinch off small portions of the dough. Shape each piece into a ring by rolling it into a rope and connecting the ends. Verify that the hole in the middle is large enough, as they’ll puff up during frying.
- Prepare the Syrup: While the dough is rising, you can make the syrup. In a saucepan, combine the chancaca (or brown sugar) with water, the cinnamon stick, cloves, and orange zest. Bring to a boil, then reduce the heat and let it simmer for about 10-15 minutes until it thickens slightly. Remove from heat and set aside.
- Fry the Picarones: In a deep skillet or frying pan, heat oil over medium heat. Once the oil is hot, carefully drop in the shaped picarones, a few at a time, making sure not to overcrowd the pan. Fry them for about 3-4 minutes on each side, or until they’re golden brown. Remove them with a slotted spoon and drain on paper towels.
- Serve: Arrange the fried picarones on a serving platter and drizzle the warm syrup over them. You can also serve the syrup on the side for dipping.
Extra Tips
When making picarones, confirm that the oil temperature is just right—too hot, and the outside will burn before the inside cooks; too cool, and they’ll absorb excess oil. It’s important to keep an eye on them while frying.
Additionally, you can experiment with the syrup by adding more spices like ginger or even a splash of pisco for added flavor. Enjoy your homemade picarones fresh for the best taste and texture!