

As the holiday season approaches, my mind fills with thoughts of the delectable Argentinian recipes that make Christmas so magical. Each dish is like a cherished tradition, from the smoky asado to the delightful sweet treats that follow. These flavors create a festive ambiance that brings the whole family together. Curious about the dishes that make the season shine? Let’s explore some of the most beloved recipes that light up the holidays.
Asado: The Argentine Barbecue Tradition

Asado, the Argentine barbecue tradition, isn’t just a meal; it’s a social event that brings friends and family together to celebrate and enjoy delicious grilled meats. The process of preparing asado is almost as important as the meal itself, with the gathering around the grill (parrilla) becoming an integral part of Argentine culture.
This dish typically features various cuts of meat, sausages, and even vegetables, all cooked slowly over an open flame or hot coals, allowing the flavors to develop beautifully.
In Argentina, the asado is often accompanied by chimichurri, a vibrant sauce made from parsley, garlic, vinegar, and olive oil, which complements the grilled meats perfectly. Each family may have their style and preferred cuts, but the essence of asado remains the same: it’s a celebration of good food and company.
This recipe will guide you through preparing a classic asado for 4-6 people, creating a memorable experience for your loved ones.
Ingredients (for 4-6 servings):
- 2 lbs of beef ribs
- 2 lbs of flank steak
- 1 lb of chorizo sausages
- 1 lb of morcilla (blood sausage)
- 2 red bell peppers
- 2 yellow bell peppers
- 1 large onion
- Salt (to taste)
- Freshly ground black pepper (to taste)
- Olive oil (for brushing)
- Chimichurri sauce (for serving)
Cooking Instructions:
- Prepare the Grill: Start by preparing your grill or parrilla. Use charcoal or wood to create a hot, even heat source. Allow the coals to burn down until they’re covered with a light ash before starting to cook. This guarantees that the heat is just right for grilling.
- Season the Meats: While the grill is heating up, season the beef ribs, flank steak, chorizo, and morcilla generously with salt and freshly ground black pepper. You can also brush them lightly with olive oil to help with the grilling process and enhance flavor.
- Grill the Meats: Place the beef ribs on the grill first, as they take longer to cook. Cook them for about 20-30 minutes, turning occasionally to get an even char. After about 10 minutes, add the flank steak, cooking it for an additional 10-15 minutes, depending on your desired level of doneness.
- Add the Sausages: Once the beef has had some time to cook, add the chorizo and morcilla to the grill. These will typically take about 10-15 minutes to cook through. Turn them frequently to guarantee they’re evenly cooked and browned.
- Grill the Vegetables: While the meats are cooking, slice the red and yellow bell peppers and onion into large pieces. Brush them with olive oil and place them on the grill. Cook the vegetables for about 10-15 minutes, turning occasionally until they’re tender and have nice grill marks.
- Serve the Asado: Once all the meats and vegetables are cooked to your liking, remove them from the grill and let them rest for a few minutes. This helps to retain their juices. Serve the asado with chimichurri sauce on the side for dipping.
Extra Tips:
For a truly authentic asado experience, consider using different cuts of meat, such as short ribs or flank steak, and don’t hesitate to experiment with local variations.
The key to great asado is patience; cook slowly and allow the flavors to develop. Additionally, don’t forget to enjoy the process and share a glass of Malbec with your guests while the meat cooks. This will enhance the experience and make the gathering even more special!
Vitel Toné: A Unique Christmas Main Dish
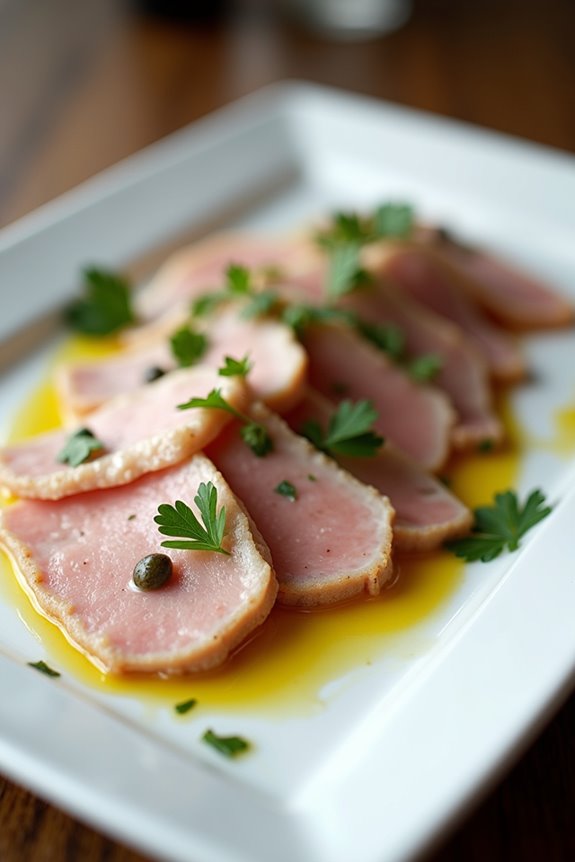
Vitel Toné is a classic Argentinian dish that has become a staple during Christmas celebrations. This unique main course features thinly sliced veal that’s served cold, accompanied by a creamy and tangy sauce made from tuna, anchovies, and capers. Its origins can be traced back to Italian cuisine, specifically from the Northern regions, but it has been embraced and adapted by the Argentinian population, making it a beloved dish during the festive season.
The combination of flavors and textures makes Vitel Toné not only delicious but also a centerpiece that sparks conversation at any Christmas gathering.
Preparing Vitel Toné is an excellent way to impress your guests with your culinary skills while also providing them with a taste of Argentina’s rich culinary heritage. The dish can be made a day in advance, allowing the flavors to meld beautifully. Serve it chilled or at room temperature, and pair it with a revitalizing salad or some crusty bread for a delightful holiday feast.
Ingredients (Serves 4-6)
- 1 kg veal round or eye of round
- 1 onion, quartered
- 2 carrots, chopped
- 2 celery stalks, chopped
- 1 bay leaf
- 10 black peppercorns
- 200 g canned tuna in oil, drained
- 50 g anchovy fillets, drained
- 2 tablespoons capers, rinsed
- 200 ml cream
- 2 tablespoons lemon juice
- Salt and pepper to taste
- Olive oil for drizzling
- Fresh parsley for garnish (optional)
Cooking Instructions
- Cook the Veal: In a large pot, place the veal along with the onion, carrots, celery, bay leaf, and peppercorns. Cover with water and bring to a boil. Once boiling, reduce the heat and simmer for about 1.5 to 2 hours or until the meat is tender. Skim off any foam that forms on the surface during cooking.
- Cool the Veal: Once cooked, remove the veal from the pot and let it cool on a cutting board. Strain the broth and reserve it for future use or other recipes. Once the veal is cool enough to handle, slice it thinly against the grain.
- Prepare the Sauce: In a food processor, combine the drained tuna, anchovies, and capers. Blend until smooth. Add the cream and lemon juice, then season with salt and pepper to taste. Blend again until you achieve a creamy consistency.
- Assemble the Dish: On a large serving platter, arrange the thinly sliced veal in an overlapping pattern. Spoon the sauce generously over the meat, ensuring it’s well-coated. If desired, reserve some sauce for serving on the side.
- Chill: Cover the dish with plastic wrap and refrigerate for at least 4 hours, preferably overnight. This chilling time allows the flavors to develop and the dish to be served at the ideal temperature.
- Serve: Before serving, drizzle a little olive oil over the top and garnish with fresh parsley, if using. Serve with additional sauce on the side and crusty bread or a light salad.
Extra Tips
When making Vitel Toné, confirm that the veal is cooked until tender but not overcooked, as this will help maintain its moisture and flavor.
Additionally, using high-quality tuna and anchovies will greatly enhance the taste of the sauce. Feel free to customize the sauce by adding ingredients like hard-boiled eggs or horseradish for an extra kick.
Ensalada Rusa: A Colorful Festive Salad

Ensalada Rusa, or Russian Salad, is a staple in Argentinian festive gatherings, especially during Christmas. This vibrant and creamy salad is known for its delightful mix of vegetables, proteins, and a tangy dressing that makes it a perfect accompaniment to the holiday meal.
Traditionally, the salad comprises boiled potatoes, carrots, peas, and sometimes even diced apples or pickles, all bound together with mayonnaise. Its colorful presentation not only adds visual appeal to your festive table but also offers a revitalizing contrast to richer holiday dishes.
Making Ensalada Rusa is relatively simple, and it can be prepared ahead of time, allowing you more freedom to enjoy the festivities. This salad is versatile, and you can modify the ingredients based on personal taste or availability. Whether served as a side dish or on its own, Ensalada Rusa is sure to be a hit with family and friends during the holiday season.
Ingredients (serves 4-6):
- 4 medium potatoes
- 2 medium carrots
- 1 cup green peas (fresh or frozen)
- 1 cup diced cooked chicken or ham (optional)
- 1/2 cup mayonnaise
- 1 tablespoon mustard
- Salt and pepper to taste
- 1/4 cup diced pickles (optional)
- 1/4 cup diced apples (optional)
- Fresh parsley for garnish (optional)
Cooking Instructions:
- Boil the Vegetables: Start by peeling the potatoes and carrots. Cut them into small cubes for even cooking. In a large pot, bring salted water to a boil, then add the diced potatoes and carrots. Cook for about 10-12 minutes or until they’re tender but firm. Add the peas in the last 2-3 minutes of cooking. Drain and set aside to cool.
- Prepare the Protein (Optional): If you’re using chicken or ham, verify it’s cooked and diced into small pieces. You can use leftover rotisserie chicken or boil some chicken breast for this purpose. Set aside.
- Mix the Dressing: In a large mixing bowl, combine the mayonnaise, mustard, salt, and pepper. Stir until well mixed. If you’re adding pickles or apples, include them in this mixture as well for extra flavor.
- Combine Ingredients: Once the boiled vegetables have cooled completely, add them to the bowl with the dressing. If using, also add the diced chicken or ham. Gently fold the mixture to combine, being careful not to mash the vegetables.
- Chill the Salad: Transfer the Ensalada Rusa to a serving dish or bowl. Cover with plastic wrap and refrigerate for at least 1 hour to allow the flavors to meld. This salad can be made a day in advance for easier preparation.
- Garnish and Serve: Just before serving, give the salad a gentle stir and taste to adjust seasoning. Garnish with fresh parsley if desired, and serve chilled.
Extra Tips: To enhance the flavor of your Ensalada Rusa, consider adding a splash of lemon juice to the dressing for a tangy kick. Additionally, you can customize the salad by including other ingredients like diced bell peppers or hard-boiled eggs.
Remember to let the salad chill adequately, as this will help the flavors blend beautifully, making it even more enjoyable at your festive gatherings. Enjoy this colorful dish that brings a taste of Argentina to your Christmas table!
Provoleta: Grilled Cheese Delight
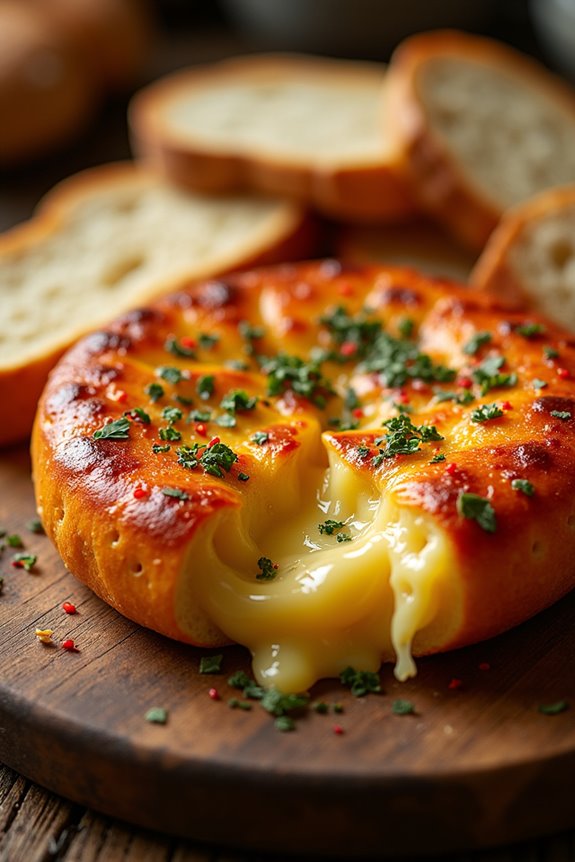
Provoleta is a traditional Argentinian dish that showcases the rich flavors of provolone cheese, perfectly suited for a festive Christmas gathering. This dish isn’t only a delightful appetizer but also a symbol of the Argentinian barbecue culture, known as asado.
Grilled to perfection, provoleta becomes a gooey and aromatic delight that’s often enjoyed straight off the grill, paired with crusty bread and a sprinkle of oregano or chili flakes. It’s the perfect dish to impress your guests during the holiday season!
The key to a successful provoleta lies in selecting high-quality provolone cheese and guaranteeing you have the right grilling setup. Whether you’re using a charcoal grill or a gas grill, the aim is to achieve that perfect melt without burning the cheese.
As you prepare this delicious dish, take your time to enjoy the grilling experience, and don’t hesitate to get creative with toppings and dipping sauces.
Ingredients (Serves 4-6):
- 1 large wheel of provolone cheese (approximately 400-500 grams)
- 2 tablespoons of olive oil
- 1 teaspoon of dried oregano
- 1 teaspoon of red pepper flakes (optional)
- Freshly cracked black pepper, to taste
- Crusty bread, for serving
Cooking Instructions:
- Preheat the Grill: Start by preheating your grill to a medium-high heat. If you’re using a charcoal grill, allow the coals to turn ashy and glowing; for a gas grill, turn on the burners and let it heat up for about 10-15 minutes. This will guarantee that the provoleta cooks evenly.
- Prepare the Cheese: While the grill is heating up, remove the provolone cheese from its packaging and pat it dry with a paper towel. This helps prevent excess moisture, which could hinder the melting process. If desired, you can cut a shallow crosshatch pattern on the top of the cheese to allow for better flavor absorption.
- Season the Cheese: Brush both sides of the provolone cheese with olive oil. Then, sprinkle the top with dried oregano, red pepper flakes (if using), and freshly cracked black pepper. This will enhance the flavor as the cheese grills.
- Grill the Cheese: Place the seasoned provolone cheese directly on the grill grates. Close the grill lid and cook for about 5-7 minutes, or until the cheese begins to bubble and the edges start to turn golden brown. Keep a close eye on it to avoid burning.
- Serve Immediately: Once the provoleta is ready, carefully remove it from the grill using a spatula. Place it on a heatproof serving platter. Serve immediately with slices of crusty bread for dipping.
Extra Tips:
When preparing provoleta, it’s important to keep the cheese at room temperature for about 30 minutes before grilling. This helps it melt more evenly.
Additionally, consider experimenting with different toppings, such as fresh herbs or a drizzle of honey, to elevate the dish further. Remember to have your bread ready for dipping, as the gooey cheese is best enjoyed fresh off the grill!
Pionono: A Sweet Rolled Cake

Pionono is a delightful Argentinian dessert that has become a staple during Christmas celebrations. This sweet rolled cake isn’t only visually appealing but also incredibly versatile, as it can be filled with various fillings like dulce de leche, fruits, or cream. Its soft sponge texture and sweet flavor make it a favorite among both children and adults, making it a perfect addition to any holiday table.
With its origins rooted in Spanish cuisine, pionono has evolved in Argentina to reflect local tastes and ingredients, turning it into a beloved holiday treat. Making pionono is a fun and rewarding process that can bring the family together in the kitchen. The cake is typically rolled after baking, allowing it to hold its shape and create a beautiful presentation when sliced.
Whether you’re preparing it for a festive gathering or a simple family meal, this delicious dessert is sure to impress. Let’s explore the recipe and create a beautiful pionono that will make your holiday celebrations even sweeter!
Ingredients (Serves 4-6 people):
- 4 large eggs
- 100 grams (about ½ cup) granulated sugar
- 100 grams (about ¾ cup) all-purpose flour
- 1 teaspoon baking powder
- 1 teaspoon vanilla extract
- 200 grams (about 1 cup) dulce de leche (or desired filling)
- Powdered sugar (for dusting)
- Optional: fresh fruits (like strawberries or bananas) for garnish
Cooking Instructions:
- Preheat the Oven: Begin by preheating your oven to 180°C (350°F). This guarantees that your pionono will bake evenly and rise properly, achieving the light and fluffy texture that’s characteristic of this cake.
- Prepare the Baking Sheet: Line a rectangular baking sheet (approximately 30×40 cm or 12×16 inches) with parchment paper. This will prevent the cake from sticking and make it easier to roll later on.
- Whisk the Eggs and Sugar: In a large mixing bowl, combine the eggs and granulated sugar. Using an electric mixer, beat the mixture on high speed until it becomes thick, pale, and fluffy (about 5-7 minutes). This step incorporates air into the batter, which will help the cake rise.
- Combine Dry Ingredients: In a separate bowl, sift together the flour and baking powder. This step is vital as it helps to aerate the flour and eliminates any lumps, allowing for a smooth batter.
- Fold the Dry Ingredients: Gently fold the dry ingredients into the egg and sugar mixture using a spatula. Be careful not to deflate the batter; use a gentle folding motion until just combined.
- Add Vanilla Extract: Stir in the vanilla extract until fully incorporated. This adds a lovely flavor to the cake.
- Spread the Batter: Pour the batter onto the prepared baking sheet and spread it evenly using a spatula. Make sure to reach the corners for an even thickness.
- Bake the Cake: Place the baking sheet in the preheated oven and bake for 10-12 minutes, or until the cake is lightly golden and springs back when touched.
- Cool and Roll the Cake: Once baked, remove the cake from the oven and immediately turn it out onto a clean kitchen towel sprinkled with powdered sugar. Peel away the parchment paper and roll the cake tightly with the towel while it’s still warm. Allow it to cool completely in this rolled-up position to help maintain its shape.
- Fill the Cake: Once cooled, unroll the cake gently and spread a generous layer of dulce de leche (or your chosen filling) over the surface. If you’re using fruits, add them on top of the dulce de leche.
- Re-roll the Cake: Carefully roll the cake back into its original shape without the towel. Place it seam-side down on a serving platter.
- Garnish and Serve: Dust the top with powdered sugar and add any additional garnishes, like fresh fruits. Slice into portions and serve.
Extra Tips:
When making pionono, it’s important to work quickly while the cake is warm to prevent it from cracking as you roll it. If you’re feeling adventurous, try experimenting with different fillings such as whipped cream, chocolate ganache, or seasonal fruits to suit your taste.
For an even more festive touch, consider drizzling melted chocolate over the top or decorating with colorful sprinkles. Enjoy your pionono as a delightful centerpiece for your holiday dessert table!
Pan Dulce: Traditional Christmas Bread
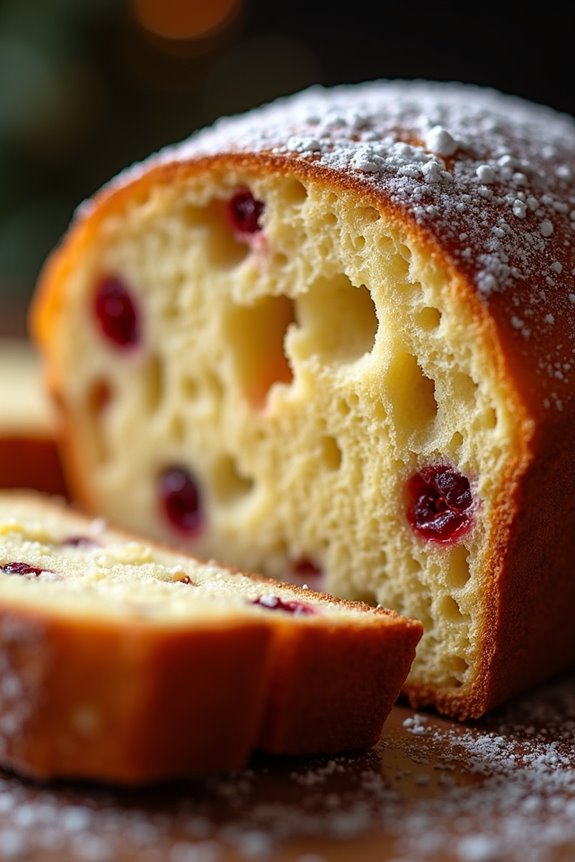
Pan Dulce, also known as “Sweet Bread,” is a beloved Argentinian Christmas treat that fills homes with the warm aroma of spices and sweetness during the festive season. This traditional bread is characterized by its fluffy texture and delightful flavors, often enhanced with dried fruits, nuts, and a hint of citrus.
Making Pan Dulce isn’t just about cooking; it’s about creating memories with loved ones as you gather around to share this festive delight.
Preparing Pan Dulce requires some time and patience as the dough needs to rise, but the end result is a beautifully golden loaf that’s certain to impress. Whether enjoyed on Christmas morning or shared at holiday gatherings, this sweet bread is an essential part of Argentinian holiday traditions.
With a touch of candied peel and a sprinkle of powdered sugar on top, Pan Dulce is both a treat for the palate and a feast for the eyes.
Ingredients (Serves 4-6 people):
- 500g all-purpose flour
- 100g sugar
- 100g unsalted butter, softened
- 200ml whole milk, warmed
- 2 large eggs
- 10g dry yeast
- 100g mixed dried fruits (raisins, candied orange peel, etc.)
- 50g chopped nuts (walnuts, almonds, etc.)
- 1 teaspoon vanilla extract
- 1 teaspoon ground cinnamon
- 1/2 teaspoon salt
- Powdered sugar for dusting (optional)
Cooking Instructions:
- Activate the Yeast: In a small bowl, combine the warm milk and dry yeast. Stir gently and let it sit for about 10 minutes until it becomes frothy. This step guarantees that the yeast is active and ready to leaven the dough.
- Prepare the Dough: In a large mixing bowl, combine the all-purpose flour, sugar, ground cinnamon, and salt. Make a well in the center and add in the activated yeast mixture, softened butter, eggs, and vanilla extract. Mix with a wooden spoon until the dough begins to come together.
- Knead the Dough: Transfer the dough onto a floured surface and knead it for about 10 minutes until it’s smooth and elastic. If the dough is too sticky, sprinkle with a little more flour as needed. Kneading develops the gluten, which gives the bread its structure.
- Add Fruits and Nuts: Once the dough is kneaded, incorporate the mixed dried fruits and chopped nuts. Knead gently to distribute them evenly throughout the dough.
- First Rise: Shape the dough into a ball and place it in a lightly greased bowl. Cover it with a damp cloth and let it rise in a warm place for about 1-2 hours, or until it doubles in size. This rising time is essential for a light and fluffy bread.
- Shape the Loaf: After the first rise, punch down the dough to release any air. Shape it into a loaf or round shape and place it in a greased loaf pan. Cover again and let it rise for another 30-60 minutes.
- Preheat the Oven: While the dough is rising, preheat your oven to 180°C (350°F). This guarantees that the bread starts baking at the right temperature.
- Bake the Pan Dulce: Once the dough has risen again, place the loaf in the preheated oven and bake for about 30-40 minutes, or until golden brown and a toothpick inserted in the center comes out clean.
- Cool and Serve: Remove the Pan Dulce from the oven and let it cool in the pan for about 10 minutes before transferring it to a wire rack. Dust with powdered sugar before serving if desired.
Extra Tips:
When making Pan Dulce, feel free to customize the dried fruits and nuts according to your preferences or what you have on hand.
For added flavor, you can also incorporate zest from lemon or orange into the dough. If you’re planning to enjoy the bread later, it freezes well; simply wrap it tightly in plastic wrap before placing it in a freezer bag.
To enjoy, thaw it at room temperature and warm it slightly in the oven for a fresh-baked taste.
Empanadas: Savory Pastry Treats

Empanadas are a beloved staple in Argentinian cuisine, often enjoyed during festive occasions, including Christmas gatherings. These delightful pastries are filled with a variety of ingredients, making them versatile and perfect for any palate. Traditionally, empanadas can be filled with beef, chicken, cheese, or vegetables, and they’re typically baked or fried to achieve a crispy, golden exterior.
The combination of flaky pastry and savory filling makes them a crowd-pleaser and a symbol of comfort food in many households.
Making empanadas at home is a rewarding culinary experience and allows you to customize the fillings to your liking. Whether you opt for the classic beef filling or experiment with a creative vegetable medley, the process is relatively straightforward. Once you master the technique of sealing the pastry, you’ll be able to whip up these delicious treats for your family and friends to enjoy during the holiday season.
Ingredients (Serves 4-6)
- 2 cups all-purpose flour
- 1/2 cup unsalted butter, chilled and cubed
- 1/4 teaspoon salt
- 1/4 cup cold water
- 1 pound ground beef
- 1 onion, finely chopped
- 1/2 bell pepper, finely chopped
- 1/2 teaspoon cumin
- 1/2 teaspoon paprika
- Salt and pepper to taste
- 1 egg, beaten (for egg wash)
Cooking Instructions
- Prepare the Dough: In a large mixing bowl, combine the flour and salt. Add the chilled butter and mix until the mixture resembles coarse crumbs. Gradually add cold water, mixing until a dough forms. Knead the dough briefly on a floured surface until smooth. Wrap in plastic wrap and refrigerate for at least 30 minutes.
- Cook the Filling: In a skillet over medium heat, add a drizzle of oil and sauté the chopped onion and bell pepper until soft. Add the ground beef, breaking it up with a spoon. Cook until browned, about 5-7 minutes. Season with cumin, paprika, salt, and pepper. Remove from heat and let cool.
- Roll Out the Dough: After chilling, remove the dough from the refrigerator and divide it into small balls, about the size of a golf ball. On a floured surface, roll each ball into a circle, about 5-6 inches in diameter.
- Fill the Empanadas: Place a spoonful of the beef filling onto one half of each dough circle, leaving a border around the edge. Fold the dough over to create a half-moon shape. Press the edges together to seal, and use a fork to crimp the edges for an extra seal and decorative touch.
- Prepare for Baking: Preheat your oven to 375°F (190°C). Place the empanadas on a baking sheet lined with parchment paper. Brush the tops with beaten egg to achieve a golden finish.
- Bake the Empanadas: Bake in the preheated oven for 25-30 minutes, or until the empanadas are golden brown. Remove from the oven and let cool slightly before serving.
Extra Tips
To achieve the best flavor and texture, consider letting the empanada dough rest for longer in the refrigerator, ideally for 1-2 hours. This helps the gluten relax, resulting in a flakier crust.
Additionally, feel free to get creative with the fillings—try adding olives, hard-boiled eggs, or cheese to the meat mixture for extra depth of flavor. If you prefer a lighter option, bake instead of frying, and serve them with chimichurri sauce for an authentic Argentinian experience.
Enjoy your homemade empanadas during the festive season!
Turrón: A Festive Nutty Confection
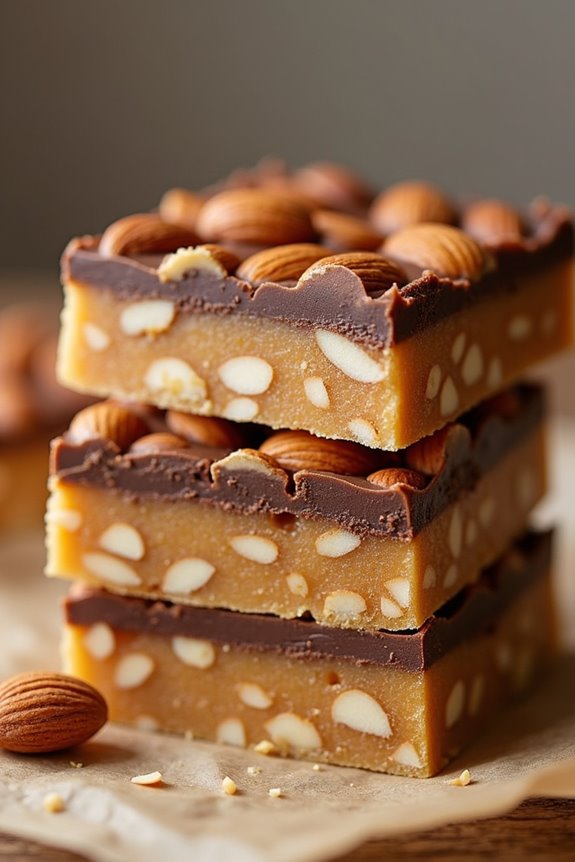
Turrón is a traditional Argentinian sweet that embodies the spirit of the holiday season. This nutty confection, primarily made from almonds and honey, has a rich history that dates back to ancient times. Its delightful combination of textures and flavors makes it a favorite treat during Christmas celebrations in Argentina.
Often enjoyed alongside other festive dishes, turrón isn’t only delicious but also a symbol of togetherness and family.
Preparing turrón at home is a wonderful way to bring a piece of Argentinian culture into your holiday festivities. While it may seem intimidating, the process is quite straightforward and rewarding. The key to achieving the perfect turrón lies in the quality of the ingredients and the careful attention paid during the cooking process.
Let’s jump into this delectable recipe that serves 4-6 people.
Ingredients:
- 2 cups whole almonds (raw or toasted)
- 1 cup granulated sugar
- 1/2 cup honey
- 1/4 cup water
- 1/2 teaspoon vanilla extract
- A pinch of salt
- 1 cup dark chocolate (optional, for coating)
Cooking Instructions:
1. Prepare the Baking Dish****: Begin by lining a square baking dish (approximately 8×8 inches) with parchment paper. This will prevent the turrón from sticking and make it easier to remove once set.
2. Toast the Almonds: If you’re using raw almonds, preheat your oven to 350°F (175°C) and spread the almonds on a baking sheet. Toast them for about 10-12 minutes, stirring halfway through until they’re golden brown. This step enhances their flavor and crunch.
3. Make the Syrup: In a medium saucepan, combine sugar, honey, water, and a pinch of salt. Cook over medium heat, stirring occasionally until the sugar dissolves. Once dissolved, stop stirring and bring the mixture to a boil.
Use a candy thermometer to monitor the temperature; it should reach 250°F (120°C) before you remove it from the heat.
4. Combine Ingredients: Once the syrup reaches the desired temperature, remove it from heat and quickly stir in the toasted almonds and vanilla extract. Mix well to guarantee the almonds are fully coated with the syrup.
5. Pour into the Dish: Immediately pour the almond mixture into the prepared baking dish. Use a spatula to evenly spread and press the mixture down firmly to create an even layer. This helps to compact the turrón, ensuring it holds together once set.
6. Let it Set: Allow the turrón to cool at room temperature for about 2 hours. If you prefer it to be firmer, you can place it in the refrigerator for an additional hour.
7. Cut and Serve: Once set, lift the turrón out of the dish using the parchment paper. Place it on a cutting board and cut it into squares or rectangles. If desired, melt dark chocolate and dip each piece for an extra indulgent touch.
Extra Tips:
When making turrón, it’s essential to keep an eye on the sugar syrup as it can quickly go from perfect to burnt. Use a candy thermometer for accuracy, and don’t be tempted to stir once it begins to boil.
If you want to experiment with flavors, consider adding dried fruits or different nuts to the mixture. Store any leftovers in an airtight container to maintain freshness, and enjoy this delightful treat not just during Christmas but all year round!
Alfajores: Sweet Sandwich Cookies

Alfajores are a beloved treat in Argentina, especially during the holiday season. These delightful sweet sandwich cookies are filled with a luscious layer of dulce de leche and often dusted with powdered sugar or coated in chocolate. The combination of the crumbly, buttery cookies and the rich caramel filling creates a melt-in-your-mouth experience that’s hard to resist.
Making alfajores can be a fun and rewarding project, perfect for sharing with family and friends during Christmas celebrations. In Argentina, alfajores come in many varieties, but the classic version typically features cornstarch cookies that are both tender and flavorful. The name “alfajor” is derived from the Arabic word “al-hasú,” which means “the filled one,” reflecting the cookie’s history and cultural significance.
Whether you choose to indulge in them as a dessert or a sweet snack, these cookies are sure to bring a taste of Argentina into your holiday festivities.
Ingredients (serving size: 4-6 people):
- 1 cup unsalted butter, softened
- 1 cup granulated sugar
- 2 large egg yolks
- 1 teaspoon vanilla extract
- 2 cups all-purpose flour
- 1 cup cornstarch
- 1 teaspoon baking powder
- 1 cup dulce de leche
- Powdered sugar for dusting
- Optional: 1 cup chocolate for coating
Cooking Instructions:
- Preheat the Oven: Begin by preheating your oven to 350°F (175°C). This guarantees that the cookies will bake evenly and develop a lovely golden color.
- Cream the Butter and Sugar: In a large mixing bowl, cream together the softened butter and granulated sugar until the mixture is light and fluffy. This process incorporates air into the mixture, which helps create a tender cookie texture.
- Add the Egg Yolks and Vanilla: Next, add the egg yolks one at a time, mixing well after each addition. Then, stir in the vanilla extract. This adds richness and flavor to the cookies.
- Combine Dry Ingredients: In a separate bowl, whisk together the all-purpose flour, cornstarch, and baking powder. Gradually add this dry mixture to the butter mixture, stirring until a smooth dough forms. Be careful not to overmix, as this could lead to tougher cookies.
- Shape the Cookies: Take small portions of dough and roll them into balls about the size of a walnut. Place them on a baking sheet lined with parchment paper, spacing them about 2 inches apart. Flatten each ball slightly with your fingers to form discs.
- Bake: Bake the cookies in the preheated oven for about 12-15 minutes, or until they’re lightly golden around the edges. Be careful not to overbake; they should remain soft.
- Cool the Cookies: Once baked, remove the cookies from the oven and let them cool on the baking sheet for a few minutes before transferring them to a wire rack to cool completely.
- Assemble the Alfajores: Once the cookies are completely cooled, spread a generous layer of dulce de leche on the flat side of one cookie, and then top it with another cookie, pressing gently to form a sandwich.
- Dust with Powdered Sugar or Coat in Chocolate: Finally, dust the assembled alfajores with powdered sugar or, for an extra indulgent treat, dip the sandwiches in melted chocolate and let them cool until the chocolate sets.
Extra Tips: When making alfajores, make sure your butter is at room temperature for easy creaming. If you prefer a softer cookie, you can chill the dough for about 30 minutes before shaping.
Additionally, feel free to experiment with different fillings, such as fruit jams or chocolate ganache, to customize your alfajores. Store any leftovers in an airtight container to keep them fresh, and enjoy them over the holiday season!
Locro: Hearty Stew for the Holidays
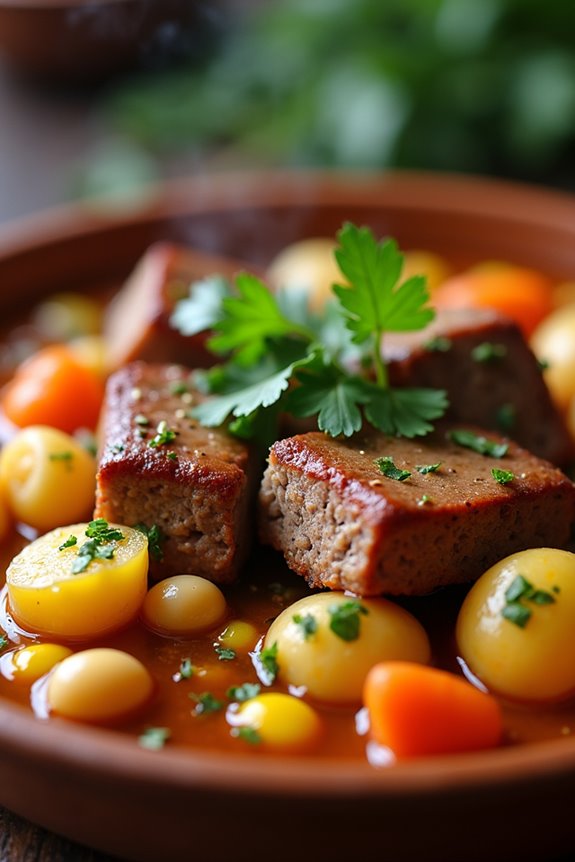
Locro is a traditional Argentinian stew that’s especially popular during the winter months and is a staple for many families celebrating national holidays like May 25th and Independence Day. This delightful dish is a perfect embodiment of warmth and comfort, combining a variety of ingredients that reflect the rich culinary heritage of Argentina.
It’s a hearty meal that features a mix of meats, vegetables, and legumes, often served with a dollop of spicy chimichurri on the side. Locro isn’t just a meal; it’s a celebration of togetherness, making it an excellent choice for festive gatherings.
Making Locro involves a bit of preparation and cooking time, but the effort is well worth it for the depth of flavor and the satisfaction it brings. The stew is typically made with corn, beans, potatoes, and a selection of meats, simmered together to create a rich and filling dish that can easily serve a crowd. This recipe serves 4-6 people, making it ideal for family dinners or holiday celebrations.
Ingredients
- 1 cup of dried white corn (hominy)
- 1/2 cup of dried beans (white beans or black beans)
- 1 medium onion, chopped
- 2 cloves of garlic, minced
- 2 medium potatoes, peeled and diced
- 1 medium carrot, diced
- 1/2 pound of smoked sausage, sliced
- 1/2 pound of beef stew meat, cut into cubes
- 1/2 pound of pork belly, cut into cubes
- 6 cups of chicken or beef broth
- 1 bay leaf
- 1 teaspoon of paprika
- Salt and pepper to taste
- Fresh parsley, chopped (for garnish)
- Chimichurri sauce (for serving)
Cooking Instructions
- Soak the Corn and Beans: Begin by soaking the dried white corn and beans in separate bowls filled with water for at least 8 hours or overnight. This step helps to soften the legumes and reduces cooking time.
- Prepare the Base: In a large pot or Dutch oven, heat a tablespoon of oil over medium heat. Add the chopped onion and minced garlic, sautéing until the onion becomes translucent and fragrant, about 5-7 minutes.
- Brown the Meats: Add the cubed beef stew meat and pork belly to the pot, cooking until they’re browned on all sides. This will take about 8-10 minutes. Make sure to stir occasionally to prevent sticking.
- Incorporate Vegetables and Spices: Stir in the diced potatoes, carrots, paprika, and the soaked corn and beans (drained). Add the bay leaf and season with salt and pepper. Mix well to incorporate all ingredients.
- Add Broth and Simmer: Pour in the chicken or beef broth, ensuring that all ingredients are submerged. Bring the mixture to a boil, then reduce the heat to low, cover, and let it simmer for about 1.5 to 2 hours. Check occasionally, stirring to prevent sticking to the bottom of the pot.
- Adjust Seasoning and Serve: After simmering, taste the Locro and adjust the seasoning if necessary. Remove the bay leaf before serving. Ladle the stew into bowls, garnish with fresh parsley, and serve with chimichurri sauce on the side for added flavor.
Extra Tips
When making Locro, feel free to customize the ingredients based on your preferences or what you have on hand. Some variations include adding squash or other seasonal vegetables.
For a richer flavor, consider using a combination of different meats, such as chicken or lamb. If you’re preparing this dish in advance, it can be stored in the refrigerator for a few days, and the flavors will continue to develop, making it even tastier when reheated.
Enjoy this comforting stew with loved ones, and don’t forget to pair it with some crusty bread for a complete meal!
Chocotorta: No-Bake Chocolate Cake

Chocotorta is a beloved Argentinian dessert that perfectly captures the essence of festive gatherings, particularly during Christmas celebrations. This no-bake chocolate cake features layers of decadent chocolate cookies and a creamy filling made from a blend of cream cheese and dulce de leche, resulting in a rich and indulgent treat that’s sure to impress your family and friends.
Its simplicity and delightful flavor make it a popular choice for those who want to enjoy a delicious dessert without spending hours in the kitchen. Making Chocotorta isn’t only straightforward but also allows for some creativity. You can customize the layers to suit your taste or add a touch of your own flair with toppings or garnishes.
This dessert is served chilled, making it a rejuvenating finish to any festive meal. Now, let’s gather the ingredients and get started on this delightful no-bake chocolate cake that serves 4-6 people.
Ingredients:
- 1 package (400g) chocolate cookies (e.g., Chocolinas or similar)
- 2 cups (500g) cream cheese, softened
- 1 cup (250g) dulce de leche
- 1 cup (240ml) milk (for dipping cookies)
- 1 teaspoon vanilla extract
- Cocoa powder or chocolate shavings (for garnish, optional)
Instructions:
- Prepare the Filling: In a mixing bowl, combine the softened cream cheese and dulce de leche. Use a hand mixer or whisk to blend until the mixture is smooth and creamy. Make sure there are no lumps, as this will create a better texture for the filling.
- Dip the Cookies: Pour the milk into a shallow dish. Take one chocolate cookie at a time and briefly dip it into the milk for a couple of seconds, allowing it to soak slightly but not become soggy. This step is essential as it helps soften the cookies, making them easier to layer.
- Layer the Cake: In a rectangular or square dish, start by placing a layer of dipped cookies at the bottom. Spread a generous layer of the cream cheese and dulce de leche mixture over the cookies. Repeat this process, alternating layers of dipped cookies and filling, until you run out of ingredients. Finish with a layer of the cream cheese mixture on top.
- Chill: Once all the layers are assembled, cover the dish with plastic wrap and refrigerate the Chocotorta for at least 4 hours, or preferably overnight. This chilling time allows the flavors to meld and the cake to set properly, ensuring a perfect slice when served.
- Serve: When you’re ready to serve, remove the Chocotorta from the refrigerator. If desired, dust the top with cocoa powder or sprinkle chocolate shavings for decoration. Cut into squares or rectangles and serve chilled.
Extra Tips:
For an extra layer of flavor, consider adding a splash of coffee or espresso to the milk when dipping the cookies. This will enhance the chocolate taste and give the Chocotorta a delightful twist.
Additionally, feel free to experiment with different types of cookies or toppings, such as fresh fruit or nuts, to make this dessert your own. Enjoy your Chocotorta as a sweet treat to share with loved ones during the holiday season!
Matambre: Flank Steak Roll
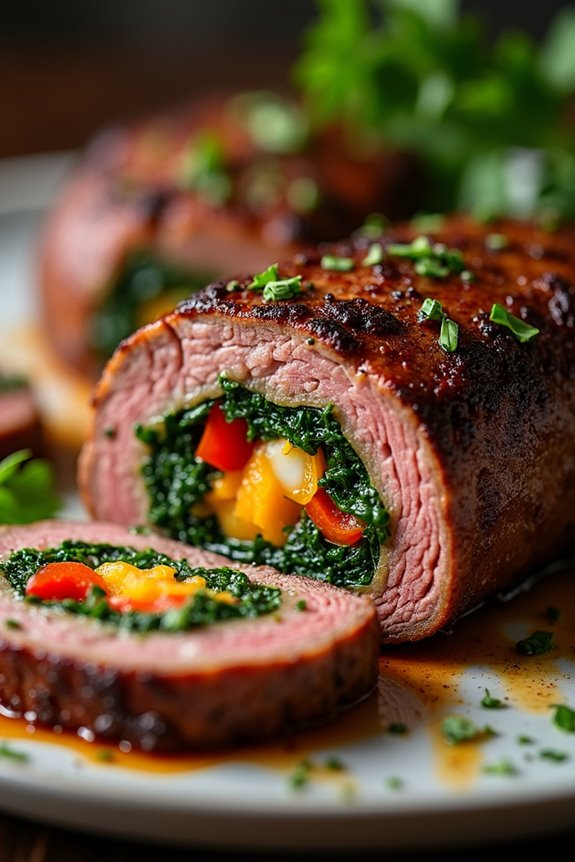
Matambre is a traditional Argentinian dish that showcases the rich flavors and culinary heritage of the country, especially during festive occasions like Christmas. This savory flank steak roll is typically stuffed with a variety of ingredients such as vegetables, herbs, and sometimes even hard-boiled eggs, making it a delightful centerpiece for any holiday table.
The name “matambre” translates to “to kill hunger,” and this dish certainly fulfills that promise with its hearty and satisfying nature.
To prepare matambre, the flank steak is marinated, then flattened and filled with an array of colorful ingredients, rolled up tightly, and cooked to perfection. This dish is often served with chimichurri sauce, which adds a fresh and zesty kick that complements the rich flavors of the beef.
Whether you’re celebrating Christmas or simply looking to impress your family and friends with a taste of Argentina, matambre is sure to become a favorite in your recipe collection.
Ingredients (Serves 4-6):
- 2 lbs flank steak
- 1 cup spinach, chopped
- 1 cup carrots, grated
- 1 cup bell peppers (red and yellow), diced
- 1/2 cup onions, finely chopped
- 2 cloves garlic, minced
- 2 hard-boiled eggs, sliced
- 1/2 cup olives, pitted and sliced
- 1/4 cup fresh parsley, chopped
- 1 teaspoon oregano
- 1 teaspoon cumin
- Salt and pepper, to taste
- Olive oil, for drizzling
- Kitchen twine
Cooking Instructions:
- Prepare the Flank Steak: Begin by laying the flank steak on a clean cutting board. Using a meat mallet, gently pound the steak to flatten it to an even thickness, about 1/2 inch. This helps in rolling the steak more easily and guarantees even cooking.
- Marinate the Meat: Season the flank steak generously with salt, pepper, oregano, and cumin. Drizzle some olive oil over the steak and rub the spices into the meat. Allow it to marinate for at least 30 minutes, or up to a few hours in the refrigerator for more flavor.
- Prepare the Filling: In a large mixing bowl, combine the chopped spinach, grated carrots, diced bell peppers, chopped onions, minced garlic, sliced hard-boiled eggs, sliced olives, and chopped parsley. Mix well until all the ingredients are evenly distributed.
- Assemble the Matambre: Once the steak is marinated, place it on a large piece of plastic wrap or parchment paper. Spread the vegetable filling evenly over the entire surface of the steak, leaving a little space at the edges for rolling.
- Roll the Steak: Carefully roll the flank steak from one end to the other, tucking in the filling as you go to prevent it from spilling out. Once rolled tightly, secure the rolled steak with kitchen twine, tying it at intervals to keep the filling intact.
- Cook the Matambre: Preheat your oven to 350°F (175°C). In a large oven-safe skillet, heat a drizzle of olive oil over medium-high heat. Sear the rolled matambre on all sides until browned, about 5-7 minutes. Transfer the skillet to the preheated oven and bake for 30-40 minutes, or until the meat reaches an internal temperature of 145°F (63°C).
- Rest and Slice: Once cooked, remove the matambre from the oven and let it rest for 10 minutes before slicing. This resting period allows the juices to redistribute, guaranteeing a moist and flavorful dish.
- Serve: Remove the kitchen twine and slice the matambre into rounds. Serve warm, accompanied by chimichurri sauce or your choice of sides.
Extra Tips:
When cooking matambre, be sure not to overstuff the flank steak, as this can make it difficult to roll and may cause the filling to spill out during cooking.
Additionally, feel free to customize the filling according to your taste preferences—adding ingredients like cheese or different vegetables can give this dish a unique spin.
Finally, serving it with a fresh salad or roasted vegetables can enhance the meal and provide a colorful presentation on your holiday table.
Fizzing Wine: Sparkling Wine for Celebrations

Fizzing Wine is a quintessential part of Argentinian celebrations, particularly during Christmas and New Year’s festivities. This sparkling wine, known as “vino espumoso,” is a perfect complement to the joyous atmosphere, enhancing the flavors of traditional Argentinian dishes served during the holiday season.
With its effervescent bubbles and crisp taste, Fizzing Wine epitomizes the spirit of togetherness, making every toast special and memorable.
To create your own sparkling wine at home, you can either choose to purchase a fine bottle from a local vineyard or take on the exciting task of making your own. The recipe below outlines a method for producing a delightful sparkling wine that’s bound to impress your guests. This is a great project for those who want to understand the winemaking process and enjoy a personal touch during their celebrations.
Ingredients (Serves 4-6 people):
- 750 ml of white wine (preferably a dry variety)
- 1/4 cup of sugar
- 1/4 cup of water
- 1 teaspoon of champagne yeast
- 1 tablespoon of lemon juice
- Optional: fresh fruits (like strawberries, raspberries, or citrus slices) for garnish
Cooking Instructions:
1. Prepare the Simple Syrup: In a small saucepan, combine the sugar and water over medium heat. Stir continuously until the sugar has completely dissolved. Allow the syrup to cool before using it in the wine mixture.
2. Mix the Ingredients: In a clean fermentation container, pour the white wine. Add the cooled simple syrup, champagne yeast, and lemon juice. Verify that all ingredients are well combined to promote the fermentation process.
3. Ferment the Mixture: Cover the fermentation container with a clean cloth, securing it with a rubber band to allow air to escape while preventing contaminants from entering. Place the container in a dark, warm area (around 70°F or 21°C) for about 2 to 3 weeks.
During this time, the yeast will convert the sugars into alcohol and carbon dioxide, creating the sparkling bubbles.
4. Bottle the Sparkling Wine: Once the fermentation process is complete, carefully siphon the wine into clean bottles, leaving about an inch of space at the top. Seal the bottles tightly with corks or caps, taking care to avoid excessive shaking which can disturb the bubbles.
5. Chill and Serve: Place the bottles in the refrigerator for at least 24 hours before serving. When ready, pour the sparkling wine into chilled glasses and add fresh fruit garnishes if desired. Enjoy the fizz as you celebrate with family and friends!
Extra Tips: When making Fizzing Wine, be sure to use high-quality ingredients, as the taste of your final product will largely depend on the wine you start with.
Cleanliness is also essential; verify that all your equipment, including bottles and fermentation containers, are thoroughly sanitized to prevent any unwanted flavors or contamination.
Finally, remember to be patient during fermentation, as rushing the process may result in a less desirable sparkling wine. Enjoy the journey of creating this festive drink!