

As the festive season draws near, my mind fills with the delightful Colombian dishes that make our family gatherings so special. From the comforting warmth of Ajiaco Santafereño to the sweet crunch of Buñuelos, each recipe is a beloved tradition. These festive foods satisfy our cravings and create cherished memories with loved ones. Join me as we explore these culinary delights that truly capture the spirit of Christmas in Colombia.
Ajiaco Santafereño
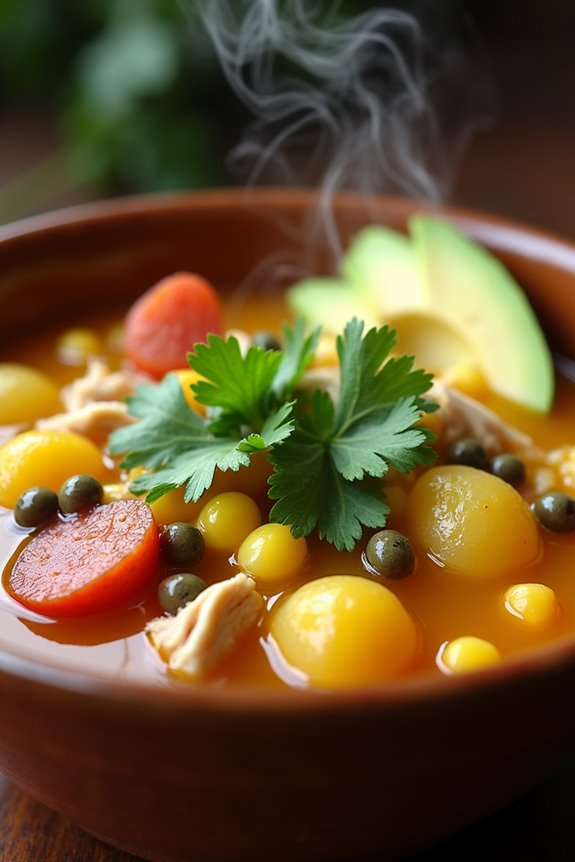
Ajiaco Santafereño is a traditional Colombian soup that embodies the rich flavors and culinary heritage of Bogotá and its surrounding regions. This hearty dish is a perfect centerpiece for festive gatherings, particularly during the Christmas season. It combines a medley of potatoes, chicken, and corn, all simmered in a fragrant broth infused with herbs. The result is a comforting and satisfying meal that warms the soul and brings people together, making it an ideal dish for festive celebrations.
The unique aspect of Ajiaco Santafereño is its use of three types of potatoes, which create a delightful variety of textures and flavors in the soup. Additionally, the dish is typically served with avocado, capers, and a dollop of cream, allowing each person to customize their bowl to their liking. This recipe will guide you through crafting an authentic Ajiaco Santafereño that will impress your family and friends during the holiday season.
Ingredients (Serves 4-6):
- 2 chicken breasts, bone-in and skin-on
- 8 cups of water
- 2 medium-sized russet potatoes, peeled and diced
- 2 medium-sized yellow potatoes, peeled and diced
- 2 medium-sized red potatoes, peeled and diced
- 2 ears of corn, cut into halves or thirds
- 1 medium onion, chopped
- 2 cloves of garlic, minced
- 1 cup of fresh cilantro, chopped
- 1 teaspoon of dried guascas (Colombian herb)
- Salt and pepper to taste
- 1 cup of heavy cream (for serving)
- 1 avocado, sliced (for serving)
- Capers (for serving)
Cooking Instructions:
- Prepare the Chicken: In a large pot, combine the chicken breasts and water. Bring to a boil over medium-high heat, skimming off any foam that forms on the surface. This will create a clear broth that’s essential for the soup’s flavor.
- Add Aromatics: Once the chicken is cooked through, about 20-25 minutes, remove it from the pot and set it aside to cool slightly. In the same broth, add the chopped onion and minced garlic. Let these simmer for about 5 minutes until they become fragrant and translucent.
- Incorporate the Potatoes: Add the diced russet, yellow, and red potatoes to the pot along with the corn. Stir to combine and let the mixture simmer for around 15-20 minutes or until the potatoes are tender.
- Season the Soup: While the potatoes are cooking, shred the chicken into bite-sized pieces, discarding the skin and bones. Once the potatoes are tender, return the shredded chicken to the pot. Stir in the chopped cilantro, guascas, and season with salt and pepper to taste. Allow the soup to simmer for an additional 5 minutes to let the flavors meld together.
- Serve: Ladle the Ajiaco Santafereño into bowls, and serve with a generous splash of heavy cream, slices of avocado, and capers on the side. Encourage your guests to customize their bowls according to their preferences.
Extra Tips:
For an authentic flavor, consider using a whole chicken instead of just chicken breasts for a richer broth. Additionally, if you can’t find guascas, you can substitute with oregano, though the flavor will differ slightly.
Ajiaco is best enjoyed fresh but can be stored in the refrigerator for up to three days. Reheat gently on the stove, adding a bit of water if the soup thickens too much. Enjoy this delightful dish with warm bread or rice on the side for a complete meal!
Buñuelos
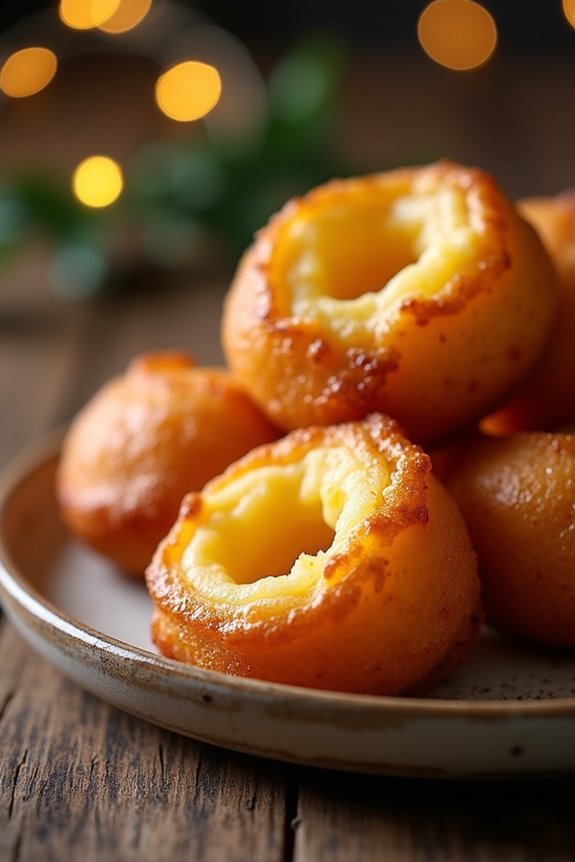
Buñuelos are a beloved Colombian Christmas treat that embodies the festive spirit of the holiday season. These delightful cheese fritters are crispy on the outside and soft on the inside, making them an irresistible addition to any holiday celebration. Traditionally enjoyed during Christmas, they’re often served alongside a warm cup of hot chocolate or natilla, another Colombian dessert. The combination of cheese and dough creates a unique flavor that perfectly balances sweetness and savory notes, making them a favorite among families.
Making buñuelos is a joyful experience that brings together friends and family in the kitchen. The dough is simple to prepare, needing only a handful of ingredients, but the result is a deliciously satisfying treat that everyone will love. Whether you’re hosting a festive gathering or simply looking to indulge in a little holiday cheer, these buñuelos will certainly add a special touch to your celebrations.
Ingredients (serving size: 4-6 people)
- 2 cups of pre-cooked cornmeal (harina de maíz)
- 1 cup of grated cheese (queso fresco or mozzarella)
- 1 cup of warm water
- 1 teaspoon of baking powder
- 1 tablespoon of sugar
- 1/2 teaspoon of salt
- Vegetable oil (for frying)
Cooking Instructions
- Mix Dry Ingredients: In a large mixing bowl, combine the pre-cooked cornmeal, baking powder, sugar, and salt. Stir these dry ingredients together until they’re well mixed to guarantee an even distribution of flavors.
- Add Cheese: Fold in the grated cheese into the dry mixture. This will help to incorporate the cheese into the dough and make sure that every bite of buñuelo is cheesy and flavorful.
- Combine Wet Ingredients: Gradually add warm water to the mixture, stirring continuously. You want to achieve a dough that’s soft but not sticky. If the dough is too dry, add a little more water; if too wet, sprinkle in a little more cornmeal.
- Shape the Dough: Once the dough is well combined, take small portions and roll them into balls about the size of a golf ball. Make sure to keep them uniform in size for even cooking.
- Heat the Oil: In a deep frying pan, heat vegetable oil over medium heat. To test if the oil is ready, drop a small piece of dough into the oil; if it sizzles and rises, the oil is hot enough.
- Fry the Buñuelos: Carefully place the buñuelo balls into the hot oil, being sure not to overcrowd the pan. Fry them for about 5-7 minutes, turning them occasionally, until they’re golden brown and puffed up.
- Drain and Serve: Once cooked, remove the buñuelos from the oil and place them on a paper towel-lined plate to drain excess oil. Serve them warm, ideally with a side of hot chocolate or natilla.
Extra Tips
When making buñuelos, it’s crucial to verify that your oil is at the correct temperature to achieve that perfect golden-brown color. Too hot, and they’ll burn; too cold, and they’ll absorb too much oil.
Additionally, feel free to experiment with different types of cheese to find your preferred flavor; some people enjoy the tanginess of queso fresco, while others may prefer the creaminess of mozzarella.
Finally, these buñuelos are best enjoyed fresh, so try to make them just before serving for the ultimate crispy experience!
Natilla
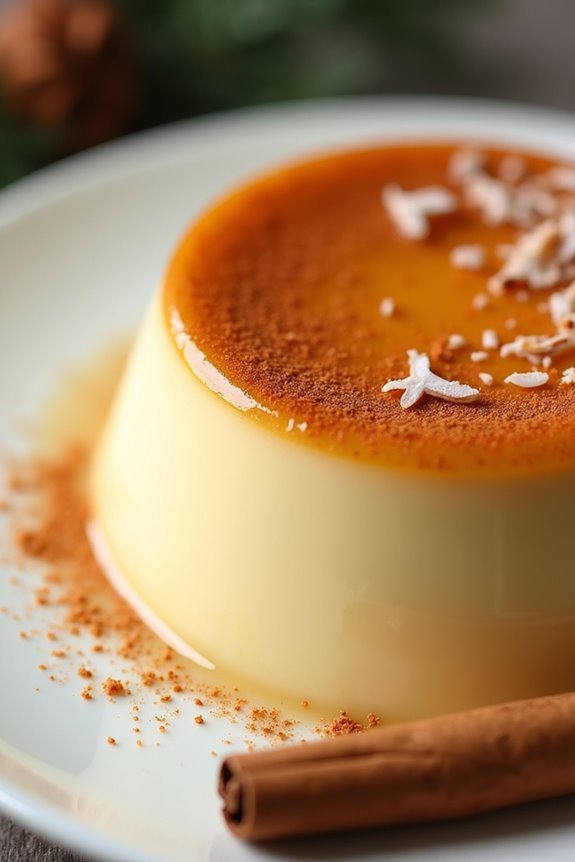
Natilla is a traditional Colombian dessert that plays a significant role during the Christmas season. This creamy, custard-like dish is often flavored with cinnamon and is a staple at festive gatherings. Its smooth texture and warm spices bring comfort and joy, making it a beloved treat among families.
Preparing natilla isn’t only a culinary adventure but also a way to connect with Colombian culture and traditions, as it’s often enjoyed alongside buñuelos, another holiday favorite.
The main ingredients for natilla include milk, sugar, cornstarch, and cinnamon. While it might seem simple, the process requires careful attention to guarantee the right consistency and flavor. This delightful dessert can be served chilled or at room temperature, and it’s commonly garnished with additional cinnamon or coconut for an extra touch.
Whether you’re celebrating the holidays or just looking for a delicious treat, making natilla can be a rewarding experience.
Ingredients (Serves 4-6):
- 4 cups whole milk
- 1 cup sugar
- 1 cup cornstarch
- 1 teaspoon ground cinnamon
- 1 teaspoon vanilla extract
- 1/4 teaspoon salt
- 1/2 cup grated coconut (optional for garnish)
- Cinnamon sticks (optional for garnish)
Cooking Instructions:
- Prepare the Ingredients: Gather all the ingredients to guarantee you have everything needed before starting. This will make the cooking process smoother and more enjoyable.
- Mix Dry Ingredients: In a medium bowl, combine the cornstarch, sugar, ground cinnamon, and salt. Mix these dry ingredients well to guarantee there are no lumps, as this will help in achieving a smooth texture in the final dish.
- Heat the Milk: In a large saucepan over medium heat, pour in the whole milk. Stir occasionally and heat until it begins to simmer. Don’t let it boil, as boiling can affect the texture of the natilla.
- Combine Mixtures: Once the milk is hot, gradually add the dry mixture to the saucepan, whisking continuously. This prevents clumping and helps the cornstarch dissolve properly, which is vital for the thickening process.
- Cook Until Thickened: Keep stirring the mixture on medium-low heat until it thickens, which should take about 10-15 minutes. The natilla is ready when it coats the back of a spoon and has a creamy consistency.
- Add Flavorings: Remove the saucepan from heat and stir in the vanilla extract. Mix well to incorporate the flavor thoroughly before pouring the mixture into a serving dish or molds.
- Chill the Natilla: Let the natilla cool to room temperature, then cover with plastic wrap and refrigerate for at least 3-4 hours, or until it’s fully set.
- Serve: Once chilled, cut the natilla into squares or scoop out portions, and garnish with grated coconut and a sprinkle of cinnamon if desired. Serve it cold or at room temperature for the best experience.
Extra Tips:
To achieve the perfect consistency, be sure to whisk constantly as you combine the dry ingredients with the heated milk, as this will prevent lumps.
If you want a richer flavor, consider using whole coconut milk instead of regular milk. You can also experiment with different spices, such as nutmeg, for a unique twist on this traditional recipe.
Finally, natilla can be stored in the refrigerator for several days, making it a convenient make-ahead dessert for holiday parties. Enjoy your natilla with family and friends, and embrace the festive spirit of Colombian culture!
Tamales

Tamales are a beloved traditional dish in Colombia, especially during the festive Christmas season. These delicious parcels are made from corn dough, filled with a variety of ingredients, and wrapped in banana leaves or corn husks before being steamed.
The preparation of tamales can be a heartwarming family affair, bringing everyone together in the kitchen to share stories and laughter as they create this flavorful delicacy. Each region in Colombia has its own variations, but the essence remains the same: a comforting and satisfying meal that embodies the spirit of celebration.
Tamales are often served alongside hot chocolate or a fresh salad, making them a perfect main dish for holiday gatherings. The combination of textures and flavors in each bite is what makes tamales so special. The dough is typically flavored with spices, while the fillings can range from savory meats to vegetables and even sweet combinations.
Regardless of the filling, tamales are always a festive treat that brings warmth to the holiday table.
Ingredients (Serves 4-6):
- 2 cups of masa harina (corn flour)
- 1 cup of chicken or vegetable broth
- 1/2 cup of vegetable oil or melted butter
- 1 teaspoon of baking powder
- 1 teaspoon of salt
- 1 cup of cooked, shredded chicken
- 1/2 cup of diced bell peppers
- 1/2 cup of diced onions
- 1/4 cup of peas (fresh or frozen)
- 1 teaspoon of cumin
- 1 teaspoon of garlic powder
- 10-12 banana leaves (or corn husks) for wrapping
- Kitchen twine or kitchen string for tying
Cooking Instructions:
- Prepare the Banana Leaves: If using banana leaves, cut them into rectangular pieces (about 10×8 inches) and briefly heat them over an open flame or in hot water until they’re pliable. This will make them easier to fold and wrap around the tamales.
- Make the Dough: In a large bowl, combine the masa harina, baking powder, and salt. Gradually add the vegetable oil and chicken or vegetable broth, mixing until the dough is smooth and pliable. The consistency should be similar to thick cake batter.
- Prepare the Filling: In a separate bowl, mix the cooked, shredded chicken with diced bell peppers, onions, peas, cumin, and garlic powder. Confirm the ingredients are evenly combined for a flavorful filling.
- Assemble the Tamales: Take a piece of the prepared banana leaf and spread about 2-3 tablespoons of the masa dough in the center. Add a spoonful of the chicken filling on top of the dough. Fold the edges of the banana leaf over the filling to create a secure package. Tie the tamale with kitchen twine to keep it closed.
- Cook the Tamales: Place the tamales standing upright in a large steamer pot. Add water to the bottom of the pot, confirming that it doesn’t touch the tamales. Cover the pot and bring the water to a boil, then reduce to a simmer. Steam the tamales for about 1 to 1.5 hours, or until the masa easily separates from the leaf.
- Serve: Once cooked, carefully remove the tamales from the steamer and allow them to cool slightly before serving. Enjoy them warm, paired with hot chocolate or your favorite salsa.
Extra Tips: When making tamales, feel free to experiment with different fillings based on your preferences. You can use pork, beef, or even a vegetarian mixture with beans and cheese.
Additionally, confirm the dough isn’t too dry; adding a bit more broth can help achieve the right consistency. If you find folding the banana leaves challenging, corn husks are a great alternative that can be easier to work with.
Finally, tamales freeze well, so feel free to prepare a larger batch and save some for later enjoyment!
Lechona

Lechona is a traditional Colombian dish that embodies the spirit of festive gatherings, especially during Christmas celebrations. This succulent pork dish is typically prepared by slow-roasting a whole pig stuffed with rice, peas, and spices. The result is a mouthwatering combination of crispy skin and tender, flavorful meat that has been infused with a medley of herbs and seasonings.
While it may seem intimidating to prepare, lechona is well worth the effort for its impressive presentation and the joy it brings to holiday feasts.
The origins of lechona can be traced back to the Tolima region of Colombia, where it’s often served at family gatherings and special occasions. Each family may have their own variation of the dish, but the essence remains the same: a celebration of flavor, tradition, and togetherness.
The process of making lechona can take several hours, but the results are bound to impress your guests and create lasting memories.
Ingredients (Serves 4-6):
- 1 whole pig (about 10-12 pounds), cleaned and deboned
- 3 cups of rice
- 1 cup of split peas
- 1 large onion, finely chopped
- 4 cloves of garlic, minced
- 2 teaspoons of cumin
- 2 teaspoons of paprika
- 1 teaspoon of black pepper
- 2 teaspoons of salt (or to taste)
- 1 cup of diced carrots
- 1 cup of diced green bell peppers
- 1 cup of chicken broth
- 1 cup of fresh cilantro, chopped
- ¼ cup of vegetable oil
- 2 tablespoons of white vinegar
- 1 lemon, juiced
Cooking Instructions:
1. Prepare the Marinade****: In a large bowl, mix the minced garlic, chopped onion, cumin, paprika, black pepper, salt, vegetable oil, white vinegar, and lemon juice. This marinade will be used to flavor the pork. Make sure to blend all the ingredients well.
2. Marinate the Pig: Rub the marinade all over the inside and outside of the cleaned pig, making sure it’s well coated. Let the pig marinate for at least 12 hours, preferably overnight, to allow the flavors to seep into the meat.
3. Prepare the Stuffing****: In a pot, cook the rice and split peas separately according to package instructions. In a large skillet, heat some oil and sauté the diced carrots and green bell peppers until they’re tender.
Once cooked, mix the rice, split peas, sautéed vegetables, chopped cilantro, and chicken broth in a large bowl. Season the mixture with additional salt and pepper if needed.
4. Stuff the Pig: Fill the cavity of the marinated pig with the rice and vegetable stuffing. Make sure that the stuffing is packed tightly but not overflowing, as it will expand while cooking.
5. Roast the Pig: Preheat your oven to 325°F (165°C). Place the stuffed pig in a large roasting pan and cover it with aluminum foil to retain moisture. Roast for approximately 5-6 hours, or until the internal temperature of the meat reaches 160°F (70°C).
Remove the foil in the last hour of roasting to allow the skin to crisp up.
6. Serve: Once fully cooked, remove the lechona from the oven and let it rest for about 30 minutes before carving. Serve with additional rice and traditional Colombian sides like arepas or avocado.
Extra Tips:
When preparing lechona, it’s essential to verify your pig is properly cleaned and prepared for roasting. If you can, seek out a trusted butcher who can assist with the cleaning and deboning process.
For a more intense flavor, consider adding herbs and spices to the stuffing or marinating the pig with different seasonings according to your taste. Additionally, using a meat thermometer can help confirm that the pork is cooked safely and to perfection.
Enjoy the cooking process and the delicious results!
Arepas De Choclo

Arepas de choclo, or corn arepas, are a delightful Colombian dish that perfectly embodies the festive spirit of Christmas. Made from fresh corn, these arepas are naturally sweet and can be enjoyed as a breakfast item, snack, or side dish. They’re especially popular during the holiday season, bringing warmth and comfort to family gatherings.
The combination of fresh ingredients and traditional cooking methods makes these arepas a must-try for anyone looking to experience authentic Colombian cuisine.
The beauty of arepas de choclo lies not only in their flavor but also in their versatility. You can serve them plain, with cheese, or topped with a variety of accompaniments such as hogao (a Colombian tomato and onion sauce). The preparation is straightforward, making it an excellent choice for both seasoned cooks and beginners.
Let’s explore the ingredients and cooking instructions to create this delicious dish that will surely impress your family and friends during the holiday celebrations.
Ingredients (Serves 4-6)
- 2 cups fresh corn kernels (or frozen, thawed)
- 1 cup cornmeal (preferably precooked)
- 1/2 cup milk
- 1/4 cup sugar
- 1/4 cup grated cheese (like queso fresco or mozzarella)
- 1 teaspoon baking powder
- 1/2 teaspoon salt
- 2 tablespoons butter, melted
- Additional cheese for filling (optional)
Cooking Instructions
- Prepare the Corn Mixture: In a blender or food processor, combine the fresh corn kernels and milk. Blend until you achieve a smooth consistency. If using frozen corn, make sure it’s thawed before blending.
- Combine Dry Ingredients: In a large mixing bowl, whisk together the cornmeal, sugar, baking powder, and salt. This guarantees that the dry ingredients are evenly distributed and will help in the rising of the arepas.
- Mix Wet and Dry Ingredients: Pour the blended corn mixture into the bowl with the dry ingredients. Add the melted butter and grated cheese, then mix until everything is well combined. The batter should be thick but spreadable, similar to pancake batter.
- Preheat the Pan: Heat a non-stick skillet or griddle over medium heat. You can lightly grease the surface with oil or butter to prevent sticking.
- Cook the Arepas: Using a ladle or measuring cup, pour a portion of the batter (about 1/4 cup) onto the skillet for each arepa. Flatten them slightly with the back of the ladle to form a disc, about 1/2 inch thick. Cook for 4-5 minutes on each side, until golden brown and cooked through.
- Check for Doneness: The arepas are done when they’ve a lightly crispy exterior and a moist interior. You can cut one open to check if it’s cooked through.
- Serve Warm: Remove the arepas from the skillet and keep them warm in a towel. Serve them immediately, either plain or stuffed with additional cheese or toppings of your choice.
Extra Tips
For the best flavor, use fresh corn when in season, as it will enhance the sweetness and texture of the arepas. If using frozen corn, verify it’s well-drained to avoid excess moisture in the batter.
You can also experiment with different types of cheese or add herbs for a unique twist on the traditional recipe. Arepas de choclo can be made ahead of time and reheated in a skillet or oven, making them a convenient option for holiday gatherings or busy weeknights.
Enjoy your culinary journey into Colombian holiday traditions!
Sancocho

Sancocho is a traditional Colombian stew that embodies the heart and soul of Colombian cuisine. This comforting dish is a fragrant mix of meats, vegetables, and spices, simmered together to create a rich and hearty meal perfect for family gatherings, especially during the Christmas season.
Each region of Colombia has its own variation of sancocho, often depending on the type of meat available and the local ingredients, making it a dish that’s as diverse as the country itself. The warm and inviting flavors of sancocho are sure to bring everyone together around the table.
To prepare sancocho, it’s crucial to gather fresh ingredients that will impart authentic flavors to the stew. The combination of chicken, beef, or fish, along with starchy vegetables like plantains and yuca, creates a filling and satisfying dish. This recipe serves 4-6 people and is perfect for sharing with friends and family during the festive season.
Ingredients
- 1 pound beef (chuck or shank), cut into chunks
- 1 pound chicken (thighs or drumsticks)
- 1 medium onion, chopped
- 2 garlic cloves, minced
- 2 medium potatoes, peeled and cubed
- 1 medium yuca (cassava), peeled and cut into chunks
- 1 green plantain, peeled and sliced
- 1 carrot, chopped
- 1 bell pepper, chopped
- 1 tomato, chopped
- 6 cups beef or chicken broth
- 2 tablespoons vegetable oil
- 1 teaspoon ground cumin
- 1 teaspoon oregano
- Salt and pepper to taste
- Fresh cilantro, for garnish
- Lime wedges, for serving
Cooking Instructions
- Sauté the aromatics: In a large pot, heat the vegetable oil over medium heat. Add the chopped onion, minced garlic, and bell pepper. Sauté until the onions are translucent and fragrant, about 5 minutes. This step helps to build a flavorful base for the sancocho.
- Brown the meats: Add the beef chunks and chicken to the pot. Cook until the meats are browned on all sides, approximately 5-7 minutes. Browning the meat enhances the depth of flavor in the stew.
- Add the vegetables: Stir in the chopped tomato, carrot, potatoes, yuca, and plantain. Mix everything together to guarantee the vegetables are evenly distributed with the meats.
- Pour in the broth: Pour the beef or chicken broth into the pot, ensuring that all ingredients are covered. Bring the mixture to a boil, then reduce the heat to low. Let it simmer for about 45 minutes to 1 hour, or until the meats and vegetables are tender. This slow cooking process allows the flavors to meld together beautifully.
- Season the stew: After simmering, add the ground cumin, oregano, salt, and pepper to taste. Stir well to incorporate the seasonings. Adjust the seasoning as needed, allowing the stew to simmer for an additional 10 minutes.
- Serve and garnish: Once the sancocho is ready, ladle it into bowls and garnish with freshly chopped cilantro. Serve with lime wedges on the side for an extra burst of flavor.
Extra Tips
When preparing sancocho, feel free to experiment with different types of meat, such as pork or fish, to create your own unique version of the dish.
Additionally, you can adjust the amount of vegetables based on your preference or what’s in season. For an extra kick, consider adding some diced jalapeños or a splash of hot sauce.
Sancocho is often enjoyed with a side of avocado or rice, which complements the stew perfectly. Don’t forget to let the stew sit for a few minutes before serving; the flavors will continue to develop even after cooking!
Empanadas

Empanadas are a beloved dish in Colombian cuisine, often enjoyed during festive celebrations, including Christmas. These delicious pastries can be filled with various ingredients, but the classic version typically features a savory mixture of ground beef, potatoes, and spices. The dough is made from cornmeal or wheat flour, providing a delightful crunch when fried or baked.
Empanadas are often served with aji, a spicy Colombian sauce, making them an irresistible treat for gatherings. Making empanadas from scratch is a rewarding experience, allowing you to share a piece of Colombian culture with your family and friends. The process may seem intimidating at first, but with a little patience and practice, you’ll be able to create these delectable morsels that are perfect for any festive occasion.
Let’s plunge into the ingredients and cooking steps needed to create a batch of empanadas that serves 4-6 people.
Ingredients:
- 2 cups of all-purpose flour
- 1/2 teaspoon of salt
- 1/2 cup of water
- 1 tablespoon of vegetable oil
- 1 pound of ground beef
- 1 medium potato, peeled and diced
- 1 small onion, finely chopped
- 2 cloves of garlic, minced
- 1 teaspoon of cumin
- 1 teaspoon of paprika
- Salt and pepper to taste
- Oil for frying
Cooking Instructions:
- Prepare the Dough: In a large bowl, combine the all-purpose flour and salt. Gradually add the water and vegetable oil, mixing until a soft dough forms. Knead the dough on a floured surface for about 5 minutes until smooth. Cover the dough with a clean cloth and let it rest for 30 minutes.
- Cook the Filling: In a skillet over medium heat, add a drizzle of oil and sauté the chopped onion and minced garlic until translucent. Add the ground beef to the skillet, breaking it apart with a spoon. Cook until browned, about 5-7 minutes. Stir in the diced potato, cumin, paprika, salt, and pepper. Add a splash of water, cover, and let it simmer for 10-15 minutes until the potatoes are tender. Remove from heat and let the filling cool.
- Shape the Empanadas: Once the dough has rested, divide it into small balls, about the size of a golf ball. On a floured surface, roll each ball into a thin circle, approximately 5-6 inches in diameter. Place a spoonful of the filling in the center of each circle.
- Seal the Empanadas: Fold the dough over the filling to create a half-moon shape. Press the edges together, ensuring they’re well sealed. For a decorative touch, you can crimp the edges with a fork or pinch them with your fingers.
- Fry the Empanadas: In a deep skillet or pot, heat enough oil for frying over medium-high heat. Once the oil is hot, carefully add the empanadas in batches, making sure not to overcrowd the pan. Fry for about 3-4 minutes on each side or until golden brown. Remove and place on paper towels to drain excess oil.
- Serve: Serve warm with aji sauce or your favorite dipping sauce. Enjoy your homemade Colombian empanadas!
Extra Tips: When making empanadas, you can customize the filling to your liking—try adding cheese, vegetables, or even chicken for a different twist. If you prefer a healthier option, consider baking the empanadas instead of frying. Just brush them with a little oil and bake in a preheated oven at 400°F (200°C) for about 20-25 minutes, or until golden.
Be sure to keep the dough covered while working to prevent it from drying out. Enjoy your culinary journey into Colombian flavors!
Posta Negra Cartagenera
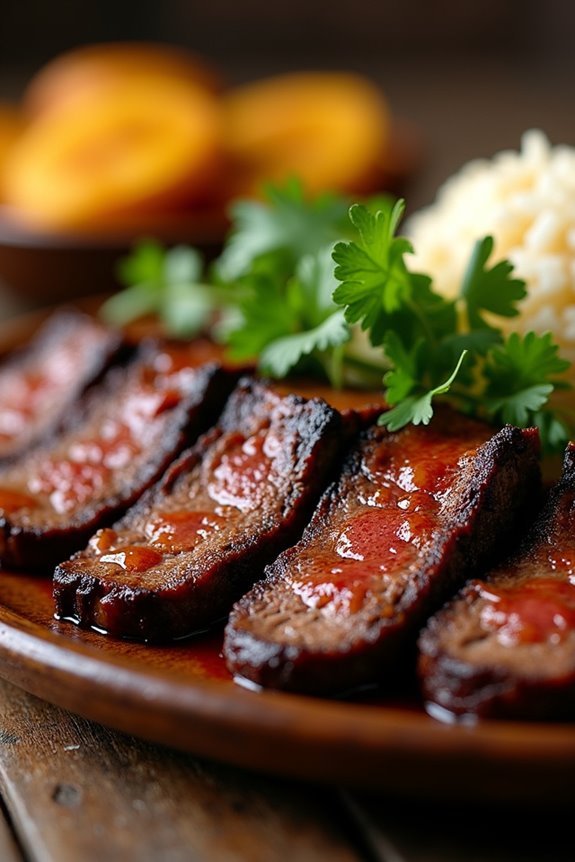
Posta Negra Cartagenera is a traditional Colombian dish that hails from the coastal city of Cartagena. Renowned for its rich flavors and tender meat, this dish is typically prepared during festive occasions, particularly Christmas. The primary ingredient is a cut of beef that’s marinated and slow-cooked in a flavorful sauce made with a blend of spices, vegetables, and a touch of sweetness from ingredients like cola or brown sugar. The result is a savory and slightly sweet dish that melts in your mouth and is often served with rice and fried plantains.
Making Posta Negra Cartagenera involves several steps, including marinating the meat, preparing the sauce, and slow-cooking the beef until it’s perfectly tender. This dish not only showcases the vibrant flavors of Colombian cuisine but also brings a sense of warmth and celebration to the table. Whether you’re preparing it for a holiday feast or a family gathering, Posta Negra Cartagenera is sure to impress your guests with its deep flavors and aromatic spices.
Ingredients (Serves 4-6):
- 2-3 pounds beef roast (such as chuck or brisket)
- 1 cup cola (or dark soda)
- 1/2 cup soy sauce
- 1/2 cup brown sugar
- 1 medium onion, chopped
- 4 cloves garlic, minced
- 2 bay leaves
- 1 tablespoon cumin
- 1 tablespoon ground black pepper
- 1 tablespoon paprika
- 1 teaspoon thyme
- 1 tablespoon vegetable oil
- Salt to taste
- Fresh cilantro for garnish (optional)
Cooking Instructions:
- Marinate the Beef: In a large bowl, combine cola, soy sauce, brown sugar, chopped onion, minced garlic, bay leaves, cumin, black pepper, paprika, thyme, and a pinch of salt. Place the beef roast in the marinade, ensuring it’s well-coated. Cover the bowl and refrigerate for at least 4 hours, preferably overnight, to allow the flavors to penetrate the meat.
- Sear the Meat: After marinating, remove the beef from the marinade and pat it dry with paper towels. In a large pot or Dutch oven, heat the vegetable oil over medium-high heat. Once hot, sear the beef on all sides until it develops a deep brown crust, about 3-5 minutes per side. This step is vital for building flavor.
- Prepare the Cooking Sauce: Once the beef is seared, remove it from the pot and set it aside. Pour the marinade into the pot, scraping up any browned bits from the bottom. Bring the marinade to a simmer, allowing it to reduce slightly for about 5 minutes.
- Slow Cook the Beef: Return the seared beef to the pot, ensuring it’s submerged in the marinade. Cover the pot with a lid and reduce the heat to low. Allow the beef to cook slowly for 2 to 3 hours, or until it’s tender and easily pulls apart with a fork. Check occasionally and add a splash of water if the sauce becomes too thick.
- Rest and Serve: Once the beef is tender, remove it from the pot and let it rest for about 10-15 minutes. Slice the meat against the grain and serve it with the thickened sauce spooned over the top. Garnish with fresh cilantro if desired.
Extra Tips:
When preparing Posta Negra Cartagenera, patience is key! Allowing the beef to marinate for an extended period will enhance the flavor greatly.
Additionally, consider using a slow cooker for an even more tender result, as this method allows the beef to cook gently and evenly.
Finally, don’t forget to serve it with traditional sides like coconut rice and fried plantains to complete the Colombian culinary experience. Enjoy the process and the delightful aromas that will fill your kitchen!
Arroz Con Coco
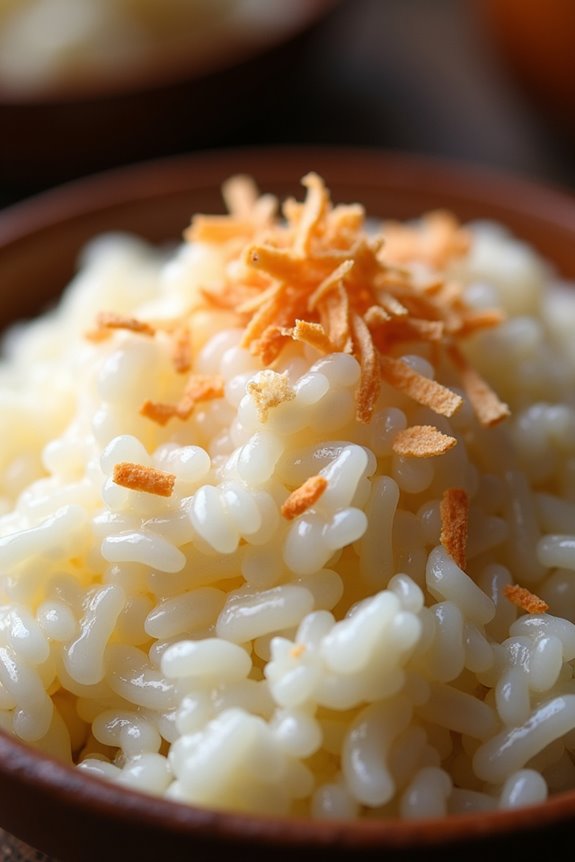
Arroz Con Coco, or Coconut Rice, is a delightful dish that perfectly encapsulates the warmth and festivity of Colombian Christmas celebrations. The combination of rice and coconut creates a creamy and aromatic experience, making it a popular accompaniment to various Colombian dishes, especially during the holiday season.
Traditionally served alongside fried fish or enjoyed as a standalone dish, Arroz Con Coco is a must-try for anyone looking to explore the rich culinary landscape of Colombia.
Preparing Arroz Con Coco is both a simple and rewarding task that brings the essence of Colombian culture into your home. The key ingredients include coconut milk, which infuses the rice with a rich flavor, and a touch of sugar that enhances the natural sweetness. This dish not only serves as a comforting side but also as a festive treat that can be enjoyed by family and friends during gatherings.
Ingredients (serving size: 4-6 people):
- 2 cups long-grain rice
- 1 can (13.5 oz) coconut milk
- 1 cup water
- 1/2 cup sugar
- 1 teaspoon salt
- 1/2 teaspoon cinnamon (optional)
- 1/4 cup shredded coconut (optional, for garnish)
Cooking Instructions:
- Rinse the Rice: Begin by rinsing the long-grain rice under cold water in a fine-mesh strainer. This step is essential as it helps remove excess starch, preventing the rice from becoming overly sticky. Continue rinsing until the water runs clear, then set it aside to drain.
- Combine Ingredients in a Pot: In a medium to large saucepan, combine the rinsed rice, coconut milk, water, sugar, salt, and cinnamon (if using). Stir the mixture well to guarantee that the rice is evenly coated with the liquids and the sugar is dissolved.
- Cook the Rice: Place the saucepan over medium heat and bring the mixture to a gentle boil. Once boiling, reduce the heat to low, cover the pot with a lid, and let it simmer for about 20-25 minutes. Avoid lifting the lid too often, as this can release steam necessary for cooking.
- Check for Doneness: After 20-25 minutes, check the rice for doneness. The rice should be tender, and most of the liquid should be absorbed. If the rice is still firm and there’s liquid left, cover and let it cook for an additional 5 minutes.
- Fluff and Serve: Once the rice is fully cooked, remove the pot from the heat and let it sit covered for an additional 5 minutes. Then, use a fork to fluff the rice gently. If desired, sprinkle shredded coconut on top for added texture and flavor before serving.
Extra Tips: To enhance the flavor of your Arroz Con Coco, consider using fresh coconut milk if available, as it offers a richer taste than canned versions. Additionally, you can experiment with adding a few raisins or nuts for a delightful twist.
Always taste and adjust the sugar to your preference, as the sweetness can vary based on personal taste. Enjoy this dish warm, and it’ll surely be a hit at your holiday gatherings!
Pandebono
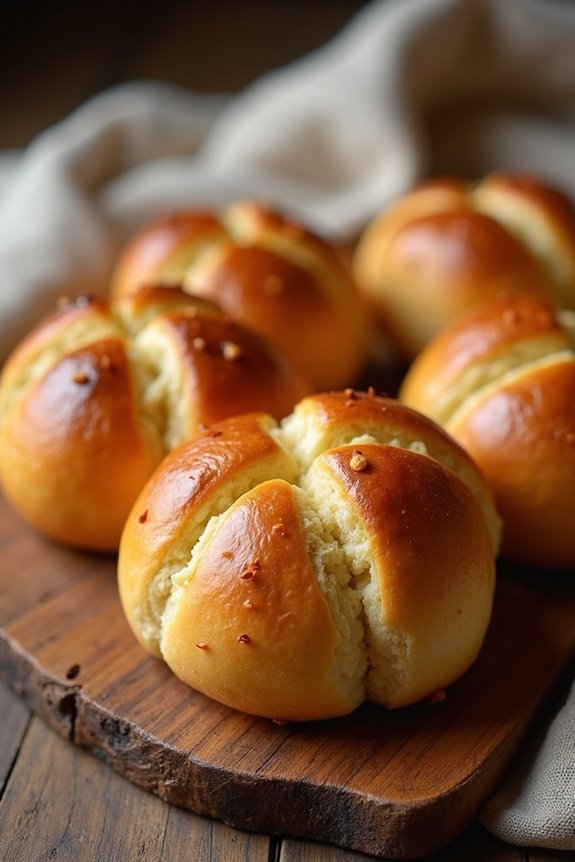
Pandebono is a traditional Colombian bread roll that’s often enjoyed during the festive season, particularly at Christmas time. This delightful treat is known for its soft and chewy texture, combined with a rich flavor profile thanks to its main ingredients: cheese and cassava flour. The name “pandebono” translates to “good bread,” and it truly lives up to this title, making it a beloved staple in Colombian households during the holidays and beyond.
Making pandebono is a simple yet rewarding process. The combination of salty cheese and the slight sweetness of the cassava flour creates a perfect balance that’s hard to resist. Often served warm, these bread rolls can be enjoyed on their own or with a cup of hot chocolate, making them an excellent addition to your Christmas celebrations. Let’s explore how to make these delicious Colombian treats!
Ingredients (serving size: 4-6 people):
- 2 cups of cassava flour (yuca flour)
- 1 cup of fresh cheese (such as queso fresco or mozzarella), crumbled
- 1/2 cup of grated parmesan cheese
- 1/2 cup of milk
- 1/4 cup of sugar
- 2 large eggs
- 1 teaspoon of baking powder
- 1/4 teaspoon of salt
Cooking Instructions:
- Preheat the Oven: Start by preheating your oven to 350°F (175°C). This guarantees that the pandebono will bake evenly and become golden brown.
- Mix the Dry Ingredients: In a large mixing bowl, combine the cassava flour, baking powder, and salt. Mix thoroughly to guarantee that the baking powder is evenly distributed throughout the flour.
- Add the Cheese: Add the crumbled fresh cheese and grated parmesan cheese to the flour mixture. Use your hands or a spatula to mix until the cheeses are well incorporated into the flour.
- Combine Wet Ingredients: In a separate bowl, whisk together the milk, sugar, and eggs until fully combined. Make sure the sugar has dissolved properly for an even sweetness.
- Combine Wet and Dry Mixtures: Gradually add the wet mixture to the dry ingredients, stirring continuously until a dough begins to form. The dough should be slightly sticky but manageable. If it’s too wet, add a little more cassava flour.
- Shape the Dough: Once the dough is well combined, take small portions and roll them into balls or discs, about the size of a golf ball. Place them on a baking sheet lined with parchment paper, leaving some space between each piece.
- Bake: Place the baking sheet in the preheated oven and bake for about 20-25 minutes, or until the pandebono are puffed up and golden brown on the outside.
- Cool and Serve: Once baked, remove the pandebono from the oven and let them cool for a few minutes. Serve warm, ideally with a cup of hot chocolate or your favorite beverage.
Extra Tips: For an added twist, consider experimenting with different types of cheese depending on your taste preferences. You can also make small adjustments to the sweetness by varying the sugar amount, depending on whether you like your bread rolls sweeter or more savory.
Make sure to enjoy your pandebono fresh out of the oven for the best flavor and texture, and remember that they can also be reheated in the oven to regain their delightful softness!
Champús
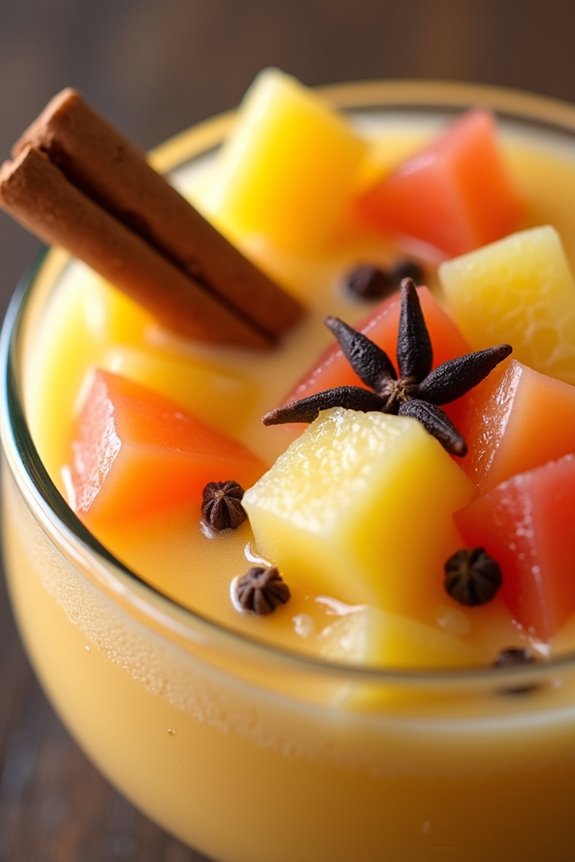
Champús is a traditional Colombian beverage that’s often enjoyed during the Christmas season. This delightful drink combines a variety of fruits, spices, and maize, creating a unique flavor profile that warms the soul and delights the senses.
With its rich, creamy consistency and the invigorating taste of fruits, Champús isn’t just a drink; it’s a celebration in a glass. Families across Colombia gather to prepare this festive drink, making it a cherished part of holiday traditions.
Preparing Champús is a wonderful way to engage with the flavors of Colombia while bringing people together. The combination of sweet and tangy fruits, along with the comforting warmth of spices, makes this drink perfect for holiday gatherings.
Whether served warm or chilled, Champús is sure to be a hit at your next festive occasion. It can be made in advance, allowing the flavors to meld beautifully, ensuring every sip is packed with festive cheer.
Ingredients for Champús (Serves 4-6 people):
- 1 cup dried corn (maiz trillado)
- 1/2 cup pineapple, chopped
- 1/2 cup chopped papaya
- 1/2 cup chopped guava
- 1/2 cup sugar (adjust to taste)
- 1 stick of cinnamon
- 5 cloves
- 6 cups water
- 2 cups fresh orange juice
- 1/2 cup panela (unrefined cane sugar)
- 1/4 teaspoon salt
- Optional: fresh fruit slices for garnish
Cooking Instructions:
- Soak the Dried Corn: Start by soaking the dried corn in a large bowl of water overnight. This process softens the corn and prepares it for cooking. Make sure to drain the corn before using it in the next step.
- Cook the Corn: In a large pot, add the soaked corn along with 6 cups of fresh water. Bring it to a boil, then reduce the heat and simmer for about 30 minutes or until the corn grains are tender. Stir occasionally and add water if needed to prevent sticking.
- Add Spices and Sweeteners: Once the corn is tender, add the cinnamon stick, cloves, sugar, panela, and salt to the pot. Stir well to dissolve the ingredients and allow the mixture to simmer for another 10 minutes. This step infuses the corn with aromatic flavors.
- Incorporate Fruits: Next, add the chopped pineapple, papaya, and guava to the pot. Stir the mixture gently, and let it cook for an additional 15-20 minutes. The fruits should soften and release their juices, enhancing the overall flavor of the Champús.
- Add Orange Juice: Remove the pot from heat, and carefully stir in the fresh orange juice. This will add a revitalizing acidity to balance the sweetness of the drink. Let the mixture cool slightly.
- Serve or Chill: Champús can be served warm or chilled. If desired, blend the mixture for a smoother texture or leave it chunky for a more rustic feel. Pour into glasses and garnish with fresh fruit slices if you like.
Extra Tips: When making Champús, feel free to experiment with different fruits and adjust the sweetness to your preference. You can also add a splash of rum or aguardiente for an adult version of the drink.
If you prefer a creamier texture, some people like to mix in a bit of coconut milk or condensed milk. Remember to allow the flavors to meld together for a few hours or even overnight for the best taste. Enjoy your festive Champús!
Tinto De Navidad

Tinto de Navidad, a traditional Colombian Christmas drink, embodies the festive spirit of the holiday season. This warm beverage is a delightful combination of coffee, spices, and sweeteners that encapsulates the essence of comfort and celebration.
Often enjoyed during family gatherings or holiday parties, Tinto de Navidad not only warms the body but also brings people together, making it a cherished part of Colombian culture.
The preparation of Tinto de Navidad is simple yet rewarding, allowing the rich flavors of coffee and spices to meld beautifully. This drink is typically served hot, making it perfect for chilly winter nights.
With its aromatic blend and sweet undertones, Tinto de Navidad is sure to become a favorite in your holiday repertoire, bringing a taste of Colombia to your festive celebrations.
Ingredients (Serves 4-6)
- 4 cups of water
- 1 cup of ground Colombian coffee
- 1 cinnamon stick
- 4-6 cloves
- 1 star anise
- 1 orange peel (from one orange)
- 1/2 cup of panela (or brown sugar, to taste)
- Milk or cream (optional, for serving)
Cooking Instructions
- Boil the Water: In a medium-sized pot, bring the 4 cups of water to a boil over medium heat. This will serve as the base for your coffee infusion.
- Add Coffee and Spices: Once the water is boiling, add the cup of ground Colombian coffee, cinnamon stick, cloves, star anise, and orange peel to the pot. Stir gently to combine all the ingredients, allowing the rich aromas to fill your kitchen.
- Simmer the Mixture: Reduce the heat to low and let the mixture simmer for about 10-15 minutes. This allows the flavors of the spices to infuse into the coffee, creating a vibrant and aromatic drink.
- Sweeten the Coffee: After simmering, add the panela (or brown sugar) to the pot, adjusting the sweetness to your preference. Stir well until the panela is completely dissolved in the coffee mixture.
- Strain and Serve: Once sweetened, remove the pot from the heat and strain the Tinto de Navidad through a fine mesh sieve or coffee filter into a large serving pitcher or directly into mugs. This will remove the coffee grounds and spices, leaving you with a smooth beverage.
- Garnish and Enjoy: If desired, add a splash of milk or cream to each cup before serving. Garnish with a sprinkle of ground cinnamon or an additional cinnamon stick for a festive touch.
Extra Tips
When preparing Tinto de Navidad, feel free to adjust the spices according to your taste preferences; some may prefer a stronger cinnamon flavor, while others may want to emphasize the orange zest.
Additionally, using freshly ground coffee can enhance the overall flavor of the drink. It’s also a great idea to prepare a larger batch for gatherings, as this drink is sure to impress your guests and create a warm, inviting atmosphere during the holiday season.
Enjoy your Tinto de Navidad and the joy it brings to your celebrations!
Galletas De Navidad

Galletas De Navidad, or Christmas Cookies, are a cherished tradition in Colombian households during the festive season. These delightful treats aren’t only delicious but also bring a sense of joy and togetherness as families gather to bake and share them. The cookies are often flavored with spices like cinnamon and clove, and can be decorated with colorful icing or sprinkles to make them even more festive.
Whether enjoyed with a warm cup of hot chocolate or shared with loved ones, these cookies embody the spirit of Christmas in Colombia.
Making Galletas De Navidad is a fun and rewarding experience, especially when involving children in the process. The dough is simple to prepare and can be rolled out and cut into various shapes, allowing for creativity in decoration. Once baked to perfection, these cookies can be stored in festive tins or given as gifts, making them a versatile addition to your holiday celebrations.
Ingredients (serving size: 4-6 people):
- 2 cups all-purpose flour
- 1/2 cup unsalted butter, softened
- 1/2 cup granulated sugar
- 1 large egg
- 1 teaspoon baking powder
- 1 teaspoon ground cinnamon
- 1/2 teaspoon ground cloves
- 1 teaspoon vanilla extract
- A pinch of salt
- Icing and sprinkles for decoration (optional)
Cooking Instructions:
- Preheat the Oven: Start by preheating your oven to 350°F (175°C). This guarantees that the cookies bake evenly and achieve a nice golden color.
- Prepare the Dough: In a large mixing bowl, combine the softened butter and granulated sugar. Use an electric mixer or a whisk to cream them together until the mixture is light and fluffy. This process incorporates air into the mixture, giving the cookies a nice texture.
- Add Wet Ingredients: Beat in the egg and vanilla extract until well combined. This adds moisture and flavor to the dough.
- Combine Dry Ingredients: In a separate bowl, whisk together the all-purpose flour, baking powder, ground cinnamon, ground cloves, and a pinch of salt. This step guarantees that the baking powder and spices are evenly distributed throughout the flour.
- Mix Dough: Gradually add the dry ingredients to the wet mixture, stirring until a soft dough forms. If the dough feels too sticky, you can add a little more flour, but be careful not to overwork it.
- Roll and Cut: Dust a clean surface with flour and roll out the dough to about 1/4 inch thickness. Use cookie cutters to cut out shapes and place them on a baking sheet lined with parchment paper.
- Bake the Cookies: Place the baking sheet in the preheated oven and bake for 8-10 minutes or until the edges of the cookies are lightly golden. Keep an eye on them to avoid overbaking.
- Cool and Decorate: Once baked, remove the cookies from the oven and let them cool on a wire rack. After they’ve cooled completely, you can decorate them with icing and sprinkles as desired.
Extra Tips:
When making Galletas De Navidad, feel free to experiment with different spices or add-ins like chopped nuts or dried fruits to the dough for added flavor and texture.
For a festive touch, consider using cookie cutters in holiday shapes such as stars, trees, or bells. If you want to save time, you can prepare the dough ahead of time and refrigerate it for up to a week before rolling and baking. Just remember to allow the dough to come to room temperature before rolling it out.
Enjoy the process and have fun decorating with your loved ones!
Tres Leches Cake

Tres Leches Cake, or “Pastel de Tres Leches,” is a traditional Latin American dessert that has gained immense popularity in Colombia, especially during the festive season. This decadent cake is soaked in a mixture of three types of milk, which gives it an incredibly moist texture and a rich flavor.
Perfect for Christmas celebrations, Tres Leches Cake is often topped with whipped cream and fresh fruits, making it a delightful treat for family and friends.
Making Tres Leches Cake involves baking a light sponge cake, soaking it in a luscious milk mixture, and finally topping it off with whipped cream. The combination of sweetened condensed milk, evaporated milk, and whole milk creates a unique and creamy flavor that’s synonymous with holiday cheer.
This recipe is designed to serve 4-6 people, making it an ideal dessert for intimate gatherings or festive parties.
Ingredients:
- 1 cup all-purpose flour
- 1 ½ teaspoons baking powder
- ¼ teaspoon salt
- 5 large eggs
- 1 cup granulated sugar
- 1 teaspoon vanilla extract
- ½ cup whole milk
- 1 can (14 oz) sweetened condensed milk
- 1 can (12 oz) evaporated milk
- 1 cup heavy cream (for topping)
- 2 tablespoons powdered sugar (for topping)
- Fresh fruits (such as strawberries or peaches) for garnish (optional)
Cooking Instructions:
1. Preheat the Oven: Begin by preheating your oven to 350°F (175°C). This guarantees that your cake will bake evenly and rise properly.
2. Prepare the Cake Batter: In a medium bowl, whisk together the all-purpose flour, baking powder, and salt. In a separate large bowl, beat the eggs and granulated sugar using an electric mixer on high speed until the mixture is pale and fluffy, about 5-7 minutes.
Add the vanilla extract and mix until combined.
3. Combine Wet and Dry Ingredients: Gradually add the flour mixture to the egg mixture, alternating with the whole milk, and mix until just combined. Be careful not to overmix to keep the batter light and airy.
4. Bake the Cake: Pour the batter into a greased 9×13 inch baking dish. Bake in the preheated oven for 25-30 minutes or until a toothpick inserted into the center comes out clean.
Allow it to cool in the pan for about 10 minutes.
5. Prepare the Milk Mixture: While the cake is cooling, combine the sweetened condensed milk, evaporated milk, and 1 cup of whole milk in a bowl. Mix well until fully combined.
6. Soak the Cake: Once the cake has cooled slightly, use a fork or skewer to poke holes all over the top of the cake. Slowly pour the milk mixture evenly over the cake, allowing it to soak in.
Let the cake absorb the milk for at least 30 minutes, or ideally, refrigerate it for several hours or overnight for the best flavor.
7. Make the Whipped Cream Topping****: In a medium bowl, whip the heavy cream with the powdered sugar until soft peaks form. Be careful not to overwhip, as it can turn grainy.
8. Top and Serve: Spread the whipped cream evenly over the soaked cake. Garnish with fresh fruits if desired. Slice and serve chilled.
Extra Tips:
When making Tres Leches Cake, it’s important to allow the cake to soak in the milk mixture for enough time to achieve the desired moistness.
Refrigerating the cake overnight enhances the flavors and texture. For an extra twist, consider adding a splash of rum or vanilla extract to the milk mixture for added depth.
Finally, always serve the cake chilled for a revitalizing treat that captures the essence of the holiday season.