

When I think of South American cuisine, I’m transported to cozy kitchens filled with the aromas of simmering spices and freshly baked goods.
Each dish tells a story, from the flaky empanadas that remind me of family gatherings to the vibrant ceviche that brings a taste of summer.
Join me as we explore 15 heartwarming recipes that celebrate the rich flavors of South America.
Each one promises a delightful experience that feels like home, perfect for sharing with loved ones.
Empanadas: A Savory Handheld Delight

Empanadas are a beloved staple throughout South America, celebrated for their versatility and rich flavors. These delightful pastries can be filled with a variety of ingredients, from savory meats to fresh vegetables and cheeses, making them suitable for any palate. The golden, flaky crust envelops the filling, creating a perfect handheld meal that’s ideal for parties, picnics, or family dinners.
Each region has its own twist on the empanada, but the basic concept remains the same: a delicious filling encased in dough, baked or fried to perfection.
To make empanadas, you’ll need to prepare both the dough and the filling. The dough is typically made with flour, salt, water, and fat, resulting in a tender yet sturdy pastry. The filling can range from seasoned ground beef, chicken, or cheese and spinach, among others. Once assembled, the empanadas can be baked for a healthier option or fried for a crispy finish. Regardless of how you choose to cook them, these savory pastries are sure to impress anyone who takes a bite.
Ingredients (serving size: 4-6 people)
- 2 cups all-purpose flour
- 1/2 teaspoon salt
- 1/2 cup unsalted butter, chilled and diced
- 1/4 cup cold water
- 1 medium onion, finely chopped
- 1 pound ground beef (or any preferred protein)
- 1 teaspoon ground cumin
- 1 teaspoon paprika
- 1/2 cup green olives, chopped
- 1/2 cup hard-boiled eggs, chopped
- Salt and pepper to taste
- 1 egg, beaten (for egg wash)
Cooking Instructions
- Prepare the Dough: In a large mixing bowl, combine the flour and salt. Add the chilled, diced butter and mix until the mixture resembles coarse crumbs. Gradually add the cold water, stirring until the dough comes together. Knead briefly on a floured surface until smooth, then wrap in plastic wrap and refrigerate for at least 30 minutes.
- Cook the Filling: In a skillet over medium heat, sauté the chopped onion until translucent. Add the ground beef and cook until browned, breaking it apart with a spoon. Stir in the cumin, paprika, salt, and pepper. Remove from heat and mix in chopped olives and hard-boiled eggs. Let the filling cool while you roll out the dough.
- Roll Out the Dough: On a floured surface, roll out the chilled dough to about 1/8 inch thick. Using a round cutter or a glass, cut out circles of dough, approximately 4-6 inches in diameter.
- Assemble the Empanadas: Place a heaping tablespoon of the filling in the center of each dough circle. Fold the dough over to create a half-moon shape and press the edges together to seal. Crimp the edges with a fork for a decorative touch and to guarantee they’re tightly closed.
- Cook the Empanadas: Preheat your oven to 375°F (190°C) if baking. Place the empanadas on a baking sheet lined with parchment paper. Brush the tops with the beaten egg for a golden finish. Bake for 20-25 minutes until golden brown. If frying, heat oil in a deep skillet and fry each empanada for 3-4 minutes, or until golden and crispy, then drain on paper towels.
- Serve: Allow the empanadas to cool slightly before serving. They can be enjoyed warm as a main dish or served with a dipping sauce such as salsa or chimichurri.
Extra Tips
When making empanadas, feel free to experiment with different fillings to suit your taste. Vegetarian options, such as a mix of sautéed mushrooms, spinach, and cheese, can be just as satisfying.
Additionally, if you find the dough too dry, adding a bit more cold water can help achieve the perfect consistency. Always verify that the filling is cooled before assembly to prevent the dough from becoming soggy.
Finally, consider making a double batch and freezing the uncooked empanadas for a quick meal option in the future!
Arepas: Corn Cakes With Endless Fillings
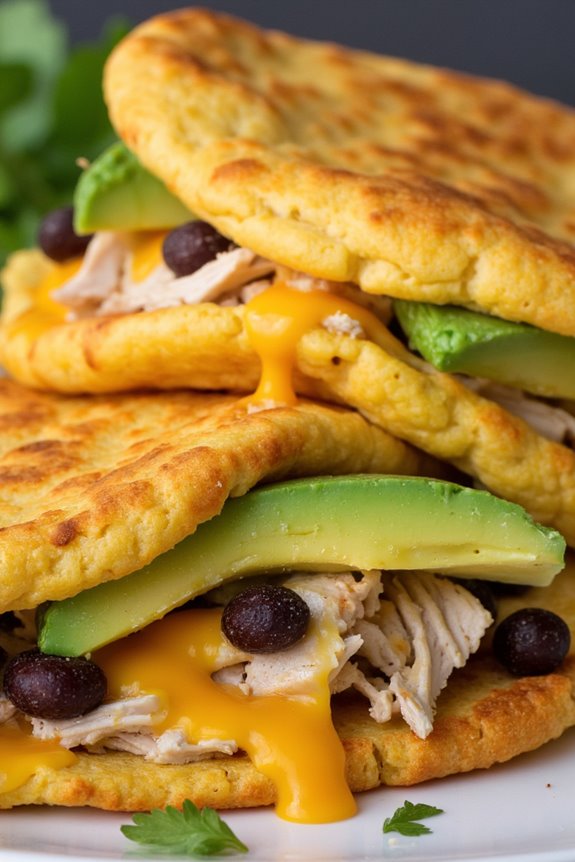
Arepas are a traditional dish from Venezuela and Colombia, made with ground maize dough or cooked flour. These versatile corn cakes can be grilled, baked, or fried, and served plain or filled with a variety of delicious ingredients.
The beauty of arepas lies in their adaptability; you can stuff them with anything from cheese, meats, and avocados to beans and vegetables, making them a perfect meal for any time of the day. Whether you enjoy them for breakfast, lunch, or dinner, arepas are sure to satisfy your cravings.
To make perfect arepas, you’ll need to use a specific type of corn flour known as “masarepa,” which is precooked and readily available in Latin American grocery stores or online. The process is simple yet rewarding, as you can customize the fillings to fit your taste. Once you master the basic recipe, the possibilities for your arepas will be virtually endless. Gather your ingredients, and let’s get started!
Ingredients (Serves 4-6):
- 2 cups masarepa (precooked corn flour)
- 2 ½ cups warm water
- 1 teaspoon salt
- 1 tablespoon vegetable oil (optional, for frying)
- Fillings of your choice (e.g., cheese, shredded chicken, black beans, avocado, etc.)
Cooking Instructions:
1. Prepare the Dough: In a large mixing bowl, combine the masarepa and salt. Gradually add the warm water while mixing with your hands or a spoon until the dough comes together. You want it to be soft and pliable, not sticky. If it feels too dry, add a little more water, and if it’s too wet, sprinkle in more masarepa.
2. Shape the Arepas: Divide the dough into equal portions, about the size of a golf ball. Roll each portion into a ball and then flatten it gently between your palms to form a disc that’s about ½ inch thick. Make sure the edges are smooth to prevent cracking during cooking.
3. Cook the Arepas: You can choose to fry, bake, or grill your arepas. If you prefer frying, heat a skillet over medium heat and add a tablespoon of vegetable oil. Cook the arepas for about 5-7 minutes on each side until they’re golden brown and crispy on the outside.
For baking, preheat your oven to 375°F (190°C) and bake the arepas for 25-30 minutes, flipping halfway through. For grilling, place the arepas on a preheated grill and cook for 4-5 minutes on each side.
4. Fill the Arepas: Once the arepas are cooked, remove them from the heat and let them cool for a minute. Cut a pocket into the side of each arepa with a knife, being careful not to cut all the way through. Stuff your arepas with your choice of fillings, packing them generously.
5. Serve and Enjoy: Serve the filled arepas warm, accompanied by sides like avocado, salsa, or a fresh salad. Enjoy your homemade corn cakes!
Extra Tips:
When making arepas, feel free to experiment with the fillings to suit your taste. You can also add spices or herbs to the dough for an extra flavor boost.
To keep the arepas warm while cooking multiple batches, wrap them in a clean kitchen towel. Leftover arepas can be stored in an airtight container in the refrigerator and reheated in a skillet or oven for a quick and delicious meal later.
Feijoada: A Hearty Brazilian Stew
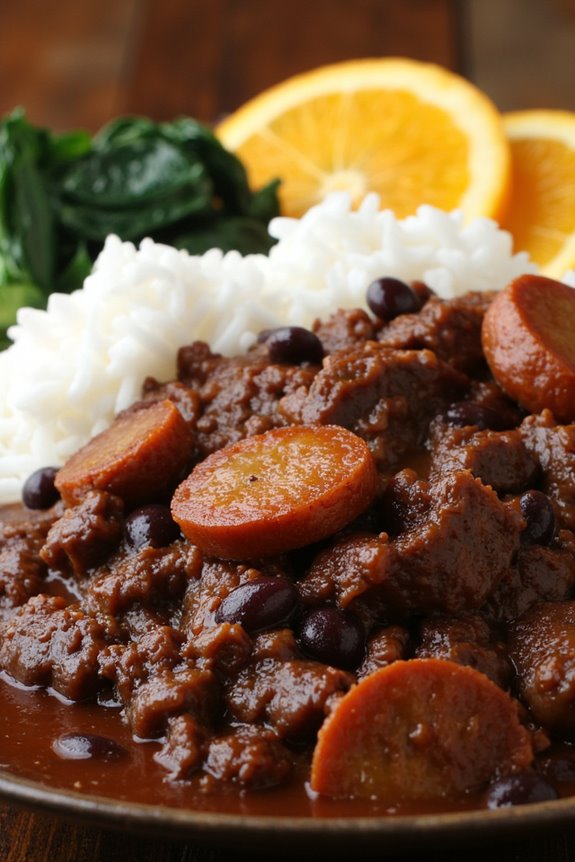
Feijoada is a traditional Brazilian stew that’s as rich in flavor as it’s in history. Originating from the Portuguese settlers, this hearty dish is made with black beans and a variety of meats, often including pork, beef, and sausages.
Feijoada is typically served with rice, collard greens, and orange slices, making it a well-rounded meal that appeals to a wide range of palates. It’s not just a staple in Brazilian cuisine; it’s a culinary symbol of the country’s culture and community, often enjoyed during gatherings and celebrations.
Making feijoada is a labor of love, requiring a bit of time and preparation, but the result is a warm and comforting dish that will impress your family and friends. The key to a great feijoada is the slow cooking process, which allows the beans to absorb the flavors of the meats and spices beautifully.
Whether you’re cooking for a special occasion or just a cozy family dinner, feijoada will surely be a hit!
Ingredients (Serves 4-6 people):
- 1 lb black beans, soaked overnight
- 1 lb pork shoulder, cut into chunks
- 1 lb beef chuck, cut into chunks
- 1/2 lb chorizo sausage, sliced
- 1/2 lb smoked sausage, sliced
- 1 medium onion, chopped
- 4 cloves garlic, minced
- 2 bay leaves
- 1 teaspoon cumin
- 1 teaspoon paprika
- Salt and pepper to taste
- 4 cups chicken broth
- 2 tablespoons olive oil
- Cooked white rice, for serving
- Fresh collard greens, sautéed, for serving
- Orange slices, for garnish
Cooking Instructions:
- Prepare the Beans: Begin by rinsing the soaked black beans under cold water. Drain and set aside. This helps remove any impurities and excess starch that might cloud the stew.
- Brown the Meats: In a large pot or Dutch oven, heat the olive oil over medium-high heat. Add the pork shoulder and beef chuck, browning them on all sides. This step adds depth of flavor through caramelization. Once browned, remove the meats and set them aside.
- Sauté Aromatics: In the same pot, add the chopped onion and minced garlic. Sauté until the onion is translucent and fragrant, about 5 minutes. The goal is to build a flavor base for the stew.
- Combine Ingredients: Return the browned meats to the pot. Add the sliced chorizo and smoked sausage, followed by the soaked black beans, bay leaves, cumin, paprika, salt, and pepper. Stir well to incorporate all ingredients.
- Add Broth and Simmer: Pour in the chicken broth, ensuring all ingredients are submerged. Bring the mixture to a boil, then reduce the heat to low. Cover the pot and let it simmer for about 2-3 hours, or until the beans are tender and the meat is fork-tender. Stir occasionally to prevent sticking.
- Adjust Seasoning and Serve: Once cooked, taste the feijoada and adjust the seasoning if necessary. Remove the bay leaves before serving. Serve the stew hot over a bed of cooked white rice, with sautéed collard greens on the side and garnished with fresh orange slices.
Extra Tips:
When preparing feijoada, feel free to customize the meats based on your preference or availability. Some might include beef ribs or even duck for a richer flavor.
Additionally, letting the stew rest for a few hours, or even overnight, enhances the flavors even more, making it a perfect make-ahead dish for gatherings. Don’t forget that feijoada is often better the next day, as the flavors continue to meld and develop!
Ceviche: A Refreshing Citrus-Marinated Dish

Ceviche is a vibrant and invigorating dish that originates from the coastal regions of South America, particularly Peru. This delightful seafood dish is made by marinating fresh raw fish in citrus juices, primarily lime or lemon, which “cooks” the fish through a process called denaturation.
Traditionally served with a variety of accompaniments like sweet potatoes, corn, and avocado, ceviche isn’t only delicious but also a healthy option packed with protein and omega-3 fatty acids. Its bright, zesty flavors make it a perfect appetizer or light meal, especially during warm weather.
The beauty of ceviche lies in its simplicity and the quality of the ingredients used. Choosing the freshest fish is vital, as it’s the star of the dish. The marinade not only adds flavor but also enhances the texture of the fish. This recipe will guide you in creating a traditional ceviche that serves 4-6 people, guaranteeing your guests will experience the essence of South American cuisine in every bite.
Ingredients:
- 1 pound fresh white fish fillets (such as snapper or tilapia), diced into small cubes
- 1 cup freshly squeezed lime juice (about 6-8 limes)
- 1 medium red onion, thinly sliced
- 1-2 jalapeños or serrano peppers, finely chopped (adjust for spice preference)
- 1 cup diced tomatoes (seeds removed)
- 1 cup diced cucumber
- 1/2 cup fresh cilantro, chopped
- Salt and pepper to taste
- 1 avocado, diced (for serving)
- Tortilla chips or plantain chips (for serving)
Cooking Instructions:
- Prepare the Fish: Start by confirming that your fish is fresh and of high quality. Rinse the fish under cold water and pat it dry with a paper towel. Cut the fish into small, uniform cubes to guarantee even marination and cooking.
- Marinate the Fish: In a large glass or ceramic bowl, combine the diced fish and freshly squeezed lime juice. Make sure the fish is fully submerged in the juice, as this is vital for the marination process. Cover the bowl with plastic wrap and refrigerate for about 15-30 minutes, or until the fish appears opaque and firm to the touch.
- Add Vegetables and Seasoning: Once the fish is marinated, remove it from the refrigerator. Add the sliced red onion, chopped jalapeños or serrano peppers, diced tomatoes, diced cucumber, and chopped cilantro to the bowl. Gently mix everything together with a spatula, guaranteeing the ingredients are evenly distributed.
- Season to Taste: Taste the ceviche mixture and season with salt and pepper according to your preference. You can adjust the amount of lime juice or peppers based on your taste as well.
- Serve: To serve, you can either plate the ceviche in individual bowls or serve it family-style in a large bowl. Garnish with diced avocado on top and serve with tortilla chips or plantain chips on the side for a crunchy contrast.
Extra Tips: When making ceviche, it’s vital to use the freshest seafood possible. If you can’t find fresh fish, consider using shrimp or scallops, which also work well in ceviche.
Additionally, if you’re preparing the dish ahead of time, marinate the fish separately and combine it with the other ingredients just before serving to maintain the texture and prevent the vegetables from becoming too soft. Enjoy your ceviche chilled for the best flavor experience!
Asado: The Art of Argentine Barbecue

Asado is more than just a meal in Argentina; it’s a social event that brings family and friends together around a smoky grill. This traditional barbecue method showcases a variety of meats, typically cooked slowly over an open flame or charcoal. The secret to a great asado lies not only in the quality of the meat but also in the way it’s prepared and seasoned, often using simple methods that allow the natural flavors to shine.
From juicy cuts of beef to succulent sausages, every element of the asado is designed to be savored and enjoyed as part of a communal experience.
To create an authentic Argentine asado, you’ll need to gather a selection of meats and some essential accompaniments. Marinades and seasonings can vary, but the most traditional is a simple mix of salt and chimichurri sauce. The cooking process is just as important as the ingredients, as the meat is often grilled to perfection over hours, allowing for that distinctive smoky flavor.
Whether you’re hosting a gathering or simply enjoying a weekend feast, an asado promises to be a culinary experience like no other.
Ingredients (Serves 4-6)
- 2 lbs of beef ribs (costillas)
- 2 lbs of flank steak (vacio)
- 1 lb of chorizo sausage
- 1 lb of morcilla (blood sausage)
- Sea salt (to taste)
- 1 cup chimichurri sauce (for serving)
- 1-2 large bell peppers (optional, for grilling)
- 1-2 large onions (optional, for grilling)
- Fresh parsley (for garnish)
Cooking Instructions
- Prepare the Grill: Start by setting up your grill for indirect heat. If using charcoal, light the coals until they’re covered with gray ash, then spread them out on one side of the grill. If using a wood fire, let the wood burn down until you have a nice bed of embers. This setup will allow for both direct and indirect grilling.
- Season the Meat: Generously season the beef ribs, flank steak, and sausages with sea salt. The salt will help to enhance the natural flavors of the meat during the cooking process. You can also prepare chimichurri sauce at this stage if you haven’t already, as it will be used for serving.
- Start Grilling the Meats: Place the beef ribs on the grill first, setting them over the cooler side of the grill for indirect cooking. Close the lid and let them cook slowly for about 30-40 minutes, allowing the fat to render and the meat to become tender.
- Add the Flank Steak and Sausages: After the ribs have cooked for about 30-40 minutes, add the flank steak and the sausages to the grill. The sausages will need less cooking time, so place them over direct heat for about 10-15 minutes, turning occasionally. The flank steak can remain on the cooler side of the grill for about 15-20 minutes, depending on your preferred doneness.
- Grill the Vegetables: While the meats are cooking, you can grill the bell peppers and onions. Cut them into large pieces and place them on the grill. They can cook alongside the meats, becoming tender and slightly charred, which will add flavor to your meal.
- Check for Doneness: Use a meat thermometer to check the internal temperature of the meats. The beef ribs should reach an internal temperature of about 145°F (medium-rare), while flank steak can be cooked to your preference, generally around 130-145°F. Chorizo and morcilla should be cooked through, about 160°F.
- Rest the Meats: Once the meats are done, remove them from the grill and let them rest for 10 minutes. This resting period allows the juices to redistribute throughout the meat, ensuring a juicy and flavorful bite.
- Serve: Slice the meats against the grain and arrange them on a large platter. Serve with chimichurri sauce on the side, along with the grilled vegetables. Garnish with fresh parsley for a touch of color and flavor.
Extra Tips
When preparing asado, the quality of your meat is essential; seek out local butchers who can provide you with fresh cuts.
Additionally, patience is key in cooking; don’t rush the grilling process. Allowing the meat to cook slowly over low heat will yield the best results.
Finally, gather your loved ones around the grill; the essence of asado is about enjoying good food and great company, making it a cherished tradition in Argentine culture.
Aji De Gallina: Creamy Chicken in a Spicy Sauce
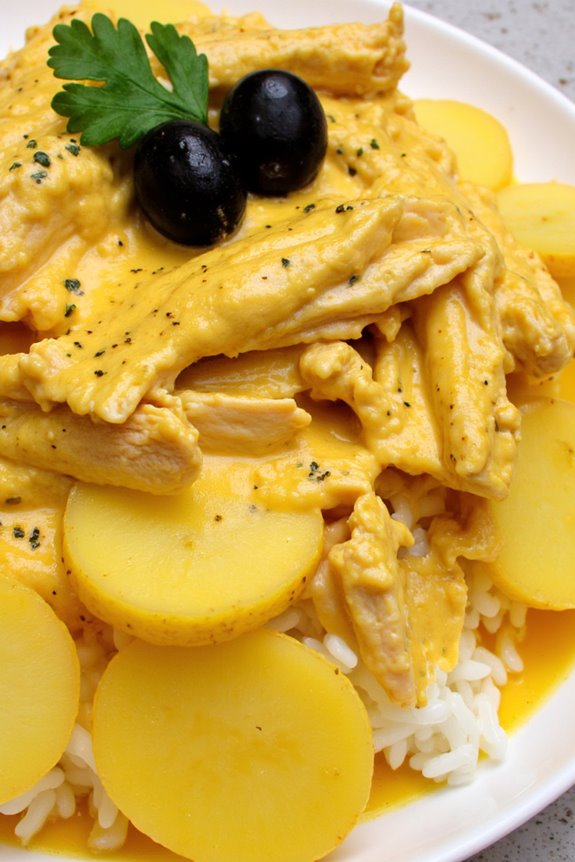
Aji De Gallina is a traditional Peruvian dish that embodies the rich culinary heritage of South America. This creamy and mildly spicy chicken dish is a delightful combination of shredded chicken, a velvety sauce made from aji amarillo (yellow chili peppers), nuts, and cheese. Served over a bed of rice and accompanied by boiled potatoes and olives, Aji De Gallina is a comforting meal that brings warmth and satisfaction to the dinner table.
The balance of flavors and textures in this dish makes it a favorite among many, and it’s often served during family gatherings and celebrations.
Cooking Aji De Gallina is a rewarding experience that allows you to explore the vibrant flavors of Peruvian cuisine. While the recipe may seem intricate, the steps are straightforward, and the end result is a dish that’s sure to impress.
By using simple ingredients and following the cooking instructions carefully, you can create a delicious and authentic Aji De Gallina that everyone will love. Gather your ingredients, roll up your sleeves, and get ready to start on a culinary adventure!
Ingredients (Serves 4-6)
- 2 cups cooked and shredded chicken breast
- 1 medium onion, chopped
- 2 cloves garlic, minced
- 2 cups chicken broth
- 4-5 yellow aji amarillo peppers, seeds removed and chopped
- 1 cup evaporated milk
- 1 cup grated Parmesan cheese
- 1/2 cup walnuts, finely chopped
- 4 tablespoons vegetable oil
- Salt and pepper to taste
- 4 medium potatoes, boiled and sliced
- 1 cup cooked white rice
- Black olives, for garnish
- Chopped parsley, for garnish
Cooking Instructions
- Prepare the Aji Amarillo Paste: In a blender, combine the chopped yellow aji amarillo peppers, garlic, and a splash of chicken broth. Blend until you achieve a smooth paste. This paste will provide the signature flavor to your dish, so make sure it’s well blended.
- Cook the Aromatics: In a large skillet, heat the vegetable oil over medium heat. Add the chopped onion and sauté until it becomes translucent, about 5 minutes. The goal is to soften the onions and release their sweetness, which will enhance the overall flavor of the sauce.
- Combine with Aji Paste: Add the aji amarillo paste to the skillet with the onions. Stir well and cook for about 3-4 minutes, allowing the flavors to meld together. This step is essential as it brings out the spiciness and aroma of the aji peppers.
- Add Chicken Broth: Pour in the chicken broth and bring the mixture to a gentle simmer. Allow it to cook for about 10 minutes to let the flavors deepen. Stir occasionally to prevent sticking.
- Incorporate Milk and Cheese: Gradually add the evaporated milk and grated Parmesan cheese to the skillet, stirring continuously until the cheese melts and the sauce becomes creamy. This creates the rich, velvety texture that characterizes Aji De Gallina.
- Add Shredded Chicken and Walnuts: Fold in the shredded chicken and finely chopped walnuts. Season with salt and pepper to taste. Allow the mixture to simmer for another 5-10 minutes, ensuring the chicken absorbs the flavors from the sauce.
- Serve: To serve, place a portion of the cooked white rice on a plate, followed by the Aji De Gallina mixture. Arrange the boiled potato slices around the chicken, and garnish with black olives and chopped parsley for a pop of color and flavor.
Extra Tips
When preparing Aji De Gallina, using fresh aji amarillo peppers will greatly enhance the dish’s flavor. If you can’t find them, you can substitute with aji amarillo paste or other mild chili peppers.
For an added depth of flavor, consider toasting the walnuts lightly before chopping them. Additionally, serving the dish with boiled eggs and a slice of avocado can elevate the presentation and taste.
Don’t forget to adjust the spice level to your preference by adding more or fewer aji peppers!
Picanha: Juicy Brazilian Beef Cut
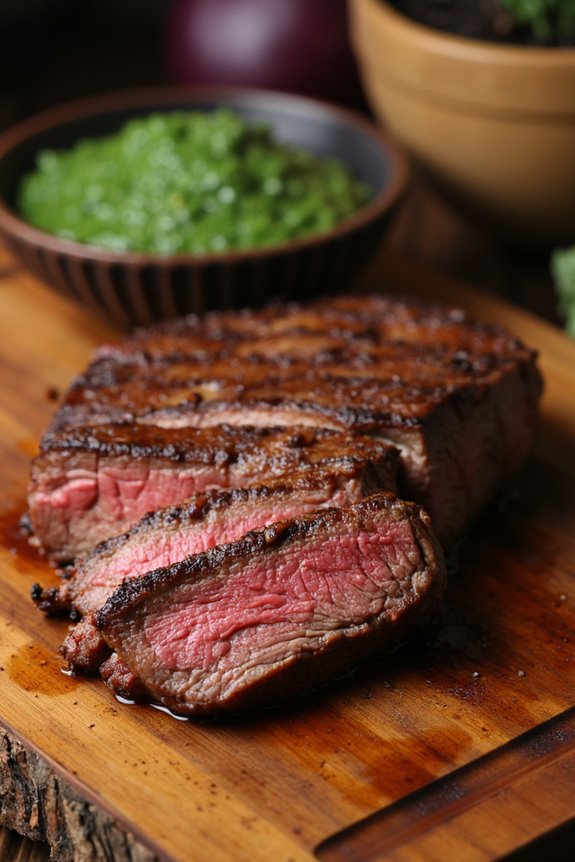
Picanha is a beloved Brazilian cut of beef, known for its incredible flavor and tenderness. Often served at churrascarias, or Brazilian steakhouses, this cut is typically grilled to perfection, allowing the natural flavors of the beef to shine through. The secret to a great picanha lies in its fat cap, which adds a rich juiciness as it cooks, making it a favorite among meat lovers.
Whether you’re hosting a barbecue or simply craving a delicious steak, preparing picanha at home is easier than you might think. For the best results, choose a quality piece of picanha from your butcher, ideally weighing between 2 to 3 pounds. The fat cap should be left intact, as it helps to keep the meat moist while cooking.
Seasoning is minimal, allowing the beef’s natural flavors to take center stage. Once grilled, picanha can be sliced into thin strips and served with chimichurri sauce, rice, or grilled vegetables for a complete meal that embodies the essence of South American cuisine.
Ingredients (Serves 4-6)
- 2 to 3 pounds picanha (top sirloin cap)
- Coarse sea salt
- Freshly cracked black pepper
- Optional: chimichurri sauce for serving
Cooking Instructions
- Prepare the Meat: Start by trimming the picanha if necessary, making sure that the fat cap is left intact. Cut the meat into a triangular shape, keeping the grain of the meat in mind, as this will affect how you slice it later. Be sure to season generously with coarse sea salt and freshly cracked black pepper, rubbing the seasoning into the meat.
- Preheat the Grill: Get your grill ready by preheating it to medium-high heat. If using a charcoal grill, allow the coals to heat until they’re covered with white ash. For a gas grill, simply turn on the burners to achieve a consistent temperature. This step is vital for achieving a nice sear on the picanha.
- Sear the Meat: Once the grill is hot, place the picanha on the grill with the fat side facing down. This will help render the fat, creating a delicious crust. Grill for about 5-7 minutes on this side until a beautiful sear forms. Avoid moving the meat around too much to guarantee a good crust develops.
- Flip and Cook: After searing the fat side, carefully flip the picanha over so the meat side is now facing down. Cook for an additional 5-7 minutes. Use a meat thermometer to check for doneness; aim for medium-rare at an internal temperature of 130-135°F (54-57°C).
- Rest the Meat: Once cooked to your liking, remove the picanha from the grill and cover it loosely with aluminum foil. Let it rest for about 10-15 minutes. This allows the juices to redistribute throughout the meat, guaranteeing each bite is juicy and flavorful.
- Slice and Serve: After resting, slice the picanha against the grain into thin strips. This is important for tenderness. Serve the sliced picanha with chimichurri sauce on the side, along with your choice of sides like rice, grilled vegetables, or a fresh salad.
Extra Tips
When cooking picanha, it’s important to monitor the cooking time closely as the thickness of the cut can vary. If you prefer your steak more done, continue to cook it, checking the temperature frequently.
Additionally, letting the picanha rest after grilling is vital for a tender final product; don’t skip this step! Experimenting with different marinades or spices can also add a unique twist to the dish, making it your own while still celebrating the traditional flavors of Brazilian cuisine.
Locro: A Hearty Andean Stew
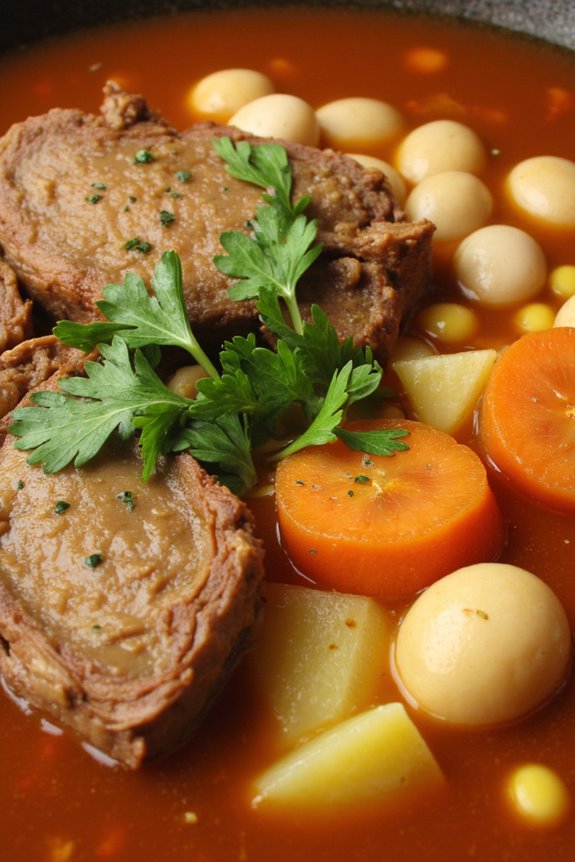
Locro is a traditional Andean stew that’s particularly popular in countries like Argentina, Bolivia, and Ecuador. This dish is cherished not only for its comforting warmth but also for its robust flavors that are a perfect reflection of the Andean culture. Typically enjoyed during colder months or festive occasions, locro combines a variety of ingredients such as potatoes, corn, and meats, offering a hearty meal that can feed a crowd.
The stew is often served with a dollop of spicy sauce or a sprinkle of fresh herbs, making it a beloved staple in South American cuisine. The beauty of locro lies in its versatility; you can adapt the recipe based on the ingredients you have on hand or your personal preferences. Whether you choose to include different types of meats or opt for a vegetarian version using more beans and vegetables, the stew remains a filling and nutritious choice.
It isn’t only packed with flavors but also rich in history, often being associated with communal gatherings and family celebrations.
Ingredients (Serves 4-6 People):
- 1 cup dried white beans
- 1 tablespoon vegetable oil
- 1 medium onion, chopped
- 2 cloves garlic, minced
- 2 medium potatoes, peeled and diced
- 2 medium carrots, sliced
- 1 cup corn kernels (fresh or frozen)
- 1 pound beef or pork, cut into cubes
- 4 cups beef or vegetable broth
- 1 teaspoon cumin
- 1 teaspoon smoked paprika
- Salt and pepper to taste
- Fresh cilantro, chopped (for garnish)
- Aji sauce or hot sauce (optional, for serving)
Cooking Instructions:
- Soak the Beans: Begin by soaking the dried white beans in water overnight. This will help soften them and reduce cooking time. The next day, drain and rinse the beans before using them in the stew.
- Sauté Aromatics: In a large pot, heat the vegetable oil over medium heat. Add the chopped onion and sauté for about 5 minutes until it becomes translucent. Then, add the minced garlic and cook for another minute until fragrant.
- Brown the Meat: Increase the heat to medium-high and add the cubed beef or pork to the pot. Season with salt and pepper. Brown the meat on all sides, which should take about 5-7 minutes. This step adds depth of flavor to your stew.
- Add Vegetables and Beans: Once the meat is browned, add the diced potatoes, sliced carrots, corn kernels, and the soaked white beans to the pot. Stir everything together to combine.
- Pour in the Broth: Pour in the beef or vegetable broth, making sure that all ingredients are covered. Bring the mixture to a boil, then reduce the heat to low. Cover the pot and let it simmer for about 1.5 to 2 hours, or until the beans and meat are tender.
- Season the Stew: After the cooking time, taste your locro and adjust the seasoning with cumin, smoked paprika, and additional salt and pepper as needed. If the stew is too thick, you can add a little more broth or water.
- Serve: Ladle the locro into bowls and garnish with fresh cilantro. Serve hot, accompanied by aji sauce or hot sauce on the side for those who enjoy a bit of spice.
Extra Tips:
When making locro, feel free to experiment with your choice of meats or make it completely vegetarian by omitting the meat and adding more beans and vegetables. Additionally, the cooking time may vary based on the type of beans you use; verify they’re fully cooked and tender before serving.
For an authentic touch, serve locro with crusty bread or corn tortillas to soak up the rich flavors of the stew. Enjoy your culinary journey through the Andes!
Tamales: Flavorful Corn Dough Wrapped in Leaves

Tamales are a traditional South American dish that showcases the rich flavors and ingredients of the region. Typically made with masa (corn dough) and filled with various fillings such as meats, cheeses, or vegetables, tamales are then wrapped in corn husks or banana leaves and steamed to perfection. This dish isn’t only delicious but also a fun culinary project that can bring friends and family together, making it perfect for gatherings and celebrations.
The process of making tamales may seem intimidating at first, but with a little patience and practice, you can create a batch that rivals those from your favorite Latin restaurant. The key to great tamales is in the dough; it should be light and fluffy, allowing the flavors of the filling to shine through. Additionally, the wrapping technique is essential to guarantee that the tamales hold their shape during steaming.
Ingredients (Serves 4-6):
- 2 cups masa harina (corn flour)
- 1 teaspoon baking powder
- 1 teaspoon salt
- 1/2 cup vegetable shortening or lard
- 1 to 1 1/2 cups chicken or vegetable broth
- 1 cup cooked and shredded chicken (or any filling of your choice)
- 1/2 cup salsa verde or red salsa (optional, for added flavor)
- 12-15 corn husks (soaked in warm water for 30 minutes)
Cooking Instructions:
- Prepare the Corn Husks: Begin by soaking the corn husks in warm water for about 30 minutes. This will make them pliable and easier to work with when wrapping the tamales. After soaking, drain the husks and set them aside.
- Make the Dough: In a large mixing bowl, combine the masa harina, baking powder, and salt. Mix these dry ingredients well. In a separate bowl, beat the vegetable shortening or lard until it’s fluffy. Gradually add the masa mixture to the shortening, alternating with the chicken or vegetable broth until you achieve a smooth, spreadable dough. The dough should be light and airy.
- Prepare the Filling: If you haven’t already, cook and shred the chicken (or your choice of filling). Mix the shredded filling with salsa verde or red salsa for added flavor. You can also choose to use cheese, vegetables, or a combination for a vegetarian option.
- Assemble the Tamales: Lay a soaked corn husk on a flat surface with the wider end facing you. Take about 1/4 cup of the masa dough and spread it evenly on the husk, leaving space at the top and bottom. Place about 1-2 tablespoons of your filling in the center of the dough. Fold the sides of the husk over the filling, then fold up the bottom end to secure the tamale. Repeat this process with the remaining husks, masa, and filling.
- Steam the Tamales: In a large steamer pot, arrange the tamales upright, with the open end facing up. Fill the pot with water, ensuring that it doesn’t touch the tamales. Cover the pot with a lid and steam the tamales for about 1 to 1.5 hours, or until the masa pulls away easily from the husk. Check the water level periodically and add more if necessary.
- Serve and Enjoy: Once cooked, remove the tamales from the steamer and let them cool slightly before serving. They can be enjoyed plain or with additional salsa, sour cream, or guacamole on the side.
Extra Tips:
When making tamales, feel free to experiment with different fillings to suit your taste. For a spicier kick, consider adding jalapeños or hot sauce to the filling. If you’re making a large batch, tamales freeze well, so you can enjoy them later. Just be sure to wrap them tightly in plastic wrap before freezing, and they can be reheated by steaming or microwaving.
Pastel De Choclo: Corn Pie With a Twist

Pastel De Choclo is a delightful South American dish, particularly popular in Chile, known for its comforting combination of flavors and textures. This corn pie features a rich filling of seasoned meat, often accompanied by olives, boiled eggs, and a sweet corn topping that creates an irresistible harmony of savory and sweet. The dish is perfect for gatherings and family meals, bringing a taste of South American culture right to your kitchen.
Making Pastel De Choclo is a delightful experience that allows you to explore the flavors of corn, meat, and spices. The dish is traditionally baked in a casserole dish, where the layers meld together beautifully, creating a satisfying and hearty meal. With its vibrant flavors and unique twist, this corn pie is sure to impress your family and friends, making it a fantastic addition to your culinary repertoire.
Ingredients (Serves 4-6):
- 2 cups of corn kernels (fresh or frozen)
- 1 cup of milk
- 1 tablespoon of butter
- 1 pound of ground beef (or a mix of beef and pork)
- 1 medium onion, finely chopped
- 2 cloves of garlic, minced
- 1 teaspoon of cumin
- 1 teaspoon of paprika
- Salt and pepper to taste
- 1/2 cup of green olives, sliced
- 2 hard-boiled eggs, chopped
- 1/2 cup of black olives, sliced (optional)
- 1/4 cup of fresh basil or parsley, chopped (optional)
- 1 tablespoon of sugar (for sweetness)
Cooking Instructions:
- Prepare the Sweet Corn Mixture: In a blender or food processor, combine the corn kernels and milk. Blend until you achieve a smooth consistency. Transfer this mixture to a saucepan, and add the butter. Cook over medium heat, stirring frequently until it thickens slightly, about 5-7 minutes. Set aside.
- Cook the Meat Filling: In a large skillet, heat some oil over medium heat. Add the chopped onion and sauté until translucent, about 3-5 minutes. Add the minced garlic and cook for another minute until fragrant. Then, add the ground beef and cook until browned. Season with cumin, paprika, salt, and pepper. Stir in the green olives and hard-boiled eggs. If using, add black olives and fresh herbs. Mix well, then remove from heat.
- Assemble the Pastel De Choclo: Preheat the oven to 375°F (190°C). In a baking dish, layer the meat mixture evenly on the bottom. Pour the sweet corn mixture over the meat, spreading it out evenly. If desired, sprinkle a tablespoon of sugar on top for added sweetness.
- Bake: Place the dish in the preheated oven and bake for about 30-40 minutes, or until the top is golden and slightly crisp. The edges may bubble slightly, which is a good sign that it’s done.
- Serve: Once baked, remove the dish from the oven and let it sit for about 10 minutes before slicing. This will help the layers set. Serve warm, and enjoy your delicious Pastel De Choclo!
Extra Tips:
When making Pastel De Choclo, feel free to customize the filling to your liking. You can add vegetables such as bell peppers or corn to enhance the flavor and texture.
For an extra touch, consider topping the corn mixture with cheese before baking for a cheesy crust. Always adjust the seasoning to your taste, as some may prefer a spicier or milder flavor.
Enjoy this dish fresh, but it also reheats well, making it perfect for leftovers!
Dulce De Leche: Sweet Milk Confection

Dulce de leche is a beloved sweet treat across South America, known for its rich, caramel-like flavor and creamy consistency. This delightful confection is made by slowly heating sweetened milk, which transforms into a luscious dessert that can be enjoyed in various ways.
Whether spread on toast, used as a filling for cakes, or simply enjoyed by the spoonful, dulce de leche is a versatile ingredient that adds sweetness and depth to any dish.
To create this sweet milk confection at home, you’ll need just a few simple ingredients and a bit of patience, as the key to achieving the perfect dulce de leche lies in the slow cooking process. The result is a velvety, golden-hued sauce that will tantalize your taste buds. The following recipe is designed to serve 4-6 people, making it perfect for sharing with family and friends during gatherings or celebrations.
Ingredients:
- 1 can (14 oz) sweetened condensed milk
- 1 can (12 oz) evaporated milk
- 1/2 teaspoon baking soda
- 1 teaspoon vanilla extract
- Pinch of salt
Cooking Instructions:
- Combine the Ingredients: In a heavy-bottomed saucepan, mix together the sweetened condensed milk, evaporated milk, baking soda, vanilla extract, and a pinch of salt. Stir the mixture thoroughly to guarantee all ingredients are well combined.
- Heat the Mixture: Place the saucepan over medium-low heat. It’s essential to keep the heat low to avoid burning the milk. Stir the mixture continuously as it heats up to prevent sticking and guarantee even cooking.
- Cook and Stir: As the mixture begins to simmer, continue stirring frequently. The milk will gradually change color and thicken. This process can take anywhere from 1 to 2 hours, so be patient. Keep an eye on the pot and stir often, scraping the sides to incorporate any caramelized bits.
- Check for Consistency: After about an hour, you’ll notice the mixture turning a deep caramel color and thickening. To check for doneness, drop a small spoonful of the dulce de leche on a plate and let it cool for a minute. If it holds its shape and is spreadable, it’s ready.
- Cool and Store: Once the desired consistency is achieved, remove the saucepan from heat. Allow the dulce de leche to cool for a bit before transferring it to a clean jar or container. It will thicken further as it cools. Store it in the refrigerator for up to 2 weeks.
Extra Tips:
When making dulce de leche, patience is key. Avoid increasing the heat to speed up the cooking process, as this may lead to burning or uneven texture.
If you like, you can experiment with flavors by adding a pinch of cinnamon or nutmeg during cooking. Additionally, if you prefer a smoother texture, you can blend the cooled dulce de leche for a few seconds before storing. Enjoy this sweet treat in various desserts or simply as a topping for your favorite snacks!
Chivito: Uruguayan Sandwich of Bliss
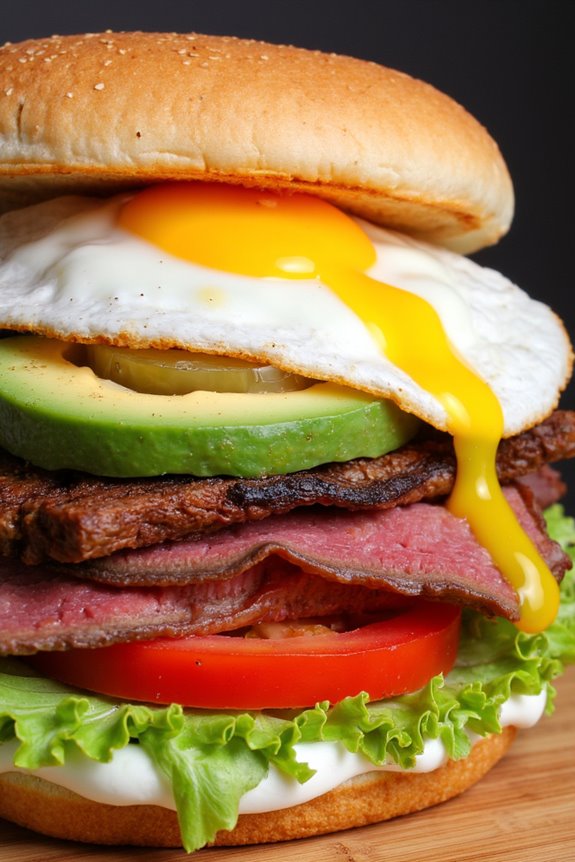
The Chivito is a beloved Uruguayan sandwich that celebrates the rich flavors of South American cuisine. Originating in the 1940s, it has become a culinary icon in Uruguay, often enjoyed as a hearty meal or a late-night snack. The sandwich typically features a grilled beef steak and is layered with a variety of delicious toppings, including ham, cheese, and a fresh salad. Each bite offers a delightful combination of textures and flavors, making it an irresistible treat for meat lovers and food enthusiasts alike.
Making a Chivito is an opportunity to explore the diverse ingredients that define Uruguayan gastronomy. While the sandwich can vary by region and personal preference, the essence lies in using high-quality ingredients and letting their flavors shine. The beauty of the Chivito lies in its versatility; feel free to customize it with your favorite toppings or sauces.
Whether you’re hosting a gathering or simply craving something special, the Chivito is sure to impress and satisfy your taste buds.
Ingredients (Serves 4-6):
- 1 lb beef steak (sirloin or ribeye)
- 4 slices of ham
- 4 slices of mozzarella cheese
- 4 large eggs
- 4 sandwich buns (preferably soft)
- 1 cup lettuce, shredded
- 1 tomato, sliced
- 1 avocado, sliced
- 1/2 cup mayonnaise
- Olive oil
- Salt and pepper to taste
- Optional: pickles, chimichurri sauce, or hot sauce for extra flavor
Cooking Instructions:
- Prepare the Steak: Start by seasoning the beef steak with salt and pepper on both sides. Preheat a grill or skillet over medium-high heat and add a drizzle of olive oil. Once the pan is hot, place the steak on the grill and cook for about 4-5 minutes on each side for medium-rare, or until it reaches your desired doneness. Remove from heat and let it rest for a few minutes before slicing it thinly.
- Cook the Eggs: In a separate skillet, add a little olive oil and heat over medium. Crack the eggs into the skillet and fry them sunny-side up, cooking for about 2-3 minutes or until the whites are set but the yolks are still runny. Season with salt and pepper. Once cooked, remove them from the heat.
- Assemble the Sandwich: Slice the sandwich buns in half. On the bottom half of each bun, spread a generous amount of mayonnaise. Layer the sliced steak, followed by a slice of ham and a slice of mozzarella cheese. Add the fried egg on top.
- Add Fresh Ingredients: Layer on the shredded lettuce, sliced tomatoes, and avocado. If using, add pickles or any additional toppings like chimichurri sauce or hot sauce for extra flavor.
- Toast the Buns (Optional): If you prefer a warm and crispy bun, you can place the assembled sandwiches under a broiler for a couple of minutes until the cheese is melted and the buns are golden brown.
- Serve: Close the sandwiches with the top halves of the buns. Serve immediately while the sandwich is warm and the flavors are at their best.
Extra Tips:
To elevate your Chivito experience, consider marinating the steak in a mixture of olive oil, garlic, and herbs for a few hours before grilling. This will infuse the meat with additional flavor.
You can also experiment with different types of cheese or add a spicy sauce to give your sandwich an extra kick. For a complete meal, serve the Chivito alongside a side of crispy fries or a fresh salad. Enjoy your culinary journey into Uruguayan cuisine!
Sopa Paraguaya: Cornbread From Paraguay

Sopa Paraguaya is a traditional dish that holds a special place in Paraguayan cuisine. Despite its name, which translates to “Paraguayan soup,” this dish is actually a savory cornbread made from cornmeal, cheese, milk, and eggs. The combination of ingredients creates a delightful texture that’s light yet filling, making it a perfect accompaniment to any meal or a delicious standalone snack.
Often enjoyed at family gatherings and celebrations, Sopa Paraguaya showcases the use of corn, a staple ingredient in many South American dishes, and reflects the culinary heritage of Paraguay.
This hearty cornbread isn’t only easy to prepare, but it also allows for various adaptations based on personal taste. Whether you prefer a cheesy version with extra cheese or a spicier rendition with added peppers, Sopa Paraguaya can be customized to suit your palate.
The dish is best served warm, allowing the cheese to melt beautifully inside, and it pairs well with salads, grilled meats, or even on its own as a flavorful treat. Let’s explore making this delightful Paraguayan cornbread!
Ingredients (Serves 4-6)
- 2 cups cornmeal
- 1 cup milk
- 1 cup shredded cheese (preferably Paraguayan cheese or a mild cheese like mozzarella)
- 1 cup finely chopped onion
- 4 large eggs
- 1 teaspoon baking powder
- 1 teaspoon salt
- ½ cup vegetable oil or melted butter
Cooking Instructions
- Preheat the Oven: Begin by preheating your oven to 350°F (175°C). This guarantees that your Sopa Paraguaya will cook evenly and develop a nice golden crust.
- Sauté the Onions: In a skillet, heat a tablespoon of oil over medium heat and add the finely chopped onions. Sauté them until they’re translucent and fragrant, which should take about 5-7 minutes. This step enhances the flavor of the dish.
- Mix Wet Ingredients: In a large mixing bowl, whisk together the milk, eggs, and the sautéed onions until well combined. The eggs will give the cornbread structure and moisture.
- Combine Dry Ingredients: In another bowl, mix together the cornmeal, baking powder, and salt. Stir the dry ingredients to evenly distribute the baking powder and salt.
- Combine Wet and Dry Mixtures: Gradually add the cornmeal mixture to the wet ingredients, stirring continuously to avoid lumps. This will create a smooth batter.
- Add Cheese and Oil: Fold in the shredded cheese and vegetable oil (or melted butter) into the batter. Make sure everything is well mixed, as the cheese is a key ingredient that adds flavor and richness.
- Bake the Mixture: Grease a 9×13-inch baking dish or a similar sized oven-safe dish. Pour the batter into the prepared dish and spread it out evenly. Place it in the preheated oven and bake for about 30-40 minutes, or until the top is golden brown and a toothpick inserted in the center comes out clean.
- Cool and Serve: Once baked, remove the Sopa Paraguaya from the oven and allow it to cool for a few minutes. Cut into squares and serve warm, enjoying the cheesy and corny goodness.
Extra Tips
For a twist on the traditional Sopa Paraguaya, consider adding diced jalapeños or bell peppers for a hint of spice. Additionally, using a mix of cheeses can enhance the flavor profile; try combining a sharp cheese with a mild one for a balanced taste.
Make sure to keep an eye on the baking time, as ovens can vary, and you want to avoid overbaking which can lead to a dry texture. Enjoy this delightful dish with a side of salad or as part of a larger meal!
Lomo Saltado: Stir-Fried Beef With Peruvian Flare
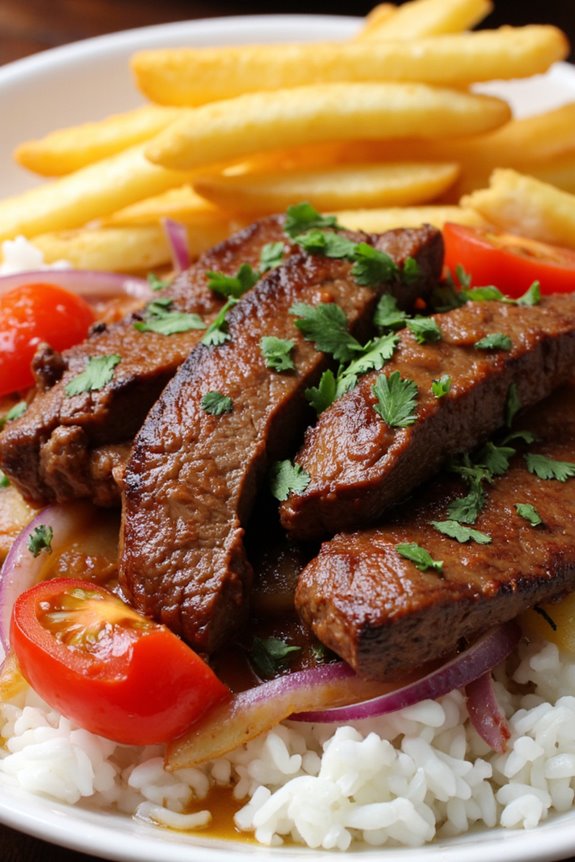
Lomo Saltado is a vibrant and delicious dish that embodies the rich culinary heritage of Peru. It marries the flavors of traditional Peruvian ingredients with Asian influences, resulting from the Chinese immigrants who settled in the region. This dish features marinated strips of beef stir-fried with onions, tomatoes, and a splash of soy sauce, served over a bed of fluffy white rice and often accompanied by crispy French fries. The combination of textures and flavors makes Lomo Saltado a beloved staple in Peruvian households and restaurants alike.
The beauty of Lomo Saltado lies in its versatility and the ease with which it can be prepared. A quick stir-fry guarantees that the beef remains tender and juicy, while the vibrant colors of the vegetables create an appetizing presentation. It’s a dish that brings together the heartiness of Western cuisine with the zing of Asian stir-fry, making it a delightful option for family dinners or gatherings. In just under an hour, you can create a stunning meal that offers a true taste of Peru.
Ingredients (Servings: 4-6)
- 1.5 lbs (680g) flank steak, sliced into thin strips
- 3 tablespoons soy sauce
- 1 tablespoon red wine vinegar
- 2 tablespoons vegetable oil
- 1 medium red onion, sliced into thin wedges
- 2 medium tomatoes, sliced into wedges
- 1-2 jalapeño peppers, sliced (optional)
- 4 cloves garlic, minced
- 1 teaspoon ground cumin
- Salt and pepper to taste
- Fresh cilantro, chopped (for garnish)
- 4 cups cooked white rice
- 2 cups French fries (optional)
Cooking Instructions
- Marinate the Beef: In a bowl, combine the sliced flank steak with soy sauce, red wine vinegar, and ground cumin. Mix well and let it marinate for at least 15-30 minutes. This step is vital as it helps to tenderize the beef and infuse it with flavor.
- Prepare the Vegetables: While the beef is marinating, slice the red onion, tomatoes, and jalapeño peppers. Mince the garlic as well. Having all your ingredients prepped and ready will make the cooking process smoother.
- Heat the Oil: In a large skillet or wok, heat the vegetable oil over medium-high heat until it shimmers. The right temperature is essential for creating a good sear on the beef and vegetables.
- Stir-Fry the Beef: Add the marinated beef to the hot skillet in a single layer. Allow it to sear without stirring for about 2-3 minutes. Then, stir-fry the beef for another 2-3 minutes until it’s browned but still juicy. Remove the beef from the skillet and set it aside.
- Cook the Vegetables: In the same skillet, add the sliced onions and cook for about 2 minutes until they begin to soften. Add the minced garlic and cook for an additional minute until fragrant. Next, add the tomatoes and jalapeño peppers, cooking for another 2-3 minutes until the tomatoes are slightly softened.
- Combine and Serve: Return the beef to the skillet, mixing it with the vegetables. Season with salt and pepper to taste. Cook for another 1-2 minutes until everything is heated through. Serve the Lomo Saltado over a bed of cooked rice, and if desired, add crispy French fries on the side. Garnish with chopped cilantro before serving.
Extra Tips
When preparing Lomo Saltado, it’s important to choose high-quality flank steak for the best flavor and tenderness. Additionally, you can adjust the spice level by adding more or fewer jalapeños according to your preference.
For an authentic touch, serve the dish with a side of aji sauce, a Peruvian chili sauce that can elevate the flavors even further. If you want to experiment, consider substituting the beef with chicken or tofu for a different twist on this classic recipe. Enjoy your culinary journey through Peru!
Chicha Morada: Refreshing Purple Corn Beverage
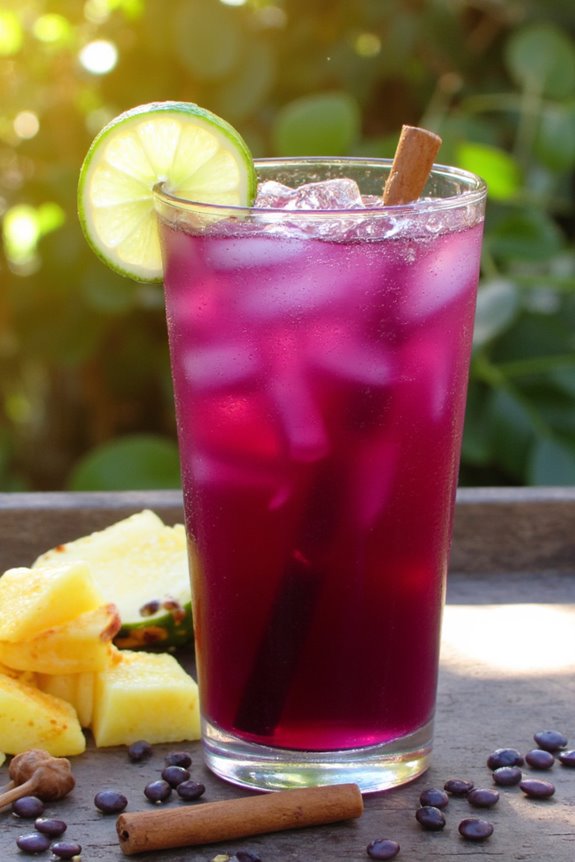
Chicha Morada is a traditional Peruvian beverage made from purple corn, a staple ingredient in South American cuisine. This invigorating drink isn’t only vibrant in color but also rich in flavor and health benefits, thanks to the antioxidants present in purple corn.
Often enjoyed chilled, Chicha Morada can be served at gatherings, parties, or simply as a delightful refreshment on a hot day. The preparation process is quite simple, making it accessible for anyone who wants to indulge in this cultural gem.
To prepare Chicha Morada, you’ll need to gather a few key ingredients, many of which may already be in your pantry. The drink is sweetened with sugar and flavored with spices such as cinnamon and cloves, giving it a warm yet invigorating profile.
It’s often garnished with fruit, adding a touch of natural sweetness and visual appeal. This recipe yields enough Chicha Morada for 4-6 people, making it perfect for sharing with family and friends.
Ingredients (serves 4-6)
- 2 cups purple corn kernels
- 10 cups water
- 1 cinnamon stick
- 4-5 cloves
- 1 cup pineapple, chopped (fresh or canned)
- 1 cup sugar (or to taste)
- Juice of 2 limes
- Fresh fruit slices for garnish (optional)
Instructions
- Boil the Purple Corn: In a large pot, combine the purple corn kernels and 10 cups of water. Bring the mixture to a boil over medium-high heat. Once boiling, reduce the heat to low and let it simmer for about 30 minutes. This step is vital as it extracts the color and flavor from the corn.
- Add Spices and Pineapple: After simmering, add the cinnamon stick, cloves, and chopped pineapple to the pot. Continue to simmer for an additional 15-20 minutes. The spices will infuse the drink with a warm, aromatic flavor, while the pineapple adds a tropical sweetness.
- Strain the Mixture: Once the infusion is complete, remove the pot from heat. Using a fine mesh strainer or cheesecloth, strain the liquid into a large bowl or pitcher, discarding the solids. This step guarantees a smooth beverage without any grainy texture.
- Sweeten and Flavor: While the liquid is still warm, add the sugar, stirring until fully dissolved. Once the sugar is incorporated, add the lime juice to enhance the flavor. Taste the Chicha Morada and adjust the sweetness or acidity as needed.
- Chill and Serve: Allow the Chicha Morada to cool to room temperature, then transfer it to the refrigerator to chill for at least 2 hours. Serve over ice and garnish with fresh fruit slices if desired. Enjoy this delightful beverage cold for the best experience!
Extra Tips
When making Chicha Morada, feel free to experiment with the sweetness by adjusting the amount of sugar or using alternatives like agave syrup or honey.
Additionally, you can enhance the flavor profile by adding other fruits like apples or berries during the simmering process. If you’re looking for a spicier kick, consider adding a small piece of ginger.