

Exploring the vibrant world of Brazilian cuisine is like uncovering delightful stories with every bite. From the comforting feijoada to the sweet brigadeiro, these recipes celebrate togetherness. I picture gatherings filled with laughter and rich aromas surrounding us. The magic of these dishes lies in their ability to bring people closer. Let’s discover the secrets behind these flavorful traditions.
Feijoada: The Heart of Brazilian Cuisine
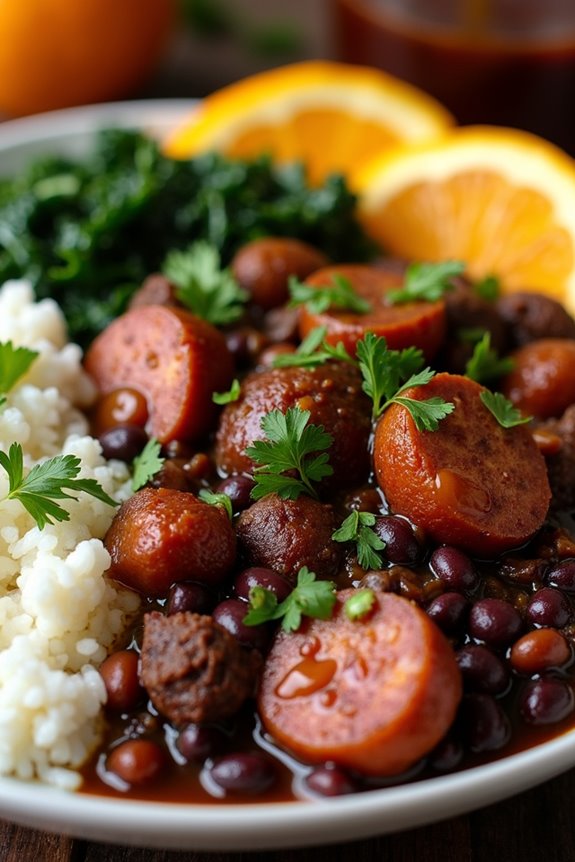
Feijoada is a traditional Brazilian stew that has become synonymous with the country’s culinary identity. Originating from Portuguese cuisine, this hearty dish is made with black beans and a variety of salted and smoked meats, making it a flavorful and robust meal that’s perfect for gatherings.
Traditionally served on Wednesdays and Saturdays, feijoada is more than just a meal; it’s a cultural experience that brings families and friends together around the table, often accompanied by rice, collard greens, and orange slices to balance the richness of the stew.
To prepare feijoada authentically, it’s important to use a mix of meats for depth of flavor. The combination of pork, beef, and sausages contributes to the distinctive taste that makes feijoada a beloved staple in Brazilian households. While it may take a few hours to prepare, the resulting dish is well worth the effort, offering a comforting and satisfying experience that reflects the spirit of Brazilian hospitality.
Ingredients (Serves 4-6)
- 1 lb black beans
- 1 lb smoked sausage (such as linguica or chorizo), sliced
- 1 lb pork shoulder, cut into cubes
- 1 lb beef brisket, cut into cubes
- 1/2 lb bacon, chopped
- 1 onion, finely chopped
- 4 cloves garlic, minced
- 2 bay leaves
- 1 teaspoon paprika
- 1 teaspoon cumin
- Salt and black pepper to taste
- 4 cups water (more as needed)
- Cooked white rice (for serving)
- Chopped fresh cilantro (for garnish)
- Orange slices (for serving)
- Collard greens, sautéed (for serving)
Cooking Instructions
- Prepare the Beans: Rinse the black beans under cold water and soak them in a large bowl overnight. This helps to soften the beans and reduces cooking time. The next day, drain and set aside.
- Cook the Meats: In a large, heavy-bottomed pot or Dutch oven, cook the chopped bacon over medium heat until it’s crispy. Remove the bacon and set it aside, leaving the rendered fat in the pot. In the same pot, add the pork shoulder and beef brisket, browning them on all sides. This step enhances the flavor of the meat.
- Sauté Vegetables: After the meats are browned, add the chopped onion and minced garlic to the pot. Sauté until the onion becomes translucent and fragrant, about 5 minutes.
- Combine Ingredients: Return the bacon to the pot and add the sliced smoked sausage, soaked black beans, bay leaves, paprika, cumin, salt, and pepper. Stir to combine all ingredients well.
- Add Water and Simmer: Pour in the water, ensuring that the meats and beans are fully submerged. Bring the mixture to a boil, then reduce the heat to low. Cover the pot and let it simmer for about 2 to 3 hours, stirring occasionally. Add more water if the stew becomes too thick.
- Adjust Seasoning and Serve: Once the beans are tender and the meat is fully cooked, taste and adjust the seasoning with more salt and pepper if necessary. Remove the bay leaves before serving. Serve the feijoada hot over a bed of white rice, garnished with fresh cilantro, alongside sautéed collard greens and orange slices.
Extra Tips
When preparing feijoada, feel free to customize the types of meat based on your preference or availability; pork ribs, beef tongue, and even chicken can be used.
Additionally, letting the feijoada sit for a few hours or overnight before serving can enhance the flavors, as the stew tastes even better the next day. Don’t hesitate to garnish with additional fresh herbs or serve with a side of hot sauce for an added kick!
Pão De Queijo: Cheesy Bread Rolls

Pão de Queijo, or Brazilian cheese bread, is a beloved snack that hails from the heart of Brazil. These delightful little rolls are naturally gluten-free, made with tapioca flour, and are known for their chewy texture and cheesy flavor. Originating from the state of Minas Gerais, Pão de Queijo has become a staple in Brazilian cuisine and is often enjoyed as a breakfast item, snack, or party appetizer.
With their irresistible aroma and cheesy goodness, these rolls are bound to please anyone who tries them. Making Pão de Queijo at home is a rewarding experience and allows you to enjoy fresh, warm rolls right out of the oven. Though they may seem intimidating, this recipe simplifies the process, guaranteeing you achieve the perfect texture and flavor.
With just a handful of ingredients, you can create a delicious treat that captures the essence of traditional Brazilian cooking. So roll up your sleeves and let’s get started on making these cheesy bread rolls!
Ingredients (serving size: 4-6 people):
- 1 cup of milk
- 1/2 cup of water
- 1/2 cup of vegetable oil
- 1 teaspoon of salt
- 2 cups of tapioca flour
- 2 beaten eggs
- 1 cup of grated Parmesan cheese (or a mix of cheeses)
Cooking Instructions:
- Prepare the Liquid Mixture: In a medium saucepan, combine the milk, water, vegetable oil, and salt. Place the saucepan over medium heat and bring the mixture to a gentle boil, stirring occasionally to assure the salt dissolves completely.
- Incorporate the Tapioca Flour: Once the liquid is boiling, remove the saucepan from the heat. Gradually add the tapioca flour to the hot liquid, stirring with a wooden spoon until a smooth dough forms. Be cautious as the mixture will be hot, and it may take a few minutes of stirring to achieve a cohesive texture.
- Cool the Dough: Allow the dough to cool for about 15 minutes. This step is essential, as handling the dough while it’s too hot can lead to burns or difficult-to-manage dough.
- Add Eggs and Cheese: Once the dough has cooled sufficiently, stir in the beaten eggs, mixing well until fully incorporated. Then, fold in the grated Parmesan cheese until evenly distributed throughout the dough.
- Shape the Rolls: Preheat your oven to 375°F (190°C). Grease a baking sheet or line it with parchment paper. Using your hands, shape the dough into small balls (about the size of a golf ball) and place them on the prepared baking sheet, leaving some space between each roll.
- Bake: Place the baking sheet in the preheated oven and bake for 15-20 minutes, or until the rolls are puffed up and golden brown. Keep an eye on them to guarantee they don’t overbake.
- Serve Warm: Once baked, remove the Pão de Queijo from the oven and allow them to cool slightly before serving. These rolls are best enjoyed warm, when they’re still cheesy and soft inside.
Extra Tips:
For the best flavor and texture, use high-quality cheese, such as aged Parmesan or a mix of cheeses for a richer taste. If you find the dough is too sticky to handle, slightly dampen your hands with water while shaping the rolls.
These delightful cheesy bread rolls can also be frozen; simply place them in an airtight container after baking. To reheat, bake them straight from the freezer at 375°F (190°C) for about 10-12 minutes until heated through. Enjoy your homemade Pão de Queijo!
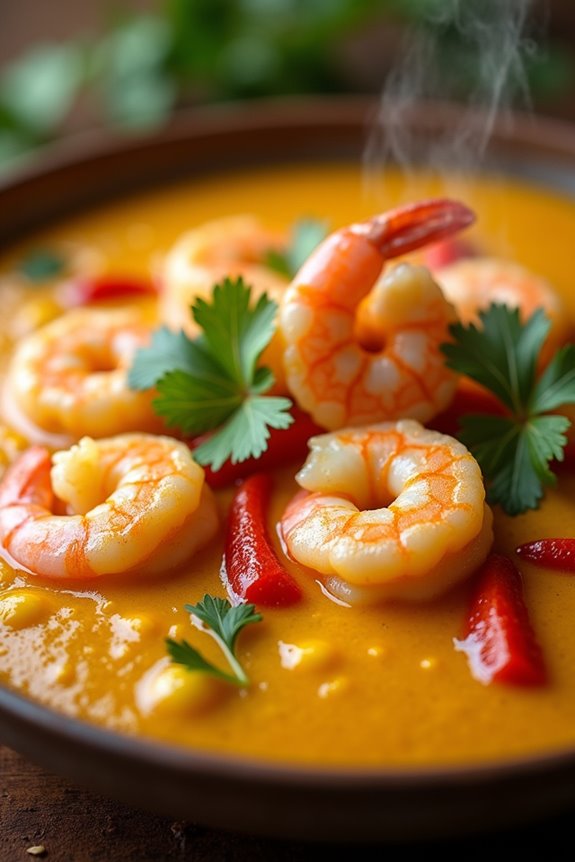
Moqueca: Brazilian Seafood Stew
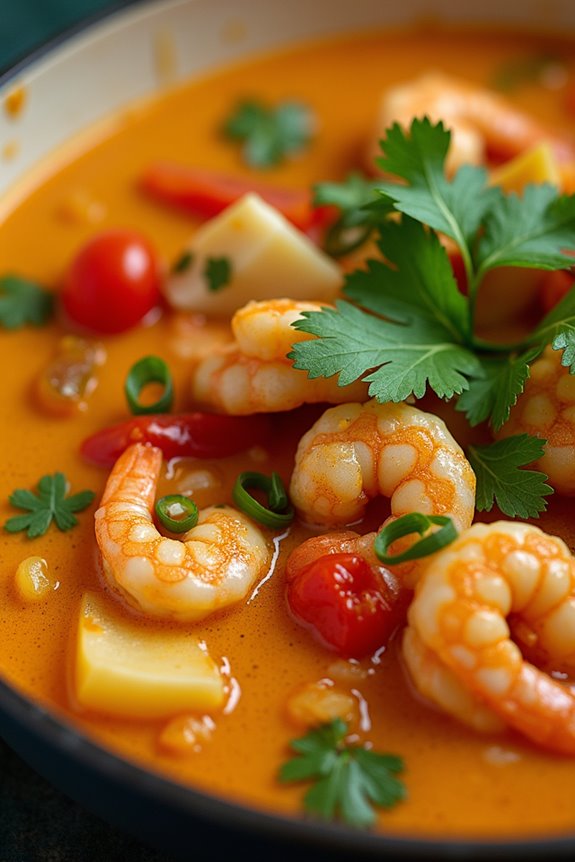
Moqueca is a traditional Brazilian seafood stew that showcases the vibrant flavors and culinary heritage of the coastal regions of Brazil, particularly Bahia and Espírito Santo. This dish is characterized by its aromatic blend of fresh fish, shrimp, and a medley of vegetables, all simmered together in a rich coconut milk base infused with herbs and spices.
Often served with rice and farofa (toasted cassava flour), Moqueca is a delightful way to experience the tropical essence of Brazil and is perfect for both special occasions and casual gatherings.
The beauty of Moqueca lies in its simplicity and the freshness of its ingredients. While there are many variations of this dish, each region boasts its unique twist, whether it’s the addition of dendê oil (palm oil) in Bahian Moqueca or the use of bell peppers in Espírito Santo’s version.
Regardless of the variation you choose, this stew promises a hearty and satisfying meal that will transport your taste buds to the sun-kissed shores of Brazil.
Ingredients (Serves 4-6)
- 1 lb (450g) firm white fish fillets (such as cod, snapper, or tilapia)
- 1 lb (450g) large shrimp, peeled and deveined
- 2 tablespoons olive oil
- 1 large onion, thinly sliced
- 4 cloves garlic, minced
- 1 bell pepper (red or yellow), sliced
- 2 tomatoes, chopped
- 1 can (14 oz) coconut milk
- 1 cup fish or seafood stock
- 1 tablespoon lime juice
- 1 teaspoon paprika
- 1 teaspoon ground cumin
- Salt and pepper to taste
- 1/4 cup fresh cilantro, chopped
- 1/4 cup green onions, sliced
- Lime wedges, for serving
- Cooked rice, for serving
Cooking Instructions
- Prepare the Seafood: Begin by rinsing the fish fillets and shrimp under cold water. Pat them dry with paper towels and cut the fish into bite-sized pieces. Season both the fish and shrimp with salt, pepper, and lime juice. Set aside to marinate while you prepare the other ingredients.
- Sauté the Aromatics: In a large pot or Dutch oven, heat the olive oil over medium heat. Add the sliced onion and sauté until it becomes translucent, about 5 minutes. Stir in the minced garlic and sliced bell pepper, cooking for an additional 3-4 minutes until fragrant.
- Add the Vegetables: Incorporate the chopped tomatoes into the pot, stirring well to combine. Cook for another 5 minutes, allowing the tomatoes to soften and release their juices.
- Combine the Liquids: Pour in the coconut milk and seafood stock, bringing the mixture to a gentle simmer. Add the paprika and ground cumin, stirring to incorporate the spices. Allow the stew to simmer for about 10 minutes, letting the flavors meld together.
- Cook the Seafood: Gently add the marinated fish and shrimp to the pot. Stir carefully to avoid breaking the fish apart. Cover the pot and let it simmer for an additional 5-7 minutes, or until the seafood is cooked through and opaque.
- Finish and Serve: Once the seafood is cooked, taste the stew and adjust the seasoning with more salt and pepper if necessary. Stir in the chopped cilantro and green onions just before serving. Serve the Moqueca hot with lime wedges and a side of cooked rice.
Extra Tips
When preparing Moqueca, freshness is key, especially when it comes to seafood. Try to use the freshest fish and shrimp available for the best flavor.
Additionally, you can customize the stew by adding other seafood like mussels or clams, or even incorporating vegetables like zucchini or eggplant. If you want to achieve an authentic Bahian flavor, consider adding a couple of tablespoons of dendê oil for a rich, distinctive taste.
Finally, let the Moqueca rest for a few minutes after cooking to allow the flavors to deepen before serving. Enjoy this comforting dish with loved ones for a true taste of Brazil!
Brigadeiro: Chocolate Truffles

Brigadeiro is a beloved Brazilian treat that highlights the country’s rich culinary traditions. These delightful chocolate truffles aren’t only a staple at birthday parties and celebrations but also a nostalgic dessert for many Brazilians. Made with just a few simple ingredients, brigadeiros are a sweet indulgence that can be prepared quickly and easily, making them a favorite among both novice and experienced cooks alike.
The combination of sweetened condensed milk, cocoa powder, and butter creates a fudgy texture that melts in your mouth, while the chocolate sprinkles coating adds a delightful crunch.
Making brigadeiros is a fun and engaging process that can be enjoyed by the whole family. The ease of preparation means you can whip up a batch in no time, perfect for satisfying sweet cravings or impressing guests at your next gathering.
Once rolled in chocolate sprinkles, these truffles can be presented in decorative paper cups, making them an appealing addition to any dessert table. Whether you’re celebrating a special occasion or just treating yourself, brigadeiros are sure to bring joy to your palate.
Ingredients (Serves 4-6 people):
- 1 can (14 ounces) sweetened condensed milk
- 2 tablespoons unsweetened cocoa powder
- 2 tablespoons unsalted butter
- Pinch of salt
- Chocolate sprinkles (for coating)
Cooking Instructions:
- Prepare the Mixture: In a medium saucepan, combine the sweetened condensed milk, unsweetened cocoa powder, unsalted butter, and a pinch of salt. Stir the mixture well until all ingredients are fully combined. This will create the base for your brigadeiro.
- Cook the Mixture: Place the saucepan over medium heat and continuously stir the mixture with a wooden spoon or spatula. It’s important to keep stirring to prevent the mixture from sticking to the bottom of the pan. Cook for about 10-15 minutes until the mixture thickens and starts to pull away from the sides of the pan. You’ll know it’s ready when you can see the bottom of the pan while stirring.
- Cool the Mixture: Once the mixture has thickened, remove the saucepan from heat and transfer it to a plate or shallow dish. Allow it to cool for about 30 minutes, or until it’s safe to handle. This cooling step is essential, as it will make rolling the brigadeiros easier.
- Shape the Brigadeiros: Once the mixture has cooled, lightly grease your hands with butter to prevent sticking. Scoop out small portions of the mixture (about one tablespoon each) and roll them into balls between your palms. This step should create smooth and uniform truffles.
- Coat with Sprinkles: After shaping the brigadeiros, roll each ball in chocolate sprinkles until they’re completely covered. This not only adds flavor but also gives the brigadeiros a wonderful texture and appearance.
- Serve: Place the coated brigadeiros in decorative paper cups and serve immediately, or refrigerate them for a firmer texture. Enjoy your homemade Brazilian chocolate truffles!
Extra Tips: Brigadeiros can be customized in numerous ways! Feel free to experiment with different coatings such as crushed nuts, coconut flakes, or even colorful sprinkles for a festive touch.
Additionally, if you prefer a more intense chocolate flavor, consider adding a splash of vanilla extract or a bit of instant coffee to the mixture before cooking. Always remember that brigadeiros can be stored in an airtight container in the fridge for up to a week, but they’re best enjoyed fresh!
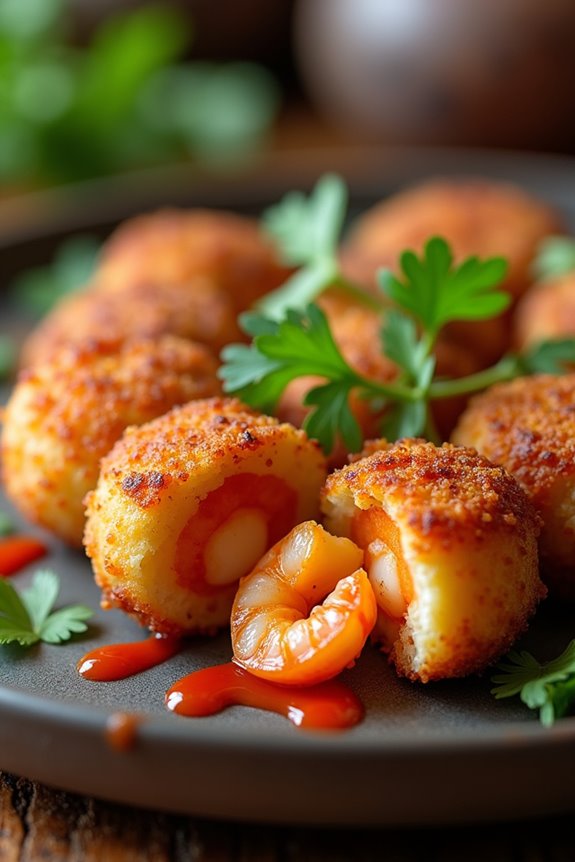
Coxinha: Chicken Croquettes

Coxinha is a beloved Brazilian snack that features a filling of shredded chicken enveloped in a creamy dough, shaped like a teardrop, and then deep-fried to golden perfection. This dish isn’t only popular at parties and celebrations but is also a comforting treat for everyday snacking. The combination of crispy exterior and tender, flavorful filling makes coxinhas a favorite among both adults and children.
The origins of coxinha date back to the late 19th century, and over the years, this recipe has evolved, with each region in Brazil adding its unique twist. Traditionally, the filling is made with shredded chicken breast and seasoned with spices, onions, and sometimes cream cheese or herbs. Whether served as an appetizer, a snack, or a party dish, coxinhas are sure to impress your guests and satisfy your cravings.
Ingredients (Serves 4-6)
- 2 cups shredded cooked chicken
- 1 onion, finely chopped
- 2 cloves garlic, minced
- 1/2 cup cream cheese
- 1/2 cup chopped parsley
- 4 cups chicken broth
- 2 cups all-purpose flour
- 1/4 cup unsalted butter
- 1 egg, beaten
- 1 cup bread crumbs
- Salt and pepper to taste
- Vegetable oil for frying
Cooking Instructions
- Prepare the Chicken Filling: In a skillet over medium heat, add a drizzle of olive oil and sauté the chopped onion and minced garlic until they’re translucent. Stir in the shredded chicken, cream cheese, chopped parsley, salt, and pepper. Mix well and let it cook for about 5 minutes, allowing the flavors to meld. Remove from heat and let it cool.
- Make the Dough: In a saucepan, bring the chicken broth to a boil. Once boiling, add the butter and stir until melted. Gradually add the flour, stirring constantly to avoid lumps. Cook the mixture over low heat, stirring until it forms a smooth ball of dough that pulls away from the sides of the pan. This should take about 5-7 minutes.
- Shape the Coxinhas: Once the dough has cooled slightly, take a small piece (about the size of a golf ball) and flatten it in your palm. Place a spoonful of the chicken filling in the center, then fold the dough over to encase the filling, shaping it into a teardrop or drumstick shape. Repeat this process with the remaining dough and filling.
- Coat the Coxinhas: Set up a breading station by placing the beaten egg in one bowl and the bread crumbs in another. Dip each shaped coxinha into the egg mixture, ensuring it’s fully coated, then roll it in the bread crumbs to create a nice crispy layer. Place the breaded coxinhas on a plate.
- Fry the Coxinhas: In a deep skillet or frying pan, heat vegetable oil over medium-high heat. Once the oil reaches about 350°F (175°C), carefully add the coxinhas in batches, making sure not to overcrowd the pan. Fry them for about 3-4 minutes on each side or until golden brown. Remove them from the oil and drain on paper towels.
- Serve: Allow the coxinhas to cool slightly before serving. They can be enjoyed on their own or with your favorite dipping sauce, such as hot sauce or a garlic aioli.
Extra Tips
To enhance the flavor of your coxinhas, consider adding spices such as paprika or cumin to the chicken filling. If you’re looking for a healthier option, you can bake the coxinhas instead of frying them; simply brush them with a bit of oil and bake at 375°F (190°C) for about 25-30 minutes or until golden brown.
Additionally, coxinhas can be made ahead of time and frozen before frying—just remember to thaw them in the refrigerator before cooking for best results.
Arroz E Feijão: Rice and Beans
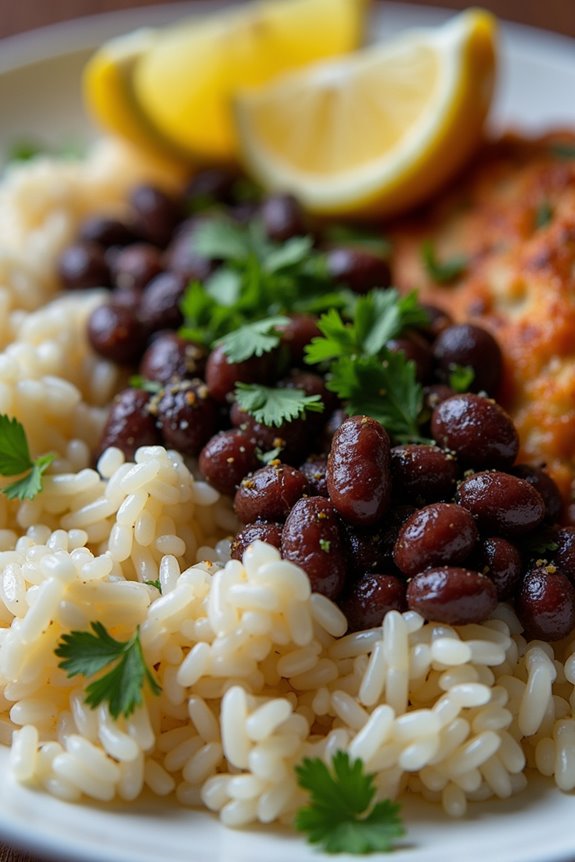
Arroz e Feijão, or Rice and Beans, is a staple dish in Brazilian cuisine that embodies the heart and soul of the country’s culinary traditions. This dish isn’t just a side; it’s often the main course in many Brazilian households. The combination of rice and beans provides a complete protein source, making it a nutritious meal that’s both satisfying and delicious.
Each region of Brazil has its own unique twist on this classic dish, but the basic preparation remains widely loved across the nation.
To prepare Arroz e Feijão, you’ll need to create both the rice and the beans, often cooking them simultaneously. The cooking methods can vary, but the goal is always to achieve a flavorful and well-cooked dish. With simple ingredients and straightforward techniques, you can whip up this beloved Brazilian comfort food right in your own kitchen.
Ingredients (serving size: 4-6 people)
- 2 cups long-grain white rice
- 1 cup black beans (or pinto beans)
- 4 cups water (for beans)
- 4 cups water (for rice)
- 1 medium onion, finely chopped
- 3 cloves garlic, minced
- 2 tablespoons olive oil
- 1 bay leaf
- Salt, to taste
- Fresh cilantro or parsley, for garnish (optional)
Cooking Instructions
- Prepare the Beans: Start by rinsing the black beans under cold water. Soak them overnight in enough water to cover the beans by at least 2 inches. If you’re short on time, you can use the quick-soak method by boiling the beans for 2 minutes and then letting them sit covered for 1 hour.
- Cook the Beans: After soaking, drain the beans and place them in a pot with 4 cups of fresh water. Add the bay leaf and a pinch of salt. Bring to a boil, then reduce the heat to low and let it simmer for about 1 to 1.5 hours, or until the beans are tender. Keep an eye on the water level, adding more if necessary to keep the beans submerged.
- Cook the Rice: While the beans are cooking, rinse the rice under cold water until the water runs clear. This helps remove excess starch. In a separate pot, heat the olive oil over medium heat, and add the chopped onion. Sauté until the onion becomes translucent (about 3-4 minutes), then add the minced garlic and sauté for another minute.
- Combine Rice and Water: Once the onions and garlic are fragrant, add the rinsed rice to the pot and stir to coat the rice with the oil and aromatics. Pour in 4 cups of water, add salt to taste, and bring it to a boil. Once boiling, reduce the heat to low, cover the pot, and let it simmer for 15-20 minutes or until the rice is cooked and water is absorbed.
- Serve Together: Once both the rice and beans are cooked, fluff the rice with a fork. Remove the bay leaf from the beans and season with additional salt if needed. Serve the rice and beans together on a plate, garnished with fresh cilantro or parsley if desired.
Extra Tips
When cooking Arroz e Feijão, feel free to add additional ingredients to enhance the flavor, such as diced bell peppers, smoked sausage, or bacon for the beans.
Additionally, for a more complex flavor, consider adding spices like cumin or paprika. This dish is versatile and can be served alongside various meats or enjoyed on its own, making it perfect for any meal of the day!
Farofa: Toasted Cassava Flour Mixture
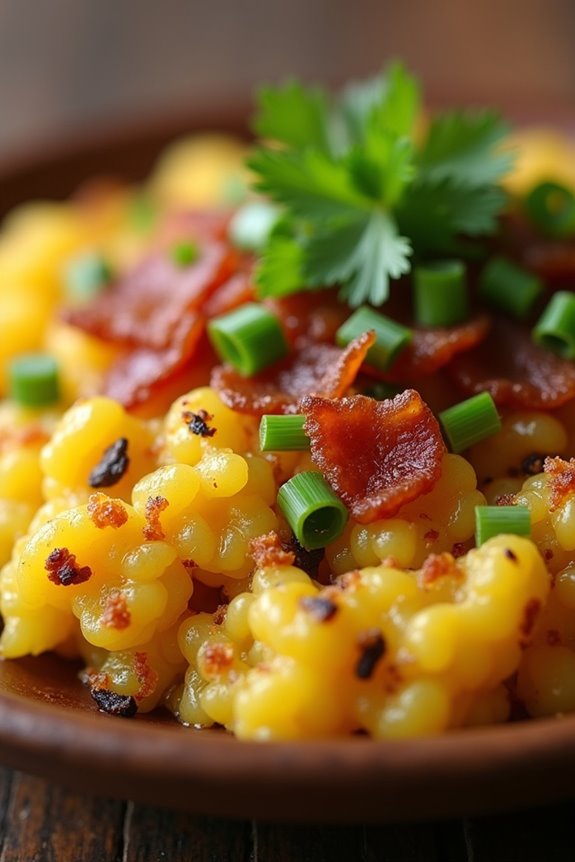
Farofa is a traditional Brazilian dish that has become a staple in Brazilian cuisine, often served as a side dish at barbecues, parties, and family gatherings. This toasted cassava flour mixture is known for its nutty flavor and delightful texture, making it a perfect accompaniment to meats, beans, and stews.
While the basic recipe is quite simple, farofa can be customized with various ingredients such as bacon, onions, garlic, and even eggs, depending on personal preferences and regional variations.
Making farofa isn’t only easy but also a fun way to bring a taste of Brazil into your kitchen. Its versatility allows it to be paired with a wide range of dishes, and it can be enjoyed hot or at room temperature.
Whether you’re looking to impress guests or simply want to try something new, farofa is sure to be a hit. Below is a recipe for a classic farofa that serves 4-6 people.
Ingredients:
- 2 cups of cassava flour (farinha de mandioca)
- 4 tablespoons of unsalted butter or olive oil
- 1 medium onion, finely chopped
- 2 cloves of garlic, minced
- 1/2 cup of cooked bacon, diced (optional)
- 1/2 cup of green olives, chopped (optional)
- 1/4 cup of scallions, sliced
- Salt and pepper to taste
- Fresh parsley or cilantro, chopped (for garnish)
Instructions:
- Prepare the Ingredients: Begin by gathering all your ingredients. If you’re using bacon, cook it in a large skillet over medium heat until crispy. Remove the bacon from the skillet and set it aside, leaving the rendered fat in the pan. If you aren’t using bacon, simply heat the butter or olive oil in the skillet.
- Sauté the Aromatics: In the same skillet, add the chopped onion and sauté for about 3-4 minutes until it becomes translucent. Then, add the minced garlic and continue to sauté for an additional 1-2 minutes, being careful not to burn the garlic.
- Incorporate the Cassava Flour: Gradually add the cassava flour to the skillet, stirring constantly to evenly coat the flour with the fats and aromatics. Toast the flour for about 5-7 minutes, or until it turns a light golden brown and develops a nutty aroma.
- Add Optional Ingredients: If you’re using cooked bacon, diced green olives, or scallions, stir them into the mixture now. This is also the time to season with salt and pepper to taste. Continue cooking for another 2-3 minutes, allowing the flavors to meld together.
- Garnish and Serve: Once the farofa is toasted and well mixed, remove it from the heat. Transfer to a serving dish and garnish with fresh parsley or cilantro. Serve warm alongside your favorite Brazilian dishes, such as grilled meats or feijoada.
Extra Tips:
When making farofa, feel free to experiment with different ingredients to suit your taste. You can add vegetables like grated carrots or diced bell peppers for added color and flavor.
If you prefer a spicier version, consider adding diced jalapeños or a sprinkle of chili flakes. Additionally, for a richer flavor, you can substitute the butter with bacon fat if available.
Always taste and adjust the seasoning as you go, and remember that farofa can be stored in an airtight container for a few days, making it a great make-ahead option for gatherings.
Acarajé: Black-Eyed Pea Fritters
Acarajé is a traditional Brazilian street food, particularly popular in the state of Bahia. This delightful dish features black-eyed peas that are fried to golden perfection, creating a crispy exterior while maintaining a soft and flavorful interior. Often served as a savory snack or appetizer, Acarajé is typically filled with a spicy shrimp paste known as vatapá and garnished with a variety of toppings. The origins of Acarajé can be traced back to African influence in Brazilian cuisine, making it a beloved staple that showcases the rich cultural tapestry of Brazil.
Preparing Acarajé can be a rewarding experience as you bring together simple ingredients to create a dish bursting with flavor. The process involves soaking and blending the black-eyed peas, forming them into balls, and frying them to achieve that perfect crunch. Although the recipe may seem intricate, the end result is a deliciously satisfying treat that will impress family and friends alike. Here is how to make Acarajé for 4-6 servings.
Ingredients:
- 2 cups dried black-eyed peas
- 1 medium onion, chopped
- 2 cloves garlic, minced
- 1 teaspoon salt
- 1 teaspoon ground cumin
- ½ teaspoon cayenne pepper (optional)
- Oil for frying (such as palm oil or vegetable oil)
- 1 cup cooked shrimp, chopped
- ½ cup vatapá (spicy shrimp paste)
- Fresh greens (such as lettuce or cilantro) for garnish
- Hot sauce (optional)
Cooking Instructions:
- Soak the Black-Eyed Peas: Start by rinsing the dried black-eyed peas under cold water. Place them in a large bowl and cover with water, allowing them to soak overnight or for at least 8 hours. This softens the peas, making them easier to blend and fry.
- Prepare the Fritter Batter: After soaking, drain and rinse the black-eyed peas. In a food processor, combine the soaked peas, chopped onion, minced garlic, salt, cumin, and cayenne pepper. Blend until you achieve a smooth but thick batter. Scrape down the sides as necessary to verify all ingredients are well incorporated.
- Heat the Oil: In a deep frying pan, pour in enough oil to submerge the fritters (around 2-3 inches deep). Heat the oil over medium-high heat until it reaches about 350°F (175°C). You can test the temperature by dropping a small spoonful of batter into the oil; it should sizzle and rise to the surface.
- Fry the Fritters: Using a spoon or small ice cream scoop, carefully drop dollops of the batter into the hot oil, being mindful not to overcrowd the pan. Fry the fritters for about 4-5 minutes on each side or until they’re golden brown and crispy. Remove them from the oil and place them on paper towels to drain any excess oil.
- Fill the Fritters: Once the fritters are cool enough to handle, make a small cut in the side of each fritter and gently open it up. Stuff each fritter with a generous amount of vatapá and a few pieces of chopped shrimp. Optionally, add fresh greens and a drizzle of hot sauce for extra flavor.
- Serve and Enjoy: Arrange the filled Acarajé on a serving platter. Serve warm and enjoy your homemade Black-Eyed Pea Fritters with friends and family!
Extra Tips:
When making Acarajé, be sure to use high-quality oil for frying, as it greatly affects the flavor of the fritters. Palm oil is traditional, but vegetable oil works well if you prefer.
Additionally, if you find the batter too thick, you can add a tablespoon of water to achieve your desired consistency. Don’t hesitate to experiment with the seasoning; adding more spices or herbs can give your Acarajé a unique twist.
Finally, consider making a larger batch, as these fritters are perfect for parties and gatherings, and they reheat wonderfully!
Bolo De Rolo: Rolled Cake

Bolo de Rolo is a beloved Brazilian dessert that hails from the northeastern state of Pernambuco. This traditional rolled cake is known for its delicate layers and vibrant guava paste filling, which results in a visually striking swirl when sliced. The cake is light, fluffy, and slightly sweet, making it a perfect treat for any occasion, from birthdays to festive gatherings.
The process may seem a bit intricate, but the end result is a delightful dessert that showcases the rich culinary heritage of Brazil. Making Bolo de Rolo involves a careful balance of ingredients to create a soft sponge cake that can be rolled without cracking. The use of guava paste is essential to achieving the authentic flavor, but you can also experiment with other fillings like dulce de leche or chocolate if you wish.
Once you master this recipe, you’ll be able to impress your friends and family with a taste of Brazil right from your kitchen.
Ingredients (Serves 4-6)
- 4 large eggs
- 1 cup granulated sugar
- 1/2 cup unsalted butter, softened
- 1 cup all-purpose flour
- 1 teaspoon baking powder
- 1/4 teaspoon salt
- 1/2 cup guava paste, softened (or your preferred filling)
- Powdered sugar for dusting (optional)
Cooking Instructions
- Preheat the Oven: Begin by preheating your oven to 350°F (175°C). This guarantees that the cake bakes evenly and achieves the perfect texture.
- Prepare the Baking Pan: Line a rectangular baking pan (approximately 13×18 inches) with parchment paper and lightly grease the paper and the sides of the pan. This will prevent the cake from sticking and make it easier to roll later.
- Mix the Batter: In a large mixing bowl, beat the eggs and granulated sugar together until the mixture is light and fluffy, which should take about 5 minutes. This step is vital as it incorporates air into the batter, contributing to the cake’s lightness.
- Add Butter: Gradually add the softened butter to the egg and sugar mixture, mixing gently until fully combined. This will add richness to the cake.
- Combine Dry Ingredients: In a separate bowl, whisk together the flour, baking powder, and salt. Gradually fold this dry mixture into the wet ingredients, being careful not to overmix, as this could deflate the batter.
- Bake the Cake: Pour the batter into the prepared baking pan and spread it evenly. Bake in the preheated oven for about 15-20 minutes, or until the cake is lightly golden and a toothpick inserted in the center comes out clean.
- Cool and Prepare to Roll: Once baked, remove the cake from the oven and let it cool in the pan for about 5 minutes. Carefully flip the cake onto a clean kitchen towel dusted with powdered sugar. Remove the parchment paper and allow it to cool completely.
- Spread the Filling: Once the cake is cool, spread the softened guava paste evenly over the surface of the cake. Leave a small border around the edges to prevent the filling from spilling out when rolling.
- Roll the Cake: Starting from one edge of the towel, carefully roll the cake tightly but gently, using the towel to help guide the roll. Make sure to keep it tight to achieve a nice spiral.
- Chill and Serve: Wrap the rolled cake in plastic wrap and refrigerate for at least 1 hour to set. Once chilled, slice the cake into rounds, dust with powdered sugar if desired, and serve.
Extra Tips
When making Bolo de Rolo, verify your ingredients are at room temperature for the best results. This helps with the emulsification of the batter and leads to a fluffier cake.
If you’re concerned about rolling the cake without it cracking, consider using a slightly thicker layer of filling, as it can act as a cushion. Finally, practice makes perfect—don’t be discouraged if your first attempt isn’t flawless! Enjoy the process and the delicious outcome.
Vatapá: Shrimp and Bread Pudding
Vatapá is a traditional Brazilian dish that beautifully combines the flavors of the sea with rich, creamy elements. Originating from the northeastern region of Brazil, particularly Bahia, this dish is often served with rice and is a staple in Afro-Brazilian cuisine. The preparation of vatapá involves a delightful mix of ingredients such as shrimp, bread, and coconut milk, all infused with aromatic herbs and spices. This rich pudding not only satisfies the palate but also embodies the cultural heritage of Brazil.
Making vatapá requires some dedication, as it involves multiple steps to guarantee the flavors meld perfectly. The key to a successful vatapá lies in the quality of the shrimp and the balance of spices. The dish is often enjoyed during festive occasions, but it can also be made for a family meal or casual gatherings. With its creamy texture and robust flavor, vatapá is sure to impress your guests and transport them to the vibrant streets of Bahia with every bite.
Ingredients (Serves 4-6):
- 500g shrimp, cleaned and deveined
- 2 cups stale white bread, crusts removed and torn into pieces
- 1 cup coconut milk
- 1 medium onion, chopped
- 2 cloves garlic, minced
- 1 bell pepper, chopped (red or yellow)
- 1/4 cup palm oil (dendê oil)
- 1/4 cup fresh cilantro, chopped
- 1/4 cup peanuts, ground (optional)
- 1 teaspoon ground cumin
- 1 teaspoon paprika
- Salt and black pepper to taste
- 2 cups fish or seafood broth
Cooking Instructions:
- Prepare the Shrimp: In a large pot, heat palm oil over medium heat. Add the chopped onion and garlic, and sauté until the onions become translucent. Then, add the shrimp and cook for about 3-4 minutes until they turn pink. Remove the shrimp from the pot and set aside.
- Make the Bread Mixture: In the same pot, add the chopped bell pepper and sauté for another 2-3 minutes. Then, add the torn bread pieces and mix well. Gradually pour in the seafood broth and coconut milk, stirring continuously until the bread absorbs the liquid and becomes soft.
- Blend the Mixture: Once the bread has softened, use a blender or immersion blender to puree the mixture until smooth. If using a regular blender, you may need to blend in batches. Return the blended mixture to the pot.
- Season the Vatapá: Add the cooked shrimp back into the pot, along with the ground peanuts (if using), ground cumin, paprika, salt, and black pepper. Stir everything together and let it simmer on low heat for about 15-20 minutes, allowing the flavors to meld.
- Final Touches: Once the vatapá has thickened to your desired consistency, remove it from the heat. Stir in the chopped cilantro for freshness and serve hot.
Extra Tips:
For an authentic taste, be sure to use high-quality palm oil, as it gives vatapá its characteristic flavor and vibrant color. If you want a creamier texture, feel free to add more coconut milk, but balance it with the broth to maintain the dish’s integrity.
Additionally, you can customize the dish by adding other seafood like fish or crab, or even make a vegetarian version by substituting the shrimp with vegetables and mushrooms. Enjoy your vatapá with steamed rice or a side of salad for a complete meal!
Quindim: Coconut Custard Dessert
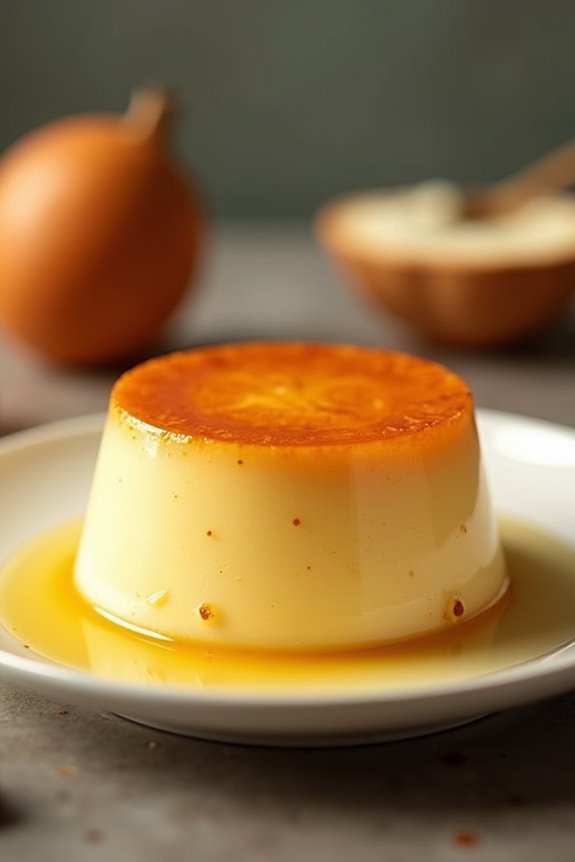
Quindim is a delightful Brazilian dessert that showcases the rich flavors of coconut and egg yolks. This traditional sweet treat is known for its glossy, golden top and a smooth, creamy texture that melts in your mouth. Originating from Portuguese colonial influences, quindim has become a beloved staple in Brazilian cuisine, often enjoyed during festive occasions and gatherings.
The combination of coconut and sugar creates a perfect harmony of flavors, making it an irresistible dessert for coconut lovers. Making quindim isn’t only a rewarding culinary experience but also a chance to impress friends and family with a unique and delicious offering. The recipe is relatively straightforward, requiring just a few ingredients, but it does take some time to achieve that perfect texture.
Whether you’re serving it at a dinner party or as a sweet treat for yourself, quindim is sure to be a hit.
Ingredients (serving size: 4-6 people):
- 1 cup shredded unsweetened coconut
- 4 large egg yolks
- 1 whole egg
- 1 cup granulated sugar
- 1/2 cup unsalted butter, melted
- 1 teaspoon vanilla extract
- 1/2 cup coconut milk
- A pinch of salt
- Butter for greasing the molds
Cooking Instructions:
- Preheat the Oven: Begin by preheating your oven to 350°F (175°C). This will guarantee that the quindim cooks evenly and achieves the perfect texture.
- Prepare the Baking Molds: Grease individual ramekins or a muffin tin with butter to prevent the quindim from sticking. This is essential for easy removal after baking.
- Mix the Ingredients: In a mixing bowl, combine the shredded coconut, egg yolks, whole egg, granulated sugar, melted butter, vanilla extract, coconut milk, and a pinch of salt. Whisk the mixture until well combined and smooth. The texture should be creamy, with the coconut evenly distributed.
- Pour into Molds: Carefully pour the coconut mixture into the prepared molds, filling them about three-quarters full. This allows room for the custard to rise while baking.
- Bake the Quindim: Place the filled molds in a baking dish and add hot water to the dish until it reaches halfway up the sides of the molds. This water bath will help cook the quindim gently, resulting in a creamy texture. Bake for about 30-35 minutes, or until the tops are lightly golden and a toothpick inserted into the center comes out clean.
- Cool and Unmold: After baking, remove the molds from the water bath and let them cool at room temperature. Once cooled, refrigerate for at least 2 hours. To unmold, run a knife around the edges and carefully invert onto a plate.
- Serve and Enjoy: Your quindim is now ready to be served! You can garnish it with additional shredded coconut or fresh fruit if desired.
Extra Tips: For an extra touch of flavor, consider adding a splash of lime or orange zest to the coconut mixture for a citrusy twist. Confirm that all your ingredients are at room temperature before mixing, as this can help achieve a smoother custard.
Quindim can be stored in the refrigerator for up to a week, making it a great make-ahead dessert for gatherings. Enjoy your delicious Brazilian coconut custard!