

When planning a gathering, Colombian appetizers are my go-to for adding a burst of flavor and creativity. Each dish, from the sweet Arepas De Choclo to the crispy Patacones, brings something special to the table. These recipes not only delight taste buds but also create a warm, inviting atmosphere. If you’re looking to impress your guests and elevate your next event, exploring these options is a must. Get ready to make your gathering unforgettable with these delightful Colombian treats.
Arepas De Choclo (Corn Arepas)
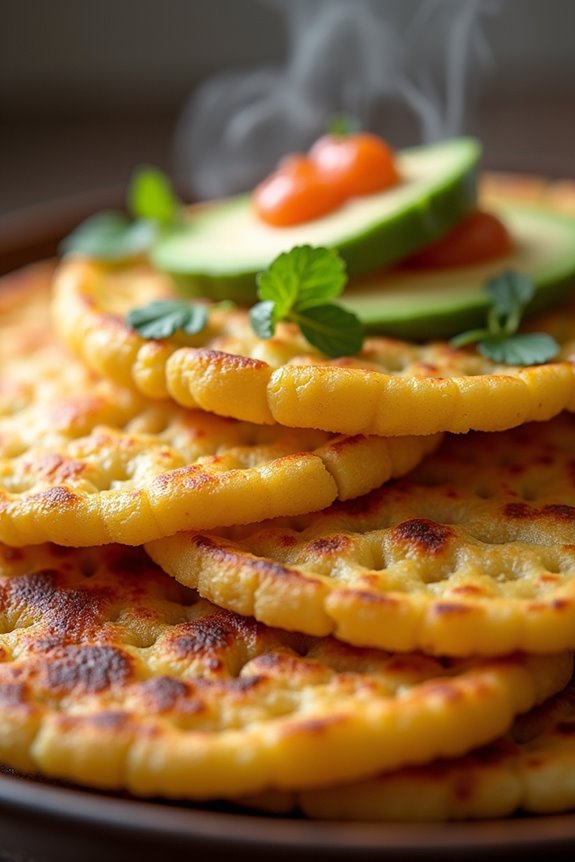
Arepas de Choclo are a delightful Colombian appetizer made from fresh corn, offering a sweet and savory flavor that’s hard to resist. These corn arepas are typically served warm and can be enjoyed on their own or with various toppings such as cheese, avocado, or hogao (a Colombian sauce). The use of fresh corn gives them a unique taste and texture that sets them apart from traditional arepas made with corn flour.
Making Arepas de Choclo is a wonderful way to bring a taste of Colombian cuisine to your table. Whether you’re hosting a gathering or looking for a delicious snack, these corn arepas are sure to impress your family and friends. The preparation is simple and the ingredients are easily accessible, making it an excellent choice for both novice and experienced cooks.
Ingredients (Serves 4-6)
- 3 cups fresh corn kernels (about 4-5 ears of corn)
- 1 cup cottage cheese or farmer’s cheese
- 1/4 cup sugar (optional, adjust based on sweetness preference)
- 1/4 cup milk
- 1/4 teaspoon salt
- 1 tablespoon butter, melted
- 1 teaspoon baking powder
- Cornmeal, for dusting (optional)
Cooking Instructions
- Prepare the Corn: Begin by shucking the corn and removing the kernels from the cobs. You should have about 3 cups of fresh corn kernels. Place the kernels in a blender or food processor and pulse them until they’re coarsely blended, creating a thick corn batter.
- Mix Ingredients: In a large mixing bowl, combine the blended corn, cottage cheese, sugar (if using), milk, salt, melted butter, and baking powder. Mix well until all the ingredients are thoroughly combined. The mixture should be thick and slightly creamy.
- Shape the Arepas: Take a handful of the mixture and form it into a patty, about ½ inch thick and 3-4 inches wide. Repeat the process until all of the mixture is shaped into arepas. If desired, you can dust them lightly with cornmeal for extra texture.
- Cook the Arepas: Preheat a griddle or a non-stick skillet over medium heat. Once hot, add a bit of oil or butter to the pan. Place the arepas on the griddle and cook for about 5-7 minutes on each side or until they’re golden brown and crispy on the outside.
- Serve Warm: Once cooked, remove the arepas from the heat and allow them to cool slightly. Serve warm with toppings of your choice, such as cheese, avocado, or hogao sauce.
Extra Tips
When making Arepas de Choclo, using fresh corn is key to achieving that authentic flavor, but if fresh corn is unavailable, you can use frozen corn kernels as a substitute. Make sure to thaw and drain them properly before blending.
Additionally, feel free to experiment with flavors by adding herbs or spices to the batter for an extra kick. These corn arepas are best enjoyed fresh off the griddle, so try to serve them immediately for the best taste experience!
Empanadas De Carne (Beef Empanadas)

Empanadas De Carne, or beef empanadas, are a beloved Colombian appetizer that perfectly captures the essence of Colombian cuisine. These delicious pastries are filled with seasoned ground beef, potatoes, and spices, all encased in a golden, flaky dough. The combination of flavors and textures makes them a favorite for gatherings, parties, or as a delightful snack any time of the day. They can be baked or fried, providing versatility in cooking methods to suit your preference.
Making empanadas from scratch may seem intimidating, but it’s a rewarding experience that will impress your family and friends. The dough is simple to prepare, and the filling is packed with flavor, making these empanadas a sure crowd-pleaser. Once you’ve mastered the technique, you’ll find yourself making these delightful treats time and again.
Ingredients (serving size: 4-6 people):
- 2 cups all-purpose flour
- 1/2 cup unsalted butter, softened
- 1/2 teaspoon salt
- 1/4 cup cold water
- 1 lb ground beef
- 1 medium onion, chopped
- 2 cloves garlic, minced
- 1 medium potato, peeled and diced
- 1 teaspoon ground cumin
- 1 teaspoon paprika
- 1/2 teaspoon salt (to taste)
- 1/4 teaspoon black pepper
- 1 tablespoon vegetable oil (for cooking)
- 1 egg (for egg wash, optional)
Cooking Instructions:
- Prepare the Dough: In a mixing bowl, combine the all-purpose flour and salt. Add the softened butter and mix until crumbly. Gradually add cold water, mixing until a soft dough forms. Knead the dough for a few minutes on a floured surface until smooth. Wrap it in plastic wrap and let it rest for at least 30 minutes.
- Cook the Filling: In a large skillet over medium heat, add the vegetable oil. Once hot, add the chopped onion and minced garlic, sautéing until the onion is translucent. Add the ground beef, breaking it up with a spatula, and cook until browned. Stir in the diced potato, cumin, paprika, salt, and black pepper. Cover and cook for about 10-15 minutes, until the potato is tender. Remove from heat and allow to cool.
- Roll Out the Dough: After the dough has rested, divide it into equal pieces (about 10-12). On a floured surface, roll each piece into a circle about 1/8 inch thick. Aim for a diameter of about 4-6 inches.
- Fill the Empanadas: Place a spoonful of the beef filling in the center of each dough circle. Be careful not to overfill. Fold the dough over to create a half-moon shape, pressing the edges together to seal. You can crimp the edges with a fork or pinch them for a decorative touch.
- Cook the Empanadas: At this point, you can choose to either fry or bake the empanadas. For frying, heat oil in a deep pan to 350°F (175°C) and fry the empanadas until golden brown on both sides. For baking, preheat the oven to 400°F (200°C), place the empanadas on a baking sheet, brush with egg wash (if using), and bake for 20-25 minutes or until golden.
- Serve: Once cooked, remove the empanadas from the heat and let them cool slightly before serving. They’re best enjoyed warm, accompanied by aji or salsa for dipping.
Extra Tips: When making empanadas, it’s important not to overfill them, as this can cause the dough to break during cooking. If you’re frying, make sure the oil is hot enough to avoid greasy empanadas.
For an added twist, you can incorporate other ingredients into the filling, such as olives or hard-boiled eggs. Experiment with different spices to suit your taste, and enjoy the process of making these delightful Colombian treats!
Patacones (Fried Green Plantains)
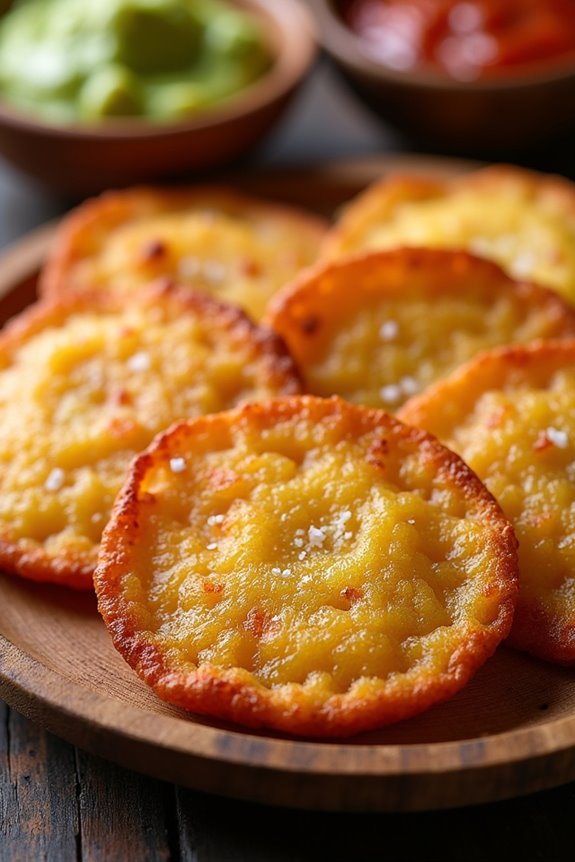
Patacones, also known as tostones, are a popular Colombian appetizer that features the delightful crunch of fried green plantains. These crispy disks aren’t only delicious but also versatile, serving as a great accompaniment to a variety of dips and toppings.
The process of making patacones involves frying, smashing, and frying again, which results in a golden brown exterior that’s both crispy and satisfying. Whether served with guacamole, hogao (a Colombian tomato-onion sauce), or simply sprinkled with salt, patacones are sure to be a hit at any gathering.
This dish is particularly cherished in Latin American cuisine and can be enjoyed as a snack or a side dish. The key to perfect patacones lies in selecting the right plantains; they should be green and firm. As you prepare this appetizer, you’ll experience the delightful aroma and texture that make patacones a beloved staple in Colombian households.
So, gather your ingredients and get ready to impress your family and friends with this tasty treat.
Ingredients (serving size: 4-6 people):
- 2-3 green plantains
- Vegetable oil (for frying)
- Salt (to taste)
- Optional toppings: guacamole, hogao, or cheese
Cooking Instructions:
- Prepare the Plantains: Start by peeling the green plantains. To do this, cut off both ends of each plantain, then make a lengthwise slit through the skin without cutting into the flesh. Carefully remove the skin, and slice the plantains into 1-inch thick rounds.
- First Frying: In a large skillet, heat about 1-2 inches of vegetable oil over medium heat. Once the oil is hot, add the sliced plantains in a single layer. Fry them for about 3-4 minutes or until they turn a light golden color. Make sure not to overcrowd the pan; you may need to do this in batches.
- Smash the Plantains: Using a flat object (like a plate or a tostonera if you have one), gently smash each fried plantain round to flatten it to about half an inch thick. Be careful not to break them apart; the goal is to create a disk shape.
- Second Frying: Return the smashed plantains to the hot oil and fry them again for an additional 2-3 minutes on each side, or until they’re golden brown and crispy. Keep an eye on them to prevent burning.
- Drain and Season: Once they’re perfectly fried, remove the patacones from the oil and place them on a plate lined with paper towels to drain excess oil. While they’re still hot, sprinkle them with salt to taste.
- Serve: Arrange the patacones on a serving platter and serve them warm with your choice of dips like guacamole or hogao, or enjoy them plain.
Extra Tips:
When cooking patacones, make sure the oil is sufficiently hot before adding the plantains, as this helps achieve that perfect crunch.
If you’re looking for added flavor, consider seasoning the oil with garlic or spices while heating it. Additionally, if you want to keep the patacones warm while frying in batches, place them on a baking sheet in a low-temperature oven. This way, everyone can enjoy them fresh and hot!
Buñuelos (Cheese Fritters)

Buñuelos are a delightful Colombian appetizer that embodies the rich culinary traditions of the country. These savory cheese fritters are popular at festive occasions and family gatherings, often enjoyed with a cup of hot chocolate. With their crispy exterior and soft, cheesy center, buñuelos are a perfect bite-sized treat that can please any crowd. The combination of fresh cheese and a hint of sweetness makes them an irresistible snack.
Making buñuelos is easier than you might think, and the ingredients are readily available in most kitchens. The key to achieving the perfect texture lies in getting the dough just right— not too dry and not too wet. Once you master this traditional recipe, you can customize it by adding different types of cheese or spices to suit your taste. Whether served as an appetizer or a snack, buñuelos are sure to delight your family and friends.
Ingredients (Serves 4-6 people)
- 2 cups of corn starch
- 1 cup of fresh cheese (like queso blanco or feta, crumbled)
- 1/2 cup of milk
- 2 large eggs
- 1 tablespoon of sugar
- 1 teaspoon of baking powder
- 1/2 teaspoon of salt
- Oil for frying
Cooking Instructions
- Prepare the Cheese Mixture: In a mixing bowl, combine the crumbled fresh cheese, sugar, and salt. Mix well until the cheese is evenly coated with the sugar and salt. This will enhance the flavor of the fritters.
- Make the Dough: In a separate bowl, combine the corn starch and baking powder. Stir to mix thoroughly. Add the eggs and milk to the corn starch mixture and mix until a soft dough forms. The dough should be pliable and not sticky. If it feels too dry, add a little more milk; if too wet, sprinkle in a bit more corn starch.
- Incorporate the Cheese: Gently fold the cheese mixture into the dough. Be careful not to overmix; you want to maintain some chunks of cheese for added texture in your buñuelos.
- Shape the Fritters: Using your hands, form small balls from the dough, about the size of a golf ball. Make sure they’re uniform in size for even cooking.
- Heat the Oil: In a deep pot or skillet, heat the oil over medium-high heat. To check if the oil is ready, drop a small piece of dough into the oil; if it sizzles and rises to the surface, the oil is hot enough.
- Fry the Buñuelos: Carefully place the dough balls into the hot oil, making sure not to overcrowd the pot. Fry them until they’re golden brown on all sides, which should take about 4-5 minutes. Use a slotted spoon to turn them occasionally for even cooking.
- Drain and Serve: Once cooked, remove the buñuelos from the oil and place them on a plate lined with paper towels to drain excess oil. Serve warm with a side of hot chocolate or your favorite dipping sauce.
Extra Tips
When making buñuelos, it’s crucial to maintain the right oil temperature to avoid greasy fritters. If the oil is too hot, the outside will cook too quickly, leaving the inside raw. On the other hand, if the oil is too cool, the buñuelos will absorb more oil and become soggy.
Additionally, feel free to experiment with different cheeses for a unique twist; a sharper cheese can add a delightful depth of flavor. Enjoy your homemade buñuelos fresh for the best taste!
Yuca Fries With Aji Sauce
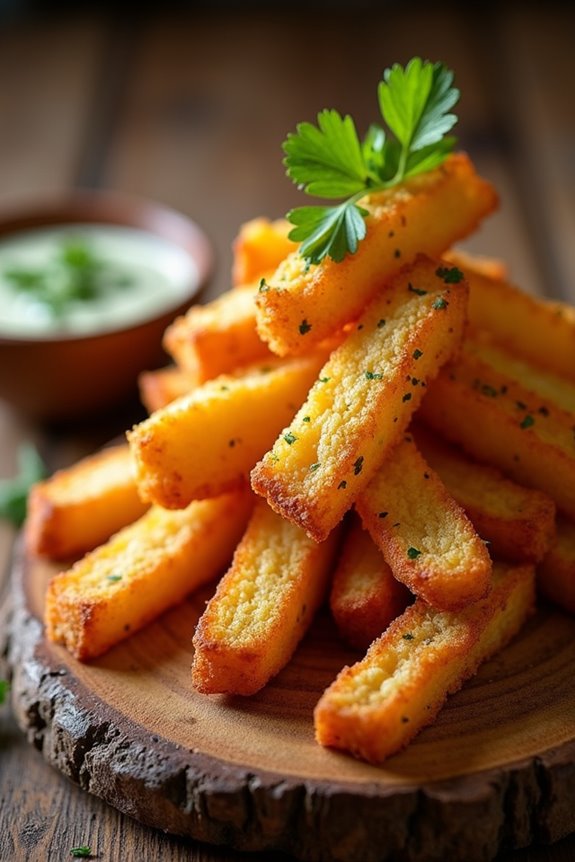
Yuca fries, a beloved Colombian appetizer, are a delightful twist on traditional potato fries. Made from yuca, a starchy root vegetable also known as cassava, these fries are crispy on the outside and tender on the inside. They’re often served with a spicy and tangy aji sauce, which adds a burst of flavor that perfectly complements the yuca’s mild taste.
This dish isn’t only popular in Colombia but also enjoyed in various Latin American cuisines, making it a perfect choice for gatherings or a cozy night in.
Preparing yuca fries is straightforward, but it does require some attention to detail to achieve the perfect texture and flavor. The yuca must be boiled until tender before frying, guaranteeing a soft interior that contrasts beautifully with a crispy exterior.
The accompanying aji sauce can be adjusted to your heat preference, so feel free to add more or less chili based on your taste. Get ready to impress your family and friends with this delicious Colombian appetizer!
Ingredients (serving size: 4-6 people)
- 2 large yuca (cassava) roots
- 4 cups water (for boiling)
- Salt (to taste)
- Vegetable oil (for frying)
- 1 tablespoon chopped fresh cilantro
- 1 small red onion, finely chopped
- 1-2 fresh green chilies (like jalapeño or serrano), chopped
- 1/4 cup fresh lime juice
- 1 teaspoon ground cumin
- 1/2 cup mayonnaise
- 1/4 cup sour cream
Cooking Instructions
- Prepare the Yuca: Start by peeling the yuca roots with a knife, making sure to remove the tough, waxy skin. Once peeled, cut the yuca into thick fries, approximately 1/2 inch wide. This will help them cook evenly.
- Boil the Yuca: In a large pot, bring 4 cups of water to a boil. Add the yuca fries and a pinch of salt. Boil for about 15-20 minutes or until the yuca is fork-tender. Be careful not to overcook, as it can become mushy.
- Drain and Cool: Once cooked, drain the yuca fries and let them cool for a few minutes. This step is essential to help them firm up before frying.
- Fry the Yuca: In a large skillet or deep fryer, heat vegetable oil over medium-high heat. Once the oil is hot, carefully add the yuca fries in batches to avoid overcrowding. Fry for about 5-7 minutes or until they’re golden brown and crispy. Use a slotted spoon to remove them from the oil and transfer them to a paper towel-lined plate to drain excess oil.
- Make the Aji Sauce: While the fries are frying, prepare the aji sauce by combining the chopped cilantro, red onion, green chilies, lime juice, ground cumin, mayonnaise, and sour cream in a bowl. Mix well until all ingredients are fully incorporated. Adjust seasoning with salt to taste.
- Serve: Arrange the crispy yuca fries on a serving platter, and serve hot with the aji sauce on the side for dipping.
Extra Tips
When cooking yuca fries, it’s important to choose fresh yuca roots, as older ones may be tougher and less flavorful.
To guarantee maximum crispiness, allow the fries to cool and dry slightly after boiling before frying them. You can also experiment with different dipping sauces to complement the yuca fries, such as a garlic aioli or a spicy ketchup, for a fun twist on flavors.
Enjoy your Colombian appetizer!
Tequeños (Cheese-Stuffed Dough Rolls)

Tequeños are a beloved Colombian appetizer that combines the delightful crunch of fried dough with the gooey, savory goodness of cheese. These cheese-stuffed dough rolls are perfect for any gathering, providing a satisfying bite that appeals to both kids and adults alike.
Traditionally made with fresh white cheese, tequeños are often served with a dipping sauce, such as guacamole or salsa, enhancing the flavor and adding a revitalizing contrast.
This recipe yields 4-6 servings, making it an ideal snack for a small party or a family get-together. With simple ingredients and straightforward techniques, you can easily whip up these delicious treats in your own kitchen. Get ready to impress your guests with the irresistible taste of homemade tequeños!
Ingredients:
- 2 cups all-purpose flour
- 1/2 teaspoon salt
- 1 tablespoon sugar
- 1/2 cup cold water
- 1 tablespoon vegetable oil
- 12 ounces white cheese (such as queso blanco or mozzarella), cut into sticks
- Vegetable oil for frying
Cooking Instructions:
1. Make the Dough: In a large mixing bowl, combine the all-purpose flour, salt, and sugar. Mix well. Gradually add the cold water and vegetable oil, stirring until a soft, pliable dough forms. Knead the dough on a lightly floured surface for about 5 minutes until smooth.
Cover the dough with a clean kitchen towel and let it rest for 30 minutes.
2. Prepare the Cheese: While the dough is resting, cut the cheese into sticks approximately 1/2 inch wide and 3 inches long. This will guarantee that the cheese melts nicely while being enveloped by the dough.
3. Roll Out the Dough: After the resting period, divide the dough into four equal portions. Roll out each portion into a thin rectangle on a floured surface, about 1/8 inch thick.
Make sure the dough isn’t too thick, as this will affect the cooking time and texture of the tequeños.
4. Wrap the Cheese: Cut the rolled-out dough into strips approximately 1 inch wide. Place a cheese stick at one end of each strip and roll the dough around the cheese, sealing the edges tightly to prevent any leakage during frying.
Confirm that the cheese is completely covered.
5. Fry the Tequeños: Heat vegetable oil in a deep frying pan over medium heat until it reaches approximately 350°F (175°C). Carefully add the tequeños in batches, frying them for about 3-4 minutes or until golden brown and crispy.
Avoid overcrowding the pan to guarantee even cooking.
6. Drain and Serve: Once golden brown, remove the tequeños from the oil using a slotted spoon and transfer them to a plate lined with paper towels to absorb excess oil. Serve warm with your favorite dipping sauce.
Extra Tips:
For the best results, make sure your oil is hot enough before adding the tequeños; this helps achieve that perfect crispy texture.
You can experiment with different types of cheese for a variation in flavor or even add herbs and spices to the dough for an extra kick. If you want to make the process easier, consider using store-bought dough. Enjoy your homemade tequeños!
Sancocho De Gallina (Chicken Stew)

Sancocho De Gallina is a traditional Colombian chicken stew that embodies the rich flavors and cultural heritage of Colombia. This hearty dish is often enjoyed during family gatherings and celebrations, providing warmth and comfort with every spoonful. The combination of tender chicken, fresh vegetables, and aromatic herbs creates a delightful symphony of tastes that will surely impress your guests and bring a taste of Colombia to your table.
To prepare Sancocho De Gallina, you’ll need to gather some key ingredients that are staples in Colombian cuisine. The slow cooking process allows the flavors to meld beautifully, making it a perfect dish for gatherings or cozy dinners. Let’s explore the ingredients and the cooking instructions to create this delicious Sancocho De Gallina from scratch.
Ingredients (Serves 4-6):
- 2 lbs whole chicken, cut into pieces
- 10 cups water
- 2 medium onions, chopped
- 4 garlic cloves, minced
- 2 medium tomatoes, diced
- 2 medium potatoes, peeled and cubed
- 2 medium carrots, sliced
- 1 large green plantain, peeled and chopped
- 1 cup corn on the cob, cut into pieces
- 1 bunch fresh cilantro, chopped
- 1 teaspoon cumin
- Salt and pepper to taste
- Lime wedges, for serving
- Avocado, for serving (optional)
Cooking Instructions:
- Prepare the Chicken: In a large pot, place the cut pieces of chicken and cover them with water. Bring to a boil over medium-high heat. As the water heats, skim off any foam that rises to the surface to guarantee a clear broth. This step is essential for a clean-tasting stew.
- Add Aromatics: Once the chicken is boiling, add the chopped onions, minced garlic, and diced tomatoes to the pot. These ingredients will enhance the flavor of the broth. Reduce the heat to medium-low, allowing the stew to simmer gently for about 20 minutes.
- Incorporate Vegetables: After 20 minutes, add the cubed potatoes, sliced carrots, chopped plantain, and corn pieces to the pot. Stir to combine all the ingredients. These vegetables will add texture and sweetness to the stew. Continue to simmer for another 30 minutes, or until the chicken is cooked through and the vegetables are tender.
- Season the Stew: Once the chicken and vegetables are cooked, stir in the chopped cilantro, cumin, salt, and pepper. Adjust seasoning to taste. The cilantro adds freshness and a vibrant flavor to the dish, making it a hallmark of Colombian cuisine.
- Serve the Dish: Carefully ladle the Sancocho De Gallina into bowls, ensuring each serving has a good portion of chicken and vegetables. Serve with lime wedges and optional avocado on the side for added creaminess and flavor. Enjoy the stew hot!
Extra Tips:
For an authentic touch, feel free to customize your Sancocho De Gallina by adding other traditional ingredients like yucca or different types of potatoes. You can also let the stew simmer longer for deeper flavors.
Additionally, serving it with a side of rice can complete the meal and make it even more filling. Don’t forget to squeeze fresh lime juice over each bowl before eating to brighten the flavors!
Salpicón (Colombian Meat Salad)
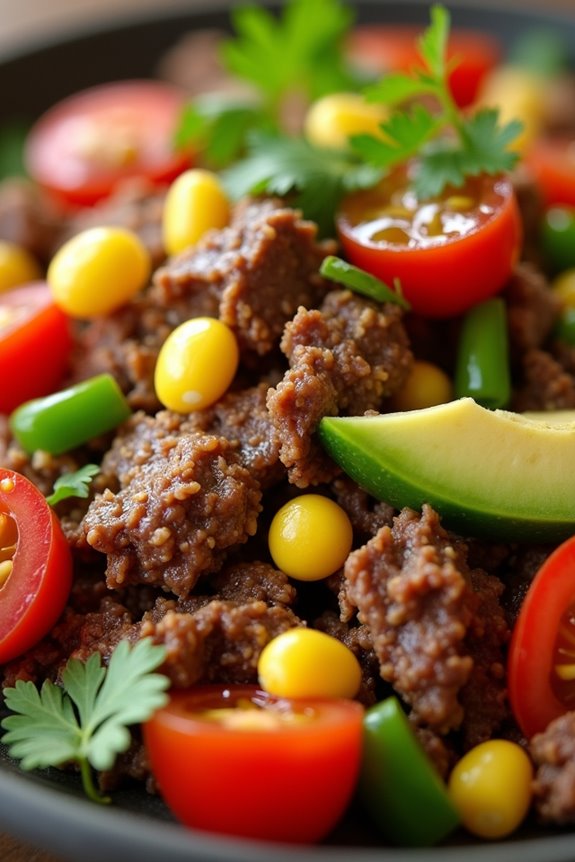
Salpicón is a vibrant and invigorating Colombian meat salad that combines various ingredients, including cooked beef, fresh vegetables, and zesty seasonings. This dish is particularly popular during warm weather and is often served as an appetizer or a light meal. It captures the essence of Colombian flavors with its delightful mix of textures and colors, making it a feast for the eyes and the palate.
Salpicón isn’t only delicious but also versatile, allowing you to adapt it to your taste with different meats or additional vegetables.
To prepare Salpicón, you’ll want to start by cooking the meat to tender perfection and allowing it to cool before shredding. Once the beef is ready, mix it with fresh vegetables like tomatoes, onions, and avocado, all dressed with a tangy dressing that enhances the flavors. This dish is perfect for gatherings and can be served alongside tortilla chips or arepas for a complete Colombian experience.
Ingredients (Serves 4-6):
- 1 pound of flank steak or beef brisket
- 2 cups of water
- 1 medium onion, chopped
- 1 medium tomato, diced
- 1 medium avocado, diced
- ½ cup of corn (fresh or canned)
- ½ cup of green bell pepper, diced
- ¼ cup of cilantro, chopped
- Juice of 2 limes
- Salt and pepper to taste
- 1 tablespoon of olive oil
Cooking Instructions:
- Cook the Meat: In a pot, add the flank steak or beef brisket along with 2 cups of water and half the chopped onion. Bring to a boil, then reduce heat and let it simmer for about 1.5 to 2 hours, or until the meat is tender. Check occasionally to confirm the water doesn’t evaporate completely.
- Shred the Meat: Once the meat is tender, remove it from the pot and let it cool slightly. Shred the beef into small, bite-sized pieces using two forks. Set aside the shredded beef.
- Prepare the Vegetables: In a large mixing bowl, combine the diced tomato, avocado, green bell pepper, corn, and remaining chopped onion. Gently toss the vegetables together to mix evenly.
- Combine Ingredients: Add the shredded beef to the bowl with the vegetables. Sprinkle with chopped cilantro, lime juice, olive oil, and season with salt and pepper to taste. Stir gently to combine all the ingredients without mashing the avocado.
- Chill and Serve: Cover the bowl with plastic wrap and refrigerate the Salpicón for at least 30 minutes to allow the flavors to meld. Serve chilled as an appetizer or light meal, alongside tortilla chips or arepas.
Extra Tips:
When preparing Salpicón, feel free to customize it by adding other vegetables like radishes or cucumber for a crunchier texture.
Additionally, if you prefer a spicier kick, you can add diced jalapeños or hot sauce to the mix. To save time, you can use pre-cooked or rotisserie chicken or beef instead of cooking the meat from scratch. Just confirm the flavors are balanced well with lime juice and seasonings.
Enjoy your culinary adventure with this traditional Colombian dish!
Chocoramo Bites (Chocolate-Covered Cookies)

Chocoramo Bites are a delightful Colombian treat that combines the rich flavors of chocolate and cookie into a bite-sized snack that’s perfect for sharing. These chocolate-covered cookies aren’t only delicious but also incredibly easy to make, making them an ideal appetizer for gatherings or a sweet treat to enjoy at home.
The contrast between the soft cookie and the crisp chocolate coating creates a delightful texture that’s sure to please everyone. This recipe is designed to serve 4-6 people, making it the perfect addition to any Colombian appetizer spread.
Whether you’re hosting a party or simply indulging in a sweet craving, these Chocoramo Bites will bring a taste of Colombia to your table. With a few simple ingredients and steps, you can create these irresistible treats that are bound to impress your guests.
Ingredients
- 1 cup all-purpose flour
- 1/2 cup unsweetened cocoa powder
- 1/2 cup granulated sugar
- 1/4 cup unsalted butter, softened
- 1/4 cup milk
- 1 teaspoon baking powder
- 1/2 teaspoon vanilla extract
- 1/2 teaspoon salt
- 1 cup semi-sweet chocolate chips
- 1 tablespoon vegetable oil (for melting chocolate)
Cooking Instructions
- Preheat the Oven: Begin by preheating your oven to 350°F (175°C). This guarantees that your cookies bake evenly and achieve a perfect texture.
- Mix Dry Ingredients: In a large mixing bowl, combine the all-purpose flour, cocoa powder, granulated sugar, baking powder, and salt. Whisk these dry ingredients together until they’re well blended, making sure there are no lumps.
- Cream Butter and Combine Wet Ingredients: In a separate bowl, cream together the softened unsalted butter and the granulated sugar until light and fluffy. Then, add in the milk and vanilla extract, mixing until fully combined.
- Combine Wet and Dry Mixtures: Gradually add the dry mixture to the butter mixture, stirring until just combined. Avoid overmixing, as this can lead to tough cookies.
- Shape the Cookies: Use your hands or a cookie scoop to form small balls of dough, about 1 inch in diameter. Place them on a baking sheet lined with parchment paper, making sure to leave space between each cookie.
- Bake the Cookies: Bake in the preheated oven for 10-12 minutes, or until the cookies are set and slightly firm to the touch. Remove them from the oven and let them cool on the baking sheet for a few minutes before transferring them to a wire rack to cool completely.
- Melt the Chocolate: While the cookies are cooling, melt the semi-sweet chocolate chips and vegetable oil together in a microwave-safe bowl. Heat in 30-second intervals, stirring in between, until smooth and fully melted.
- Dip the Cookies: Once the cookies have cooled completely, dip the tops into the melted chocolate, allowing any excess chocolate to drip off. Place the dipped cookies back onto the parchment paper to set.
- Let the Chocolate Harden: Allow the chocolate coating to set at room temperature, or place the cookies in the refrigerator for about 15-20 minutes to speed up the process.
Extra Tips
For an added twist, you can sprinkle crushed nuts or sprinkles on top of the melted chocolate before it hardens. This not only enhances the flavor but also adds a decorative touch.
Additionally, feel free to experiment with different types of chocolate, such as dark or white chocolate, for a unique flavor profile. Store any leftovers in an airtight container to keep them fresh for longer!
Tostones Rellenos (Stuffed Plantain Cups)

Tostones Rellenos, or stuffed plantain cups, are a delightful Colombian appetizer that brings together the crispiness of twice-fried green plantains and a savory filling of your choice, often featuring ingredients like shredded meat or seafood. The dish isn’t only visually appealing but also offers a delicious combination of textures and flavors that are bound to impress your guests.
These plantain cups are versatile and can be filled with various ingredients, allowing you to customize them according to your preferences or dietary restrictions.
Making Tostones Rellenos is easier than it may seem. The key is to select the right type of green plantains for frying, as they should be firm and unripe. The process involves first frying the plantains, smashing them into cups, then frying them again to achieve that perfect golden-brown crispiness. Finally, the cups are filled with a hearty mixture that can be made ahead of time, making this dish a fantastic option for gatherings or parties.
Ingredients (Serves 4-6)
- 3-4 green plantains
- Vegetable oil (for frying)
- Salt (to taste)
- 1 cup cooked shredded chicken, beef, or seafood
- 1/2 cup diced bell peppers
- 1/2 cup diced onions
- 2 cloves garlic, minced
- 1/2 cup shredded cheese (optional)
- Fresh cilantro or parsley (for garnish)
Cooking Instructions
- Prepare the Plantains: Begin by peeling the green plantains. To do this, cut off the ends, then make a lengthwise slit through the skin without cutting into the flesh. Carefully remove the skin and slice the plantains into 1-inch thick pieces.
- First Fry: Heat about 1 inch of vegetable oil in a deep skillet or frying pan over medium heat. Once the oil is hot, add the plantain slices in batches, frying them for about 3-4 minutes on each side until they’re golden and slightly soft. Remove them from the oil and place them on paper towels to absorb excess oil.
- Form the Cups: Using the bottom of a sturdy glass or a tostonera (a plantain press), smash each fried plantain piece into a flat disc about 1/2 inch thick. Make sure to create a small indentation in the center to form a cup shape.
- Second Fry: Return the smashed plantain cups to the hot oil and fry them again for another 2-3 minutes, or until they’re crispy and golden brown. Remove them from the oil and drain on paper towels. Sprinkle with salt while they’re still hot.
- Prepare the Filling: In a separate pan, sauté the diced onions, bell peppers, and minced garlic over medium heat until they’re softened, about 5 minutes. Add in the cooked shredded chicken, beef, or seafood and mix well. If using, stir in the shredded cheese until melted and combined.
- Assemble the Tostones Rellenos: Once the plantain cups are cooled slightly, fill each cup generously with the prepared filling mixture. Finish with a sprinkle of fresh cilantro or parsley for garnish.
- Serve and Enjoy: Arrange the stuffed plantain cups on a serving platter and serve warm as a delicious appetizer.
Extra Tips
When making Tostones Rellenos, it’s crucial to verify that the oil is at the right temperature for frying. If the oil is too hot, the plantains may burn before cooking through; if it’s too cool, they’ll absorb too much oil and become greasy.
To maintain the perfect texture, keep an eye on the color as they fry and adjust the heat accordingly. Additionally, feel free to experiment with different fillings such as black beans, cheese, or even vegetarian options for a unique twist on this traditional Colombian dish.