

South America is a snack lover’s paradise, brimming with vibrant flavors and textures. Each bite, from flaky empanadas to cheesy arepas, has its own unique story. These snacks are perfect for gatherings and will surely impress your friends. If you’re looking to add some flair to your snack repertoire, these recipes are a must-try. Let’s discover what makes each one so irresistible.
Empanadas De Carne

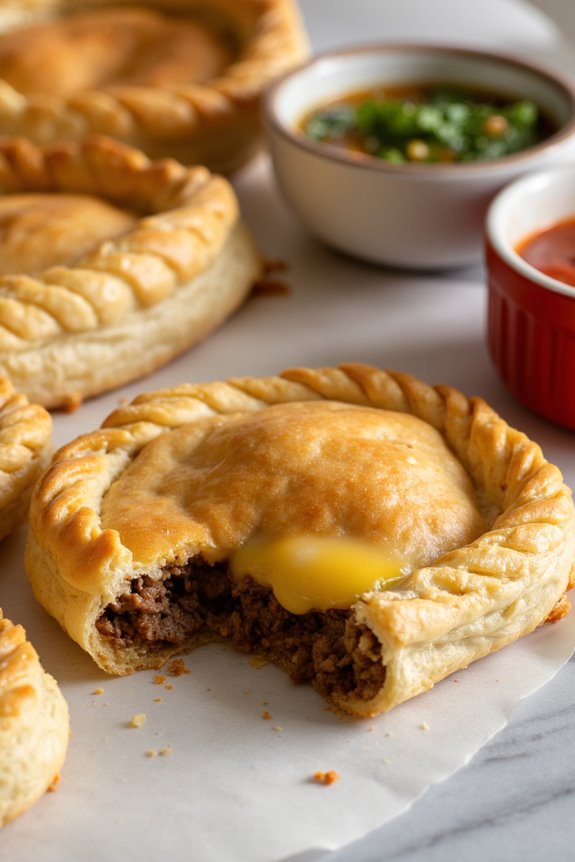
Empanadas de Carne are a beloved South American snack, known for their flaky pastry and savory filling. Originating from Spain, these delicious hand-held pies have become a staple across the continent, particularly in Argentina, where they’re often enjoyed during gatherings and celebrations.
The filling, typically made with ground beef, spices, and vegetables, offers a rich and satisfying flavor that pairs perfectly with the buttery crust.
Making Empanadas de Carne at home is easier than you might think! With just a few ingredients, you can create a batch that will impress your family and friends. The secret to a perfect empanada lies in the dough and the careful seasoning of the filling.
Once baked or fried to golden perfection, these empanadas will be a hit at any occasion.
Ingredients (Serves 4-6):
- 3 cups all-purpose flour
- 1 teaspoon salt
- 1/2 cup unsalted butter, cold and cubed
- 1/2 cup cold water
- 1 pound ground beef
- 1 onion, finely chopped
- 1/2 red bell pepper, finely chopped
- 2 cloves garlic, minced
- 1 teaspoon ground cumin
- 1 teaspoon paprika
- Salt and pepper to taste
- 1 egg, beaten (for egg wash)
- Oil for frying (if frying)
Cooking Instructions:
1. Prepare the Dough: In a large bowl, combine the flour and salt. Add the cold, cubed butter and mix until the mixture resembles coarse crumbs. Gradually add cold water, one tablespoon at a time, mixing until a dough forms.
Knead gently for about 2-3 minutes, then wrap in plastic wrap and refrigerate for at least 30 minutes.
2. Cook the Filling: In a skillet over medium heat, add a splash of oil and sauté the chopped onion and red bell pepper until softened, about 5 minutes. Add the minced garlic and cook for an additional minute.
Stir in the ground beef, cooking until browned. Season with ground cumin, paprika, salt, and pepper. Remove from heat and allow to cool slightly.
3. Roll Out the Dough: On a floured surface, roll out the chilled dough to about 1/8-inch thickness. Use a round cutter (about 4-5 inches in diameter) to cut out circles.
Gather any scraps, re-roll, and cut additional circles.
4. Fill the Empanadas: Place a spoonful of the beef filling onto the center of each dough circle. Be careful not to overfill. Fold the dough over the filling to create a half-moon shape.
Press the edges together to seal, then crimp with a fork or pinch by hand to guarantee they’re well sealed.
5. Cook the Empanadas: Preheat your oven to 375°F (190°C) if baking, or heat oil in a deep pan for frying. If baking, place the empanadas on a parchment-lined baking sheet, brush the tops with beaten egg, and bake for 20-25 minutes or until golden brown.
If frying, carefully lower a few empanadas at a time into the hot oil and fry until golden, about 3-4 minutes per side. Drain on paper towels.
6. Serve and Enjoy: Once cooked, serve the empanadas warm, with your favorite dipping sauce or salsa on the side.
Extra Tips:
For the best flavor, consider adding diced olives, hard-boiled eggs, or spices like oregano to the filling.
If you prefer a vegetarian option, you can substitute the ground beef with lentils or mushrooms. Additionally, experiment with different dipping sauces like chimichurri or aioli to elevate your empanada experience.
Make a larger batch and freeze unbaked empanadas for a quick and delicious snack anytime!
Arepas With Cheese
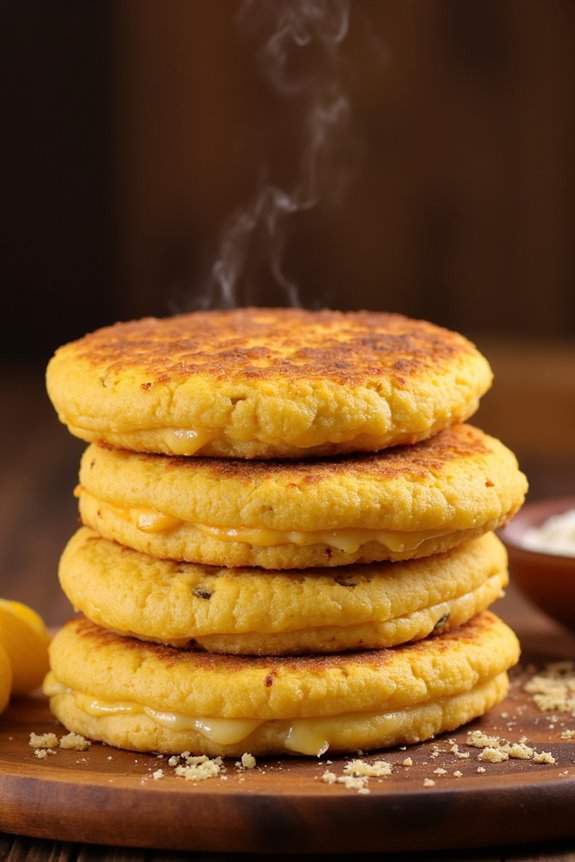
Arepas are a traditional South American dish, particularly popular in Venezuela and Colombia. These delicious cornmeal cakes can be grilled, baked, or fried and serve as a versatile base for various fillings. Arepas with cheese are a delightful variation that combines the soft, fluffy texture of the arepa with the rich flavors of melted cheese, making them a perfect snack for any time of the day or a hearty meal when paired with additional ingredients.
Making arepas with cheese is simple and requires only a few ingredients. The key to a great arepa is in the dough, which must be kneaded to the right consistency for a perfect texture. This recipe will guide you through the process of creating these delectable treats, ensuring that you achieve the ideal balance of crispy on the outside and soft on the inside. Serve them warm, and you’ll have a dish that will impress family and friends alike.
Ingredients (Servings: 4-6)
- 2 cups of precooked cornmeal (such as arepa flour)
- 2 cups of warm water
- 1 teaspoon of salt
- 1 cup of shredded cheese (mozzarella, queso blanco, or any cheese of your choice)
- 2 tablespoons of vegetable oil (for frying, if desired)
Cooking Instructions
- Prepare the Dough: In a large mixing bowl, combine the precooked cornmeal and salt. Gradually add the warm water while mixing with your hands or a spoon until the mixture comes together. Knead the dough for about 2-3 minutes until it’s smooth and pliable. If the dough feels too dry, add a little more water; if it’s too wet, sprinkle in a bit more cornmeal.
- Divide the Dough: Once the dough is ready, divide it into equal portions, about the size of a golf ball. You should get 8-10 portions, depending on how large you want the arepas to be. Roll each portion into a ball and then flatten it into a disc that’s about ½ inch thick.
- Add the Cheese: Take half of each flattened dough disc and place a generous amount of shredded cheese in the center. Fold the other half over the cheese and gently press the edges to seal. You can reshape the arepa into a round disc if needed, ensuring the cheese is well enclosed.
- Cook the Arepas: Heat a skillet or griddle over medium heat and add a tablespoon of vegetable oil. Once the oil is hot, place the arepas in the skillet, cooking them for about 5-7 minutes on each side until they develop a golden brown crust. If you prefer a healthier option, you can also bake them in a preheated oven at 375°F (190°C) for about 20-25 minutes, flipping halfway through.
- Serve Warm: Once cooked, remove the arepas from the skillet and let them cool slightly. Serve them warm, and if desired, you can cut them open and add more cheese or other fillings such as avocado, pulled pork, or beans for a heartier meal.
Extra Tips
For the best results, make sure your water is warm when mixing the dough; this helps hydrate the cornmeal more effectively, resulting in a better texture. You can also experiment with different types of cheese or add herbs and spices to the dough for added flavor.
If you have leftovers, arepas can be stored in an airtight container in the refrigerator and reheated in the oven or skillet for a quick snack. Enjoy your arepas with cheese with a side of guacamole or hot sauce for an extra kick!
Churros With Chocolate Sauce
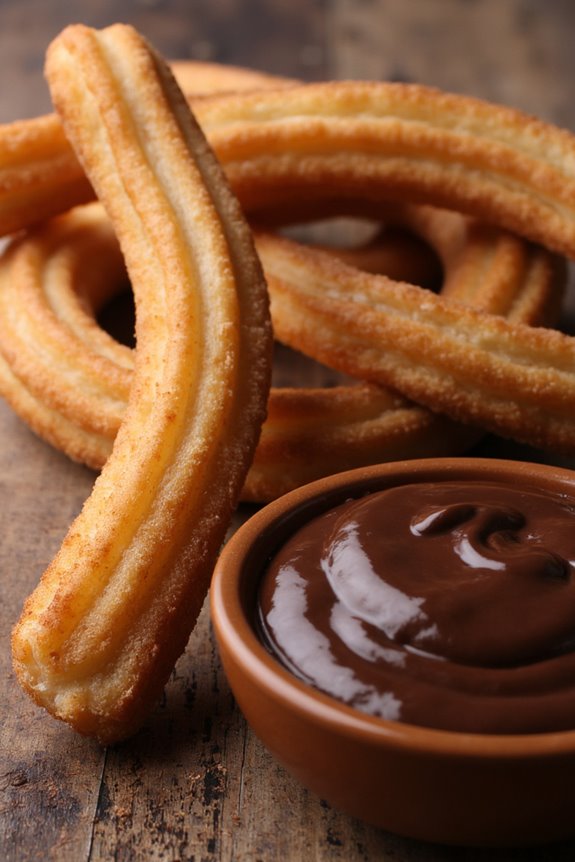
Churros are a delightful and traditional South American snack that have gained popularity worldwide. These crispy, golden-brown pastries are made from a simple dough that’s piped into long strips and deep-fried to perfection. The exterior is crisp, while the inside is soft and airy, making them irresistibly delicious.
Traditionally, churros are rolled in cinnamon and sugar, but they truly shine when paired with a rich chocolate sauce for dipping, creating a perfect balance of sweetness and warmth.
Making churros at home is easier than you might think, and the result will impress your friends and family. Whether you serve them at a gathering, as a dessert, or simply as a sweet treat, churros with chocolate sauce are sure to be a hit. This recipe yields enough churros for 4-6 people, making it perfect for sharing or indulging on your own.
Ingredients (Serves 4-6)
- 1 cup water
- 1/2 cup unsalted butter
- 1 tablespoon granulated sugar
- 1/4 teaspoon salt
- 1 cup all-purpose flour
- 2 large eggs
- 1 teaspoon vanilla extract
- Oil for frying
- 1/2 cup granulated sugar (for rolling)
- 1 teaspoon ground cinnamon
For the Chocolate Sauce:
- 1 cup semi-sweet chocolate chips
- 1/2 cup heavy cream
- 1 tablespoon butter
- 1 teaspoon vanilla extract
Cooking Instructions
- Prepare the Churro Dough: In a medium saucepan, combine the water, butter, sugar, and salt. Bring to a boil over medium heat. Once boiling, remove from heat and stir in the flour until a dough forms. Allow the mixture to cool for a few minutes.
- Incorporate Eggs: Once the dough has cooled slightly, add the eggs one at a time, mixing well after each addition. Stir in the vanilla extract until the mixture is smooth and well combined. The dough should be thick but pipeable.
- Heat the Oil: In a deep pot or fryer, heat about 2 inches of oil to 350°F (175°C). This temperature is essential for achieving the perfect crispy texture. Use a thermometer to monitor the oil temperature.
- Pipe the Churros: Fit a piping bag with a star tip and fill it with the churro dough. Carefully pipe 5-6 inch lengths of dough directly into the hot oil, cutting the dough with scissors. Fry in batches, avoiding overcrowding, until golden brown, about 2-3 minutes per side.
- Roll in Sugar and Cinnamon: Once cooked, use a slotted spoon to remove the churros from the oil and place them on paper towels to drain. In a shallow dish, mix the granulated sugar and cinnamon together, then roll the warm churros in this mixture until well coated.
- Make the Chocolate Sauce: In a small saucepan over low heat, combine the chocolate chips, heavy cream, butter, and vanilla extract. Stir continuously until the chocolate is melted and the sauce is smooth. Remove from heat and keep warm.
- Serve: Arrange the churros on a plate and serve warm with the chocolate sauce on the side for dipping.
Extra Tips
When making churros, be sure to fry them in small batches to maintain the oil temperature, which guarantees they cook evenly. You can also experiment with different coatings, such as powdered sugar or flavored sugar, for a unique twist.
For an extra decadent treat, consider adding a pinch of sea salt to your chocolate sauce. Enjoy your homemade churros while they’re still warm for the best texture and flavor!
Ceviche

Ceviche is a vibrant and invigorating dish that hails from the coastal regions of South America, particularly Peru. This delightful preparation features fresh fish marinated in citrus juices, primarily lime, which “cooks” the fish through the process of denaturation. Traditionally, ceviche is accompanied by a variety of ingredients that enhance its flavor, making it a popular appetizer or snack for gatherings. The dish isn’t only delicious but also showcases the freshness of seafood, making it a staple in many South American households.
Preparing ceviche is an art that balances the acidity of the marinade with the natural sweetness of the fish. It’s vital to use very fresh fish, as the quality of the ingredients directly affects the outcome of the dish. With a few simple steps and a handful of ingredients, you can create an authentic ceviche that bursts with flavor and is sure to impress your guests.
Ingredients (Serves 4-6):
- 1 pound of fresh white fish fillets (such as snapper, sea bass, or tilapia)
- 1 cup of freshly squeezed lime juice
- 1 small red onion, thinly sliced
- 1 jalapeño or serrano pepper, finely chopped (adjust for spice level)
- 1 cup of diced tomatoes
- 1/2 cup of chopped fresh cilantro
- Salt and pepper to taste
- 1 cup of corn (cooked, optional)
- 1 avocado, diced (optional)
- Tortilla chips or plantain chips for serving
Cooking Instructions:
- Prepare the Fish: Start by selecting the freshest fish available. Rinse the fish fillets under cold water, then pat them dry with paper towels. Cut the fish into small, bite-sized cubes (about 1/2 inch) and place them in a glass or ceramic bowl. Avoid using metal bowls, as the acidity can react with the metal.
- Marinate the Fish: Pour the freshly squeezed lime juice over the cubed fish, ensuring all pieces are well-coated. Cover the bowl with plastic wrap and refrigerate for about 15-30 minutes. The acidity of the lime juice will “cook” the fish, turning it opaque.
- Add Vegetables and Seasoning: Once the fish has marinated, remove it from the refrigerator. Add the thinly sliced red onion, chopped jalapeño or serrano pepper, diced tomatoes, and chopped cilantro to the bowl. Stir gently to combine all the ingredients evenly.
- Season and Serve: Taste the ceviche and season with salt and pepper as desired. If using, fold in the cooked corn and diced avocado for added texture and flavor. Serve the ceviche chilled with tortilla chips or plantain chips on the side for a delightful crunch.
- Garnish (Optional): For an extra touch, you may garnish the ceviche with additional cilantro or lime wedges before serving.
Extra Tips:
When making ceviche, it’s important to use the freshest fish possible, as this dish relies heavily on the quality of its main ingredient. If you’re unsure about the freshness, ask your fishmonger for recommendations.
Additionally, feel free to customize the recipe by adding ingredients like mango or cucumber for a unique twist. For those who prefer a milder flavor, you can reduce the amount of pepper or omit it entirely.
Finally, ceviche is best enjoyed the same day it’s made, as the fish can become mushy if marinated for too long.
Pão De Queijo
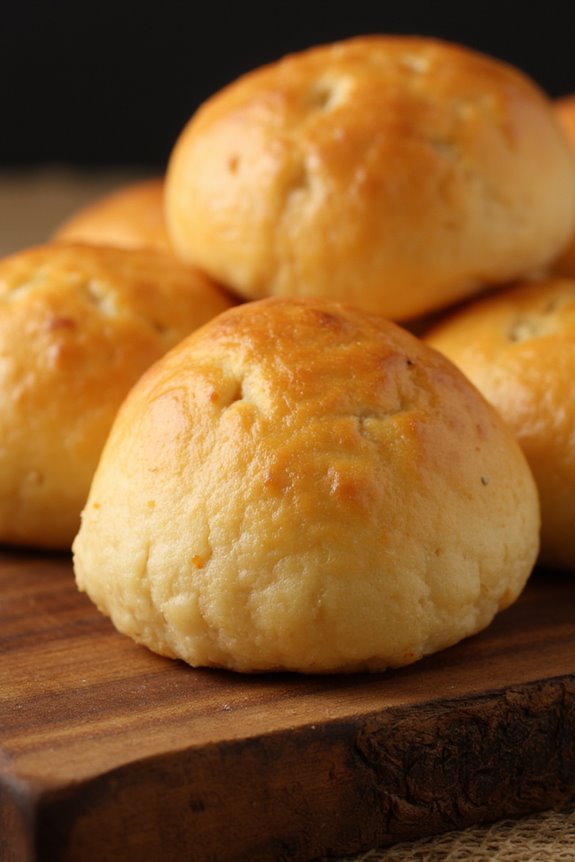
Pão de Queijo, or Brazilian cheese bread, is a delightful snack that hails from the heart of Brazil. With a crispy exterior and a soft, chewy interior, these cheesy bites are made primarily from tapioca flour, which gives them their unique texture and makes them gluten-free.
Traditionally served as a snack or breakfast item, they’re often enjoyed with coffee or tea and are a favorite among both locals and visitors. The rich flavor of cheese combined with the slight nuttiness of the tapioca creates a savory treat that’s hard to resist.
Making Pão de Queijo at home is surprisingly simple, requiring only a handful of ingredients and minimal kitchen equipment. The dough is easy to work with and can be shaped into balls or left as drop biscuits depending on your preference.
Once baked, they puff up beautifully and are best enjoyed warm right out of the oven. Whether you’re hosting a gathering or just craving a snack, these delicious cheese breads are sure to captivate.
Ingredients (Serves 4-6 people)
- 1 cup tapioca flour (also known as tapioca starch)
- 1/2 cup milk
- 1/4 cup vegetable oil
- 1 teaspoon salt
- 1 large egg
- 1 cup grated cheese (such as Parmesan, mozzarella, or a blend)
- 1/2 teaspoon baking powder (optional for extra fluffiness)
Cooking Instructions
- Preheat the Oven: Start by preheating your oven to 375°F (190°C). This will guarantee that your Pão de Queijo cooks evenly and develops a lovely golden color.
- Combine Wet Ingredients: In a medium saucepan, combine the milk, vegetable oil, and salt. Heat the mixture over medium heat until it comes to a gentle boil. Stir occasionally to prevent burning.
- Mix with Tapioca Flour: Once the mixture is boiling, remove it from the heat and immediately add the tapioca flour. Stir with a wooden spoon until the mixture is well combined and forms a sticky dough. Allow it to cool for about 10 minutes.
- Add Egg and Cheese: Once the dough has cooled slightly, add the egg and grated cheese to the mixture. Mix thoroughly until the egg is fully incorporated and the cheese is evenly distributed throughout the dough. If you’re using baking powder, add it now.
- Shape the Dough: With your hands, pinch off small pieces of the dough and roll them into balls about the size of a golf ball. Place the balls on a baking sheet lined with parchment paper, spacing them about 2 inches apart as they’ll expand while baking.
- Bake the Pão de Queijo: Place the baking sheet in the preheated oven and bake for 15-20 minutes or until the tops are golden brown and the cheese bread has puffed up nicely.
- Cool and Serve: Remove the Pão de Queijo from the oven and let them cool for a few minutes before serving. Enjoy them warm for the best flavor and texture!
Extra Tips
For an even cheesier flavor, feel free to experiment with different types of cheese or add herbs and spices to the dough for extra flair.
If you want to prepare them ahead of time, you can freeze the shaped dough balls before baking. Just place them in a single layer on a baking sheet until frozen, then transfer them to a zip-top bag.
When ready to bake, simply add a few extra minutes to the baking time. Enjoy your homemade Pão de Queijo fresh and warm!
Alfajores

Alfajores are a delightful South American treat that have captured the hearts of many with their sweet and crumbly texture. Originating from Spain and adapted throughout Latin America, these cookies are traditionally made with two soft, melt-in-your-mouth biscuits filled with dulce de leche and rolled in coconut or dusted with powdered sugar.
They’re perfect for any occasion, whether enjoyed with a cup of coffee or as a sweet snack after a meal. The versatility of alfajores is truly remarkable, as they can be made using various types of flour, fillings, and toppings. In Argentina, you might find them made with cornstarch, giving them a unique tenderness, while in Peru, they can be found with a chocolate coating.
Regardless of the variations, the essence of alfajores lies in their rich flavor and satisfying texture, making them a beloved confection across South America.
Ingredients (Serves 4-6 people)
- 1 cup unsalted butter, softened
- 3/4 cup powdered sugar
- 2 large egg yolks
- 1 teaspoon vanilla extract
- 2 cups all-purpose flour
- 1 cup cornstarch
- 1 teaspoon baking powder
- 1 cup dulce de leche
- 1/2 cup shredded coconut (unsweetened) or additional powdered sugar for dusting
Cooking Instructions
- Prepare the Dough: In a large mixing bowl, cream together the softened butter and powdered sugar until light and fluffy. This will incorporate air into the mixture, making your cookies tender. Add the egg yolks one at a time, mixing well after each addition, then stir in the vanilla extract.
- Combine Dry Ingredients: In a separate bowl, sift together the all-purpose flour, cornstarch, and baking powder. This step helps to aerate the flour and guarantees even distribution of the baking powder, which is vital for the cookies’ rise.
- Mix Ingredients: Gradually add the dry mixture to the wet mixture, mixing until a soft dough forms. Avoid overmixing, as this can lead to tougher cookies. Once the dough is well combined, cover it with plastic wrap and refrigerate for about 30 minutes. Chilling the dough helps it hold its shape during baking.
- Shape the Cookies: Preheat your oven to 350°F (175°C). Once chilled, roll out the dough on a lightly floured surface to about 1/4 inch thick. Use a round cookie cutter (about 2 inches in diameter) to cut out cookies and place them on a baking sheet lined with parchment paper.
- Bake: Bake in the preheated oven for 10-12 minutes, or until the edges are lightly golden. Keep an eye on them, as baking times may vary based on your oven. Once baked, remove the cookies from the oven and allow them to cool completely on a wire rack.
- Assemble the Alfajores: Once the cookies are cool, spread a generous spoonful of dulce de leche on the bottom side of one cookie and sandwich it with another cookie, pressing gently to adhere.
- Finish and Serve: Roll the edges of the stuffed cookies in shredded coconut or dust the tops with powdered sugar for a finishing touch. Serve the alfajores with coffee or tea, and enjoy!
Extra Tips
When making alfajores, using high-quality dulce de leche can greatly enhance the flavor of your cookies, so opt for a brand you love or make your own if time allows.
Additionally, if you want to add a unique twist, consider flavoring the dough with a hint of citrus zest or cocoa powder for a chocolate variation. Store any leftovers in an airtight container to keep them fresh, and if possible, let them sit for a day before serving; this allows the flavors to meld beautifully.
Tequeños
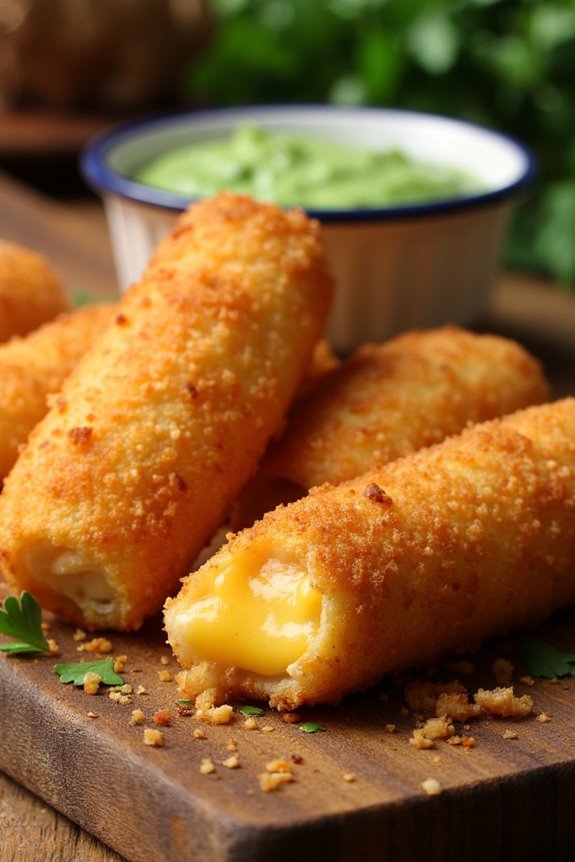
Tequeños are a beloved Venezuelan snack that consists of cheese wrapped in a deliciously crispy dough. They’re often enjoyed at parties, gatherings, or as a delightful appetizer that can be dipped into sweet or spicy sauces. The dough is relatively simple to prepare, and the resulting treat is a perfect blend of savory and satisfying flavors.
When you bite into a tequeño, you’ll experience the warm, gooey cheese paired with a perfectly crispy outer layer that makes them irresistible.
Making tequeños from scratch can be a fun and rewarding culinary adventure. The ingredients are straightforward, and the process allows for some creativity regarding the cheese you choose to use. While traditional recipes often call for white cheese, you can experiment with mozzarella or even pepper jack for a spicier kick.
Perfect for sharing, these cheesy delights are sure to be a hit among friends and family, making them a staple in South American cuisine.
Ingredients (Serves 4-6)
- 2 cups all-purpose flour
- 1/2 teaspoon salt
- 1 tablespoon sugar
- 1/4 cup butter, softened
- 1/2 cup water (adjust as needed)
- 8 ounces cheese (preferably blanco, mozzarella, or a mix)
- Oil for frying
Cooking Instructions
- Prepare the Dough: In a large mixing bowl, combine the all-purpose flour, salt, and sugar. Mix the dry ingredients well. Add the softened butter and mix it into the flour until the mixture resembles coarse crumbs. Gradually add water, a little at a time, until the dough comes together. Knead the dough on a floured surface for about 5-7 minutes until it’s smooth and elastic.
- Rest the Dough: Once the dough is well-kneaded, cover it with a damp cloth or plastic wrap and let it rest for about 30 minutes. This resting period allows the gluten to relax, making it easier to roll out later.
- Prepare the Cheese: While the dough rests, cut the cheese into strips about 1/2 inch wide and 3 inches long. You want the cheese strips to be thin enough to wrap easily but thick enough to provide that cheesy core.
- Roll Out the Dough: After the resting time, divide the dough into smaller sections for easier handling. On a lightly floured surface, roll out each section to about 1/8 inch thick. Use a sharp knife or pizza cutter to cut the dough into rectangles that are approximately 3 inches wide and 5 inches long.
- Wrap the Cheese: Place a cheese strip at one end of each rectangle of dough. Roll the dough over the cheese, tucking in the sides to seal it securely. Make sure there are no gaps for the cheese to ooze out during frying.
- Heat the Oil: In a deep frying pan or pot, heat oil over medium heat until it reaches 350°F (175°C). You can test if the oil is hot enough by dropping a small piece of dough into it; if it bubbles and sizzles, it’s ready.
- Fry the Tequeños: Carefully place the wrapped tequeños in the hot oil, a few at a time to avoid overcrowding. Fry them for about 3-4 minutes, turning occasionally, until they’re golden brown. Remove them with a slotted spoon and place them on paper towels to drain excess oil.
- Serve: Serve the tequeños hot with your choice of dipping sauces such as guasacaca (a Venezuelan avocado sauce) or a spicy tomato sauce. Enjoy!
Extra Tips
When making tequeños, verify that the cheese you choose melts well; this will enhance the gooey texture that makes them so delicious.
If you want to add extra flavor to the dough, consider incorporating herbs or spices into the mixture. For a healthier option, you can also bake the tequeños instead of frying them—just brush them with a little oil and bake at 375°F (190°C) for about 20 minutes or until golden.
Enjoy experimenting with different cheese types, and don’t forget to serve them fresh for the best experience!
Beef and Cheese Pastelitos
Beef and cheese pastelitos are a delightful South American snack that brings together the rich flavors of seasoned beef and gooey cheese, all encased in a crispy pastry shell. Originating from various countries in South America, these little pockets of goodness are perfect for parties, gatherings, or simply as a delicious treat to enjoy with family.
The combination of textures and flavors makes them a favorite among many, and they can be served with a variety of dipping sauces for an added kick.
Making pastelitos at home is easier than you might think. With a few simple ingredients and some straightforward steps, you can recreate this beloved snack in your kitchen. Whether you opt to fry or bake them, these beef and cheese pastelitos will surely impress your guests and satisfy your cravings.
Follow this recipe for a mouthwatering experience that captures the essence of South American cuisine.
Ingredients (Serves 4-6):
- 1 lb ground beef
- 1 small onion, finely chopped
- 2 cloves garlic, minced
- 1 teaspoon cumin
- 1 teaspoon paprika
- Salt and pepper to taste
- 1 cup shredded cheese (such as mozzarella or cheddar)
- 1 package of empanada dough discs (store-bought or homemade)
- 1 egg (for egg wash)
- Oil for frying (or for brushing if baking)
Instructions:
1. Cook the Beef Filling: In a large skillet over medium heat, add a drizzle of oil. Once hot, add the chopped onion and sauté until translucent, about 3-4 minutes. Add the minced garlic and cook for another minute.
Then, add the ground beef, breaking it up with a spatula. Cook until browned and fully cooked through, about 7-10 minutes. Season with cumin, paprika, salt, and pepper, mixing well.
2. Add Cheese: Once the beef is cooked, remove the skillet from heat and stir in the shredded cheese until it’s melted and well-combined with the beef. Allow the filling to cool slightly before assembling the pastelitos.
3. Prepare the Dough: On a clean surface, lay out the empanada dough discs. If using homemade dough, roll it out to about 1/8 inch thickness and cut into 5-6 inch circles.
4. Fill the Pastelitos: Take a disc of dough and place about 1-2 tablespoons of the beef and cheese filling in the center. Be careful not to overfill. Fold the dough over to create a half-moon shape.
Press the edges together firmly to seal, and use a fork to crimp the edges for extra security.
5. Prepare for Cooking: If frying, heat a pot with oil over medium-high heat until it reaches 350°F (175°C). If baking, preheat your oven to 375°F (190°C) and line a baking sheet with parchment paper.
6. Cook the Pastelitos: For frying, carefully lower the pastelitos into the hot oil in batches, cooking for about 3-4 minutes on each side or until golden brown. Remove them with a slotted spoon and drain on paper towels.
For baking, brush the tops of the pastelitos with beaten egg and bake for about 20-25 minutes, or until golden and crispy.
7. Serve: Let the pastelitos cool slightly before serving. They can be enjoyed warm or at room temperature, and are often accompanied by dipping sauces like chimichurri or salsa.
Extra Tips:
When making beef and cheese pastelitos, feel free to customize the filling according to your taste preferences. You can add diced bell peppers, olives, or even switch to chicken or shrimp for a different flavor profile.
If you prefer a healthier option, baking instead of frying will yield a lighter version. Additionally, make sure to seal the edges of the dough well to prevent any filling from leaking out during cooking.
Enjoy your homemade pastelitos with friends and family for a true taste of South America!
Peruvian Anticuchos
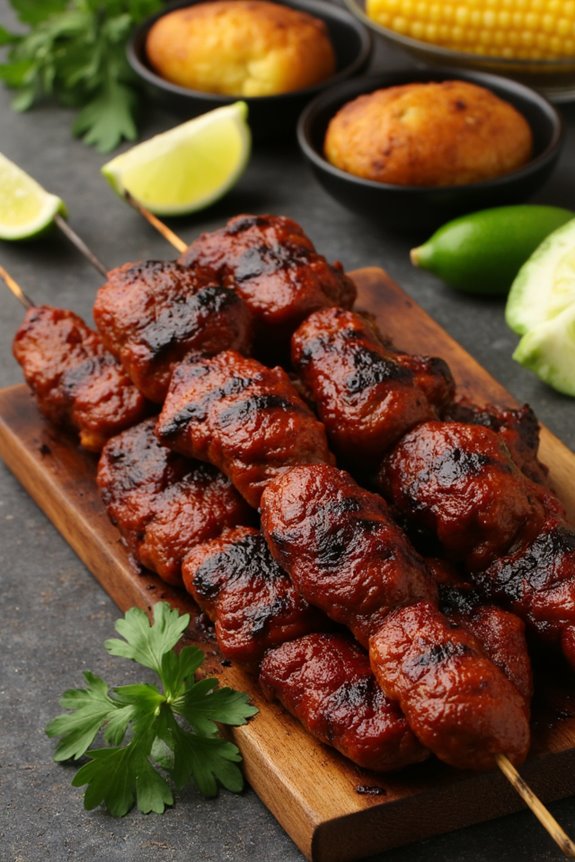
Peruvian Anticuchos are a beloved street food that showcases the rich culinary heritage of Peru. Traditionally made with marinated beef heart, these skewers are grilled to perfection and served with a spicy, tangy sauce. However, you can also use other cuts of beef or even chicken, making this dish versatile and accessible for everyone.
The marinade consists of a delightful blend of vinegar, spices, and herbs, which infuses the meat with incredible flavor, resulting in a savory and satisfying snack that’s perfect for gatherings or casual dinners. The dish isn’t only easy to prepare but also offers a fantastic opportunity to experience the vibrant flavors of South America.
Anticuchos are often enjoyed with sides such as potatoes or corn, enhancing the overall experience. Whether you’re a seasoned cook or a novice in the kitchen, you’ll find that making Peruvian Anticuchos is both simple and rewarding, bringing a taste of Peru right to your home.
Ingredients (Serves 4-6):
- 1.5 lbs beef heart (or beef sirloin, chicken breast)
- 1/2 cup red wine vinegar
- 1/4 cup vegetable oil
- 4 cloves garlic, minced
- 2 teaspoons cumin
- 1 teaspoon paprika
- 1 teaspoon black pepper
- 1 teaspoon salt
- 1 teaspoon oregano
- 1 tablespoon aji amarillo paste (or any chili paste)
- Wooden or metal skewers
- Fresh parsley (for garnish)
- Lime wedges (for serving)
Cooking Instructions:
- Prepare the Marinade: In a large mixing bowl, combine the red wine vinegar, vegetable oil, minced garlic, cumin, paprika, black pepper, salt, oregano, and aji amarillo paste. Whisk the ingredients together until well blended. This marinade will impart rich flavors to the meat, making it tender and savory.
- Marinate the Meat: Cut the beef heart (or your chosen meat) into 1-inch cubes and add them to the marinade. Confirm that all pieces are well-coated. Cover the bowl with plastic wrap and refrigerate for at least 2 hours, or ideally overnight. The longer the meat marinates, the more flavorful it will be.
- Prepare Skewers: If using wooden skewers, soak them in water for about 30 minutes to prevent burning on the grill. If using metal skewers, you can skip this step. Skewering the meat will make it easier to grill and serve.
- Skewer the Meat: Once marinated, thread the meat cubes onto the prepared skewers, leaving a little space between each piece to allow for even cooking. This step is important for confirming that the meat cooks thoroughly and gets those beautiful grill marks.
- Preheat the Grill: Heat your grill to medium-high heat (about 400°F). If you’re using a charcoal grill, make sure the coals are ashed over and glowing. A well-heated grill will give the anticuchos a nice char and prevent sticking.
- Grill the Anticuchos: Place the skewers on the grill and cook for about 10-15 minutes, turning occasionally to confirm even cooking. The meat should reach an internal temperature of about 145°F for medium-rare. Adjust the cooking time based on your desired level of doneness.
- Serve: Once cooked, remove the skewers from the grill and let them rest for a couple of minutes. Serve the anticuchos hot, garnished with fresh parsley and lime wedges on the side. The lime adds a revitalizing zing that complements the rich flavors of the meat.
Extra Tips: When preparing anticuchos, feel free to customize the marinade to suit your taste preferences. You can add ingredients like soy sauce, cilantro, or chili powder for an extra kick.
Additionally, serving the skewers with a side of Peruvian salsa, such as rocoto sauce, can elevate the dish even more. Don’t shy away from trying different types of meat or vegetables on the skewers, as this dish is all about versatility and personal flair!
Papas a La Huancaina
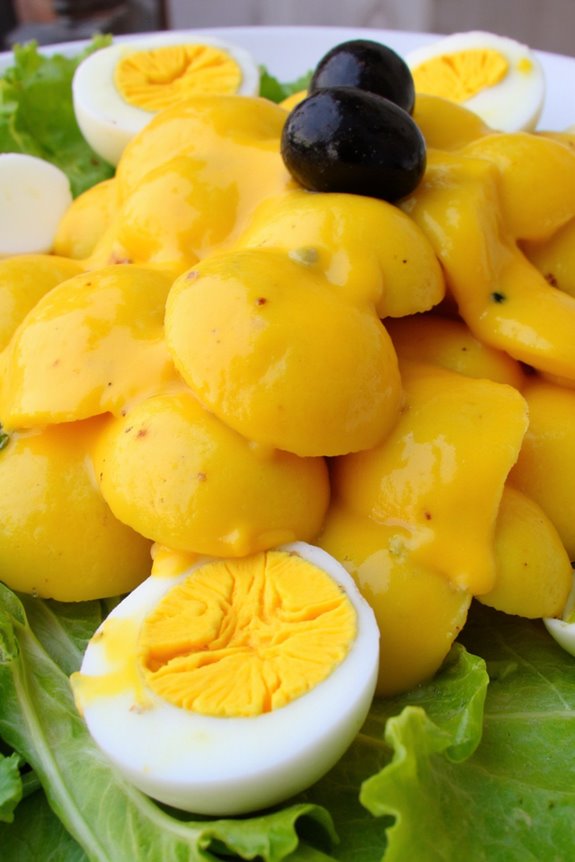
Papas a La Huancaina is a traditional Peruvian dish that showcases the vibrant flavors of South America. This delicious appetizer consists of boiled potatoes served with a creamy, spicy cheese sauce made from a blend of fresh ingredients, including ají amarillo, a staple in Peruvian cuisine.
The dish isn’t only visually appealing with its bright yellow hue but also offers a delightful mix of textures and flavors that will transport your taste buds straight to the heart of Peru. This dish is perfect for gatherings, parties, or as a unique addition to your home-cooked meals.
It’s a great representation of the rich culinary heritage of Peru, and it’s often enjoyed with a hard-boiled egg and black olives as a garnish. Preparing Papas a La Huancaina is an easy process that will impress your guests and leave them wanting more.
Ingredients (Serves 4-6)
- 4 medium-sized yellow potatoes
- 2 cups of queso fresco (or feta cheese)
- 2 ají amarillo peppers (or yellow bell peppers for a milder taste)
- 1 cup of evaporated milk
- 2 tablespoons of vegetable oil
- 1 garlic clove
- Salt to taste
- 4 hard-boiled eggs (for garnish)
- Black olives (for garnish)
- Lettuce leaves (for serving)
Cooking Instructions
1. Boil the Potatoes: Start by washing the yellow potatoes thoroughly. Place them in a pot of salted water and bring it to a boil. Cook the potatoes for about 20-25 minutes or until they’re tender when pierced with a fork.
Once cooked, drain the potatoes and allow them to cool. Once cooled, peel and slice them into rounds.
2. Prepare the Huancaina Sauce: In a blender, combine the queso fresco, ají amarillo peppers, evaporated milk, vegetable oil, garlic clove, and salt. Blend the mixture until it reaches a smooth consistency.
If the sauce is too thick, you can add a little more evaporated milk to achieve your desired thickness.
3. Assemble the Dish: On a serving platter, lay down a bed of lettuce leaves. Arrange the sliced boiled potatoes on top of the lettuce. Pour the Huancaina sauce generously over the potatoes, ensuring they’re well coated.
4. Garnish: Cut the hard-boiled eggs into quarters and place them around the potatoes. Add black olives for an appealing contrast, both in color and flavor.
5. Serve: Enjoy your Papas a La Huancaina as an appetizer or side dish. It can be served warm or at room temperature, making it a versatile addition to your meal.
Extra Tips
For an authentic touch, try to find genuine Peruvian ají amarillo peppers, as they provide a unique flavor that’s difficult to replicate.
If you can’t find them, yellow bell peppers can be a substitute, but they’ll yield a milder taste. Additionally, feel free to adjust the creaminess of the sauce by experimenting with the amount of evaporated milk.
For a more robust flavor, you can also add a pinch of cumin or a squeeze of lime juice to the sauce. Enjoy your culinary journey through Peru!
Tortilla De Patatas
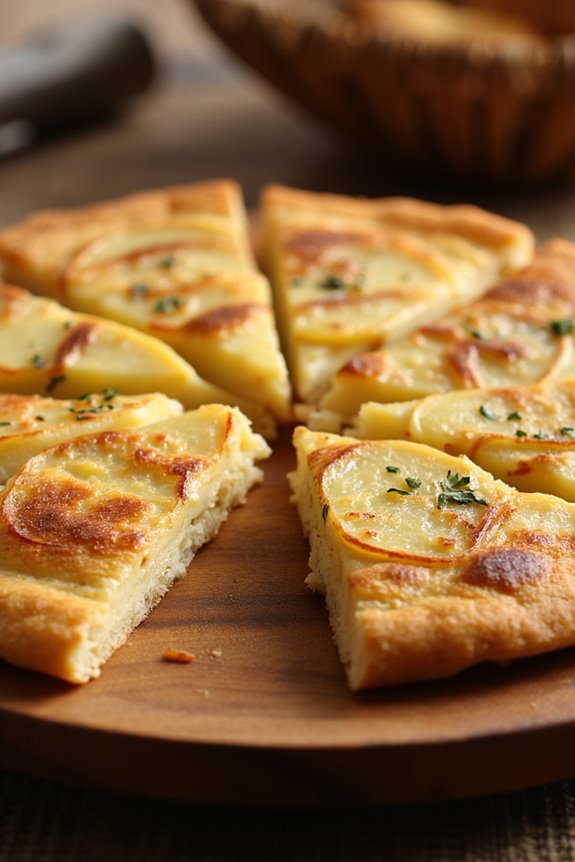
Tortilla De Patatas, also known as Spanish omelette, is a beloved dish in Spain and throughout South America. This simple yet flavorful dish is made primarily with potatoes and eggs, often enhanced with onions and seasoning.
It’s a versatile recipe that can be served warm or at room temperature, making it perfect for any occasion, from family dinners to gatherings with friends. The creamy texture of the eggs combined with the tender potatoes creates a satisfying meal that’s both comforting and delicious.
Making Tortilla De Patatas may seem straightforward, but achieving the perfect balance of flavors and textures requires attention to detail. The key to a great tortilla is the cooking of the potatoes; they should be soft but not mushy.
Additionally, the cooking of the eggs should be just right to create a moist, yet firm binding of the ingredients. Once mastered, this dish will become a staple in your culinary repertoire.
Ingredients (Serves 4-6):
- 4 medium-sized potatoes
- 1 medium onion (optional)
- 6 large eggs
- Salt, to taste
- Olive oil, for frying
Cooking Instructions:
1. Prepare the Ingredients: Begin by peeling the potatoes and slicing them into thin rounds (about 1/8 inch thick). If you’re using onion, slice it thinly as well. This will help them cook evenly and quickly.
2. Cook the Potatoes and Onion: In a large skillet, heat a generous amount of olive oil over medium heat. Once hot, add the sliced potatoes and onion (if using). Season with a pinch of salt.
Cook for about 15-20 minutes, stirring occasionally, until the potatoes are tender and lightly golden. Be careful not to brown them too much; you want them to soften without becoming crispy.
3. Drain the Potatoes: Once the potatoes and onions are cooked, remove them from the skillet using a slotted spoon and transfer them to a bowl lined with paper towels to absorb excess oil. Let them cool slightly.
4. Beat the Eggs: In a separate bowl, crack the six eggs and whisk them thoroughly. Add a little salt to taste.
5. Combine Ingredients: Gently fold the cooked potatoes and onions into the beaten eggs. Make sure everything is well combined but handle the potatoes carefully to avoid breaking them up too much.
6. Cook the Tortilla: Wipe out the skillet and add a little more olive oil. Heat over medium-low heat. Pour the potato-egg mixture into the skillet, spreading it evenly.
Cook for about 5-7 minutes until the bottom is set and lightly golden.
7. Flip the Tortilla: To flip the tortilla, place a large plate over the skillet and carefully invert the tortilla onto the plate. Then slide it back into the skillet to cook the other side for another 5-7 minutes.
Cook until both sides are golden and the center is slightly set but still creamy.
8. Serve: Once cooked, slide the tortilla onto a serving plate. Let it rest for a few minutes before slicing into wedges. Serve warm or at room temperature.
Extra Tips:
For an added depth of flavor, consider letting the cooked potatoes and onions sit in the egg mixture for a few minutes before cooking the tortilla. This allows the flavors to meld together beautifully.
If you like a bit of spice, feel free to add diced bell peppers or chorizo to the mixture. Tortilla De Patatas can be enjoyed as a main dish, a side, or even as a tapas-style snack, making it a fantastic addition to any meal.
Guacamole With Plantain Chips
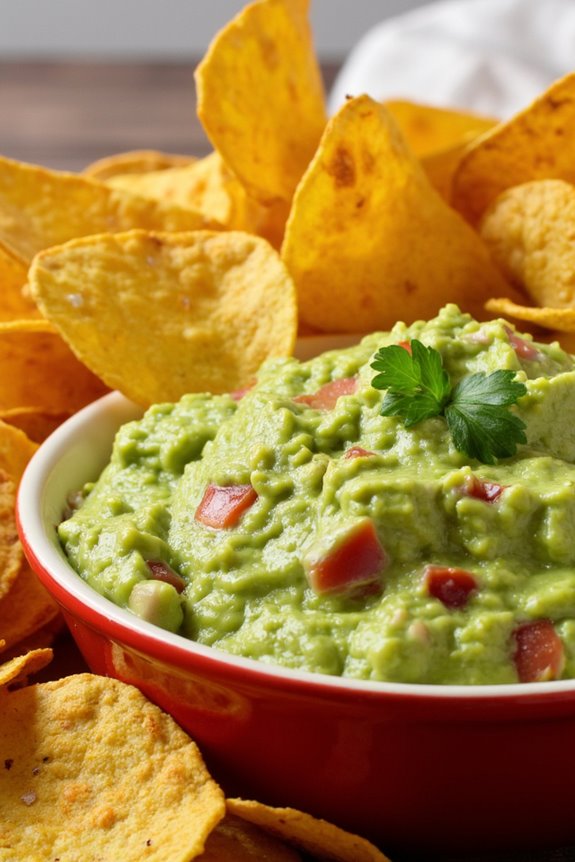
Guacamole is a classic South American dip that has gained popularity worldwide for its creamy texture and vibrant flavors. This dish isn’t only delicious but also packed with healthy fats from avocados, making it a nutritious choice for any snack or appetizer.
Paired with crispy plantain chips, it creates a delightful contrast that enhances the overall experience. Whether you’re hosting a gathering or simply enjoying a quiet night at home, this recipe is sure to impress your guests.
Plantain chips are a fantastic alternative to traditional tortilla chips, offering a unique flavor and crunch that pairs perfectly with guacamole. Preparing both the guacamole and plantain chips is simple and allows you to customize the flavor to your liking. You can adjust the spices in the guacamole or even experiment with the thickness of the plantain chips to achieve your desired texture.
This recipe serves 4-6 people, making it ideal for sharing with family and friends.
Ingredients:
- 3 ripe avocados
- 1 medium onion, finely chopped
- 2 tomatoes, diced
- 1-2 jalapeño peppers, finely chopped (adjust for spice preference)
- Juice of 2 limes
- Salt, to taste
- Fresh cilantro, chopped (optional)
- 2 green plantains
- Vegetable oil, for frying
- Salt, for seasoning plantain chips
Cooking Instructions:
- Prepare the Guacamole: Start by slicing the avocados in half, removing the pits, and scooping the flesh into a mixing bowl. Use a fork or a potato masher to mash the avocados to your desired level of creaminess. You can leave it chunky or make it smooth.
- Mix in Other Ingredients: Add the finely chopped onion, diced tomatoes, and chopped jalapeño peppers to the mashed avocado. Squeeze the juice of two limes over the mixture to add freshness and prevent browning. Season with salt to taste and mix everything until well combined. If you like, add chopped cilantro for an extra layer of flavor.
- Prepare the Plantain Chips: Peel the green plantains by cutting off the ends and making a slit down the side of the plantain. Gently remove the peel. Slice the plantains into thin rounds, about 1/8 inch thick for crispier chips.
- Fry the Plantain Chips: In a large skillet, heat vegetable oil over medium-high heat. Once the oil is hot, carefully add the plantain slices in batches, ensuring not to overcrowd the pan. Fry until they turn golden brown and crispy, about 2-4 minutes per side. Use a slotted spoon to remove them from the oil and place them on paper towels to drain excess oil.
- Season the Chips: While the plantain chips are still warm, sprinkle them with salt to enhance their flavor. Allow them to cool slightly before serving.
- Serve Together: Transfer the guacamole to a serving bowl and arrange the plantain chips on a platter. Serve immediately for the best taste and texture.
Extra Tips:
When making guacamole, always use ripe avocados for the best flavor and creaminess. To keep guacamole from browning, make sure to cover it with plastic wrap, pressing it directly onto the surface of the dip to minimize air exposure.
If you’re short on time, you can prepare the guacamole a few hours in advance and store it in the refrigerator. When frying plantain chips, make sure the oil is sufficiently hot to achieve that perfect crunch.
Enjoy your guacamole with plantain chips as a fantastic snack or a crowd-pleasing appetizer!
Brazilian Coxinhas
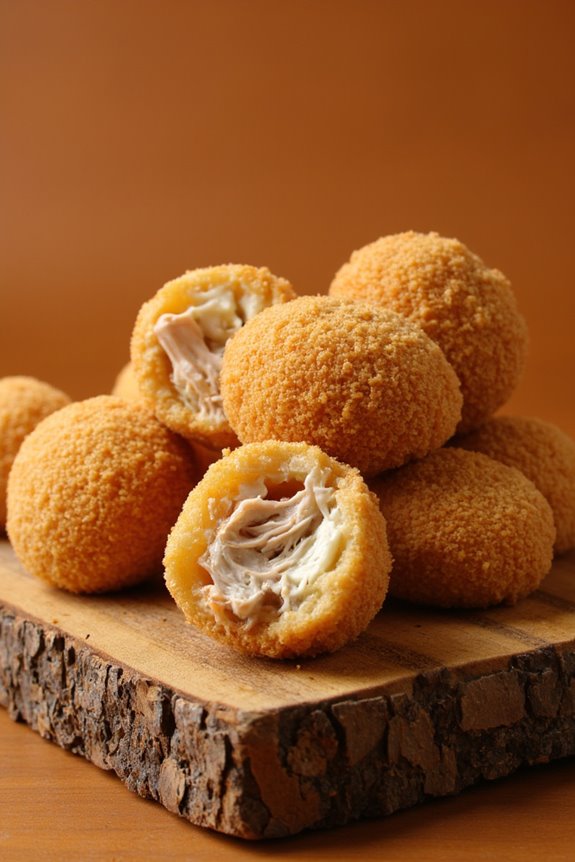
Coxinhas are a beloved Brazilian snack known for their delightful combination of flavors and textures. These savory treats are made from a tender dough that encases a rich, shredded chicken filling, all molded into a shape reminiscent of a drumstick. Traditionally served at parties or as street food, coxinhas are often enjoyed with a spicy dipping sauce, making them a perfect appetizer or snack for gatherings.
The preparation of coxinhas might seem challenging at first, but once you understand the process, you’ll find it quite manageable. The key to achieving the perfect coxinha lies in the dough, which should be soft yet sturdy enough to hold the filling without breaking. With a crispy outer layer and a moist interior, these tasty bites are sure to impress your family and friends.
Ingredients (Serves 4-6 people)
- 2 cups of all-purpose flour
- 1 cup of chicken broth (preferably homemade)
- 1 tablespoon of unsalted butter
- 1 pound of cooked chicken, shredded
- 1 small onion, finely chopped
- 2 cloves of garlic, minced
- 1 teaspoon of paprika
- 1 teaspoon of salt
- 1/2 teaspoon of black pepper
- 1/4 cup of cream cheese
- 1/2 cup of breadcrumbs
- Oil for frying
Cooking Instructions
- Prepare the Filling: In a skillet over medium heat, melt some butter and sauté the chopped onion until it becomes translucent. Add the minced garlic, paprika, salt, and black pepper, cooking for an additional minute. Stir in the shredded chicken and cream cheese until well combined. Allow it to cool while you prepare the dough.
- Make the Dough: In a saucepan, bring the chicken broth to a boil. Once boiling, add the butter and salt. Gradually stir in the flour, mixing continuously until the dough forms a ball and pulls away from the sides of the pan. Remove it from heat and let it cool slightly. Once it’s manageable, knead the dough for a couple of minutes until smooth.
- Shape the Coxinhas: Divide the dough into small, golf ball-sized portions. Flatten each piece in your palm, creating a small circle. Place about a tablespoon of the chicken filling in the center, then fold the edges over the filling and pinch to seal, forming a teardrop shape.
- Bread the Coxinhas: Set up a breading station with a bowl of beaten eggs and a plate of breadcrumbs. Dip each coxinha in the egg wash, then roll it in the breadcrumbs until fully coated. Repeat this for all coxinhas.
- Fry the Coxinhas: In a large pot or deep skillet, heat oil over medium-high heat. Once the oil is hot (around 350°F or 175°C), carefully drop in the coxinhas in batches, frying until they’re golden brown and crispy. This should take about 4-5 minutes per batch. Remove them with a slotted spoon and place on paper towels to drain excess oil.
- Serve: Allow the coxinhas to cool for a few minutes before serving. Enjoy them with your favorite dipping sauce, such as a spicy mayo or ketchup.
Extra Tips
When preparing Brazilian coxinhas, ensuring the filling is well-seasoned is essential, as this will enhance the overall flavor of the snack. You can also experiment with different fillings, such as cheese or vegetables, to cater to various tastes.
Additionally, if you don’t want to fry them, coxinhas can be baked in the oven for a healthier alternative; just brush them with some oil before baking to achieve a golden color. Finally, for extra crunch, double coat the coxinhas in breadcrumbs by repeating the egg wash and breadcrumb process before frying.