

When I think of the vibrant flavors of Peru, my heart warms with the thought of hearty veggie dishes that celebrate plant-forward eating. These recipes are more than just meals; they tell stories through nourishing ingredients and tantalizing taste. From refreshing quinoa salads to comforting stews, there’s truly something for everyone. I’m thrilled to share these ten recipes that honor both tradition and flavor. I can’t wait for you to discover the delightful surprises they hold.
Quinoa Salad With Avocado and Lime
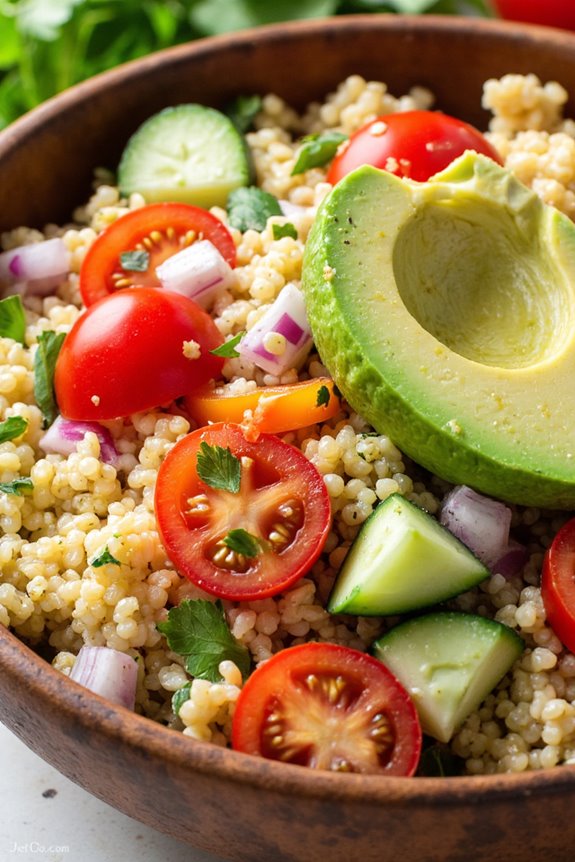
Quinoa Salad with Avocado and Lime is a revitalizing and nutritious dish that showcases the vibrant flavors of Peruvian cuisine. This salad not only highlights quinoa, a staple grain in Peru, but also incorporates creamy avocado, zesty lime, and a colorful array of vegetables. Perfect for a light lunch or as a side dish at dinner, this salad is packed with protein and healthy fats, making it a wholesome choice for anyone looking to embrace a plant-based diet.
The combination of textures and flavors in this salad is simply delightful. With the nutty quinoa as a base, the fresh crunch of vegetables, and the creamy richness of avocado, each bite is a celebration of fresh ingredients. The lime juice not only adds brightness but also enhances the overall taste, making this dish a favorite for gatherings or meal prep. Enjoy this vibrant quinoa salad as a delicious way to incorporate more vegetables into your diet.
Ingredients (Serves 4-6):
- 1 cup quinoa
- 2 cups vegetable broth or water
- 1 ripe avocado, diced
- 1 cup cherry tomatoes, halved
- 1 medium cucumber, diced
- 1 bell pepper (red or yellow), diced
- 1/4 cup red onion, finely chopped
- 1/4 cup fresh cilantro, chopped
- Juice of 2 limes
- 2 tablespoons olive oil
- Salt and pepper to taste
Cooking Instructions:
- Rinse the Quinoa: Begin by rinsing the quinoa under cold water in a fine mesh strainer. This helps to remove the natural coating called saponin, which can impart a bitter taste. Rinse for about a minute until the water runs clear.
- Cook the Quinoa: In a medium saucepan, combine the rinsed quinoa and vegetable broth (or water). Bring it to a boil over medium-high heat. Once boiling, reduce the heat to low, cover the saucepan, and let it simmer for about 15-20 minutes, or until the liquid is absorbed and the quinoa is fluffy. Remove from heat and let it sit covered for 5 minutes.
- Prepare the Vegetables: While the quinoa is cooking, wash and chop the vegetables. Dice the avocado, cucumber, and bell pepper, and halve the cherry tomatoes. Finely chop the red onion and cilantro, and set everything aside.
- Fluff the Quinoa: After the quinoa has rested, remove the lid and fluff it with a fork. This will help separate the grains and prevent it from becoming mushy.
- Combine Ingredients: In a large mixing bowl, combine the fluffed quinoa, diced avocado, cherry tomatoes, cucumber, bell pepper, red onion, and cilantro.
- Dress the Salad: In a small bowl, whisk together the lime juice, olive oil, salt, and pepper. Pour this dressing over the quinoa and vegetables, and gently toss to combine, ensuring everything is evenly coated.
- Chill and Serve: Let the salad sit for at least 10 minutes to allow the flavors to meld. You can serve it immediately or chill it in the refrigerator for 30 minutes for a revitalizing cold salad.
Extra Tips:
For an added crunch, consider tossing in some toasted nuts or seeds, such as pumpkin seeds or walnuts. You can also customize this salad by adding other ingredients like black beans for extra protein or corn for sweetness. If you prefer a spicier kick, a dash of chili flakes or diced jalapeño can elevate the flavors further.
This salad isn’t only delicious on its own but can also be used as a filling for wraps or served alongside grilled meats. Enjoy your vibrant and nutritious quinoa salad!
Peruvian Stuffed Peppers
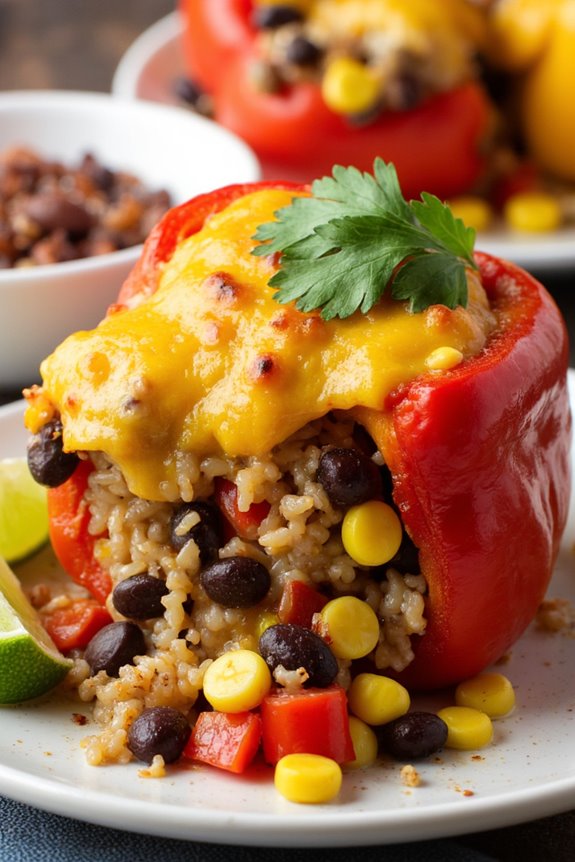
Peruvian Stuffed Peppers, known as “Pimientos Rellenos,” are a delightful and colorful dish that combines the sweetness of bell peppers with a delicious filling that embodies the rich flavors of Peruvian cuisine. This dish typically features a mixture of rice, vegetables, and spices, all packed into vibrant bell peppers, which are then baked to perfection.
The combination of tastes and textures creates a satisfying meal that isn’t only visually appealing but also hearty and nutritious. This recipe is perfect for serving 4-6 people and can be enjoyed as a main course or as a side dish. The stuffed peppers can be easily customized with different fillings based on personal preference or seasonal ingredients.
The warmth and comfort of this dish make it an ideal choice for gatherings or a cozy family dinner. Let’s explore the ingredients and the step-by-step process to create these delectable Peruvian Stuffed Peppers.
Ingredients (Serves 4-6):
- 4 large bell peppers (any color)
- 1 cup cooked rice (white or brown)
- 1 cup black beans, drained and rinsed
- 1 cup corn kernels (fresh or frozen)
- 1 medium onion, finely chopped
- 2 cloves garlic, minced
- 1 teaspoon ground cumin
- 1 teaspoon smoked paprika
- 1 teaspoon salt
- ½ teaspoon black pepper
- 1 cup diced tomatoes (canned or fresh)
- ½ cup shredded cheese (cheddar or queso fresco)
- 2 tablespoons olive oil
- Fresh cilantro, chopped (for garnish)
- Lime wedges (for serving)
Cooking Instructions:
- Prepare the Bell Peppers: Preheat your oven to 375°F (190°C). Cut the tops off the bell peppers and remove the seeds and membranes. Lightly brush the outside of the peppers with olive oil and place them upright in a baking dish. Set aside.
- Sauté the Vegetables: In a large skillet, heat 2 tablespoons of olive oil over medium heat. Add the chopped onion and sauté for about 3-4 minutes until softened. Add the minced garlic and continue to cook for another 1-2 minutes until fragrant.
- Mix the Filling: To the skillet, add the cooked rice, black beans, corn, diced tomatoes, ground cumin, smoked paprika, salt, and black pepper. Stir everything together and let it cook for an additional 5 minutes, allowing the flavors to meld.
- Stuff the Peppers: Carefully spoon the filling mixture into each of the prepared bell peppers, packing it in gently. Leave a little space at the top to allow for any expansion during cooking.
- Add Cheese and Bake: Sprinkle shredded cheese generously over the top of each stuffed pepper. Cover the baking dish with aluminum foil and bake in the preheated oven for 30 minutes. After 30 minutes, remove the foil and bake for another 10-15 minutes, until the peppers are tender and the cheese is bubbly and golden.
- Garnish and Serve: Once done, remove the peppers from the oven and let them cool for a few minutes. Garnish with chopped fresh cilantro and serve with lime wedges on the side for an extra burst of flavor.
Extra Tips:
When preparing Peruvian Stuffed Peppers, feel free to experiment with the filling ingredients based on what you have on hand. You can add chopped zucchini, carrots, or even avocado for added creaminess.
If you prefer a spicier kick, consider adding diced jalapeños or a splash of hot sauce into the filling. Additionally, these stuffed peppers can be made ahead of time and stored in the refrigerator, making them a convenient choice for meal prep.
Simply reheat in the oven before serving, and enjoy the delicious flavors of this hearty dish!
Vegan Aji De Gallina

Aji De Gallina is a traditional Peruvian dish that’s known for its rich and creamy sauce, originally made with chicken. However, with a few clever substitutions, we can create a delightful vegan version that maintains the essence of this beloved dish while making it suitable for plant-based diets. This Vegan Aji De Gallina recipe uses jackfruit as a substitute for chicken, providing a similar texture while soaking up all the flavorful ingredients. The result is a hearty, comforting dish that’s perfect for family gatherings or any occasion.
This dish isn’t just a feast for the stomach but also for the eyes, with its vibrant yellow sauce and colorful toppings. Served over rice with a side of boiled potatoes and olives, this meal is sure to impress even the most dedicated meat lovers. Let’s explore this fulfilling recipe that serves 4-6 people, guaranteeing everyone leaves the table satisfied.
Ingredients (Serves 4-6):
- 2 cans of young green jackfruit in water or brine, drained and rinsed
- 2 tablespoons olive oil
- 1 medium onion, finely chopped
- 3 cloves garlic, minced
- 1 cup unsweetened plant-based milk (such as almond or soy)
- 2-3 tablespoons aji amarillo paste (or yellow bell pepper puree for a milder version)
- 1/2 cup nutritional yeast
- 1/2 cup walnuts, chopped
- 2 tablespoons soy sauce or tamari
- Salt and pepper to taste
- 4 servings of cooked rice
- 2-3 boiled potatoes, sliced
- Black olives and fresh parsley for garnish
Cooking Instructions:
- Prepare the Jackfruit: Begin by preparing the jackfruit. Using your hands or two forks, shred the jackfruit pieces into smaller chunks, mimicking the texture of pulled chicken. Set aside to marinate in a bowl with soy sauce, salt, and pepper to enhance the flavor.
- Sauté the Aromatics: In a large skillet, heat the olive oil over medium heat. Add the chopped onion and sauté for about 5-7 minutes until the onion becomes translucent. Next, add the minced garlic and cook for an additional 1-2 minutes, stirring frequently to prevent burning.
- Cook the Jackfruit: Once the onions and garlic are fragrant, add the shredded jackfruit to the skillet. Sauté for about 5 minutes, allowing it to absorb the flavors from the aromatics. Stir occasionally to guarantee even cooking.
- Create the Sauce: In a separate bowl, combine the plant-based milk, aji amarillo paste, nutritional yeast, and chopped walnuts. Mix well until smooth. Pour this mixture into the skillet with the jackfruit, stirring to combine. Reduce the heat to low and let it simmer for about 10 minutes, allowing the sauce to thicken and the jackfruit to soak up the flavors.
- Serve the Dish: Once the sauce has thickened, taste and adjust the seasoning with more salt, pepper, or a splash of soy sauce if needed. Serve the Vegan Aji De Gallina over a bed of cooked rice, accompanied by sliced boiled potatoes. Garnish with black olives and fresh parsley for a pop of color and flavor.
Extra Tips:
When preparing Vegan Aji De Gallina, consider using fresh aji amarillo peppers if you can find them, as they add a wonderful depth of flavor. If you prefer a spicier kick, you can add a pinch of cayenne pepper or red pepper flakes to the sauce. Additionally, this dish can be made in advance and reheats beautifully, making it a great option for meal prepping or entertaining.
Potato and Spinach Causa
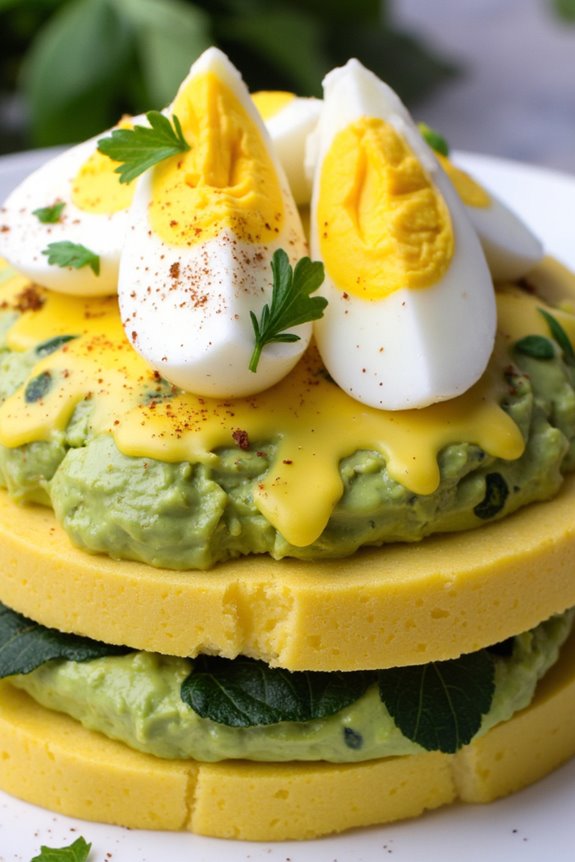
Causa is a classic Peruvian dish that showcases the versatility of potatoes, particularly the yellow variety native to the region. This delightful dish isn’t only visually appealing but also packed with flavors, thanks to the creamy avocado and the savory filling of spinach.
Traditionally served cold, Potato and Spinach Causa makes for an excellent appetizer or a light meal, perfect for gatherings or family dinners. Each layer of this dish is a harmonious blend of textures and tastes that highlight the rich culinary heritage of Peru.
This dish is both nutrient-dense and satisfying, as it combines the wholesomeness of potatoes with the freshness of spinach. The vibrant colors of the ingredients are sure to impress your guests, making it a great choice for special occasions or simply a delicious way to enjoy a veggie-packed meal.
With its unique flavor profile, Potato and Spinach Causa is a wonderful introduction to the world of Peruvian cuisine.
Ingredients (serving size: 4-6 people)
- 1 kg yellow potatoes
- 1 cup fresh spinach
- 1 ripe avocado
- 1/2 cup mayonnaise
- 1 tablespoon lime juice
- 1 tablespoon aji amarillo paste (or yellow chili paste)
- Salt to taste
- Black pepper to taste
- 2 hard-boiled eggs (for garnish)
- Fresh parsley or cilantro (for garnish)
Cooking Instructions
- Prepare the Potatoes: Start by boiling the yellow potatoes in a large pot of salted water until they’re tender, which should take about 20-25 minutes. Once cooked, drain the potatoes and let them cool. This step is vital as the texture of the potatoes will be key to achieving a smooth causa.
- Make the Potato Mixture: Peel the cooled potatoes and mash them until smooth. In a mixing bowl, combine the mashed potatoes with aji amarillo paste, lime juice, salt, and black pepper. Mix well until all ingredients are fully integrated. This flavorful potato mixture will serve as the base for your causa.
- Prepare the Spinach Filling: While the potatoes are cooling, wash the fresh spinach thoroughly. In a skillet, sauté the spinach over medium heat until wilted, which should take about 2-3 minutes. Remove from heat and let it cool before chopping it finely.
- Combine Spinach with Avocado: In a separate bowl, mash the ripe avocado and mix it with mayonnaise, adding a pinch of salt and black pepper to taste. Then, fold in the chopped spinach. This creamy mixture will be the filling layer in your causa.
- Assemble the Causa: Take a mold or a rectangular dish, and layer half of the potato mixture at the bottom, pressing it down to create an even layer. Spread the spinach and avocado filling over this layer, ensuring it’s evenly distributed. Finally, top with the remaining potato mixture, pressing down gently to compact it.
- Chill and Serve: Cover the assembled causa with plastic wrap and refrigerate for at least 1 hour to allow the flavors to meld and the dish to set. When ready to serve, carefully invert the causa onto a serving platter. Garnish with sliced hard-boiled eggs and fresh parsley or cilantro for a pop of color.
Extra Tips
When preparing Potato and Spinach Causa, it’s important to use yellow potatoes, as their natural creaminess contributes to the dish’s texture.
You can adjust the spice level by varying the amount of aji amarillo paste according to your taste preferences. Additionally, feel free to experiment with other fillings, such as diced vegetables or cheese, to create your own variations of this classic dish.
Always remember to let the causa chill thoroughly, as it enhances the flavors and makes it easier to slice and serve. Enjoy your culinary adventure into Peruvian cuisine!
Choclo Con Queso
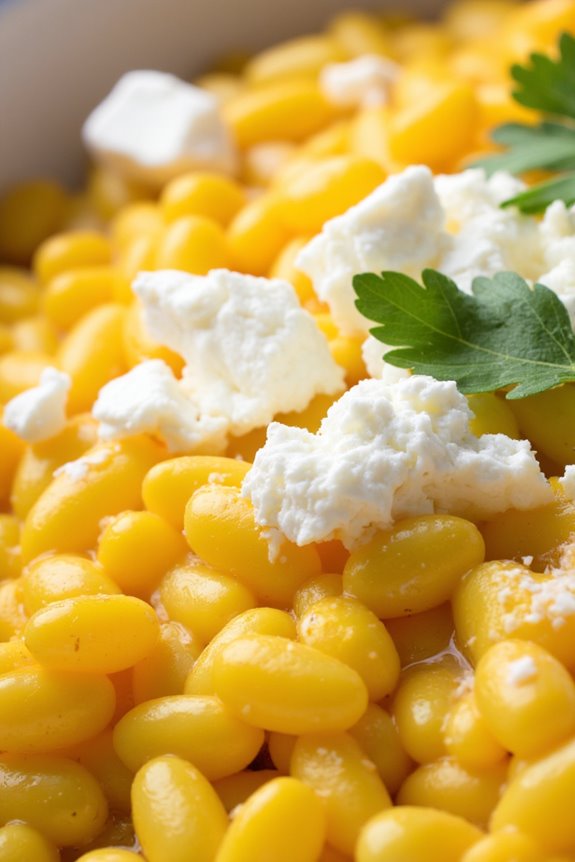
Choclo Con Queso is a delightful Peruvian dish that features fresh corn, known as choclo, paired with creamy cheese. This simple yet satisfying dish is a staple in Peruvian cuisine, often enjoyed as a snack or a side dish. The combination of the sweet, tender kernels of corn with the rich, salty flavor of cheese creates a mouthwatering experience that highlights the natural ingredients of Peru.
Preparing Choclo Con Queso is a straightforward process that allows the vibrant flavors of the ingredients to shine through. Traditionally, this dish uses fresh, large kernels of Andean corn, but you can substitute with sweet corn if necessary. Whether you’re hosting a gathering or simply indulging in a comforting meal, Choclo Con Queso is bound to please both your palate and your guests.
Ingredients (serves 4-6):
- 4-6 ears of fresh choclo (or sweet corn)
- 200 grams of queso fresco (or feta cheese as a substitute)
- 1 tablespoon of butter
- Salt to taste
- Fresh cilantro for garnish (optional)
Cooking Instructions:
- Prepare the Corn: Start by husking the choclo (or sweet corn) and removing the silk. Rinse the ears under cold water to clean them. If using fresh choclo, you may need to break the ears in half for easier cooking and serving.
- Boil the Corn: Fill a large pot with water and add a pinch of salt. Bring the water to a boil over high heat. Once boiling, add the prepared choclo. Reduce the heat to medium and let it simmer for about 20-25 minutes, or until the kernels are tender. If using sweet corn, reduce the cooking time to about 10-15 minutes.
- Drain and Butter: After the corn has cooked, carefully drain the water. Return the corn to the pot and add the butter. Toss the corn gently to coat it evenly with the melted butter. Adjust the salt to taste based on your preference.
- Add the Cheese: Crumble the queso fresco over the warm corn. Verify that the cheese is evenly distributed so that every bite has the creamy goodness of cheese. Allow the heat from the corn to slightly soften the cheese.
- Serve and Garnish: Transfer the Choclo Con Queso to a serving dish. If desired, sprinkle some fresh cilantro on top for a pop of color and added flavor. Serve warm as a side dish or a satisfying snack.
Extra Tips:
For an enhanced flavor profile, consider adding a sprinkle of chili powder or a drizzle of olive oil before serving. If you can’t find queso fresco, feta cheese works as a great alternative, providing a similar salty and creamy texture.
You can also experiment with different herbs or spices to suit your taste preferences. Enjoy your Choclo Con Queso with a rejuvenating drink to balance the richness of the dish!
Vegetable Anticuchos
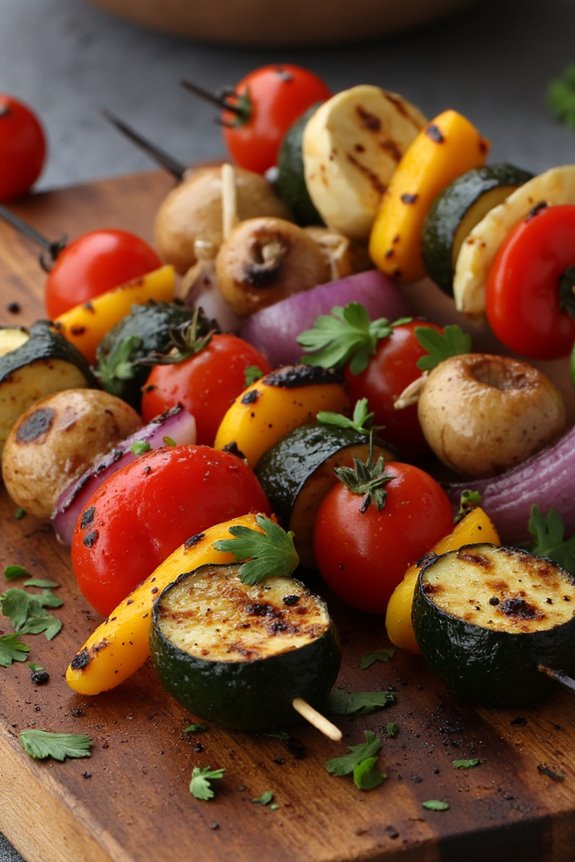
Vegetable Anticuchos are a delightful twist on the traditional Peruvian skewers, which are usually made with meat. These veggie versions incorporate a vibrant mix of seasonal vegetables, marinated in a flavorful blend of spices and herbs, then grilled to perfection. The result is a smoky, charred dish that captures the essence of Peruvian street food while being entirely plant-based.
This recipe is perfect for a summer barbecue or a cozy dinner, offering a satisfying meal that can please both vegetarians and carnivores alike.
Marinating the vegetables is key to infusing them with flavor. Common vegetables used for anticuchos include bell peppers, zucchini, mushrooms, and red onions, but feel free to experiment with your favorites. After marinating, the veggies are threaded onto skewers and grilled until they reach that perfect balance of tenderness and smokiness.
Serve these Vegetable Anticuchos with a side of spicy aji sauce for an extra kick, and enjoy a taste of Peru right in your own home.
Ingredients (serving size: 4-6 people)
- 2 zucchini, sliced into thick rounds
- 2 bell peppers (any color), cut into large chunks
- 1 red onion, cut into wedges
- 8 oz mushrooms, whole or halved
- 1 cup cherry tomatoes
- 1/4 cup olive oil
- 3 tablespoons soy sauce
- 2 tablespoons red wine vinegar
- 2 cloves garlic, minced
- 1 teaspoon smoked paprika
- 1 teaspoon cumin
- 1/2 teaspoon black pepper
- Salt, to taste
- Skewers (wooden or metal)
Cooking Instructions
- Prepare the Marinade: In a mixing bowl, combine the olive oil, soy sauce, red wine vinegar, minced garlic, smoked paprika, cumin, black pepper, and salt. Whisk the ingredients together until well blended to create a savory marinade.
- Marinate the Vegetables: Add the sliced zucchini, bell peppers, red onion, mushrooms, and cherry tomatoes to the bowl with the marinade. Toss the vegetables gently to guarantee they’re evenly coated. Cover the bowl with plastic wrap and let it marinate for at least 30 minutes at room temperature, or up to 2 hours in the refrigerator for more flavor.
- Prepare the Skewers: If using wooden skewers, soak them in water for 30 minutes to prevent burning on the grill. After marinating, take the skewers and thread the marinated vegetables onto them, alternating between different types for visual appeal and variety.
- Preheat the Grill: Heat your grill to medium-high heat. Make sure the grates are clean and lightly oiled to prevent sticking.
- Grill the Skewers: Place the vegetable skewers on the grill and cook for about 10-15 minutes, turning occasionally, until the vegetables are tender and have nice grill marks. Be cautious not to overcook them; they should maintain a bit of crunch.
- Serve: Remove the skewers from the grill and let them cool for a couple of minutes. Serve hot with a side of aji sauce or your preferred dipping sauce for a delightful finish.
Extra Tips
When making Vegetable Anticuchos, feel free to customize the vegetables based on seasonal availability or personal preference. Adding a pinch of cayenne pepper to the marinade can give it an extra kick, while using fresh herbs like cilantro or parsley as a garnish can enhance the presentation.
For a smoky flavor without a grill, you can also roast the skewers in the oven at 400°F for about 20 minutes, turning halfway through. Enjoy your culinary adventure into Peruvian cuisine!
Peruvian Bean Stew

Peruvian Bean Stew, known locally as “Frejoles,” is a beloved dish that embodies the essence of comfort food in Peruvian cuisine. This savory stew is packed with protein-rich beans, fresh vegetables, and aromatic spices, making it a hearty option for vegetarians and meat-lovers alike. The combination of spices creates a warm, rich flavor that’s perfect for any occasion, whether you’re hosting a family dinner or enjoying a cozy meal on a chilly evening.
What sets this stew apart is its versatility; you can easily customize it by adding different vegetables or spices according to your taste. It’s often served with a side of rice or crusty bread, perfect for soaking up the delicious broth. Not only is this dish satisfying, but it also brings a taste of Peru right to your kitchen. Gather your ingredients and prepare to delight your senses with this delicious, hearty stew.
Ingredients (Serves 4-6):
- 2 cups dried white beans (such as cannellini or navy beans)
- 1 medium onion, diced
- 3 cloves garlic, minced
- 2 medium carrots, diced
- 1 red bell pepper, diced
- 1 medium zucchini, diced
- 1 cup corn kernels (fresh or frozen)
- 4 cups vegetable broth
- 1 tablespoon olive oil
- 1 teaspoon ground cumin
- 1 teaspoon paprika
- 1 teaspoon dried oregano
- Salt and pepper to taste
- Fresh cilantro, chopped (for garnish)
- Lime wedges (for serving)
Cooking Instructions:
- Soak the Beans: Start by soaking the dried beans overnight in a large bowl of water. This helps to soften the beans and reduce cooking time. If you’re short on time, you can also use the quick-soak method by boiling the beans for 2 minutes, then letting them sit for an hour.
- Prepare the Vegetables: While the beans are soaking, dice the onion, garlic, carrots, red bell pepper, and zucchini. This will make certain all the ingredients are ready to be added to the stew once the beans are cooked.
- Cook the Beans: Drain the soaked beans and transfer them to a large pot. Cover with fresh water and bring to a boil. Reduce to a simmer and cook for about 1 to 1.5 hours, or until the beans are tender. Drain and set aside.
- Sauté the Aromatics: In a large pot, heat the olive oil over medium heat. Add the diced onions and garlic, sautéing until the onions become translucent, about 5 minutes. This step enhances the flavor base of the stew.
- Add the Vegetables: Stir in the carrots, red bell pepper, and zucchini. Cook for another 5-7 minutes, allowing the vegetables to soften slightly while stirring occasionally.
- Combine Ingredients: Add the cooked beans, corn, vegetable broth, cumin, paprika, oregano, and season with salt and pepper. Stir well to combine all ingredients.
- Simmer the Stew: Bring the stew to a gentle boil, then reduce the heat to low and let it simmer for 20-30 minutes. This allows the flavors to meld together and the stew to thicken slightly.
- Serve: Once the stew has reached your desired consistency, taste and adjust the seasoning if necessary. Serve hot, garnished with fresh cilantro and lime wedges on the side for an added burst of flavor.
Extra Tips: When preparing Peruvian Bean Stew, feel free to experiment with the types of beans and vegetables you use based on what you have available. You can add sweet potatoes or greens like kale for added nutrition.
If you prefer a spicier kick, consider adding a diced jalapeño or a pinch of cayenne pepper during the sautéing process. Additionally, letting the stew sit for a few hours or even overnight enhances the flavors, making it a great dish for meal prep!
Lomo Saltado With Tofu
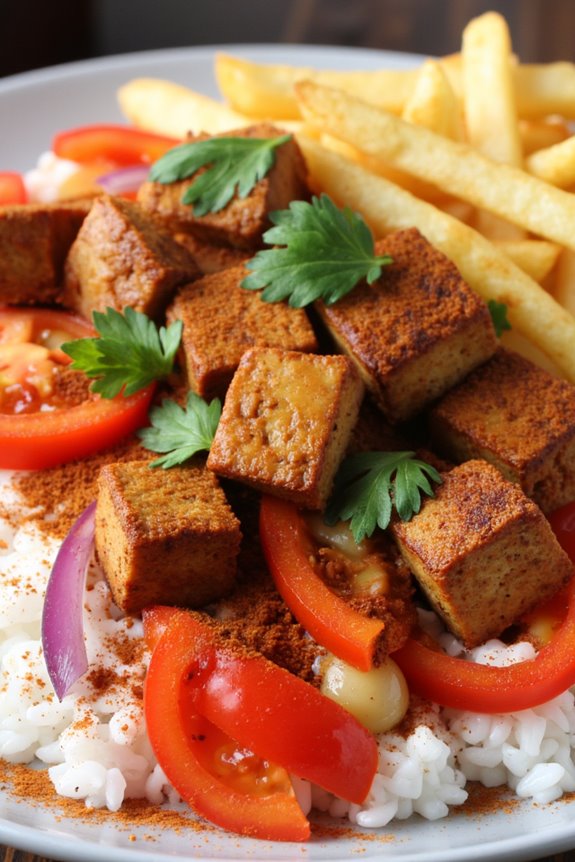
Lomo Saltado is a classic Peruvian dish that beautifully blends the rich flavors of stir-fried beef with the freshness of vegetables, all while embracing a hint of Asian influence. However, in this vegetarian version, tofu takes the spotlight as a protein-packed substitute, soaking up the savory marinade and adding a delightful texture to the dish.
The combination of soy sauce, tomatoes, onions, and spices creates a tantalizing stir-fry that’s both hearty and satisfying, perfect for those looking to enjoy a delicious and nutritious meal without meat. This dish is typically served with a side of rice and fries, making it a filling and delightful option for dinner gatherings or family meals.
The vibrant colors and aromatic scents will surely entice everyone at the table. Whether you’re a long-time fan of Peruvian cuisine or trying it for the first time, Lomo Saltado With Tofu is an exciting way to experience the flavors of Peru while keeping it plant-based.
Ingredients (Serves 4-6):
- 1 block (14 oz) firm tofu, drained and pressed
- 2 tablespoons soy sauce
- 2 tablespoons red wine vinegar
- 1 tablespoon olive oil
- 1 medium red onion, sliced
- 2 medium tomatoes, sliced into wedges
- 1 red bell pepper, sliced
- 2 cloves garlic, minced
- 1 teaspoon ground cumin
- 1 teaspoon paprika
- Salt and black pepper to taste
- 1 cup cooked white rice
- 2 cups French fries (store-bought or homemade)
- Fresh cilantro or parsley for garnish
Cooking Instructions:
- Prepare the Tofu: Start by cutting the pressed tofu into bite-sized cubes. In a bowl, mix together the soy sauce and red wine vinegar. Add the tofu cubes to the marinade and let them soak for at least 15 minutes, turning occasionally to guarantee even absorption of flavors.
- Sauté the Tofu: Heat the olive oil in a large frying pan or wok over medium-high heat. Once the oil is hot, add the marinated tofu cubes. Cook until they’re golden brown on all sides, about 6-8 minutes. Remove the tofu from the pan and set it aside on a plate.
- Cook the Vegetables: In the same pan, add the sliced red onion and garlic. Sauté for about 2-3 minutes until the onion becomes translucent. Next, add the sliced tomatoes and red bell pepper. Continue to stir-fry for another 3-4 minutes until the vegetables are tender but still crisp.
- Combine Ingredients: Once the vegetables are cooked, return the tofu to the pan. Sprinkle the ground cumin, paprika, salt, and black pepper over the mixture. Gently toss everything together to combine, allowing the flavors to meld for an additional 2-3 minutes.
- Serve: To serve, place a generous scoop of the tofu stir-fry over a bed of cooked white rice, and add a portion of French fries on the side. Garnish with fresh cilantro or parsley for an added pop of color and flavor.
Extra Tips:
When preparing Lomo Saltado With Tofu, don’t hesitate to customize the vegetables based on your preferences or seasonal availability. Zucchini, carrots, or snap peas can make great additions.
Additionally, for an extra kick of flavor, consider adding a splash of hot sauce or a sprinkle of chili flakes to spice things up. Make sure to keep the heat high when stir-frying to achieve that perfect sear and keep the vegetables crisp! Enjoy your delicious and heartwarming Peruvian-inspired meal.
Sweet Potato and Chickpea Tacos
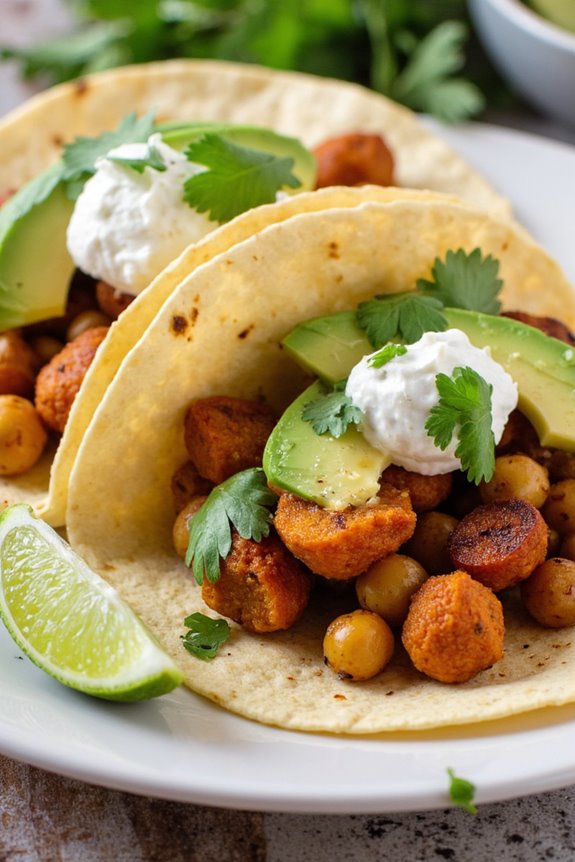
Sweet Potato and Chickpea Tacos are a vibrant and hearty dish that showcases the delightful flavors of Peruvian cuisine. This recipe combines the natural sweetness of roasted sweet potatoes with the earthy notes of chickpeas, all wrapped in a warm tortilla. Each bite is a celebration of texture and taste, making it a perfect meal for both vegetarians and meat-lovers alike.
These tacos aren’t only delicious but also packed with nutrients, guaranteeing that you feel satisfied and energized. This dish is incredibly versatile, allowing for various toppings and sauces to suit your personal preferences.
Whether you choose to add a zesty avocado crema, fresh cilantro, or a squeeze of lime, each topping enhances the flavors and elevates the overall experience. Gather your friends and family for a fun taco night, where everyone can customize their own tacos to their liking!
Ingredients (Serves 4-6):
- 2 large sweet potatoes, peeled and diced
- 1 can (15 oz) chickpeas, drained and rinsed
- 2 tablespoons olive oil
- 1 teaspoon ground cumin
- 1 teaspoon smoked paprika
- 1/2 teaspoon chili powder
- Salt and pepper to taste
- 8 small corn tortillas
- 1 avocado, sliced
- Fresh cilantro, chopped (for garnish)
- Lime wedges (for serving)
Cooking Instructions:
- Preheat the Oven: Start by preheating your oven to 425°F (220°C). This will guarantee that the sweet potatoes roast perfectly, becoming tender and caramelized.
- Prepare the Sweet Potatoes and Chickpeas: In a large mixing bowl, combine the diced sweet potatoes and chickpeas. Drizzle with olive oil, and sprinkle with cumin, smoked paprika, chili powder, salt, and pepper. Toss everything together until the sweet potatoes and chickpeas are well coated in the spices.
- Roast the Mixture: Spread the sweet potato and chickpea mixture evenly on a baking sheet lined with parchment paper. Roast in the preheated oven for about 25-30 minutes, or until the sweet potatoes are fork-tender and starting to brown. Be sure to stir the mixture halfway through for even cooking.
- Warm the Tortillas: While the sweet potato and chickpeas are roasting, warm the corn tortillas. You can do this by wrapping them in aluminum foil and placing them in the oven for the last 10 minutes of roasting or by heating them in a dry skillet over medium heat for about 30 seconds on each side.
- Assemble the Tacos: Once the sweet potato and chickpeas are ready, remove them from the oven. To assemble the tacos, place a generous spoonful of the mixture onto each tortilla. Top with avocado slices and garnish with fresh cilantro.
- Serve with Lime: Serve the tacos immediately with lime wedges on the side. Squeeze fresh lime juice over the tacos for an extra burst of flavor.
Extra Tips:
For added depth of flavor, consider marinating the chickpeas in lemon juice and spices for 30 minutes before roasting. You can also experiment with different toppings such as pickled red onions or a dollop of Greek yogurt for creaminess.
If you prefer a bit of heat, add sliced jalapeños or a drizzle of your favorite hot sauce. Enjoy your Sweet Potato and Chickpea Tacos with your favorite sides, like a light salad or corn on the cob, for a complete meal!
Fruit-Infused Chicha Morada
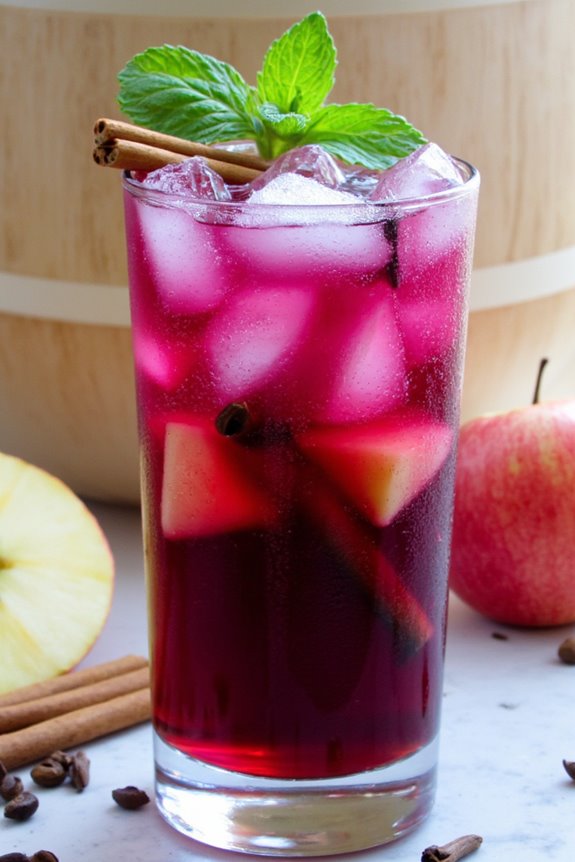
Chicha Morada is a traditional Peruvian beverage made from purple corn, which isn’t only vibrant in color but also rich in antioxidants. This invigorating drink is infused with a medley of fruits and spices, making it a delightful combination of sweet and tangy flavors. Perfect for warm days or festive gatherings, Fruit-Infused Chicha Morada brings a taste of Peru to your table and is a fantastic way to introduce this unique beverage to your friends and family.
The preparation of Chicha Morada is relatively simple, but the infusion of fruits makes it truly special. While the base of the drink is purple corn, adding fruits like pineapple and lime enhances its flavor profile. It’s a versatile drink that can be enjoyed on its own or paired with a variety of dishes. In this recipe, we’ll guide you through making this colorful and invigorating beverage that serves 4-6 people.
Ingredients:
- 1 cup of dried purple corn
- 8 cups of water
- 1 cup of pineapple chunks (fresh or canned)
- 1 medium-sized apple, cored and diced
- 1 medium-sized lime, juiced
- 1 cup of sugar (or to taste)
- 1 stick of cinnamon
- 4-5 cloves
- Ice cubes (for serving)
- Mint leaves (for garnish, optional)
Cooking Instructions:
- Boil the Purple Corn: In a large pot, add the dried purple corn and 8 cups of water. Bring it to a boil over medium-high heat. Once boiling, reduce the heat to low and let it simmer for about 30 minutes. This step is essential as it allows the corn to release its rich color and flavor into the water.
- Strain the Mixture: After simmering, strain the liquid using a fine mesh sieve or cheesecloth into a large pitcher or bowl, discarding the corn. This will leave you with a beautiful purple base for your drink.
- Add Fruits and Spices: To the strained liquid, add the pineapple chunks, diced apple, lime juice, cinnamon stick, and cloves. Stir well to combine. The fruits and spices will infuse their flavors into the chicha as it cools.
- Sweeten the Drink: Gradually add sugar to the mixture to taste. Stir thoroughly until the sugar is fully dissolved. This is the time to adjust the sweetness according to your preference.
- Chill and Serve: Let the chicha cool to room temperature, then refrigerate it for at least 2 hours. Serve over ice cubes in tall glasses, and garnish with fresh mint leaves if desired.
Extra Tips: For an even more invigorating twist, you can experiment with different fruits such as berries or citrus slices. Additionally, feel free to adjust the sweetness level by adding more or less sugar, depending on your taste. This drink can also be made ahead of time and stored in the refrigerator for 2-3 days, making it a convenient option for parties or gatherings. Enjoy your homemade Fruit-Infused Chicha Morada!