

When I think of Brazilian cuisine, vibrant flavors and fresh ingredients come to mind. I’ve rounded up a collection of light veggie recipes that make healthy eating a breeze. From hearty salads to delightful grain bowls, each dish brings a unique twist to your table. Curious about how these recipes can transform your meals? Let’s explore the delicious possibilities together.
Brazilian Black Bean Salad
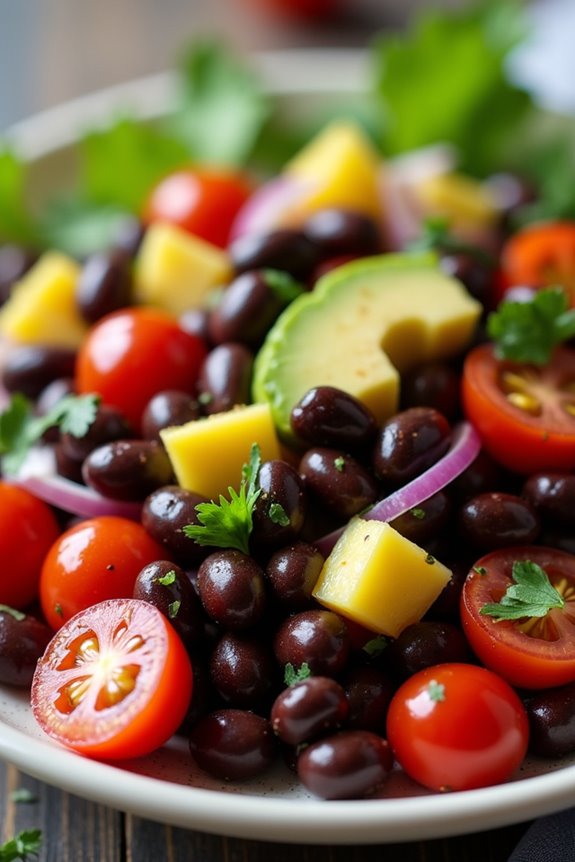
Brazilian Black Bean Salad is a vibrant and nutritious dish that brings together the rich flavors of black beans, fresh vegetables, and zesty dressing. This salad isn’t only easy to make but also packed with protein and fiber, making it a perfect addition to any meal or a standalone dish for a light lunch or dinner.
The combination of beans, bell peppers, corn, and herbs creates a revitalizing salad that’s both satisfying and delicious. This salad is often enjoyed during festive gatherings and is a staple in Brazilian cuisine. The black beans serve as the base, providing a hearty texture, while the colorful vegetables add crunch and freshness.
Whether served as a side or a main dish, Brazilian Black Bean Salad is sure to be a hit. Plus, it’s easily customizable to suit your taste preferences by adding or omitting ingredients as desired.
Ingredients (Serves 4-6)
- 1 can (15 oz) black beans, drained and rinsed
- 1 cup corn (fresh, frozen, or canned)
- 1 red bell pepper, diced
- 1 yellow bell pepper, diced
- 1 small red onion, finely chopped
- 1 cup cherry tomatoes, halved
- 1 avocado, diced
- 1/4 cup fresh cilantro, chopped
- 1/4 cup olive oil
- 2 tablespoons red wine vinegar
- 1 tablespoon lime juice
- 1 teaspoon cumin
- Salt and pepper to taste
Cooking Instructions
- Prepare the Ingredients: Start by gathering all your ingredients. Rinse and drain the black beans to remove excess sodium and preserve their freshness. Chop the bell peppers, red onion, and cherry tomatoes, and dice the avocado just before mixing to prevent browning.
- Mix the Salad Base: In a large mixing bowl, combine the black beans, corn, diced bell peppers, red onion, and cherry tomatoes. Gently toss these ingredients together to guarantee even distribution.
- Make the Dressing: In a separate small bowl, whisk together the olive oil, red wine vinegar, lime juice, cumin, salt, and pepper. This dressing will add flavor and moisture to the salad.
- Combine and Toss: Pour the dressing over the salad mixture and gently toss everything together. Be careful not to mash the avocado. You want all the ingredients to be well-coated with the dressing for maximum flavor.
- Add Avocado and Cilantro: Fold in the diced avocado and chopped cilantro last. This helps to keep the avocado intact and the cilantro fresh, enhancing the salad’s vibrant appearance.
- Chill and Serve: For the best flavor, let the salad sit for at least 30 minutes in the refrigerator before serving. This allows the flavors to meld together. Serve chilled or at room temperature.
Extra Tips
To elevate your Brazilian Black Bean Salad, consider adding some diced jalapeños for a spicy kick or crumbled feta cheese for a creamy texture.
This salad can also be made a day in advance; just wait to add the avocado until you’re ready to serve to keep it fresh. If you’re looking for a heartier meal, you can serve this salad over a bed of quinoa or alongside grilled meats. Enjoy experimenting with different ingredients to make this dish your own!
Grilled Vegetable Skewers With Chimichurri
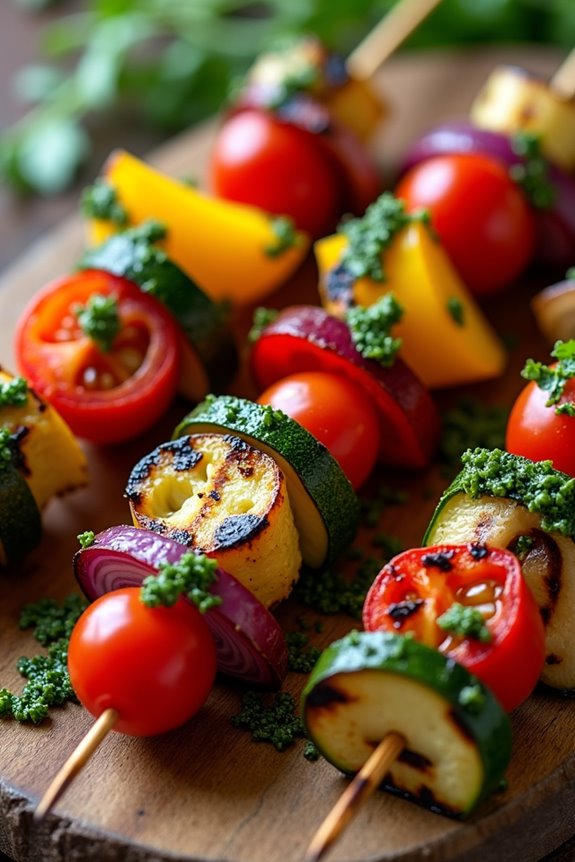
Grilled Vegetable Skewers with Chimichurri is a vibrant and flavorful dish that showcases the best of summer produce. This Brazilian-inspired recipe combines a variety of colorful vegetables, which are marinated and then grilled to perfection. The addition of chimichurri sauce, a zesty herb condiment originating from Argentina, elevates the flavors and adds a rejuvenating kick.
It’s a perfect dish for summer barbecues, picnics, or simply enjoying a healthy meal outdoors. These skewers aren’t only visually appealing but also versatile, allowing you to mix and match your favorite vegetables. The grilling process caramelizes the natural sugars in the vegetables, enhancing their sweetness and creating a delightful texture.
Serve these skewers as a main dish or a side, and they’re sure to be a hit with both vegetarians and meat-lovers alike.
Ingredients (Serves 4-6):
- 1 red bell pepper, cut into 1-inch pieces
- 1 yellow bell pepper, cut into 1-inch pieces
- 1 zucchini, sliced into thick rounds
- 1 red onion, cut into wedges
- 8 cherry tomatoes
- 8 ounces mushrooms, halved
- 2 tablespoons olive oil
- Salt and pepper to taste
- 1 teaspoon garlic powder
- 1 teaspoon smoked paprika
- Fresh parsley, for garnish (optional)
Chimichurri Sauce:
- 1 cup fresh parsley, chopped
- 1/2 cup olive oil
- 1/4 cup red wine vinegar
- 4 garlic cloves, minced
- 1 teaspoon red pepper flakes (optional)
- Salt and pepper to taste
Cooking Instructions:
- Prepare the Chimichurri Sauce: In a medium bowl, combine chopped parsley, olive oil, red wine vinegar, minced garlic, red pepper flakes (if using), salt, and pepper. Mix well and set aside to allow the flavors to meld. This sauce can be made ahead of time and stored in the refrigerator.
- Marinate the Vegetables: In a large bowl, toss the cut vegetables (red and yellow bell peppers, zucchini, red onion, cherry tomatoes, and mushrooms) with olive oil, salt, pepper, garlic powder, and smoked paprika. Verify that all vegetables are well coated with the marinade. Let them sit for at least 15 minutes to absorb the flavors.
- Prepare the Skewers: Preheat your grill to medium-high heat. If you’re using wooden skewers, soak them in water for about 30 minutes to prevent burning. Thread the marinated vegetables onto the skewers, alternating between different types for a colorful presentation.
- Grill the Skewers: Place the vegetable skewers on the hot grill. Cook for about 10-15 minutes, turning occasionally until the vegetables are tender and have nice grill marks. The exact cooking time may vary depending on the size of the vegetable pieces and the heat of your grill.
- Serve: Once grilled, remove the skewers from the grill and transfer them to a serving platter. Drizzle the chimichurri sauce over the skewers, and garnish with fresh parsley if desired. Serve immediately and enjoy the vibrant flavors!
Extra Tips: For added depth of flavor, consider marinating the vegetables for a longer period, even overnight. This will enhance the taste considerably.
You can also experiment with different vegetables based on your preference or what’s in season, such as eggplant or asparagus. Finally, if you want to make it a complete meal, pair these skewers with a side of rice or a fresh salad for a delightful and nutritious feast.
Quinoa and Roasted Vegetable Bowl
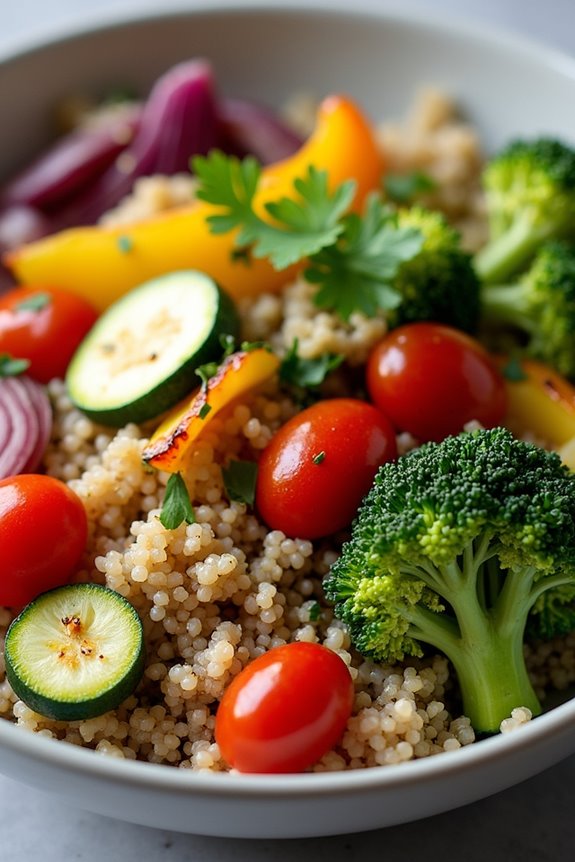
The Quinoa and Roasted Vegetable Bowl is a vibrant and nutritious dish that combines hearty quinoa with an array of colorful roasted vegetables, making it a perfect meal for any time of the year. This recipe showcases the natural flavors of the vegetables while providing a satisfying protein boost from the quinoa. This bowl isn’t only visually appealing but also packed with essential nutrients, making it a healthy choice for lunch or dinner.
In addition to being healthy, this dish is incredibly versatile. You can customize the roasted vegetables to your liking or based on seasonal availability. Whether you prefer zucchini, bell peppers, or seasonal root vegetables, feel free to mix and match. This bowl can also serve as a great base for additional toppings, such as avocado, nuts, or a drizzle of your favorite dressing, enhancing both flavor and texture.
Ingredients (serving size: 4-6 people):
- 1 cup quinoa
- 2 cups vegetable broth (or water)
- 1 medium zucchini, diced
- 1 medium bell pepper (any color), diced
- 1 red onion, diced
- 1 cup cherry tomatoes, halved
- 2 cups broccoli florets
- 3 tablespoons olive oil
- 1 teaspoon garlic powder
- 1 teaspoon paprika
- Salt and pepper to taste
- Fresh parsley or cilantro for garnish (optional)
Cooking Instructions:
- Preheat the oven: Begin by preheating your oven to 425°F (220°C). This high temperature will help the vegetables roast quickly, enhancing their natural sweetness and flavors.
- Prepare the quinoa: Rinse the quinoa under cold water using a fine mesh strainer to remove any bitterness. In a medium saucepan, combine the rinsed quinoa and vegetable broth (or water). Bring it to a boil over medium heat, then reduce to a simmer, cover, and cook for about 15 minutes, or until the liquid has been absorbed and the quinoa is fluffy. Once cooked, remove it from heat and let it sit covered for 5 minutes before fluffing it with a fork.
- Chop the vegetables: While the quinoa is cooking, wash and chop your vegetables. Dice the zucchini, bell pepper, and red onion, and halve the cherry tomatoes. Confirm all vegetables are cut into similar sizes for even roasting.
- Roast the vegetables: On a large baking sheet, spread out the chopped vegetables in a single layer. Drizzle olive oil over the vegetables and sprinkle with garlic powder, paprika, salt, and pepper. Toss everything together to ascertain the vegetables are well-coated. Roast in the preheated oven for 20-25 minutes, or until the vegetables are tender and slightly caramelized, stirring halfway through for even cooking.
- Combine and serve: Once the quinoa and vegetables are ready, combine them in a large bowl. Gently mix until the vegetables are evenly distributed throughout the quinoa. Taste and adjust seasoning if necessary. Serve warm, garnished with fresh parsley or cilantro if desired.
Extra Tips:
For added flavor, consider marinating the vegetables in a mixture of olive oil, lemon juice, and herbs before roasting. This can enhance the overall taste of the dish.
Additionally, feel free to incorporate protein such as chickpeas or grilled tofu to elevate the meal further. Leftovers can be stored in an airtight container in the fridge for up to three days and reheated easily, making this dish a convenient option for meal prep!
Brazilian Spinach and Tomato Stir-Fry
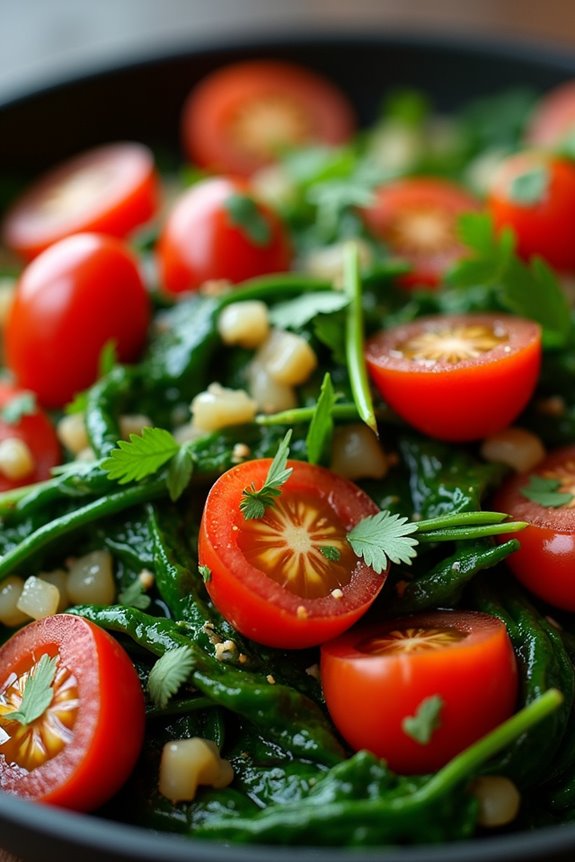
Brazilian Spinach and Tomato Stir-Fry is a vibrant and nutritious dish that highlights the fresh flavors of Brazil’s rich agricultural bounty. This simple yet satisfying recipe combines tender spinach with juicy tomatoes, creating a colorful medley that can be served as a delightful side or a light main course. The dish isn’t only quick to prepare but also packed with vitamins and minerals, making it an excellent addition to any meal.
Incorporating ingredients that are staples in Brazilian cuisine, this stir-fry is both flavorful and healthy. With the natural sweetness of tomatoes, the slight bitterness of spinach, and a hint of garlic, every bite is a burst of flavor. This dish is perfect for busy weeknights or as a complement to grilled meats, rice, or beans, showcasing the versatility of spinach in Brazilian cooking.
Ingredients for 4-6 Servings:
- 2 tablespoons olive oil
- 4 cloves garlic, minced
- 1 onion, chopped
- 6 cups fresh spinach, washed and roughly chopped
- 4 medium tomatoes, diced
- 1 teaspoon salt (to taste)
- 1/2 teaspoon black pepper (to taste)
- 1/2 teaspoon red pepper flakes (optional)
- 1 tablespoon lemon juice
- Fresh parsley or cilantro, chopped (for garnish)
Cooking Instructions:
- Heat the Oil: In a large skillet or wok, heat the olive oil over medium heat. Allow the oil to warm up for about 2 minutes, ensuring it’s hot enough to sauté the ingredients without burning.
- Sauté the Garlic and Onion: Add the minced garlic and chopped onion to the skillet. Sauté them for about 3-4 minutes, stirring frequently, until the onion becomes translucent and the garlic is fragrant but not browned.
- Add the Spinach: Gradually add the chopped spinach to the skillet. It may seem like a lot, but spinach wilts considerably. Stir the spinach into the mixture and cook for about 3-5 minutes until it has completely wilted down.
- Incorporate the Tomatoes: Once the spinach has wilted, add the diced tomatoes to the skillet. Stir everything together, cooking for an additional 4-5 minutes. The tomatoes should soften and release their juices, creating a lovely sauce.
- Season the Dish: Sprinkle salt, black pepper, and red pepper flakes (if using) over the mixture. Stir well to combine and adjust the seasoning according to your taste preferences.
- Finish with Lemon Juice: Remove the skillet from heat and drizzle the lemon juice over the stir-fry. This will add a revitalizing brightness to the dish. Toss everything together one last time.
- Garnish and Serve: Transfer the stir-fry to a serving platter or individual plates. Garnish with freshly chopped parsley or cilantro before serving.
Extra Tips:
For added flavor, consider including other vegetables such as bell peppers or zucchini that can be sautéed alongside the onion and garlic. If you want a richer taste, a sprinkle of grated parmesan cheese on top before serving can enhance the dish further.
This stir-fry is best enjoyed fresh but can be stored in the refrigerator for up to two days; simply reheat gently on the stovetop to preserve the texture of the spinach and tomatoes.
Farofa With Nuts and Vegetables
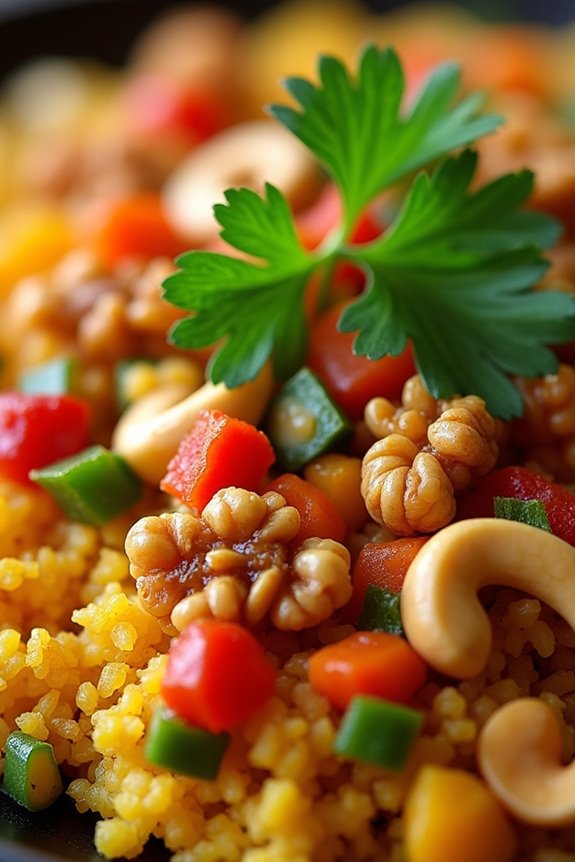
Farofa is a traditional Brazilian side dish made from toasted cassava flour, often served alongside meats and stews. In this version, we incorporate a variety of nuts and vegetables to enhance the flavor and add texture, making it a delicious and nutritious accompaniment for any meal. This dish not only brings a distinct taste of Brazil to your table but also provides a wonderful way to use up some of your favorite vegetables.
The beauty of Farofa lies in its versatility; you can customize it with whatever nuts or vegetables you have on hand. This recipe features a delightful mix of sautéed onions, bell peppers, and carrots, complemented by the crunch of walnuts and cashews. The result is a colorful and flavorful dish that can serve as a fantastic vegetarian main or a hearty side for any meat dish.
Ingredients (Serves 4-6)
- 2 cups cassava flour
- 1 medium onion, finely chopped
- 2 cloves garlic, minced
- 1 medium carrot, grated
- 1 red bell pepper, diced
- 1 green bell pepper, diced
- 1 cup walnuts, chopped
- 1 cup cashews, chopped
- 1/4 cup olive oil
- Salt and black pepper to taste
- Fresh parsley, chopped (for garnish)
Cooking Instructions
- Prepare the Ingredients: Before you start cooking, make certain all your ingredients are prepped. Finely chop the onion and garlic, grate the carrot, and dice the bell peppers. Chop the walnuts and cashews into smaller pieces if they’re whole.
- Sauté the Vegetables: In a large skillet, heat the olive oil over medium heat. Once hot, add the chopped onion and garlic. Sauté for about 3-4 minutes until the onions become translucent. This step helps to build the flavor base of the dish.
- Add the Carrots and Bell Peppers: Stir in the grated carrot and diced bell peppers. Cook for an additional 5-7 minutes, stirring occasionally, until the vegetables are tender. This will guarantee that the veggies are well-cooked and infused with the flavors of the sautéed onions and garlic.
- Toast the Nuts: Add the chopped walnuts and cashews to the skillet. Toast them for about 2-3 minutes, stirring frequently to prevent burning. The nuts will absorb the flavors and add an extra crunch to the Farofa.
- Incorporate the Cassava Flour: Gradually add the cassava flour to the skillet, stirring constantly to combine all the ingredients. Cook for another 5-7 minutes, allowing the flour to toast and gain a light golden color. This step is vital, as toasting the flour enhances its nutty flavor.
- Season and Serve: Once the Farofa reaches your desired texture and color, season it with salt and black pepper to taste. Remove from heat and garnish with freshly chopped parsley before serving. This adds a touch of color and freshness to the dish.
Extra Tips
When making Farofa, feel free to experiment with different nuts and vegetables based on your preferences or what you have available. You can add ingredients like corn, peas, or even cooked mushrooms for extra flavor and nutrition.
Adjust the amount of olive oil and seasoning according to your taste, and don’t hesitate to serve it with a squeeze of lime or lemon juice for a zesty finish. Enjoy your Brazilian culinary adventure!
Stuffed Bell Peppers With Rice and Beans
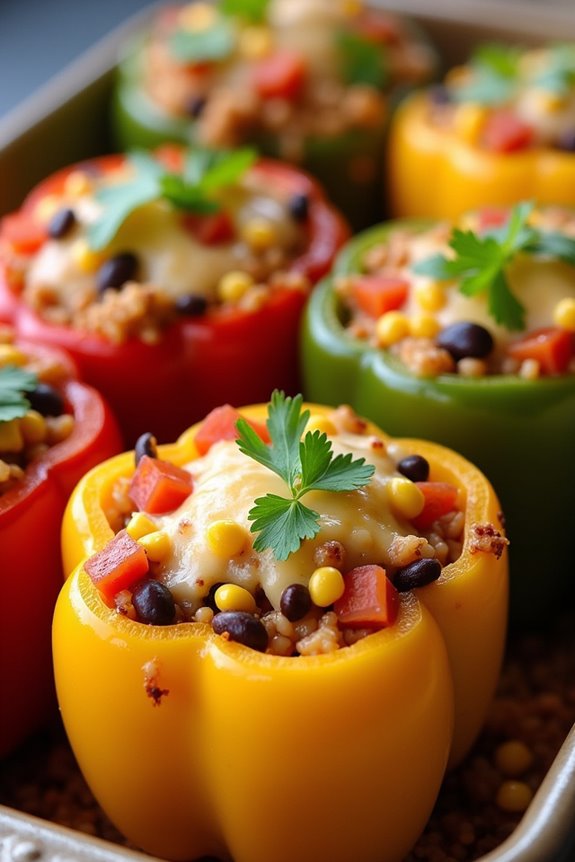
Stuffed bell peppers with rice and beans is a vibrant and nutritious dish that showcases the best of Brazilian cuisine. This hearty meal combines the earthy flavors of beans with fluffy rice, all encased in colorful bell peppers that not only add visual appeal but also a sweet crunch.
It’s a fantastic option for both vegetarians and those looking to incorporate more plant-based meals into their diet. Plus, the versatility of this dish allows you to adapt it to your personal taste and dietary needs, making it a staple in many households across Brazil.
This recipe isn’t only simple to prepare but also a great way to use up leftover rice or beans you might’ve on hand. As the peppers bake, they become tender and flavorful, absorbing the spices and seasonings from the filling. Serve them alongside a fresh salad or some crusty bread for a complete meal that’s sure to please both family and friends.
Let’s explore making these delicious stuffed bell peppers!
Ingredients (Serves 4-6):
- 4 large bell peppers (any color)
- 1 cup cooked rice (white or brown)
- 1 can (15 oz) black beans, rinsed and drained
- 1 small onion, diced
- 2 cloves garlic, minced
- 1 teaspoon ground cumin
- 1 teaspoon paprika
- 1 teaspoon chili powder
- Salt and pepper to taste
- 1 cup corn (fresh, frozen, or canned)
- 1 cup diced tomatoes (fresh or canned)
- 1 cup shredded cheese (optional, for topping)
- Fresh cilantro or parsley for garnish
Cooking Instructions:
1. Prepare the Peppers: Begin by preheating your oven to 375°F (190°C). While the oven is heating, wash the bell peppers, slice off the tops, and remove the seeds and membranes. Set the cleaned peppers aside.
2. Cook the Filling: In a large skillet over medium heat, add a splash of oil and sauté the diced onion until it becomes translucent, about 5 minutes. Add the minced garlic and cook for an additional minute until fragrant.
Stir in the cooked rice, black beans, corn, diced tomatoes, cumin, paprika, chili powder, salt, and pepper. Mix well and let it cook for 5-7 minutes, allowing the flavors to meld together.
3. Stuff the Peppers: Once the filling is ready, carefully spoon the rice and bean mixture into each bell pepper, packing it in gently. If you’re using cheese, sprinkle some on top of the filling. Place the stuffed peppers upright in a baking dish.
4. Bake the Peppers: Pour a small amount of water into the bottom of the baking dish to help steam the peppers while they cook. Cover the dish with aluminum foil and bake in the preheated oven for 25-30 minutes.
After this time, remove the foil and bake for an additional 10-15 minutes, or until the peppers are tender and the tops are slightly golden.
5. Serve: Once the peppers are cooked, remove them from the oven and let them cool for a few minutes. Garnish with fresh cilantro or parsley before serving. Enjoy your stuffed bell peppers with a side salad or crusty bread for a delightful meal.
Extra Tips:
For added flavor, consider incorporating other ingredients into your filling, such as diced zucchini, mushrooms, or even a splash of hot sauce for some heat.
If you prefer a vegan option, simply omit the cheese or use a plant-based alternative. These stuffed peppers can also be prepared ahead of time; just store them in the fridge before baking and pop them in the oven when you’re ready to serve.
Leftovers can be stored in an airtight container and reheated, making them perfect for meal prep!
Cauliflower Rice With Brazilian Spices

Cauliflower rice is a delicious and nutritious alternative to traditional rice, making it a fantastic choice for those looking to reduce their carb intake or simply add more vegetables to their meals.
This Brazilian-inspired version infuses the cauliflower rice with vibrant spices that are characteristic of the country’s cuisine, creating a delightful dish that pairs well with a variety of proteins or can be enjoyed on its own. The combination of garlic, cumin, and paprika, along with a touch of coconut milk, elevates the flavor profile, making it a perfect accompaniment for any meal.
This dish isn’t only easy to prepare but also quick to cook, making it an excellent option for busy weeknights or when entertaining guests. By using fresh ingredients and simple techniques, you can create a colorful and aromatic side dish that will impress anyone at your table.
Served warm, this cauliflower rice dish can be a standout component of a larger Brazilian feast or a wholesome addition to your everyday meals.
Ingredients (Serves 4-6)
- 1 large head of cauliflower
- 2 tablespoons olive oil
- 1 medium onion, finely chopped
- 3 cloves garlic, minced
- 1 teaspoon ground cumin
- 1 teaspoon smoked paprika
- 1/2 teaspoon cayenne pepper (optional, for heat)
- 1/2 cup coconut milk
- Salt, to taste
- Fresh cilantro, chopped (for garnish)
- Lime wedges (for serving)
Cooking Instructions
- Prepare the Cauliflower: Begin by removing the leaves and stem from the cauliflower head. Cut it into large florets and then pulse in a food processor until it reaches a rice-like texture. If you don’t have a food processor, you can grate the cauliflower using a box grater.
- Sauté the Aromatics: In a large skillet, heat the olive oil over medium heat. Add the chopped onion and cook for about 5 minutes, stirring occasionally, until it becomes translucent. This step helps to build a flavorful base for the dish.
- Add Garlic and Spices: Once the onions are ready, add the minced garlic, ground cumin, smoked paprika, and cayenne pepper (if using) to the skillet. Sauté for an additional 1-2 minutes until fragrant, making sure not to burn the garlic.
- Cook the Cauliflower Rice: Add the processed cauliflower rice to the skillet, stirring to combine with the onion and spice mixture. Cook for about 5-7 minutes, stirring frequently, until the cauliflower is tender but not mushy.
- Incorporate Coconut Milk: Pour in the coconut milk and season with salt to taste. Mix well to guarantee the cauliflower rice absorbs the creamy flavor. Allow it to cook for another 2-3 minutes, until heated through.
- Garnish and Serve: Once cooked, remove from heat and transfer the cauliflower rice to a serving dish. Garnish with fresh cilantro and serve with lime wedges on the side for an extra burst of flavor.
Extra Tips
When making cauliflower rice, it’s essential not to over-process the florets, as they can become mushy if too finely chopped.
For added texture, you can also mix in other diced vegetables like bell peppers or peas as you cook the cauliflower rice. Adjust the spices according to your taste preferences; if you prefer a milder flavor, reduce the amount of cayenne pepper or omit it altogether.
Finally, serving the dish with lime wedges allows each person to customize their serving with a zesty kick, enhancing the overall experience.
Zucchini Fritters With Salsa

Zucchini fritters are a delightful and versatile dish that can serve as a tasty appetizer, side, or even a main course for a light meal. These crispy, golden fritters are packed with fresh zucchini, herbs, and spices, making them a healthy and flavorful addition to any meal. Paired with a vibrant salsa, they offer an invigorating contrast that elevates their taste, making them perfect for gatherings or family dinners.
The preparation of zucchini fritters is quite simple, and they’re a great way to use up an abundance of zucchini during the summer months. With a few basic ingredients and some easy cooking techniques, you can whip up a batch of these delicious fritters that are certain to impress your guests. Serve them hot, alongside the salsa, for a delightful culinary experience that celebrates the flavors of Brazil.
Ingredients (Serves 4-6):
- 2 medium zucchinis, grated
- 1 teaspoon salt
- 1 cup all-purpose flour
- 1 large egg
- 1/2 cup grated Parmesan cheese
- 1/2 cup chopped fresh parsley
- 1/4 teaspoon black pepper
- 1/4 teaspoon garlic powder
- 1/4 cup vegetable oil (for frying)
For the Salsa:
- 1 cup diced tomatoes
- 1/4 cup diced red onion
- 1/4 cup chopped fresh cilantro
- 1 jalapeño, finely chopped (optional)
- Juice of 1 lime
- Salt to taste
Cooking Instructions:
- Prepare the Zucchini: Start by grating the zucchinis using a box grater or food processor. Once grated, place the zucchini in a clean kitchen towel and squeeze out the excess moisture. This step is vital, as it helps prevent the fritters from becoming soggy.
- Mix the Fritter Batter: In a large mixing bowl, combine the grated zucchini and salt. Let it sit for about 10 minutes to draw out more moisture. After that, add in the flour, egg, grated Parmesan cheese, chopped parsley, black pepper, and garlic powder. Mix everything together until well combined, making sure that the ingredients are evenly distributed.
- Heat the Oil: In a large skillet or frying pan, heat the vegetable oil over medium heat. You want enough oil to cover the bottom of the pan but not so much that the fritters will be deep-fried.
- Fry the Fritters: Once the oil is hot, scoop about 2 tablespoons of the zucchini mixture and carefully drop it into the skillet, flattening it slightly with the back of the spoon to form a patty. Repeat this process, making sure not to overcrowd the pan. Fry the fritters for about 3-4 minutes on each side until they’re golden brown and crispy.
- Prepare the Salsa: While the fritters are cooking, prepare the salsa by combining diced tomatoes, red onion, cilantro, jalapeño (if using), lime juice, and salt in a bowl. Mix well and set aside to allow the flavors to meld.
- Drain and Serve: Once the fritters are done frying, transfer them to a paper towel-lined plate to drain excess oil. Serve the zucchini fritters hot with the fresh salsa on the side.
Extra Tips:
To enhance the flavor of your zucchini fritters, feel free to experiment with different herbs and spices such as dill, chives, or even a pinch of cayenne pepper for some heat.
Additionally, you can make the batter ahead of time and refrigerate it for up to an hour before frying, which allows the flavors to deepen. If you’re concerned about frying, consider baking the fritters in a preheated oven at 400°F (200°C) for about 20 minutes, flipping them halfway through to guarantee they’re crisp on both sides.
Enjoy your cooking adventure with these tasty Brazilian-inspired zucchini fritters!
Sweet Potato and Kale Hash
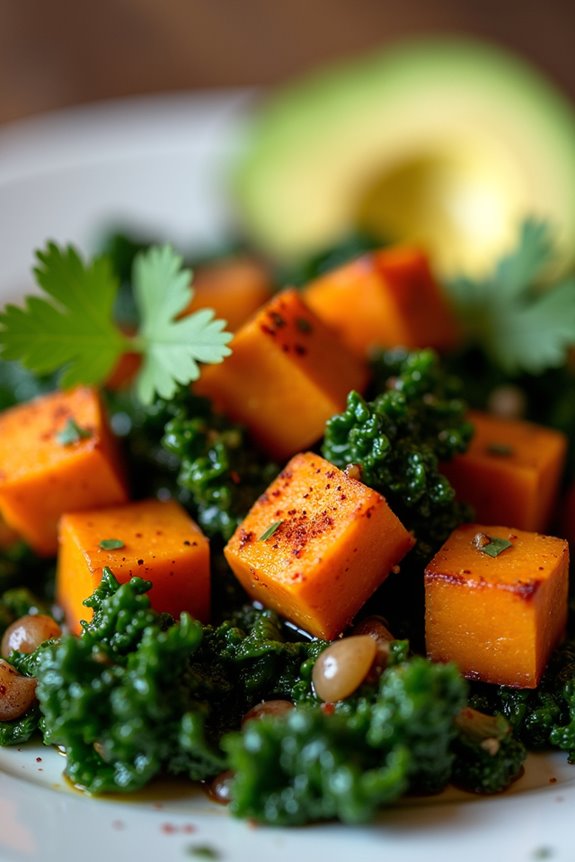
Sweet Potato and Kale Hash is a vibrant, nutritious dish that celebrates the robust flavors of Brazilian cuisine while providing a hearty meal that’s perfect for any time of the day. This dish combines the sweetness of roasted sweet potatoes with the earthy richness of sautéed kale, creating a delightful medley that’s both satisfying and healthy.
Whether you serve it for breakfast topped with a poached egg or as a side dish for dinner, this hash is bound to please. The simplicity of the ingredients allows the natural flavors to shine through, making it an easy yet impressive addition to your culinary repertoire.
Packed with vitamins, minerals, and fiber, this recipe isn’t only delicious but also a great way to incorporate more vegetables into your diet. With its colorful presentation and comforting texture, Sweet Potato and Kale Hash is a dish that brings warmth and joy to the table.
Ingredients (Serves 4-6):
- 2 large sweet potatoes, peeled and diced
- 1 tablespoon olive oil
- 1 onion, diced
- 3 cloves garlic, minced
- 1 teaspoon smoked paprika
- 1/2 teaspoon salt
- 1/4 teaspoon black pepper
- 1 bunch of kale, stems removed and leaves chopped
- 1/4 cup vegetable broth (or water)
- 2 tablespoons fresh cilantro, chopped (optional for garnish)
- 1 avocado, sliced (optional for serving)
Instructions:
- Prepare the Sweet Potatoes: Start by peeling and dicing the sweet potatoes into small, uniform pieces. This will guarantee they cook evenly. Set them aside while you prepare the other ingredients.
- Sauté the Onions and Garlic: In a large skillet, heat the olive oil over medium heat. Once hot, add the diced onion and sauté for about 5 minutes or until the onions become translucent. Stir in the minced garlic and cook for an additional minute until fragrant, being careful not to burn the garlic.
- Cook the Sweet Potatoes: Add the diced sweet potatoes to the skillet with the onions and garlic. Sprinkle in the smoked paprika, salt, and black pepper. Stir to combine all the ingredients, then cover the skillet with a lid. Cook for about 10-15 minutes, stirring occasionally until the sweet potatoes are tender and cooked through.
- Add the Kale: Once the sweet potatoes are tender, add the chopped kale to the skillet. Pour in the vegetable broth (or water) to help steam the kale. Stir everything together and cover the skillet again. Cook for another 5-7 minutes until the kale wilts and becomes tender.
- Final Adjustments: Taste the hash and adjust the seasoning if necessary. If you prefer a bit more spice, you can add a pinch of red pepper flakes. Once everything is well combined and cooked, remove from heat.
- Serve: Transfer the Sweet Potato and Kale Hash to a serving dish. If desired, garnish with fresh cilantro and serve with sliced avocado on the side for added creaminess.
Extra Tips:
When making Sweet Potato and Kale Hash, feel free to customize the dish according to your taste preferences. You can add other vegetables like bell peppers or mushrooms for added flavor.
Additionally, for a protein boost, consider adding cooked black beans or chickpeas. This dish is versatile and can be enjoyed warm or at room temperature, making it a great option for meal prep or a potluck. Enjoy your cooking!
Avocado and Tomato Salad With Lime Dressing
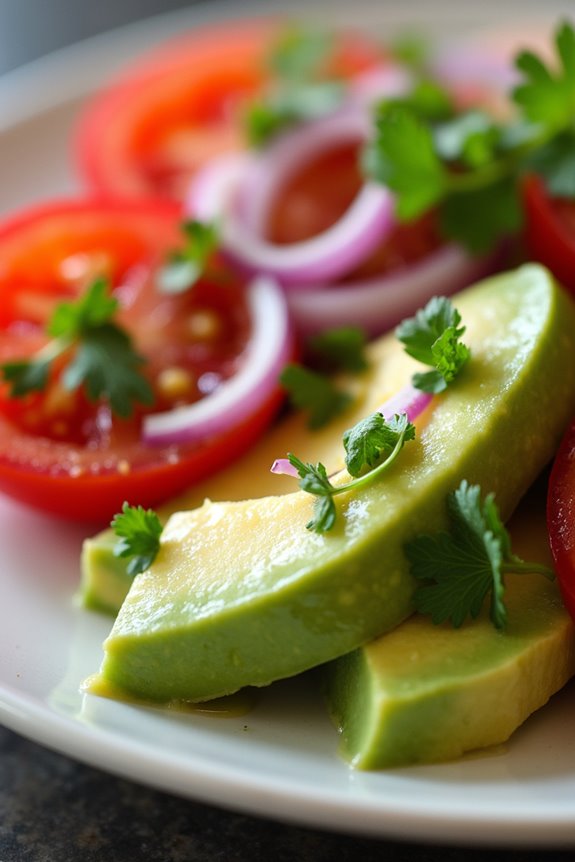
Avocado and Tomato Salad with Lime Dressing is a vibrant and invigorating dish that celebrates the flavors of fresh ingredients. This salad is perfect for warm days or as a side dish for barbecues and picnics. The creamy texture of ripe avocados pairs beautifully with the juicy, tangy tomatoes, while the zesty lime dressing ties everything together, creating a dish that’s both nutritious and delicious.
In addition to being a delightful salad, this recipe is incredibly simple to prepare. With minimal ingredients and preparation time, you can whip up an impressive dish that will please your palate and impress your guests. Whether you’re serving it as a light lunch or as part of a larger meal, this Avocado and Tomato Salad with Lime Dressing is sure to be a hit.
Ingredients (Serves 4-6):
- 2 ripe avocados
- 4 medium-sized tomatoes
- 1 small red onion
- 1/4 cup fresh cilantro leaves
- 3 tablespoons lime juice
- 2 tablespoons olive oil
- Salt and pepper to taste
Cooking Instructions:
- Prepare the Ingredients: Begin by washing the tomatoes thoroughly under cold water. Once clean, slice them into bite-sized pieces. Next, cut the avocados in half, remove the pit, and scoop the flesh out with a spoon. Cut the avocado into cubes. Peel and finely chop the red onion. Rinse the cilantro leaves and roughly chop them.
- Mix the Salad: In a large mixing bowl, combine the chopped tomatoes, avocado cubes, red onion, and cilantro. Gently toss the ingredients together to avoid mashing the avocados, making sure that they’re evenly distributed throughout the salad.
- Make the Dressing: In a small bowl, whisk together the lime juice, olive oil, salt, and pepper until well combined. This dressing will add a zesty flavor to the salad and help enhance the natural tastes of the fresh ingredients.
- Combine and Serve: Drizzle the lime dressing over the salad ingredients in the mixing bowl. Carefully toss everything together again to coat the salad evenly with the dressing. Taste and adjust seasoning if necessary. Serve immediately for the best flavor and texture.
Extra Tips:
When preparing Avocado and Tomato Salad with Lime Dressing, make sure to choose ripe avocados that yield slightly to gentle pressure. This guarantees a creamy texture in the salad.
Additionally, to prevent the avocado from browning, you can add it to the salad just before serving, or squeeze a bit of extra lime juice over the cut avocado. This salad is best enjoyed fresh, but if you have leftovers, store them in an airtight container in the fridge and consume them within a day for ideal taste.
Brazilian Vegetable Soup
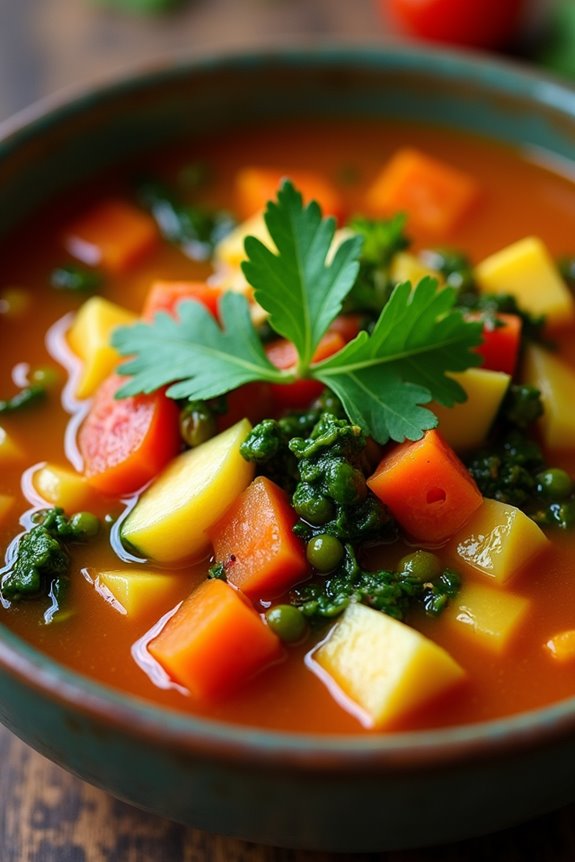
Brazilian Vegetable Soup, or “Sopa de Legumes,” is a hearty and nutritious dish that showcases the abundance of fresh produce found in Brazil. This vibrant soup isn’t only comforting but also provides a delightful way to enjoy a variety of vegetables, making it a perfect choice for those looking to incorporate more plant-based meals into their diet.
The combination of flavors and textures makes this soup a delicious option for any time of the year, whether as a starter, main course, or even a light meal. The beauty of Brazilian Vegetable Soup lies in its versatility; you can add whatever vegetables you have on hand, making it a great way to reduce food waste.
Traditionally, this soup is made with a selection of seasonal vegetables, herbs, and spices that create a warm and inviting aroma. Serve it with crusty bread or rice for a complete meal that will satisfy your taste buds and nourish your body.
Ingredients (Serves 4-6):
- 2 tablespoons olive oil
- 1 medium onion, diced
- 2 cloves garlic, minced
- 2 medium carrots, diced
- 1 medium zucchini, diced
- 1 bell pepper (any color), diced
- 1 cup green beans, trimmed and cut into 1-inch pieces
- 1 cup kale or spinach, chopped
- 4 cups vegetable broth
- 1 can (14 oz) diced tomatoes, with juices
- 1 teaspoon dried thyme
- 1 teaspoon paprika
- Salt and pepper to taste
- Fresh parsley or cilantro, for garnish
Cooking Instructions:
1. Sauté the Aromatics: In a large pot, heat the olive oil over medium heat. Add the diced onion and sauté for about 5 minutes, or until the onion becomes translucent.
Then, add the minced garlic and cook for an additional 1-2 minutes, stirring frequently to prevent burning.
2. Add the Vegetables: Stir in the diced carrots, zucchini, and bell pepper into the pot. Cook for about 5-7 minutes, stirring occasionally, until the vegetables begin to soften.
3. Incorporate the Green Beans: Add the green beans to the pot and continue to cook for another 3-4 minutes. This step helps to guarantee that all the vegetables are evenly cooked and infused with the flavors of the aromatics.
4. Pour in the Broth and Tomatoes: Carefully pour the vegetable broth and canned diced tomatoes (with juices) into the pot. Stir well to combine all ingredients. This will form the base of your soup and contribute to its rich flavor.
5. Season the Soup: Add the dried thyme, paprika, salt, and pepper to taste. Stir everything together and bring the soup to a gentle boil over medium-high heat.
6. Simmer: Once boiling, reduce the heat to low and let the soup Simmer uncovered for about 20-25 minutes. This allows the flavors to meld together and the vegetables to become tender.
7. Add Greens: In the last 5 minutes of cooking, stir in the chopped kale or spinach. This will add a fresh, vibrant element to the soup and enhance its nutritional value.
8. Serve: Once the vegetables are tender and the flavors are well combined, remove the soup from heat. Ladle the soup into bowls and garnish with fresh parsley or cilantro before serving.
Extra Tips:
For an extra layer of flavor, consider adding a splash of lemon juice or a dash of hot sauce just before serving. This brings a bright acidity that balances the richness of the soup.
Additionally, feel free to customize the recipe by incorporating your favorite vegetables or using leftover veggies from your fridge. This soup is perfect for meal prep and can be stored in the fridge for several days or frozen for later enjoyment.
Coconut and Mango Chia Pudding

Coconut and Mango Chia Pudding is a deliciously tropical dessert that brings together the creamy richness of coconut milk and the sweet, vibrant flavor of ripe mangoes. This dish isn’t only a feast for the eyes but also packed with nutrients, making it a perfect treat for health-conscious individuals.
Chia seeds, known for their high fiber and omega-3 fatty acid content, transform this pudding into a satisfying and wholesome option for breakfast, a snack, or a dessert.
Making this pudding is a breeze, requiring minimal ingredients and no cooking. The chia seeds absorb the coconut milk and create a delightful, pudding-like texture, while the mangoes add a burst of sweetness and freshness. Ideal for serving 4-6 people, this recipe is perfect for gatherings or meal prep, guaranteeing you have a nutritious treat ready to enjoy whenever you need it.
Ingredients (Serves 4-6):
- 1 cup coconut milk (canned or fresh)
- 1/2 cup almond milk (or any plant-based milk)
- 1/4 cup chia seeds
- 1/4 cup maple syrup (or honey)
- 1 teaspoon vanilla extract
- 2 ripe mangoes, diced
- Fresh mint leaves (for garnish, optional)
- Toasted coconut flakes (for garnish, optional)
Cooking Instructions:
- Combine the Base Ingredients: In a medium mixing bowl, combine the coconut milk, almond milk, maple syrup, and vanilla extract. Whisk them together until well blended. This will create a creamy and sweet base for your chia pudding.
- Add the Chia Seeds: Gradually stir in the chia seeds into the milk mixture. Make sure the seeds are evenly distributed to prevent clumping. Give it a gentle stir to guarantee all the seeds are submerged in the liquid.
- Let it Sit: Cover the mixture with plastic wrap or a lid and let it sit in the refrigerator for at least 2 hours, or ideally overnight. This resting period allows the chia seeds to absorb the liquid and swell up, creating a pudding-like consistency.
- Prepare the Mangoes: While the pudding is setting, peel and dice your ripe mangoes. Set them aside in a bowl. If you prefer, you can also blend half of the mangoes to create a mango puree to layer with the pudding.
- Assemble the Pudding: Once the chia pudding has set, take it out of the refrigerator. Spoon the pudding into serving bowls or glasses, layering it with the diced mangoes. If you made a mango puree, you can alternate layers for a visually appealing presentation.
- Garnish and Serve: Top each serving with fresh mint leaves and toasted coconut flakes for added texture and flavor. Enjoy your Coconut and Mango Chia Pudding chilled.
Extra Tips:
For the best flavor and texture, use ripe mangoes that are sweet and juicy. If you want to add a little extra zing, consider adding a squeeze of lime juice to the mangoes before garnishing. This will enhance the tropical flavor profile of the dish.
Additionally, feel free to experiment with other fruits like berries or bananas for variations on this pudding. Remember to store any leftovers in an airtight container in the refrigerator for up to 3 days, and stir well before serving again.