

When I stumbled upon Ocopa sauce, I was instantly hooked by its creamy texture and lively flavors. This Peruvian gem can bring any dish to life, whether it’s roasted potatoes or grilled shrimp. I’ve tried out a variety of recipes, each one highlighting the sauce’s incredible versatility and depth. If you’re eager to add some zest to your meals, these 14 rich recipes will transform simple ingredients into something special. Let’s discover the delightful possibilities together.
Classic Ocopa Sauce for Roasted Potatoes
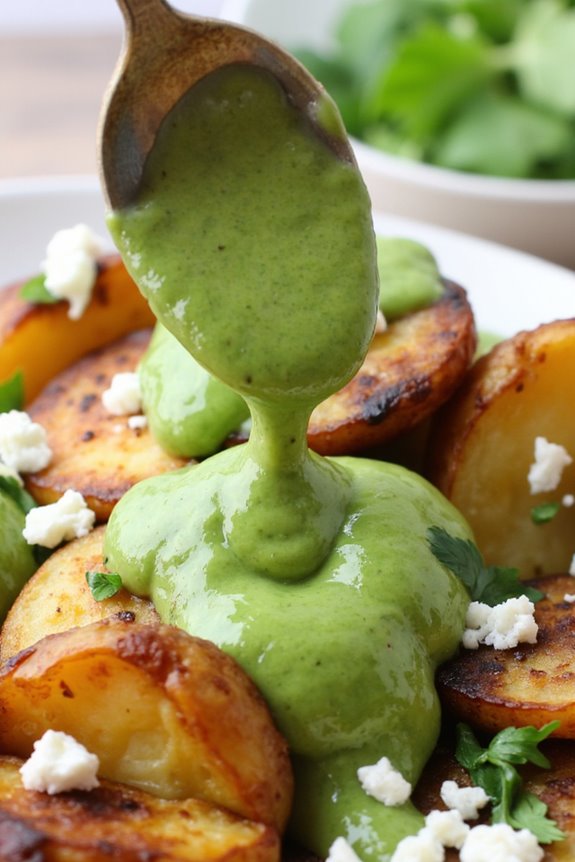
Ocopa sauce is a vibrant and flavorful Peruvian condiment that perfectly complements roasted potatoes, transforming a simple dish into a culinary delight. The sauce is typically made with fresh herbs, nuts, and spices, resulting in a creamy and zesty flavor that enhances the earthy taste of the potatoes.
This recipe for Classic Ocopa Sauce for Roasted Potatoes not only brings authentic Peruvian flavors to your table but also offers a unique way to enjoy a beloved comfort food. The preparation of this dish involves making the ocopa sauce from scratch, which is easy and quick, and then roasting the potatoes until they’re golden and crispy.
The combination of the rich, herby sauce with the tender potatoes creates a delightful experience for the palate. Whether you’re hosting a family dinner or simply want to treat yourself to a delicious meal, this recipe is sure to impress.
Ingredients (Serving size: 4-6 people)
- 2 lbs of baby potatoes
- 2 tablespoons of vegetable oil
- Salt, to taste
- 1 cup of fresh cilantro leaves
- 1/2 cup of roasted peanuts
- 2-3 fresh green chilies (adjust to taste)
- 1 garlic clove
- 1/2 cup of crumbled queso fresco or feta cheese
- 1/2 cup of evaporated milk
- 1 tablespoon of lime juice
- 1/4 teaspoon of cumin
- Black pepper, to taste
Cooking Instructions
- Preheat the Oven: Begin by preheating your oven to 400°F (200°C). This temperature is perfect for roasting the potatoes, allowing them to become crispy on the outside while remaining tender inside.
- Prepare the Potatoes: Rinse the baby potatoes under cold water to remove any dirt. Pat them dry with a kitchen towel. In a large bowl, toss the potatoes with vegetable oil and a sprinkle of salt until they’re evenly coated.
- Roast the Potatoes: Spread the potatoes out in a single layer on a baking sheet. Place the baking sheet in the preheated oven and roast for about 25-30 minutes, turning the potatoes halfway through, until they’re golden brown and fork-tender.
- Make the Ocopa Sauce: While the potatoes are roasting, prepare the ocopa sauce. In a blender or food processor, combine the fresh cilantro leaves, roasted peanuts, green chilies, garlic clove, queso fresco or feta cheese, evaporated milk, lime juice, cumin, and black pepper. Blend until smooth and creamy. Taste and adjust seasoning if necessary.
- Serve: Once the potatoes are done roasting, remove them from the oven and let them cool slightly. Place the roasted potatoes on a serving platter and generously drizzle the ocopa sauce over the top. Serve warm, garnished with additional cilantro if desired.
Extra Tips
For an extra layer of flavor, consider adding toasted sesame seeds or a sprinkle of paprika to the ocopa sauce. If you prefer a spicier kick, feel free to add more green chilies or even a dash of hot sauce.
This dish pairs beautifully with grilled meats or fish, making it a versatile addition to any meal. Enjoy the delightful combination of textures and flavors!
Ocopa Sauce Chicken Marinade
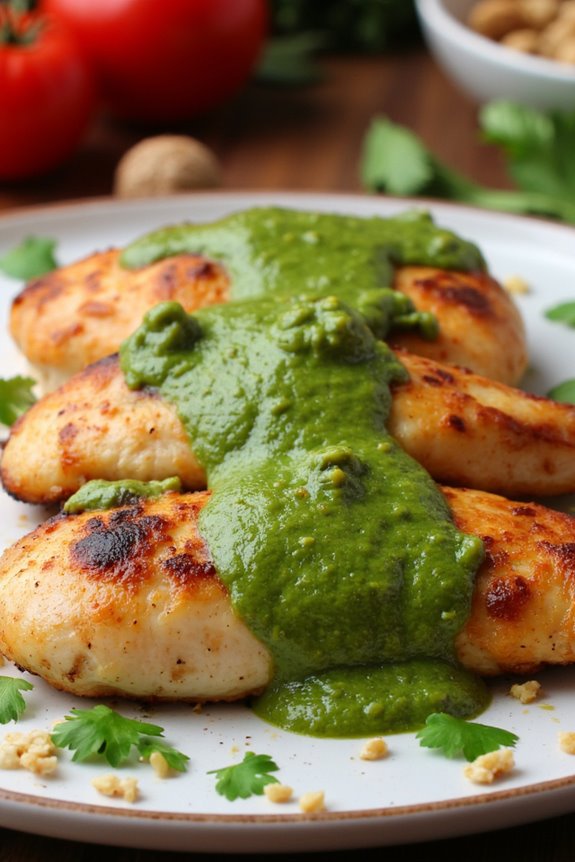
Ocopa sauce, a traditional Peruvian condiment, is a vibrant blend of flavors that elevates any dish it accompanies. Its main ingredients, which include fresh herbs, nuts, and a hint of spice, create a unique taste that pairs beautifully with chicken.
This marinade not only infuses the chicken with the rich, earthy flavors of the ocopa sauce but also helps to tenderize the meat, guaranteeing a juicy and flavorful dish. Whether you’re grilling, baking, or sautéing, marinating chicken in ocopa sauce will add a delightful twist to your meal.
This recipe for Ocopa Sauce Chicken Marinade is designed to serve 4-6 people, making it perfect for family dinners or gatherings with friends. The preparation is straightforward, and the combination of ingredients is easily accessible.
By allowing the chicken to marinate for several hours, or even overnight, you’ll guarantee that each bite is packed with the bold flavors of the ocopa sauce.
Ingredients:
- 4-6 chicken breasts (boneless, skinless)
- 1 cup fresh cilantro, chopped
- 1/2 cup walnuts, toasted
- 1/4 cup queso fresco or feta cheese
- 1-2 jalapeños or green chili peppers, seeds removed for less heat
- 2 cloves garlic, minced
- 1 tablespoon olive oil
- 2 tablespoons lime juice
- Salt and pepper to taste
Cooking Instructions:
- Prepare the Ocopa Sauce: In a blender or food processor, combine the chopped cilantro, toasted walnuts, queso fresco (or feta), jalapeños, minced garlic, olive oil, lime juice, and a pinch of salt and pepper. Blend until smooth, scraping down the sides as needed to guarantee all ingredients are well combined.
- Marinate the Chicken: Place the chicken breasts in a large resealable plastic bag or a shallow dish. Pour the prepared ocopa sauce over the chicken, guaranteeing all pieces are well coated. Seal the bag or cover the dish with plastic wrap.
- Refrigerate: Allow the chicken to marinate in the refrigerator for at least 2 hours, but for best results, let it marinate overnight. This will allow the flavors to penetrate the chicken thoroughly.
- Cook the Chicken: Preheat your grill, oven, or stovetop pan over medium-high heat. Remove the chicken from the marinade, shaking off any excess, and cook until the chicken reaches an internal temperature of 165°F (about 6-8 minutes per side on the grill or 20-25 minutes in the oven).
- Serve: Once cooked, let the chicken rest for a few minutes before slicing. Serve with additional ocopa sauce drizzled over the top or on the side for dipping.
Extra Tips:
For an even richer flavor, consider adding a splash of apple cider vinegar or a teaspoon of smoked paprika to the ocopa sauce while blending.
If you prefer a milder sauce, adjust the amount of jalapeños based on your heat preference. Additionally, this marinade works well with other proteins like pork or fish, so feel free to experiment!
Grilled Shrimp With Ocopa Sauce
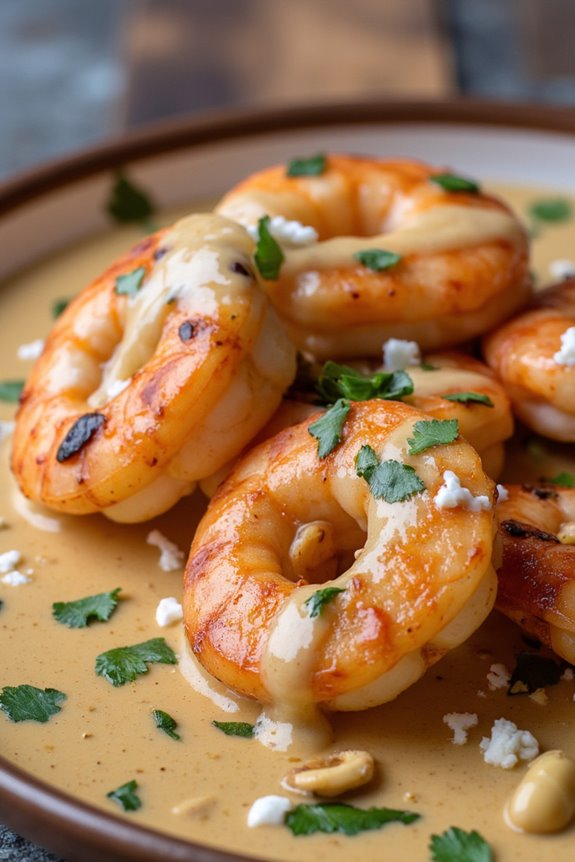
Grilled shrimp with ocopa sauce is a delightful Peruvian dish that combines the freshness of shrimp with the vibrant flavors of ocopa, a traditional sauce made with herbs, nuts, and spices. This dish is perfect for summer gatherings or a cozy dinner, offering a tantalizing taste of Peru right from your grill.
The ocopa sauce not only enhances the shrimp but also adds a creamy texture and rich flavor profile that will leave your guests wanting more.
To prepare this dish, you’ll need to marinate the shrimp to infuse them with flavor before grilling. The ocopa sauce can be made ahead of time, allowing the flavors to meld beautifully. Serve the grilled shrimp drizzled with the ocopa sauce for a visually appealing presentation, and pair it with a side of rice or grilled vegetables to complete the meal. This recipe serves 4-6 people, making it an ideal choice for entertaining friends and family.
Ingredients:
- 1 lb large shrimp, peeled and deveined
- 2 tablespoons olive oil
- 1 teaspoon garlic powder
- 1 teaspoon paprika
- Salt and pepper to taste
- 1 cup fresh cilantro leaves
- 1/2 cup roasted peanuts
- 1/2 cup queso fresco (or feta cheese)
- 2-3 fresh jalapeños (adjust for spice level)
- 2 tablespoons lime juice
- 1/4 cup vegetable broth
- 1/4 teaspoon cumin
Cooking Instructions:
- Prepare the Marinade: In a mixing bowl, combine the olive oil, garlic powder, paprika, salt, and pepper. Mix well to create a marinade. Add the cleaned shrimp to the bowl and toss until they’re evenly coated. Cover and let the shrimp marinate in the refrigerator for at least 30 minutes to allow the flavors to penetrate.
- Make the Ocopa Sauce: In a blender or food processor, combine the cilantro, roasted peanuts, queso fresco, jalapeños, lime juice, vegetable broth, and cumin. Blend until smooth and creamy. Adjust the seasoning with salt and pepper to taste. If the sauce is too thick, add a little more broth to reach your desired consistency.
- Preheat the Grill: Preheat your grill to medium-high heat. Confirm the grates are clean and well oiled to prevent the shrimp from sticking.
- Grill the Shrimp: Remove the marinated shrimp from the refrigerator. Place the shrimp on the grill, ensuring they’re spaced out evenly. Grill for about 2-3 minutes on each side or until they turn pink and opaque. Be careful not to overcook the shrimp, as they can become rubbery.
- Serve: Once the shrimp are cooked, remove them from the grill and arrange them on a serving platter. Drizzle the ocopa sauce generously over the grilled shrimp. You can also serve extra sauce on the side for dipping.
- Garnish and Enjoy: Optionally, garnish with additional cilantro leaves or lime wedges for a pop of color. Serve immediately and enjoy the vibrant flavors of grilled shrimp with ocopa sauce.
Extra Tips:
To amplify the flavor of the grilled shrimp, you can add a splash of tequila to the marinade for an extra kick.
If you prefer a milder ocopa sauce, remove the seeds from the jalapeños before blending. Additionally, feel free to substitute other proteins, such as chicken or fish, if you want to experiment with different flavors.
This dish pairs beautifully with a chilled bottle of white wine or a revitalizing cocktail, making it perfect for summer barbecues or festive gatherings.
Ocopa Sauce Veggie Wraps

Ocopa Sauce Veggie Wraps are a delightful and nutritious dish that brings the vibrant flavors of Peruvian cuisine right to your kitchen. This recipe centers around the unique Ocopa sauce, which is a creamy, herb-infused sauce made primarily from huacatay (black mint), peanuts, and cheese.
It’s not just a dip; it’s a versatile sauce that pairs perfectly with fresh vegetables, making it an ideal filling for wraps. These veggie wraps aren’t only colorful and appetizing but also packed with nutrients, making them a perfect choice for a light lunch or a satisfying snack.
In this recipe, we’ll combine seasonal vegetables with the delicious Ocopa sauce, all wrapped up in soft tortillas. The combination of crunchy vegetables and smooth, flavorful sauce creates a delightful contrast that’s sure to please anyone’s palate.
Whether you’re a vegetarian or just looking for a healthy meal option, these wraps are easy to prepare and can be customized to your liking with your favorite veggies.
Ingredients (Serves 4-6 people)
- 4 large tortillas (flour or whole wheat)
- 1 cup Ocopa sauce (homemade or store-bought)
- 1 cup bell peppers, sliced (red, yellow, and green)
- 1 cup cucumber, thinly sliced
- 1 cup carrots, grated
- 1 cup avocado, sliced
- 1 cup mixed greens (spinach, arugula, or lettuce)
- Salt and pepper to taste
- Lime wedges (for serving)
Cooking Instructions
- Prepare the Vegetables: Wash and slice the bell peppers into thin strips, grate the carrots, and slice the cucumber and avocado. Make sure all vegetables are fresh and crisp for the best texture in your wraps.
- Warm the Tortillas: Heat a large skillet over medium heat. Place one tortilla in the skillet for about 30 seconds on each side until warm and pliable. Repeat this process for all tortillas. This step helps make the tortillas flexible and easier to fold without tearing.
- Assemble the Wraps: Lay a warm tortilla flat on a clean surface. Spread a generous amount of Ocopa sauce in the center of the tortilla. Layer the mixed greens on top of the sauce, followed by the bell peppers, cucumber, carrots, and avocado. Be careful not to overfill to prevent the wraps from tearing.
- Roll the Wraps: Start rolling the tortilla from the bottom, tucking in the filling as you go. Roll it tightly but not too tight to avoid squeezing the filling out. Once rolled, you can slice the wrap in half for easier handling.
- Serve: Arrange the wraps on a serving platter. Drizzle extra Ocopa sauce over the top if desired, and serve with lime wedges on the side for an added burst of flavor.
Extra Tips
When preparing your Ocopa Sauce Veggie Wraps, feel free to customize the vegetables based on your preferences or what you have on hand. Grilled zucchini, roasted sweet potatoes, or even fresh herbs can add unique flavors and textures.
Additionally, if you prefer a spicier kick, consider adding sliced jalapeños or a dash of hot sauce to the Ocopa sauce. For meal prep, you can prepare the sauce and chop the veggies in advance, making it easy to assemble wraps whenever you’re ready to eat.
Enjoy your healthy and flavorful wraps!
Baked Fish Topped With Ocopa Sauce

Baked Fish Topped With Ocopa Sauce is a delightful and flavorful dish that showcases the unique taste of Peruvian cuisine. The combination of tender, flaky fish and the creamy, spicy ocopa sauce creates a symphony of flavors that’s bound to impress your family and friends. This dish isn’t only delicious but also healthy, making it a perfect choice for any occasion. Serve it alongside rice or a fresh salad for a complete meal that’s both satisfying and nutritious.
Preparing this dish is simple, and it requires minimal ingredients, most of which can be found in your pantry. The ocopa sauce, made from a blend of herbs, nuts, and spices, adds a rich depth of flavor that elevates the baked fish to new heights.
Whether you’re a seasoned chef or a beginner in the kitchen, you’ll find that this recipe is easy to follow and results in a mouthwatering dish that everyone will love.
Ingredients (Serves 4-6):
- 4-6 pieces of white fish fillets (such as tilapia, cod, or sole)
- 1 tablespoon olive oil
- Salt and pepper to taste
- 1 cup fresh cilantro, chopped
- 2-3 green onions, chopped
- 1 jalapeño, seeds removed and chopped
- 1/2 cup roasted peanuts or walnuts
- 2 cloves garlic, minced
- 1/2 cup feta cheese
- 1/2 cup evaporated milk
- 1 tablespoon lime juice
- 1 teaspoon cumin
- 1 teaspoon paprika
Cooking Instructions:
- Preheat the Oven: Begin by preheating your oven to 375°F (190°C). This will guarantee that your fish cooks evenly and thoroughly.
- Prepare the Fish: In a baking dish, place the fish fillets. Drizzle olive oil over the fillets and season them with salt and pepper. Make sure the fish is evenly coated for ideal flavor.
- Blend the Ocopa Sauce: In a blender or food processor, combine the cilantro, green onions, jalapeño, roasted peanuts or walnuts, garlic, feta cheese, evaporated milk, lime juice, cumin, and paprika. Blend until smooth and creamy. Taste and adjust seasoning if necessary.
- Top the Fish with Sauce: Pour the ocopa sauce over the seasoned fish fillets in the baking dish, ensuring that the fish is well covered. This will allow the flavors of the sauce to infuse into the fish as it bakes.
- Bake the Fish: Place the baking dish in the preheated oven and bake for 25-30 minutes or until the fish is cooked through and flakes easily with a fork. The sauce should bubble slightly and become golden on the edges.
- Serve: Once the fish is done, remove it from the oven and let it rest for a few minutes. Serve the baked fish topped with ocopa sauce alongside your choice of rice or a fresh salad for a complete meal.
Extra Tips:
For the best results, you can marinate the fish in a little lime juice, salt, and pepper for about 15-30 minutes before baking. This will enhance the flavor of the fish even more.
Additionally, feel free to experiment with different types of fish or adjust the spice level of the ocopa sauce by adding more or fewer jalapeños. This recipe is versatile, and you can customize it to suit your taste preferences!
Ocopa Sauce Pasta Salad
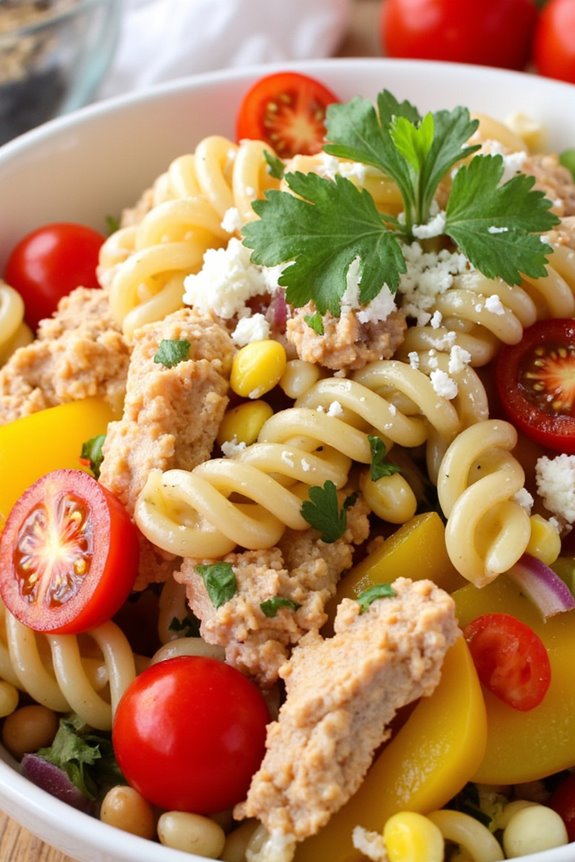
Ocopa Sauce Pasta Salad is a vibrant and delicious dish that brings together the zesty flavors of the Peruvian ocopa sauce with the heartiness of pasta and fresh vegetables. This delightful salad is perfect for warm weather gatherings, potlucks, or a light lunch. The creamy, herb-infused ocopa sauce complements the textures of al dente pasta and colorful veggies, creating a rejuvenating dish that’s both satisfying and nutritious.
In this recipe, we’ll incorporate the traditional ingredients of ocopa sauce, such as fresh herbs, peanuts, and spices, into a pasta salad that’s sure to impress your family and friends. Whether served as a main course or a side dish, this pasta salad is versatile and can be customized with your favorite vegetables or protein additions, making it a great option for everyone at the table.
Ingredients (Serves 4-6)
- 12 oz rotini or fusilli pasta
- 1 cup ocopa sauce (homemade or store-bought)
- 1 cup cherry tomatoes, halved
- 1 cup corn kernels (fresh or frozen)
- 1 cup diced bell peppers (red, yellow, or green)
- 1 cup cooked and diced chicken breast or chickpeas for a vegetarian option
- 1/2 cup red onion, finely chopped
- 1/4 cup fresh cilantro, chopped
- Salt and pepper, to taste
- Optional: 1/4 cup crumbled queso fresco or feta cheese
Cooking Instructions
- Cook the Pasta: In a large pot, bring salted water to a boil. Add the rotini or fusilli pasta and cook according to package instructions until al dente. Once cooked, drain the pasta in a colander and rinse under cold water to stop the cooking process. Set aside to cool completely.
- Prepare the Vegetables: While the pasta is cooling, chop the cherry tomatoes, bell peppers, and red onion. If using frozen corn, thaw it in warm water or microwave it for a minute or two. Make sure the vegetables are fresh and crisp to add texture to the salad.
- Make the Ocopa Sauce: If you’re making homemade ocopa sauce, blend together fresh herbs (like cilantro and parsley), peanuts or walnuts, garlic, queso fresco, aji amarillo or yellow chili paste, lime juice, and olive oil until smooth. Adjust the seasoning with salt and pepper to taste. If using store-bought sauce, simply prepare it according to the package instructions.
- Combine Ingredients: In a large mixing bowl, combine the cooled pasta, ocopa sauce, cherry tomatoes, corn, bell peppers, diced chicken or chickpeas, and red onion. Gently toss everything together until the pasta and vegetables are evenly coated with the sauce.
- Chill and Serve: Once everything is combined, cover the bowl with plastic wrap or a lid and refrigerate for at least 30 minutes to allow the flavors to meld together. When ready to serve, taste the salad and adjust seasoning with salt, pepper, or additional lime juice as needed. If desired, sprinkle with crumbled queso fresco or feta cheese before serving.
Extra Tips
For the best flavor, allow your Ocopa Sauce Pasta Salad to chill for a bit longer—up to a couple of hours—before serving. This will enhance the flavors and make the dish even more delicious.
Feel free to customize the salad by adding other ingredients such as black olives, avocado, or different types of cheese. For a spicier kick, consider adding diced jalapeños or a splash of hot sauce to the ocopa sauce. Enjoy your vibrant and flavorful pasta salad!
Stuffed Peppers With Ocopa Sauce
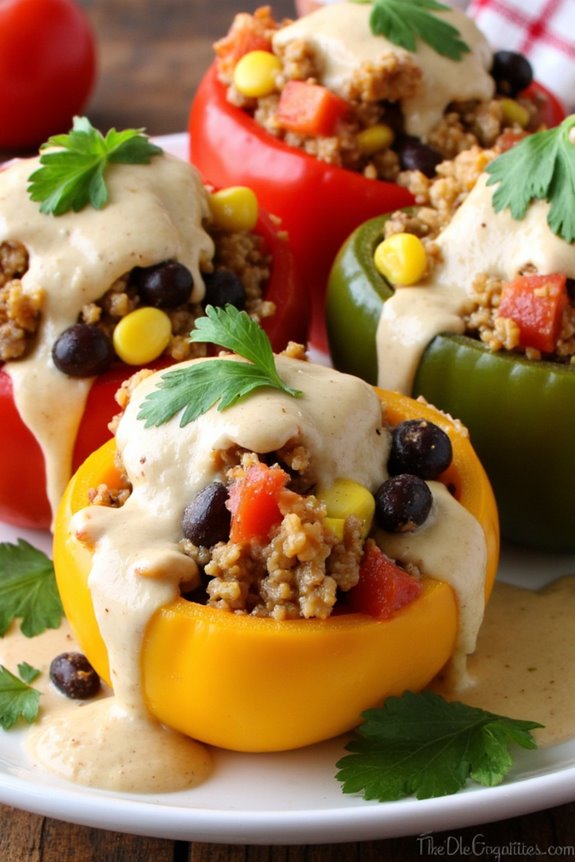
Stuffed Peppers with Ocopa Sauce is a delightful Peruvian dish that combines vibrant flavors and colorful presentations. The ocopa sauce, made from a blend of herbs, spices, and a creamy base, elevates the dish and complements the sweetness of the bell peppers. This recipe is perfect for a family dinner, as it can serve 4-6 people, making it a great option for gatherings or meal prep for the week ahead.
The preparation of stuffed peppers is straightforward yet allows for endless creativity. You can customize the filling based on your preferences, whether you prefer a meat-based stuffing, a vegetarian option, or even a fusion of different cuisines. The ocopa sauce, traditionally made with ingredients like fresh herbs, peanuts, and queso fresco, adds a unique twist that will leave your guests asking for seconds.
Ingredients:
- 4-6 large bell peppers (any color)
- 1 cup cooked quinoa or rice
- 1 cup black beans, drained and rinsed
- 1 cup corn kernels (fresh or frozen)
- 1 cup diced tomatoes
- 1 teaspoon cumin
- 1 teaspoon paprika
- Salt and pepper to taste
- 1 cup Ocopa Sauce (store-bought or homemade)
- Fresh cilantro, for garnish
Cooking Instructions:
- Preheat the Oven: Begin by preheating your oven to 375°F (190°C). This will guarantee that your stuffed peppers cook evenly and thoroughly.
- Prepare the Peppers: Rinse the bell peppers under cold water. Cut the tops off each pepper and carefully remove the seeds and membranes. This will create a hollow space for the filling. Place the prepared peppers upright in a baking dish.
- Prepare the Filling: In a large mixing bowl, combine the cooked quinoa or rice, black beans, corn, and diced tomatoes. Add the cumin, paprika, salt, and pepper. Mix well until all ingredients are evenly incorporated. This filling should be flavorful and well-seasoned since it will be the core of your dish.
- Stuff the Peppers: Carefully spoon the filling mixture into each bell pepper, packing it in gently but firmly. Confirm that each pepper is filled to the top. This step allows the flavors to meld as they cook.
- Add the Ocopa Sauce: Pour the ocopa sauce over the stuffed peppers in the baking dish, ensuring that the sauce seeps into the filling. You can reserve some sauce for drizzling over the peppers when serving.
- Bake: Cover the baking dish with aluminum foil and place it in the preheated oven. Bake for 25-30 minutes, then remove the foil and bake for an additional 10-15 minutes, or until the peppers are tender and slightly charred.
- Serve and Garnish: Once cooked, remove the stuffed peppers from the oven and let them cool for a few minutes. Garnish with fresh cilantro before serving. Drizzle any reserved ocopa sauce over the top for added flavor.
Extra Tips: When making Stuffed Peppers with Ocopa Sauce, feel free to experiment with different fillings based on what you have on hand. For a spicier kick, consider adding diced jalapeños to the filling or topping the dish with a sprinkle of feta cheese.
Additionally, the ocopa sauce can be made ahead of time and stored in the fridge for up to a week, making it easy to whip up this dish on a busy weeknight. Enjoy the vibrant flavors of this Peruvian-inspired meal!
Ocopa Sauce Deviled Eggs
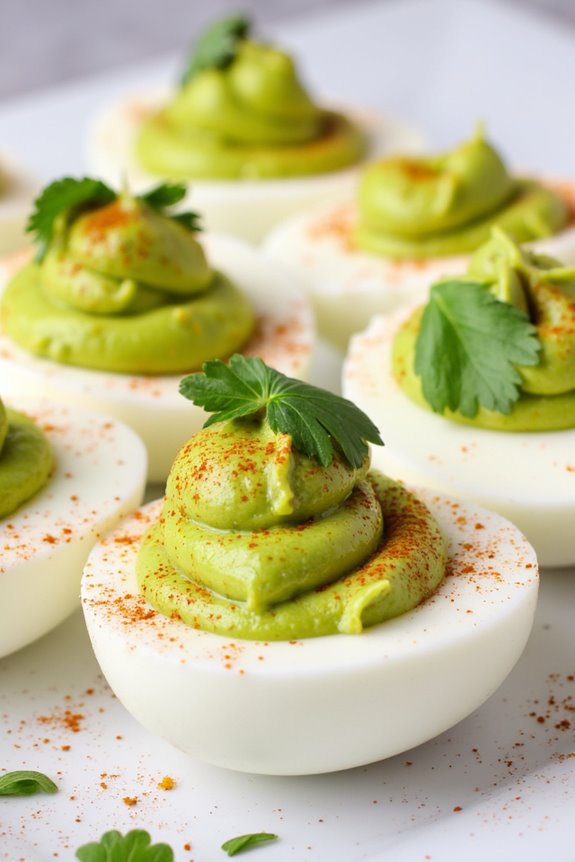
Ocopa Sauce Deviled Eggs are a delightful twist on the classic deviled eggs, infusing the creamy filling with the unique flavors of Peruvian ocopa sauce. This vibrant green sauce, made from fresh herbs, nuts, and spices, adds a zesty kick that elevates the simple deviled egg into an exciting appetizer.
Perfect for gatherings, parties, or even as a snack, these deviled eggs are sure to impress your guests with their rich taste and beautiful presentation.
Creating Ocopa Sauce Deviled Eggs isn’t only easy but also a fun way to explore the flavors of Peruvian cuisine. The combination of the ocopa sauce with the creamy yolk filling results in a luscious taste experience that’s both savory and invigorating.
Whether you’re hosting a brunch or looking for an innovative dish to share at a potluck, these deviled eggs will stand out on any table.
Ingredients (Serving Size: 4-6 People):
- 6 large eggs
- 1 cup fresh cilantro leaves
- 1/2 cup walnuts
- 1/2 cup queso fresco (or feta cheese)
- 1-2 cloves garlic
- 1-2 green chilies (like jalapeño or serrano, adjust to taste)
- 1/4 cup olive oil
- 2 tablespoons lime juice
- Salt to taste
- Pepper to taste
- Paprika (for garnish)
- Extra cilantro leaves (for garnish)
Cooking Instructions:
- Boil the Eggs: Place the eggs in a pot and cover them with cold water. Bring the water to a boil over medium heat. Once boiling, cover the pot and remove it from heat. Let the eggs sit for about 12-15 minutes. This will make certain the yolks are fully cooked and have a creamy texture.
- Prepare the Ocopa Sauce: While the eggs are boiling, prepare the ocopa sauce. In a blender or food processor, combine the cilantro leaves, walnuts, queso fresco, garlic, green chilies, olive oil, lime juice, salt, and pepper. Blend until you achieve a smooth, creamy consistency. Taste and adjust seasoning as needed.
- Cool and Peel the Eggs: After the eggs have finished cooking, transfer them to a bowl of ice water to cool for about 5-10 minutes. This will make peeling them easier. Once cooled, peel the eggs carefully and slice them in half lengthwise.
- Make the Filling: Remove the yolks from the egg halves and place them in a mixing bowl. Mash the yolks with a fork until smooth. Add the prepared ocopa sauce to the yolks and mix until well combined. You can adjust the amount of sauce based on your preference for flavor and creaminess.
- Fill the Eggs: Using a spoon or piping bag, fill the egg white halves with the ocopa yolk mixture. Be generous with the filling for an appealing look.
- Garnish and Serve: Sprinkle a pinch of paprika over the filled eggs for color and garnish with extra cilantro leaves. Serve immediately or refrigerate until ready to serve.
Extra Tips:
When cooking Ocopa Sauce Deviled Eggs, feel free to customize the heat level by adjusting the amount of green chilies in the ocopa sauce.
You can also experiment with different types of cheese or add other herbs to create a unique flavor profile. For an added crunch, consider topping the eggs with crushed walnuts or a drizzle of extra olive oil just before serving.
Enjoy the delightful combination of flavors and textures in this tasty dish!
Spicy Ocopa Sauce Tacos
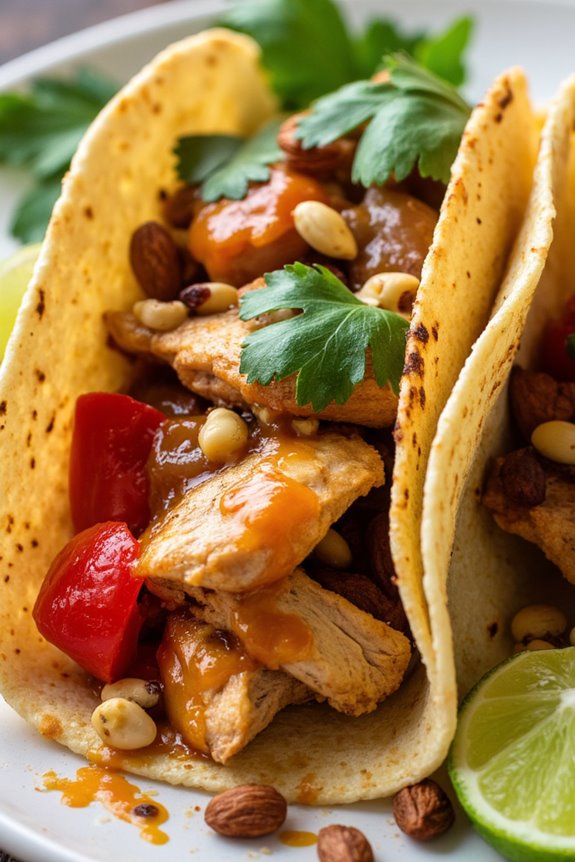
Spicy Ocopa Sauce Tacos are a delightful fusion of Peruvian flavors and the classic taco experience. This dish highlights the rich and aromatic Ocopa sauce, made with a blend of fresh herbs, spices, and creamy ingredients that perfectly complement grilled meats or vegetables. The combination of the spicy sauce with soft corn tortillas creates a tantalizing flavor adventure that’s sure to impress your family and friends.
To prepare these tacos, you’ll need to make the Ocopa sauce, which is the star of this dish. The sauce isn’t only spicy but also creamy, offering a burst of flavor with each bite. Once you have the sauce ready, you can assemble the tacos with your choice of protein, fresh toppings, and a drizzle of the Ocopa sauce for an unforgettable meal.
Ingredients (serving size: 4-6 people)
- 1 pound of chicken breast (or any protein of your choice)
- 8 small corn tortillas
- 1 cup of Ocopa sauce (see separate recipe if needed)
- 1 medium onion, sliced
- 1 red bell pepper, sliced
- 1 tablespoon olive oil
- Salt and pepper to taste
- Fresh cilantro, for garnish
- Lime wedges, for serving
Cooking Instructions
- Prepare the Ocopa Sauce:
- If you haven’t made the Ocopa sauce yet, start by blending together fresh cilantro, green onions, garlic, roasted peanuts, and aji amarillo (yellow chili pepper) in a food processor. Add in a bit of vegetable oil and lime juice to create a creamy consistency. Season with salt to taste. Set aside.
- Cook the Protein:
- In a large skillet, heat the olive oil over medium-high heat. Season the chicken breast (or chosen protein) with salt and pepper. Once the oil is hot, add the chicken and cook for about 5-7 minutes on each side until fully cooked and golden brown. Remove from heat and let it rest for a few minutes before slicing it into thin strips.
- Sauté the Vegetables:
- In the same skillet, add the sliced onion and red bell pepper. Sauté for about 3-4 minutes, or until the vegetables are softened and slightly caramelized. Season with a pinch of salt and pepper for flavor.
- Warm the Tortillas:
- In a separate skillet or on a griddle, warm the corn tortillas over medium heat for about 30 seconds on each side, until they’re pliable and slightly toasted.
- Assemble the Tacos:
- To assemble the tacos, place a few slices of the cooked chicken (or protein) on a warm tortilla. Top with sautéed vegetables and a generous drizzle of Ocopa sauce. Garnish with fresh cilantro and serve with lime wedges on the side.
Extra Tips
When preparing Spicy Ocopa Sauce Tacos, feel free to customize the toppings to your liking. Consider adding avocado slices or crumbled queso fresco for added creaminess.
You can also adjust the heat level of the Ocopa sauce by varying the amount of aji amarillo used. To save time, prepare the Ocopa sauce a day in advance and store it in the refrigerator; the flavors will only improve as it sits!
Enjoy your taco night with these flavorful creations!
Ocopa Sauce Quinoa Bowl

The Ocopa Sauce Quinoa Bowl is a delightful and nutritious dish that brings together the rich, vibrant flavors of traditional Peruvian ocopa sauce and the wholesome goodness of quinoa. This dish isn’t only packed with protein and fiber but also gives you a taste of the Andes with its unique blend of ingredients.
Perfect for a healthy lunch or dinner, this quinoa bowl can be enjoyed on its own or paired with your favorite toppings, making it a versatile option for any meal.
To create this colorful and flavorful dish, you’ll need to prepare the ocopa sauce, which features ingredients like fresh herbs, nuts, and spices blended to perfection. The quinoa serves as a hearty base that absorbs the delicious sauce, while veggie toppings add texture and color. This bowl is a great option for those looking to explore new flavors while maintaining a healthy diet.
Ingredients (serving size: 4-6 people)
- 1 cup quinoa
- 2 cups vegetable broth
- 1 cup fresh cilantro leaves
- 1/2 cup roasted peanuts
- 2-3 green onions, chopped
- 1-2 aji amarillo peppers (or yellow bell peppers for milder flavor)
- 2 cloves garlic
- 1/2 cup queso fresco or feta cheese (optional)
- Juice of 1 lime
- Salt to taste
- Olive oil for drizzling
- 1 cup cherry tomatoes, halved
- 1 avocado, sliced
Cooking Instructions
1. Cook the Quinoa: Rinse the quinoa under cold water to remove any bitterness. In a medium saucepan, combine the rinsed quinoa and vegetable broth. Bring to a boil, then reduce the heat to low, cover, and simmer for about 15 minutes or until the quinoa is cooked and the liquid is absorbed.
Remove from heat and let it sit covered for 5 minutes before fluffing with a fork.
2. Prepare the Ocopa Sauce: In a blender or food processor, combine the fresh cilantro, roasted peanuts, green onions, aji amarillo peppers, garlic, lime juice, and a pinch of salt. Blend until smooth, adding a little water or olive oil if needed to reach your desired consistency.
Taste and adjust salt as necessary.
3. Assemble the Bowl: In serving bowls, start with a generous portion of cooked quinoa as the base. Drizzle the ocopa sauce over the quinoa, ensuring an even distribution.
4. Add Toppings: Top the quinoa and sauce with halved cherry tomatoes and sliced avocado. If desired, sprinkle with crumbled queso fresco or feta cheese for added creaminess.
5. Serve and Enjoy: Drizzle a little olive oil over the bowls for an extra flavor boost. Serve immediately, and enjoy the harmonious blend of flavors and textures.
Extra Tips
When preparing the Ocopa Sauce Quinoa Bowl, feel free to customize it according to your taste preferences. You can add other vegetables such as bell peppers, corn, or black beans for added nutrition and flavor.
If you prefer a spicier kick, increase the amount of aji amarillo peppers. Additionally, make the ocopa sauce ahead of time and store it in the refrigerator for up to three days to save time on busy days.
Enjoy exploring this nutritious dish that brings a taste of Peru to your table!
Ocopa Sauce Cilantro Lime Rice
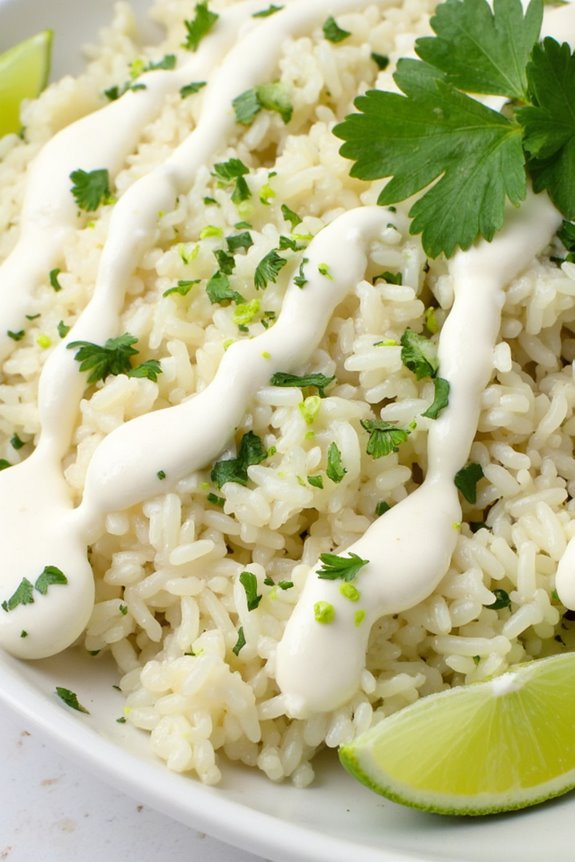
Ocopa Sauce Cilantro Lime Rice is a vibrant and flavorful dish that combines the rich, aromatic notes of the Peruvian Ocopa sauce with the zesty brightness of cilantro lime rice. This dish not only serves as a delightful side but can also be a satisfying vegetarian main course when paired with your favorite vegetables or proteins.
The creamy, herbaceous Ocopa sauce complements the fluffy rice perfectly, making each bite a culinary experience that transports your taste buds to the heart of Peru.
Preparing Ocopa Sauce Cilantro Lime Rice is both straightforward and rewarding. The key to this dish lies in the freshness of the ingredients, particularly the cilantro and lime, which elevate the flavor profile of the rice. The Ocopa sauce, with its unique blend of spices and herbs, adds depth and complexity, making it an excellent accompaniment for a variety of meals.
Whether you’re serving it at a family gathering or enjoying a quiet dinner at home, this dish is sure to impress.
Ingredients (serving size: 4-6 people):
- 2 cups long-grain white rice
- 4 cups water
- 1 teaspoon salt
- 1 cup fresh cilantro leaves, chopped
- 2 limes, juiced and zested
- 2 tablespoons vegetable oil
- 1 cup Ocopa sauce (homemade or store-bought)
- 1/2 teaspoon black pepper
- 1/4 teaspoon cumin
- Optional: lime wedges and additional cilantro for garnish
Cooking Instructions:
- Rinse the Rice: Begin by rinsing the long-grain white rice under cold water until the water runs clear. This step helps remove excess starch and prevents the rice from becoming sticky during cooking.
- Cook the Rice: In a medium-sized pot, combine the rinsed rice, water, and salt. Bring the mixture to a boil over medium-high heat. Once boiling, reduce the heat to low, cover the pot with a lid, and let the rice simmer for about 18-20 minutes, or until all the water is absorbed and the rice is tender.
- Fluff the Rice: Once the rice is cooked, turn off the heat and let it sit covered for an additional 5 minutes. Then, remove the lid and fluff the rice with a fork to separate the grains. This step guarantees a light and airy texture.
- Prepare the Cilantro Lime Mixture: In a small bowl, combine the chopped cilantro, lime juice, lime zest, black pepper, and cumin. Mix well until the ingredients are evenly incorporated.
- Combine Rice and Cilantro Lime Mixture: In a large bowl, gently fold the cilantro lime mixture into the fluffed rice. Drizzle in the vegetable oil and toss until the rice is well coated with the flavors. Taste and adjust seasoning if necessary.
- Serve with Ocopa Sauce: To serve, place a generous portion of the cilantro lime rice on each plate. Drizzle the Ocopa sauce over the rice or serve it on the side for dipping. Garnish with lime wedges and additional cilantro if desired.
Extra Tips: To enhance the flavor of your Ocopa Sauce Cilantro Lime Rice, consider toasting the rice in a little oil for a couple of minutes before adding water. This adds a nutty flavor and can elevate the overall taste.
Additionally, feel free to customize the dish by adding sautéed vegetables or beans for extra nutrition and texture. Enjoy this dish warm, and savor the blend of flavors that will surely become a new favorite in your household!
Roasted Cauliflower With Ocopa Sauce
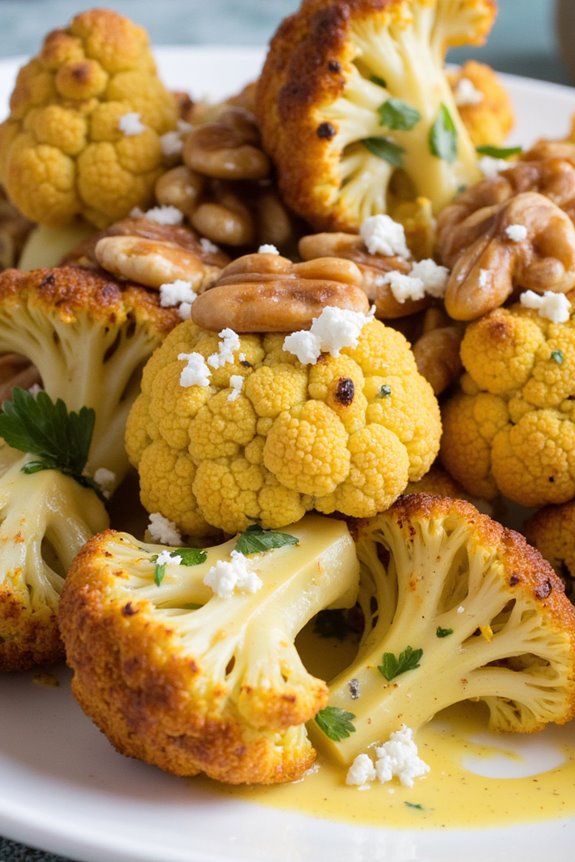
Roasted Cauliflower with Ocopa Sauce is a delightful and vibrant dish that showcases the unique flavors of Peruvian cuisine. This dish combines the nutty and earthy taste of roasted cauliflower with the creamy, zesty Ocopa sauce, which is traditionally made with a blend of fresh herbs, nuts, and spices.
The contrast between the crispy, caramelized edges of the cauliflower and the smooth, rich sauce creates a delicious balance that’s guaranteed to impress at any dinner table or gathering.
Preparing this dish is simple and straightforward, making it an excellent choice for both novice and experienced cooks alike. The roasting process brings out the natural sweetness of the cauliflower while enhancing its texture, while the Ocopa sauce adds a burst of flavor that elevates the dish to new heights.
Serve it as a vegetarian main course or as a flavorful side dish alongside grilled meats or fish.
Ingredients (Serves 4-6):
- 1 large head of cauliflower, cut into florets
- 3 tablespoons olive oil
- Salt and pepper, to taste
- 1/2 cup walnuts, toasted
- 1/4 cup queso fresco or feta cheese
- 1/4 cup fresh cilantro leaves
- 2 tablespoons fresh lime juice
- 1 teaspoon garlic, minced
- 1 teaspoon aji amarillo paste (or substitute with another chili paste)
- 1/4 teaspoon cumin
- 1/4 cup water or adjust for desired consistency
Cooking Instructions:
- Preheat the Oven: Begin by preheating your oven to 425°F (220°C). This high temperature will guarantee that the cauliflower roasts evenly and develops a lovely golden-brown color.
- Prepare the Cauliflower: In a large mixing bowl, toss the cauliflower florets with olive oil, salt, and pepper. Make sure each piece is well-coated, which will help in achieving that delicious roasted flavor.
- Roast the Cauliflower: Spread the seasoned cauliflower florets onto a baking sheet in a single layer. Roast in the preheated oven for about 25-30 minutes, or until the cauliflower is tender and golden brown, flipping halfway through for even cooking.
- Make the Ocopa Sauce: While the cauliflower is roasting, prepare the Ocopa sauce. In a food processor, combine the toasted walnuts, queso fresco, cilantro leaves, lime juice, minced garlic, aji amarillo paste, cumin, and water. Blend until smooth and creamy. Adjust the water as needed to reach your desired sauce consistency.
- Serve the Dish: Once the cauliflower is perfectly roasted, remove it from the oven. Transfer the cauliflower to a serving platter and generously drizzle the Ocopa sauce over the top. You can also serve additional sauce on the side for those who want extra flavor.
Extra Tips: When roasting the cauliflower, feel free to experiment with different spices or herbs to enhance the flavor profile. You can also add a sprinkle of chili flakes for an extra kick.
If you’re looking for a more substantial dish, consider adding cooked quinoa or chickpeas to the roasted cauliflower before drizzling with the Ocopa sauce. This dish can be served warm or at room temperature, making it a versatile option for meal prep or entertaining.
Ocopa Sauce Flatbread Pizza
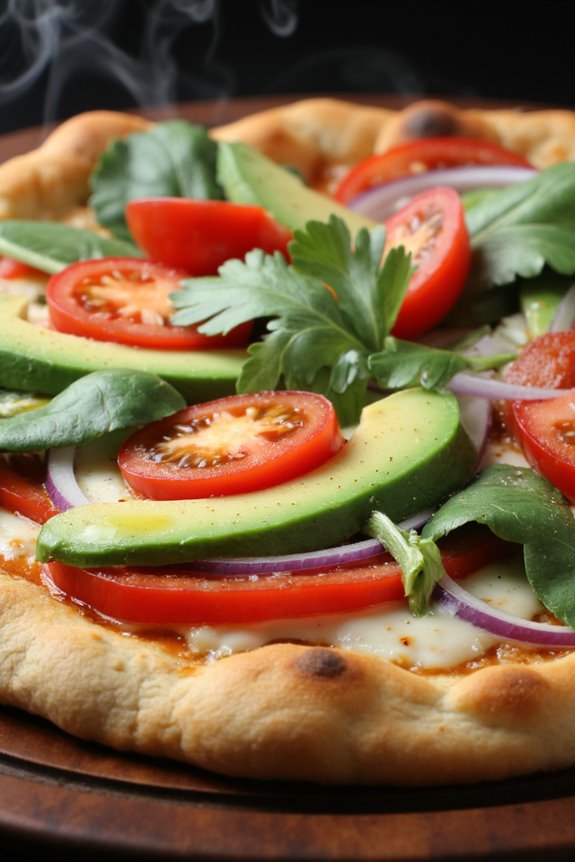
Ocopa Sauce Flatbread Pizza is a delightful fusion of flavors that brings the vibrant taste of Peruvian ocopa sauce to the classic pizza format. This dish features a rich and creamy sauce made with fresh herbs, nuts, and spices, which is drizzled over crispy flatbread, topped with fresh vegetables, and baked to perfection.
Perfect for sharing with friends and family, this innovative pizza is sure to impress anyone who tries it. Creating this unique flatbread pizza not only showcases the versatility of ocopa sauce but also allows you to experiment with various toppings.
Whether you prefer a vegetarian version or want to add your choice of protein, this recipe can easily accommodate your taste preferences. Get ready to enjoy a deliciously different take on pizza that combines the best of both worlds.
Ingredients (serving size: 4-6 people)
- 4 flatbreads or pita breads
- 1 cup ocopa sauce
- 1 cup shredded mozzarella cheese
- 1 cup cherry tomatoes, halved
- 1 bell pepper, sliced (any color)
- 1 small red onion, thinly sliced
- 1 cup fresh spinach leaves
- 1 avocado, sliced
- Fresh cilantro, for garnish
- Olive oil, for drizzling
- Salt and pepper, to taste
Cooking Instructions
- Preheat the Oven: Begin by preheating your oven to 425°F (220°C). This high temperature will help achieve that perfect crispy flatbread base.
- Prepare the Flatbreads: Take your flatbreads or pita and lay them out on a baking sheet lined with parchment paper. You can lightly brush them with olive oil to enhance the flavor and crispiness.
- Spread the Ocopa Sauce: Evenly spread approximately ¼ cup of the ocopa sauce on each flatbread. Make sure to leave a small border around the edges for a crust. The sauce will provide a flavorful base for your toppings.
- Add the Cheese: Sprinkle about ¼ cup of shredded mozzarella cheese on top of the ocopa sauce on each flatbread. The cheese will melt beautifully and create that gooey, delicious pizza experience.
- Layer the Vegetables: Distribute the halved cherry tomatoes, sliced bell pepper, red onion, and fresh spinach evenly over the cheese. These fresh vegetables not only add color but also contribute to the overall taste profile.
- Season and Bake: Lightly season the toppings with salt and pepper to enhance their flavors. Then, place the baking sheet in the preheated oven and bake for 10-12 minutes, or until the cheese is melted and bubbly, and the flatbreads are golden brown.
- Finish with Avocado and Garnish: Once the pizzas are out of the oven, top each flatbread with sliced avocado and garnish with fresh cilantro. A drizzle of olive oil can also be added for an extra touch of richness.
- Slice and Serve: Allow the flatbread pizzas to cool slightly, then slice them into wedges. Serve warm and enjoy the delightful combination of flavors!
Extra Tips
For an even more personalized touch, feel free to customize your Ocopa Sauce Flatbread Pizza with additional toppings such as grilled chicken, roasted vegetables, or even a sprinkle of feta cheese for a tangy kick.
If you want a spicier kick, consider adding jalapeños or a drizzle of hot sauce. Remember, the key to a great pizza is balancing flavors and textures, so have fun experimenting with different combinations!
Ocopa Sauce Dipping Sauce for Appetizers

Ocopa Sauce is a delicious and aromatic Peruvian sauce that perfectly complements a variety of appetizers. Traditionally made with fresh herbs and spices, this vibrant sauce is a wonderful addition to potato dishes, grilled meats, or even as a dip for vegetables. Its unique blend of flavors brings a fresh and zesty kick that can elevate any gathering, making it an excellent choice for parties or family meals.
Creating Ocopa Sauce is an easy process that involves blending together a few simple ingredients to achieve a creamy and flavorful result. The key to a great Ocopa sauce lies in the freshness of the ingredients and the balance of flavors. This versatile sauce not only adds a delightful taste to your appetizers but can also be used as a marinade or dressing, making it a must-have recipe in your culinary repertoire.
Ingredients (Serves 4-6)
- 1 cup of walnuts
- 1 cup of fresh cilantro leaves
- 2 tablespoons of fresh parsley leaves
- 2-3 tablespoons of aji amarillo paste (or any mild chili paste)
- 2 cloves of garlic, minced
- 1/2 cup of crumbled queso fresco (or feta cheese)
- 1/4 cup of vegetable oil
- 2 tablespoons of lime juice
- Salt and pepper to taste
Cooking Instructions
- Prepare the Ingredients: Gather all your ingredients and measure them accurately. This will make the blending process easier and guarantee that the flavors are balanced in the final sauce.
- Toast the Walnuts: In a dry skillet over medium heat, lightly toast the walnuts for about 3-4 minutes until they’re fragrant and slightly browned. Be sure to stir them frequently to avoid burning. This step adds depth to the flavor of the sauce.
- Blend the Ingredients: In a blender, combine the toasted walnuts, fresh cilantro, parsley, aji amarillo paste, minced garlic, queso fresco, vegetable oil, and lime juice. Start by blending on low speed, gradually increasing to high until the mixture is smooth and creamy. You may need to scrape down the sides of the blender to guarantee all ingredients are well combined.
- Season the Sauce: Once the sauce reaches a creamy consistency, taste it and season with salt and pepper as needed. Blend for a few more seconds to mix in the seasoning thoroughly.
- Chill Before Serving: Transfer the Ocopa Sauce to a serving bowl and cover it with plastic wrap. Refrigerate for at least 30 minutes before serving. This chilling time allows the flavors to meld together beautifully.
- Serve: Serve the Ocopa Sauce as a dipping sauce alongside your favorite appetizers, such as fried potatoes, grilled meats, or fresh vegetables. Enjoy the vibrant flavors!
Extra Tips
When preparing Ocopa Sauce, feel free to adjust the spice level by adding more or less aji amarillo paste according to your taste preferences. Additionally, if you want a creamier texture, you can add a bit more vegetable oil or even a splash of cream.
Always use fresh herbs for the best flavor, and feel free to experiment by adding other ingredients such as avocado for a richer sauce. This sauce can be stored in the refrigerator for up to a week, making it easy to prepare in advance for your gatherings!