

Exploring the rustic charm of Peruvian bread fills my kitchen with inviting aromas. Each loaf, from the tender Pan Chuta to the decadent Pan De Tres Leches, carries its own unique story. Kneading and baking these breads is like a comforting ritual that transforms my home. I’m excited to share these recipes with you. Each one is a delightful surprise to discover.
Pan Chuta
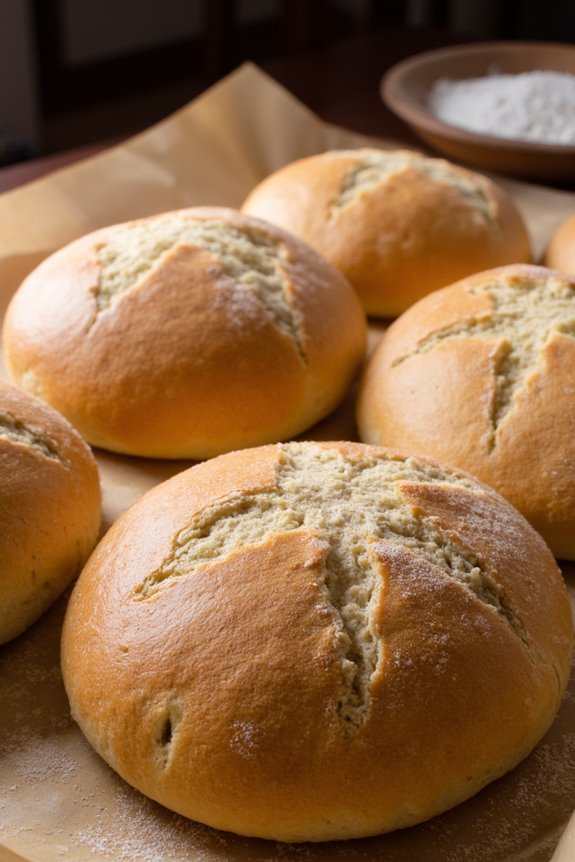
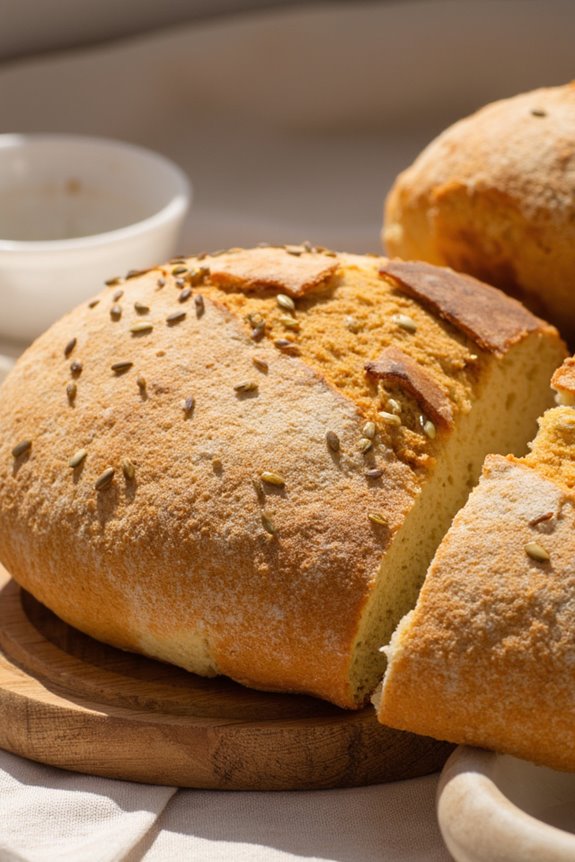
Pan Chuta is a traditional Peruvian bread that’s often enjoyed during family gatherings and celebrations. This rustic bread, hailing from the Andean region, is characterized by its round shape, crispy crust, and soft, fluffy interior. Made with simple ingredients, Pan Chuta can be easily prepared at home, allowing you to experience a taste of Peru right in your own kitchen. The bread pairs wonderfully with various spreads, cheeses, or even as an accompaniment to hearty stews.
The process of making Pan Chuta is both satisfying and rewarding. As you knead and shape the dough, the aroma of fresh bread will fill your kitchen, creating an inviting atmosphere. This recipe will guide you through the steps to create a delicious loaf that serves 4-6 people, perfect for sharing with family and friends.
Ingredients
- 4 cups all-purpose flour
- 1 teaspoon salt
- 1 tablespoon sugar
- 2 teaspoons active dry yeast
- 1 ½ cups warm water (around 110°F or 43°C)
- 2 tablespoons vegetable oil
- 1 egg (for egg wash, optional)
Cooking Instructions
- Activate the Yeast: In a small bowl, combine the warm water and sugar, then sprinkle the yeast over the top. Allow it to sit for about 5-10 minutes until it becomes frothy. This step guarantees that the yeast is active and ready to help the bread rise.
- Mix the Dry Ingredients: In a large mixing bowl, whisk together the flour and salt. Creating a well in the center of the flour mixture will help incorporate the wet ingredients more easily.
- Combine Ingredients: Pour the activated yeast mixture and vegetable oil into the well of the dry ingredients. Using a wooden spoon or your hands, mix until a shaggy dough forms.
- Knead the Dough: Transfer the dough to a lightly floured surface and knead it for about 8-10 minutes until it becomes smooth and elastic. If the dough is too sticky, sprinkle a little more flour as needed.
- First Rise: Place the kneaded dough in a greased bowl, cover it with a damp cloth or plastic wrap, and let it rise in a warm place for about 1-2 hours, or until it has doubled in size.
- Shape the Bread: Once the dough has risen, punch it down to release the air. Divide the dough into 2 equal portions and shape each piece into a round loaf. Place them on a baking sheet lined with parchment paper.
- Second Rise: Cover the shaped loaves with a cloth and let them rise for another 30-45 minutes until they puff up slightly.
- Preheat the Oven: While the loaves are rising, preheat your oven to 375°F (190°C). If you wish to add an egg wash for a golden crust, beat the egg and brush it over the tops of the loaves.
- Bake the Bread: Bake the loaves for 25-30 minutes or until they’re golden brown and sound hollow when tapped on the bottom.
- Cool and Serve: Remove the bread from the oven and let it cool on a wire rack. Slice and serve warm, or store in an airtight container for later.
When making Pan Chuta, it’s essential to ascertain that the ingredients are at the right temperature, especially the water for activating the yeast. If the water is too hot, it can kill the yeast; if it’s too cold, the yeast won’t activate properly.
Additionally, feel free to experiment with adding herbs or spices to the dough for a unique twist. Enjoy the process and the delicious aroma that will fill your home as you bake this wonderful Peruvian bread!
Pan De Tres Leches
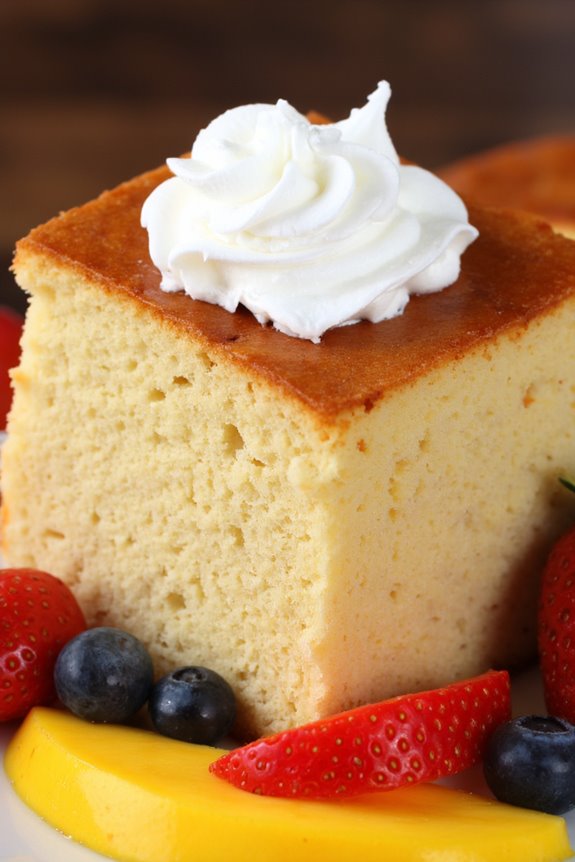
Pan De Tres Leches, or Three Milk Bread, is a delightful Peruvian dessert that showcases the country’s rich culinary heritage. This moist and sweet bread is soaked in a mixture of three types of milk: evaporated milk, condensed milk, and heavy cream, which gives it a unique flavor and texture. It’s a perfect treat for celebrations or simply to enjoy with family and friends.
The bread itself is light and fluffy, making it a versatile base for various toppings like fruits or whipped cream. Making Pan De Tres Leches might seem intimidating, but it’s quite simple with the right approach. The combination of milks not only infuses the bread with incredible moisture but also adds a layer of sweetness that complements its flavor beautifully.
When served chilled, this bread becomes an irresistible dessert that’s sure to impress. Here, we’ll guide you through the process of creating this rustic Peruvian delight.
Ingredients (serving size: 4-6 people)
- 2 cups all-purpose flour
- 1 tablespoon baking powder
- 1/2 teaspoon salt
- 1/2 cup unsalted butter, softened
- 1 cup granulated sugar
- 4 large eggs
- 1 teaspoon vanilla extract
- 1 can (12 oz) evaporated milk
- 1 can (14 oz) sweetened condensed milk
- 1 cup heavy cream
- Whipped cream (for topping, optional)
- Fresh fruits (for garnish, optional)
Cooking Instructions
- Preheat the Oven: Begin by preheating your oven to 350°F (175°C). This guarantees that the bread will bake evenly and develop a nice golden crust.
- Prepare the Baking Pan: Grease a 9×13 inch baking dish with butter or cooking spray. This will prevent the bread from sticking to the pan and make it easier to remove after baking.
- Mix Dry Ingredients: In a medium bowl, whisk together the flour, baking powder, and salt. This step helps to evenly distribute the leavening agent and guarantees your bread rises properly.
- Cream Butter and Sugar: In a large mixing bowl, cream together the softened butter and granulated sugar until light and fluffy. This usually takes about 3-5 minutes using an electric mixer. The air incorporated during this process will help create a lighter texture in the finished bread.
- Add Eggs and Vanilla: Beat in the eggs one at a time, ensuring each egg is fully incorporated before adding the next. Then, mix in the vanilla extract. This step adds flavor and moisture to the batter.
- Combine Dry and Wet Ingredients: Gradually add the dry ingredients to the wet mixture, mixing until just combined. Be careful not to overmix, as this can result in a denser bread.
- Bake the Bread: Pour the batter into the prepared baking dish and spread it evenly. Bake in the preheated oven for 25-30 minutes, or until a toothpick inserted into the center comes out clean. Allow the bread to cool slightly in the pan.
- Prepare the Milk Mixture: While the bread is cooling, whisk together the evaporated milk, sweetened condensed milk, and heavy cream in a separate bowl. This will create the soaking mixture that gives the bread its signature flavor.
- Soak the Bread: Once the bread has cooled for about 10 minutes, poke holes all over the surface using a fork or skewer. Slowly pour the milk mixture over the bread, allowing it to soak in. Let the bread absorb the milk for at least 1 hour in the refrigerator.
- Serve and Garnish: When ready to serve, cut the Pan De Tres Leches into squares, top with whipped cream if desired, and garnish with fresh fruits. Enjoy this delightful treat chilled for the best experience.
Extra Tips
When making Pan De Tres Leches, it’s important to let the bread soak in the milk mixture for at least an hour, but for peak flavor, consider soaking it overnight in the refrigerator. This will allow the bread to absorb even more of the milk mixture, resulting in a richer and more decadent dessert.
Additionally, feel free to experiment with different toppings or add a sprinkle of cinnamon for an extra layer of flavor. Enjoy your culinary journey into rustic Peruvian bread!
Pan De Maíz
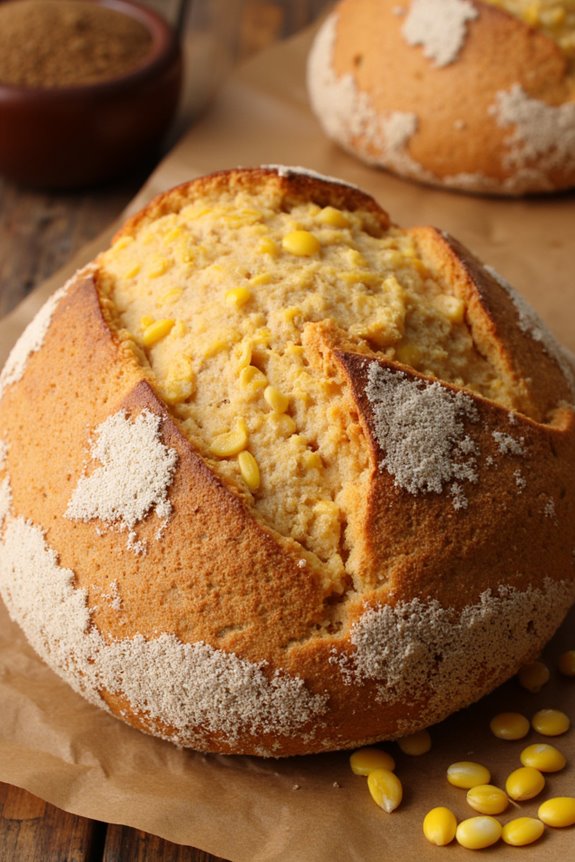
Pan de Maíz, or Corn Bread, is a traditional Peruvian dish that embodies the rustic charm of Andean cuisine. Made primarily from cornmeal, this bread isn’t only delicious but also a versatile accompaniment to many meals. Its slightly sweet flavor and dense texture make it a perfect partner for stews, grilled meats, or even on its own as a snack. The use of fresh corn gives it a unique taste that sets it apart from other types of cornbread found around the world.
This recipe brings together simple ingredients to create a hearty bread that’s both satisfying and easy to make. Whether you’re looking to impress guests at a dinner party or simply want to treat yourself to a taste of Peru, Pan de Maíz is a delightful addition to any table. With its rustic appearance and comforting flavor, this bread will quickly become a favorite among family and friends.
Ingredients (Serves 4-6):
- 2 cups cornmeal
- 1 cup milk
- 1/2 cup sugar
- 1/2 cup butter, melted
- 3 large eggs
- 1 tablespoon baking powder
- 1/2 teaspoon salt
- 1 cup corn kernels (fresh or frozen)
Cooking Instructions:
- Preheat the Oven: Begin by preheating your oven to 350°F (175°C). This allows the oven to reach the right temperature for baking the bread evenly and achieving a lovely golden crust.
- Mix Dry Ingredients: In a large mixing bowl, combine the cornmeal, sugar, baking powder, and salt. Whisk them together until fully incorporated, confirming that the baking powder is evenly distributed throughout the mixture.
- Combine Wet Ingredients: In a separate bowl, beat the eggs and then add the melted butter and milk. Whisk these wet ingredients together until they’re well mixed. The warmth of the melted butter will help to combine everything smoothly.
- Combine Dry and Wet Ingredients: Pour the wet mixture into the bowl with the dry ingredients. Stir gently with a spatula or wooden spoon until just combined. Be careful not to overmix; a few lumps are perfectly fine.
- Add Corn Kernels: Fold in the corn kernels gently to incorporate them into the batter. This adds texture and enhances the flavor of the bread.
- Prepare the Baking Pan: Grease a 9×5 inch loaf pan with butter or line it with parchment paper for easy removal. This step guarantees the bread doesn’t stick to the pan while baking.
- Pour Batter into the Pan: Carefully pour the batter into the prepared loaf pan. Use a spatula to level the top for even baking.
- Bake: Place the loaf pan in the preheated oven and bake for 45-55 minutes, or until the top is golden brown and a toothpick inserted into the center comes out clean. Keep an eye on it during the last few minutes of baking to avoid over-browning.
- Cool and Serve: Once baked, remove the bread from the oven and let it cool in the pan for about 10 minutes. Then, transfer it to a wire rack to cool completely before slicing. Serve warm or at room temperature.
Extra Tips:
For an added twist, consider incorporating cheese or herbs into the batter for extra flavor. Cotija cheese or fresh cilantro can complement the sweetness of the corn.
Additionally, you can experiment with different types of cornmeal, such as stone-ground, for a rustic texture. Storing leftover Pan de Maíz in an airtight container will keep it fresh for a few days, and it can also be toasted for a delightful breakfast option.
Pan De Yuca
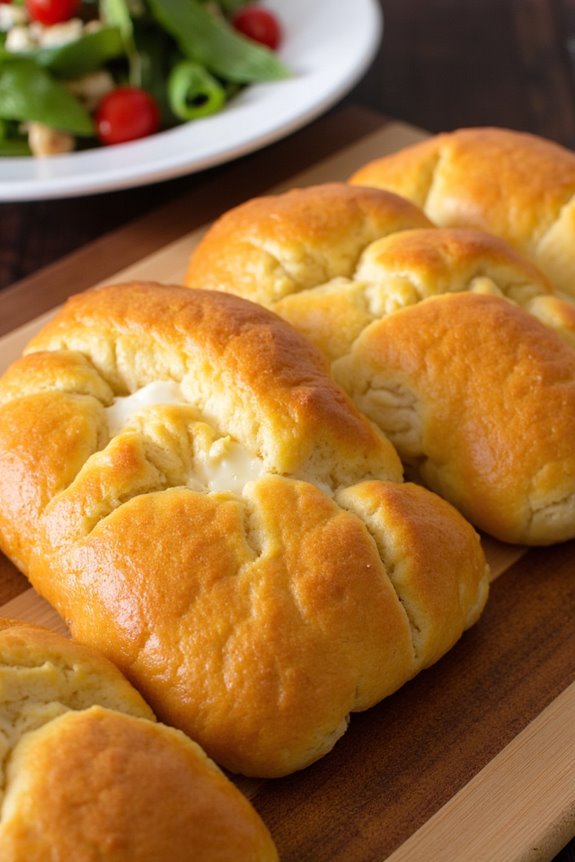
Pan De Yuca is a delightful and savory bread that hails from the Andes region of Peru. This unique bread is made primarily with yuca (also known as cassava), which gives it a distinct texture and flavor that sets it apart from traditional wheat breads. The combination of yuca flour and cheese creates a soft, chewy bread that pairs wonderfully with soups, salads, or can even be enjoyed on its own as a snack.
This recipe is simple to follow and results in a deliciously aromatic bread that will impress your family and friends. The preparation of Pan De Yuca is straightforward, making it a perfect choice for both novice and experienced bakers alike. The dough comes together quickly, requiring minimal ingredients and effort.
Once baked, the bread emerges golden and slightly crisp on the outside, while maintaining a soft and cheesy interior. Whether you’re hosting a dinner party or looking to try something new, Pan De Yuca is sure to be a hit!
Ingredients (Serves 4-6)
- 2 cups yuca flour
- 1 cup grated cheese (such as queso blanco or mozzarella)
- 2 large eggs
- 1/2 cup milk
- 1/4 cup vegetable oil
- 1 teaspoon baking powder
- 1/2 teaspoon salt
Cooking Instructions
- Preheat the Oven: Begin by preheating your oven to 375°F (190°C). This guarantees that the bread bakes evenly and achieves a nice golden crust.
- Combine Dry Ingredients: In a large mixing bowl, combine the yuca flour, baking powder, and salt. Whisk the dry ingredients together until they’re well mixed, which helps to distribute the leavening agent evenly throughout the flour.
- Mix Wet Ingredients: In a separate bowl, whisk together the eggs, milk, and vegetable oil until fully combined. This mixture will add moisture to the dough and help bind the ingredients together.
- Combine Mixtures: Gradually add the wet ingredients to the dry ingredients, mixing until a dough starts to form. The dough should be slightly sticky but manageable. If it feels too dry, add a little more milk.
- Add Cheese: Fold the grated cheese into the dough, making sure that it’s evenly distributed. The cheese will provide a rich flavor and a delightful texture once baked.
- Shape the Dough: Lightly grease a baking sheet or line it with parchment paper. Take small portions of the dough and shape them into balls or discs, about the size of a golf ball. Place them on the prepared baking sheet, leaving space between each piece.
- Bake: Place the baking sheet in the preheated oven and bake for 20-25 minutes, or until the tops are golden brown and the bread is cooked through. You can check for doneness by inserting a toothpick into the center; it should come out clean.
- Cool and Serve: Once baked, remove the bread from the oven and let it cool for a few minutes. Serve warm, either as a side dish or as a snack.
Tips
When making Pan De Yuca, feel free to experiment with different types of cheese to customize the flavor to your liking. Additionally, if you want to add a bit of spice, consider incorporating some diced jalapeños or herbs like rosemary into the dough for a unique twist.
Store any leftovers in an airtight container to keep them fresh; they can be reheated in the oven or enjoyed at room temperature. Enjoy your delicious homemade Pan De Yuca!
Pan De Pesto
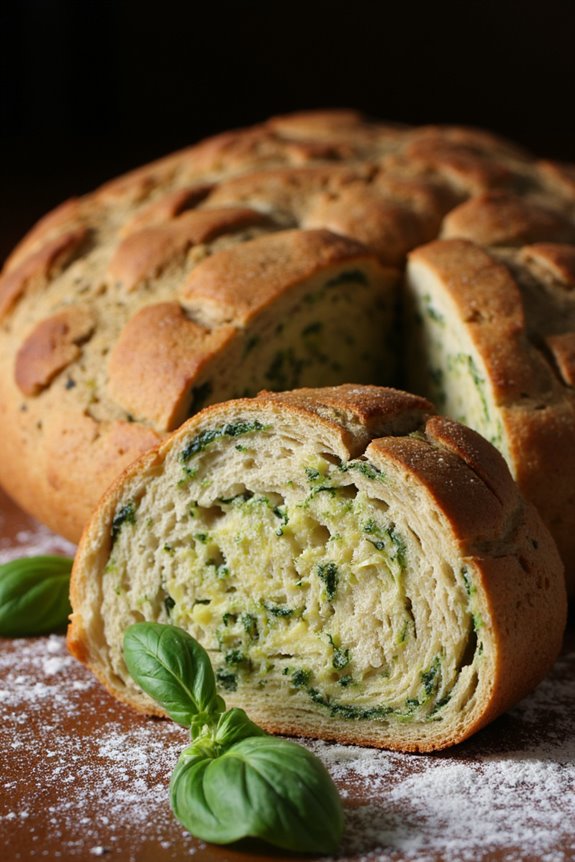
Pan De Pesto is a delightful rustic bread from Peru, infused with the rich and vibrant flavors of fresh basil and garlic. This aromatic bread is perfect for gathering around the table with friends and family, whether served as an appetizer, side dish, or enjoyed on its own with a drizzle of olive oil or a slice of cheese.
The combination of a crunchy crust and a soft, flavorful interior makes this bread an irresistible addition to any meal. Making Pan De Pesto isn’t only a rewarding experience but also a chance to explore the bold tastes of Peruvian cuisine.
The unique blend of ingredients, including fresh herbs and sprouted grains, creates a bread that’s both nutritious and delicious. With each bite, you’ll enjoy a burst of flavor that reflects the essence of rustic cooking. Let’s plunge into this recipe and bring the taste of Peru into your kitchen.
Ingredients (Serves 4-6)
- 2 cups all-purpose flour
- 1 cup whole wheat flour
- 1 packet (2 ¼ teaspoons) active dry yeast
- 1 teaspoon sugar
- 1 teaspoon salt
- 1 cup warm water (about 110°F)
- ½ cup fresh basil leaves, packed
- 2 cloves garlic
- 1/4 cup olive oil
- 1/4 cup grated Parmesan cheese
- 1 tablespoon pine nuts (optional)
- Extra flour for dusting
Cooking Instructions
- Activate the Yeast: In a small bowl, combine the warm water, sugar, and active dry yeast. Allow the mixture to sit for about 5-10 minutes, or until it becomes frothy. This step is vital as it activates the yeast, guaranteeing that your bread will rise properly.
- Prepare the Pesto: In a food processor, combine the fresh basil leaves, garlic, olive oil, Parmesan cheese, and pine nuts (if using). Blend until smooth. This homemade pesto will infuse your bread with vibrant flavor, so taste and adjust seasoning if necessary.
- Mix the Dry Ingredients: In a large mixing bowl, whisk together the all-purpose flour, whole wheat flour, and salt. This guarantees an even distribution of the dry ingredients, which is essential for consistent texture in the bread.
- Combine Wet and Dry Ingredients: Once the yeast is activated, pour the frothy mixture into the dry ingredients. Add the prepared pesto to the mixture, and stir until a shaggy dough forms. This step combines all the flavors and sets the foundation for your bread.
- Knead the Dough: Transfer the dough to a floured surface and knead for about 8-10 minutes, or until the dough is smooth and elastic. Kneading develops the gluten structure, which gives the bread its chewy texture.
- First Rise: Place the kneaded dough in a lightly greased bowl, cover it with a damp cloth, and let it rise in a warm place for about 1-2 hours, or until it has doubled in size. This fermentation process allows the flavors to deepen and the dough to become airy.
- Shape the Bread: After the dough has risen, punch it down gently to release the air. Turn it out onto a floured surface and shape it into a round or oval loaf, depending on your preference. Place the shaped dough onto a parchment-lined baking sheet.
- Second Rise: Cover the shaped dough with a cloth and let it rise again for about 30-45 minutes, or until it has puffed up. This final rise contributes to the lightness of the bread.
- Preheat the Oven: While the dough is rising, preheat your oven to 375°F (190°C). A hot oven is essential for achieving a perfect crust.
- Bake the Bread: Once the dough has risen, bake it in the preheated oven for 25-30 minutes, or until the bread is golden brown and sounds hollow when tapped on the bottom. The aroma will be irresistible as it bakes.
- Cool and Serve: Remove the bread from the oven and let it cool on a wire rack for at least 15 minutes before slicing. This cooling period allows the crumb to set properly. Serve warm or at room temperature, and enjoy!
Extra Tips
When making Pan De Pesto, feel free to experiment with different herbs or add-ins to customize the flavor to your liking. Adding sun-dried tomatoes or olives can enhance the taste even further.
Be mindful of the humidity in your kitchen, as it can affect the flour measurement. If the dough feels too sticky, sprinkle in a bit more flour while kneading.
Finally, for an extra crispy crust, place a small pan of water in the oven during baking to create steam, which promotes a beautiful crust formation. Enjoy your baking adventure!
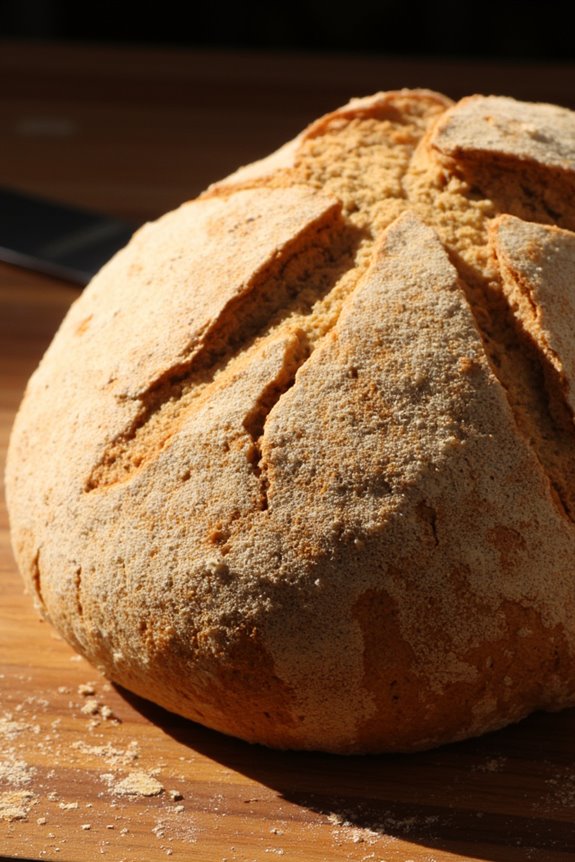
Pan Sourdough Peruano
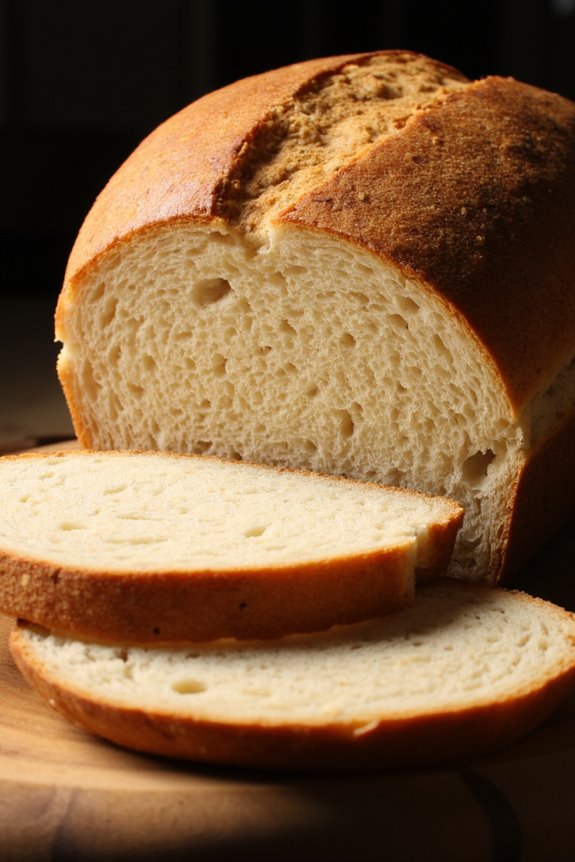
Pan Sourdough Peruano, or Peruvian sourdough bread, is a delightful and rustic bread that reflects the rich culinary traditions of Peru. This bread is characterized by its crusty exterior and soft, tangy interior, making it a perfect accompaniment to various dishes or simply enjoyed on its own with butter. The fermentation process involved in making sourdough adds depth of flavor to the bread, making it a favorite among bread enthusiasts.
To initiate this delicious baking adventure, you’ll need to prepare a sourdough starter ahead of time. This starter is typically made from flour and water and allowed to ferment naturally, capturing wild yeasts from the environment. Once you have a bubbly and active starter, you can proceed to create the Pan Sourdough Peruano. With a little patience and practice, you can enjoy the wonderful aroma and flavor of fresh, homemade Peruvian sourdough bread.
Ingredients (Serves 4-6)
- 1 cup (240 ml) active sourdough starter
- 1 ½ cups (360 ml) warm water
- 4 cups (480 g) all-purpose flour
- 1 tablespoon (15 g) sugar
- 2 teaspoons (10 g) salt
- 1 tablespoon (15 ml) olive oil
- Extra flour for dusting
Cooking Instructions
- Prepare the Dough: In a large mixing bowl, combine the active sourdough starter and warm water. Stir well to dissolve the starter completely. Gradually add the flour, sugar, and salt to the mixture, using a wooden spoon or your hands to combine until a shaggy dough forms.
- Knead the Dough: Transfer the dough onto a lightly floured surface. Knead the dough for about 10 minutes until it becomes smooth and elastic. You can also use a stand mixer with a dough hook for this step, mixing on medium speed for about 6-8 minutes.
- First Rise: Place the kneaded dough into a lightly greased bowl, cover it with a damp cloth or plastic wrap, and let it rise in a warm place for about 4-6 hours, or until it has doubled in size.
- Shape the Loaves: Once the dough has risen, gently punch it down to release any air bubbles. Turn it out onto a floured surface and divide it into two equal portions. Shape each portion into a round or oval loaf and place them onto a parchment-lined baking sheet.
- Second Rise: Cover the shaped loaves with a cloth and let them rise again for about 1-2 hours, or until they’ve noticeably puffed up. This second rise enhances the bread’s texture and flavor.
- Preheat the Oven: While the loaves are rising, preheat your oven to 450°F (230°C). Place a baking stone or a cast-iron skillet in the oven to heat as well, which will help create steam for a crusty exterior.
- Score and Bake: Once the loaves have risen, use a sharp knife or a razor blade to make a few slashes on the top of each loaf. This allows the bread to expand while baking. Carefully transfer the loaves to the preheated baking stone or skillet and bake for 30-35 minutes, or until the crust is golden brown and the bread sounds hollow when tapped on the bottom.
- Cool: Remove the loaves from the oven and let them cool on a wire rack for at least 30 minutes before slicing. This cooling period allows the interior to set properly.
Extra Tips
For best results, confirm that your sourdough starter is active and bubbly before using it. The temperature of your kitchen can greatly affect the rising times, so adjust accordingly—if it’s cooler, the dough may take longer to rise.
Additionally, if you prefer a more intense sour flavor, you can let the dough rise longer. Always keep a close eye on the bread while it’s baking to prevent over-browning, and consider placing a pan of hot water in the oven to create steam for a more pronounced crust.
Enjoy the process of making Pan Sourdough Peruano; it’s a rewarding experience that yields delicious results!
Pan De Chocolate
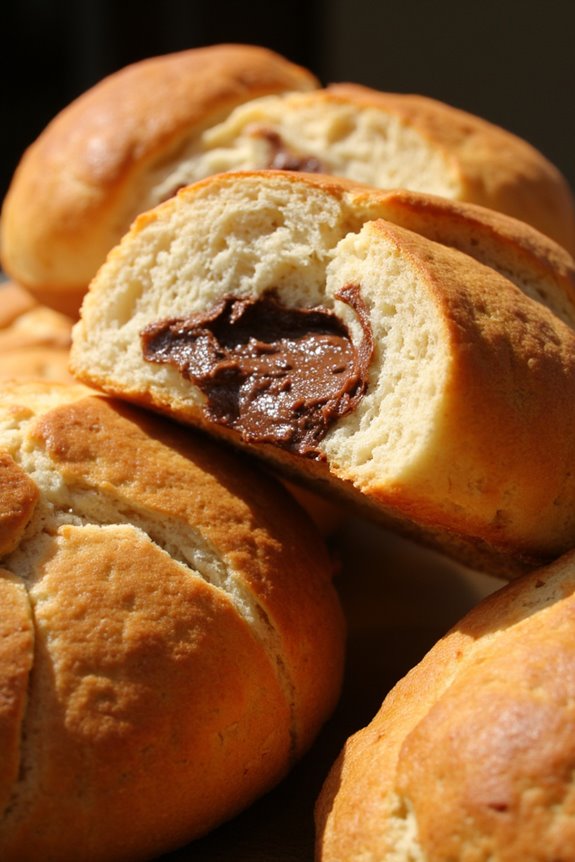
Pan De Chocolate, or Chocolate Bread, is a delightful treat that combines the rustic charm of traditional Peruvian baking with the rich sweetness of chocolate. This bread is perfect for breakfast or as a snack and is sure to satisfy any sweet tooth. The dough is soft and fluffy, and the melted chocolate pieces create a heavenly experience with every bite.
This recipe brings the essence of Peruvian culinary culture right into your kitchen, allowing you and your loved ones to enjoy a taste of this South American delight. The key to a successful Pan De Chocolate is using high-quality chocolate that melts beautifully and creates a gooey center.
This bread isn’t only easy to make, but it also fills your home with an irresistible aroma as it bakes. Whether you’re enjoying it fresh from the oven or toasted the next day, this chocolate bread is sure to become a favorite in your household. Gather your ingredients, and let’s get started on making this scrumptious treat!
Ingredients (Serves 4-6 people):
- 3 cups all-purpose flour
- 1 packet (2 ¼ teaspoons) active dry yeast
- ½ cup granulated sugar
- 1 teaspoon salt
- 1 cup warm milk (about 110°F)
- 1/3 cup unsalted butter, melted
- 2 large eggs
- 1 cup semisweet chocolate chips or chunks
- 1 teaspoon vanilla extract
Instructions:
- Prepare the Yeast Mixture: In a small bowl, combine the warm milk and active dry yeast. Let it sit for about 5-10 minutes until it becomes frothy. This step activates the yeast, which is vital for the bread to rise.
- Mix Dry Ingredients: In a large mixing bowl, whisk together the all-purpose flour, sugar, and salt. This guarantees that the sugar and salt are evenly distributed throughout the flour, which is essential for flavor.
- Combine Wet Ingredients: In another bowl, mix the melted butter, eggs, vanilla extract, and the frothy yeast mixture. Stir until well combined. This step brings together your wet ingredients, creating a rich and flavorful base for the bread.
- Form the Dough: Gradually add the wet mixture to the dry ingredients, mixing with a wooden spoon or your hands until a dough begins to form. Once the dough comes together, knead it for about 5-7 minutes on a floured surface until it’s smooth and elastic.
- Incorporate Chocolate: Gently fold in the semisweet chocolate chips or chunks into the dough until they’re evenly distributed. This step guarantees that every slice of bread will have delicious pockets of melted chocolate.
- First Rise: Place the dough in a greased bowl, cover it with a clean kitchen towel, and let it rise in a warm area for about 1 hour, or until the dough has doubled in size. This process allows the yeast to do its job and the dough to become light and airy.
- Shape the Bread: After the first rise, punch down the dough to release air bubbles. Transfer the dough onto a floured surface and shape it into a loaf. You can also divide it into smaller rolls if you prefer individual servings.
- Second Rise: Place the shaped dough into a greased loaf pan or on a baking sheet. Cover it again with a kitchen towel and let it rise for another 30-45 minutes until it has puffed up.
- Preheat the Oven: While the dough is rising for the second time, preheat your oven to 350°F (175°C). This guarantees that the bread will bake evenly.
- Bake the Bread: Once the dough has risen, place it in the preheated oven and bake for 25-30 minutes, or until the top is golden brown and sounds hollow when tapped on the bottom. This step is vital for achieving that perfect crust.
- Cool and Serve: After baking, remove the bread from the oven and let it cool in the pan for about 10 minutes. Then, transfer it to a wire rack to cool completely before slicing. This allows the bread to set, making it easier to slice without falling apart.
Extra Tips:
For an added flavor boost, consider sprinkling some coarse sea salt on top of the bread before baking. This contrast between the sweetness of the chocolate and the saltiness can elevate the overall taste.
Additionally, if you prefer a richer chocolate flavor, you can substitute some of the all-purpose flour with cocoa powder. Just be sure to adjust the amount of liquid accordingly to maintain the dough’s consistency.
Enjoy your Pan De Chocolate warm, perhaps with a spread of butter, or simply on its own for a delightful treat!
Pan De Manteca
Pan de Manteca, a traditional Peruvian bread, is a delightful treat that’s perfect for breakfast, snacks, or even as an accompaniment to meals. This rich and buttery bread is often made with lard, which gives it a distinctive flavor and texture.
Originating from the rustic kitchens of Peru, this bread is soft, slightly sweet, and has a wonderfully flaky crust that’s sure to please all palates. The process of making Pan de Manteca involves simple ingredients and techniques that can be mastered by any home baker.
To enjoy this delicious bread, you’ll want to prepare it fresh and serve it warm. Whether you choose to enjoy it plain, with butter, or alongside your favorite spreads, Pan de Manteca is versatile enough to complement a variety of dishes. Its comforting aroma and taste will transport you to the heart of Peru with every bite.
Now let’s explore the recipe so you can experience this culinary delight in your own home.
Ingredients (Serves 4-6):
- 4 cups all-purpose flour
- 1 cup lard (or unsalted butter, softened)
- 1 cup warm milk
- 1/4 cup sugar
- 2 teaspoons salt
- 2 teaspoons active dry yeast
- 2 large eggs
- 1 teaspoon baking powder
Cooking Instructions:
- Prepare the Yeast Mixture: In a small bowl, combine the warm milk and active dry yeast. Allow it to sit for about 5-10 minutes until it becomes frothy. This step is essential as it activates the yeast, which will help the bread rise.
- Mix Dry Ingredients: In a large mixing bowl, whisk together the all-purpose flour, sugar, salt, and baking powder. Make sure these ingredients are well combined to guarantee an even distribution of flavors.
- Combine Wet Ingredients: In another bowl, mix the lard (or softened butter) with the eggs. Use a fork or a whisk to blend until smooth. Once the yeast mixture is frothy, add it to the egg and lard mixture, stirring well to combine.
- Form the Dough: Gradually add the wet mixture into the dry ingredients, stirring with a wooden spoon or your hands until a dough forms. You may need to adjust the flour or milk slightly to achieve a soft, pliable dough that isn’t too sticky.
- Knead the Dough: Transfer the dough onto a lightly floured surface and knead it for about 8-10 minutes until it becomes smooth and elastic. This step develops the gluten structure, which is vital for a good bread texture.
- First Rise: Place the kneaded dough in a lightly greased bowl, cover it with a clean kitchen towel, and let it rise in a warm place for about 1-2 hours or until it has doubled in size.
- Shape the Bread: After the dough has risen, punch it down to release the air. Divide it into equal portions (about the size of a golf ball) and shape each piece into a round ball. Place the shaped dough onto a greased baking sheet, keeping some space between them.
- Second Rise: Cover the shaped dough with a towel and let them rise again for about 30-45 minutes until they’ve puffed up.
- Preheat Oven: While the dough is rising, preheat your oven to 350°F (175°C).
- Bake the Bread: Once the dough has risen, place the baking sheet in the preheated oven and bake for 20-25 minutes or until the tops are golden brown and the bread sounds hollow when tapped on the bottom.
- Cool and Serve: Remove the bread from the oven and let them cool slightly on a wire rack. Serve warm, either plain or with your favorite spreads.
Extra Tips:
When making Pan de Manteca, confirm your lard or butter is at room temperature for easier mixing. If you find the dough too sticky, sprinkle a bit more flour while kneading, but be careful not to add too much as it can make the bread dense.
Additionally, for a touch of sweetness, consider brushing the tops of the bread with melted butter and sprinkling a little sugar before baking. Enjoy the warm, comforting experience of fresh Pan de Manteca!
Pan De Choclo
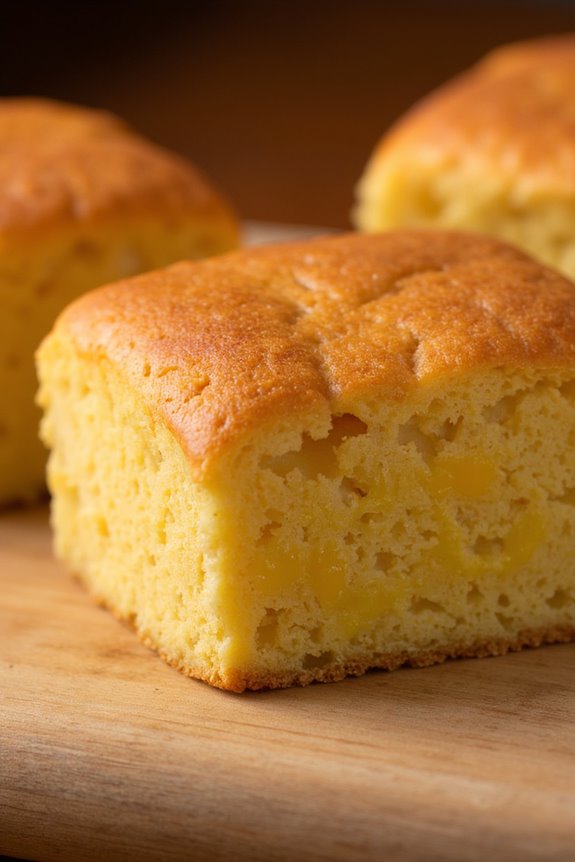
Pan de Choclo is a traditional Peruvian corn bread that embodies the essence of rustic South American cuisine. This flavorful bread is made primarily from fresh corn, which gives it a unique sweetness and texture that sets it apart from other breads.
Often enjoyed as a side dish or snack, Pan de Choclo can be served warm with a dollop of butter or paired with savory stews and soups. Its history traces back to the Andean regions, where corn has been a staple food for centuries, making this bread not only delicious but also a cultural emblem.
To prepare Pan de Choclo, you’ll need fresh ingredients that highlight the natural flavors of corn. The bread’s moist and slightly dense texture is complemented by the addition of cheese, which adds a rich creaminess. The recipe is straightforward, making it perfect for both experienced bakers and novices looking to explore Peruvian cuisine.
Follow these steps to create a delightful Pan de Choclo that will transport your taste buds straight to the heart of Peru.
Ingredients (Serves 4-6)
- 2 cups fresh corn kernels (or frozen, thawed)
- 1 cup milk
- 1/2 cup butter, melted
- 2 large eggs
- 1 cup queso fresco or feta cheese, crumbled
- 1 cup all-purpose flour
- 1 tablespoon sugar
- 1 tablespoon baking powder
- 1/2 teaspoon salt
Cooking Instructions
- Prepare the Corn Mixture: In a blender, combine the fresh corn kernels, milk, melted butter, and eggs. Blend the mixture until smooth, making sure that the corn is well incorporated and the mixture is creamy.
- Combine Dry Ingredients: In a large mixing bowl, sift together the all-purpose flour, sugar, baking powder, and salt. This step is vital as it guarantees that the baking powder is evenly distributed throughout the flour, which will help the bread rise properly.
- Mix Wet and Dry Ingredients: Pour the blended corn mixture into the bowl with the dry ingredients. Gently fold the mixture using a spatula until just combined. Be careful not to overmix, as this can lead to a dense texture.
- Add Cheese: Fold the crumbled cheese into the batter. The cheese not only adds flavor but also contributes to the moistness of the bread. Make sure the cheese is evenly distributed throughout the batter.
- Preheat the Oven: Preheat your oven to 350°F (175°C). Grease a baking dish or a cast-iron skillet with butter or cooking spray to prevent the bread from sticking.
- Bake the Bread: Pour the batter into the prepared baking dish and spread it out evenly. Place the dish in the preheated oven and bake for 30-35 minutes or until the top is golden brown and a toothpick inserted in the center comes out clean.
- Cool and Serve: Once baked, remove the Pan de Choclo from the oven and let it cool for a few minutes. Cut into squares and serve warm, optionally with a pat of butter on top.
Extra Tips
When making Pan de Choclo, using fresh corn will yield the best flavor, but if it’s not in season, frozen corn works well too.
For a twist on the traditional recipe, you can experiment by adding chopped herbs like cilantro or spices such as paprika for an extra kick. Additionally, be sure to monitor the baking time closely, as ovens can vary; the bread should be golden and firm to the touch when done.
Enjoy your homemade Pan de Choclo as a delightful addition to any meal!
Pan De Cacao
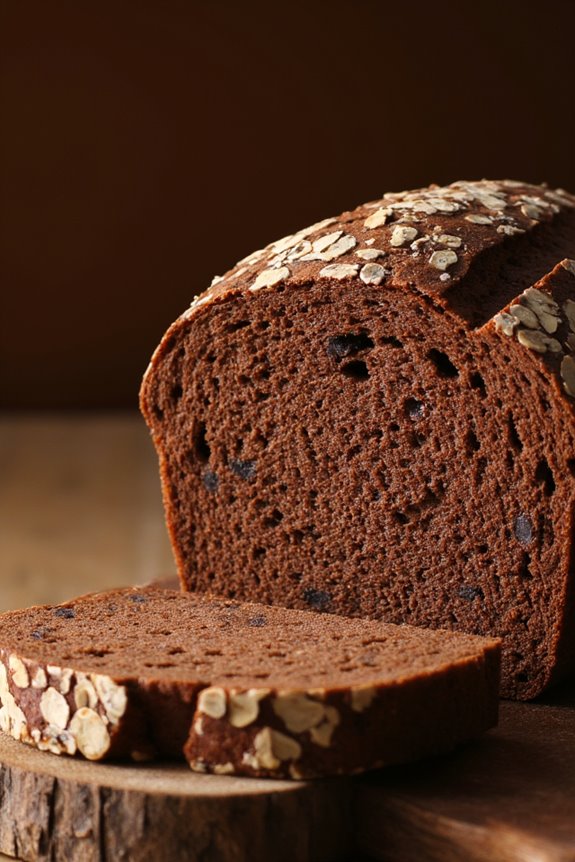
Pan De Cacao is a delightful rustic Peruvian bread that combines the rich flavor of cocoa with the comforting texture of freshly baked bread. This unique recipe not only highlights the use of cocoa powder but also incorporates ingredients that enhance the bread’s sweetness and aroma, making it a perfect treat for breakfast or an afternoon snack.
Enjoyed warm with a pat of butter or used as a base for decadent sandwiches, Pan De Cacao is certain to impress your family and friends.
Baking this bread is an enjoyable process that fills your kitchen with a mouth-watering aroma. The recipe is straightforward, and it allows for creativity regarding additions like nuts or dried fruits. Once you master the basics, you can experiment with different flavors and textures, creating your own signature version of this delicious Peruvian delight.
Ingredients (serving size: 4-6 people)
- 2 cups all-purpose flour
- 1/2 cup cocoa powder
- 1/2 cup sugar
- 1 teaspoon baking powder
- 1/2 teaspoon baking soda
- 1/4 teaspoon salt
- 1/2 cup unsalted butter, softened
- 1 cup milk
- 2 large eggs
- 1 teaspoon vanilla extract
Cooking Instructions
- Preheat the Oven: Begin by preheating your oven to 350°F (175°C). This guarantees that your bread will bake evenly and rise properly once it’s placed in the oven.
- Mix Dry Ingredients: In a large mixing bowl, whisk together the all-purpose flour, cocoa powder, sugar, baking powder, baking soda, and salt. This step is essential as it helps to evenly distribute the leavening agents and the cocoa throughout the flour, giving your bread a uniform texture and flavor.
- Cream Butter and Sugar: In another bowl, cream the softened butter and sugar together until light and fluffy. This process incorporates air into the butter, which will help your bread achieve a light and airy texture.
- Combine Wet Ingredients: Add the milk, eggs, and vanilla extract to the butter mixture. Mix well until all the wet ingredients are fully incorporated. This mixture will provide moisture and richness to the bread.
- Combine Wet and Dry Mixtures: Gradually add the dry mixture to the wet mixture, stirring gently until just combined. Avoid overmixing, as this can lead to dense bread. The batter should be slightly lumpy, which is perfectly fine.
- Transfer to Baking Pan: Pour the batter into a greased loaf pan, smoothing the top with a spatula. Make sure to spread it evenly to guarantee uniform baking.
- Bake: Place the loaf pan in the preheated oven and bake for approximately 40-45 minutes, or until a toothpick inserted into the center comes out clean. Keep an eye on the bread towards the end of the baking time to prevent over-browning.
- Cool and Serve: Once baked, remove the bread from the oven and let it cool in the pan for about 10 minutes. Carefully transfer it to a wire rack to cool completely before slicing. Enjoy your Pan De Cacao warm or at room temperature!
Extra Tips
When making Pan De Cacao, consider adding chopped nuts or chocolate chips to the batter for added texture and flavor. Additionally, make sure all your ingredients are at room temperature before you start baking, as this helps with even mixing and better rising.
If you prefer a sweeter bread, you can increase the sugar slightly. Finally, store any leftovers wrapped in plastic wrap or in an airtight container to keep it fresh for several days. Enjoy your baking!
Pan De Quinua
Pan De Quinua, or quinoa bread, is a delightful and nutritious rustic bread that hails from the heart of Peru. This unique recipe incorporates quinoa flour, which not only adds a distinct flavor but also boosts the bread’s protein content, making it a wholesome choice for any meal.
The combination of ingredients creates a soft, slightly nutty loaf that pairs beautifully with various spreads, or can simply be enjoyed fresh out of the oven. Making Pan De Quinua is a wonderful way to explore traditional Peruvian flavors while also embracing the health benefits of quinoa.
This bread is perfect for breakfast, as a snack, or served alongside soups and salads. With its simple ingredients and easy preparation, you’ll find that this rustic bread can become a staple in your homemade bread repertoire.
Ingredients (Serves 4-6)
- 1 cup quinoa flour
- 1 cup all-purpose flour
- 1 teaspoon baking powder
- 1 teaspoon salt
- 2 tablespoons olive oil
- 1 tablespoon honey or sugar
- 1 cup warm water
- 1 teaspoon active dry yeast
Cooking Instructions
- Activate the Yeast: In a small bowl, combine the warm water and honey (or sugar). Sprinkle the active dry yeast over the surface and let it sit for about 5-10 minutes until it becomes frothy. This indicates that the yeast is active and ready to be incorporated into the dough.
- Mix Dry Ingredients: In a large mixing bowl, combine the quinoa flour, all-purpose flour, baking powder, and salt. Whisk these ingredients together until they’re evenly combined, ensuring there are no lumps.
- Combine Wet and Dry Ingredients: Once the yeast mixture is frothy, add it to the bowl with the dry ingredients along with the olive oil. Stir the mixture with a wooden spoon or spatula until a shaggy dough forms.
- Knead the Dough: Transfer the dough onto a lightly floured surface and knead it gently for about 5-7 minutes. The dough should become smooth and elastic. If it feels too sticky, you can sprinkle a little more flour as needed.
- Let the Dough Rise: Form the kneaded dough into a ball and place it in a lightly greased bowl. Cover it with a clean kitchen towel or plastic wrap, and let it rise in a warm area for about 1 hour, or until it has doubled in size.
- Shape the Bread: Once the dough has risen, punch it down to release any air bubbles. Shape it into a loaf or divide it into smaller rolls, depending on your preference. Place the shaped dough onto a baking sheet lined with parchment paper.
- Second Rise: Cover the shaped bread again with the towel and let it rise for another 30-40 minutes until it puffs up slightly. Preheat your oven to 375°F (190°C) during this time.
- Bake the Bread: After the second rise, place the bread in the preheated oven and bake for about 25-30 minutes, or until the crust is golden brown and the bread sounds hollow when tapped on the bottom.
- Cool and Serve: Remove the bread from the oven and let it cool on a wire rack for at least 10 minutes before slicing. Enjoy your Pan De Quinua warm or at room temperature.
Extra Tips
When making Pan De Quinua, feel free to experiment with the flavors by adding herbs or seeds to the dough for extra texture and taste.
You can also substitute part of the all-purpose flour with whole wheat flour for a heartier version. If you want to enhance the bread with a little extra richness, consider brushing the top with melted butter before baking.
Remember to store any leftover bread in an airtight container to keep it fresh for several days!
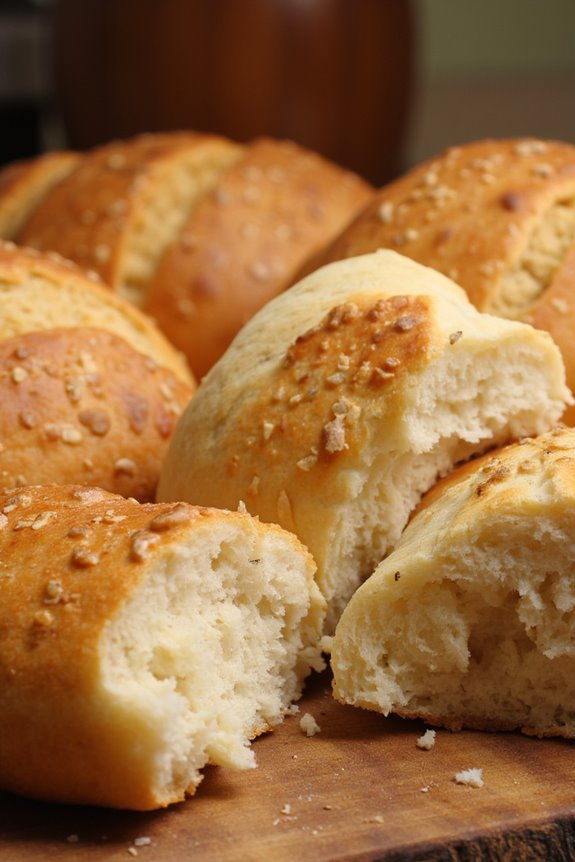
Pan De Sal
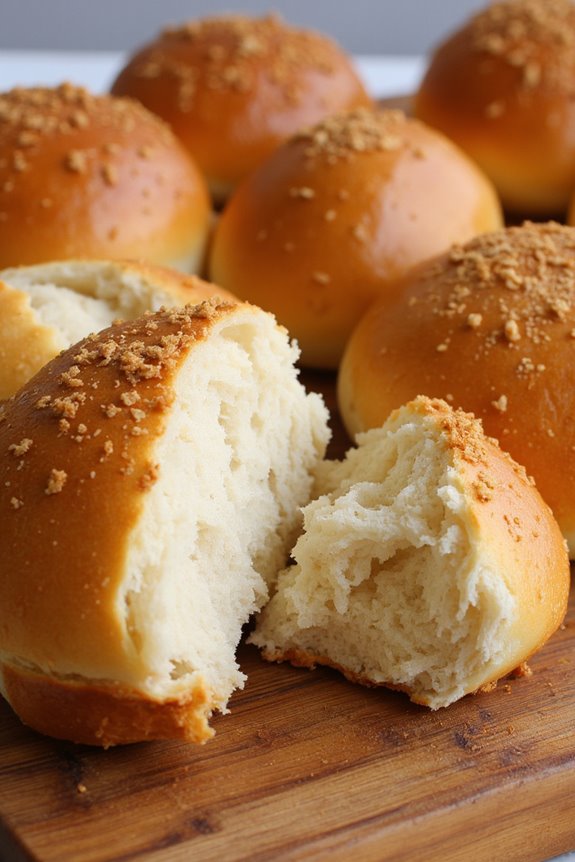
Pan De Sal, which translates to “salt bread,” is a beloved staple in Peruvian cuisine. This delightful bread is known for its slightly sweet, soft texture and crusty exterior, making it perfect for breakfast or as an accompaniment to a variety of dishes.
Traditionally, Pan De Sal is enjoyed with butter, cheese, or even stuffed with savory fillings. Its simplicity and versatility have made it a favorite in many households across Peru.
Making Pan De Sal at home is an enjoyable experience that allows you to indulge in the warm, comforting aroma of freshly baked bread. While it may seem intimidating, the process is straightforward and requires only a handful of ingredients. In just a few hours, you can create a batch of these delicious rolls that will impress your family and friends.
Ingredients (Serves 4-6 people):
- 4 cups all-purpose flour
- 1 cup warm milk (about 110°F/43°C)
- 1/4 cup granulated sugar
- 1/4 cup unsalted butter, softened
- 2 teaspoons active dry yeast
- 1 teaspoon salt
- 2 large eggs
- 1/2 cup breadcrumbs (for topping)
- Additional flour for dusting
Cooking Instructions:
- Activate the Yeast: In a small bowl, combine the warm milk and sugar. Sprinkle the yeast over the top and let it sit for about 5-10 minutes, or until it becomes frothy. This step guarantees that the yeast is alive and ready to help the dough rise.
- Mix the Dough: In a large mixing bowl, combine the flour and salt. Create a well in the center and add the activated yeast mixture, softened butter, and eggs. Stir the mixture until a rough dough begins to form.
- Knead the Dough: Transfer the dough onto a lightly floured surface and knead it for about 10 minutes, or until it becomes smooth and elastic. If the dough is too sticky, add a little more flour until you achieve the right consistency.
- First Rise: Place the kneaded dough in a greased bowl, cover it with a clean kitchen towel, and let it rise in a warm place for about 1-2 hours, or until it has doubled in size. This step allows the dough to develop flavor and texture.
- Shape the Rolls: Once the dough has risen, punch it down to release the air. Divide the dough into equal pieces (approximately 12-15) and shape each piece into a small ball. Roll each ball in breadcrumbs to coat it lightly.
- Second Rise: Place the shaped rolls on a greased baking sheet, leaving some space between them. Cover with a towel and let them rise again for about 30-45 minutes, or until they puff up.
- Preheat the Oven: While the rolls are rising, preheat your oven to 350°F (175°C). This guarantees that the rolls bake evenly and develop a beautiful golden crust.
- Bake the Rolls: Once the second rise is complete, place the baking sheet in the preheated oven. Bake the rolls for about 20-25 minutes or until they’re golden brown. The aroma will fill your kitchen!
- Cool and Serve: Remove the rolls from the oven and let them cool on a wire rack for a few minutes. Enjoy them warm or at room temperature, best served with butter or your favorite spread.
Extra Tips:
For the best results, make sure your yeast is fresh and active to achieve a good rise. If you prefer a richer flavor, consider adding a pinch of nutmeg or cinnamon to the dough.
Additionally, you can experiment with fillings by adding cheese, ham, or your favorite spreads before shaping the rolls. Remember that the dough can be prepared ahead of time; simply refrigerate it after the first rise and shape the rolls when you’re ready to bake.
Enjoy the process and the delicious results!
Pan De Cebada
Pan De Cebada, or Barley Bread, is a traditional Peruvian bread that showcases the rich agricultural heritage of the Andes. This rustic bread is made primarily with barley flour, which imparts a nutty flavor and a dense texture.
In addition to being a staple in many Peruvian households, Pan De Cebada is often enjoyed with cheese or as an accompaniment to soups and stews, making it a versatile addition to any meal. The process of making this bread is simple yet rewarding, allowing you to experience a taste of Peru in your own kitchen.
To create the perfect Pan De Cebada, it’s crucial to use quality ingredients and allow the dough to rise properly. The bread is typically baked until it develops a golden-brown crust, while maintaining a soft and chewy interior.
The aroma of freshly baked barley bread is sure to draw everyone to the kitchen, making it an ideal recipe for family gatherings or casual get-togethers. With a few basic steps, you can enjoy this delightful Peruvian bread that honors its ancestral roots.
Ingredients (Serves 4-6):
- 2 cups barley flour
- 1 cup all-purpose flour
- 1 cup warm water
- 1 tablespoon honey
- 1 teaspoon salt
- 1 tablespoon active dry yeast
- 2 tablespoons olive oil
- Optional: seeds for topping (e.g., sesame, sunflower)
Cooking Instructions:
- Activate the Yeast: In a small bowl, combine the warm water with the honey and active dry yeast. Allow the mixture to sit for about 10 minutes until it becomes frothy. This step guarantees that the yeast is active and ready to help the bread rise.
- Mix Dry Ingredients: In a large mixing bowl, whisk together the barley flour, all-purpose flour, and salt. This combination of flours will give the bread its unique flavor and texture.
- Combine Ingredients: Once the yeast mixture is frothy, pour it into the bowl with the dry ingredients along with the olive oil. Mix with a wooden spoon or your hands until a rough dough forms.
- Knead the Dough: Transfer the dough to a floured surface and knead it for about 10 minutes until it becomes smooth and elastic. This step develops the gluten, giving the bread a better structure.
- First Rise: Place the kneaded dough into a lightly greased bowl, cover it with a damp cloth or plastic wrap, and let it rise in a warm place for about 1 hour or until it has doubled in size.
- Shape the Bread: After the dough has risen, punch it down to release any air bubbles. Shape it into a round or oval loaf, depending on your preference. If desired, sprinkle seeds on top for added flavor and texture.
- Second Rise: Place the shaped dough on a baking sheet lined with parchment paper. Cover it again and let it rise for an additional 30 minutes.
- Preheat the Oven: While the dough is rising, preheat your oven to 375°F (190°C). This guarantees that the bread starts baking at the right temperature.
- Bake the Bread: Once the dough has risen again, place it in the oven and bake for 25-30 minutes, or until the bread is golden brown and sounds hollow when tapped on the bottom.
- Cool and Serve: Remove the bread from the oven and let it cool on a wire rack for at least 15 minutes before slicing. Enjoy it warm with butter or as an accompaniment to your favorite dish.
Extra Tips:
When preparing Pan De Cebada, feel free to experiment with different toppings such as herbs or spices to customize the flavor profile.
Additionally, for a sweeter version, you can add a handful of raisins or nuts to the dough before the first rise. If you have leftover bread, it can be stored in an airtight container for a few days, or sliced and frozen for longer preservation.
Enjoying this homemade bread fresh out of the oven is a delightful experience that captures the essence of Peruvian cuisine!
Pan De Frutas
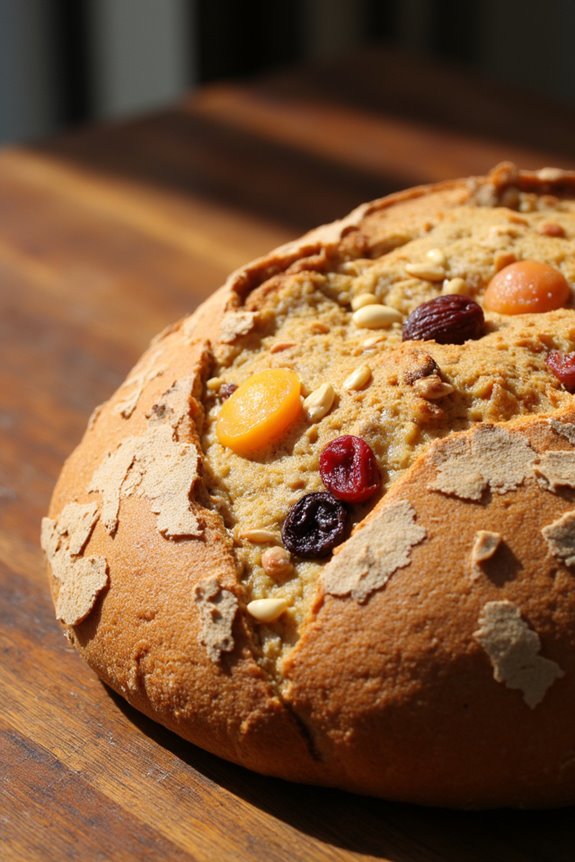
Pan De Frutas, or Fruit Bread, is a delightful traditional Peruvian bread that showcases the country’s rich agricultural bounty. This sweet bread is typically enriched with fresh fruits, nuts, and aromatic spices, offering a unique blend of flavors and textures. It’s perfect for breakfast, an afternoon snack, or even as a dessert. The addition of fruits not only enhances the taste but also provides a beautiful visual appeal, making it a favorite for festive occasions and family gatherings.
Making Pan De Frutas at home allows you to customize the ingredients to your liking. You can use a variety of fruits such as bananas, apples, or even seasonal berries. The process of baking this bread fills your kitchen with a warm, inviting aroma that will have everyone keenly awaiting the moment it comes out of the oven. This recipe is straightforward, making it accessible for bakers of all skill levels, guaranteeing that everyone can enjoy this rustic Peruvian delight.
Ingredients (Servings: 4-6)
- 3 cups all-purpose flour
- 1 cup sugar
- 1 cup milk
- 2 large eggs
- 1/2 cup unsalted butter, melted
- 1 tablespoon baking powder
- 1 teaspoon vanilla extract
- 1 teaspoon ground cinnamon
- 1/2 teaspoon salt
- 1 cup mixed dried fruits (such as raisins, apricots, and cranberries)
- 1/2 cup chopped nuts (such as almonds or walnuts)
Cooking Instructions
- Preheat the Oven: Begin by preheating your oven to 350°F (175°C). This guarantees that your bread will bake evenly and rise properly once it’s in the oven.
- Prepare the Baking Pan: Grease a loaf pan or line it with parchment paper. This step is essential to prevent the bread from sticking to the pan, allowing for easy removal once it’s baked.
- Mix the Dry Ingredients: In a large mixing bowl, whisk together the all-purpose flour, sugar, baking powder, ground cinnamon, and salt. Make sure that these dry ingredients are well combined to provide an even distribution of flavors throughout the bread.
- Combine the Wet Ingredients: In a separate bowl, beat the eggs and then add the milk, melted butter, and vanilla extract. Mix these ingredients until they’re well combined. This mixture will add moisture and richness to your bread.
- Combine Wet and Dry Mixtures: Gradually pour the wet ingredients into the dry ingredients, stirring gently until just combined. Be careful not to overmix, as this can lead to a dense bread.
- Fold in the Fruits and Nuts: Gently fold in the mixed dried fruits and chopped nuts into the batter. This step adds texture and flavor, making every bite of your Pan De Frutas exciting.
- Pour Batter into the Pan: Carefully pour the batter into the prepared loaf pan, smoothing the top with a spatula. This will assure an even rise during baking.
- Bake the Bread: Place the loaf pan in the preheated oven and bake for 45-55 minutes, or until the bread is golden brown and a toothpick inserted into the center comes out clean. Keep an eye on the bread towards the end of the baking time to avoid overbaking.
- Cool Before Serving: Once baked, remove the bread from the oven and let it cool in the pan for about 10 minutes. Then, transfer it to a wire rack to cool completely before slicing and serving.
Extra Tips
For an even more flavorful Pan De Frutas, consider experimenting with different combinations of fruits and spices. You might add a touch of nutmeg or cardamom for a warm, aromatic twist.
Additionally, if you prefer a sweeter bread, feel free to increase the sugar slightly or drizzle a glaze on top once it has cooled. This bread can also be stored in an airtight container for up to three days, making it a great make-ahead option for busy days ahead.
Enjoy your delicious homemade Pan De Frutas!
Pan De Acelga
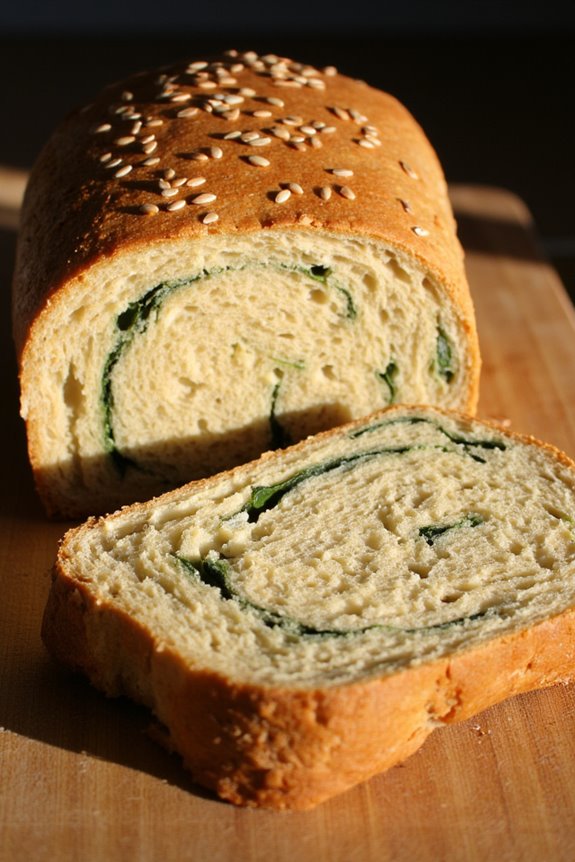
Pan de Acelga, or Swiss Chard Bread, is a delightful rustic bread that hails from the heart of Peru. This unique recipe incorporates the vibrant flavors and nutritional benefits of Swiss chard, making it not only a tasty addition to any meal but also a wholesome one.
Traditionally enjoyed as a side dish or snack, this bread is perfect for pairing with soups, stews, or simply with a smattering of butter. Its soft texture and earthy flavor make it a comforting staple in Peruvian households.
The beauty of Pan de Acelga lies in its simplicity and the use of fresh ingredients. The Swiss chard is the star of the show, providing a beautiful green hue and a hint of bitterness that balances out the sweetness of the bread. When baked, it transforms into a warm, inviting treat that can be enjoyed at any time of the day.
Whether you’re an experienced baker or a novice in the kitchen, this recipe will guide you through creating your very own Pan de Acelga.
Ingredients (Serves 4-6):
- 2 cups all-purpose flour
- 1 cup cooked Swiss chard, chopped and drained
- 1/2 cup warm milk
- 1/4 cup olive oil
- 2 tablespoons sugar
- 2 teaspoons baking powder
- 1 teaspoon salt
- 1 large egg
- 1/4 teaspoon black pepper
- Optional: sesame seeds for topping
Cooking Instructions:
- Prepare the Chard: Start by washing the Swiss chard thoroughly under cold water. Remove the stems and chop the leaves. In a pot of boiling water, blanch the chard for about 2-3 minutes, then drain and let it cool. Once cool, squeeze out any excess moisture and chop it finely.
- Mix Dry Ingredients: In a large mixing bowl, combine the all-purpose flour, baking powder, sugar, salt, and black pepper. Use a whisk to guarantee that the ingredients are well blended and aerated.
- Combine Wet Ingredients: In a separate bowl, whisk together the warm milk, olive oil, and egg until fully combined. Make sure the milk is warm, not hot, to prevent cooking the egg.
- Combine Mixtures: Make a well in the center of the dry ingredients and pour in the wet mixture. Add the chopped Swiss chard to the mixture. Using a wooden spoon, stir gently until a soft dough forms.
- Knead the Dough: Turn the dough out onto a lightly floured surface. Knead gently for about 5 minutes until the dough is smooth and elastic. Avoid over-kneading, as this can make the bread tough.
- Shape and Rest: Shape the dough into a round loaf or divide it into smaller rolls if preferred. Place it on a greased baking sheet. Cover with a kitchen towel and allow it to rest for about 30 minutes to rise slightly.
- Preheat the Oven: While the dough is resting, preheat the oven to 375°F (190°C).
- Bake the Bread: If desired, sprinkle sesame seeds on top of the loaf for added flavor and texture. Bake in the preheated oven for 25-30 minutes or until the bread is golden brown and sounds hollow when tapped on the bottom.
- Cool and Serve: Once baked, remove the bread from the oven and allow it to cool on a wire rack for at least 10 minutes before slicing. Serve warm or at room temperature.
Extra Tips:
When making Pan de Acelga, feel free to experiment with different types of greens, such as spinach or kale, if Swiss chard isn’t available.
Additionally, for added flavor, consider incorporating cheese or herbs into the dough. This bread is best enjoyed fresh, but you can store leftovers in an airtight container for a few days. Reheat gently in the oven before serving to bring back its warm, soft texture. Enjoy this rustic Peruvian treat with family and friends!