

When it comes to dinner, there’s something truly special about the flavors of South America. Each dish is like a little celebration on your plate, from the smoky charm of Argentine asado to the vibrant zest of Peruvian ceviche. These recipes are not only delicious but also bring people together with their rich cultural heritage. If you’re excited to try some unforgettable meals that can make your weeknights a bit more special, get ready to explore the options ahead.
Argentine Asado: A Hearty Barbecue Experience
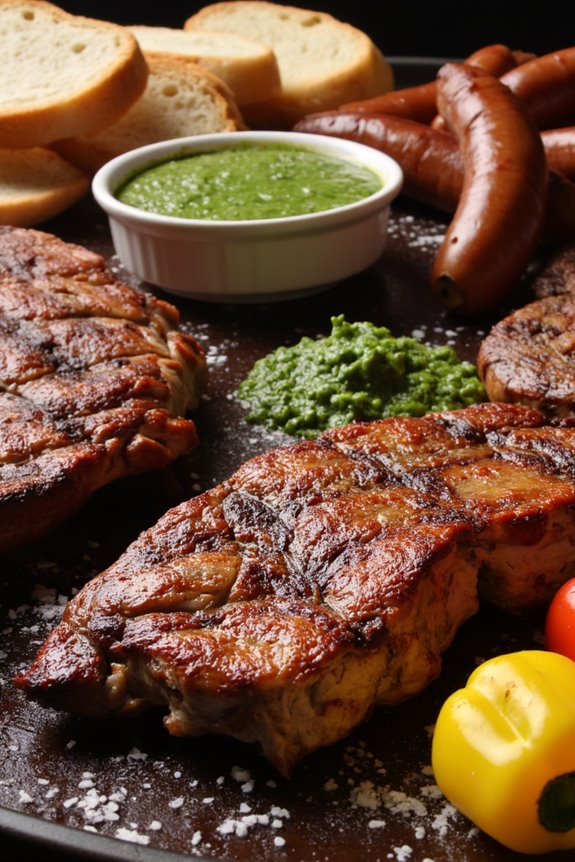
Argentine Asado is more than just a meal; it’s a cultural tradition that brings friends and families together around a grill. This hearty barbecue experience is characterized by its variety of meats, slow cooking method, and the use of wood or charcoal, which imparts a distinct flavor to the dishes. The centerpiece of an Asado is usually beef, but it can also include pork, chicken, and an array of sausages, all seasoned simply with salt to highlight the meat’s natural flavors.
The social aspect of Asado is equally important—it’s a time for gathering, storytelling, and enjoying good company over delicious food.
To create an authentic Argentine Asado, you’ll want to prepare a variety of cuts to give your guests a true taste of Argentina. The meats are often cooked on a parrilla (grill) or an asador (a traditional grill frame) over a wood fire, allowing them to develop a smoky flavor that’s simply irresistible. Accompanying the meats with traditional sides such as chimichurri sauce, grilled vegetables, and fresh bread will elevate this experience even further.
Let’s explore the ingredients and steps needed to prepare a mouthwatering Argentine Asado for 4-6 people.
Ingredients:
- 2 lbs of beef ribeye or short ribs
- 1 lb of pork ribs
- 1 lb of chorizo sausages
- 1 lb of flank steak
- 2-3 tablespoons of coarse sea salt
- 1 tablespoon of black pepper
- 1 tablespoon of smoked paprika (optional)
- 1 bunch of fresh parsley (for chimichurri)
- 4 cloves of garlic
- 1 teaspoon of red pepper flakes (optional)
- ½ cup of olive oil
- ¼ cup of red wine vinegar
- 1-2 bell peppers (for grilling)
- Fresh bread (for serving)
Cooking Instructions:
1. Prepare the Chimichurri Sauce: In a food processor, combine the parsley, garlic, red pepper flakes, olive oil, and red wine vinegar. Pulse until you achieve a chunky consistency. Set aside to allow the flavors to meld together while you prepare the meat.
2. Select and Prepare the Meats: Choose a variety of cuts, including ribeye, pork ribs, chorizo, and flank steak. Trim any excess fat if needed. Pat the meats dry with paper towels to guarantee they sear properly on the grill.
3. Season the Meats: Generously season each cut of meat with coarse sea salt, black pepper, and smoked paprika if using. Let the seasoned meat rest for about 30 minutes at room temperature to absorb the flavors before grilling.
4. Prepare the Grill: If using a charcoal grill, light the coals and let them burn until they’re ash-covered (about 20-30 minutes). If using a wood fire, allow the wood to burn down until you have a bed of hot coals. Preheat the grill to medium-high heat.
5. Grill the Meat: Start with the larger cuts of meat, like the ribeye and flank steak, placing them on the grill first. Cook for about 5-7 minutes on each side, depending on thickness and desired doneness.
Next, add the pork ribs and chorizo sausages, grilling them for an additional 10-15 minutes, turning occasionally to guarantee even cooking.
6. Grill the Vegetables: While the meat is cooking, place halved bell peppers on the grill. Cook until they’re tender and slightly charred, about 5-7 minutes.
7. Rest the Meat: Once the meats are cooked to your preference, remove them from the grill and let them rest for about 10 minutes. This allows the juices to redistribute, keeping the meat moist and flavorful.
8. Serve: Slice the meats and arrange them on a large platter. Serve with chimichurri sauce, grilled vegetables, and fresh bread on the side.
Extra Tips:
For the best results, use high-quality cuts of meat, as they’ll yield the most delicious flavors.
Don’t rush the cooking process; allow the meat to grill slowly for that perfect char and tenderness. Experiment with different cuts and cooking times to discover your favorites.
Additionally, feel free to customize your chimichurri by adding ingredients like oregano or lemon juice for extra zest. Enjoying Asado is as much about the experience as it’s about the food, so take your time and savor each moment!
Peruvian Ceviche: A Fresh and Zesty Delight
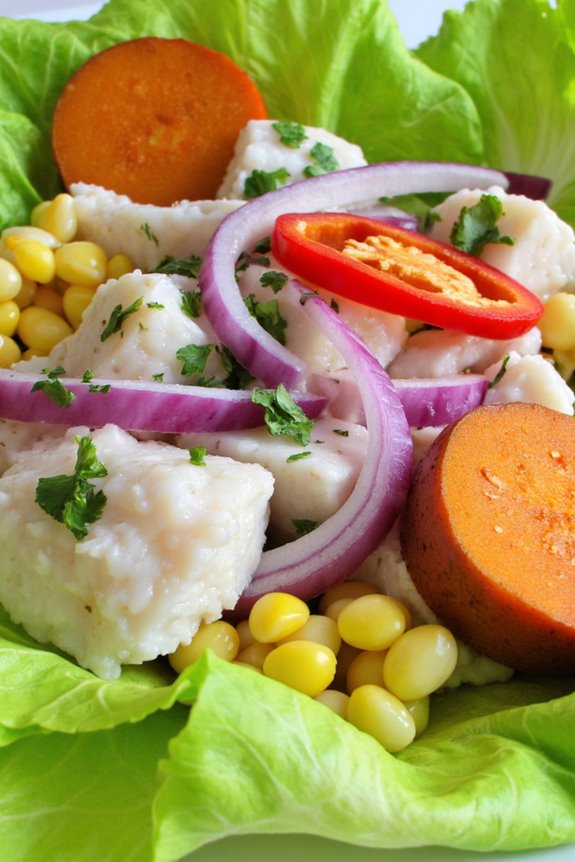
Peruvian Ceviche is a vibrant and invigorating dish that captures the essence of South American cuisine. Known for its use of fresh, high-quality ingredients, this dish showcases the natural flavors of the seafood, beautifully enhanced by the tanginess of lime juice and the heat of chili peppers. The combination of fresh fish, aromatic herbs, and zesty marinade creates a delightful experience for the taste buds, making it a perfect appetizer or light meal, especially during warm weather.
Originating from the coastal regions of Peru, ceviche has become a staple of Peruvian gastronomy. Traditionally, it’s made with raw fish that’s “cooked” in the acidity of citrus juice, often accompanied by onions, cilantro, and a variety of spices. This dish isn’t only delicious but also symbolically represents the rich culinary heritage of Peru, celebrating its fresh seafood and vibrant ingredients.
Whether enjoyed on a sunny terrace or at a festive gathering, Peruvian Ceviche is sure to impress your guests and leave them craving more.
Ingredients (Serves 4-6):
- 1 lb (450 g) fresh firm white fish fillets (such as snapper or tilapia)
- 1 cup freshly squeezed lime juice
- 1 medium red onion, thinly sliced
- 1-2 small fresh chili peppers (like ají amarillo or jalapeño), thinly sliced
- 1/2 cup fresh cilantro, chopped
- 1 teaspoon salt
- 1/2 teaspoon black pepper
- 1 cup sweet potato, cooked and sliced (optional)
- 1 cup corn (preferably Peruvian corn or hominy, cooked)
- Lettuce leaves for serving (optional)
Cooking Instructions:
- Prepare the Fish: Begin by selecting the freshest fish available. Rinse the fish fillets under cold water and pat them dry with a paper towel. Cut the fish into bite-sized cubes, ensuring they’re uniform for even marination.
- Marinate the Fish: In a large mixing bowl, combine the fish cubes with the freshly squeezed lime juice. Make sure the fish is fully submerged in the juice, as this is what’ll “cook” the fish. Cover the bowl with plastic wrap and refrigerate for about 15-30 minutes, depending on how “cooked” you prefer the texture of the fish.
- Add Aromatics: Once the fish has marinated, drain a small amount of the lime juice, leaving some to keep the fish moist. Add the thinly sliced red onion, chili peppers, chopped cilantro, salt, and black pepper to the bowl. Gently toss the ingredients together, ensuring the fish is well coated in the mixture.
- Serve: If desired, prepare a serving plate with lettuce leaves as a base. Spoon the ceviche mixture onto the lettuce, and garnish with slices of cooked sweet potato and corn for added texture and sweetness. Serve immediately to enjoy the fresh flavors.
- Presentation: Ceviche is best enjoyed cold. You can serve it in small bowls or on a large platter for sharing. Include extra lime wedges on the side for those who prefer a little more acidity.
Extra Tips:
When making Peruvian Ceviche, freshness is essential, so always opt for the highest quality fish available. If you can, visit a local fish market early in the day to find the freshest catch.
Additionally, feel free to experiment with different types of fish or seafood, such as shrimp or scallops, to customize the dish to your liking. Remember, the longer the fish marinates, the firmer it will become, so adjust the marination time based on your preference.
Enjoy your ceviche with a side of crispy tortilla chips or plantain chips for a delightful crunch!
Brazilian Feijoada: A Flavorful Black Bean Stew

Feijoada is a traditional Brazilian dish that has its roots in the country’s colonial past, blending African, Portuguese, and Indigenous influences into a hearty meal that warms the soul. This dish is primarily made with black beans and a variety of meats, creating a rich and flavorful stew that’s often enjoyed on special occasions and gatherings.
Traditionally, feijoada is served with rice, collard greens, and orange slices, making it not only a delightful culinary experience but also a feast for the eyes.
The beauty of feijoada lies in its versatility; you can mix and match the types of meats used according to personal preference and availability. While the classic version includes cuts of pork and beef, you can also incorporate smoked sausage or even turkey for a lighter option.
As the stew simmers, the flavors meld beautifully, resulting in a comforting dish that’s sure to please a crowd.
Ingredients (Serves 4-6)
- 1 pound black beans (dried)
- 1 tablespoon olive oil
- 1 onion, chopped
- 4 cloves garlic, minced
- 1 pound pork shoulder, cut into chunks
- 1 pound beef brisket, cut into chunks
- 1/2 pound chorizo or smoked sausage, sliced
- 2 bay leaves
- 1 teaspoon smoked paprika
- 1 teaspoon cumin
- Salt and pepper to taste
- 4 cups chicken broth or water
- 2 oranges, cut into wedges (for serving)
- Cooked white rice (for serving)
- Chopped fresh cilantro (for garnish)
Cooking Instructions
- Prepare the Beans: Start by rinsing the black beans under cold water. Place them in a large pot, cover with water, and soak overnight. This will help soften the beans and reduce cooking time.
- Sauté the Aromatics: In a large Dutch oven or heavy pot, heat the olive oil over medium heat. Add the chopped onion and minced garlic, sautéing until the onion is translucent and fragrant, about 5 minutes.
- Brown the Meats: Add the pork shoulder and beef brisket to the pot, browning them on all sides for about 10 minutes. This step enhances the flavor of the meat and adds depth to the stew.
- Add the Sausage: Once the meats are browned, stir in the sliced chorizo or smoked sausage. Allow it to cook with the meats for an additional 5 minutes, releasing its savory oils.
- Combine Ingredients: Drain the soaked black beans and add them to the pot along with the bay leaves, smoked paprika, cumin, salt, and pepper. Pour in the chicken broth or water, making sure everything is well covered.
- Simmer the Stew: Bring the mixture to a boil, then reduce the heat to low and cover. Let it simmer for about 2 to 3 hours, stirring occasionally, until the beans are tender and the meats are falling apart.
- Adjust Seasoning: After the cooking time, taste the stew and adjust the seasoning with more salt and pepper if needed. Remove the bay leaves before serving.
- Serve: Ladle the feijoada into bowls. Serve with cooked white rice, fresh orange wedges, and a sprinkle of chopped cilantro on top for a burst of color and flavor.
Extra Tips
When preparing feijoada, it’s important to remember that the dish improves with time; it can be made a day in advance and reheated, allowing the flavors to deepen even further.
Additionally, feel free to experiment with different types of meats and spices to customize the stew to your liking. If you want to make the dish even more traditional, serve it alongside farofa (toasted cassava flour) for an added crunch that complements the stew perfectly.
Enjoy your cooking adventure with this delightful Brazilian classic!
Chilean Pastel De Choclo: Corn Pie With a Twist

Chilean Pastel De Choclo, or Corn Pie, is a beloved dish that showcases the rich agricultural bounty of Chile, particularly its sweet corn. This comforting casserole is a delightful blend of flavors and textures, combining a savory filling of meat, onions, olives, and hard-boiled eggs, all topped with a creamy layer of blended corn.
Traditionally served during the summer months, this dish captures the essence of Chilean cuisine, making it a perfect centerpiece for family gatherings and celebrations.
The beauty of Pastel De Choclo lies not only in its taste but also in its versatility. While the classic version includes ground beef or chicken, feel free to customize the ingredients to your liking. The sweet corn topping adds a unique sweetness to the savory filling, creating a delightful contrast that keeps everyone coming back for more.
So, gather your ingredients and get ready to create a dish that will transport you to the heart of Chile with every bite.
Ingredients (Serves 4-6):
- 2 cups of corn kernels (fresh or frozen)
- 1 cup of milk
- 2 tablespoons of butter
- 1 teaspoon of sugar
- Salt and pepper, to taste
- 1 pound of ground beef or chicken
- 1 medium onion, finely chopped
- 2 hard-boiled eggs, chopped
- 1/2 cup of black olives, pitted and sliced
- 1 teaspoon of paprika
- 1 teaspoon of cumin
- 1/4 cup of fresh basil or cilantro, chopped (optional)
- 1 tablespoon of olive oil
Cooking Instructions:
- Prepare the corn topping: In a blender, combine the corn kernels, milk, butter, sugar, salt, and pepper. Blend until smooth and creamy. This will be the delicious topping for your pastel. Set aside.
- Cook the meat filling: In a large skillet, heat the olive oil over medium heat. Add the chopped onion and sauté until translucent. Then, add the ground beef or chicken, cooking until browned. Stir in the paprika, cumin, and season with salt and pepper to taste. Allow to simmer for about 5 minutes.
- Add the other filling ingredients: Once the meat is cooked, remove the skillet from heat and mix in the chopped hard-boiled eggs, sliced olives, and fresh herbs if using. This mixture will provide a savory and rich filling for your pastel.
- Assemble the pastel: Preheat your oven to 375°F (190°C). In a baking dish, spread the meat filling evenly across the bottom. Next, pour the blended corn mixture over the meat, spreading it out evenly to cover the filling completely.
- Bake the pastel: Place the baking dish in the preheated oven and bake for about 30-35 minutes, or until the corn topping is golden brown and set. Keep an eye on it to prevent over-browning.
- Serve and enjoy: Once baked, remove the pastel from the oven and let it cool for a few minutes before slicing. Serve warm as a main dish, and enjoy the comforting flavors of Chile!
Extra Tips:
For a bit of extra flavor, consider adding some diced bell peppers or minced garlic to the meat filling. If you prefer a spicier kick, a few diced jalapeños can elevate the dish wonderfully.
Additionally, feel free to substitute the ground meat with a plant-based alternative for a vegetarian version. This dish can also be made ahead of time; simply assemble and refrigerate, baking it just before serving for a warm, comforting meal.
Enjoy your Chilean Pastel De Choclo!
Colombian Bandeja Paisa: A Protein-Packed Platter
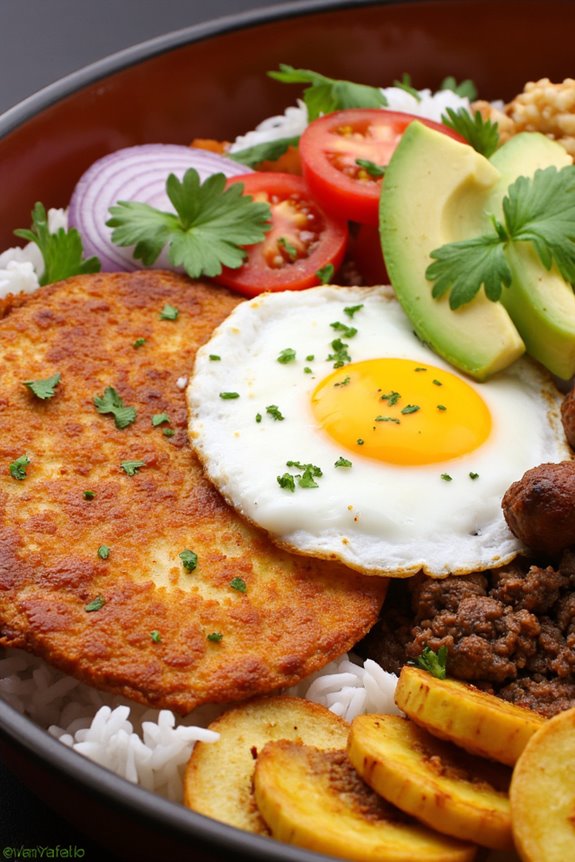
Bandeja Paisa is a traditional Colombian dish that represents the culinary heritage of the Antioquia region. This hearty platter is a feast for the senses, featuring a delightful array of proteins and flavors that come together to create a satisfying meal. Each component of Bandeja Paisa tells a story, from the savory chicharrón to the comforting arepas, making it a favorite among locals and visitors alike. The combination of beans, rice, meats, and fried eggs offers a protein-rich experience that will leave you feeling full and content.
To prepare a traditional Bandeja Paisa, you’ll need a variety of ingredients that come together to create this iconic dish. While it may seem like a lot of work, the end result is a mouthwatering platter that’s perfect for family gatherings or special occasions. The key is to take your time and enjoy the cooking process, as each element contributes to the overall richness and diversity of flavors in the dish.
Ingredients (Serves 4-6)
- 1 cup of red beans
- 1/2 pound of chicharrón (fried pork belly)
- 1/2 pound of ground beef
- 1/2 pound of pork sausage (such as chorizo)
- 4 cups of white rice, cooked
- 4 eggs
- 2 ripe plantains, sliced and fried
- 1 avocado, sliced
- 1/2 cup of hogao (Colombian tomato and onion sauce)
- Fresh cilantro for garnish
- Salt and pepper to taste
- Arepas (optional, for serving)
Cooking Instructions
- Prepare the Beans: Rinse the red beans thoroughly and soak them in water overnight. This will help them cook faster and become tender. The next day, drain the beans and place them in a pot with fresh water. Add salt and simmer for about 1-1.5 hours or until the beans are soft. You can also use canned beans for a quicker option.
- Cook the Ground Beef: In a large skillet, heat a tablespoon of oil over medium heat. Add the ground beef and season with salt and pepper. Cook until browned and fully cooked through, breaking it up into smaller pieces as it cooks, which should take about 8-10 minutes. Set aside.
- Prepare the Chicharrón: In another skillet, heat oil over medium-high heat. Cut the pork belly into bite-sized pieces and fry them until crispy, turning occasionally to ascertain even cooking. This should take around 10-15 minutes. Once crispy, remove and drain on paper towels.
- Cook the Sausage: In the same pan used for the chicharrón, add the pork sausage and cook for about 5-7 minutes, until browned and cooked through. Set aside with the other meats.
- Fry the Plantains: In a separate skillet, heat oil over medium heat. Fry the sliced plantains until golden brown on both sides, about 2-3 minutes per side. Remove and drain on paper towels.
- Fry the Eggs: In a clean skillet, add a bit of oil and crack the eggs in, frying them sunny side up, or to your preference, until the whites are set but the yolks are still runny.
- Assemble the Bandeja Paisa: On a large platter, arrange a generous serving of rice, beans, ground beef, chicharrón, sausage, fried plantains, and top with fried eggs. Add slices of avocado and a dollop of hogao on the side. Garnish with fresh cilantro and serve with arepas if desired.
Extra Tips
When preparing Bandeja Paisa, the key to achieving authentic flavors is using fresh and quality ingredients. If you want to save time, you can prepare the beans and rice ahead of time.
Additionally, feel free to customize the protein components based on your preference or availability—you can add chicken or omit any ingredients you may not enjoy.
Remember that the beauty of Bandeja Paisa lies in its presentation, so take care to arrange the components beautifully on the platter for a feast that’s as pleasing to the eye as it’s to the palate!
Ecuadorian Locro De Papa: Creamy Potato Soup
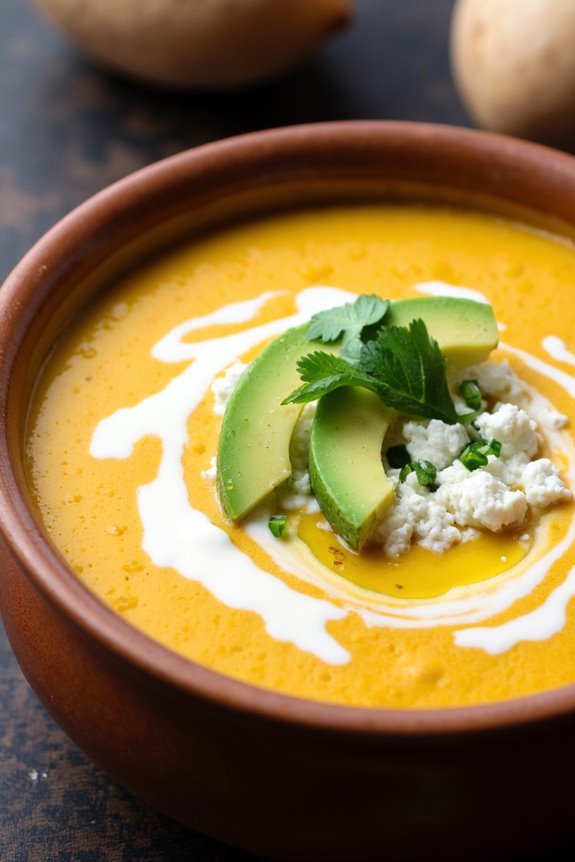
Ecuadorian Locro De Papa is a traditional creamy potato soup that embodies the rich flavors of Andean cuisine. Originating from the highlands of Ecuador, this dish isn’t only hearty and satisfying but also a comforting staple that reflects the vibrant culture of the region. Made primarily with potatoes, cheese, and avocado, Locro De Papa is perfect for chilly evenings and serves as a warm embrace in a bowl.
This delightful soup is typically garnished with fresh cilantro and a drizzle of olive oil, enhancing its flavor profile. The combination of creamy potatoes and the subtle hints of spices creates a deliciously rich texture that’s both filling and nutritious. Ideal for a gathering, this recipe serves 4-6 people, making it a great choice for family dinners or casual get-togethers.
Ingredients
- 6 medium-sized potatoes (Yukon Gold or similar)
- 1 medium onion, finely chopped
- 2 cloves of garlic, minced
- 4 cups vegetable or chicken broth
- 1 cup whole milk or heavy cream
- 1 cup queso fresco or other fresh cheese, crumbled
- 1 tablespoon olive oil
- 1 teaspoon ground cumin
- Salt and black pepper to taste
- Fresh cilantro, chopped for garnish
- 1 avocado, sliced for serving
Cooking Instructions
- Prepare the Potatoes: Start by peeling and chopping the potatoes into small cubes. This helps them cook evenly and quickly. Set aside the chopped potatoes.
- Sauté the Aromatics: In a large pot, heat the olive oil over medium heat. Add the chopped onion and sauté until it becomes translucent, about 5-7 minutes. Stir in the minced garlic and cook for an additional minute until fragrant.
- Cook the Potatoes: Add the cubed potatoes to the pot and sprinkle with ground cumin, salt, and black pepper. Stir well to coat the potatoes with the spices. Pour in the vegetable or chicken broth and bring the mixture to a boil. Once boiling, reduce the heat and let it simmer for about 15-20 minutes or until the potatoes are tender.
- Blend the Soup: After the potatoes are cooked, use an immersion blender to puree the soup to your desired consistency. If you prefer a chunkier texture, blend only part of the soup. If you don’t have an immersion blender, you can carefully transfer the soup in batches to a regular blender.
- Add Creaminess: Once blended, return the soup to the pot and stir in the milk or heavy cream. Heat through, but don’t boil. Adjust the seasoning with additional salt and pepper if needed.
- Serve: Ladle the Locro De Papa into bowls and top each serving with crumbled queso fresco, sliced avocado, and a sprinkle of fresh cilantro. Drizzle a touch of olive oil on top for added flavor.
Extra Tips
When making Locro De Papa, the choice of potatoes can notably affect the texture of the soup. Opt for starchy potatoes like Yukon Gold for a creamier consistency.
Additionally, feel free to customize the soup by adding your favorite vegetables or spices. If you want a bit more heat, consider adding a pinch of cayenne pepper or some diced jalapeños.
Finally, serving the soup with a side of crusty bread or empanadas complements the dish beautifully and makes for a fulfilling meal.
Venezuelan Arepas: Versatile Cornmeal Patties

Arepas are a traditional Venezuelan dish made from cornmeal, and they hold a special place in the hearts and kitchens of many South Americans. These versatile patties can be filled with a variety of ingredients, making them perfect for breakfast, lunch, or dinner. Their crispy exterior and soft interior create a delightful contrast, while their adaptability allows for endless culinary creativity. Whether you choose to stuff them with cheese, meats, or vegetables, arepas are bound to please.
Making arepas is a simple process that requires only a few basic ingredients. The key to achieving the perfect texture is to use pre-cooked cornmeal, which can be found in Latin American grocery stores or online. Once you master the basic recipe, you can experiment with different fillings and toppings to suit your taste. This dish serves 4-6 people, making it an ideal choice for family meals or gatherings with friends.
Ingredients:
- 2 cups of pre-cooked cornmeal (such as P.A.N. or Masarepa)
- 2 ½ cups of warm water
- 1 teaspoon of salt
- 1 tablespoon of vegetable oil (optional for frying)
- Fillings of your choice (e.g., shredded cheese, avocado, shredded beef, black beans, or chicken)
Cooking Instructions:
- Prepare the Dough: In a large bowl, combine the pre-cooked cornmeal and salt. Gradually add the warm water to the cornmeal mixture, stirring with a fork or your hands until a soft dough forms. Let the dough rest for about 5-10 minutes to allow the cornmeal to hydrate.
- Shape the Arepas: Once the dough has rested, divide it into 8 equal portions. Roll each portion into a ball and then flatten it gently between your palms to form a patty about ½ inch thick. Confirm they’re uniform in thickness for even cooking.
- Cook the Arepas: You can choose to either grill, bake, or fry the arepas. For grilling, preheat the grill to medium-high heat and cook the patties for about 5-7 minutes on each side, or until they develop a nice golden-brown crust. If baking, preheat the oven to 375°F (190°C) and place the arepas on a baking sheet for approximately 15-20 minutes, flipping them halfway through. For frying, heat vegetable oil in a skillet over medium heat and fry the arepas for 5 minutes on each side, until golden and crispy.
- Add Fillings: Once cooked, remove the arepas from the heat and let them cool slightly. Using a knife, slice each arepa open to create a pocket, making sure not to cut all the way through. Stuff them with your desired fillings such as cheese, avocado, or any other ingredients you prefer.
- Serve and Enjoy: Serve the arepas warm, with additional toppings or sauces on the side. They can be enjoyed as is or with a salsa or sauce for added flavor.
Extra Tips: When making arepas, feel free to adjust the thickness according to your preference; thicker arepas will be softer, while thinner ones will be crispier. Experiment with different fillings and toppings to discover new flavor combinations.
Also, if you have leftovers, arepas can be stored in the refrigerator and reheated in a skillet or toaster for a quick meal. Enjoy your culinary journey into Venezuelan cuisine!
Uruguayan Chivito: A Satisfying Sandwich

The Uruguayan Chivito is a mouthwatering sandwich that captures the essence of Uruguayan cuisine through its substantial layers of flavors and textures. Traditionally made with beef, this sandwich is a celebration of the rich agricultural produce of Uruguay, where quality meat is a staple.
The Chivito isn’t just a meal; it’s a culinary experience that combines multiple ingredients, making it a satisfying option for lunch or dinner. With its origins in the 1940s, this iconic dish has evolved over the years and is now served in various versions across the country, showcasing the versatility of the ingredients used.
What sets the Uruguayan Chivito apart is the perfect harmony of grilled meat, fresh vegetables, and flavorful condiments, all sandwiched between soft bread. The classic preparation involves a tender beef steak, but modern variations may include chicken or pork, accommodating different tastes.
Whether you’re enjoying it at a local eatery in Montevideo or making it at home, this sandwich promises a hearty and satisfying meal that will leave you wanting more.
Ingredients (serving size: 4-6 people)
- 4 large beef steaks (sirloin or ribeye)
- 4 slices of bacon
- 4 slices of ham
- 4 slices of mozzarella cheese
- 4 large sandwich rolls (preferably soft)
- 1 avocado, sliced
- 1 large tomato, sliced
- 1 lettuce head, leaves separated
- Mayonnaise
- Mustard
- Olive oil
- Salt and black pepper to taste
Cooking Instructions
- Prepare the Beef Steaks: Start by seasoning the beef steaks with salt and black pepper on both sides. This will enhance the flavor of the meat. You can also marinate them for 30 minutes in olive oil for added tenderness and taste.
- Cook the Bacon: In a skillet over medium heat, cook the bacon until it’s crispy. This will take about 5-7 minutes. Once cooked, remove the bacon from the skillet and place it on paper towels to drain excess grease.
- Grill the Steaks: Using the same skillet or a grill, cook the seasoned steaks for about 4-5 minutes on each side, depending on the thickness and desired doneness. Ascertain that they’re cooked to your preference, then place a slice of mozzarella cheese on each steak during the last minute of cooking to allow it to melt.
- Toast the Sandwich Rolls: While the steaks are finishing, slice the sandwich rolls in half and toast them lightly on the grill or in a toaster. This will add a nice crunch and help prevent the bread from becoming soggy.
- Assemble the Chivito: Spread a layer of mayonnaise and mustard on the bottom half of each toasted roll. Then, layer each sandwich with the grilled steak topped with melted cheese, followed by a slice of ham, crispy bacon, avocado slices, tomato slices, and lettuce. Finally, place the top half of the roll on each sandwich.
- Serve and Enjoy: Cut the assembled Chivito in half for easier handling and serve with French fries or a simple salad on the side. Enjoy the rich flavors and textures of this iconic Uruguayan dish!
Extra Tips
When preparing the Chivito, feel free to customize the ingredients according to your taste. You can add pickles, jalapeños, or even a fried egg on top for extra flavor.
Additionally, using quality, fresh ingredients will elevate the sandwich experience, so opt for local produce and meats when possible. Finally, don’t hesitate to experiment with different sauces or spreads to make the sandwich truly your own!
Bolivian Salteñas: Savory Stuffed Pastries
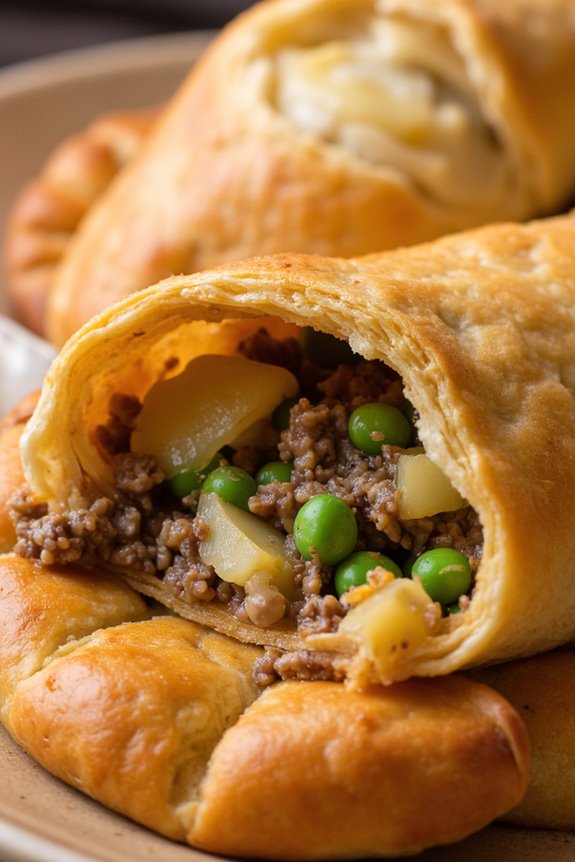
Bolivian salteñas are a beloved street food and snack that blend flavors and textures into a delightfully satisfying pastry. These savory stuffed pastries are known for their slightly sweet, flaky dough and rich filling, which typically includes a mix of seasoned meat, potatoes, peas, and hard-boiled eggs. Salteñas are often enjoyed as a snack or appetizer and are especially popular during festive occasions in Bolivia.
Making them at home can be a rewarding experience that allows you to share this traditional treat with friends and family. Preparing salteñas requires a bit of time and patience, but the delicious results are well worth the effort. The key to a perfect salteña lies in the dough, which must be both tender and crispy, as well as the filling that should be aromatic and flavorful.
With the right ingredients and steps, you can recreate this Bolivian classic that’s sure to impress anyone who takes a bite.
Ingredients (Serves 4-6)
- For the Dough:
- 4 cups all-purpose flour
- 1/2 cup unsalted butter, softened
- 1/4 cup sugar
- 1 teaspoon salt
- 1 egg
- 1 cup cold water
- 1 tablespoon baking powder
- 2 teaspoons vinegar
- For the Filling:
- 1 pound ground beef or chicken
- 1 medium onion, finely chopped
- 2 cloves garlic, minced
- 1/2 cup diced potatoes
- 1/2 cup green peas (fresh or frozen)
- 2 hard-boiled eggs, chopped
- 1 tablespoon paprika
- 1 teaspoon cumin
- Salt and pepper to taste
- 2 tablespoons olive oil
- 1/2 cup beef or chicken broth
Cooking Instructions
1. Prepare the Dough:
In a large mixing bowl, combine the flour, sugar, and salt. Add the softened butter and mix until the mixture resembles coarse crumbs.
In a separate bowl, whisk together the egg, cold water, vinegar, and baking powder. Gradually add this liquid mixture to the flour mixture, mixing until a dough forms. Knead the dough on a floured surface for about 5-7 minutes until smooth. Cover with a damp cloth and let it rest for 30 minutes.
2. Make the Filling:
In a large skillet, heat olive oil over medium heat. Sauté the chopped onion and garlic until translucent and fragrant. Add the ground beef or chicken, cooking until browned.
Stir in the diced potatoes, peas, paprika, cumin, salt, and pepper. Pour in the broth and allow the mixture to simmer for 10-15 minutes until the potatoes are tender and the mixture thickens. Remove from heat and fold in the chopped hard-boiled eggs.
3. Assemble the Salteñas:
Preheat your oven to 375°F (190°C). Divide the dough into equal portions, about the size of a tennis ball. Roll each portion into a circle on a floured surface, about 1/8 inch thick.
Place a heaping tablespoon of filling in the center of each circle. Fold the dough over the filling to create a half-moon shape and crimp the edges securely to seal them. Place the salteñas on a baking sheet lined with parchment paper.
4. Bake the Salteñas:
Bake the salteñas in the preheated oven for 20-25 minutes or until they’re golden brown. Keep an eye on them to guarantee they don’t over-bake.
Once done, remove from the oven and let them cool slightly before serving.
5. Serve:
Serve the salteñas warm, ideally with a side of spicy ají sauce for dipping. They can also be enjoyed on their own as a tasty snack.
Extra Tips
When making salteñas, it’s essential to keep the dough chilled before assembling, as this helps maintain its flaky texture. You can prepare the filling in advance and store it in the refrigerator, allowing the flavors to meld together.
Additionally, don’t hesitate to customize the filling based on your preferences—vegetables, different meats, or even cheese can be great additions. Finally, practice crimping the edges of the dough—this not only seals the filling but adds to the aesthetic appeal of the salteñas. Enjoy your cooking adventure!
Paraguayan Sopa Paraguaya: Cheesy Cornbread

Sopa Paraguaya is a traditional dish hailing from Paraguay, known for its unique combination of flavors and textures. Despite the name suggesting a soup, it’s actually a cornbread that boasts a delightful cheesy flavor and a moist, dense consistency. This dish isn’t only a staple in Paraguayan homes but also a beloved offering at gatherings and celebrations.
The incorporation of cornmeal, cheese, and milk results in a rich and hearty treat that pairs excellently with meats, salads, or can simply be enjoyed on its own.
The roots of Sopa Paraguaya can be traced back to the Guarani people, who utilized corn as a fundamental ingredient in their diet. Over time, this dish has evolved, with variations emerging in other South American countries. The beauty of Sopa Paraguaya lies in its simplicity, making it easy to prepare with just a few ingredients while still delivering an impressive flavor.
Cooking this cornbread can bring a taste of Paraguay into your kitchen, providing a warm and comforting dish that everyone will enjoy.
Ingredients (Serves 4-6):
- 2 cups cornmeal
- 1 cup milk
- 1 cup cheese (preferably Paraguayan cheese or mozzarella)
- 1 large onion, chopped
- 4 large eggs
- 1 teaspoon baking powder
- 1 teaspoon salt
- ½ cup vegetable oil or melted butter
Cooking Instructions:
- Preheat the Oven: Begin by preheating your oven to 350°F (175°C). This guarantees that the Sopa Paraguaya will bake evenly and achieve a nice golden crust.
- Sauté the Onion: In a skillet over medium heat, add a splash of oil and sauté the chopped onion until it becomes translucent and soft, about 5-7 minutes. This will enhance the flavor of the dish and add a lovely aroma.
- Mix Dry Ingredients: In a large mixing bowl, combine the cornmeal, baking powder, and salt. Whisk them together until they’re evenly mixed. This step is vital to guarantee that the leavening agent is evenly distributed throughout the cornmeal.
- Combine Wet Ingredients: In another bowl, beat the eggs, then add the milk and vegetable oil (or melted butter). Mix well until all the wet ingredients are thoroughly combined.
- Combine Mixtures: Pour the wet ingredients into the bowl with the dry ingredients. Stir gently until just combined, being careful not to overmix. Then, fold in the sautéed onions and the cheese, making sure they’re evenly distributed throughout the batter.
- Bake the Sopa Paraguaya: Grease a baking dish (approximately 9×13 inches) with oil or butter, then pour the batter into the dish. Spread it out evenly and place it in the preheated oven. Bake for 30-40 minutes, or until the top is golden brown and a toothpick inserted in the center comes out clean.
- Cool and Serve: Once baked, remove the dish from the oven and allow it to cool for about 10 minutes. Cut into squares or wedges and serve warm. Sopa Paraguaya can be enjoyed alone or alongside your favorite Paraguayan dishes.
Extra Tips:
When preparing Sopa Paraguaya, it’s important to use fresh cheese for the best flavor and texture. If you can’t find Paraguayan cheese, a good-quality mozzarella will work as a suitable substitute.
Additionally, allow the dish to cool slightly before cutting; this will help it hold its shape better. For an extra kick of flavor, feel free to add some chopped jalapeños or spices to the batter. Enjoy your cheesy cornbread with a side of your favorite Paraguayan meat or a fresh salad!
Guyanese Pepperpot: A Spicy Slow-Cooked Stew
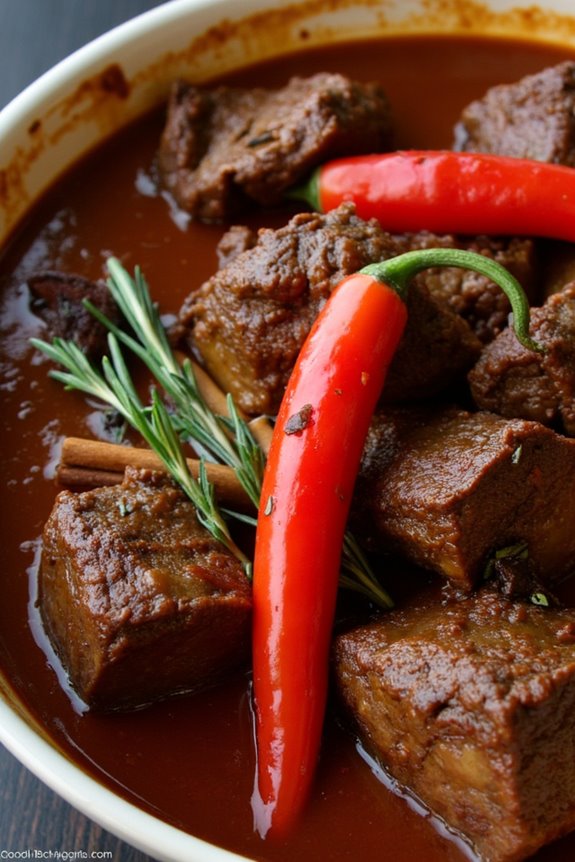
Guyanese Pepperpot is a traditional meat stew that’s a hallmark of Guyanese cuisine, often enjoyed during festive occasions and family gatherings. This rich and aromatic dish combines the bold flavors of spices, herbs, and meats, creating a deliciously hearty meal that warms the soul. The secret of Pepperpot lies in its slow cooking process, allowing all the ingredients to meld together beautifully, resulting in a deep, savory flavor that’s simply irresistible.
Typically, Pepperpot is made with beef, but variations can include pork or even chicken, depending on personal preferences. The dish is seasoned with a unique blend of spices and aromatic ingredients, including cinnamon, cloves, and hot peppers, which give it a distinctive kick. Served with bread or rice, this dish is perfect for those who appreciate a bold and spicy culinary experience.
Ingredients (serving size: 4-6 people):
- 2 pounds beef (chuck or brisket), cut into chunks
- 1 tablespoon vegetable oil
- 1 large onion, chopped
- 4 cloves garlic, minced
- 2-3 Scotch bonnet peppers (or to taste)
- 1 teaspoon ground black pepper
- 1 teaspoon ground cinnamon
- 1 teaspoon ground cloves
- 2 teaspoons allspice
- 4 cups water
- 1 cup brown sugar
- 1/4 cup soy sauce
- 2 bay leaves
- 1/2 cup fresh thyme leaves
- Salt to taste
Cooking Instructions:
- Prepare the Meat: Begin by cutting the beef into chunks. Pat the pieces dry with paper towels to remove excess moisture, which helps in browning the meat. Season the beef with salt and black pepper, ensuring each piece is well coated.
- Brown the Meat: In a large pot or Dutch oven, heat the vegetable oil over medium-high heat. Add the beef chunks in batches, ensuring not to overcrowd the pot. Brown the meat on all sides for about 5-7 minutes per batch. This step enhances the flavor and adds depth to the stew.
- Sauté Aromatics: Once all the beef is browned and removed from the pot, add the chopped onion and minced garlic to the remaining oil in the pot. Sauté for about 3-4 minutes, or until the onions are translucent and fragrant. This creates a flavorful base for the stew.
- Combine Ingredients: Return the browned beef to the pot and add the Scotch bonnet peppers (whole for less heat or chopped for more), ground cinnamon, ground cloves, and allspice. Stir to combine all the spices with the beef and aromatics.
- Add Liquid and Simmer: Pour in the water, soy sauce, and add the brown sugar. Stir well to dissolve the sugar. Add the bay leaves and fresh thyme. Bring the mixture to a boil, then reduce the heat to low, cover the pot, and let it simmer for about 3 to 4 hours. This slow cooking will tenderize the meat and meld the flavors.
- Check and Adjust Seasoning: After about 3 hours, taste the stew and adjust the seasoning with salt and additional spices if necessary. If the stew is too thick, add a little more water to reach your desired consistency.
- Serve: Once the meat is tender and the flavors are well combined, remove the pot from heat. Serve hot with crusty bread or over rice, allowing everyone to enjoy the rich, spicy goodness of Guyanese Pepperpot.
Extra Tips: When preparing Guyanese Pepperpot, consider making it a day in advance. The flavors deepen and improve overnight, making it even more delicious when reheated. Additionally, if you prefer a milder dish, you can remove the Scotch bonnet peppers before serving, or adjust the quantity used. Always feel free to experiment with different meats or add vegetables like carrots and potatoes for added nutrition and flavor.