

When I think of South American bread, I’m instantly surrounded by the warm, inviting aromas that fill my kitchen. Each recipe tells a unique story, from the cheesy delight of Pão De Queijo to the sweet allure of Pan Dulce. These breads bring a comforting touch and a sense of tradition to any gathering. Curious about what makes each one special? Let’s explore these delightful recipes that promise to fill your kitchen with irresistible scents.
Pão De Queijo: Brazilian Cheese Bread
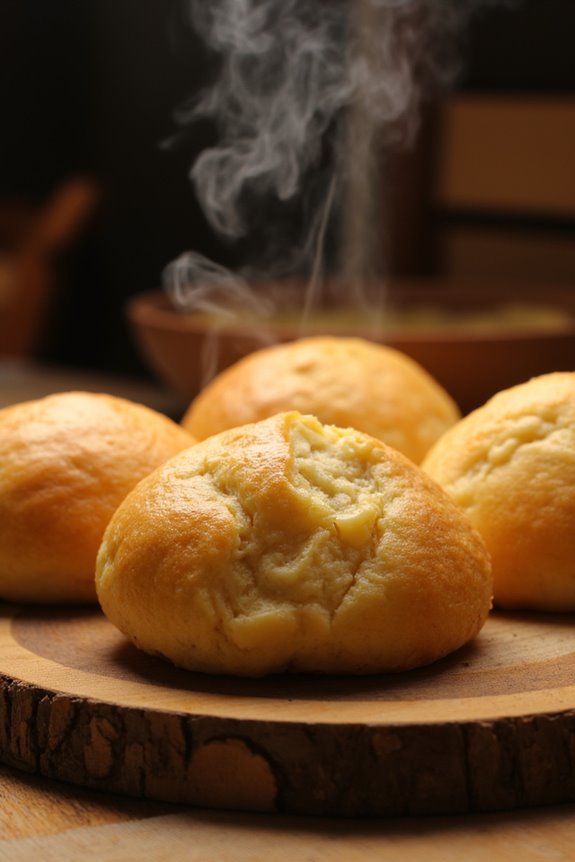
Pão de Queijo is a delightful Brazilian cheese bread that has won the hearts of many around the world. This gluten-free treat is made primarily with tapioca flour, which gives it a unique chewy texture, while the cheese provides a rich flavor that’s hard to resist.
Traditionally served as a snack or breakfast item, Pão de Queijo is best enjoyed warm, fresh from the oven, making it an ideal comfort food for any occasion.
The origins of Pão de Queijo date back to the 18th century in the state of Minas Gerais, Brazil. It was initially created by the indigenous people using cassava flour, later evolving into the modern version we recognize and love today.
The combination of cheese, eggs, milk, and oil creates a wonderfully savory bread that’s perfect for dipping or simply snacking on its own. Whether you’re hosting a Brazilian-themed gathering or simply craving a delicious bread, this recipe is sure to impress.
Ingredients (Serves 4-6 people)
- 1 cup of milk
- 1/2 cup of vegetable oil
- 1 teaspoon of salt
- 2 cups of tapioca flour
- 2 large eggs
- 1 cup of grated cheese (such as Parmesan, mozzarella, or a mix)
- Optional: 1/2 teaspoon of garlic powder or herbs for added flavor
Cooking Instructions
- Preheat the Oven: Start by preheating your oven to 375°F (190°C). This guarantees that your Pão de Queijo will bake evenly and become perfectly golden brown.
- Combine Milk and Oil: In a saucepan, combine the milk, vegetable oil, and salt. Heat the mixture over medium heat until it comes to a gentle boil. Stir occasionally to prevent burning.
- Mix with Tapioca Flour: Once boiling, remove the saucepan from heat and add the tapioca flour. Stir vigorously with a wooden spoon until the mixture is smooth and well combined. It will have a sticky consistency.
- Cool the Mixture: Allow the dough to cool for about 10 minutes. This step is important as it prevents the eggs from cooking when added to the mixture.
- Add Eggs and Cheese: Once the dough has cooled slightly, add the eggs one at a time, mixing well after each addition. After incorporating the eggs, fold in the grated cheese until evenly distributed. If using garlic powder or herbs, add them at this stage.
- Shape the Dough: With your hands, shape the dough into small balls, about the size of a golf ball. Place them on a baking sheet lined with parchment paper, leaving some space between each ball to allow for spreading.
- Bake: Place the baking sheet in the preheated oven and bake for 15-20 minutes or until the Pão de Queijo is puffed up and golden brown on the outside.
- Serve Warm: Remove from the oven and let cool for a few minutes. Serve warm and enjoy the cheesy goodness!
Extra Tips
For the best results, use a high-quality cheese to enhance the flavor of your Pão de Queijo. If you prefer a cheesier bread, feel free to increase the amount of cheese used in the recipe.
Additionally, these cheese breads freeze well, so you can make a larger batch and store them in an airtight container. To reheat, simply pop them in the oven or microwave until warmed through. Enjoy experimenting with different cheese combinations and flavors to create your own unique version of this Brazilian classic!
Pan Dulce: Argentine Sweet Bread
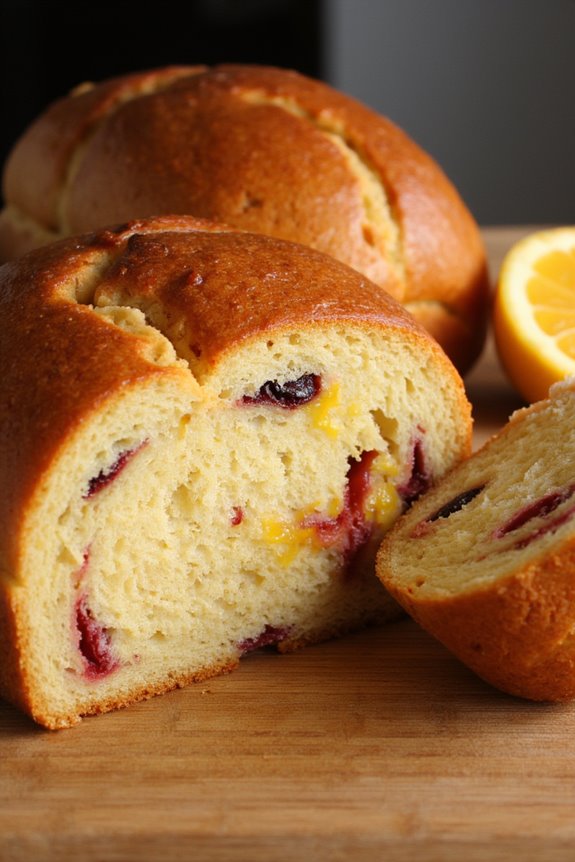
Pan Dulce, or “sweet bread,” is a delightful Argentine treat typically enjoyed during the festive season, especially around Christmas and New Year’s. This soft, sweet, and fragrant bread is often studded with candied fruits, nuts, and spices, making it a beloved addition to any holiday table.
The bread has a rich history and is reminiscent of Panettone from Italy, but it has its unique twist that reflects the vibrant flavors of South America. The process of making Pan Dulce involves a rich dough that’s allowed to rise and develop its flavors, resulting in a soft texture and a delightful aroma.
Making Pan Dulce at home can seem challenging, but with a little patience and attention to detail, you can create a beautiful loaf that will impress your family and friends. The recipe combines simple ingredients, but the magic lies in the method and the love you put into it.
Whether enjoyed fresh from the oven or toasted with a bit of butter, Pan Dulce is sure to bring warmth and joy to your gatherings.
Ingredients (serving size: 4-6 people)
- 4 cups all-purpose flour
- 1 cup sugar
- 1/2 cup unsalted butter, softened
- 1 cup whole milk, warm
- 1 packet (2 1/4 teaspoons) active dry yeast
- 3 large eggs
- 1/2 teaspoon salt
- 1 teaspoon vanilla extract
- 1 teaspoon ground cinnamon
- 1/2 cup mixed candied fruit (such as orange peel, cherries, and lemon peel)
- 1/2 cup chopped nuts (such as almonds or walnuts)
- Zest of 1 lemon and 1 orange
- 1 egg, beaten (for egg wash)
Cooking Instructions
- Activate the Yeast: In a small bowl, combine the warm milk and sugar. Sprinkle the yeast over the top and let it sit for about 5-10 minutes, or until it’s frothy. This indicates that the yeast is active and ready to use.
- Prepare the Dough: In a large mixing bowl, combine the flour, salt, and ground cinnamon. Make a well in the center and add the softened butter, eggs, vanilla extract, and the activated yeast mixture. Mix until a dough begins to form.
- Knead the Dough: Transfer the dough to a floured surface and knead it for about 10 minutes, or until it’s smooth and elastic. You can add a little more flour if the dough is too sticky.
- First Rise: Place the kneaded dough into a greased bowl, cover it with a clean kitchen towel, and let it rise in a warm place for about 1-2 hours, or until it has doubled in size.
- Add Fruits and Nuts: Once the dough has risen, gently punch it down to release any air. Fold in the candied fruits, chopped nuts, and citrus zest until evenly distributed throughout the dough.
- Shape the Bread: Divide the dough into two equal portions. Shape each portion into a loaf or round shape, and place them into greased loaf pans or on a baking sheet lined with parchment paper.
- Second Rise: Cover the shaped dough with a towel and allow it to rise again for about 30-45 minutes, or until it has puffed up.
- Preheat the Oven: While the dough is rising, preheat your oven to 350°F (175°C).
- Egg Wash: Brush the tops of the loaves with the beaten egg to give them a golden color as they bake.
- Bake: Place the loaves in the preheated oven and bake for 30-35 minutes, or until they’re golden brown and sound hollow when tapped on the bottom.
- Cool and Serve: Remove the bread from the oven and let it cool in the pans for about 10 minutes before transferring them to a wire rack to cool completely. Slice and serve.
Extra Tips
When making Pan Dulce, be mindful of the dough’s rising times; the warmer the environment, the quicker the dough will rise. If you live in a cooler climate, you might need to extend the rising time.
Additionally, feel free to customize the mix-ins according to your preference; dried fruits, chocolate chips, or even a sprinkle of coconut can add delightful variations. Enjoy your homemade Pan Dulce fresh out of the oven or toasted for breakfast the next day!
Arepas: Venezuelan Cornmeal Cakes
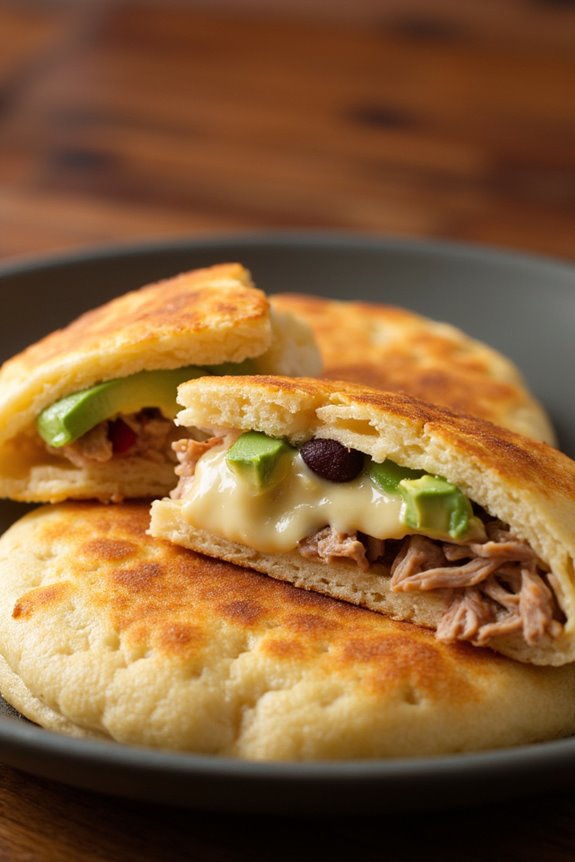
Arepas are a traditional Venezuelan staple made from cornmeal that can be served at any meal. These versatile cakes can be grilled, baked, or fried, and they can be filled or topped with a variety of ingredients, making them an excellent option for breakfast, lunch, or dinner. The dough is simple to prepare, requiring just a few ingredients, and the flavor is enhanced by the fillings you choose. Whether you prefer cheese, avocado, or savory meats, arepas are sure to satisfy your cravings.
Making arepas is a fun and rewarding process that brings the rich flavors of Venezuelan cuisine to your kitchen. The dough comes together quickly, and once you master the technique of cooking them, you’ll find that they’re an easy and delicious addition to your meal rotation. When prepared correctly, arepas have a crispy exterior and a soft, warm interior that’s perfect for holding your favorite fillings. Serve them alongside a rejuvenating salad or some spicy salsa for a complete meal.
Ingredients (Serves 4-6):
- 2 cups of masa harina (precooked cornmeal)
- 2 ½ cups of warm water
- 1 teaspoon of salt
- 1 tablespoon of vegetable oil (optional for frying)
- Filling of your choice (cheese, avocado, meats, etc.)
Cooking Instructions:
- Prepare the Dough: In a large mixing bowl, combine the masa harina and salt. Gradually add warm water to the mixture, stirring until the dough starts to come together. Use your hands to knead the dough for about 2-3 minutes until it’s smooth and pliable. If the dough is too dry, add a little more water; if it’s too wet, add a bit more masa harina.
- Shape the Arepas: Divide the dough into equal portions, about the size of a golf ball. Roll each portion into a ball and then flatten it gently to form a disc that’s about ½ inch thick. Make sure the edges are smooth to prevent cracking during cooking.
- Cook the Arepas: Heat a griddle or skillet over medium heat. If desired, add a little vegetable oil to the pan. Place the arepas on the hot surface, cooking for about 5-7 minutes on each side until they develop a golden-brown crust. You can also bake them at 375°F (190°C) for 15-20 minutes after frying for a crispier texture.
- Fill the Arepas: Once cooked, remove the arepas from the heat and let them cool for a minute. Using a sharp knife, slice them open like a pocket, being careful not to cut all the way through. Fill each arepa with your choice of ingredients, such as shredded cheese, avocado, black beans, or cooked meats.
- Serve: Serve the filled arepas warm, perhaps with a side of salsa or a fresh salad. Enjoy your delicious Venezuelan cornmeal cakes!
Extra Tips: To achieve the best texture for your arepas, confirm that the masa harina is of good quality, and that you use warm water when mixing the dough. If you’re looking for extra flavor, consider adding spices or herbs to the dough itself. Feel free to experiment with different fillings to find your perfect combination, and don’t hesitate to prepare a larger batch; arepas freeze well and can be reheated easily for quick meals later on!
Chipa: Paraguayan Cheese Breads

Chipa is a traditional Paraguayan bread that isn’t only delicious but also incredibly versatile. Made primarily from cassava flour and cheese, this delightful bread is often enjoyed during breakfast or as a snack throughout the day.
Chipa is particularly popular during the festive season, but its savory flavor and chewy texture make it a favorite year-round. The combination of cheese and the unique flavor of the cassava flour creates a truly irresistible treat that’s gluten-free and loved by many.
Making Chipa is a straightforward process that can be accomplished in less than an hour. The key to achieving the perfect texture is to guarantee that your cheese is well combined with the other ingredients. As you mix, you’ll notice the dough becoming pliable and ready to shape into the traditional ring or other fun shapes.
Baking them to a golden brown will fill your kitchen with an enchanting aroma, making it hard to resist snacking on them right out of the oven.
Ingredients (Serves 4-6):
- 2 cups cassava flour
- 1 cup grated cheese (Paraguayan cheese, or a mix of mozzarella and cheddar)
- 2 eggs
- 1/2 cup milk
- 1/2 cup vegetable oil
- 1 teaspoon baking powder
- 1 teaspoon salt
Cooking Instructions:
- Preheat the Oven: Begin by preheating your oven to 350°F (175°C). This guarantees that the Chipa will bake evenly and develop a nice golden crust.
- Mix Dry Ingredients: In a large mixing bowl, combine the cassava flour, baking powder, and salt. Whisk these dry ingredients together until they’re well blended. This step is essential as it guarantees that the baking powder is evenly distributed throughout the flour.
- Incorporate Cheese: Add the grated cheese into the bowl with the dry ingredients. Using your hands or a spatula, mix the cheese into the flour until it’s evenly coated. This will help distribute the cheese flavor throughout the dough.
- Combine Wet Ingredients: In a separate bowl, whisk together the eggs, milk, and vegetable oil until well combined. This mixture will add moisture and richness to the dough.
- Combine Wet and Dry Mixtures: Pour the wet ingredients into the bowl with the dry ingredients and cheese. Stir the mixture until it forms a soft dough. If the dough is too sticky, you can add a little more cassava flour.
- Shape the Dough: Dust your hands with a little cassava flour to prevent sticking. Take small portions of dough and shape them into rings or balls, about 2-3 inches in diameter. Place them on a greased baking sheet, leaving space between each piece.
- Bake: Place the baking sheet in the preheated oven and bake for 20-25 minutes, or until the Chipa are golden brown. Keep an eye on them to prevent over-baking.
- Cool and Serve: Once baked, remove the Chipa from the oven and let them cool slightly on a wire rack. Serve warm for the best flavor and texture.
Extra Tips:
For the best results, use fresh cheese, as it will melt beautifully and add a wonderful creaminess to your Chipa. If you can find it, opt for Paraguayan cheese for an authentic taste.
Additionally, feel free to experiment by adding herbs or spices to the dough for added flavor, such as oregano or garlic powder. Chipa can also be stored in an airtight container for a few days, but they’re truly best enjoyed fresh from the oven!
Pan De Yuca: Cassava Bread From Paraguay

Pan de Yuca is a delightful gluten-free bread originating from Paraguay that highlights the versatility of cassava, also known as yuca. This traditional bread is known for its chewy texture and slightly cheesy flavor, making it a popular snack and accompaniment to various dishes.
The combination of cassava flour and cheese creates a unique taste that’s both satisfying and comforting. It’s often enjoyed warm and can be eaten plain or with various spreads.
Making Pan de Yuca is a straightforward process that requires just a few ingredients, making it accessible for home cooks of all levels. The bread can be served as a side dish for your meals or enjoyed on its own as a delicious snack. With its rich flavor and inviting aroma, Pan de Yuca is sure to become a favorite in your household.
Ingredients (Serves 4-6 people):
- 2 cups cassava flour
- 1 cup grated cheese (preferably Paraguayan cheese, or mozzarella)
- 1 cup milk
- 2 large eggs
- 1/4 cup vegetable oil or melted butter
- 1 teaspoon baking powder
- 1/2 teaspoon salt
Cooking Instructions:
- Preheat the Oven: Begin by preheating your oven to 375°F (190°C). This step is vital as it guarantees that your Pan de Yuca bakes evenly and achieves the perfect texture.
- Mix Dry Ingredients: In a large mixing bowl, combine the cassava flour, baking powder, and salt. Use a whisk to mix these dry ingredients thoroughly. This guarantees that the baking powder is evenly distributed throughout the flour, which is essential for achieving a good rise in the bread.
- Combine Wet Ingredients: In another bowl, beat the eggs, then add the milk and vegetable oil (or melted butter). Mix well until everything is fully combined. This mixture will help bring moisture to the dry ingredients and create the dough.
- Combine Wet and Dry Mixtures: Gradually pour the wet mixture into the bowl with the dry ingredients. Stir with a spatula or wooden spoon until a dough begins to form. It should be slightly sticky but manageable. If the dough feels too dry, add a little more milk, one tablespoon at a time.
- Add Cheese: Fold in the grated cheese into the dough mixture until evenly distributed. The cheese will melt during baking, adding flavor and texture to the bread.
- Shape the Dough: Lightly flour your hands and take small portions of the dough to shape them into small balls or discs, about 1-2 inches in diameter. Place them on a greased baking sheet, leaving some space between each piece to allow for expansion during baking.
- Bake: Place the baking sheet in the preheated oven and bake for 20-25 minutes, or until the tops are golden brown. Keep an eye on them to avoid over-baking, as you want them to remain soft and chewy inside.
- Cool and Serve: Once baked, remove the Pan de Yuca from the oven and let them cool slightly on a wire rack. Serve warm for the best flavor and texture.
Extra Tips: For an added twist, consider experimenting with different types of cheese or adding herbs and spices to the dough to enhance the flavor.
You can also serve Pan de Yuca with a dipping sauce, such as a spicy salsa or a creamy avocado dip, to elevate your snacking experience. Remember that freshly baked Pan de Yuca is best enjoyed on the same day, but you can store leftovers in an airtight container for a day or two and reheat them in the oven for a few minutes before serving.
Cuca: Brazilian Coffee Cake

Cuca, a delightful Brazilian coffee cake, is a beloved treat that combines the rich flavor of coffee with a moist, sweet cake base, often topped with a crumbly streusel. Traditionally enjoyed during coffee breaks or served at family gatherings, this dessert is both versatile and easy to make. The combination of flavors and textures makes it a perfect companion to a warm cup of coffee or tea.
This cake isn’t only delicious but also a wonderful way to introduce a taste of Brazil into your home cooking. With its buttery crumb topping and the aromatic hints of cinnamon, Cuca is sure to impress your family and friends. Whether you’re an experienced baker or a novice in the kitchen, this recipe will guide you through creating a scrumptious Cuca that everyone will love.
Ingredients (Serves 4-6)
- 2 cups all-purpose flour
- 1 cup sugar
- 1 tablespoon baking powder
- 1/2 teaspoon salt
- 1/2 cup unsalted butter, softened
- 1 cup milk
- 2 large eggs
- 1 teaspoon vanilla extract
- 1 teaspoon cinnamon
- 1 cup brown sugar
- 1/2 cup chopped nuts (optional)
Cooking Instructions
- Preheat the Oven: Begin by preheating your oven to 350°F (175°C). This guarantees that the cake will bake evenly and rise properly once you place it in the oven.
- Prepare the Baking Dish: Grease and flour a 9×13 inch baking dish. This will prevent the cake from sticking and make it easier to remove once it’s baked.
- Mix Dry Ingredients: In a large mixing bowl, combine the flour, sugar, baking powder, and salt. Whisk together until they’re well blended. This will incorporate the leavening agent evenly throughout the cake batter.
- Combine Wet Ingredients: In a separate bowl, beat the softened butter until creamy. Then add the milk, eggs, and vanilla extract. Mix until you have a smooth consistency. This mixture will provide moisture and flavor to your cake.
- Combine Wet and Dry Ingredients: Gradually add the wet mixture to the dry ingredients. Stir gently until just combined. Be careful not to overmix, as this can result in a dense cake.
- Prepare the Topping: In a small bowl, mix the brown sugar, cinnamon, and chopped nuts (if using). This will create a sweet, crumbly topping to sprinkle over the batter.
- Assemble the Cake: Pour the cake batter into the prepared baking dish, spreading it evenly. Then, sprinkle the topping mixture generously over the batter.
- Bake: Place the dish in the preheated oven and bake for 30-35 minutes, or until a toothpick inserted into the center comes out clean. Keep an eye on it, as baking times can vary.
- Cool and Serve: Once baked, remove the cake from the oven and allow it to cool in the dish for about 10 minutes. Then, cut into squares and serve warm or at room temperature.
Extra Tips
When making Cuca, feel free to experiment with flavors by adding different spices such as nutmeg or cardamom to the topping. Additionally, you can mix in fruits like apples or bananas into the batter for added moisture and flavor.
To enhance the coffee flavor, consider using brewed coffee instead of milk. Finally, this cake can be stored in an airtight container for a few days, making it a convenient treat to have on hand. Enjoy your baking adventure with this delightful Brazilian specialty!
Pan De Muerto: Mexican Day of the Dead Bread
Pan de Muerto, or “Bread of the Dead,” is a traditional Mexican bread made to honor deceased loved ones during the Day of the Dead celebrations. This sweet, aromatic bread is typically shaped like a round loaf with decorative bone-like pieces on top and is often flavored with orange blossom and anise.
The preparation of Pan de Muerto isn’t just about the baking; it’s also about the connection to the rich cultural traditions of Mexico, where families come together to remember and celebrate their departed.
Making Pan de Muerto can be a rewarding experience, especially when shared with family and friends. The dough is soft and fluffy, and the flavors are enhanced by a sprinkle of sugar and a glaze that adds an extra sweetness. This bread isn’t only enjoyed during the festivities but can also be savored as a delicious treat any time of the year.
Ingredients (serving size: 4-6 people):
- 4 cups all-purpose flour
- 1 cup whole milk
- 1/2 cup granulated sugar
- 1/2 cup unsalted butter, softened
- 3 large eggs
- 2 1/4 teaspoons active dry yeast (1 packet)
- 1 teaspoon orange zest
- 1 teaspoon anise seeds (or 1/2 teaspoon anise extract)
- 1/2 teaspoon salt
- 1 egg (for egg wash)
- Extra sugar for sprinkling
Cooking Instructions:
- Activate the Yeast: In a small bowl, combine 1/4 cup of warm milk (about 110°F), 1 tablespoon of sugar, and the yeast. Let it sit for about 5-10 minutes until it becomes frothy. This step guarantees that the yeast is active and will help the bread rise.
- Combine Wet Ingredients: In a large mixing bowl, whisk together the remaining warm milk, softened butter, and eggs until well blended. Add the activated yeast mixture to the bowl.
- Mix Dry Ingredients: In another bowl, combine the flour, sugar, orange zest, anise seeds, and salt. Mix well to distribute the ingredients evenly.
- Combine Wet and Dry Ingredients: Gradually add the dry ingredients to the wet mixture, stirring with a wooden spoon or spatula until a rough dough forms.
- Knead the Dough: Transfer the dough to a floured surface and knead for about 8-10 minutes until it becomes smooth and elastic. You can also knead it in a stand mixer with a dough hook on medium speed for about 5-7 minutes.
- First Rise: Place the kneaded dough in a lightly greased bowl, cover it with a clean kitchen towel or plastic wrap, and let it rise in a warm place for about 1-2 hours or until it doubles in size.
- Shape the Bread: Once risen, punch down the dough and remove it from the bowl. Reserve a small portion of dough (about the size of a golf ball) for the decorative bone pieces. Shape the remaining dough into a round loaf and place it on a baking sheet lined with parchment paper.
- Create Decorative Bones: Shape the reserved dough into thin strips and form them into bone shapes. Place them on top of the loaf, pressing lightly to adhere. Cover the loaf with a kitchen towel and let it rise again for about 30-45 minutes.
- Preheat Oven and Prepare for Baking: Preheat your oven to 350°F (175°C) while the dough is rising. Beat the additional egg and brush it over the loaf for a glossy finish.
- Bake the Bread: Bake the bread in the preheated oven for 25-30 minutes or until it turns golden brown and sounds hollow when tapped on the bottom.
- Cool and Finish: Once baked, remove the Pan de Muerto from the oven and let it cool on a wire rack. While still warm, sprinkle with sugar, and if desired, drizzle with a simple glaze made of powdered sugar and orange juice.
Extra Tips: When making Pan de Muerto, feel free to experiment with flavors by adding spices like cinnamon or using different citrus zests. If you want a richer flavor, you can replace some of the milk with orange juice.
For an authentic touch, serve the bread with hot chocolate or your favorite Mexican beverage. Finally, remember that the dough rises best in a warm, draft-free environment, so consider turning on your oven for a few minutes and then turning it off to create an ideal rising space.
Tortillas: Traditional South American Flatbreads

Tortillas are a staple in many South American countries, particularly in Mexico and regions influenced by indigenous cultures. These versatile flatbreads can be enjoyed in various ways, from being served alongside meals as a side dish to being filled with a variety of ingredients to create delicious wraps or tacos.
Made from simple ingredients, tortillas are easy to prepare and can be customized to suit your taste preferences or dietary needs. The beauty of tortillas lies in their simplicity and their ability to complement a wide range of dishes.
Whether you’re making classic corn tortillas or opting for flour tortillas, the process remains largely the same. With just a few basic ingredients and a hot cooking surface, you can create fresh, homemade tortillas that elevate any meal. In this recipe, we’ll focus on making traditional corn tortillas, which boast a delightful texture and flavor that pairs perfectly with numerous fillings.
Ingredients (Serves 4-6)
- 2 cups masa harina (corn flour)
- 1/2 teaspoon salt
- 1 1/4 cups warm water
- Additional masa harina for dusting
- Cooking oil (optional, for greasing the skillet)
Cooking Instructions
1. Mix the Dough: In a large mixing bowl, combine the masa harina and salt. Gradually add the warm water while mixing with your hands or a spoon until the dough comes together. It should be soft and pliable but not sticky. If the dough feels too dry, add a little more water; if too wet, sprinkle in more masa harina.
2. Knead the Dough: Turn the dough out onto a lightly floured surface and knead it for about 2-3 minutes until it becomes smooth and elastic. This step helps develop the gluten slightly, giving the tortillas a better texture.
3. Divide the Dough: Once kneaded, Divide the Dough into small balls, roughly the size of a golf ball (about 1.5 inches in diameter). You should end up with about 10-12 balls depending on your desired tortilla size.
4. Flatten the Balls: Preheat a griddle or skillet over medium-high heat. Using a tortilla press or a rolling pin, flatten each ball between two sheets of plastic wrap or parchment paper until they’re about 1/8 inch thick. This guarantees even cooking and prevents sticking.
5. Cook the Tortillas: Place the flattened tortilla onto the hot griddle. Cook for about 30-45 seconds on one side until lightly browned and puffed. Flip it over and cook for another 30-45 seconds. The tortilla should be cooked through but still soft.
Repeat with the remaining tortillas, stacking them on a plate and covering with a clean kitchen towel to keep warm.
6. Serve: Enjoy your freshly made tortillas warm, either plain or with your favorite fillings. They can be used for tacos, enchiladas, or simply served as a side to accompany your meals.
Extra Tips
For the best results, verify that your griddle or skillet is hot enough before cooking each tortilla. If the heat is too low, the tortillas may become tough instead of soft and pliable.
Additionally, if you find that your tortillas are sticking, lightly dust them with masa harina before cooking. You can also experiment with adding herbs or spices to the masa dough for a unique flavor twist.
Store any leftovers in an airtight container in the fridge, and reheat them on the griddle before serving.
Bizcocho: Colombian Corn Cake
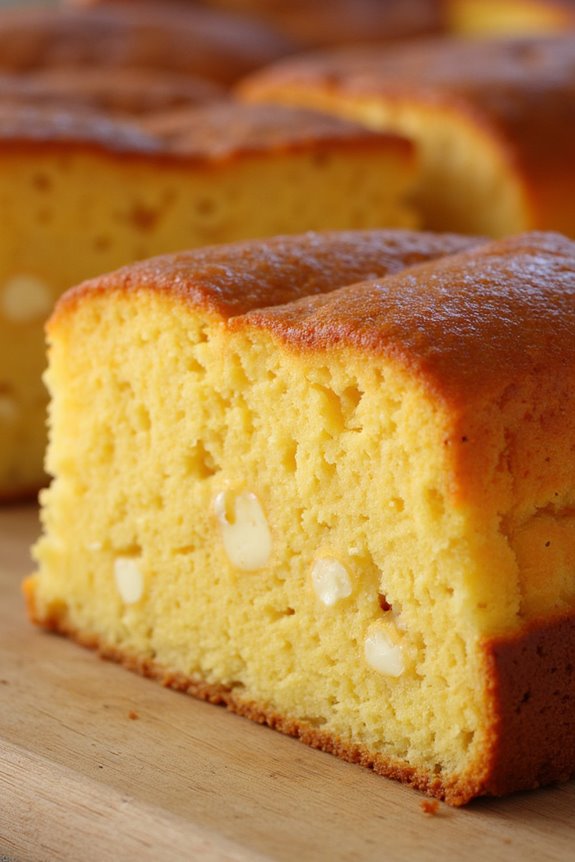
Bizcocho, or Colombian Corn Cake, is a delightful treat that embodies the rich culinary traditions of Colombia. This cake is made primarily from corn, giving it a unique texture and flavor that sets it apart from other cakes. It’s a common dish found in Colombian kitchens, often served during festivities or special occasions, but it can also be enjoyed any day of the week.
The sweetness of the corn combined with the creaminess of cheese creates a balanced profile that pleases the palate. Making Bizcocho is a straightforward process that allows home cooks to experience the flavors of Colombian cuisine. The cake is moist, slightly sweet, and perfect for pairing with coffee or as a standalone snack.
Once you have the ingredients ready, the preparation is quick and simple, making it an accessible recipe for both seasoned bakers and novice cooks. Gather your ingredients, and let’s get started on this delicious Colombian corn cake!
Ingredients (Serves 4-6)
- 2 cups of cornmeal (preferably precooked)
- 1 cup of milk
- 1 cup of sugar
- 1/2 cup of unsalted butter, melted
- 1 cup of crumbled queso fresco or any soft cheese
- 1 teaspoon of baking powder
- 1/2 teaspoon of salt
- 3 large eggs
- 1 teaspoon of vanilla extract
Cooking Instructions
- Preheat the oven: Begin by preheating your oven to 350°F (175°C). This step is essential as it guarantees that your cake will bake evenly and rise properly.
- Prepare the baking pan: Grease a round 9-inch baking pan with butter or non-stick spray. This will prevent the cake from sticking to the pan and make for easier removal once it’s baked.
- Mix the dry ingredients: In a large mixing bowl, combine the cornmeal, baking powder, and salt. Whisk these dry ingredients together until they’re evenly mixed. This helps to distribute the leavening agent and guarantees an even rise in your cake.
- Combine the wet ingredients: In another bowl, mix together the melted butter, sugar, eggs, milk, and vanilla extract. Whisk until well combined and the mixture is smooth and creamy. This step infuses flavor and moisture into the cake.
- Combine wet and dry ingredients: Gradually add the wet mixture to the dry ingredients, stirring gently until just combined. Be careful not to overmix, as this can lead to a dense cake.
- Fold in the cheese: Gently fold in the crumbled queso fresco or soft cheese. This will give your bizcocho a lovely flavor and texture throughout.
- Transfer to the baking pan: Pour the batter into the prepared baking pan, smoothing the top with a spatula. This guarantees an even bake and a nice appearance once the cake is finished.
- Bake: Place the cake in the preheated oven and bake for about 30-35 minutes, or until the top is golden brown and a toothpick inserted in the center comes out clean. Keep an eye on it towards the end of the baking time to prevent over-baking.
- Cool and serve: Once baked, remove the cake from the oven and allow it to cool in the pan for about 10 minutes. Then, carefully remove it from the pan and let it cool completely on a wire rack. Slice and serve as desired.
Extra Tips
When making Bizcocho, feel free to experiment by adding a touch of cinnamon or a bit of lime zest to the batter for an extra layer of flavor. If you can’t find queso fresco, any soft cheese such as ricotta or cream cheese can work well as substitutes.
Additionally, this cake can be enjoyed warm, at room temperature, or even chilled, making it a versatile choice for any time of the day. Finally, it pairs wonderfully with a drizzle of honey or a dollop of yogurt for added richness. Enjoy your culinary journey into Colombian cuisine!
Mantecal: Venezuelan Sweet Bread

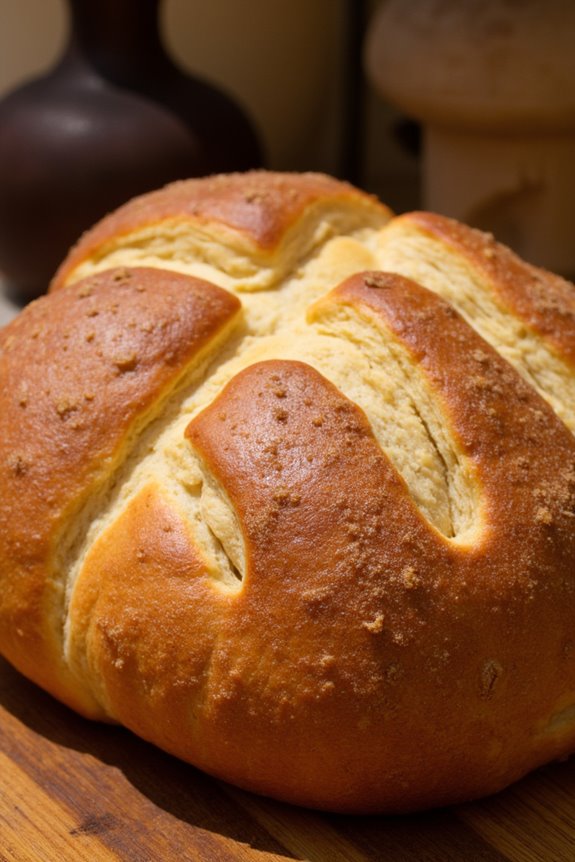
Mantecal is a delightful Venezuelan sweet bread that embodies the rich cultural heritage and culinary traditions of South America. This bread is known for its soft, fluffy texture and sweet, buttery flavor, making it a perfect accompaniment to morning coffee or an afternoon snack.
Often made for special occasions or family gatherings, Mantecal is a beloved treat that showcases the simplicity and beauty of homemade bread.
The key to a successful Mantecal lies in the balance of ingredients and the method of preparation. The dough is enriched with eggs and sugar, giving it a rich flavor and tender crumb. Once baked, the bread is often enjoyed warm, allowing its sweet aroma to fill your kitchen.
Follow this recipe to create your very own Mantecal and share a taste of Venezuela with your loved ones.
Ingredients (Serves 4-6)
- 4 cups all-purpose flour
- 1/2 cup sugar
- 1/4 cup butter, softened
- 1/2 cup milk, warmed
- 2 large eggs
- 2 teaspoons dry yeast
- 1 teaspoon vanilla extract
- 1/2 teaspoon salt
- 1/4 cup water (if needed)
- 2 tablespoons butter for brushing on top (optional)
Cooking Instructions
- Activate the Yeast: In a small bowl, combine the warm milk and dry yeast. Stir gently and let it sit for about 5-10 minutes until it becomes frothy. This indicates that the yeast is active and ready to be used in the dough.
- Prepare the Dough: In a large mixing bowl, combine the all-purpose flour, sugar, and salt. Create a well in the center and add the activated yeast mixture, softened butter, eggs, and vanilla extract. Mix the ingredients together until they form a cohesive dough.
- Knead the Dough: Turn the dough out onto a lightly floured surface and knead it for about 8-10 minutes, or until it becomes smooth and elastic. If the dough is too sticky, add a little extra flour, but be careful not to add too much.
- First Rise: Place the kneaded dough into a lightly greased bowl, cover it with a clean kitchen towel or plastic wrap, and let it rise in a warm place for about 1-2 hours, or until it has doubled in size.
- Shape the Bread: After the dough has risen, punch it down to release the air. Divide it into equal pieces (about 4-6) and shape each piece into a round ball. Place the shaped dough onto a greased baking sheet, leaving space between each piece.
- Second Rise: Cover the shaped dough with a towel and let it rise again for about 30-45 minutes, or until they’ve puffed up.
- Preheat the Oven: Preheat your oven to 350°F (175°C) while the dough is rising for the second time.
- Bake the Bread: Once the dough has risen, place it in the preheated oven and bake for 20-25 minutes, or until the tops are golden brown. Optionally, brush the tops with melted butter halfway through baking for an extra rich flavor.
- Cool and Serve: After baking, remove the Mantecal from the oven and let it cool on a wire rack. Serve warm or at room temperature, and enjoy the sweet aroma and delightful taste of this Venezuelan bread.
Extra Tips
For best results, verify that your ingredients are at room temperature before starting. This helps the dough rise more effectively.
If you live in a cooler climate, you can create a warm environment for rising by placing the dough in an oven that’s turned off but has the light on, or simply cover it with a thick blanket.
Additionally, feel free to experiment with different flavors by adding spices like cinnamon or nutmeg, or incorporating dried fruits such as raisins or cranberries into the dough for added sweetness.
Pan De Coco: Coconut Bread From Colombia

Pan De Coco is a delicious coconut bread that hails from Colombia, where it’s often enjoyed as a snack or breakfast treat. This soft, sweet bread is infused with the rich flavor of coconut, making it a delightful addition to any meal. Traditionally made with fresh grated coconut, this recipe can bring a taste of Colombian culture right to your kitchen.
The combination of coconut milk and grated coconut gives the bread its moist texture and tropical aroma, while a hint of sugar adds just the right amount of sweetness.
Making Pan De Coco can be a fun family activity. Children and adults alike can enjoy getting their hands in the dough and shaping the bread. It’s perfect for sharing with friends, and it pairs wonderfully with coffee or tea. By following this recipe, you’ll create a batch of warm, comforting coconut bread that can be enjoyed fresh out of the oven or toasted with butter for a delicious treat.
Ingredients (Serves 4-6):
- 3 cups all-purpose flour
- 1 cup unsweetened grated coconut
- 1 cup coconut milk
- 1/2 cup sugar
- 1/4 cup butter, melted
- 1 packet (2 1/4 teaspoons) active dry yeast
- 1/4 teaspoon salt
- 1/2 teaspoon vanilla extract
- 1 egg (for egg wash)
Cooking Instructions:
- Activate the Yeast: In a small bowl, combine the warm coconut milk (about 100°F) and the packet of active dry yeast. Allow it to sit for about 5-10 minutes until it becomes frothy. This indicates that the yeast is active and ready to use.
- Mix Dry Ingredients: In a large mixing bowl, whisk together the all-purpose flour, grated coconut, sugar, and salt. Make sure they’re well combined to guarantee even distribution of flavors.
- Combine Wet Ingredients: In a separate bowl, mix the melted butter, vanilla extract, and the frothy yeast mixture. Stir until well combined.
- Form the Dough: Gradually add the wet ingredient mixture to the dry ingredients, stirring with a wooden spoon or your hands until a dough forms. If the dough is too sticky, you can add a little more flour, but be careful not to overdo it.
- Knead the Dough: Turn the dough out onto a floured surface and knead it for about 5-7 minutes until it becomes smooth and elastic. This step is essential for developing the gluten that gives the bread its structure.
- First Rise: Place the kneaded dough in a lightly greased bowl, cover it with a damp cloth, and let it rise in a warm place for about 1 hour, or until it doubles in size.
- Shape the Bread: After the dough has risen, punch it down to remove excess air. Divide the dough into equal portions (about 6 pieces) and shape each piece into a round or oval shape. Place the shaped dough on a baking sheet lined with parchment paper.
- Second Rise: Cover the shaped dough with a clean cloth and let it rise again for about 30 minutes, or until they puff up noticeably.
- Preheat the Oven: While the dough is rising, preheat your oven to 350°F (175°C).
- Egg Wash: Beat the egg and brush it over the tops of the risen dough to give it a nice golden color when baked.
- Bake: Bake in the preheated oven for 20-25 minutes, or until the tops are golden brown and the bread sounds hollow when tapped on the bottom.
- Cool and Serve: Remove the bread from the oven and let it cool on a wire rack. Enjoy your Pan De Coco warm or at room temperature!
Extra Tips:
For the best flavor and texture, try to use fresh, unsweetened grated coconut if possible. If you can’t find it, packaged unsweetened coconut works as well.
You can also experiment with adding spices like cinnamon or nutmeg to the dough for a unique twist. Additionally, storing the bread in an airtight container will help maintain its softness for several days. Enjoy your homemade Pan De Coco with a cup of coffee or tea for a delightful treat!
Torta Frita: Fried Bread From Argentina

Torta Frita, a beloved traditional Argentine bread, is a delightful treat often enjoyed during rainy days or as a street food snack. This deep-fried bread is crispy on the outside and soft on the inside, making it a perfect accompaniment to mate or a sweet treat when sprinkled with sugar. Its simple ingredients and quick preparation make it an accessible recipe for anyone looking to explore South American cuisine.
The origins of Torta Frita date back to the gaucho culture, where it was cooked over an open flame. Today, it’s commonly found in bakeries and at family gatherings across Argentina. Whether served plain, with a touch of jam, or alongside a savory dish, Torta Frita is versatile and sure to please a crowd. In this recipe, we’ll guide you through making this delicious fried bread, perfect for a serving size of 4-6 people.
Ingredients
- 2 cups all-purpose flour
- 1/2 teaspoon baking powder
- 1/2 teaspoon salt
- 1 tablespoon sugar
- 1/4 cup vegetable oil (for dough)
- 1/2 cup water (or as needed)
- Vegetable oil (for frying)
- Optional: powdered sugar (for dusting)
Cooking Instructions
- Prepare the Dough: In a large mixing bowl, combine the all-purpose flour, baking powder, salt, and sugar. Mix these dry ingredients thoroughly to ascertain even distribution. Slowly add the vegetable oil and mix with your hands or a spoon until the mixture resembles coarse crumbs.
- Add Water: Gradually add water to the dough mixture, a little at a time, until the dough comes together. You want it to be soft but not sticky. Knead the dough on a lightly floured surface for about 5 minutes until it’s smooth and elastic. Cover the dough with a damp cloth and let it rest for about 30 minutes.
- Shape the Dough: After resting, divide the dough into 8 equal pieces. Roll each piece into a ball and then flatten it into a disc shape about 1/4 inch thick. Use a fork to poke holes in the center of each disc; this helps to prevent them from puffing up too much during frying.
- Heat the Oil: In a deep frying pan or pot, heat vegetable oil over medium-high heat. You’ll need enough oil to submerge the discs partially. To test if the oil is ready, drop a small piece of dough into the oil; if it sizzles, it’s time to fry.
- Fry the Torta Frita: Carefully place the flattened discs into the hot oil, cooking them in batches to avoid overcrowding. Fry for about 2-3 minutes on each side, or until they’re golden brown and crispy. Use a slotted spoon to remove them from the oil and drain on paper towels.
- Serve: Once drained, you can sprinkle the tortas fritas with powdered sugar if desired, or serve them plain. Enjoy them warm with a cup of mate or your favorite jam.
Extra Tips
When making Torta Frita, verify that the oil is at the right temperature to achieve a crispy exterior without burning. If you find that your bread is browning too quickly, reduce the heat slightly.
Additionally, you can experiment with different flavors by adding a sprinkle of cinnamon or vanilla extract into the dough for a twist. Remember, Torta Frita is best enjoyed fresh, so try to eat them soon after frying for the ultimate experience!