

Mornings can be hectic, but adding a touch of sweetness with soft South American breads can make them feel a little brighter. With options like the creamy Pan De Leche or the delightful Chipa, there’s a flavor to suit every craving. Whether you’re yearning for something cheesy or a bit more sugary, these breads are here to elevate your breakfast. Let me share some lovely recipes that can turn your ordinary mornings into something a bit more special.
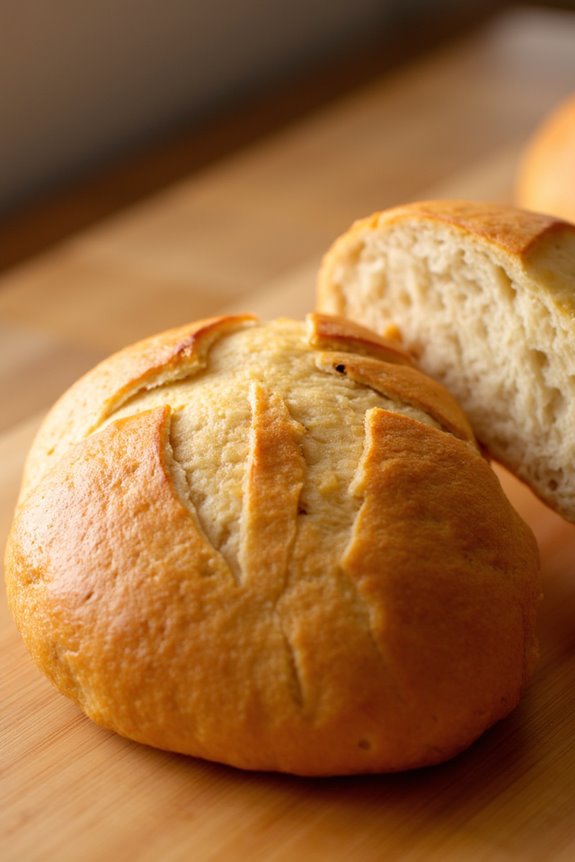
Pan De Leche – Argentine Milk Bread
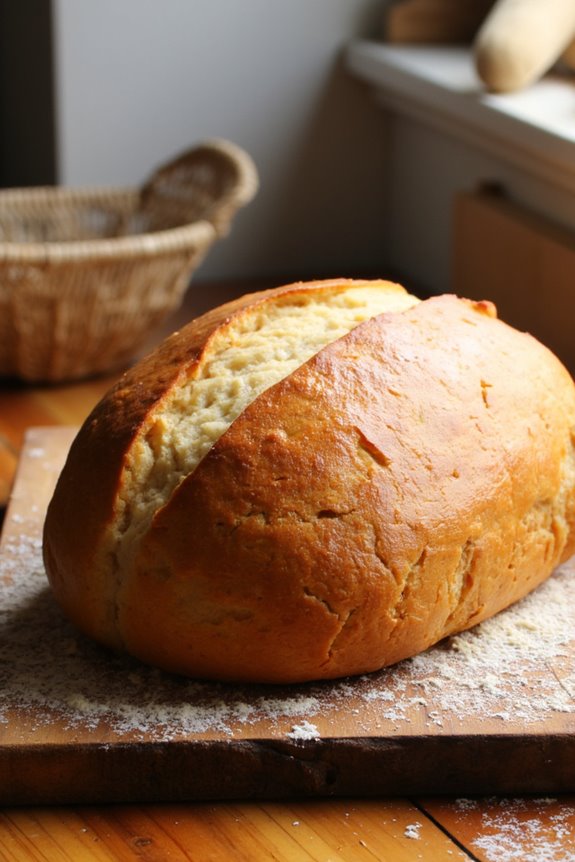
Pan De Leche, or Argentine Milk Bread, is a beloved staple in many South American households, known for its soft, fluffy texture and slightly sweet flavor. This delightful bread is often enjoyed for breakfast or as a snack, spread with butter or jam. Its origins can be traced back to European influences, particularly from Italian and Spanish immigrants, who brought their baking traditions to Argentina.
The combination of milk, sugar, and a hint of vanilla creates an irresistible aroma that fills the kitchen as it bakes, making it a perfect treat for family gatherings or festive occasions.
Making Pan De Leche is a straightforward process, and the result is a warm, comforting loaf that can easily be made at home. This recipe yields enough bread for 4-6 people, making it an ideal dish to share with friends and family. Whether you’re looking to impress guests at a brunch or simply want to enjoy a taste of South American culture, this milk bread is sure to please everyone at the table.
Ingredients
- 3 cups all-purpose flour
- 1 packet (2 ¼ teaspoons) active dry yeast
- 1 cup warm milk (about 110°F or 43°C)
- ¼ cup granulated sugar
- ½ teaspoon salt
- 2 large eggs
- ¼ cup unsalted butter, melted
- 1 teaspoon vanilla extract
- Additional flour for dusting
Cooking Instructions
- Prepare the Yeast Mixture: In a small bowl, combine the warm milk with the active dry yeast and 1 tablespoon of the sugar. Stir gently and let it sit for about 5-10 minutes until it becomes frothy. This step activates the yeast, which is vital for the bread to rise.
- Mix Dry Ingredients: In a large mixing bowl, whisk together the all-purpose flour, remaining sugar, and salt. This guarantees that the ingredients are evenly distributed and helps to create a uniform texture in the final product.
- Combine Wet Ingredients: In another bowl, whisk the eggs, melted butter, and vanilla extract together. Once the yeast mixture is frothy, add it to the wet ingredients and mix well.
- Form the Dough: Gradually add the wet mixture to the dry ingredients, stirring with a wooden spoon or spatula until a shaggy dough forms. Once combined, transfer the dough to a lightly floured surface.
- Knead the Dough: Knead the dough for about 8-10 minutes until it becomes smooth and elastic. If the dough is too sticky, add a little more flour as needed. Kneading helps develop the gluten, giving the bread its structure and chewy texture.
- First Rise: Place the kneaded dough in a large, greased bowl, cover it with a clean kitchen towel, and let it rise in a warm place for about 1-2 hours or until it has doubled in size. This is the first rise, allowing the yeast to work its magic.
- Shape the Bread: Once risen, punch down the dough to release the air. Transfer it to a floured surface and shape it into a loaf or divide it into smaller portions for individual rolls. Place the shaped dough into a greased loaf pan or onto a baking sheet, depending on your preference.
- Second Rise: Cover the shaped dough again and let it rise for another 30-45 minutes until it’s puffed up. This second rise is necessary for achieving that soft, airy texture.
- Preheat the Oven: While the dough is rising, preheat your oven to 350°F (175°C). This guarantees that the bread will bake evenly and develop a beautiful golden crust.
- Bake the Bread: Once the dough has risen, place it in the preheated oven and bake for 25-30 minutes or until the top is golden brown and sounds hollow when tapped. If the bread starts browning too quickly, you can cover it loosely with aluminum foil.
- Cool and Serve: Remove the bread from the oven and let it cool in the pan for about 10 minutes before transferring it to a wire rack to cool completely. Once cooled, slice and serve with your favorite spreads.
Extra Tips
To enhance the flavor of your Pan De Leche, consider adding a sprinkle of cinnamon or nutmeg to the dough. You can also experiment with different types of milk, such as almond or coconut, for a unique twist.
If you want to make the bread ahead of time, it can be frozen after baking. Just wrap it tightly in plastic wrap and aluminum foil before placing it in the freezer. When you’re ready to enjoy it, simply thaw at room temperature and warm it up in the oven for a few minutes to regain that fresh-baked taste.
Pão De Queijo – Brazilian Cheese Bread
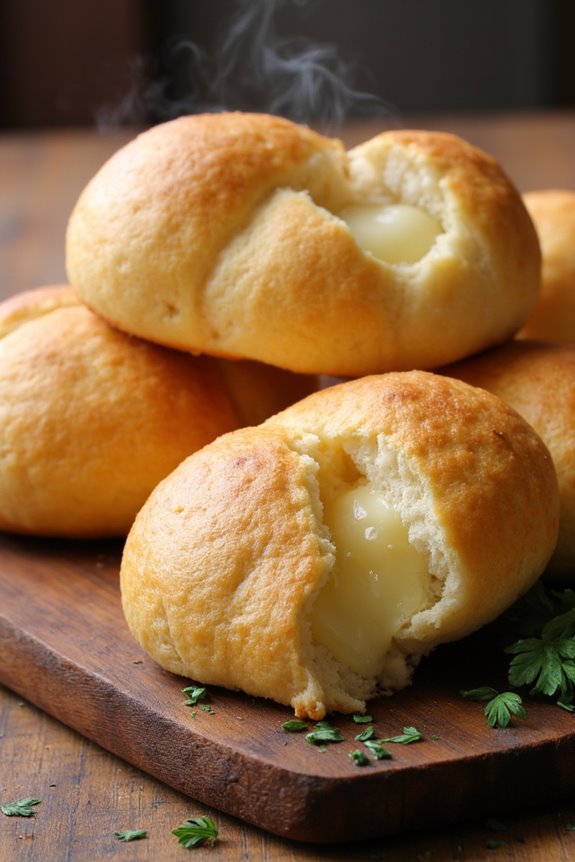
Pão de Queijo is a beloved Brazilian treat, often enjoyed warm and fresh from the oven. This delightful cheese bread has a unique texture, being both chewy and airy, thanks to the use of tapioca flour. It’s gluten-free and incredibly easy to prepare, making it a perfect snack or side dish for any occasion. The delightful aroma of cheese wafting through the kitchen as they bake will have everyone enthusiastic for the first bite.
Traditionally served during breakfast or as a snack with coffee, these little cheese balls are made with just a few simple ingredients. The beauty of Pão de Queijo lies in its versatility; you can experiment with different types of cheese to customize the flavor according to your preference. Whether you prefer the sharpness of cheddar or the creaminess of mozzarella, the result will always be deliciously satisfying.
Ingredients (Serves 4-6)
- 1 cup milk
- 1/2 cup vegetable oil
- 1 teaspoon salt
- 2 cups tapioca flour
- 2 large eggs
- 1 cup grated cheese (such as Parmesan, mozzarella, or a blend)
- Optional: 1/2 teaspoon garlic powder or herbs for flavor enhancement
Cooking Instructions
- Preheat the Oven: Begin by preheating your oven to 375°F (190°C). This guarantees that the Pão de Queijo will bake evenly and achieve a golden-brown color.
- Combine Liquid Ingredients: In a medium saucepan over medium heat, combine the milk, vegetable oil, and salt. Stir occasionally until the mixture comes to a gentle boil. Once boiling, remove it from the heat.
- Mix with Tapioca Flour: Quickly add the tapioca flour to the hot milk mixture, stirring vigorously with a wooden spoon until well combined. The heat from the milk will help to cook the tapioca flour, creating a sticky dough.
- Incorporate Eggs and Cheese: Allow the dough to cool for a few minutes, then add the eggs one at a time, mixing well after each addition until the dough is smooth. Next, fold in the grated cheese until evenly distributed throughout the dough.
- Shape the Dough: With your hands, take small portions of the dough and roll them into balls, about the size of a golf ball. Place them on a baking sheet lined with parchment paper, spacing them about 2 inches apart as they’ll expand while baking.
- Bake: Transfer the baking sheet to the preheated oven and bake for 15-20 minutes, or until the tops are puffed and lightly golden. Keep an eye on them to avoid over-baking, as they should remain soft on the inside.
- Serve Warm: Once baked, remove the Pão de Queijo from the oven and let them cool slightly. Serve warm for the best texture and flavor.
Extra Tips
For an extra flavor kick, consider adding a pinch of garlic powder or herbs like oregano or parsley to the dough before baking. You can also experiment with different types of cheese for varied taste profiles.
If you’re feeling adventurous, try stuffing the center of each dough ball with a small piece of cheese before baking for an even cheesier experience. Pão de Queijo is best enjoyed fresh out of the oven but can also be frozen for later use—just reheat in the oven to restore their delightful texture.
Chipa – Paraguayan Cheese Bread
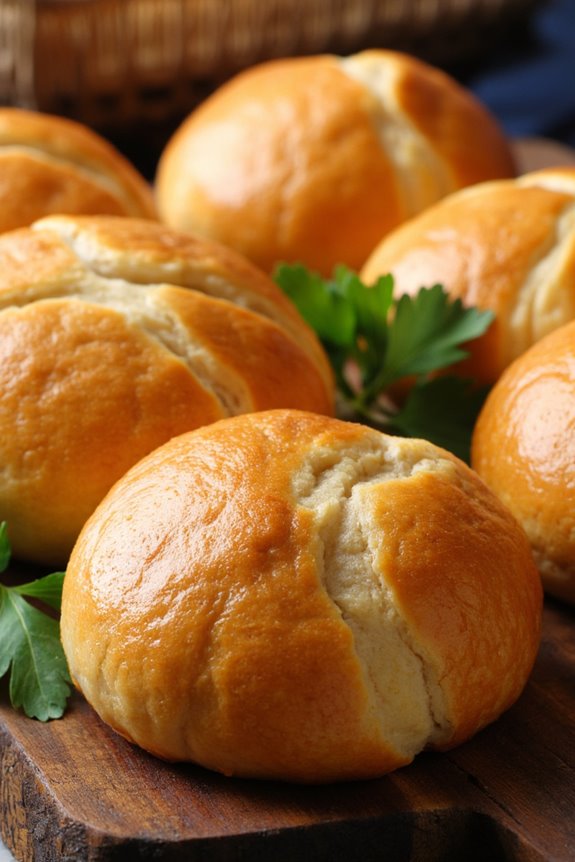
Chipa is a traditional cheese bread from Paraguay, highly cherished for its delightful flavor and chewy texture. Made primarily with cassava flour and cheese, this gluten-free treat is perfect for any occasion, whether enjoyed as a light snack, served with breakfast, or offered at social gatherings.
The combination of cheese and the slight nuttiness of cassava flour creates a unique taste that’s both satisfying and delicious. The preparation of Chipa is relatively straightforward, making it an accessible recipe for both seasoned bakers and novices alike.
While there are many variations of Chipa across different regions, this recipe captures the essence of the traditional Paraguayan version, guaranteeing that you can enjoy a taste of South America right from your kitchen.
Ingredients (Serves 4-6)
- 2 cups cassava flour (also known as manioc flour)
- 1 cup grated Paraguayan cheese or a mix of mozzarella and Parmesan
- 2 large eggs
- ½ cup milk
- ½ cup vegetable oil
- 1 teaspoon baking powder
- 1 teaspoon salt
- ½ teaspoon ground black pepper (optional)
- ½ teaspoon garlic powder (optional)
Cooking Instructions
- Preheat the Oven: Begin by preheating your oven to 350°F (175°C). This guarantees that the Chipa bakes evenly and achieves a golden, crispy exterior.
- Mix Dry Ingredients: In a large mixing bowl, combine the cassava flour, baking powder, salt, and optional garlic powder and black pepper. Whisk together until well blended, making sure there are no lumps.
- Combine Wet Ingredients: In a separate bowl, whisk together the eggs, milk, and vegetable oil until fully incorporated. This mixture will add moisture and richness to the dough.
- Combine Mixtures: Gradually pour the wet ingredients into the bowl with the dry ingredients while stirring continuously. Mix until a soft dough forms. The dough should be slightly sticky but manageable.
- Incorporate Cheese: Gently fold in the grated cheese until it’s evenly distributed throughout the dough. This is what gives Chipa its signature cheesy flavor.
- Shape the Dough: Lightly flour your hands and divide the dough into small balls, about the size of a golf ball. You can also shape them into small oval or ring shapes if you prefer.
- Arrange on Baking Sheet: Place the shaped dough onto a baking sheet lined with parchment paper, guaranteeing they’re spaced apart to allow for expansion while baking.
- Bake: Place the baking sheet in the preheated oven and bake for approximately 20-25 minutes, or until the Chipa are puffed up and golden brown on the outside.
- Cool and Serve: Once baked, remove the Chipa from the oven and let them cool slightly on a wire rack before serving. They’re best enjoyed warm!
Extra Tips
For an added depth of flavor, consider experimenting with different types of cheese or adding herbs like fresh parsley or oregano to the dough.
If you prefer a more pronounced cheese flavor, use a stronger cheese such as aged cheddar or a sharper Parmesan. Additionally, Chipa can be stored in an airtight container for a couple of days, but they’re best eaten fresh when the texture is at its peak.
Enjoy your homemade Chipa with a side of guava jelly or on their own!
Pan Dulce – Sweet Bread From Mexico

Pan Dulce, or sweet bread, is a beloved staple in Mexican bakeries and households alike. This delightful treat is often enjoyed for breakfast or as a snack, pairing perfectly with coffee or hot chocolate. With its soft, fluffy texture and sweet, buttery flavor, Pan Dulce comes in various shapes and sizes, each adorned with colorful toppings that entice the eye and tantalize the taste buds. Making your own Pan Dulce at home allows you to experience the joy of this traditional Mexican treat while filling your kitchen with a warm, inviting aroma.
The origins of Pan Dulce can be traced back to the influence of French pastry-making techniques introduced in Mexico during the 19th century. Over time, it evolved into a unique cultural phenomenon, with each region developing its own variations. From the iconic concha, shaped like a seashell with a sweet topping, to the whimsical cuernito, resembling a crescent, each type of Pan Dulce offers a delicious glimpse into the culinary traditions of Mexico.
Preparing Pan Dulce from scratch might seem intimidating, but with this easy recipe, you’ll be able to indulge in homemade sweet bread that captures the essence of Mexican culture.
Ingredients (Serves 4-6):
- 4 cups all-purpose flour
- 1 cup milk, warmed
- 1/2 cup sugar
- 1/2 cup unsalted butter, softened
- 2 large eggs
- 2 1/4 teaspoons active dry yeast (1 packet)
- 1 teaspoon vanilla extract
- 1 teaspoon salt
- 1/4 cup sugar (for topping)
- 1/4 cup all-purpose flour (for topping)
- 1/4 cup unsweetened cocoa powder (optional, for chocolate topping)
- 1/4 cup unsalted butter, melted (for topping)
- 1 teaspoon cinnamon (optional, for topping)
Cooking Instructions:
- Activate the Yeast: In a small bowl, combine the warm milk and yeast. Allow it to sit for about 5-10 minutes until it becomes frothy. This step is essential as it activates the yeast, which helps the bread rise.
- Mix the Dough: In a large mixing bowl, combine the flour, sugar, and salt. Create a well in the center and add the activated yeast mixture, softened butter, eggs, and vanilla extract. Stir until a dough begins to form.
- Knead the Dough: Transfer the dough onto a floured surface and knead for about 8-10 minutes until it becomes smooth and elastic. If the dough is sticky, add a little more flour as needed.
- First Rise: Place the kneaded dough into a greased bowl, cover it with a clean kitchen towel or plastic wrap, and let it rise in a warm place for about 1-2 hours, or until it doubles in size.
- Prepare the Topping: While the dough is rising, mix the 1/4 cup sugar, 1/4 cup flour, cocoa powder (if using), and cinnamon (if using) in a bowl. Add the melted butter and mix until crumbly.
- Shape the Dough: Once the dough has risen, punch it down and divide it into smaller portions (about 12 pieces for medium-sized pieces). Shape each piece into a round ball or your desired shape.
- Second Rise: Place the shaped dough on a baking sheet lined with parchment paper, cover, and let it rise again for about 30-45 minutes until puffy.
- Preheat Oven: Preheat your oven to 350°F (175°C) while the dough is rising for the second time.
- Add Toppings: After the second rise, gently flatten the tops of the dough and sprinkle the topping mixture generously over each piece.
- Bake: Bake in the preheated oven for 15-20 minutes or until the tops are golden brown and the bread sounds hollow when tapped on the bottom.
- Cool and Serve: Once baked, remove the Pan Dulce from the oven and let it cool slightly on a wire rack. Serve warm or at room temperature.
Extra Tips:
For an added touch of flavor, consider incorporating citrus zest, such as orange or lemon, into the dough or topping. Experiment with different shapes and toppings, like adding colored sugar or nuts, to make your Pan Dulce uniquely yours.
Remember to keep an eye on the baking time, as ovens can vary, and you want to achieve that perfect golden hue without overbaking. Enjoy your homemade Pan Dulce with a warm beverage for a truly delightful experience!
Alfajores De Dulce De Leche – Sweet Filled Cookies
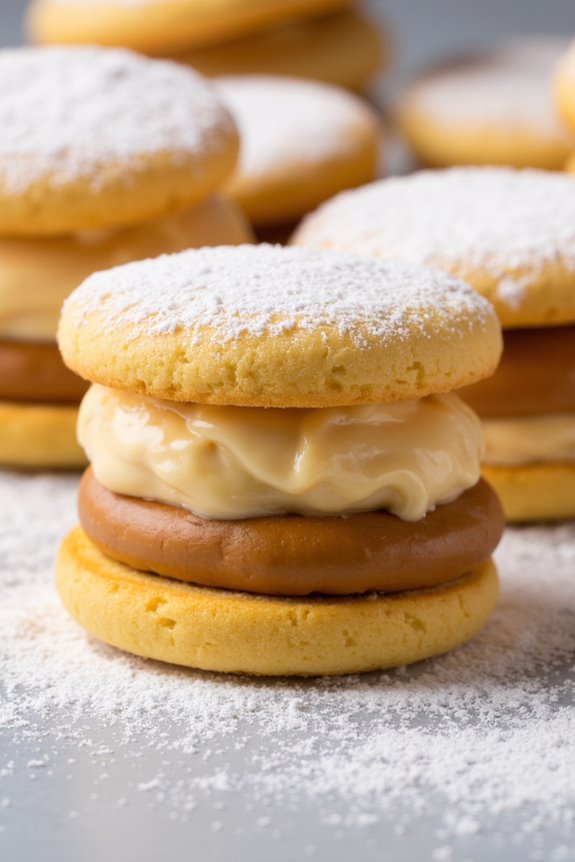
Alfajores De Dulce De Leche are a classic South American treat that consists of two delicate cookies sandwiched together with a luscious layer of dulce de leche, a rich caramel-like filling made from sweetened milk.
Originating from the colonial period, these sweet cookies are especially popular in countries like Argentina and Peru. The combination of the crumbly, buttery cookies and the sweet, creamy filling creates a melt-in-your-mouth experience that’s hard to resist.
Making Alfajores De Dulce De Leche at home is a delightful experience that allows you to enjoy a taste of South America right in your kitchen. The dough is typically flavored with cornstarch, which gives the cookies their signature texture, while a dusting of powdered sugar on the outside adds an elegant finish.
These cookies can be enjoyed any time of the year, and they’re perfect for sharing with family and friends during gatherings or as a sweet treat with your afternoon coffee.
Ingredients (Serves 4-6)
- 1 cup unsalted butter, softened
- 1 cup granulated sugar
- 2 large egg yolks
- 1 teaspoon vanilla extract
- 2 cups all-purpose flour
- 1 cup cornstarch
- 1 teaspoon baking powder
- 1 cup dulce de leche
- Powdered sugar for dusting
Cooking Instructions
1. Prepare the Dough: In a large mixing bowl, cream together the softened butter and granulated sugar until light and fluffy. This process usually takes about 3-5 minutes and incorporates air into the mixture, giving the cookies a tender texture.
Add in the egg yolks and vanilla extract, mixing until fully combined.
2. Combine Dry Ingredients: In a separate bowl, sift together the all-purpose flour, cornstarch, and baking powder. Sifting helps to aerate the flour and removes any lumps, guaranteeing a smooth dough.
3. Mix Dry and Wet Ingredients: Gradually add the dry ingredients to the butter mixture, mixing just until the dough comes together. Be careful not to overmix, as this can lead to tougher cookies.
4. Chill the Dough: Divide the dough into two equal portions, shape them into discs, and wrap them in plastic wrap. Refrigerate for at least 1 hour. Chilling the dough firms it up, making it easier to roll out later.
5. Roll Out the Dough: Once chilled, preheat your oven to 350°F (175°C). On a lightly floured surface, roll out one disc of dough to about 1/8 inch thick. Use a round cookie cutter to cut out circles and place them on a parchment-lined baking sheet.
Repeat with the second disc.
6. Bake the Cookies: Bake the Cookies in the preheated oven for about 10-12 minutes, or until the edges are lightly golden. Remove from the oven and allow them to cool on the baking sheet for a few minutes before transferring them to a wire rack to cool completely.
7. Assemble the Alfajores: Once the cookies are completely cool, spread a generous amount of dulce de leche on the bottom of one cookie and sandwich it with another cookie. Press gently to confirm they stick together.
8. Dust with Powdered Sugar: Finally, dust the assembled alfajores with powdered sugar before serving. This adds a touch of sweetness and makes them look appealing.
Extra Tips
For the best results, make sure your butter is at room temperature to achieve a fluffy batter. If you can’t find dulce de leche, you can make your own by simmering sweetened condensed milk until it thickens and turns caramel in color.
These cookies are also perfect for customization – feel free to add a hint of cocoa powder to the dough for a chocolate variation or roll them in shredded coconut for added texture.
Store the alfajores in an airtight container to keep them fresh for several days. Enjoy your baking!
Marraqueta – Chilean Crusty Bread
Marraqueta, also known as “pan batido,” is a beloved Chilean bread that boasts a crisp crust and a soft, airy interior. Perfect for breakfast or as an accompaniment to any meal, this bread is characterized by its unique shape—flattened and slightly scored on top, allowing it to split easily for stuffing with butter, avocado, or even cheese.
Making marraqueta at home can be a rewarding experience that fills your kitchen with a delightful aroma. This versatile bread is often served with a variety of toppings or enjoyed on its own, showcasing its delicious flavor.
While it may seem challenging to create such a crusty delight, following this recipe will guide you through the process, guaranteeing you produce a batch of marraqueta that will impress family and friends alike. With just a few simple ingredients and some patience, you’ll be able to enjoy this traditional Chilean treat.
Ingredients (Serves 4-6)
- 4 cups all-purpose flour
- 1 ½ cups warm water
- 2 teaspoons salt
- 1 tablespoon sugar
- 2 teaspoons instant yeast
- 2 tablespoons olive oil
Cooking Instructions
- Activate the Yeast: In a small bowl, combine the warm water, sugar, and instant yeast. Let the mixture sit for about 5-10 minutes until it becomes frothy. This step is vital as it guarantees that the yeast is active and ready to help the dough rise.
- Mix the Dry Ingredients: In a large mixing bowl, combine the all-purpose flour and salt. Mix them well to evenly distribute the salt throughout the flour, which enhances the flavor of the bread.
- Combine Wet and Dry Ingredients: Pour the yeast mixture and olive oil into the bowl with the flour. Using a wooden spoon or your hands, mix until the dough begins to come together. It should be slightly sticky but manageable.
- Knead the Dough: Transfer the dough to a floured surface and knead it for about 10 minutes. You want to develop the gluten in the dough, which will give the marraqueta its characteristic texture. If the dough is too sticky, sprinkle a little extra flour as needed.
- First Rise: Place the kneaded dough in a greased bowl, cover it with a damp cloth or plastic wrap, and let it rise in a warm area for about 1 to 1.5 hours, or until it has doubled in size.
- Shape the Breads: Once the dough has risen, punch it down gently to release the air. Divide the dough into 8 equal portions. Shape each portion into a small oval and then flatten it slightly. Use a sharp knife to make two shallow cuts on top of each piece, creating the characteristic marraqueta shape.
- Second Rise: Place the shaped dough on a baking sheet lined with parchment paper. Cover them with a clean cloth and let them rise for another 30-40 minutes. This will allow them to puff up before baking.
- Preheat the Oven: During the second rise, preheat your oven to 425°F (220°C). This high temperature is crucial for achieving a crispy crust.
- Bake: Once the dough has risen again, place the baking sheet in the oven and bake for 15-20 minutes, or until the marraquetas are golden brown and sound hollow when tapped on the bottom.
- Cool and Serve: Remove the marraqueta from the oven and let them cool on a wire rack for a few minutes before serving. Enjoy them warm with your favorite toppings!
Extra Tips
For the best results, make sure that your water is warm, but not hot, as excessive heat can kill the yeast. Additionally, using a baking stone can help create an even better crust.
If you want to add a touch of flavor, consider incorporating herbs or spices into the dough. Finally, for an extra crispy crust, you can spritz the oven with water a few times during the first few minutes of baking to create steam. Enjoy your homemade marraqueta!
Bizcochos – Uruguayan Sweet Pastries
Bizcochos are delightful Uruguayan sweet pastries that are often enjoyed as a snack or dessert, perfect for pairing with a cup of coffee or tea. Known for their flaky texture and slightly sweet flavor, these pastries can be found in bakeries across Uruguay and are beloved by locals and visitors alike. The dough is typically enriched with butter and sugar, making it irresistibly delicious.
Making bizcochos at home is a rewarding experience that allows you to savor the authentic flavors of Uruguay. This recipe yields 4-6 servings, providing enough for a small gathering or family treat. With a little patience and care, you can recreate these scrumptious pastries that will surely impress your friends and family.
Ingredients
- 3 cups all-purpose flour
- 1/2 cup granulated sugar
- 1 tablespoon baking powder
- 1/2 teaspoon salt
- 1/2 cup unsalted butter, softened
- 1/2 cup milk
- 1 large egg
- 1 teaspoon vanilla extract
- 1 egg yolk (for egg wash)
- 1 tablespoon water (for egg wash)
Cooking Instructions
- Prepare the Dough: In a large mixing bowl, combine the flour, sugar, baking powder, and salt. Mix well to guarantee the dry ingredients are evenly distributed. Add the softened butter and use your hands or a pastry cutter to blend it into the flour mixture until it resembles coarse crumbs.
- Incorporate Wet Ingredients: In a separate bowl, whisk together the milk, egg, and vanilla extract. Gradually add this wet mixture to the flour mixture, stirring with a wooden spoon until a dough forms. If the dough is too sticky, sprinkle a little more flour as needed.
- Knead the Dough: Turn the dough out onto a lightly floured surface and knead gently for about 5 minutes until it becomes smooth and elastic. Wrap the dough in plastic wrap and refrigerate for about 30 minutes to allow it to firm up.
- Roll Out the Dough: Once chilled, remove the dough from the refrigerator and roll it out to about 1/4 inch thick on a floured surface. Use a knife or pastry cutter to cut the dough into desired shapes, such as squares or rectangles.
- Prepare for Baking: Preheat your oven to 350°F (175°C). Place the cut dough pieces onto a baking sheet lined with parchment paper. In a small bowl, whisk together the egg yolk and water to create an egg wash. Brush the tops of the pastries with the egg wash for a golden finish.
- Bake the Bizcochos: Bake in the preheated oven for about 15-20 minutes, or until the pastries are lightly golden brown. Keep an eye on them to prevent over-browning.
- Cooling: Once baked, remove the bizcochos from the oven and let them cool on a wire rack. They can be enjoyed warm or at room temperature.
Extra Tips
For an added touch of flavor, consider sprinkling cinnamon sugar on top of the egg wash before baking, or experiment with fillings such as dulce de leche or fruit preserves inside the dough.
When storing leftover bizcochos, keep them in an airtight container to maintain their flakiness, and they can be reheated in the oven for a few minutes to restore their original texture. Enjoy your delicious homemade bizcochos!
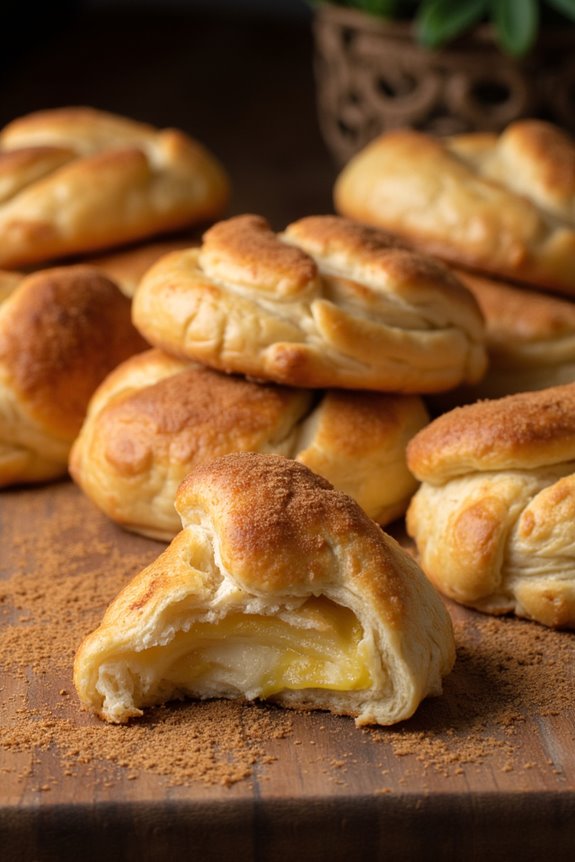
Cuernitos – Sweet Croissants From Peru
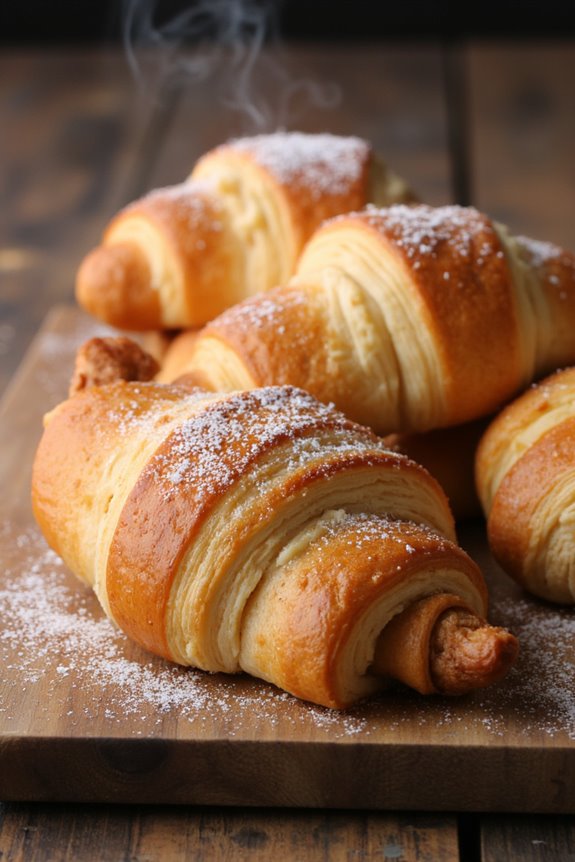
Cuernitos, a delightful Peruvian pastry, are sweet croissants that offer a perfect balance of flaky texture and rich flavor. These delightful treats are often enjoyed for breakfast or as a snack, accompanied by a cup of coffee or tea. The dough is enriched with butter and sugar, resulting in a sweet and tender croissant that can be filled or topped with various ingredients. They’re perfect for sharing with family and friends, making them a popular choice for gatherings and celebrations.
Making cuernitos requires a bit of patience and skill, as the dough must be rolled and folded multiple times to achieve the desired flakiness. However, the end result is worth the effort, as you’ll be rewarded with golden-brown croissants that are soft on the inside and slightly crisp on the outside. Whether you enjoy them plain or with fillings such as chocolate or fruit preserves, cuernitos are sure to impress anyone who takes a bite.
Ingredients (Serves 4-6 people):
- 3 cups all-purpose flour
- 1/4 cup granulated sugar
- 1 teaspoon salt
- 1 packet (2 1/4 teaspoons) instant yeast
- 1 cup whole milk, warmed
- 1/2 cup unsalted butter, softened and divided
- 1 large egg
- 1 teaspoon vanilla extract
- 1/4 cup confectioners’ sugar (for dusting)
- Optional: chocolate chips, fruit preserves, or almond paste for filling
Cooking Instructions:
- Prepare the Dough: In a large mixing bowl, combine the flour, granulated sugar, salt, and instant yeast. Stir the dry ingredients together until well mixed. In a separate bowl, whisk together the warmed milk, 1/4 cup of softened butter, egg, and vanilla extract. Gradually pour the wet mixture into the dry ingredients, mixing until a dough forms.
- Knead the Dough: Transfer the dough onto a lightly floured surface and knead for about 5-7 minutes until it becomes smooth and elastic. Form the dough into a ball and place it in a lightly greased bowl. Cover with a damp cloth or plastic wrap and let it rise in a warm place for about 1 hour or until it has doubled in size.
- Roll and Fold: After the dough has risen, punch it down to release air. Roll the dough out into a large rectangle, about 1/4 inch thick. Spread the remaining 1/4 cup softened butter evenly over the surface of the dough. Fold the dough into thirds like a letter, then roll it out again into a rectangle. Repeat this rolling and folding process 2 more times to create layers.
- Shape the Cuernitos: Roll the dough out one final time into a rectangle. Cut the dough into triangles, about 4-5 inches wide at the base. Starting from the base of each triangle, roll the dough up towards the tip to form a croissant shape. Place the shaped cuernitos on a baking sheet lined with parchment paper.
- Second Rise: Cover the shaped cuernitos with a clean cloth and allow them to rise for another 30-45 minutes, or until they’ve puffed up slightly. Preheat your oven to 375°F (190°C).
- Bake: Once the cuernitos have risen, bake them in the preheated oven for 15-20 minutes, or until they’re golden brown. Remove them from the oven and allow them to cool slightly on a wire rack.
- Serve: Dust the cooled cuernitos with confectioners’ sugar before serving. Enjoy them plain or with your choice of fillings!
Extra Tips:
When making cuernitos, it’s crucial to keep your ingredients and workspace cool, especially the butter. If the butter becomes too warm, it can melt into the dough, resulting in less flaky croissants.
Additionally, feel free to experiment with different fillings; chocolate chips or a dollop of fruit preserves can elevate the flavor.
Finally, for an even richer taste, consider brushing the croissants with an egg wash before baking for a beautifully golden finish. Enjoy your homemade cuernitos!
Rosca De Reyes – Kings’ Ring Bread
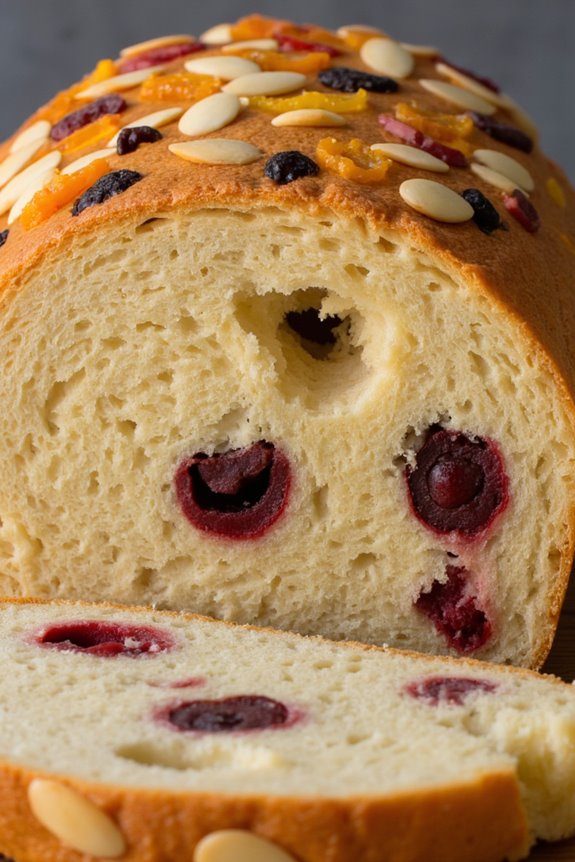
Rosca De Reyes, or Kings’ Ring Bread, is a traditional sweet bread that celebrates the Epiphany in many Spanish-speaking countries, particularly in Latin America. This deliciously rich and slightly sweet bread is shaped in a circular form to symbolize the journey of the Three Wise Men to see the baby Jesus.
Often adorned with colorful dried fruits and sometimes hiding a small figurine or bean inside, this festive treat isn’t only a delight to eat but also a wonderful centerpiece for family gatherings.
Making Rosca De Reyes can be a fun and rewarding experience, especially during the holiday season. The bread is typically flavored with orange blossom water and has a soft, fluffy texture that makes it irresistible.
While the preparation may take some time, the end result is well worth the effort, as this beautiful bread is enjoyed by families and friends alike, often paired with hot chocolate or coffee.
Ingredients (Serves 4-6):
- 4 cups all-purpose flour
- 1/2 cup sugar
- 1/2 teaspoon salt
- 1 packet (2 1/4 teaspoons) active dry yeast
- 1/2 cup warm milk (110°F)
- 1/2 cup unsalted butter, softened
- 3 large eggs
- 1 tablespoon orange blossom water
- 1 teaspoon vanilla extract
- 1/4 cup candied citrus peels
- 1/4 cup dried cherries
- 1/4 cup almonds, sliced
- 1 small figurine or dried bean (optional)
- Egg wash (1 beaten egg mixed with 1 tablespoon milk) for glazing
Cooking Instructions:
- Activate the Yeast: In a small bowl, combine the warm milk with the active dry yeast and a teaspoon of sugar. Let it sit for about 5-10 minutes until it becomes frothy. This indicates that the yeast is active and ready to use.
- Mix the Dry Ingredients: In a large mixing bowl, whisk together the flour, sugar, and salt. Make a well in the center of the mixture to add the wet ingredients.
- Combine Wet Ingredients: To the well, add the softened butter, eggs, orange blossom water, vanilla extract, and the activated yeast mixture. Mix with a wooden spoon until the dough begins to come together.
- Knead the Dough: Turn the dough onto a floured surface and knead for about 8-10 minutes until it’s smooth and elastic. If the dough is too sticky, sprinkle a little more flour as needed.
- First Rise: Place the kneaded dough in a greased bowl, cover it with a damp cloth or plastic wrap, and let it rise in a warm place for about 1-2 hours or until it has doubled in size.
- Shape the Bread: Once risen, punch down the dough to release the air. Knead in the candied citrus peels and dried cherries. Shape the dough into a long rope and then form it into a ring, pinching the ends together securely.
- Second Rise: Place the ring on a baking sheet lined with parchment paper. Cover it again and let it rise for another 30-45 minutes. Preheat the oven to 350°F (175°C) while the dough rises.
- Decorate and Bake: Once risen, brush the top of the dough with egg wash. Decorate with sliced almonds and any additional dried fruits. If using, hide the figurine or bean inside the dough before baking. Bake for 25-30 minutes or until golden brown.
- Cool and Serve: Remove from the oven and let the bread cool on a wire rack. Once cooled, it’s ready to be sliced and enjoyed!
Extra Tips:
When making Rosca De Reyes, be sure to keep an eye on the dough during the rising processes; the temperature and humidity can greatly affect how quickly it rises.
If you want to get creative, you can use different toppings like colorful sprinkles or even a glaze made from powdered sugar and milk to give your bread a festive touch.
Additionally, if you don’t have orange blossom water, orange zest can be used as an alternative for that citrus flavor. Enjoy your baking!
Torta De Tres Leches – Three Milk Cake Bread
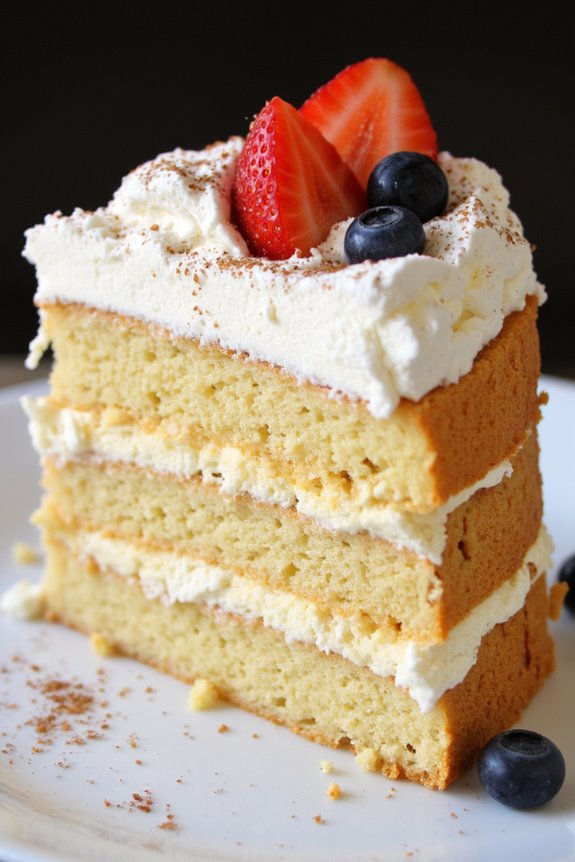
Torta De Tres Leches, or Three Milk Cake Bread, is a beloved dessert throughout Latin America, renowned for its moist and rich flavor. This delightful cake is soaked in a combination of three different types of milk—evaporated milk, sweetened condensed milk, and whole milk—resulting in a decadent treat that melts in your mouth.
The origins of this cake can be traced back to various countries, but its charm lies in its ability to bring people together during celebrations and gatherings.
Making Torta De Tres Leches is a two-part process that involves baking a light sponge cake and then soaking it in the three milk mixture. The cake is often topped with whipped cream and fresh fruit, making it a stunning centerpiece for any dessert table.
Its versatility also allows for various flavorings and toppings, guaranteeing that each baker can add their own twist. Prepare to indulge in this sweet, creamy delight that’s sure to impress your family and friends!
Ingredients (Serves 4-6)
- 1 cup all-purpose flour
- 1 ½ teaspoons baking powder
- ½ teaspoon salt
- 4 large eggs
- 1 cup granulated sugar
- 1 teaspoon vanilla extract
- ½ cup milk
- 1 cup evaporated milk
- 1 cup sweetened condensed milk
- 1 cup whole milk
- 1 cup heavy cream (for topping)
- 2 tablespoons powdered sugar (for topping)
- Fresh fruit (optional, for garnish)
Cooking Instructions
- Preheat the Oven: Preheat your oven to 350°F (175°C). This guarantees that your cake will bake evenly and rise properly. Prepare a 9×13 inch baking pan by greasing it lightly with butter or non-stick spray.
- Prepare the Dry Ingredients: In a medium bowl, whisk together the all-purpose flour, baking powder, and salt. This helps to evenly distribute the leavening agent and guarantees a light and fluffy cake.
- Beat the Eggs and Sugar: In a large mixing bowl, beat the eggs and granulated sugar together until the mixture is pale and fluffy, about 5-7 minutes. The air incorporated during this step is essential for creating a light sponge cake.
- Combine Wet Ingredients: Add the vanilla extract and milk to the egg mixture, gently folding them in until just combined. Be careful not to deflate the batter by over-mixing.
- Incorporate Dry Ingredients: Gradually add the dry ingredients to the wet mixture, folding them in gently with a spatula until no flour streaks remain. This should be done carefully to maintain the airiness of the batter.
- Bake the Cake: Pour the batter into the prepared baking pan and spread it evenly. Bake in the preheated oven for 25-30 minutes or until a toothpick inserted into the center comes out clean. Allow the cake to cool in the pan for 10-15 minutes before transferring to a wire rack.
- Prepare the Milk Mixture: In a separate bowl, combine the evaporated milk, sweetened condensed milk, and whole milk. Stir well to guarantee the ingredients are fully blended.
- Soak the Cake: Once the cake is cool, poke holes all over the top using a fork or skewer. Slowly pour the milk mixture over the cake, allowing it to soak in. The cake should absorb the milk mixture completely.
- Chill the Cake: Cover the soaked cake with plastic wrap and refrigerate for at least 4 hours, or overnight for the best results. This chilling time allows the flavors to meld and the cake to become even more moist.
- Prepare the Topping: Before serving, whip the heavy cream with powdered sugar until soft peaks form. Spread or pipe the whipped cream over the top of the chilled cake and garnish with fresh fruit if desired.
Extra Tips
When making Torta De Tres Leches, patience is key. Allowing the cake to soak overnight will yield the best texture and flavor, as it gives the milk mixture time to infuse into the cake fully.
Additionally, feel free to experiment with flavored extracts or adding a splash of rum or coffee to the milk mixture for a unique twist. For presentation, serve the cake directly from the refrigerator and add fresh fruit or chocolate shavings just before serving to maintain their freshness.
Enjoy this delightful dessert with family and friends!