

I’ve always been drawn to the delightful world of Brazilian desserts, especially their cakes. Each one offers a unique blend of flavors, from the rich Brigadeiro Cake to the tropical Coconut Cake. These sweets not only satisfy cravings but also add a vibrant touch of Brazil to any gathering. If you’re eager to explore these tempting cakes, keep reading. There’s something truly special in every recipe.
Brigadeiro Cake
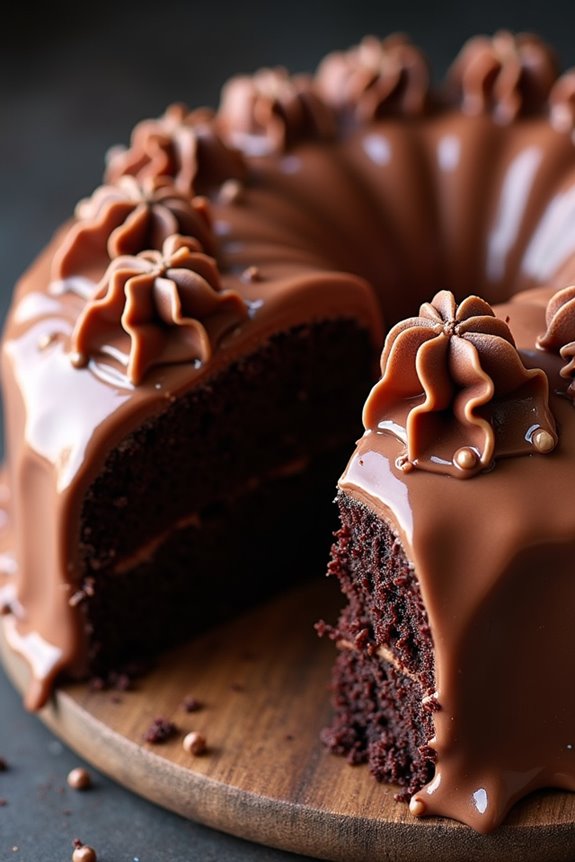
Brigadeiro Cake is a delightful Brazilian dessert that combines the rich flavors of chocolate and condensed milk, reminiscent of the traditional brigadeiro sweet. This cake isn’t only visually appealing with its luscious chocolate frosting and sprinkles but also provides a decadent experience with every bite.
Perfect for celebrations or family gatherings, this cake is bound to impress both adults and children alike. The base of the cake is a moist chocolate sponge that pairs perfectly with a creamy brigadeiro frosting, making it a popular choice for birthdays and special occasions in Brazil.
With its unique flavors and textures, Brigadeiro Cake is a delicious way to introduce a taste of Brazil to your dessert repertoire.
Ingredients (Serves 4-6):
- 1 cup all-purpose flour
- 1 cup granulated sugar
- ½ cup unsweetened cocoa powder
- 1 teaspoon baking powder
- ½ teaspoon baking soda
- ½ teaspoon salt
- 2 large eggs
- ½ cup whole milk
- ½ cup vegetable oil
- 1 teaspoon vanilla extract
- ½ cup boiling water
- 1 can (14 oz) sweetened condensed milk
- 2 tablespoons unsweetened cocoa powder (for frosting)
- 2 tablespoons unsalted butter
- Chocolate sprinkles (for decoration)
Cooking Instructions:
1. Preheat the Oven: Begin by preheating your oven to 350°F (175°C). This guarantees that the cake bakes evenly and rises properly once you pour the batter in.
2. Prepare the Cake Batter: In a large mixing bowl, combine the all-purpose flour, sugar, cocoa powder, baking powder, baking soda, and salt. Mix these dry ingredients well.
In a separate bowl, whisk together the eggs, milk, vegetable oil, and vanilla extract. Gradually add the wet ingredients to the dry mixture, mixing until well combined. Finally, stir in the boiling water until the batter is smooth and well incorporated.
3. Bake the Cake: Grease and flour a round cake pan (9-inch) and pour the batter into it. Bake in the preheated oven for 30-35 minutes, or until a toothpick inserted in the center comes out clean.
Once baked, remove the cake from the oven and allow it to cool in the pan for about 10 minutes before transferring it to a wire rack to cool completely.
4. Make the Brigadeiro Frosting: In a saucepan over medium heat, combine the sweetened condensed milk, unsweetened cocoa powder, and butter. Stir continuously until the mixture thickens and starts to pull away from the sides of the pan, about 10-15 minutes.
Remove from heat and allow the frosting to cool slightly before using.
5. Assemble the Cake: Once the cake has completely cooled, slice it in half horizontally to create two layers. Spread a generous amount of brigadeiro frosting on the top of the bottom layer, then place the second layer on top.
Use the remaining frosting to cover the top and sides of the cake. Finally, sprinkle chocolate sprinkles generously over the frosting for decoration.
6. Serve and Enjoy: Slice the Brigadeiro Cake into portions and serve. Enjoy this rich Brazilian treat with a glass of milk or coffee!
Extra Tips:
When making Brigadeiro Cake, be sure to use high-quality cocoa powder for a richer chocolate flavor. If you want a more intense chocolate experience, you can add chocolate chips to the batter before baking.
Additionally, let the brigadeiro frosting cool sufficiently before spreading it on the cake to achieve a smooth finish. If you prefer, you can also refrigerate the cake for a bit before serving; this can enhance the flavor and texture of the frosting. Enjoy your delightful Brigadeiro Cake!
Coconut Cake (Bolo De Coco)
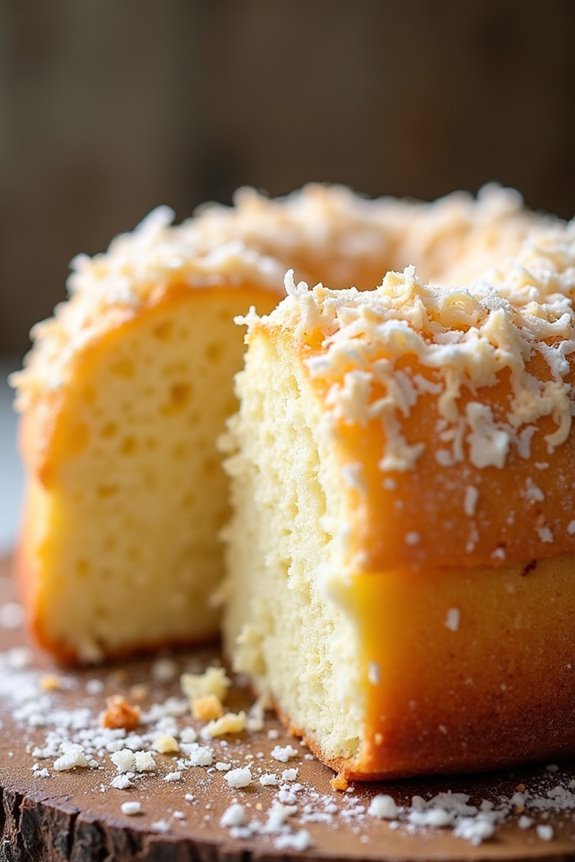
Coconut Cake, or Bolo De Coco, is a beloved Brazilian dessert that perfectly embodies the tropical flavors of the country. This moist and fluffy cake is infused with coconut milk and shredded coconut, creating a delightful combination that appeals to coconut lovers everywhere.
Traditionally served at family gatherings and festive celebrations, this cake isn’t only delicious but also simple to prepare, making it a great addition to your baking repertoire.
The beauty of Coconut Cake lies in its versatility. Whether enjoyed as a sweet breakfast treat, a snack with coffee, or a dessert after dinner, this cake is sure to impress your family and friends.
The fragrant aroma of coconut fills the kitchen as it bakes, making it hard to resist cutting a slice before it has fully cooled. With just a few ingredients and some easy steps, you can create this Brazilian classic that will have everyone asking for seconds.
Ingredients (Serves 4-6):
- 2 cups all-purpose flour
- 1 cup sugar
- 1 cup coconut milk
- 1 cup shredded coconut (unsweetened)
- ½ cup vegetable oil
- 3 large eggs
- 1 tablespoon baking powder
- ½ teaspoon salt
- 1 teaspoon vanilla extract
Cooking Instructions:
- Preheat the Oven: Begin by preheating your oven to 350°F (175°C). This guarantees that the cake will bake evenly and rise properly once you place it in the oven.
- Prepare the Baking Pan: Grease and flour a round or rectangular cake pan (9-inch size is recommended) to prevent the cake from sticking. You can use butter or cooking spray for greasing, and flour to dust the pan.
- Mix Dry Ingredients: In a large mixing bowl, whisk together the all-purpose flour, sugar, baking powder, and salt. This helps to evenly distribute the leavening agent and guarantees that your cake will rise well.
- Combine Wet Ingredients: In another bowl, mix the coconut milk, vegetable oil, eggs, and vanilla extract until well combined. Beat the mixture for about 1-2 minutes with a whisk or an electric mixer until it’s smooth.
- Combine the Mixtures: Gradually pour the wet ingredients into the dry ingredients, stirring gently until just combined. Be careful not to overmix; a few lumps are perfectly fine.
- Add Shredded Coconut: Fold in the shredded coconut into the cake batter using a spatula. This will give the cake its distinct coconut flavor and texture.
- Pour into the Pan: Transfer the batter into the prepared cake pan, spreading it evenly with a spatula. This guarantees that the cake will bake uniformly.
- Bake the Cake: Place the cake in the preheated oven and bake for 30-35 minutes, or until a toothpick inserted into the center comes out clean. Keep an eye on it towards the end of the baking time to avoid overbaking.
- Cool the Cake: Once baked, remove the cake from the oven and let it cool in the pan for about 10 minutes. Then, gently remove it from the pan and transfer it to a wire rack to cool completely.
- Serve and Enjoy: Once the cake is cooled, slice it into pieces and serve. You can enjoy it plain or with a sprinkle of powdered sugar on top for an extra touch.
Extra Tips:
For an added burst of flavor, consider toasting the shredded coconut before adding it to the batter. This enhances its natural sweetness and adds a lovely nutty aroma to the cake.
Additionally, if you want to elevate the dessert further, serve it with a dollop of whipped cream or a scoop of vanilla ice cream on the side. This Coconut Cake also keeps well, making it a great make-ahead option for gatherings.
Store it in an airtight container at room temperature for up to three days or refrigerate it to extend its freshness.
Chocolate Mousse Cake (Bolo De Mousse De Chocolate)
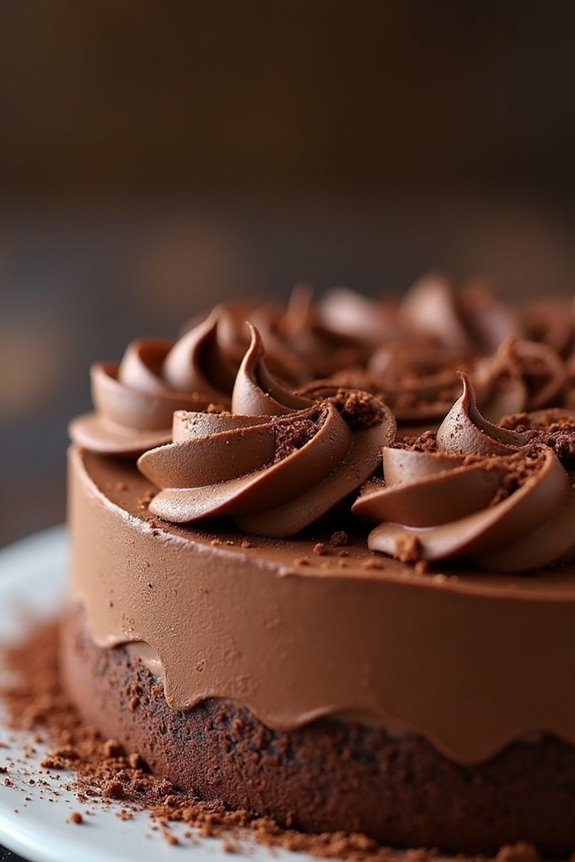
Chocolate Mousse Cake, or Bolo De Mousse De Chocolate, is a delightful Brazilian dessert that combines the rich flavors of chocolate with a light and airy texture. This cake is perfect for celebrations, special occasions, or simply as a sweet treat to enjoy with family and friends.
The cake itself is layered with a smooth and creamy chocolate mousse, creating a luxurious dessert that’s both impressive and indulgent. This recipe is designed to serve 4-6 people, making it an ideal choice for small gatherings or intimate dinners.
With its decadent flavor and stunning presentation, the Chocolate Mousse Cake is sure to impress your guests. Follow the simple steps below to create this delightful dessert that captures the essence of Brazilian cuisine.
Ingredients
- 200g of dark chocolate (at least 70% cocoa), chopped
- 3 large eggs, separated
- 1/4 cup of sugar
- 1 cup of heavy cream
- 1/2 teaspoon of vanilla extract
- Pinch of salt
- Optional: Cocoa powder or chocolate shavings for garnish
Cooking Instructions
- Melt the Chocolate: In a heatproof bowl, set over a pot of simmering water (double boiler), melt the chopped dark chocolate. Stir occasionally until completely melted and smooth. Remove from heat and let it cool slightly.
- Prepare Egg Yolks: In a separate bowl, whisk the egg yolks with half of the sugar (1/8 cup) until pale and creamy. Once the chocolate has cooled slightly, gently fold it into the egg yolk mixture until well combined.
- Whip the Egg Whites: In another clean bowl, beat the egg whites with a pinch of salt until soft peaks form. Gradually add the remaining sugar (1/8 cup) and continue beating until stiff peaks form. This will provide a light texture to the mousse.
- Combine Mixtures: Carefully fold the whipped egg whites into the chocolate mixture in three additions. Use a spatula to gently combine, ensuring that you don’t deflate the mixture. Be patient and fold until just blended.
- Whip the Cream: In a separate bowl, whip the heavy cream until soft peaks form. Add the vanilla extract and continue whipping until slightly firmer but not overly stiff.
- Fold in the Cream: Gently fold the whipped cream into the chocolate mixture until fully incorporated. This will create the mousse texture that’s both rich and airy.
- Chill the Mousse: Pour the mousse into a cake mold or individual serving cups. Cover with plastic wrap and refrigerate for at least 4 hours, or overnight, to allow it to set properly.
- Serve: Once chilled and set, gently remove the cake from the mold if using, or serve the mousse in cups. Optionally, garnish with cocoa powder or chocolate shavings before serving.
Extra Tips
When making Chocolate Mousse Cake, it’s important to use high-quality dark chocolate for the best flavor. You can also experiment with different types of chocolate, such as milk or white chocolate, to create variations of this dessert.
Make sure to whip the cream and egg whites separately to achieve the desired lightness in your mousse. If you’re concerned about using raw eggs, consider using pasteurized eggs or an egg substitute.
Finally, for an added touch, consider pairing the cake with fresh berries or a drizzle of chocolate sauce when serving. Enjoy your Brazilian treat!
Guava Cake (Bolo De Goiaba)
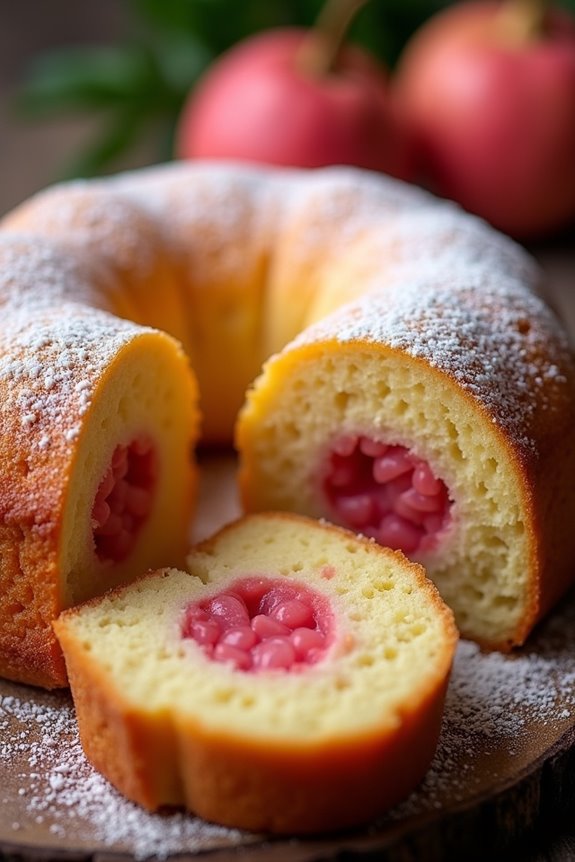
Guava Cake, or Bolo De Goiaba, is a delightful Brazilian dessert that captures the essence of tropical flavors with its rich guava paste filling. This moist and tender cake is perfect for any occasion, whether it be a casual family gathering or a festive celebration. The sweetness of the guava pairs beautifully with the lightness of the cake batter, resulting in a treat that’s both satisfying and memorable.
In Brazil, guava is a popular fruit often used in desserts, and this cake showcases its unique flavor. The cake is typically served in slices, making it an ideal dessert for sharing. With its charming aroma and inviting appearance, Guava Cake is sure to be a hit among your family and friends. Prepare to indulge in a slice of Brazilian culture with this delicious recipe!
Ingredients (Serves 4-6 people)
- 1 cup all-purpose flour
- 1 cup granulated sugar
- 1/2 cup unsalted butter, softened
- 2 large eggs
- 1/2 cup milk
- 1 tablespoon baking powder
- 1 teaspoon vanilla extract
- 1/2 teaspoon salt
- 1 cup guava paste, cut into small pieces
- Powdered sugar, for dusting (optional)
Cooking Instructions
- Preheat the Oven: Begin by preheating your oven to 350°F (175°C). This guarantees that the cake will bake evenly and rise properly.
- Prepare the Baking Pan: Grease a 9-inch round cake pan with butter or non-stick spray, and lightly dust it with flour to prevent the cake from sticking. This step is essential for a smooth release after baking.
- Mix the Wet Ingredients: In a large mixing bowl, cream together the softened butter and granulated sugar until light and fluffy. This should take about 3-5 minutes. Then, add the eggs one at a time, mixing well after each addition. Finally, stir in the milk and vanilla extract until combined.
- Combine Dry Ingredients: In a separate bowl, sift together the all-purpose flour, baking powder, and salt. This helps to aerate the flour and guarantees an even distribution of the baking powder.
- Combine Wet and Dry Ingredients: Gradually add the dry mixture to the wet mixture, stirring gently until just combined. Be careful not to over-mix, as this can make the cake dense.
- Incorporate Guava Paste: Fold in the small pieces of guava paste gently into the batter, making sure they’re evenly distributed without breaking them too much. This will create delightful pockets of guava flavor throughout the cake.
- Bake the Cake: Pour the batter into the prepared cake pan and smooth the top with a spatula. Place the pan in the preheated oven and bake for 30-35 minutes, or until a toothpick inserted into the center comes out clean.
- Cool and Serve: Once baked, remove the cake from the oven and let it cool in the pan for about 10 minutes. Then, carefully transfer it to a wire rack to cool completely. Once cooled, dust with powdered sugar if desired, slice, and serve.
Extra Tips
For an extra layer of flavor, consider adding a dash of cinnamon or nutmeg to the batter. If you want to elevate your Guava Cake further, you can serve it with a dollop of whipped cream or a scoop of vanilla ice cream on the side.
Additionally, try to use high-quality guava paste for the best results, as this will greatly enhance the flavor of the cake. Enjoy your baking experience and the wonderful taste of Brazil!
Corn Cake (Bolo De Milho)
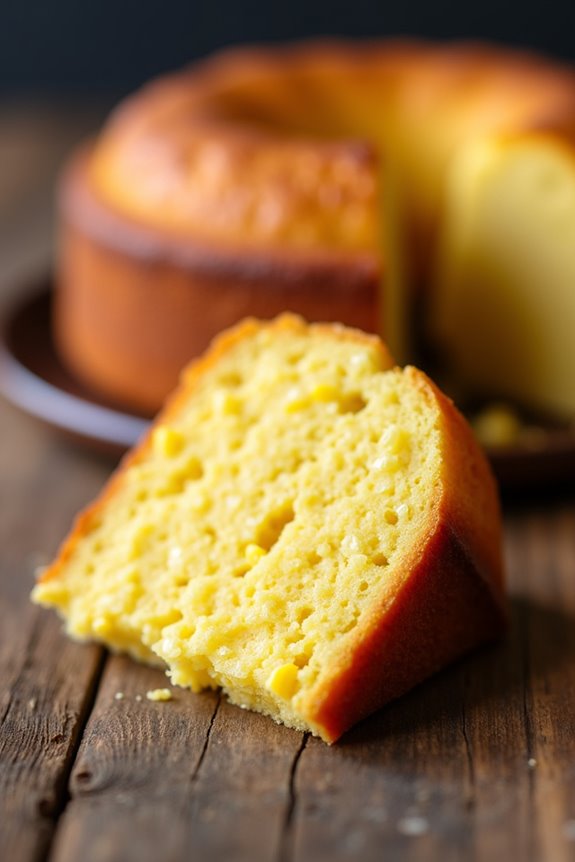
Corn Cake, or Bolo De Milho, is a beloved Brazilian dessert that captures the essence of sweet, tender corn in every bite. This delightful cake is typically made with fresh corn, milk, and sugar, resulting in a moist texture and a rich flavor that’s reminiscent of home and comfort.
Often enjoyed during festivities or as a simple afternoon treat, Bolo De Milho is a staple in Brazilian households, embodying the warm and inviting spirit of Brazilian cuisine.
Making Corn Cake isn’t only a rewarding endeavor but also a great way to introduce the flavors of Brazil to your kitchen. The recipe is quite straightforward, making it ideal for bakers of all skill levels.
Whether you’re serving it at a special occasion or simply indulging on a lazy afternoon, this deliciously sweet cake will leave everyone yearning for more.
Ingredients (Serves 4-6)
- 2 cups fresh corn kernels (about 3-4 ears of corn, or 1 can of corn)
- 1 cup milk
- 1 cup sugar
- 1/2 cup vegetable oil
- 3 large eggs
- 1 tablespoon baking powder
- 1/2 teaspoon salt
- 1 cup cornmeal (or fine corn flour)
Cooking Instructions
- Preheat the Oven: Begin by preheating your oven to 350°F (175°C). This guarantees that the cake bakes evenly and rises properly when you place it in the oven.
- Prepare the Corn: If using fresh corn, carefully cut the kernels off the cob. If using canned corn, drain it well. You’ll need about 2 cups of corn kernels for this recipe.
- Blend the Wet Ingredients: In a blender, combine the fresh or canned corn, milk, sugar, vegetable oil, and eggs. Blend on high speed until the mixture is smooth and well combined. This step helps to incorporate air into the mixture, leading to a fluffier cake.
- Mix the Dry Ingredients: In a large mixing bowl, whisk together the cornmeal, baking powder, and salt. This helps to evenly distribute the leavening agent and guarantees that your cake rises uniformly.
- Combine Wet and Dry Ingredients: Pour the blended corn mixture into the bowl with the dry ingredients. Use a spatula to gently fold the mixture until just combined. Be careful not to overmix, as this can lead to a denser cake.
- Prepare the Baking Pan: Grease a round or square baking pan with butter or non-stick spray to prevent the cake from sticking. You can also line the bottom with parchment paper for easier removal.
- Pour and Bake: Pour the batter into the prepared baking pan, smoothing out the top with a spatula. Bake in the preheated oven for 30-40 minutes or until a toothpick inserted into the center comes out clean.
- Cool and Serve: Once baked, remove the cake from the oven and let it cool in the pan for about 10 minutes. Carefully transfer it to a wire rack to cool completely. Slice and serve the cake warm or at room temperature.
Extra Tips
For a delightful twist, consider adding a sprinkle of cinnamon or a dash of vanilla extract to the batter for extra flavor.
You can also serve the Corn Cake with a dollop of whipped cream or a drizzle of sweetened condensed milk for added richness.
If you have leftover cake, it stores well in an airtight container at room temperature for a couple of days, or you can refrigerate it for longer freshness.
Enjoy your homemade Bolo De Milho with friends and family for a true taste of Brazilian hospitality!
Carrot Cake With Chocolate (Bolo De Cenoura Com Cobertura De Chocolate)
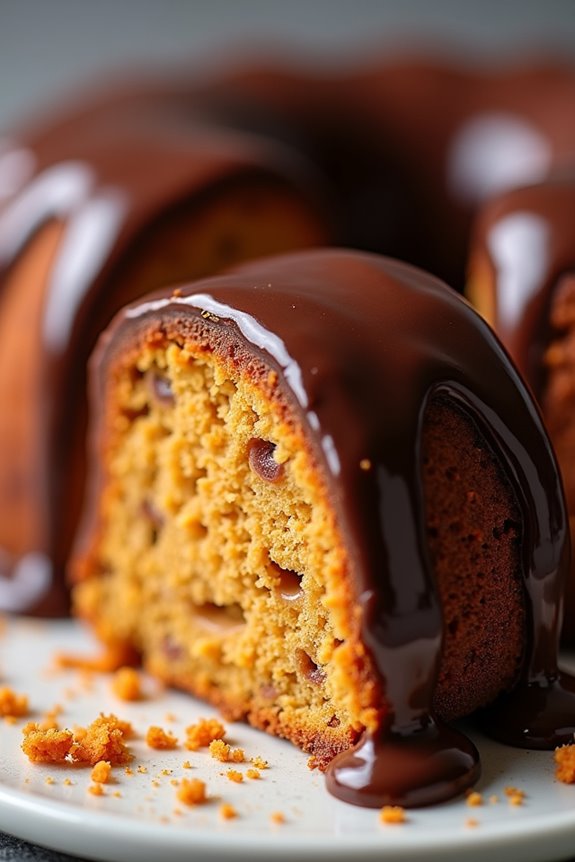
Carrot Cake with Chocolate, known as Bolo de Cenoura com Cobertura de Chocolate in Brazil, is a beloved dessert that perfectly embodies the country’s rich culinary traditions. This cake is moist, fluffy, and infused with a subtle sweetness from the carrots, making it a delightful treat for any occasion.
The addition of a luscious chocolate glaze adds a decadent touch that balances the cake’s natural flavors, creating a dessert that’s both comforting and indulgent.
This recipe is easy to follow and requires simple ingredients, making it perfect for both novice bakers and seasoned chefs. Whether you’re celebrating a special event or simply craving something sweet, this Carrot Cake with Chocolate is bound to impress your family and friends. Serve it with a cup of coffee or tea for the ultimate experience!
Ingredients (Serves 4-6):
- 2 cups grated carrots (about 3 medium carrots)
- 1 cup vegetable oil
- 1 cup sugar
- 3 large eggs
- 2 cups all-purpose flour
- 1 tablespoon baking powder
- 1/2 teaspoon salt
- 1/2 cup cocoa powder (for the chocolate glaze)
- 1 cup powdered sugar (for the chocolate glaze)
- 1/2 cup milk (for the chocolate glaze)
- 2 tablespoons unsweetened cocoa powder (for the chocolate glaze)
- 1 tablespoon butter (for the chocolate glaze)
Cooking Instructions:
- Preheat the Oven: Begin by preheating your oven to 350°F (180°C). This guarantees that your cake will bake evenly and rise properly once you pour the batter in.
- Prepare the Baking Pan: Grease and flour a round cake pan (about 9 inches in diameter) to prevent the cake from sticking. You can also line the bottom with parchment paper for added security.
- Blend the Wet Ingredients: In a blender or food processor, combine the grated carrots, vegetable oil, sugar, and eggs. Blend until the mixture is smooth and well combined. This step helps to incorporate the carrots thoroughly, confirming they’re evenly distributed in the cake.
- Mix the Dry Ingredients: In a large mixing bowl, sift together the all-purpose flour, baking powder, salt, and cocoa powder. Sifting helps to aerate the flour and remove any lumps, resulting in a lighter cake.
- Combine Wet and Dry Ingredients: Gradually pour the carrot mixture into the bowl with the dry ingredients, stirring gently with a spatula or wooden spoon until just combined. Be careful not to overmix, as this can make the cake dense.
- Bake the Cake: Pour the batter into the prepared cake pan and spread it evenly. Bake in the preheated oven for 30-35 minutes, or until a toothpick inserted in the center comes out clean. Allow the cake to cool in the pan for about 10 minutes before transferring it to a wire rack to cool completely.
- Prepare the Chocolate Glaze: In a saucepan over medium heat, combine the cocoa powder, powdered sugar, milk, and butter. Stir continuously until the mixture is smooth and begins to thicken. Once it reaches a desired consistency, remove it from the heat.
- Glaze the Cake: Once the cake is completely cooled, pour the chocolate glaze over the top, allowing it to drip down the sides. Use a spatula to spread it evenly if desired. Let the glaze set for a few minutes before slicing.
Extra Tips:
When preparing your Carrot Cake with Chocolate, consider using fresh, firm carrots for the best flavor and texture. You can also add nuts or raisins to the batter for an extra crunch and depth of flavor.
If you want to enhance the chocolate glaze, try adding a splash of vanilla extract or a pinch of salt to balance the sweetness. Store any leftovers in an airtight container at room temperature for up to three days, or refrigerate for a longer shelf life. Enjoy your delicious Brazilian treat!
Passion Fruit Cake (Bolo De Maracujá)
Passion Fruit Cake, or Bolo De Maracujá, is a delightful Brazilian dessert celebrated for its vibrant flavor and moist texture. This cake is made with the tangy essence of fresh passion fruit, giving it a unique tropical flair that’s perfect for any occasion. The combination of the sweet and sour notes from the passion fruit makes it a revitalizing treat that pairs beautifully with coffee or tea.
The cake isn’t only simple to prepare but also visually appealing with its bright yellow hue, often topped with a luscious passion fruit glaze. Serving this cake at gatherings or family celebrations can transport your guests to the sunny shores of Brazil. Whether you’re a seasoned baker or a novice, this recipe will guide you through creating a delicious Passion Fruit Cake that will impress everyone at the table.
Ingredients (Serves 4-6):
- 1 cup of sugar
- 1/2 cup of unsalted butter, softened
- 2 large eggs
- 1 cup of all-purpose flour
- 1/2 cup of milk
- 1/2 cup of fresh passion fruit juice (about 4-5 passion fruits)
- 1 tablespoon of baking powder
- A pinch of salt
- Optional: Passion fruit pulp for topping
Cooking Instructions:
- Preheat the Oven: Begin by preheating your oven to 350°F (175°C). This guarantees that the cake bakes evenly and rises properly.
- Prepare the Baking Pan: Grease a round 9-inch (23 cm) cake pan with butter and lightly dust it with flour. This step is essential to prevent the cake from sticking to the pan once baked.
- Mix the Wet Ingredients: In a large mixing bowl, cream together the sugar and softened butter until the mixture is light and fluffy. This can take about 3-4 minutes with an electric mixer. Add the eggs one at a time, mixing well after each addition.
- Add the Passion Fruit Juice: Pour in the fresh passion fruit juice to the mixture, stirring until well combined. The juice adds moisture and flavor to the cake, making it uniquely fragrant.
- Combine Dry Ingredients: In a separate bowl, whisk together the flour, baking powder, and salt. Gradually add this dry mixture to the wet ingredients, alternating with the milk. Mix until just combined, being careful not to overmix as this can result in a dense cake.
- Pour into the Pan: Once the batter is smooth, pour it into the prepared cake pan, spreading it evenly with a spatula.
- Bake the Cake: Place the pan in the preheated oven and bake for 30-35 minutes, or until a toothpick inserted into the center comes out clean. Be sure to keep an eye on it towards the end of the baking time to avoid overbaking.
- Cool the Cake: After baking, remove the cake from the oven and let it cool in the pan for about 10 minutes. Then, carefully remove it from the pan and transfer it to a wire rack to cool completely.
- Serve: Once the cake is completely cooled, you can optionally top it with fresh passion fruit pulp or a simple glaze made from mixing powdered sugar with a little passion fruit juice.
Extra Tips:
For an extra burst of flavor, consider adding some grated zest from the passion fruit or even a splash of vanilla extract to the batter. If you want a richer taste, you can substitute half of the milk with coconut milk.
Additionally, this cake can be stored in an airtight container at room temperature for up to three days, making it a great make-ahead option for gatherings. Enjoy your delicious Passion Fruit Cake!
Brazilian Nut Cake (Bolo De Castanha Do Pará)
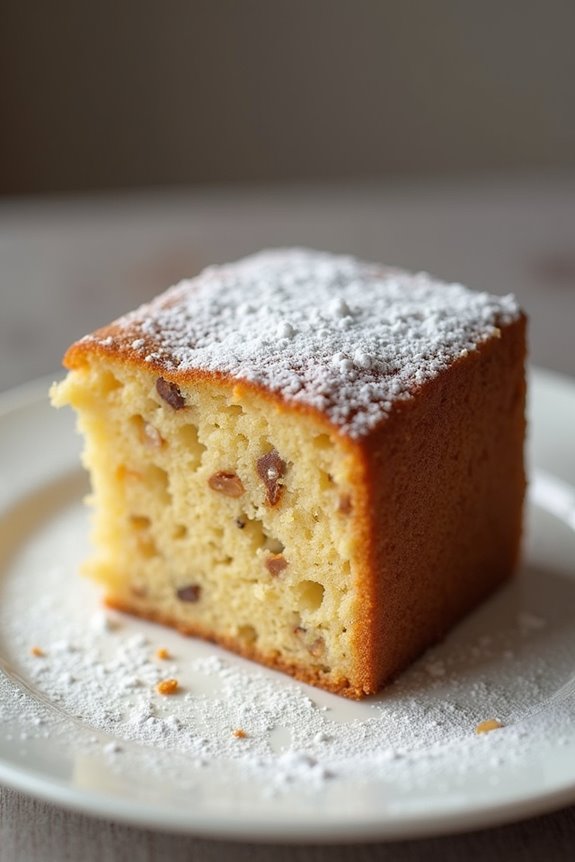
Brazilian Nut Cake, or Bolo De Castanha Do Pará, is a delightful and rich dessert that showcases the unique flavor of Brazil nuts. This cake is moist, has a tender crumb, and is usually enjoyed with a cup of coffee or tea. The simplicity of the ingredients allows the nuts to shine through, making it a perfect treat for gatherings or special occasions. Its nutty aroma fills the kitchen and invites everyone to come and enjoy a slice.
This cake isn’t only delicious but also easy to prepare. With just a few steps, you can create a beautifully baked dessert that will impress your family and friends. The combination of the earthy taste of the Brazil nuts with the sweetness of sugar and the lightness of eggs results in a cake that’s both satisfying and unforgettable. Serve it plain or with a dusting of powdered sugar for an added touch.
Ingredients (Serves 4-6):
- 1 cup Brazil nuts (unsalted)
- 1 cup granulated sugar
- 4 large eggs
- 1/2 cup unsalted butter, softened
- 1 teaspoon vanilla extract
- 1 cup all-purpose flour
- 1 teaspoon baking powder
- A pinch of salt
Cooking Instructions:
- Preheat the Oven: Begin by preheating your oven to 350°F (175°C). This guarantees that the cake will bake evenly once it’s in the oven.
- Prepare the Baking Pan: Grease a 9-inch round cake pan with butter and lightly dust it with flour. This step helps prevent the cake from sticking to the pan after baking.
- Blend the Brazil Nuts: In a food processor, add the Brazil nuts and pulse them until they’re finely ground. Be careful not to over-process, as they can turn into nut butter. Set aside the ground nuts for later use.
- Mix the Wet Ingredients: In a large mixing bowl, combine the softened butter and granulated sugar. Using an electric mixer, beat them together until the mixture is light and fluffy. Then, add the eggs one at a time, mixing well after each addition. Finally, stir in the vanilla extract.
- Combine Dry Ingredients: In a separate bowl, whisk together the all-purpose flour, baking powder, and salt. This step ensures the dry ingredients are evenly mixed before adding to the wet mixture.
- Combine Everything: Gradually add the dry ingredients to the wet mixture, stirring gently until just combined. Be careful not to overmix. Then, fold in the ground Brazil nuts until they’re evenly distributed throughout the batter.
- Bake the Cake: Pour the batter into the prepared cake pan and smooth the top with a spatula. Place the pan in the preheated oven and bake for 30-35 minutes, or until a toothpick inserted into the center comes out clean.
- Cool and Serve: Once baked, remove the cake from the oven and let it cool in the pan for about 10 minutes. Then, carefully transfer it to a wire rack to cool completely before slicing and serving.
Extra Tips:
For an enhanced flavor, consider toasting the Brazil nuts lightly in a dry skillet before grinding them. This brings out their natural oils and intensifies their nutty aroma.
Additionally, you can experiment with adding a splash of almond extract for a different twist on the flavor profile. If you wish to make it extra special, serve the cake with a scoop of vanilla ice cream or a dollop of whipped cream. Enjoy your Brazilian Nut Cake!
Strawberry Cake (Bolo De Morango)
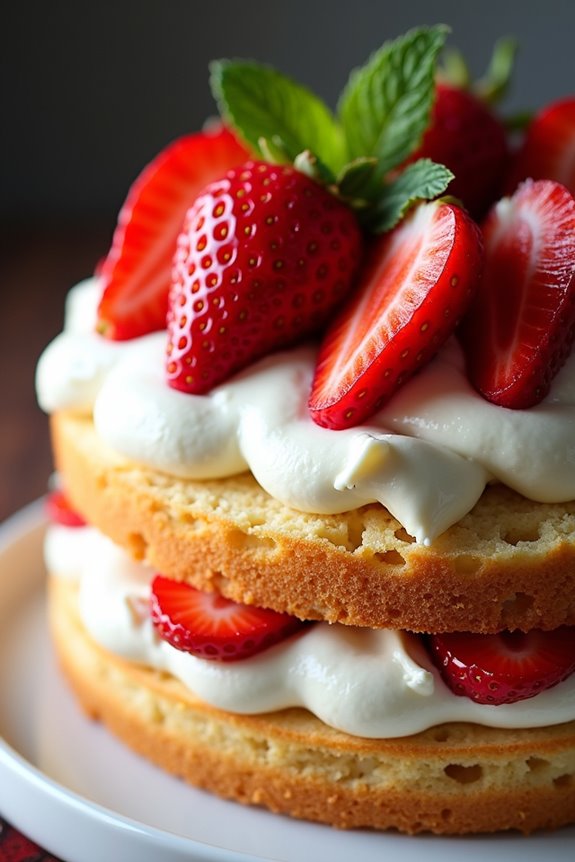
Strawberry Cake, or Bolo De Morango, is a delightful Brazilian dessert that showcases the sweet and luscious flavors of fresh strawberries. This cake isn’t only visually stunning with its vibrant red fruit topping, but it also provides a perfect balance of sweetness and freshness that makes it an ideal treat for any occasion.
Whether you’re celebrating a birthday, hosting a tea party, or simply indulging in a sweet craving, this cake is sure to impress.
The preparation of Strawberry Cake involves baking a light and fluffy sponge cake, which serves as the perfect base for a creamy filling and fresh strawberry topping. The cake is often layered, allowing the flavors to meld together beautifully. The combination of whipped cream and strawberries adds a revitalizing touch, making each slice a burst of flavor.
Follow this recipe to create your own Strawberry Cake that brings a taste of Brazil to your kitchen.
Ingredients (Serves 4-6 people)
- 1 ½ cups all-purpose flour
- 1 cup granulated sugar
- ½ cup unsalted butter, softened
- 3 large eggs
- 1 tablespoon baking powder
- ½ cup milk
- 1 teaspoon vanilla extract
- 2 cups fresh strawberries, hulled and sliced
- 1 cup heavy cream
- 2 tablespoons powdered sugar
- 1 teaspoon vanilla extract (for whipped cream)
- Fresh mint leaves (optional, for garnish)
Cooking Instructions
- Preheat the Oven: Start by preheating your oven to 350°F (175°C). This step is vital as it guarantees that your cake bakes evenly and rises properly.
- Prepare the Cake Batter: In a mixing bowl, cream together the softened butter and granulated sugar until light and fluffy. This should take about 3-5 minutes. Then, add the eggs one at a time, mixing well after each addition. Incorporate the vanilla extract.
- Mix Dry Ingredients: In a separate bowl, whisk together the flour and baking powder. Gradually add the dry ingredients to the wet mixture, alternating with the milk. Mix until just combined, being careful not to overmix.
- Bake the Cake: Pour the batter into a greased and floured round cake pan. Bake in the preheated oven for 25-30 minutes or until a toothpick inserted in the center comes out clean. Once baked, allow the cake to cool in the pan for 10 minutes before transferring it to a wire rack to cool completely.
- Prepare the Whipped Cream: In a chilled mixing bowl, combine the heavy cream, powdered sugar, and vanilla extract. Whip the cream with an electric mixer until soft peaks form. Be cautious not to over-whip, as this can turn the cream into butter.
- Assemble the Cake: Once the cake has completely cooled, slice it in half horizontally to create two layers. Place the bottom layer on a serving plate and spread a generous amount of whipped cream on top. Layer with sliced strawberries, then place the second cake layer on top.
- Decorate the Cake: Spread more whipped cream on top of the cake and arrange additional sliced strawberries decoratively on the surface. For a touch of elegance, garnish with fresh mint leaves.
Extra Tips
When making Strawberry Cake, it’s important to use fresh, ripe strawberries for the best flavor. If strawberries are out of season, consider using other fruits like blueberries or raspberries for a similar effect.
Confirm that your cake layers are completely cool before assembling to prevent the whipped cream from melting. For added richness, you can also drizzle some strawberry syrup or jam between layers. Serve chilled for a revitalizing dessert experience!
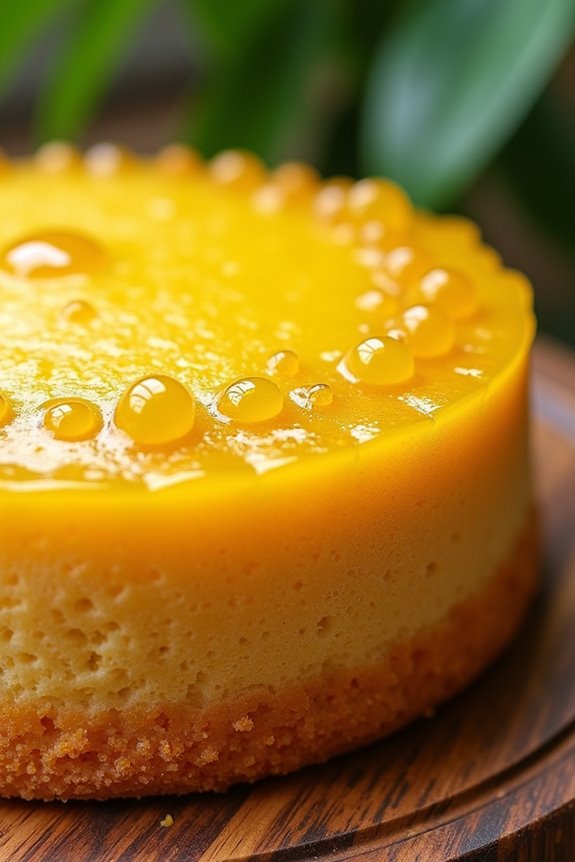
Pudding Cake (Bolo Pudim)
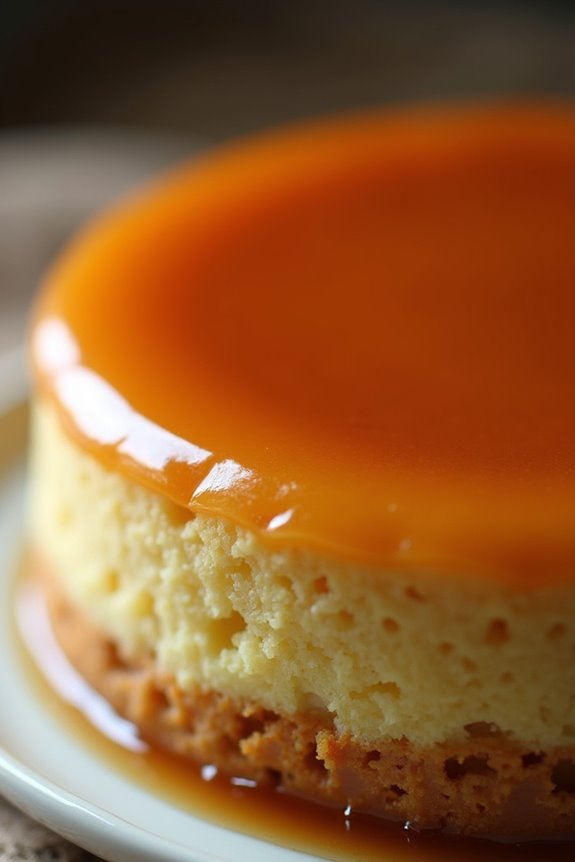
Pudding Cake, or Bolo Pudim, is a delightful Brazilian dessert that combines the richness of a pudding with the texture of a cake. This enchanting treat isn’t only visually stunning with its glossy caramel top but also offers a sweet, creamy flavor that’s guaranteed to satisfy any sweet tooth.
It’s perfect for gatherings and celebrations, bringing a taste of Brazil to your table. The best part is that it’s relatively easy to make, requiring simple ingredients that you may already have in your pantry.
The pudding cake is typically baked in a bundt pan, allowing the caramel sauce to naturally flow over the cake once it’s inverted onto a serving platter. This dessert is a wonderful blend of textures and flavors, with the moist cake base complementing the smooth and luscious pudding layer.
Whether you’re hosting a dinner party or simply indulging in a sweet treat, Bolo Pudim is sure to impress with its unique presentation and delicious taste.
Ingredients (Serves 4-6)
- 1 cup sugar (for caramel)
- 1 can (14 oz) sweetened condensed milk
- 2 cups milk
- 3 large eggs
- 1 teaspoon vanilla extract
- 1 cup sugar (for cake)
- 1 ½ teaspoons baking powder
- 1 cup all-purpose flour
Cooking Instructions
- Prepare the Caramel: In a medium saucepan over medium heat, add 1 cup of sugar. Stir continuously until the sugar melts and turns into a golden caramel. Immediately pour the caramel into the bottom of a bundt pan, tilting the pan to coat the sides. Set aside to cool and harden.
- Blend the Pudding Mixture: In a blender, combine the sweetened condensed milk, milk, eggs, and vanilla extract. Blend on high speed until the mixture is smooth and well combined. This will form the pudding layer of the cake.
- Mix the Cake Batter: In a separate bowl, whisk together the sugar, baking powder, and flour. Gradually add the blended pudding mixture into this dry mixture, stirring until everything is well incorporated and smooth.
- Layer the Mixtures: Carefully pour the cake batter over the hardened caramel in the bundt pan. The batter will sink slightly, but this is normal as it will create layers during baking.
- Bake the Cake: Preheat your oven to 350°F (175°C). Place the bundt pan in a larger baking dish filled with water (this is known as a water bath). Bake for approximately 50-60 minutes, or until a toothpick inserted into the cake comes out clean.
- Cool and Serve: Once baked, remove the bundt pan from the oven and let it cool at room temperature for about 15 minutes. Carefully invert the pan onto a serving platter to release the cake. Allow it to cool further before slicing and serving.
Extra Tips
When making Bolo Pudim, make certain that the caramel isn’t overcooked, as it can become bitter. If you want a richer flavor, you can add a splash of coconut milk or replace some of the regular milk with it.
Additionally, let the cake chill in the fridge for a few hours before serving; this will enhance the flavor and make it easier to slice. Enjoy your delicious Brazilian pudding cake!
Sweet Potato Cake (Bolo De Batata Doce)
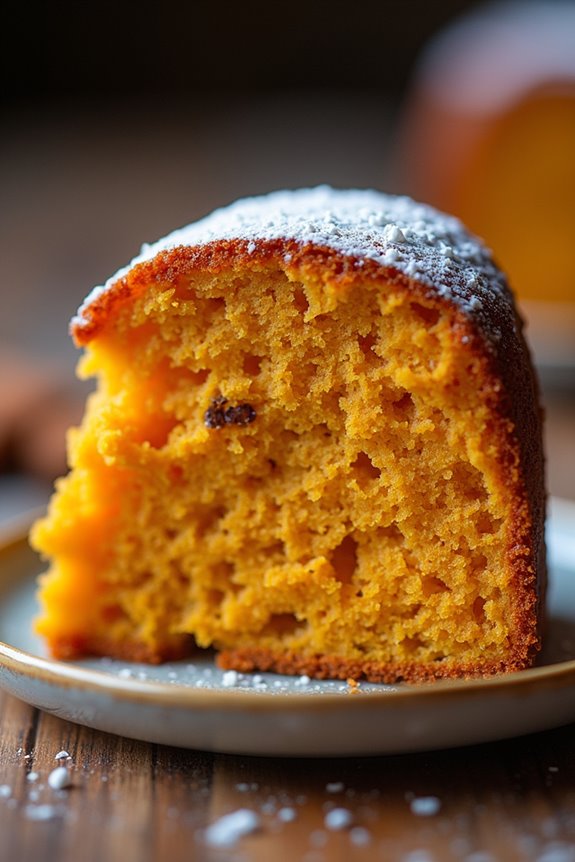
Sweet Potato Cake, known as Bolo De Batata Doce in Brazil, is a delightful and moist dessert that brings a unique twist to traditional cake recipes. Made primarily with sweet potatoes, this cake isn’t only delicious but also adds a nutritional boost to your dessert table.
It’s a popular choice for family gatherings and celebrations, showcasing the versatility of sweet potatoes in Brazilian cuisine. The cake is often flavored with vanilla and cinnamon, which complement the natural sweetness of the potatoes, making it irresistible.
This cake is easy to prepare and can be enjoyed at any time of the day, whether as a snack or a dessert. Its vibrant color and fluffy texture make it appealing to both kids and adults alike. Plus, it can be served plain, dusted with powdered sugar, or topped with a light glaze for an extra touch of sweetness.
Get ready to impress your family and friends with this exquisite Brazilian treat!
Ingredients (Serves 4-6):
- 2 medium sweet potatoes (about 1 pound)
- 1 cup sugar
- 1/2 cup vegetable oil
- 3 large eggs
- 1 teaspoon vanilla extract
- 1 cup all-purpose flour
- 1 tablespoon baking powder
- 1 teaspoon ground cinnamon
- A pinch of salt
- Powdered sugar for dusting (optional)
Cooking Instructions:
- Preheat the Oven: Begin by preheating your oven to 350°F (175°C). This guarantees that the cake bakes evenly and rises properly.
- Prepare Sweet Potatoes: Peel and cut the sweet potatoes into small chunks. Boil them in water until they’re tender, which should take about 15-20 minutes. Drain and let them cool before mashing.
- Mash the Sweet Potatoes: Once the sweet potatoes are cool enough to handle, mash them in a bowl until smooth. Make sure there are no lumps for a perfect cake texture.
- Mix Wet Ingredients: In a separate large mixing bowl, combine the sugar and vegetable oil. Whisk them together until they’re well blended. Next, add the eggs, one at a time, mixing well after each addition. Stir in the vanilla extract.
- Combine Wet and Dry Ingredients: Add the mashed sweet potatoes to the wet mixture and mix until fully incorporated. In another bowl, combine the flour, baking powder, cinnamon, and salt. Gradually add the dry ingredients to the sweet potato mixture, stirring until just combined.
- Prepare the Baking Pan: Grease a 9-inch round cake pan with oil or butter and lightly dust with flour. This will prevent the cake from sticking to the pan.
- Pour Batter into Pan: Pour the batter into the prepared cake pan, smoothing the top with a spatula to guarantee even baking.
- Bake the Cake: Place the pan in the preheated oven and bake for 30-35 minutes, or until a toothpick inserted into the center comes out clean.
- Cool and Serve: Once baked, remove the cake from the oven and allow it to cool in the pan for about 10 minutes. Then, transfer it to a wire rack to cool completely. Dust with powdered sugar before serving if desired.
Extra Tips:
For added flavor, consider incorporating chopped nuts or chocolate chips into the batter before baking. Additionally, if you prefer a richer taste, you can substitute half of the vegetable oil with melted butter.
This cake can be stored in an airtight container at room temperature for up to three days, making it a convenient and delicious option for entertaining. Enjoy your Sweet Potato Cake with a cup of coffee or tea for the perfect pairing!
Pineapple Cake (Bolo De Abacaxi)
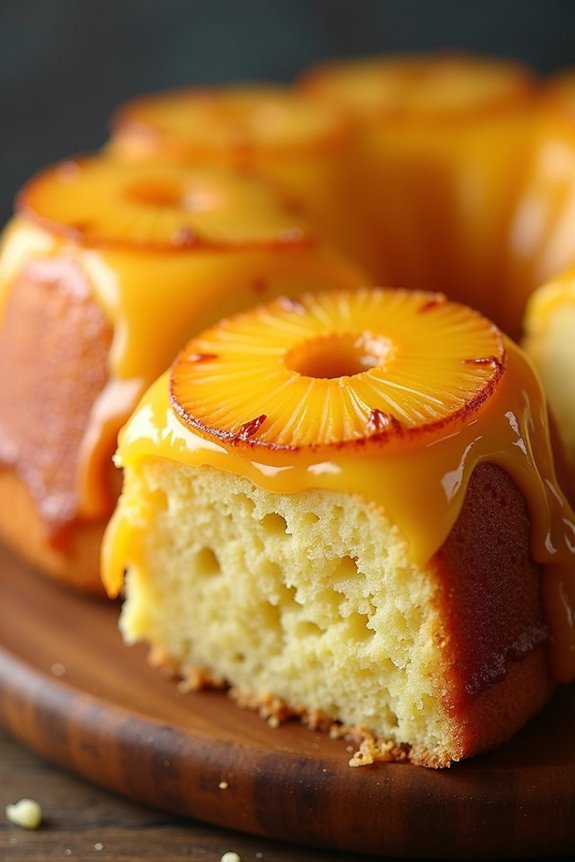
Pineapple Cake, or Bolo De Abacaxi, is a delightful Brazilian dessert that captures the tropical essence of fresh pineapples. This cake is characterized by its moist texture and a perfect balance of sweetness, making it an ideal treat for any occasion. The combination of fresh pineapple and a rich batter creates a flavorful experience that’s certain to impress family and friends.
Whether served at a birthday party, a festive gathering, or simply enjoyed with a cup of coffee, this cake is a beloved favorite in Brazilian cuisine.
This recipe for Pineapple Cake is both simple and rewarding, allowing you to bring a taste of Brazil into your kitchen. The cake is traditionally topped with a caramelized pineapple glaze, adding an extra layer of decadence. With a few basic ingredients and some easy steps, you can create a stunning dessert that isn’t only delicious but also visually appealing.
Get ready to indulge in this tropical delight that will transport your taste buds to sunny shores!
Ingredients (Serves 4-6 people):
- 1 medium ripe pineapple, peeled and sliced
- 1 cup granulated sugar
- 1/2 cup unsalted butter, softened
- 1 cup all-purpose flour
- 1 teaspoon baking powder
- 4 large eggs
- 1/2 teaspoon vanilla extract
- A pinch of salt
Cooking Instructions:
- Prepare the Pineapple: Begin by peeling and slicing the pineapple into rings or small chunks. If using fresh pineapple, make sure it’s ripe for the best flavor. Set aside to drain any excess juice.
- Make the Caramel: In a medium saucepan, add 1/2 cup of granulated sugar over medium heat. Allow the sugar to melt and turn a golden brown color, stirring occasionally to guarantee even melting. Once the caramel is ready, pour it into a greased 9-inch round cake pan, coating the bottom evenly. Arrange the pineapple slices on top of the caramel in a decorative pattern.
- Prepare the Batter: In a large mixing bowl, cream together the softened butter and remaining 1/2 cup of sugar until light and fluffy. This should take about 3-5 minutes with an electric mixer. Add the eggs, one at a time, mixing well after each addition. Then, stir in the vanilla extract.
- Combine Dry Ingredients: In a separate bowl, whisk together the all-purpose flour, baking powder, and salt. Gradually add this dry mixture to the wet ingredients, mixing until just combined. Be careful not to overmix, as this can lead to a denser cake.
- Bake the Cake: Pour the batter over the arranged pineapple in the cake pan. Preheat your oven to 350°F (175°C) and bake for approximately 30-35 minutes, or until a toothpick inserted into the center comes out clean. The top should be golden brown.
- Cool and Serve: Once baked, remove the cake from the oven and allow it to cool in the pan for about 10 minutes. Carefully invert the cake onto a serving plate, allowing the caramelized pineapple to be on top. Let it cool slightly before slicing and serving.
Extra Tips:
When making Pineapple Cake, using fresh pineapple will yield the best flavor, but canned pineapple can be a convenient alternative. Make sure to drain the canned pineapple well to avoid excess moisture in the cake.
Additionally, for a more intense pineapple flavor, you can add a splash of pineapple juice to the batter. This cake can be stored in an airtight container in the fridge for several days, and it also tastes delightful when served chilled.
Enjoy your culinary adventure with this tropical Brazilian treat!
Lemon Cake (Bolo De Limão)
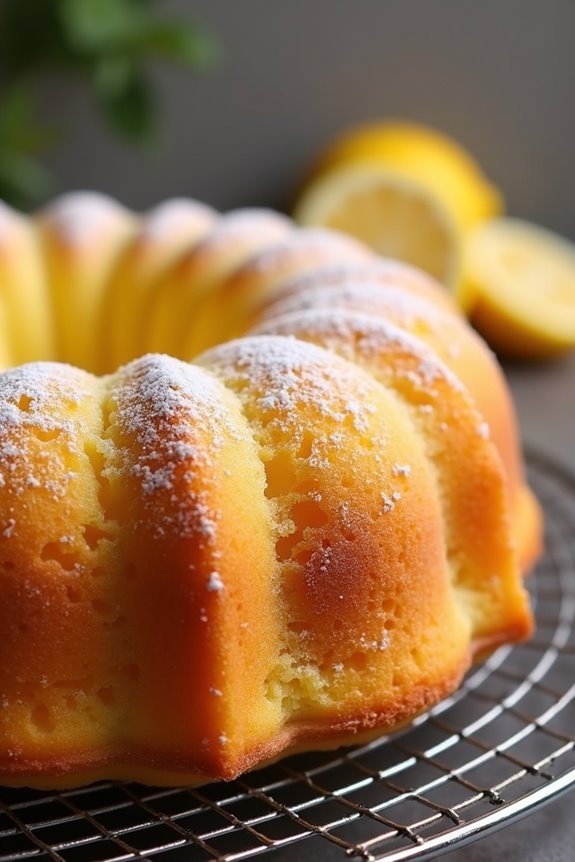
Lemon Cake, known as Bolo De Limão in Brazil, is a delightful dessert that perfectly balances sweetness and tartness. This moist and zesty cake is a favorite not only for its invigorating flavor but also for its simplicity in preparation. Often enjoyed during afternoon tea or as a light dessert, it’s an excellent choice for gatherings or celebrations.
The bright lemon flavor is enhanced by a delicious glaze that makes it even more irresistible. This cake is typically made with pantry staples, making it easy to whip up whenever you’re craving something sweet. With its fluffy texture and vibrant taste, Lemon Cake is sure to impress your family and friends.
Plus, the aroma of baking lemons will fill your kitchen with an energizing scent that will entice everyone nearby.
Ingredients (Serves 4-6):
- 1 cup all-purpose flour
- 1 cup granulated sugar
- 1/2 cup unsalted butter, softened
- 2 large eggs
- 1/2 cup milk
- Zest of 1 large lemon
- 1/4 cup fresh lemon juice
- 1 tablespoon baking powder
- 1/4 teaspoon salt
- 1 teaspoon vanilla extract
- Powdered sugar (for dusting, optional)
Cooking Instructions:
- Preheat the Oven: Begin by preheating your oven to 350°F (175°C). This step guarantees that your cake will bake evenly and rise beautifully once you place it in the oven.
- Prepare the Baking Pan: Grease a 9-inch round cake pan with butter or non-stick spray. You can also line the bottom with parchment paper for easier removal after baking.
- Mix Dry Ingredients: In a medium bowl, whisk together the all-purpose flour, baking powder, and salt. This helps to evenly distribute the leavening agent throughout the flour.
- Cream the Butter and Sugar: In a large mixing bowl, cream the softened butter and granulated sugar together until light and fluffy. This usually takes about 3-5 minutes with an electric mixer. This process incorporates air into the mixture, resulting in a lighter cake.
- Add Eggs and Flavorings: Beat in the eggs one at a time, ensuring each is fully incorporated before adding the next. Then, mix in the lemon zest and vanilla extract. This will add depth to the flavor of your cake.
- Combine Wet and Dry Ingredients: Gradually add the dry ingredients to the butter mixture, alternating with the milk and lemon juice. Start and end with the dry ingredients, mixing until just combined. Be careful not to overmix, as this can lead to a dense cake.
- Pour Batter into Pan: Pour the batter into the prepared cake pan and spread it evenly. Tap the pan gently on the counter to remove any air bubbles.
- Bake: Place the pan in the preheated oven and bake for 25-30 minutes, or until a toothpick inserted in the center comes out clean. Keep an eye on the cake to prevent overbaking.
- Cool the Cake: Once baked, remove the cake from the oven and let it cool in the pan for about 10 minutes. Then, transfer it to a wire rack to cool completely.
- Serve: Once cooled, dust the top with powdered sugar if desired. Slice and serve the cake, enjoying its moist texture and invigorating lemon flavor.
Extra Tips:
For an extra touch of flavor, consider adding a lemon glaze on top of the cooled cake made from a mix of powdered sugar and lemon juice. Additionally, using fresh lemons for zest and juice will give your cake a vibrant taste.
If you have leftovers, store the cake in an airtight container at room temperature for up to three days. To revive the cake, you can microwave individual slices for a few seconds before serving. Enjoy your delicious Lemon Cake!
Orange Cake (Bolo De Laranja)
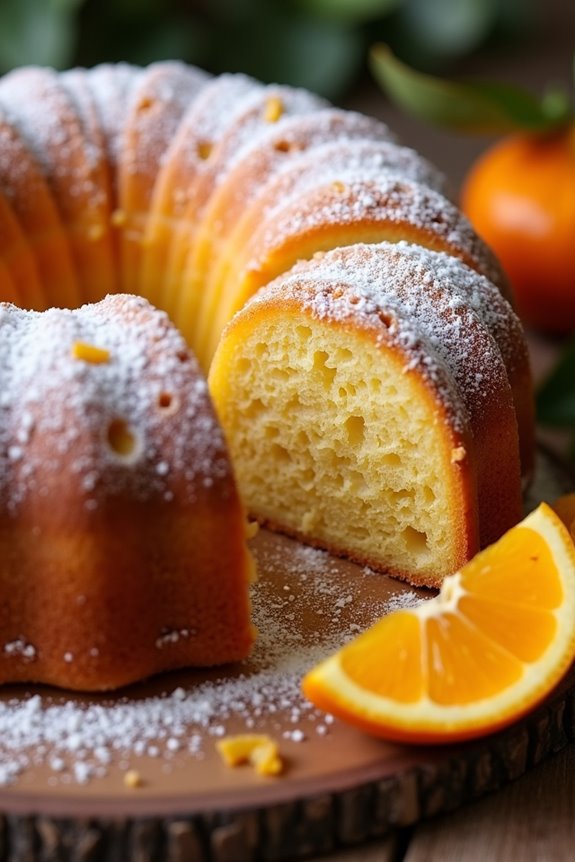
Orange Cake, or Bolo De Laranja, is a delightful Brazilian dessert that captures the essence of fresh oranges in a moist and flavorful cake. This cake isn’t only easy to make but also perfect for any occasion, whether it’s a family gathering, a birthday party, or simply a sweet treat to enjoy with your afternoon coffee.
The vibrant flavor of oranges combined with the lightness of the cake makes it a favorite among many. The beauty of Bolo De Laranja lies in its simplicity. With just a few basic ingredients, this cake comes together quickly, allowing you to enjoy a delicious homemade dessert without spending hours in the kitchen.
The use of fresh orange juice and zest infuses the cake with a revitalizing citrus aroma that will fill your home, making it even more inviting.
Ingredients (Serves 4-6)
- 2 medium oranges (juice and zest)
- 1 cup granulated sugar
- 1/2 cup vegetable oil
- 3 large eggs
- 2 cups all-purpose flour
- 1 tablespoon baking powder
- A pinch of salt
- Optional: powdered sugar for dusting
Cooking Instructions
- Preheat the Oven: Begin by preheating your oven to 350°F (175°C). This guarantees that the cake will bake evenly and rise properly once you put it in the oven.
- Prepare the Oranges: Wash the oranges thoroughly to remove any pesticides or wax. Cut them in half and juice them, making sure to collect about 1 cup of orange juice. Zest the oranges to get about 1 tablespoon of orange zest. Set the juice and zest aside for later use.
- Mix Wet Ingredients: In a large mixing bowl, combine the granulated sugar and vegetable oil. Whisk them together until they’re well blended. Add the eggs one at a time, mixing thoroughly after each addition. Finally, pour in the orange juice and add the orange zest. Mix until everything is well combined.
- Combine Dry Ingredients: In another bowl, sift together the all-purpose flour, baking powder, and salt. This not only combines the ingredients but also aerates the flour, leading to a lighter cake.
- Mix Wet and Dry Ingredients: Gradually add the dry ingredients to the wet mixture, stirring gently until just combined. Be careful not to overmix, as this can result in a dense cake.
- Prepare the Baking Pan: Grease a round cake pan (about 9 inches) with butter or cooking spray, and lightly dust it with flour to prevent sticking.
- Pour the Batter: Pour the cake batter into the prepared pan, spreading it evenly with a spatula.
- Bake the Cake: Place the cake in the preheated oven and bake for 30-35 minutes, or until a toothpick inserted into the center comes out clean. Keep an eye on it towards the end of the baking time to guarantee it doesn’t overbake.
- Cool and Serve: Once baked, remove the cake from the oven and let it cool in the pan for about 10 minutes. Then, invert it onto a wire rack to cool completely. If desired, dust the cooled cake with powdered sugar before serving.
Extra Tips
For an extra burst of flavor, consider adding a pinch of cinnamon or vanilla extract to the batter. You can also enhance the presentation by garnishing the cake with thin orange slices or a drizzle of orange glaze.
If you have leftover cake, store it in an airtight container at room temperature for up to three days, or refrigerate it to keep it fresh longer. Enjoy your homemade Orange Cake with a cup of coffee or tea for a delightful treat!
Honey Cake (Bolo De Mel)
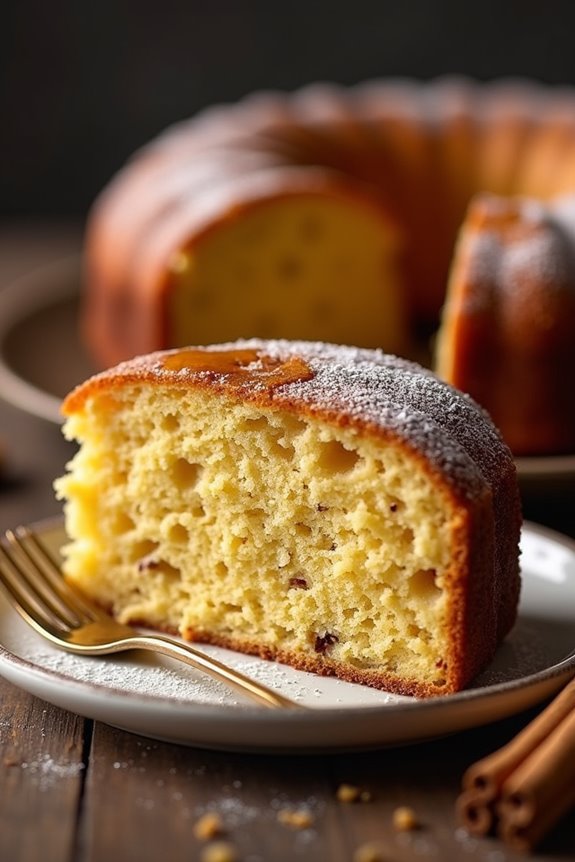
Bolo de Mel, or Honey Cake, is a traditional Brazilian dessert that embodies the rich culinary heritage of the country. This moist and flavorful cake is infused with honey, spices, and a touch of molasses, creating a uniquely sweet and aromatic treat.
Often enjoyed during festive occasions, this cake isn’t just a delightful dessert but also a warm reminder of family gatherings and celebrations. Its texture is soft and dense, making it perfect for pairing with a cup of coffee or tea.
The origins of Bolo de Mel can be traced back to the colonial period, where honey was a prized ingredient. The cake’s recipe has evolved over the years, with variations that reflect regional flavors and family traditions.
Whether served plain or adorned with a glaze, this cake is a true representation of Brazilian culture. With its simple yet rich ingredients, making this cake at home is a rewarding experience that will fill your kitchen with wonderful aromas and your heart with joy.
Ingredients (Serves 4-6)
- 1 cup of honey
- 1 cup of sugar
- 1/2 cup of unsalted butter, softened
- 2 large eggs
- 2 cups of all-purpose flour
- 1 cup of milk
- 1 tablespoon of baking powder
- 1 teaspoon of ground cinnamon
- 1/2 teaspoon of ground cloves
- 1/2 teaspoon of ground ginger
- A pinch of salt
Cooking Instructions
- Preheat the Oven: Begin by preheating your oven to 350°F (175°C). This step is vital as it allows the cake to cook evenly and rise properly.
- Mix Wet Ingredients: In a large mixing bowl, combine the honey, sugar, and softened butter. Use a hand mixer or a whisk to blend these ingredients until they’re smooth and creamy. This process will make sure that the sugar dissolves properly, creating a sweet base for the cake.
- Add Eggs: Next, crack in the two large eggs, one at a time, mixing well after each addition. This will help to incorporate air into the batter, making the cake fluffier.
- Combine Dry Ingredients: In a separate bowl, whisk together the flour, baking powder, cinnamon, cloves, ginger, and salt. This guarantees that the baking powder and spices are evenly distributed throughout the flour, which is essential for the rise and flavor of the cake.
- Alternate Adding Dry Ingredients and Milk: Gradually add the dry mixture to the honey mixture, alternating with the milk. Start with a portion of the dry ingredients, mix until just combined, then add a splash of milk. Repeat this process until all ingredients are combined. Be careful not to overmix; you want a smooth batter without lumps.
- Pour into Pan: Grease a 9-inch round cake pan with butter or cooking spray to prevent sticking. Pour the batter into the prepared pan, smoothing the top with a spatula.
- Bake: Place the cake in the preheated oven and bake for about 30-40 minutes, or until a toothpick inserted into the center comes out clean. Keep an eye on the cake in the last few minutes to avoid overbaking.
- Cool and Serve: Once baked, remove the cake from the oven and allow it to cool in the pan for about 10 minutes. Then, turn it out onto a wire rack to cool completely. Once cooled, you can dust it with powdered sugar or glaze it with a honey syrup if desired.
Extra Tips
For an extra layer of flavor, consider adding chopped nuts or dried fruits to the batter before baking. Additionally, if you prefer a more pronounced honey flavor, you can substitute some of the sugar with more honey.
Storing the cake in an airtight container will keep it moist for several days, and it often tastes even better the next day as the flavors meld together. Enjoy this delicious treat with friends and family!