

Exploring the world of South American cakes is like discovering a treasure trove of flavors and textures. Each recipe showcases a story, from the rich layers of Brigadeiro Cake to the creamy indulgence of Chocotorta. These desserts are more than just sweet treats; they celebrate culture and tradition. Let’s uncover these soft and special delights that are sure to impress and inspire your next baking adventure.
Brigadeiro Cake
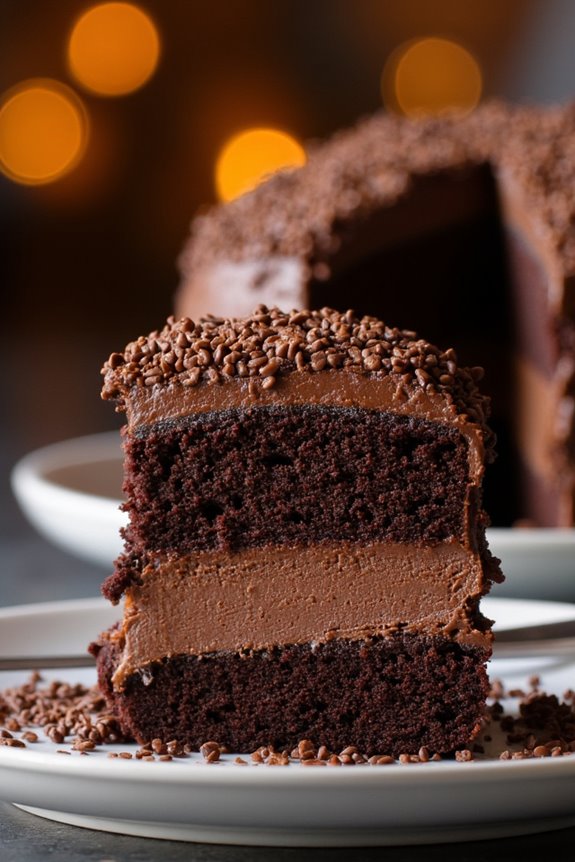
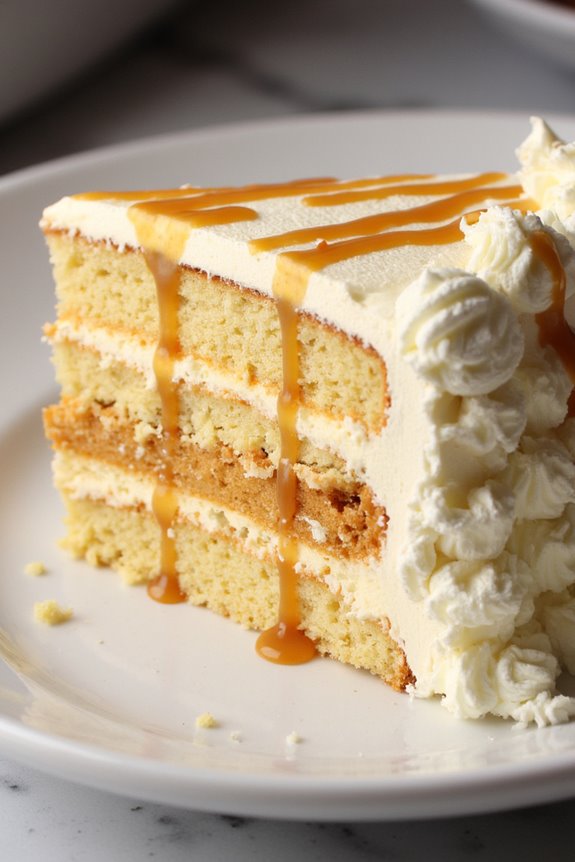
Brigadeiro Cake is a delightful dessert that brings together the rich flavors of the classic Brazilian brigadeiro sweet and the comforting texture of a cake. This indulgent treat features a moist chocolate cake layered with brigadeiro filling and topped with a luscious brigadeiro frosting. With its fudgy consistency and a sprinkle of chocolate sprinkles on top, this cake is perfect for celebrations or any special occasion.
The beauty of Brigadeiro Cake lies in its simplicity and the delightful combination of flavors. The cake isn’t only a feast for the eyes but is also a crowd-pleaser that will leave your guests asking for seconds. Whether you’re hosting a birthday party, a family gathering, or just craving something sweet, this cake is sure to captivate.
Ingredients (Serves 4-6):
- 1 cup all-purpose flour
- 1 cup granulated sugar
- 1/2 cup unsweetened cocoa powder
- 1 tsp baking powder
- 1/2 tsp baking soda
- 1/4 tsp salt
- 1/2 cup milk
- 1/4 cup vegetable oil
- 2 large eggs
- 1 tsp vanilla extract
- 1/2 cup boiling water
For Brigadeiro Filling and Frosting:
- 1 can (14 oz) sweetened condensed milk
- 2 tbsp unsweetened cocoa powder
- 2 tbsp unsalted butter
- 1/2 cup chocolate sprinkles (for decoration)
Cooking Instructions:
- Preheat the Oven: Begin by preheating your oven to 350°F (175°C). Grease two 8-inch round cake pans with butter or non-stick spray and line the bottoms with parchment paper to prevent sticking.
- Mix Dry Ingredients: In a large mixing bowl, combine the all-purpose flour, granulated sugar, cocoa powder, baking powder, baking soda, and salt. Whisk the dry ingredients together until they’re well combined.
- Add Wet Ingredients: In a separate bowl, mix together the milk, vegetable oil, eggs, and vanilla extract. Pour this wet mixture into the bowl of dry ingredients and stir gently until just combined.
- Incorporate Boiling Water: Carefully add the boiling water to the batter. Be cautious, as the mixture will be thin. Stir until the batter is smooth and well incorporated.
- Bake the Cakes: Divide the batter evenly between the prepared cake pans. Bake in the preheated oven for 30-35 minutes, or until a toothpick inserted into the center comes out clean. Once baked, remove the cakes from the oven and allow them to cool in the pans for about 10 minutes before transferring them to a wire rack to cool completely.
- Prepare Brigadeiro Filling and Frosting: In a saucepan over medium heat, combine the sweetened condensed milk, cocoa powder, and butter. Cook while stirring constantly for about 10-15 minutes until the mixture thickens and pulls away from the sides of the pan. Remove from heat and let it cool slightly.
- Assemble the Cake: Once the cakes are completely cooled, place one layer on a serving plate. Spread a generous layer of the brigadeiro filling on top, then place the second cake layer on top.
- Frost the Cake: Use the remaining brigadeiro mixture to frost the top and sides of the cake. Confirm it’s evenly spread and smooth, then finish with a sprinkle of chocolate sprinkles on top for decoration.
Extra Tips:
For an even richer flavor, you can add a splash of coffee to the boiling water when preparing the cake batter. This will enhance the chocolate taste beautifully.
Additionally, if you’re looking to make the cake ahead of time, it can be stored in the refrigerator for up to three days. Just make sure to cover it well to maintain its moisture. Enjoy your Brigadeiro Cake with a side of fresh fruit or a scoop of ice cream for an extra touch of indulgence!
Chocotorta
Chocotorta is a beloved dessert from Argentina that combines the richness of chocolate with the creaminess of cheese, creating a delightful no-bake cake that’s perfect for any occasion. This traditional cake is made by layering chocolate cookies with a luscious filling of cream cheese and dulce de leche, making it a favorite among both children and adults.
The simplicity of its preparation and the indulgent flavors make Chocotorta a must-try for anyone looking to explore South American desserts.
The origins of Chocotorta date back to the 1980s, and it has since become a staple in Argentine households. This dessert isn’t only quick to prepare but also allows for variations, such as adding fruit or nuts for extra texture and flavor. With just a few ingredients, you can create a stunning dessert that impresses guests while satisfying your sweet tooth.
Ingredients (Serves 4-6):
- 2 packages of chocolate cookies (such as Chocolinas or similar)
- 500g cream cheese, softened
- 400g dulce de leche
- 1 cup milk
- Cocoa powder (for dusting, optional)
- Chocolate shavings (for garnish, optional)
Cooking Instructions:
1. Prepare the Filling: In a large mixing bowl, combine the softened cream cheese and dulce de leche. Using a hand mixer or whisk, beat the mixture until it’s smooth and creamy. This will create a rich filling that will complement the chocolate cookies.
2. Prepare the Milk**: In a shallow dish, pour the milk. This will be used to soak the chocolate cookies, allowing them to become soft and flavorful. You can also add a splash of coffee** or rum to the milk for an extra flavor kick if desired.
3. Assemble the Layers: Take one chocolate cookie and briefly dip it into the milk, making sure not to soak it for too long, as it can become too soggy. Place the dipped cookie in a rectangular dish to form the first layer. Spread a layer of the cream cheese and dulce de leche mixture over the cookie.
Repeat this process, layering cookies and filling until you have used all the cookies and filling, finishing with a layer of the cream mixture on top.
4. Chill the Cake: Cover the assembled Chocotorta with plastic wrap and place it in the refrigerator for at least 4 hours, allowing the flavors to meld and the cake to set. For the best results, you can leave it overnight.
5. Serve the Cake: Once chilled, remove the Chocotorta from the refrigerator. Dust the top with cocoa powder and garnish with chocolate shavings if desired. Cut into slices and serve chilled.
Extra Tips:
For a variation on the classic Chocotorta, consider incorporating layers of fresh fruit, such as sliced bananas or strawberries, between the cookies and cream filling for added freshness and flavor.
Additionally, be sure to use high-quality dulce de leche for the best taste. If you’re looking for a lighter version, you can substitute part of the cream cheese with Greek yogurt, which will still provide a creamy texture while reducing the richness.
Enjoy your Chocotorta with a cup of coffee or tea for a delightful afternoon treat!
Tres Leches Cake
Tres Leches Cake, or “pastel de tres leches,” is a beloved dessert in Latin America, celebrated for its rich, moist texture and sweet, milky flavor. The name translates to “three milks,” which refers to the three types of milk used to soak the sponge cake: evaporated milk, condensed milk, and heavy cream. This cake is typically served chilled, making it a revitalizing treat perfect for warm weather or festive occasions.
The origins of Tres Leches Cake can be traced back to Central America, but it has become a staple in many South American countries, each adding its own twist to the classic recipe. The cake is often topped with whipped cream and fresh fruits, allowing for a beautiful presentation that’s as delightful to look at as it’s to eat.
Whether you’re celebrating a birthday, a family gathering, or simply indulging in a sweet treat, Tres Leches Cake is sure to impress your guests.
Ingredients (for 4-6 servings):
- 1 cup all-purpose flour
- 1 ½ teaspoons baking powder
- ¼ teaspoon salt
- 5 large eggs
- 1 cup granulated sugar
- 1 teaspoon vanilla extract
- 1 cup whole milk
- 1 can (12 oz) evaporated milk
- 1 can (14 oz) sweetened condensed milk
- 1 cup heavy cream
- Whipped cream (for topping)
- Fresh fruits (for garnish, optional)
Cooking Instructions:
- Preheat the Oven: Preheat your oven to 350°F (175°C). Proper preheating guarantees that the cake bakes evenly and rises correctly.
- Prepare the Cake Batter: In a medium bowl, sift together the flour, baking powder, and salt. In a separate large bowl, beat the eggs and sugar together until light and fluffy, about 5-7 minutes. Add the vanilla extract and mix in the dry ingredients gradually, alternating with the whole milk until all is combined.
- Bake the Cake: Pour the batter into a greased 9×13 inch baking pan. Bake for 25-30 minutes, or until a toothpick inserted into the center comes out clean. Allow the cake to cool completely in the pan on a wire rack.
- Prepare the Milk Mixture: In a mixing bowl, whisk together the evaporated milk, sweetened condensed milk, and heavy cream until well combined. Set aside.
- Soak the Cake: Once the cake has cooled, poke holes all over the surface using a fork or skewer. Slowly pour the milk mixture over the cake, making sure it soaks in evenly. It’s important to allow the cake to absorb the milk mixture thoroughly, so let it sit for at least an hour, or overnight in the refrigerator for best results.
- Add Toppings: Before serving, whip some cream to soft peaks and spread it over the top of the soaked cake. Optionally, you can decorate with fresh fruits like strawberries, mangoes, or berries for added color and flavor.
- Serve and Enjoy: Slice the cake into squares and serve chilled. Enjoy the rich, creamy texture and sweet flavors of this delightful dessert!
Extra Tips: When making Tres Leches Cake, it’s vital to let the cake soak in the milk mixture for adequate time; this will guarantee it becomes deliciously moist without being soggy. Additionally, consider experimenting with different flavorings, such as adding a splash of rum or almond extract to the milk mixture for a unique twist. Always serve the cake chilled, as this enhances the flavor and texture, making every bite a revitalizing experience.
Alfajor Cake
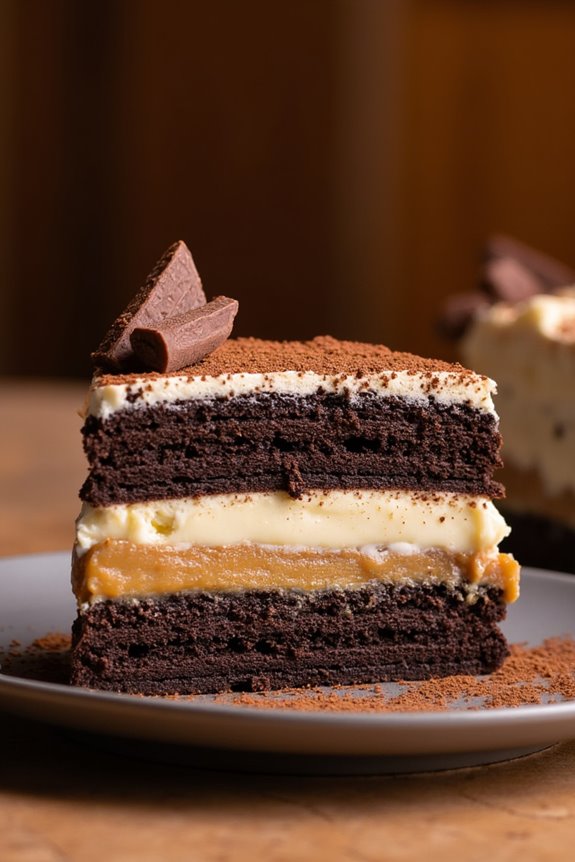
Alfajor Cake is a delightful treat inspired by the traditional South American alfajor, which is typically a sandwich cookie filled with dulce de leche and coated in chocolate or powdered sugar. This cake version combines the same rich flavors of dulce de leche, soft cake layers, and a luscious frosting, making it a perfect dessert for gatherings or special occasions.
The cake captures the essence of alfajores, providing an indulgent experience that will leave your guests wanting more. The beauty of this cake lies in its simplicity and the balance of flavors. The moist cake layers are complemented by the creamy dulce de leche filling, and when topped with a light frosting, it becomes a heavenly dessert that celebrates the rich culinary traditions of South America.
Whether you’re serving it at a birthday party, holiday celebration, or just for a sweet treat at home, Alfajor Cake is bound to impress.
Ingredients (Serves 4-6 people):
- 1 ½ cups all-purpose flour
- 1 cup granulated sugar
- ½ cup unsalted butter, softened
- 3 large eggs
- 1 teaspoon baking powder
- ½ teaspoon baking soda
- ½ teaspoon salt
- 1 teaspoon vanilla extract
- 1 cup dulce de leche (plus extra for filling)
- 1 cup heavy cream (for frosting)
- 1 tablespoon powdered sugar (for frosting)
- Chocolate shavings or cocoa powder (for garnish, optional)
Cooking Instructions:
- Preheat the Oven: Begin by preheating your oven to 350°F (175°C). This guarantees that the cake bakes evenly and rises properly.
- Prepare Cake Pans: Grease and flour two 8-inch round cake pans. This will prevent the cake from sticking to the pans and make it easier to remove once baked.
- Mix Dry Ingredients: In a medium bowl, whisk together the all-purpose flour, baking powder, baking soda, and salt. This helps to evenly distribute the leavening agents throughout the flour.
- Cream Butter and Sugar: In a large mixing bowl, beat the softened butter and granulated sugar together until the mixture is light and fluffy. This should take about 3-5 minutes and adds air to the batter for a lighter cake.
- Add Eggs and Vanilla: Add the eggs one at a time, mixing well after each addition. Then, stir in the vanilla extract. This will enhance the flavor of the cake.
- Combine Dry and Wet Ingredients: Gradually add the dry mixture to the butter mixture, alternating with the dulce de leche. Start and end with the flour mixture, mixing just until combined. Be careful not to overmix, as this can make the cake dense.
- Bake the Cake: Divide the batter evenly between the prepared pans and smooth the tops. Bake in the preheated oven for 25-30 minutes or until a toothpick inserted into the center comes out clean.
- Cool the Cakes: Once baked, remove the cakes from the oven and let them cool in the pans for about 10 minutes. Then, turn them out onto wire racks to cool completely.
- Prepare the Frosting: In a mixing bowl, whip the heavy cream with the powdered sugar until soft peaks form. This will create a light and fluffy frosting.
- Assemble the Cake: Once the cakes have completely cooled, place one layer on a serving plate. Spread a generous layer of dulce de leche on top, followed by a layer of whipped cream frosting. Place the second cake layer on top and frost the top and sides of the cake with the remaining whipped cream.
- Garnish and Serve: If desired, sprinkle chocolate shavings or cocoa powder on top for garnish. Slice the cake and serve to your enthusiastic guests!
Extra Tips:
When making Alfajor Cake, feel free to experiment with flavors by adding a hint of cinnamon or cocoa powder to the cake batter for an extra layer of taste.
Additionally, if you want to enhance the texture, consider adding crushed nuts or coconut flakes to the filling. This cake can be prepared a day in advance; just make sure to store it in the refrigerator to keep the frosting fresh. Enjoy this decadent cake with a cup of coffee or tea for a truly delightful experience!
Torta De Santiago
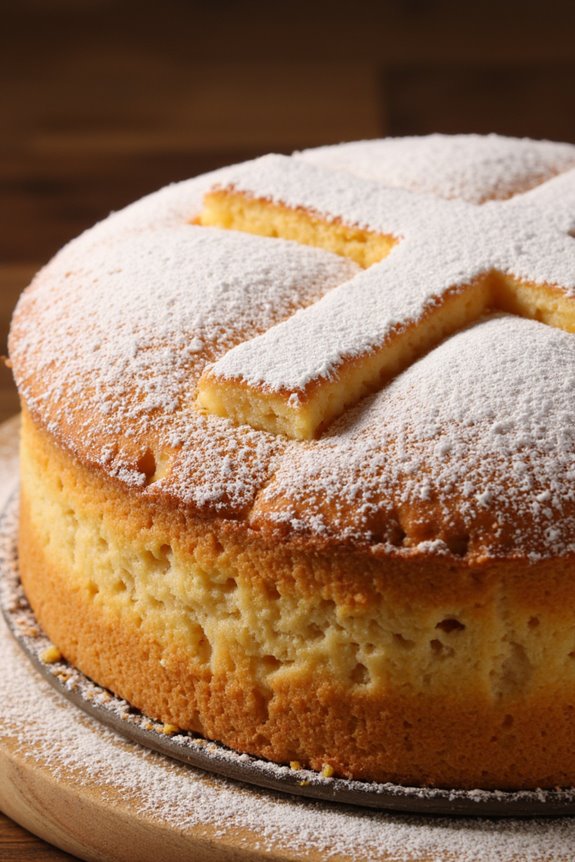
Torta De Santiago is a traditional Spanish almond cake that hails from the region of Galicia. This delightful dessert isn’t only a staple in local bakeries but also a symbol of the pilgrimage to Santiago de Compostela. Its simple yet rich flavors come from ground almonds, sugar, and eggs, making it a gluten-free option that’s perfect for those looking for a sweet treat without wheat.
Often dusted with powdered sugar and adorned with the cross of Saint James, this cake is as visually appealing as it’s delicious. This cake is both easy to make and perfect for various occasions, from family gatherings to celebrations. The combination of almonds gives it a moist texture and nutty flavor, while the lemon zest adds a revitalizing brightness.
Whether enjoyed on its own or paired with a cup of coffee or tea, Torta De Santiago is sure to impress your guests and leave them wanting more.
Ingredients (serving size: 4-6 people)
- 200g ground almonds
- 200g granulated sugar
- 4 large eggs
- Zest of 1 lemon
- 1 teaspoon baking powder
- Powdered sugar for dusting
- Butter for greasing the cake pan
Cooking Instructions
1. Preheat the Oven: Start by preheating your oven to 180°C (350°F). This step is vital as it guarantees that the cake bakes evenly and rises properly.
2. Prepare the Cake Pan: Grease a round cake pan (approximately 9 inches in diameter) with butter and line the bottom with parchment paper. Greasing the pan will prevent the cake from sticking, making it easier to remove once baked.
3. Mix the Ingredients: In a large mixing bowl, combine the ground almonds, granulated sugar, and baking powder. Stir these dry ingredients together to verify they’re evenly mixed.
In a separate bowl, beat the eggs and lemon zest together until well combined. Then, add the egg mixture to the dry ingredients and mix until you have a consistent batter.
4. Pour the Batter into the Pan: Transfer the batter into the prepared cake pan, smoothing the top with a spatula. Make sure to spread it evenly to guarantee uniform baking.
5. Bake the Cake: Place the cake in the preheated oven and bake for 30-35 minutes, or until the top is golden brown and a toothpick inserted into the center comes out clean. Keep an eye on the cake towards the end of the baking time to prevent it from overbaking.
6. Cool the Cake: Once baked, remove the cake from the oven and let it cool in the pan for about 10 minutes. Then, carefully transfer it to a wire rack to cool completely. This step helps to maintain the cake’s moisture.
7. Dust with Powdered Sugar: Once the cake is completely cool, dust the top with powdered sugar using a fine sieve. For an authentic touch, you can place a stencil of the Cross of Saint James on the cake before dusting to create a beautiful design.
Extra Tips
When making Torta De Santiago, using high-quality ground almonds can greatly enhance the flavor and texture of your cake. If you prefer a more pronounced citrus taste, consider adding a splash of lemon juice to the batter.
Additionally, this cake can be stored in an airtight container for several days; its flavor improves as it sits, making it a wonderful make-ahead dessert. Serve it with a dollop of whipped cream or a scoop of vanilla ice cream for an extra indulgent treat.
Pão De Ló
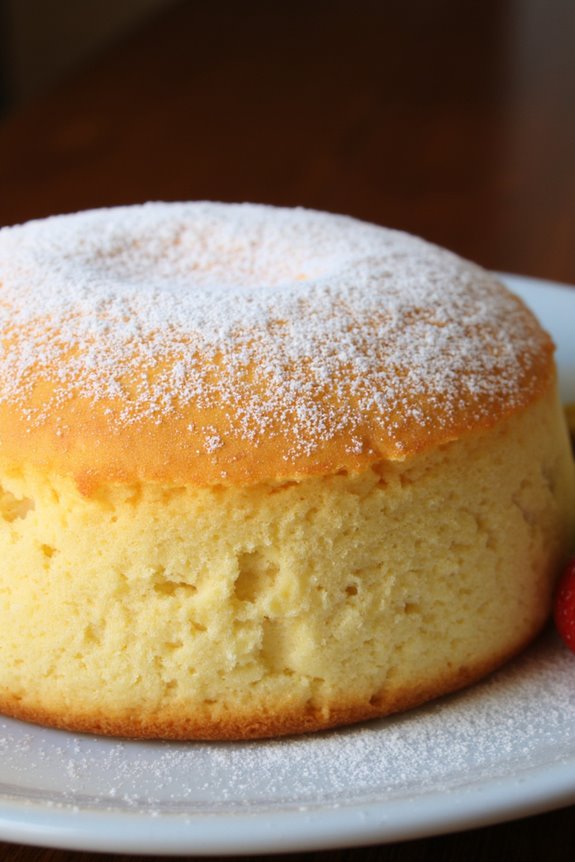
Pão De Ló is a traditional Portuguese sponge cake that has become popular in various South American countries, particularly Brazil. Known for its light and airy texture, this cake is perfect for special occasions and family gatherings.
Its simplicity and versatility make it an excellent base for various frostings, fruits, or even enjoyed plain with a cup of coffee. The cake’s flavor is mild, allowing it to complement a variety of toppings or fillings, making it a favorite among cake lovers.
This recipe will guide you through creating a classic Pão De Ló that serves 4-6 people. With just a handful of ingredients and a few simple steps, you can impress your friends and family with this delightful treat. Whether you serve it on its own or with a delicious filling, this cake is sure to be a hit at any gathering.
Ingredients
- 4 large eggs
- 1 cup granulated sugar
- 1 cup all-purpose flour
- 1 teaspoon baking powder
- 1/4 teaspoon salt
- 1 teaspoon vanilla extract
- 1/4 cup melted butter (optional, for added richness)
Cooking Instructions
1. Preheat the Oven: Begin by preheating your oven to 350°F (175°C). This guarantees that the cake cooks evenly and rises properly when it goes in the oven.
2. Prepare the Cake Pan: Grease an 8-inch round cake pan with butter or non-stick spray, and line the bottom with parchment paper. This step is vital to prevent the cake from sticking to the pan, making it easier to remove after baking.
3. Beat the Eggs: In a large mixing bowl, crack the eggs and add the granulated sugar. Using a hand mixer or a stand mixer, beat the mixture on high speed for about 5-7 minutes until it becomes pale and fluffy. This process incorporates air into the eggs, which is important for achieving that light sponge texture.
4. Mix Dry Ingredients: In a separate bowl, whisk together the all-purpose flour, baking powder, and salt. This helps to evenly distribute the leavening agent and guarantees it combines well with the wet ingredients.
5. Combine Ingredients: Gently fold the dry ingredients into the egg mixture using a spatula. Be careful not to overmix; you want to preserve the airiness of the batter.
If using, add the melted butter and vanilla extract at this stage, folding them in until just combined.
6. Pour the Batter: Pour the batter into the prepared cake pan, smoothing the top with the spatula to guarantee even cooking.
7. Bake: Place the cake in the preheated oven and bake for 25-30 minutes, or until a toothpick inserted into the center comes out clean. Keep an eye on it towards the end of the baking time to avoid overcooking.
8. Cool the Cake: Once baked, remove the cake from the oven and let it cool in the pan for about 10 minutes. Then, carefully turn it out onto a wire rack to cool completely. This step prevents the cake from becoming soggy.
9. Serve: Once the cake has cooled, you can serve it plain, dusted with powdered sugar, or topped with fruit and whipped cream, as desired.
Extra Tips
When making Pão De Ló, it’s important to keep the mixing gentle after incorporating the flour to maintain the light and fluffy texture.
Be sure to use fresh eggs, as they contribute to the cake’s rise and overall flavor. For a twist, consider adding citrus zest or almond extract for added flavor.
If you want to create a layered cake, you can slice the cooled cake horizontally and fill it with your favorite jam or whipped cream. Enjoy experimenting with different toppings and fillings to make this cake uniquely yours!
Bolo De Rolo
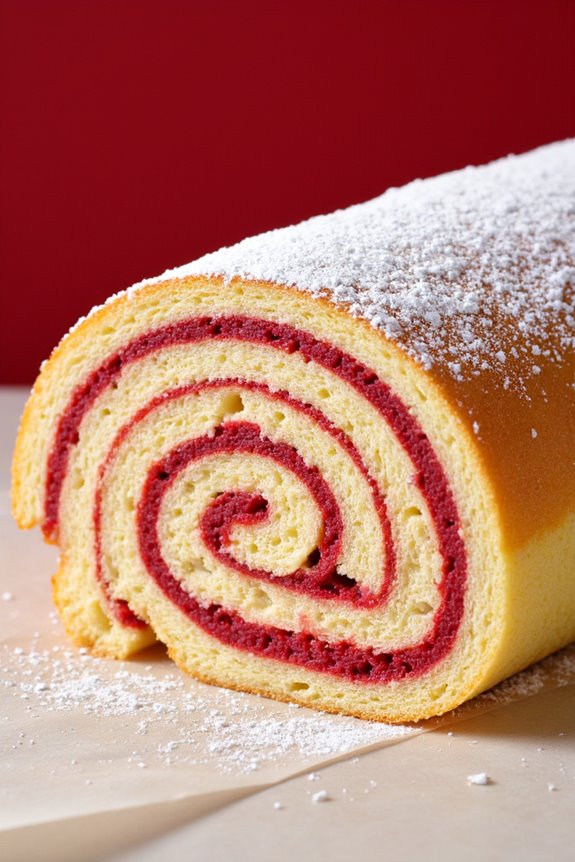
Bolo De Rolo is a traditional Brazilian cake that showcases the art of rolling a thin layer of sponge cake filled with guava paste, creating a beautiful spiral pattern when sliced. This delightful dessert is a beloved treat in many parts of Brazil, especially in the northeastern region. Its unique combination of flavors and textures makes it a perfect addition to any celebration or afternoon tea.
The preparation of Bolo De Rolo may seem intricate, but with the right approach, anyone can master this delicious cake. The key to a successful Bolo De Rolo is achieving a thin and pliable sponge cake that can easily be rolled without cracking. Once you have that perfect roll, the sweet guava paste adds a delightful fruity flavor that complements the lightness of the cake.
Ingredients (Serves 4-6 people):
- 4 large eggs
- 1 cup granulated sugar
- 1 cup all-purpose flour
- 1/4 cup unsalted butter, melted
- 1 teaspoon baking powder
- 1/4 teaspoon salt
- 1 cup guava paste, softened
- Powdered sugar for dusting (optional)
Cooking Instructions:
- Preheat the Oven: Start by preheating your oven to 350°F (175°C). This guarantees that the cake bakes evenly and achieves the right texture. Prepare a jelly roll pan (approximately 10×15 inches) by greasing it lightly and lining it with parchment paper.
- Prepare the Batter: In a large mixing bowl, beat the eggs with the granulated sugar using an electric mixer on medium speed until the mixture is thick and pale, about 5-7 minutes. This aeration is essential for the cake’s light and fluffy texture.
- Combine Dry Ingredients: In another bowl, sift together the all-purpose flour, baking powder, and salt. Gradually fold this dry mixture into the egg and sugar mixture using a spatula. Be gentle to maintain the airiness of the batter.
- Add Melted Butter: Drizzle the melted butter into the batter while gently folding until just combined. This will add moisture and richness to the cake.
- Spread the Batter: Pour the batter into the prepared jelly roll pan, spreading it evenly with a spatula. Make sure it reaches the corners for a uniform thickness.
- Bake: Place the pan in the preheated oven and bake for about 12-15 minutes, or until the cake is lightly golden and springs back when touched. Keep an eye on it to prevent over-baking.
- Cool the Cake: Once baked, remove the pan from the oven and let it cool for about 5 minutes. Carefully lift the edges of the parchment paper to transfer the cake onto a clean kitchen towel, flipping it over so the parchment side is up.
- Spread Guava Paste: While the cake is still warm, spread the softened guava paste evenly over the surface. Use a spatula for a smooth application.
- Roll the Cake: Starting from one edge, carefully roll the cake along with the towel, forming a tight log. Allow it to cool completely in this rolled shape, which will help maintain its form.
- Slice and Serve: Once cooled, gently unroll the cake and remove the towel. Roll it back up and slice it into rounds to reveal the beautiful spiral. Dust with powdered sugar if desired before serving.
Extra Tips: When making Bolo De Rolo, be sure to use fresh guava paste for the best flavor. If you find the guava paste too thick, you can warm it slightly to make it easier to spread. Additionally, practice rolling the cake with a towel a couple of times to get the technique right; this will help you achieve that perfect spiral. If you want to get creative, feel free to experiment with different fillings, such as dulce de leche or fruit preserves, while maintaining the classic rolled cake method.
Pastel De Nata
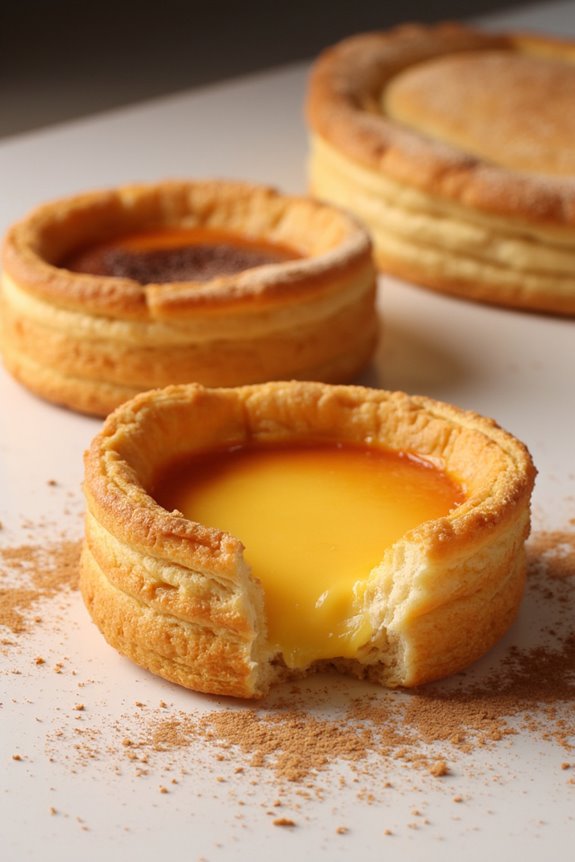
Pastel de Nata, a beloved Portuguese custard tart, has made its way across the globe, especially to South America, where it has been embraced with open arms. This delightful pastry features a flaky crust filled with a rich and creamy custard, baked to perfection until the top is beautifully caramelized. Each bite offers a delightful contrast of textures, from the crisp outer shell to the smooth, velvety filling.
Whether enjoyed as a dessert or a sweet snack with coffee, pastel de nata is a treat that captivates the taste buds and warms the heart.
Making pastel de nata at home might seem intimidating, but with the right ingredients and a little patience, you can create these delicious tarts that rival those from your favorite bakery. The recipe below is designed for a serving size of 4-6 people, perfect for sharing with friends or family. Get ready to impress your guests with your baking skills and transport them to the streets of Lisbon with every bite!
Ingredients:
- 1 sheet of puff pastry (thawed)
- 1 cup heavy cream
- 1 cup whole milk
- 3/4 cup granulated sugar
- 1/4 cup all-purpose flour
- 6 large egg yolks
- 1 teaspoon vanilla extract
- 1 cinnamon stick (optional)
- Ground cinnamon (for garnish)
- Powdered sugar (for garnish)
Cooking Instructions:
1. Preheat the Oven: Begin by preheating your oven to 475°F (245°C). This high temperature is crucial for achieving that characteristic caramelization on top of the custard and guaranteeing the pastry cooks thoroughly.
2. Prepare the Puff Pastry: Roll out the sheet of puff pastry on a floured surface to make sure it’s thin and pliable. Cut the pastry into circles that are about 4 inches in diameter. You’ll need enough circles to line the cups of a muffin tin. Use your fingers to press the pastry into the tin, confirming it covers the bottom and sides well.
3. Make the Custard Filling: In a medium saucepan, combine the heavy cream, whole milk, and sugar. If using, add the cinnamon stick for additional flavor. Heat the mixture over medium heat until it’s warm but not boiling.
In a separate bowl, whisk together the egg yolks and flour until smooth. Gradually whisk in the warm milk mixture into the egg yolks to temper them, then return the entire mixture to the saucepan.
4. Cook the Custard: Continue to Cook the Custard over medium heat, stirring constantly until it thickens (about 5-7 minutes). Once thickened, remove the saucepan from heat and stir in the vanilla extract. Strain the mixture through a fine-mesh sieve to remove any lumps or the cinnamon stick, confirming a smooth custard.
5. Fill the Pastry Shells: Carefully pour the custard filling into each pastry shell, filling them about three-quarters full. This allows for the custard to expand slightly while baking.
6. Bake: Place the muffin tin in the preheated oven and Bake for 15-20 minutes or until the custard is set and the tops are golden and slightly charred. Keep an eye on them to prevent burning, as oven temperatures can vary.
7. Cool and Serve: Once baked, remove the pastel de nata from the oven and let them cool in the muffin tin for about 10 minutes. Carefully transfer them to a wire rack to cool completely. Serve warm or at room temperature, dusted with ground cinnamon and powdered sugar for an extra touch.
Extra Tips:
For the best results, make sure your ingredients are at room temperature, as this helps achieve a smoother custard. If you’re short on time, you can use store-bought puff pastry, which simplifies the process.
Don’t rush the cooling process; allowing the tarts to sit for a few minutes after baking will help set the filling. Feel free to experiment with flavors by adding a hint of lemon zest or nutmeg to the custard for a unique twist!
Dulce De Leche Cake
Dulce De Leche Cake is a rich and indulgent dessert that celebrates the sweet flavor of dulce de leche, a caramel-like sauce made from sweetened condensed milk. This cake is popular in various South American countries and has gained widespread acclaim for its creamy layers and delightful sweetness.
The moist sponge cake pairs perfectly with the luscious dulce de leche, making it an irresistible treat for any occasion, from birthdays to holidays.
Crafting a Dulce De Leche Cake may seem intimidating, but with a little patience and attention to detail, you can create a stunning dessert that will impress your family and friends. The cake consists of layers of fluffy vanilla sponge, generously filled with dulce de leche and topped with a rich frosting.
Enjoying a slice of this cake is like experiencing a little piece of South America right in your kitchen.
Ingredients (Serves 4-6)
- 1 cup all-purpose flour
- 1 teaspoon baking powder
- 1/2 teaspoon baking soda
- 1/4 teaspoon salt
- 1/2 cup unsalted butter, softened
- 1 cup granulated sugar
- 2 large eggs
- 1 teaspoon vanilla extract
- 1/2 cup buttermilk
- 1 cup dulce de leche (store-bought or homemade)
- 1 cup heavy cream
- 2 tablespoons powdered sugar
- Additional dulce de leche for drizzling (optional)
Cooking Instructions
- Preheat the Oven: Begin by preheating your oven to 350°F (175°C). Grease and flour two 8-inch round cake pans to prevent the cakes from sticking.
- Prepare the Dry Ingredients: In a medium bowl, whisk together the all-purpose flour, baking powder, baking soda, and salt. This step guarantees that the leavening agents are evenly distributed throughout the flour, which is crucial for a well-risen cake.
- Cream the Butter and Sugar: In a large mixing bowl, beat the softened butter and granulated sugar together with an electric mixer until the mixture is light and fluffy. This process typically takes about 3-5 minutes and incorporates air into the batter, helping the cake rise.
- Add Eggs and Vanilla: Add the eggs, one at a time, mixing well after each addition. Then stir in the vanilla extract. The eggs add moisture and structure to the cake, while the vanilla enhances its flavor.
- Combine Wet and Dry Ingredients: Gradually add the dry ingredients to the butter mixture, alternating with the buttermilk. Start and end with the flour mixture, mixing just until combined. Over-mixing can lead to a dense cake, so be gentle.
- Bake the Cakes: Divide the batter evenly between the prepared cake pans and smooth the tops. Bake in the preheated oven for 25-30 minutes, or until a toothpick inserted into the center comes out clean. Allow the cakes to cool in the pans for 10 minutes before transferring them to wire racks to cool completely.
- Whip the Cream: In a separate bowl, whip the heavy cream and powdered sugar together until stiff peaks form. This will be used for frosting the cake and adds a light, airy texture.
- Assemble the Cake: Once the cakes are completely cooled, place one layer on a serving plate. Spread a generous layer of dulce de leche over the top. Then, add a layer of whipped cream on top of the dulce de leche. Place the second cake layer on top and repeat the process.
- Frost and Decorate: Use the remaining whipped cream to frost the sides and top of the cake. Drizzle additional dulce de leche over the top for an extra touch of sweetness and decoration.
Extra Tips
When making Dulce De Leche Cake, it’s important to verify all your ingredients are at room temperature for better mixing.
For an added twist, consider incorporating chopped nuts or chocolate chips into the batter for added texture. If you want to make the cake ahead of time, it can be stored in the refrigerator for a couple of days; just be sure to cover it well to keep it fresh.
Enjoy your homemade Dulce De Leche Cake with a cup of coffee or tea for a perfect pairing!
Panqueque De Dulce De Leche
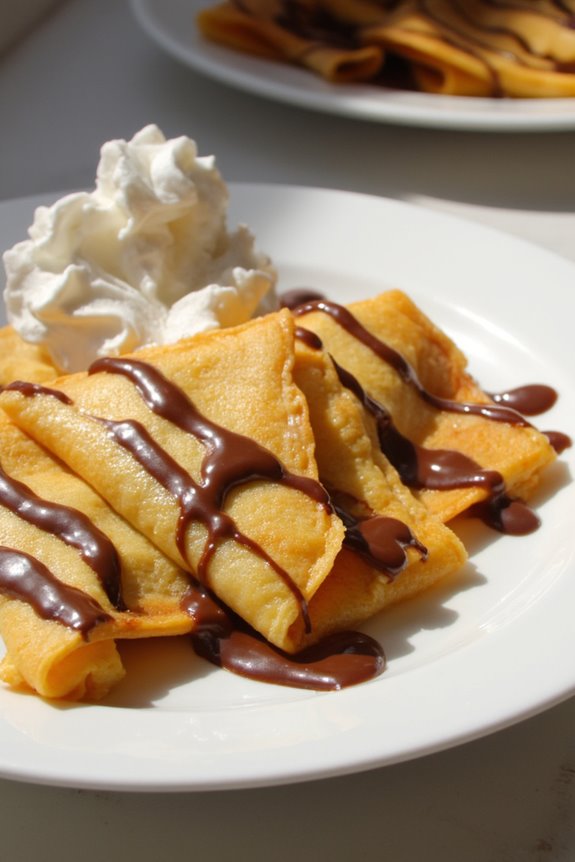
Panqueque de Dulce de Leche, a delightful South American dessert, combines the rich flavors of caramelized milk with delicate crepes to create a mouthwatering treat. This recipe is particularly popular in countries like Argentina and Uruguay, where dulce de leche is a staple ingredient in many desserts.
The crepes are thin and soft, providing the perfect canvas for the luscious filling. Once rolled and topped with more dulce de leche, they’re often garnished with whipped cream or chocolate sauce, making them an irresistible indulgence.
Cooking Panqueque de Dulce de Leche isn’t only straightforward but also a fun experience for bakers of all levels. The ingredients are simple and easy to find, and the process allows for creativity in presentation and toppings.
Whether served at a family gathering or as a sweet ending to a dinner party, these crepes are sure to captivate your guests and satisfy your sweet tooth.
Ingredients (serving size: 4-6 people):
- 1 cup all-purpose flour
- 2 large eggs
- 2 cups milk
- 2 tablespoons sugar
- 1/4 teaspoon salt
- 2 tablespoons unsalted butter, melted
- 1 cup dulce de leche (plus extra for serving)
- Whipped cream (optional, for garnish)
- Chocolate sauce (optional, for garnish)
Instructions:
1. Prepare the crepe batter: In a mixing bowl, whisk together the flour, eggs, milk, sugar, and salt until the mixture is smooth and well combined. Make certain there are no lumps.
Stir in the melted butter and let the batter rest for about 15-30 minutes. This resting time allows the gluten to relax, resulting in more tender crepes.
2. Cook the crepes: Heat a non-stick skillet or crepe pan over medium heat. Lightly grease the pan with a little butter or oil.
Pour about 1/4 cup of the crepe batter into the skillet, swirling it around to evenly coat the bottom. Cook for about 1-2 minutes, or until the edges start to lift and the bottom is lightly golden.
Carefully flip the crepe and cook for another 1 minute on the other side. Remove the crepe to a plate and repeat the process with the remaining batter, stacking the cooked crepes on top of each other.
3. Assemble the panqueques: Take a crepe and spread a generous layer of dulce de leche over one half. Fold the crepe in half, then in half again to create a triangle.
Repeat this process with the remaining crepes and dulce de leche.
4. Serve the panqueques: Arrange the filled crepes on a serving platter. Drizzle with additional dulce de leche, and if desired, add a dollop of whipped cream and a drizzle of chocolate sauce for an extra touch of decadence.
5. Enjoy your creation: Serve immediately while the crepes are still warm, and watch as your guests savor every bite of this sweet, caramel-infused delight.
Extra Tips: For the best results, make sure your pan is adequately heated before adding the batter; this guarantees that the crepes cook evenly.
If you find the batter is too thick, you can thin it out with a little more milk. Additionally, don’t hesitate to experiment with different fillings or toppings, such as fresh fruit, nuts, or a sprinkle of cinnamon, to customize your panqueques to your taste.
Enjoy the process and the delicious results!
Dalgona Cake
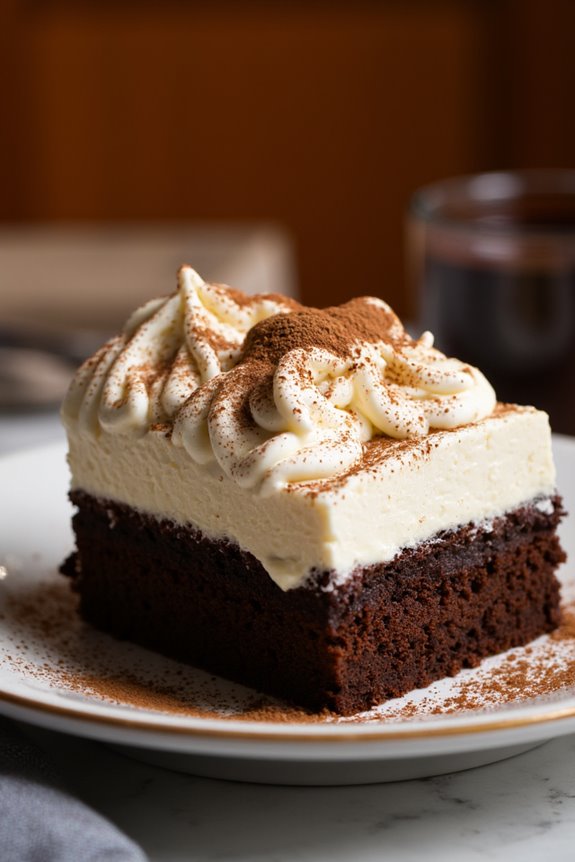
Dalgona Cake is a delightful fusion of the trendy whipped coffee treat known as Dalgona and a soft, moist cake base. Originating from South Korea but quickly gaining popularity worldwide, this cake isn’t only visually appealing but also packed with the rich flavors of coffee and cocoa.
Its unique combination of textures—the airy whipped coffee topping over a dense cake—makes it a perfect dessert for coffee lovers and those looking to impress their guests at gatherings or special occasions. The cake itself provides a tender crumb that contrasts beautifully with the creamy, frothy Dalgona coffee layer.
Whether you’re serving it at a birthday party, a cozy gathering, or simply indulging in a sweet treat at home, Dalgona Cake is sure to be a hit. Follow this recipe to create a delicious dessert that will satisfy your cravings and delight everyone around the table.
Ingredients (Serves 4-6):
- 1 cup all-purpose flour
- 1 cup granulated sugar
- 1/2 cup unsweetened cocoa powder
- 1/2 cup vegetable oil
- 1/2 cup milk
- 2 large eggs
- 1 tsp baking powder
- 1/2 tsp baking soda
- 1/4 tsp salt
- 1/2 cup instant coffee granules
- 1/2 cup hot water
- 1/2 cup heavy cream
- 1 tbsp vanilla extract
Cooking Instructions:
1. Preheat the Oven: Begin by preheating your oven to 350°F (175°C). This will guarantee that your cake bakes evenly and rises properly.
2. Prepare the Cake Batter: In a large mixing bowl, combine the all-purpose flour, granulated sugar, cocoa powder, baking powder, baking soda, and salt. Whisk the dry ingredients together until they’re well blended.
In another bowl, mix the vegetable oil, milk, eggs, and vanilla extract. Gradually add the wet ingredients to the dry ingredients, stirring until just combined. Be careful not to overmix, as this can lead to a tough cake.
3. Bake the Cake: Grease and flour a round cake pan (8-inch or 9-inch works well). Pour the cake batter into the pan and spread it evenly. Bake in the preheated oven for 25-30 minutes or until a toothpick inserted into the center comes out clean.
Once baked, remove from the oven and let the cake cool in the pan for about 10 minutes before transferring it to a wire rack to cool completely.
4. Make the Dalgona Coffee Topping: In a separate bowl, combine the instant coffee granules and hot water. Using a hand mixer or a whisk, beat the mixture until it becomes fluffy and light, forming stiff peaks. This process may take about 3-5 minutes.
5. Whip the Cream: In another bowl, whip the heavy cream until it thickens and forms soft peaks. Be careful not to overwhip, as this can lead to a grainy texture.
6. Combine the Toppings: Gently fold the whipped cream into the whipped coffee mixture until well combined. This will create a creamy, fluffy Dalgona topping.
7. Assemble the Cake: Once the cake has completely cooled, place it on a serving plate. Spoon the Dalgona coffee topping generously over the top of the cake, allowing it to cascade slightly over the edges for an appealing presentation.
8. Serve: Slice the cake into wedges and serve immediately. Enjoy the delightful combination of rich chocolate cake and fluffy coffee topping!
Extra Tips:
To elevate the flavor and presentation of your Dalgona Cake, consider adding a sprinkle of cocoa powder or instant coffee on top of the whipped coffee layer before serving.
Additionally, you can serve it with a scoop of vanilla ice cream or a drizzle of chocolate sauce for an extra indulgent treat. For best results, use high-quality coffee granules and confirm all ingredients are at room temperature before mixing for a smoother batter and topping.